M2TECH HiFace DAC User manual

M2TECH
HIFACE DAC
384KHZ/32BIT DIGITAL-TO-ANALOG CONVERTER
USER MANUAL

REV. 1.1 – 5/2013

hiFace DAC
384kHz/32bit digital-TO-ANALOG CONVERTER
REVISION 1.1 – MAY 2013
Copyright © 2013, M2Tech Srl
3
M2Tec
h
Warning!
Changes or modifications not authorized by the manufacturer can invalidate the
compliance to CE regulations and cause the unit to be no more suitable to use. The
manufacturer refuses every responsibility regarding damages to people or things
due to the use of a unit which has been subject to unauthorized modifications or to
misuse or to malfunction of a unit which has been subject to unauthorized
modifications.
This unit is compliant with the following CE regulations when an USB cable less than 3m is used: CEI EN
55022:2009 Class B (Radiated Emissions), CEI EN 55024:1999, CEI EN 55024:A2/2003, CEI EN
55024:IS1/2008 (Radio Frequency Electromagnetic Fields, 50Hz Magnetic Field Immunity Test and
Electrostatic Discharges – ESD).
Recycling
The label above, printed on the product case, indicates that the product, when no more usable, can’t be
treated as generic garbage, but must be disposed of at a collection point for recycling of electrical and
electronic equipment, in compliance with the WEEE regulation (Waste of Electrical and Electronic
Equipment).
By making sure that this unit is correctly recycled, you will help preventing potential damages to environment
and human health, which could be caused by a wrong treatment of this product as generic garbage.
Materials recycling helps saving natural resources. For more in-depth information about recycling this
product, please contact M2Tech Srl.
WARNING: the information contained in this manual are considered to be reliable and accurate.
M2Tech reserves the right to change or modify the information any time, without prior advice. It’s up
to the customer to ensure that the manual being consulted is the latest version.

hiFace DAC
384kHz/32bit digital-TO-ANALOG CONVERTER
REVISION 1.1 – MAY 2013
Copyright © 2013, M2Tech Srl
4
M2Tec
h
Dear customer,
thank you for purchasing hiFace DAC. What you have is a first-rate USB digital-to-analog
converter with many unique features conceived to obtain the best audio performance out
of a music file.
Even if getting digital music out of a PC, a Mac or a Linux computer is nowadays quite
simple, much harder is to obtain the best sonic performance from it, due to intrinsic limits
in USB 1.1 audio standard and the implementation of digital audio interfaces in computers.
Please visit M2Tech website (www.m2tech.biz) to find extensive literature about this topic.
hiFace DAC overcomes all the limits of usual USB D/A converters by exploiting the
powerful performance allowed by USB 2.0 Audio class and by using asynchronous data
transfer, along with a sophisticated electronic design.
hiFace DAC performance largely exceed those of similar units costing a lot more: you’ll
be amazed by how good the hiFace DAC can sound, even with CD-standard files. And a
whole new world will be at reach when listening to high-resolution files.
We feel that your expectations will be fulfilled by hiFace DAC: you’ll hear your music files
in a way like never before, prepare for a whole new experience!
Nadia Marino, CEO
Please annotate here your hiFace DAC serial number and purchase date for future
reference:
Serial number: ___________________________
Date of purchase: _________________________

hiFace DAC
384kHz/32bit digital-TO-ANALOG CONVERTER
REVISION 1.1 – MAY 2013
Copyright © 2013, M2Tech Srl
5
M2Tec
h
INDEX
1. Connections...................................................................................................................6
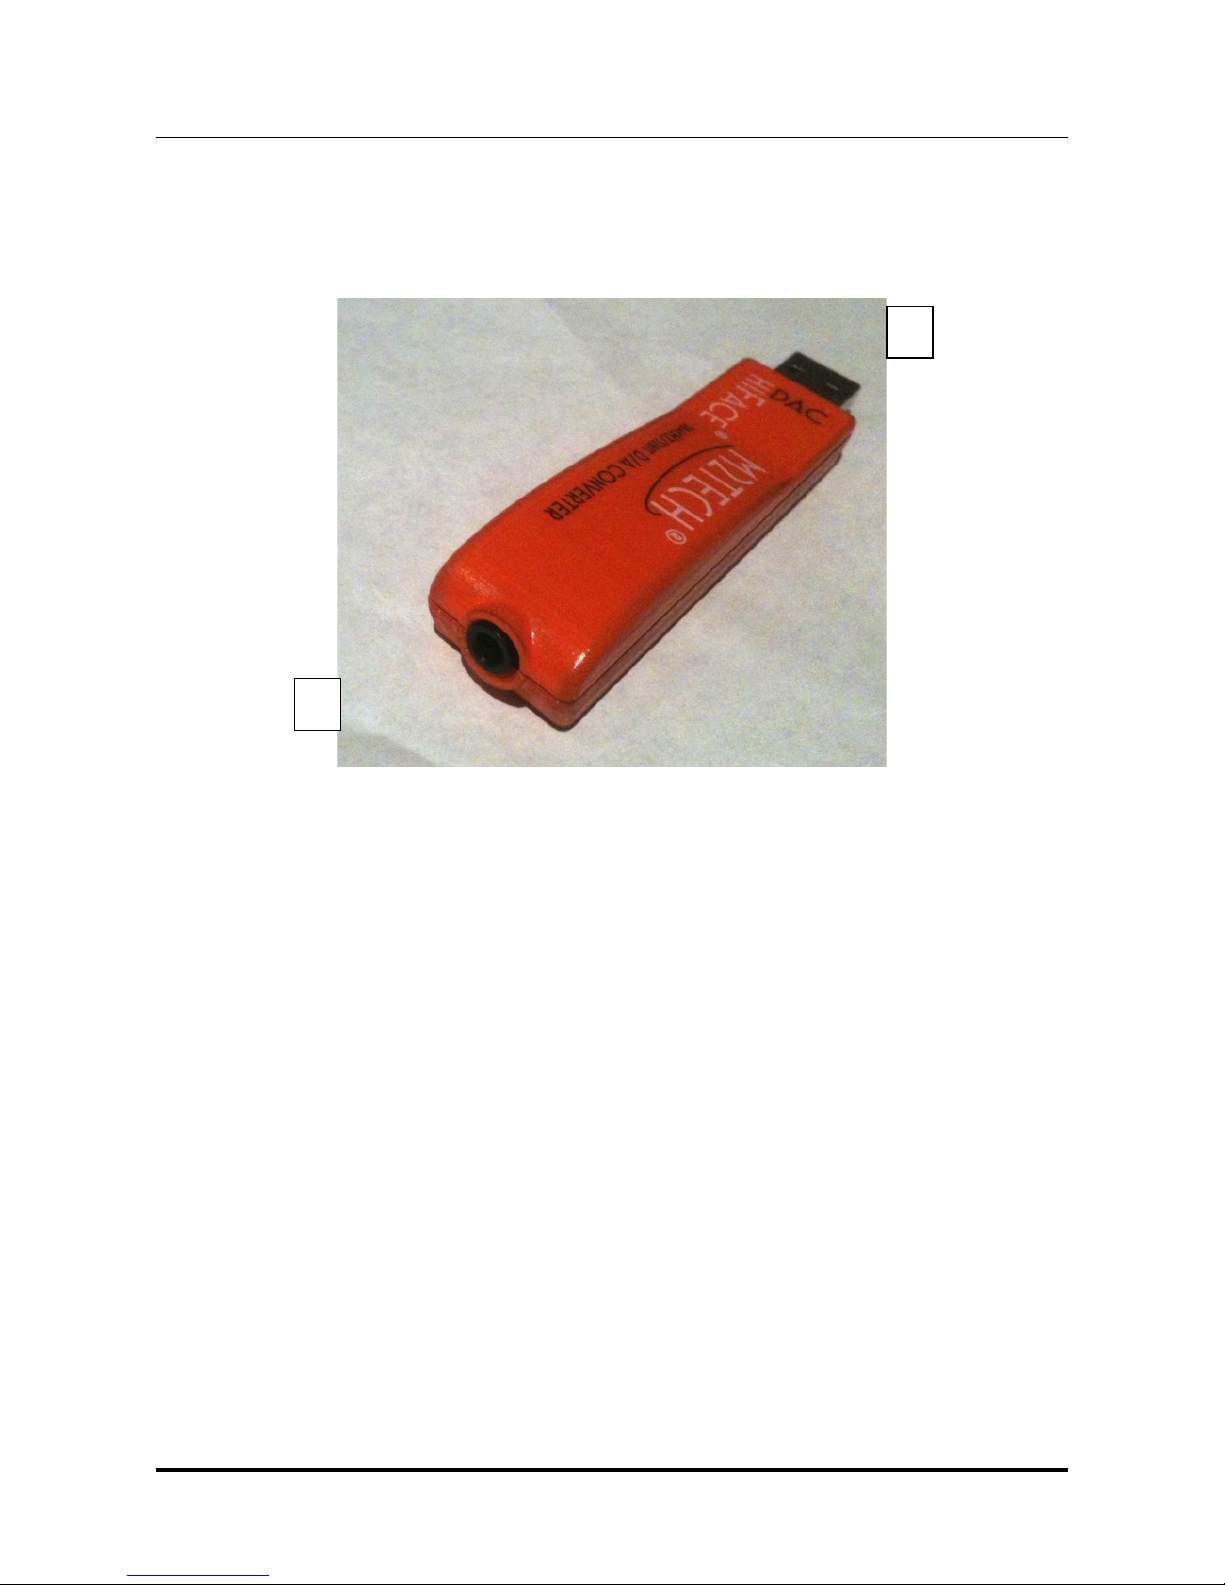
2. Connection to the host and the amplifier/headphones..............................................7
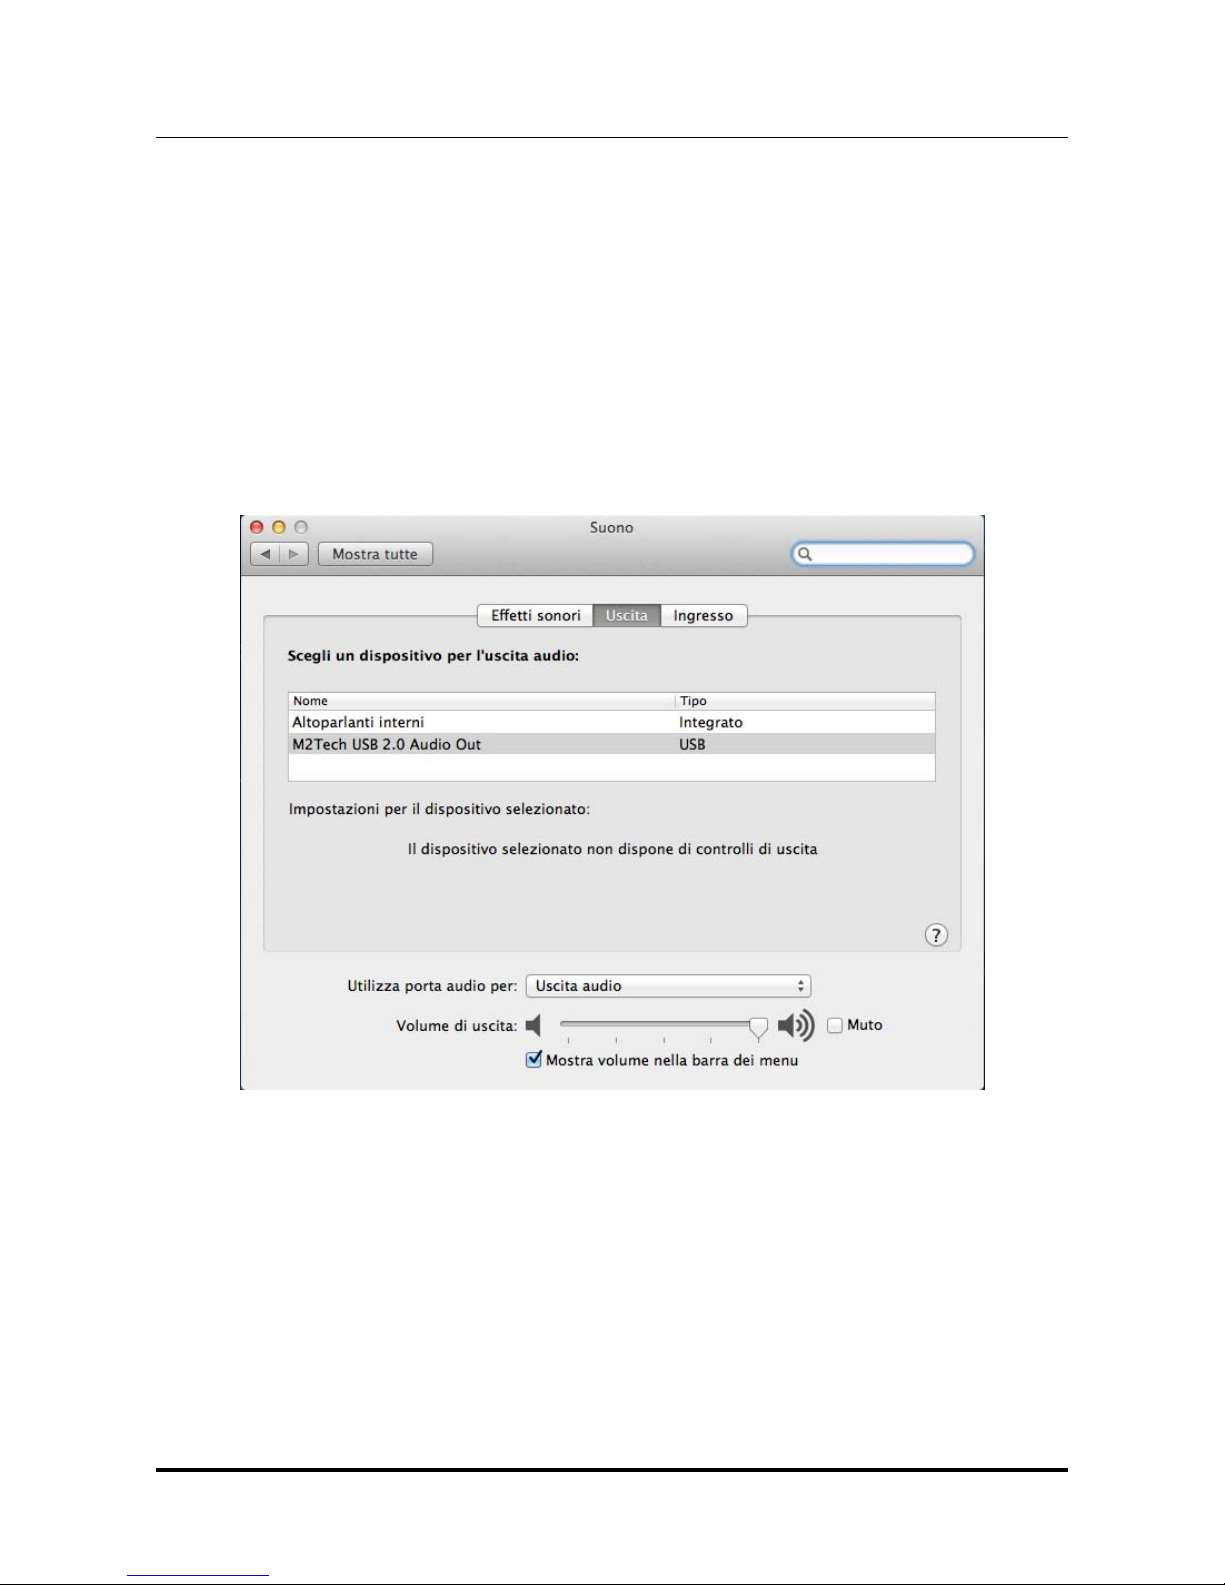
3. True plug’n’play operation with Mac............................................................................8
4. True plug’n’play operation with Linux.......................................................................10
5. Operation with iPad and Android-based tablets.......................................................11
5. Windows driver installation........................................................................................12
5.1. Obtaining the driver.................................................................................................12
5.2. Installing the driver on a Windows-based PC (XP, Vista, Windows 7 and Windows
8, 32 & 64 bits)...............................................................................................................12
5.2.1. Checking for right installation and trying the interface ......................................16
5.3. Unistalling the driver................................................................................................18
6. Configuring the computer to use hiFace DAC.........................................................21
6.1. Configuring a PC with Windows XP ........................................................................21
6.1.1. Configuring for Direct Sound with Windows XP................................................21
6.1.2. Configuring for ASIO with Windows XP............................................................22
6.2. Configuring a PC with Windows Vista, Windows 7 or Windows 8...........................23
6.2.1. Configuring for Direct Sound with Windows Vista, Windows 7 or Windows 8...23
6.2.2. Configuring for Kernel Streaming with Windows Vista, Windows 7 or Windows 8
...................................................................................................................................24
6.2.3. Configuring for WASAPI with Windows Vista, Windows 7 or Windows 8 .........24
6.2.4. Configuring for ASIO with Windows Vista, Windows 7or Windows 8................24
7. Configuring the player for Kernel Streaming: two examples...................................25
7.1. FooBar ....................................................................................................................25
7.2. Winamp and MediaMonkey.....................................................................................26
8. Configuring the player for WASAPI: two examples..................................................28
8.1. FooBar ....................................................................................................................28
8.2. JRiver......................................................................................................................29
9. Configuring the player for ASIO: an example ...........................................................29
9.1. FooBar ....................................................................................................................29
10. Interface Special Features ........................................................................................31
10.1. Precision oscillators...............................................................................................31
10.2. Asynchronous transfer mode ................................................................................31
10.3. 384/32 operation ...................................................................................................31
10.4. Driving headphones ..............................................................................................31
10.4. Powering the hiFace DAC with an external power supply...................................31
11. Technical Specifications...........................................................................................33

hiFace DAC
384kHz/32bit digital-TO-ANALOG CONVERTER
REVISION 1.1 – MAY 2013
Copyright © 2013, M2Tech Srl
6
M2Tec
h
1. Connections
Figure 1
1) USB input. Connect directly to the USB 3.0 or 2.0 or 1.1* port of a PC, Mac or Linux-
based computer, or use an USB extender (A male to A female). In the latter, the extender
must be compliant with USB 2.0 and less than 3m, otherwise the bus performance will
decrease and the correct operation of the interface will not be guaranteed. USB type A
male connector
2) Stereo analog output. Connect to the amplifier or preamplifier input with a 3.5mm jack-
to-RCA interconnect or to a medium- or high-impedance headphones. 3.5mm stereo jack
female connector.
*hiFace DAC performance on USB 1.1 are limited to 96kHz. Please note that 1.0 ports
won’t work.
1
2

hiFace DAC
384kHz/32bit digital-TO-ANALOG CONVERTER
REVISION 1.1 – MAY 2013
Copyright © 2013, M2Tech Srl
7
M2Tec
h
2. Connection to the host and the amplifier/headphones
ADVICE: Windows users must install the driver prior to connecting the hiFace to the
PC (please refer to section 5).
ADVICE: both PC and amplifier/preamplifier should be switched off and
disconnected from the mains sockets before connecting the hiFace DAC.
Please refer to section 1, “Connections”.
Connect the hiFace DAC to the host USB 2.0 port by inserting its USB plug (Figure 1, 1)
into the host socket. If straight insertion is difficult or when in need of avoiding straight
insertion, an USB 2.0 extender cable (A male to A female) can be used. Please avoid
using extenders more than 4m, to avoid invalidating the bus performance.
If your computer has a Windows operating system and a driver hasn’t been installed prior
connecting the hiFace DAC, an error message may appear and you may need to
disconnect the hiFace DAC and install the driver (see section 5.3).
Connect the 3.5mm jack end connector of a 3.5mm jack-to-RCA interconnect to the
hiFace DAC output connector (Figure 1, 2). Connect the RCA end of the connector to
one stereo input of a preamplifier or integrated amplifier.
A headphones set can also be driven by the hiFace DAC, provided its impedance is
medium or high (32 Ohms or more). In this case, connect the 3.5mm stereo jack of the
headphones to the output connectors of the hiFace DAC.
This can be done either before or after connecting the hiFace DAC to the computer: the
hiFace DAC operation is glitchless, so no bumps or other dangerous noises will be
generated on headphones drivers.

hiFace DAC
384kHz/32bit digital-TO-ANALOG CONVERTER
REVISION 1.1 – MAY 2013
Copyright © 2013, M2Tech Srl
8
M2Tec
h
3. True plug’n’play operation with Mac
Mac computers with OSX 10.6.4 and later have a native support for audio devices
compliant with USB Audio Class 2.0. This means that the driver is already included in the
operating system and the user needs not to install anything: just connect the hiFace DAC
to your Mac and it will be immediately recognized by the OS and ready to use. Macs with
older OS need update to use the hiFace DAC.
To use hiFace DAC as output device for your Mac, you need to select it as default output
device from the Audio Control Panel (Preferences -> Sound) as shown in Figure 2:
Figure 2
After selecting hiFace DAC, please check settings, particularly the output sampling
frequency (Figure 3): that setting forces the sampling frequency for the hiFace DAC,
regardless the native sampling frequency of the various tracks being played back (to get
rid of such unease operation mode, you may want to use a player which automatically
changes this setting based on each track’s native sampling frequency, Like Sonic Studio’s
Amarra or PureMusic).

hiFace DAC
384kHz/32bit digital-TO-ANALOG CONVERTER
REVISION 1.1 – MAY 2013
Copyright © 2013, M2Tech Srl
9
M2Tec
h
Figure 3

hiFace DAC
384kHz/32bit digital-TO-ANALOG CONVERTER
REVISION 1.1 – MAY 2013
Copyright © 2013, M2Tech Srl
10
M2Tec
h
4. True plug’n’play operation with Linux
Linux has a native support for audio devices compliant with USB Audio Class 2.0 based on
ALSA. This means that the driver is already included in the operating system and the user
needs not to install anything: just connect the hiFace DAC to your PC with Linux and it
will be immediately recognized by the OS and ready to use. ALSA version needs to be
1.0.24 or later.
To use hiFace DAC as output device, select it as default output device for the system or
for the player you’re using.

hiFace DAC
384kHz/32bit digital-TO-ANALOG CONVERTER
REVISION 1.1 – MAY 2013
Copyright © 2013, M2Tech Srl
11
M2Tec
h
5. Operation with iPad and Android-based tablets
iPad also supports USB Audio Class 2.0. This means that it is possible to connect the
hiFace DAC to an iPad through the latter’s camera kit, which exports a high speed host
USB port. The limited supply current required by the hiFace DAC makes it possible to
power it even by the reduced current capabilities provided by the iPad.
Once the hiFace DAC is connected, the iPad automatically set it as default output device.
Android tablets may potentially use the hiFace DAC, provided they have a 2.0 or 1.1 USB
host port capable of at least 100mA output current and ALSA or any other audio
management module compliant with USB Audio Class 2.0. Please refer to the tablet’s
specification chart.

hiFace DAC
384kHz/32bit digital-TO-ANALOG CONVERTER
REVISION 1.1 – MAY 2013
Copyright © 2013, M2Tech Srl
12
M2Tec
h
5. Windows driver installation
5.1. Obtaining the driver
The Windows driver for hiFace DAC is available on the M2Tech website, in the download
page (www.m2tech.biz/download.asp). Download the exe file containing the driver
package and save it to a folder in your PC. This is a self-extracting file which will deliver a
folder. Double-click on it to extract the folder. Please pay attention to the location where
the folder will be extracted to avoid losing it into the hard disk (Figure 4).
Figure 4
5.2. Installing the driver on a Windows-based PC (XP, Vista, Windows 7
and Windows 8, 32 & 64 bits)
Uninstall older driver version if already installed (see section 5.3). Then follow the
instruction to successfully install the driver. Please note that the pictures in this Section are
taken from installation process for either Window 7 and Windows 8: the process is
basically the same and also applies to Windows XP and Vista.
Open the folder produced by the self-extracting exe file. Double-click on “setup.exe” and
follow the indications provided by the setup program. First, the installation wizard will ask
for authorization to start installation (Figure 5). Accept.

hiFace DAC
384kHz/32bit digital-TO-ANALOG CONVERTER
REVISION 1.1 – MAY 2013
Copyright © 2013, M2Tech Srl
13
M2Tec
h
Figure 5
Then, the wizard will check for system features. At a certain point, it will ask you to plug
the hiFace DAC in one of the USB ports (Figure 6).
Figure 6

hiFace DAC
384kHz/32bit digital-TO-ANALOG CONVERTER
REVISION 1.1 – MAY 2013
Copyright © 2013, M2Tech Srl
14
M2Tec
h
Follow the indications and plug the device in one port, then click on “Install”. You will be
asked to follow the destination folder (Figure 7).
Figure 7
The installation process continues showing the progress (Figure 8).
Figure 8

hiFace DAC
384kHz/32bit digital-TO-ANALOG CONVERTER
REVISION 1.1 – MAY 2013
Copyright © 2013, M2Tech Srl
15
M2Tec
h
At the end of the installation process, the wizard notify the completion (Figure 9).
Figure 9
Clock on “Next”: the installation is almost completed (Figure 10). Click on “Finish” to
complete the installation.

hiFace DAC
384kHz/32bit digital-TO-ANALOG CONVERTER
REVISION 1.1 – MAY 2013
Copyright © 2013, M2Tech Srl
16
M2Tec
h
Figure 10
At the end of the installation process, the USB Audio Class control panel is running and
you can open it by clicking on the red “T” to the bottom right of the desktop (Figure 11) to
check and select various operation options.
Figure 11
5.2.1. Checking for right installation and trying the interface
From Control Panel -> Audio select the hiFace DAC in the “Playback” tab and then
choose Properties. This windows also allows you to set hiFace DAC as default output
device, which is mandatory when user needs to use hiFace DAC to listen to Youtube files
audio and other streaming sources (Figure 12).
Select the Advanced tab, from the drop down window choose the desired audio sample
rate and then try it out: you should hear a bell ringing in your system’s speakers.
Also check the Exclusive Mode acces boxes. In this way the running player will take the
exclusive access to the device, ensuring high end performance. Warning: this modality is
not appropriate for the shared access, for instance when user sets hiFace DAC as the
default output audio device: in this case, multiple access would be desirable.

hiFace DAC
384kHz/32bit digital-TO-ANALOG CONVERTER
REVISION 1.1 – MAY 2013
Copyright © 2013, M2Tech Srl
17
M2Tec
h
Figure 12

hiFace DAC
384kHz/32bit digital-TO-ANALOG CONVERTER
REVISION 1.1 – MAY 2013
Copyright © 2013, M2Tech Srl
18
M2Tec
h
5.3. Unistalling the driver
Sometimes it is necessary to uninstall the driver to roll back to a previous version. Uninstall
is a quite simple procedure.
Go to the control panel and launch the “Application Installation” utility (Figure 13).
Look for the hiFace DAC driver item in the list. Double-click on it to launch uninstalling.
Figure 13
The installation wizard, which also handles uninstalling, will show up (Figure 14 on next
page). Click on “Uninstall” to start uninstalling.

hiFace DAC
384kHz/32bit digital-TO-ANALOG CONVERTER
REVISION 1.1 – MAY 2013
Copyright © 2013, M2Tech Srl
19
M2Tec
h
Figure 14
At this point, the wizard will show up the installation progress (Figure 15), up to the end.
Figure 15

hiFace DAC
384kHz/32bit digital-TO-ANALOG CONVERTER
REVISION 1.1 – MAY 2013
Copyright © 2013, M2Tech Srl
20
M2Tec
h
After the uninstalling of all files related to the driver is complete, the “Next” button will be
enabled. Click on it. The final message will appear (Figure 16). Click on “Finish” to
complete uninstalling.
Figure 16
Table of contents
Other M2TECH Media Converter manuals

M2TECH
M2TECH EVO DAC User manual

M2TECH
M2TECH VAUGNAN User manual

M2TECH
M2TECH JOPLIN User manual

M2TECH
M2TECH JOPLIN MKII User manual

M2TECH
M2TECH JOPLIN MKIII User manual

M2TECH
M2TECH JOPLIN User manual

M2TECH
M2TECH YOUNG 384KHZ/32BIT User manual

M2TECH
M2TECH YOUNG User manual

M2TECH
M2TECH Vaughan User manual

M2TECH
M2TECH HIFACE EVO TWO User manual
Popular Media Converter manuals by other brands

Lantronix
Lantronix C3100 Series install guide

exemys
exemys EGW1-IA3-MB user manual

evertz
evertz 8083XDS-AD instruction manual

Midi Solutions
Midi Solutions MultiVoltage Professional Series operating instructions

Polyamp
Polyamp PM250 installation manual

Cobalt Digital Inc
Cobalt Digital Inc 6540 owner's manual