M2TECH JOPLIN MKIII User manual

M2TECH
JOPLIN MKIII
384KHZ/32BIT ANALOG-TO-DIGITAL CONVERTER
USER MANUAL
REV. PrA – 4/2019


JOPLIN MKIII
384kHz/32bit ANALOG-TO-DIGITAL CONVERTER
REVISION PRA – APRIL 2019
Copyright © 2019, M2Tech Srl
3
M2Tech
www.m2tech.biz
Warning!
Changes or modifications not authorized by the manufacturer can invalidate the
compliance to CE regulations and cause the unit to be no more suitable to use. The
manufacturer refuses every responsibility regarding damages to people or things
due to the use of a unit which has been subject to unauthorized modifications or to
misuse or to malfunction of a unit which has been subject to unauthorized
modifications.
This unit is compliant with the following CE regulations when an USB cable less than 3m is used: CEI EN
55022:2009 Class B (Radiated Emissions), CEI EN 55024:1999, CEI EN 55024:A2/2003, CEI EN
55024:IS1/2008 (Radio Frequency Electromagnetic Fields, 50Hz Magnetic Field Immunity Test and
Electrostatic Discharges – ESD).
For a proper operation of this unit, all connections to other equipment in the system must be done
when all equipment are off. Failing to comply to this advice may lead to damage to the unit.
Recycling
The label above, printed on the product case, indicates that the product, when no more usable, can’t be
treated as generic garbage, but must be disposed of at a collection point for recycling of electrical and
electronic equipment, in compliance with the WEEE regulation (Waste of Electrical and Electronic
Equipment).
By making sure that this unit is correctly recycled, you will help preventing potential damages to environment
and human health, which could be caused by a wrong treatment of this product as generic garbage.
Materials recycling helps saving natural resources. For more in-depth information about recycling this
product, please contact M2Tech Srl.
WARNING: the information contained in this manual are considered to be reliable and accurate.
M2Tech reserves the right to change or modify the information any time, without prior advice. It’s up
to the customer to ensure that the manual being consulted is the latest version.

JOPLIN MKIII
384kHz/32bit ANALOG-TO-DIGITAL CONVERTER
REVISION PRA – APRIL 2019
Copyright © 2019, M2Tech Srl
4
M2Tech
www.m2tech.biz
Dear customer,
thank you for purchasing JOPLIN MKIII. What you have is a first-rate analog-to-digital
converter with many unique features conceived to obtain the best audio performance out
of an analogue source.
Even if sending music to a PC or a Mac is nowadays quite simple, much harder is to
obtain the best sonic performance while doing it, due to intrinsic limits in digital audio
interfaces in computers. Please visit M2Tech website (www.m2tech.biz) to find extensive
literature about this topic.
JOPLIN MKIII overcomes all the limits of your computer’s audio card by implementing the
latest generation hiFace TWO technology, which uses proprietary drivers and
asynchronous data transfer, along with a sophisticated electronic design.
JOPLIN MKIII features a comprehensive set of output connections which suit virtually all
digital equipment around.
JOPLIN MKIII is provided with a very complete set of equalization and filtering options to
accommodate all kind of analogue signals.
We feel that your expectations will be fulfilled by JOPLIN MKIII: you’ll hear your analogue
sources turned into music files or digital streams in a way like never before, prepare for a
whole new experience!
Nadia Marino, CEO
Please note here your JOPLIN MKIII serial number and purchase info for future reference:
S/N: _______________________ Date of Purchase: _________________________
Place of Purchase__________________________
Note: Proof of retail purchase, such as your purchase receipt, will be required in the unlikely event
that any warranty service will be required

JOPLIN MKIII
384kHz/32bit ANALOG-TO-DIGITAL CONVERTER
REVISION PRA – APRIL 2019
Copyright © 2019, M2Tech Srl
5
M2Tech
www.m2tech.biz
INDEX
1. Unpacking and placing the unit........................................................................................7
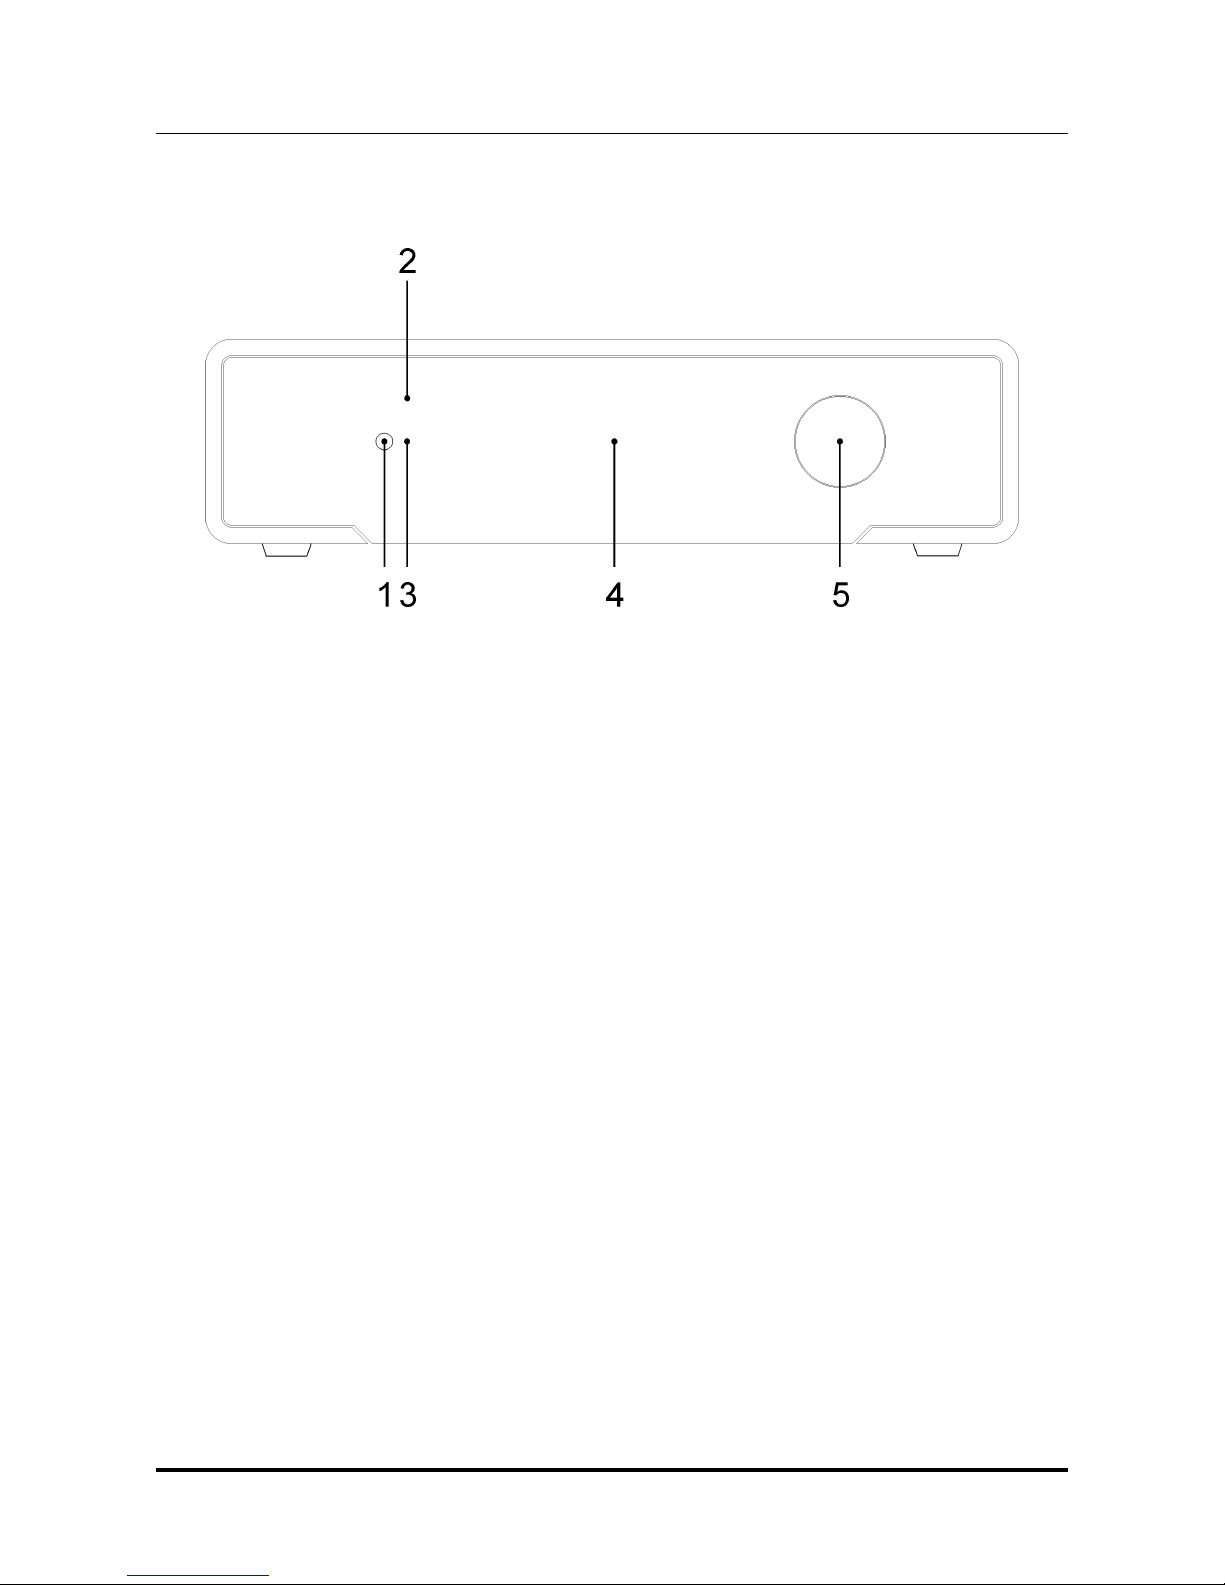
2. Front Panel ......................................................................................................................9
3. Back Panel.....................................................................................................................11
4. Remote Control..............................................................................................................13
5. Connecting and powering the unit..................................................................................15
6. Driver installation ...........................................................................................................17
6.1. Obtaining the driver.................................................................................................17
6.2. Installing the driver on a Windows-based PC..........................................................17
6.3. USB Control Panel ..................................................................................................21
6.4. Uninstalling the driver..............................................................................................22
6.5. True plug’n’play operation with Mac........................................................................25
6.6. True plug’n’play operation with Linux ......................................................................25
7. Configuring the computer to use the JOPLIN MKIII ...........................................................27
7.1. Configuring a PC with or Windows 7.......................................................................27
7.1.1. Configuring for Direct Sound with Windows 7...................................................27
7.2.2. Configuring for Kernel Streaming with Windows 7............................................28
7.2.3. Configuring for ASIO with Windows 7...............................................................28
7.2.4. Configuring for WASAPI with Windows 7 .........................................................28
7.3. Configuring a Mac ...................................................................................................28
8. Configuring the ..............................................................................................................29
8.1. Navigating the menu by the front panel controls .....................................................29
8.2. Navigating the menu by the IR remote ....................................................................30
8.3. Parameters meaning and choices...........................................................................30
8.3.1. Input gain..........................................................................................................30
8.3.2. Input choice ......................................................................................................30
8.3.3. Sampling frequency ..........................................................................................31
8.3.4. Resolution.........................................................................................................31
8.3.5. Clipping warning activation level.......................................................................32
8.3.6. Equalization curve ............................................................................................32
8.3.7. Display auto-off.................................................................................................32
8.3.8. High pass (anti-rumble) filter.............................................................................32
8.3.9. Low pass (anti-hiss) filter ..................................................................................33
8.3.10. MPX filter ........................................................................................................33
8.3.11. I2S output format.............................................................................................34
8.3.12. I2S output auxiliary pins mode ........................................................................35
8.3.13. Remote sensing..............................................................................................35
9. Notes on equalization ....................................................................................................37
9.1. Why is equalization needed for records? ................................................................37
9.2. List of phono equalization curves available on the JOPLIN MKIII and notes on their
usage .............................................................................................................................40
9.2.1. RIAA .................................................................................................................40
9.2.2. AES ..................................................................................................................40
9.2.3. Angel (ANG) .....................................................................................................41
9.2.4. Audiophile (AUDP)............................................................................................41
9.2.5. Bartok (BAR).....................................................................................................41
9.2.6. Capitol (CAP)....................................................................................................41
9.2.7. Columbia (COL)................................................................................................41

JOPLIN MKIII
384kHz/32bit ANALOG-TO-DIGITAL CONVERTER
REVISION PRA – APRIL 2019
Copyright © 2019, M2Tech Srl
6
M2Tech
www.m2tech.biz
9.2.8. HMV..................................................................................................................41
9.2.9. Decca/London FFRR ........................................................................................41
9.2.10. MGM...............................................................................................................42
9.2.11. NAB ................................................................................................................42
9.2.12. Oiseau-Lyre (OYLR) .......................................................................................42
9.2.13. Pacific Jazz (PACJ) ........................................................................................42
9.2.14. Philips .............................................................................................................42
9.2.15. RCA (RCA1, RCA2 and RCAO) .....................................................................42
9.2.16. Brunswick .......................................................................................................43
9.2.17. Columbia 1925, Columbia 1938 and Columbia England (CO25, CO38 and
COLE).........................................................................................................................43
9.2.18. Decca FFRR 78rpm (DEC) .............................................................................43
9.2.19. MGM 78rpm (MGM7)......................................................................................43
9.2.20. Victor 1938-47 and Victor 1947-52 (VIC3 and VIC4) ......................................43
9.3. Equalizing tapes: why and when .............................................................................43
9.3.1. CCIR/IEC for 9.5cm/s and 19cm/s (3¾ ips and 7½ ips) and CCIR/IEC for
38cm/s (15 ips) (IEC1 and IEC3) ................................................................................44
9.3.2. NAB for 9.5cm/s (3¾ ips) and NAB for 19cm/s (7½ ips)...................................44
9.4. Acquiring with equalization......................................................................................44
9.5. Interfacing a cartridge or a tape head......................................................................45
9.6. Recording programs................................................................................................45
10. Using a power supply different from the standard one.................................................47
11. Cleaning the unit..........................................................................................................47
12. Technical Specifications ..............................................................................................49

JOPLIN MKIII
384kHz/32bit ANALOG-TO-DIGITAL CONVERTER
REVISION PRA – APRIL 2019
Copyright © 2019, M2Tech Srl
7
M2Tech
www.m2tech.biz
1. Unpacking and placing the unit
Lay the package on a table and open the external box by removing or cutting the adhesive
tape seal. Then extract the internal box and open it by lifting the front wing. The following
items are included:
one JOPLIN MKIII ADC;
one wall adapter;
one A-B USB cable;
a remote control;
two AAA batteries.
Should one or more item be missing, please contact your retail dealer.
Remove the JOPLIN MKIII from the foam enclosure and place it onto a stable base, far from
heat sources. Avoid full sunlight on the unit. Allow for ample room around the unit for
venting.
The JOPLIN MKIII is a high efficiency device; therefore it doesn’t produce relevant heat
during its operation. Regardless, it’s recommended to guarantee an adequate air flow
around the unit. Moreover, every time it will mainly be operated by remote control, it’s
recommended to place it so as the remote control’s infrared signals can easily reach its
front panel.
Avoid smoke, moisture, dirt and liquids from reaching the unit. Please note that any signs
of abuse will void warranty coverage.

JOPLIN MKIII
384kHz/32bit ANALOG-TO-DIGITAL CONVERTER
REVISION PRA – APRIL 2019
Copyright © 2019, M2Tech Srl
8
M2Tech
www.m2tech.biz

JOPLIN MKIII
384kHz/32bit ANALOG-TO-DIGITAL CONVERTER
REVISION PRA – APRIL 2019
Copyright © 2019, M2Tech Srl
9
M2Tech
www.m2tech.biz
2. Front Panel
Figure 1
1) Power On/Exit button. This button has two function. When the unit is off, press this
button to turn it on. When the unit is operative and the menu is not being accessed, press
this button to turn it off. When accessing the menu, press this button to exit the menu
without changing the selected option.
2) IR receiver. Aim the remote control to this point to send commands to the JOPLIN MKIII.
3) Standby LED. When the JOPLIN MKIII is in standby mode, this LED is on to indicate to
the user that the device can be switched on by the included remote control.
4) Display with VU-meter. Multifunction OLED display. During normal operation, it
indicates the sampling frequency, the gain, the selected input and the equalization curve.
When accessing the menu, it indicates the menu item and current value. When clipping is
reached on the analogue input, it indicates the status by displaying “CLIP”. It includes a
high resolution VU-meter. This indicates the peak value for both channels. Left channel is
top, right channel is immediately below left channel. It can be shut off by menu.
5) Encoder knob and switch. Push the knob to access the menu. More pushes allow to
navigate the various menu items. When the desired item is accessed, rotate the knob to
choose the desired value for that item. Push the knob one last time to select the desired
value and exit the menu.

JOPLIN MKIII
384kHz/32bit ANALOG-TO-DIGITAL CONVERTER
REVISION PRA – APRIL 2019
Copyright © 2019, M2Tech Srl
10
M2Tech
www.m2tech.biz

JOPLIN MKIII
384kHz/32bit ANALOG-TO-DIGITAL CONVERTER
REVISION PRA – APRIL 2019
Copyright © 2019, M2Tech Srl
11
M2Tech
www.m2tech.biz
3. Back Panel
Figure 2
6) Left and right channels analogue inputs. Connect to the analogue source output.
RCA female connectors.
7) Ground (chassis) post. When necessary, connect this post to the chassis wire from
the source, to reduce hum and noise pickup.
8) Analogue input impedance potentiometer. Use to set the analogue input impedance
to suit your cartridge’s recommended load. Set to 50K for line level sources
9) AES/EBU digital output. Generate AES/EBU data streams in consumer format. XLR
male connector.
10) S/PDIF digital output. Generate S/PDIF data streams. RCA female connector.
11) S/PDIF digital input. Accept S/PDIF data streams. RCA female connector.
12) ToslinkTM optical digital output. Optical output for ToslinkTM cables. ToslinkTM
connector.
13) USB 2.0 output. Connect to a PC with Windows or Linux or MacIntosh with an USB
2.0 compliant A-B cable. USB 2.0 B female connector.

JOPLIN MKIII
384kHz/32bit ANALOG-TO-DIGITAL CONVERTER
REVISION PRA – APRIL 2019
Copyright © 2019, M2Tech Srl
12
M2Tech
www.m2tech.biz
14) I2S output. Connect to a DAC provided with PS Audio I2S input. HDMI female
connector.
15) Power supply input. Connect the wall adaptor provided with the unit or any other
power supply capable of 15V/500mA. 5.5mm/2.1mm supply jack (female, tip is positive).

JOPLIN MKIII
384kHz/32bit ANALOG-TO-DIGITAL CONVERTER
REVISION PRA – APRIL 2019
Copyright © 2019, M2Tech Srl
13
M2Tech
www.m2tech.biz
4. Remote Control
Standby. Push this button to put the unit in standby and to
activate it.
Dim. Push this button to toggle the display auto-off function.
Menu. Push this button to access the menu.
Esc. Push this button to exit the menu discarding all changes.
Menu navigation arrows. When accessing the menu, push
arrow up and arrow down to scroll through the various menu
items. Push arrow left and arrow right to choose the value for
the selected item.
OK. When accessing the menu, push this button to update the
current item with the displayed value.
Vol+/Vol-. Use these buttons to set the gain for the analogue
input.
In+/In-. Use these buttons to select the input.

JOPLIN MKIII
384kHz/32bit ANALOG-TO-DIGITAL CONVERTER
REVISION PRA – APRIL 2019
Copyright © 2019, M2Tech Srl
14
M2Tech
www.m2tech.biz

JOPLIN MKIII
384kHz/32bit ANALOG-TO-DIGITAL CONVERTER
REVISION PRA – APRIL 2019
Copyright © 2019, M2Tech Srl
15
M2Tech
www.m2tech.biz
5. Connecting and powering the unit
ADVICE: all connections to other equipment in the system must be done when all
equipment are off. Failing to comply to this advice may expose the JOPLIN MKIII to the
risk of damages.
ADVICE: Windows users must install the driver prior to connecting the JOPLIN MKIII to
the PC (please refer to section 6).
Please refer to section 3, “Back Panel Description”.
Connect the “B” plug of a 2.0 USB A-B cable to the USB connector (Figure 2, 13) of the
JOPLIN MKIII.
Connect the “A” plug of the cable to a 2.0 USB port of your computer.
Connect two interconnects to the analogue inputs of the JOPLIN MKIII (Figure 2, 6) and to
the outputs of your analogue source (be it a turntable, a tuner, a tape recorder or even the
tape rec output of your amplifier).
Connect a digital cable with suitable termination (RCA, XLR, optical Toslink™ or HDMI)
from the JOPLIN MKIII to your amplifier’s digital inputs or to a DAC (Figure 2, 9/10/12/14).
If you need to route the output of a digital source to your computer or to the amplifier, you
may connect the source to the JOPLIN MKIII using an RCA digital interconnect (Figure 2,
11).
Connect the wall adaptor provided with the JOPLIN MKIII or one output of the Van Der Graaf
MkII to the supply connector (Figure 2, 15) of the JOPLIN MKIII.

JOPLIN MKIII
384kHz/32bit ANALOG-TO-DIGITAL CONVERTER
REVISION PRA – APRIL 2019
Copyright © 2019, M2Tech Srl
16
M2Tech
www.m2tech.biz

JOPLIN MKIII
384kHz/32bit ANALOG-TO-DIGITAL CONVERTER
REVISION PRA – APRIL 2019
Copyright © 2019, M2Tech Srl
17
M2Tech
www.m2tech.biz
6. Driver installation
The JOPLIN MKIII is USB 2.0 Audio compliant. This means that no driver is needed with
Apple computers, nor with Linux-based PC’s. The latter will need ALSA to operate the
JOPLIN MKIII.
Windows is presently only compatible with USB 2.0 Audio since latest updates of version
10. Even this version doesn’t support DSD or DXD. Therefore, M2Tech provides a driver
which needs to be installed prior to access the JOPLIN MKIII via USB.
6.1. Obtaining the driver
The Windows driver for the JOPLIN MKIII is available on the M2Tech website, in the
“support”. The driver is contained in self-extracting file.
6.2. Installing the driver on a Windows-based PC
The procedure is almost the same for Windows XP, Windows Vista and Windows 7.
Double-click on the 7-Zip folder to automatically extract the files in a directory of your
choice (Figure 4).
Figure 4
Amongst the files extracted is “setup.exe”. Double-click on its icon to launch it and follow
the indications provided by the setup program (Figure 5).

JOPLIN MKIII
384kHz/32bit ANALOG-TO-DIGITAL CONVERTER
REVISION PRA – APRIL 2019
Copyright © 2019, M2Tech Srl
18
M2Tech
www.m2tech.biz
Figure 5
In Windows 7, the installation wizard will ask for authorization to start installation. Accept.
Then, the wizard will check for system features. At a certain point, it will ask you to connect
the JOPLIN MKIII in one of the USB ports (Figure 6).
Figure 6

JOPLIN MKIII
384kHz/32bit ANALOG-TO-DIGITAL CONVERTER
REVISION PRA – APRIL 2019
Copyright © 2019, M2Tech Srl
19
M2Tech
www.m2tech.biz
Follow the indications and plug the device in one port, then click on “Next”. You’ll be asked
to choose the installation directory (Figure 7). After choosing it, click on “Install”.
Figure 7
The installation process continues showing the progress (Figure 8).

JOPLIN MKIII
384kHz/32bit ANALOG-TO-DIGITAL CONVERTER
REVISION PRA – APRIL 2019
Copyright © 2019, M2Tech Srl
20
M2Tech
www.m2tech.biz
Figure 8
At the end of the installation process, the wizard notify the completion (Figure 9). Click on
“Finish” to complete the installation.
Figure 9
To ensure that installation has correctly completed, the Device Manager should be
checked. The JOPLIN MKIII will be listed under “Audio, Video and Games Controllers”
(Figure 10 on next page).
Table of contents
Other M2TECH Media Converter manuals

M2TECH
M2TECH JOPLIN User manual

M2TECH
M2TECH YOUNG User manual

M2TECH
M2TECH VAUGNAN User manual

M2TECH
M2TECH Vaughan User manual

M2TECH
M2TECH EVO DAC User manual

M2TECH
M2TECH HIFACE EVO TWO User manual

M2TECH
M2TECH HiFace DAC User manual

M2TECH
M2TECH JOPLIN User manual

M2TECH
M2TECH JOPLIN MKII User manual

M2TECH
M2TECH YOUNG 384KHZ/32BIT User manual
Popular Media Converter manuals by other brands

APLIC
APLIC 303576/20190122SZ241 user manual

HEIDENHAIN
HEIDENHAIN LIDA 277 Mounting instructions

Korenix
Korenix JetCon 2302 user manual

PIXELHUE
PIXELHUE 4K ViewPro quick start guide

Advantech
Advantech SSPBM-K125-BTE Installation and operating manual

Infineon
Infineon ILD8150 Operation, design guide and performance