MAAX INTUITION User manual

1
INTUITION
INTUITIONTM
TM
Read carefully before proceeding. TO BE REMOVED FOR USE BY THE OCCUPANT.
Keep the serial number for the unit
Lire attentivement les instructions avant de débuter l’installation. CE GUIDE EST À CONSERVER PAR L’UTILISATEUR FINAL.
Conserver le numéro de série de l'unité
Leer atentamente las instrucciones antes de comenzar la instalación. ESTA GUIA DEBE SER CONSERVADA POR EL USUARIO FINAL.
Conserve el número de serie de la unidad
Installation Guide / Guide d’installation / Guía de instalación

2
LIST OF COMPONENTS
BEFORE STARTING
• Read local construction codes to make sure installation meets standards.
• Unpack the unit and, before discarding it, make sure that the unit is in good condition. If inspection reveals damages to the unit, or a finish
defect, please contact the distributor. The warranty does not cover damages or finish defects once the unit is installed. MAAX responsibility
with respect to shipping damages stops when the unit is transferred to the shipper. Any shipping-related complaint should be made directly
to the shipper.
• In order to protect the unit during installation, it is recommended to put a piece of cardboard in the bottom of the unit.
Tools required
- Electric drill
- 1/8" drill bit (for installation on an acrylic frame)
- 1/4" masonry drill bit (for installation on ceramics
or marble tiles).
- Tape measure
- Pencil
- Philips- or Robertson-head screwdriver #1
- Level, Square
- Safety glasses
- Caulking gun
Materials required
- Silicone-based caulk (high quality mold-resistant)
- White spirit (thinner) - NO LACQUER THINNER
OR ACETONE
- Clean soft cloths
01B
01C
6E
2F
2G
2 Assembly of RH door
3 Stationary glass panels 2
4 PVC seal
1 Assembly of LH door 1
5 Wall bracket 2
6 Adjustable wall bracket
7 Upper and lower rail 2
8 Assembly of handle 2
9 Hardware kit
Glass clip tab 2
10
9 Composition of hardware kit Qty
QtynoitpircseD#
9A Anchoring plug
Wall bracket screw
Assembly screw
Glass clip screw
Glass clip screw “A”
Glass clip screw “B”
D Wall bracket screw
H Wall bracket latch
2
1
4
9
1
9
If you need spare parts, do not return the shower door
to the store, but call us; you will be answered
courteously and immediately. See contact information
at the back of this manual.
When ordering parts, please have handy the following
information:
Model number
Item no.
Description
To help identify the proper parts, please refer to the
spare parts illustrations. Hardware is represented at
its actual length.
Extra screws and plugs are supplied in the
hardware kits.
Maintenance and cleaning:
Use only soft detergents or soapy water applied with a soft cloth. Always
rinse carefully after cleaning, and blot dry using a damp cloth or a
chamois. It is recommended to use a rubber squeegee after each shower
to remove water stains from the inside of the glass panels. To keep the
new appearance of your shower door, NEVER use scouring pads, rough
cloths, cutting instruments, or strong or abrasive cleaners on the metal
parts, the wall or the glass panels.
Remove superficial scratches using automotive polish or automotive
polishing liquid followed with automotive polish. DO NOT USE
ABRASIVE POLISHING LIQUID.
Remark: Take precautions while unpacking your shower door.
Place glass panels vertically in a safe place to keep them from being damaged.
DO NOT SET THE GLASS PANELS ON A HARD SURFACE.
English
Warning - Remove packaging before handling the doors

5
E
F7
44
4
4
6
6
7
G
E
5
10
3
1
3
2
10
C
B
H
3
IDENTIFICATION OF COMPONENTS
9 - Hardware Kit
8- Handle
assembly
NEO-ROUND FRAMELESS CORNER SHOWER DOOR
English

English
4
PARTS ILLUSTRATION
HARDWARE KIT
AAnchoring plug
F" A " glass clip
10 Glass clip tab
G"B" glass clip
BWall bracket screw
#8 x 1"
CAssembly screw
#8 x 3/4"
EGlass clip screw
#7 x 7/16"
3/4
DWall bracket screw
M4 x 7/16"
HWall bracket latch
4PVC seal
7Upper and
lower rail
5Wall bracket 6Adjustable
wall bracket
8Handle
assembly

English
5
U
UN
NI
IT
T
I
IN
NS
ST
TA
AL
LL
LA
AT
TI
IO
ON
N
1
1
2
2
Assemble the structure as indicated on the figure below, using
#8 x 3/4" screws, as indicated.
Note: Use the help of a second person to support the rails
during assembly, or perform the assembly flat on the ground,
after protecting the surfaces with a blanket.
1
1
-
-
STRUCTURE ASSEMBLY
This task requires
two people.
Assemble the wall brackets as
illustrated in the above figure
Note: This task should be
performed in two steps.
x2

English
6
2
2
-
-WALL POST POSITIONING AND INSTALLATION
6
6
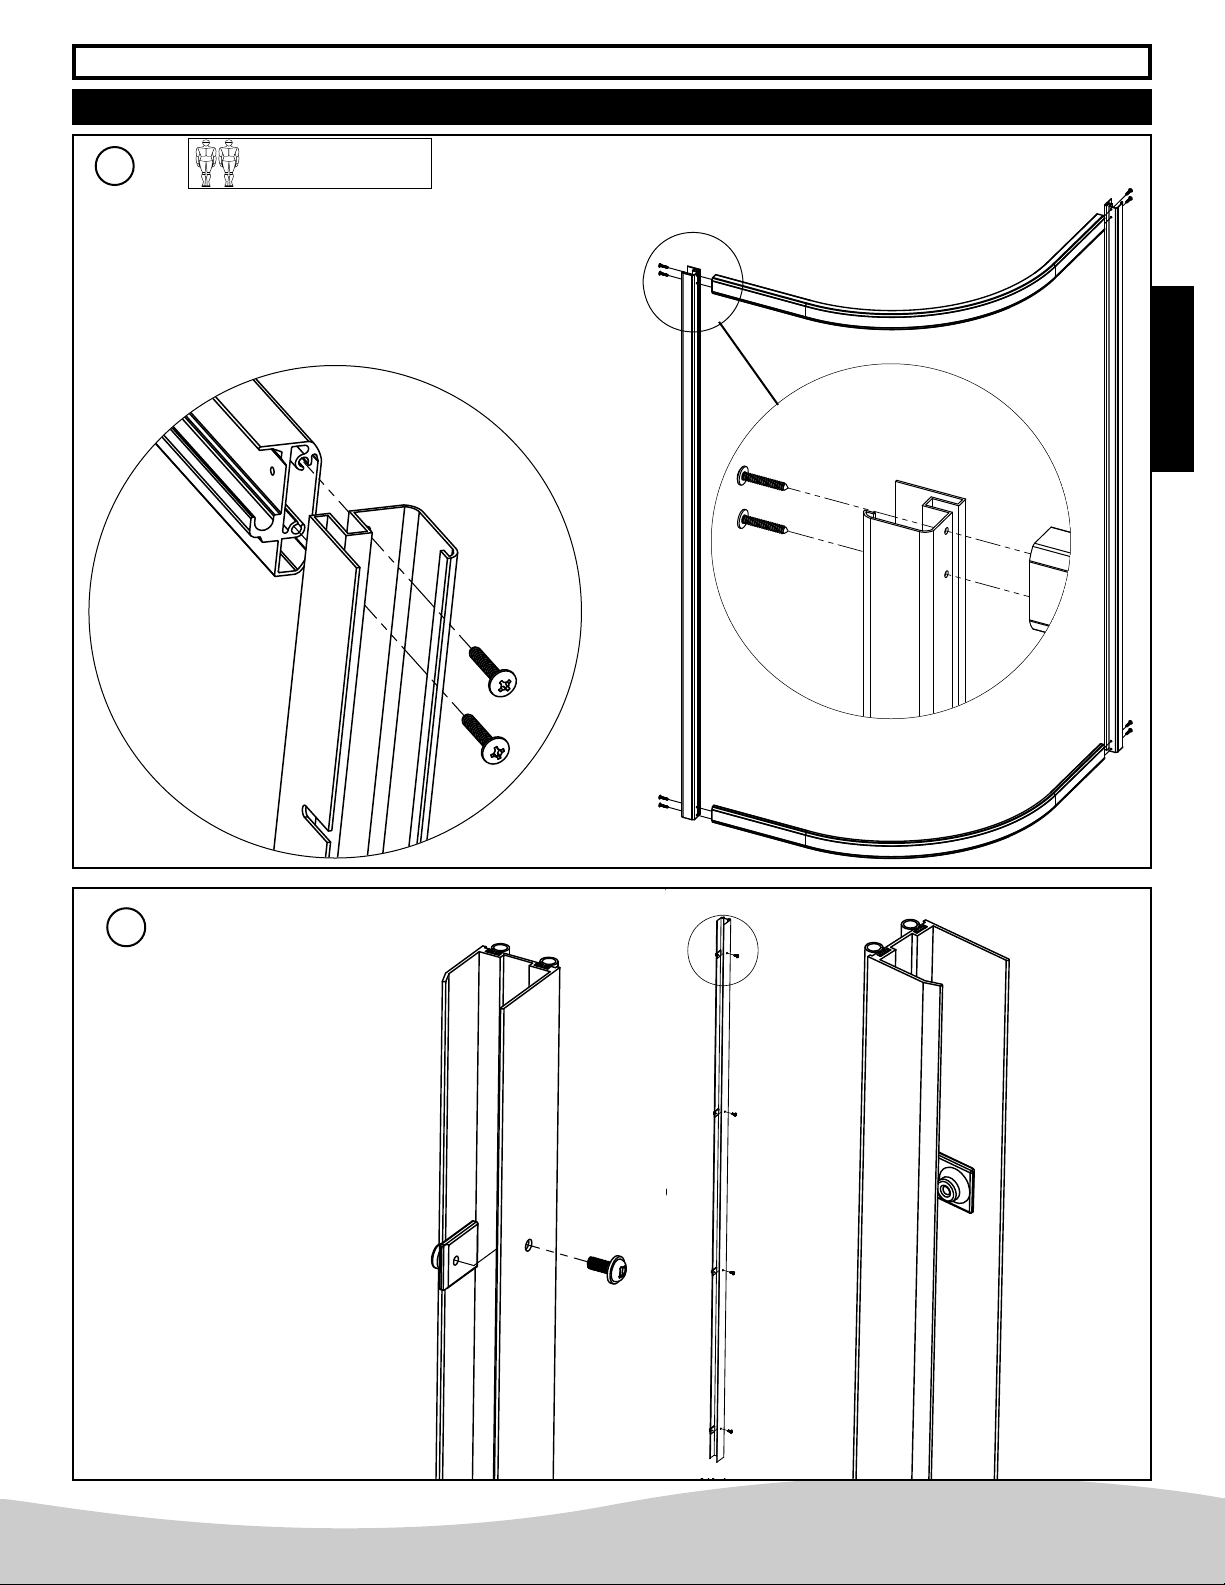
The rail ideal position should be on the base
threshold centerline, as illustrated.
+45º
Note:The bottom of the
wall posts must be filed
to adjust for installation
on a single-hull unit.
Wall bracket
front view.
Lift the frame assembly and position
it on the base. Center the frame
from left to right, as illustrated in the
figure.
Note: By positioning the frame over the
base, the wall posts can be pushed further
back inside the panel posts.
1
1Using a pencil, makes sure that the
wall posts are plumb, and mark a
line with a pencil inside the wall post to
mark its position on the wall, as illustrated
in the figure.
While a person holds the shower frame in
position, the other should makes sure that
wall posts are in contact with the wall. If
required, wall posts can be removed or
inserted. Remove the shower unit from
the base and remove the wall posts from
the panel posts.
2
2
Repeat for both sides
Reinstall the wall posts on the wall
at the marked location. The wall
post lower edges must align with the
pencil marks, as illustrated on the figure.
3
3
Using a pencil, mark all attachment
hole locations, as illustrated in
the figure.
4
4Remove the wall posts and drill
holes at each attachment location,
as illustrated in the figure.
For installation on ceramics tiles, use a
1/4"masonry bit.
5
5
Using a center punch, punch the ceramics
surface at the location of the attachment
points. Drill, then insert plugs.
For installation on an acrylic enclosure,
use a 1/8"bit. Plugs are not required.
Reinstall the wall posts and attach them to
the wall with #8 x 1", screws, as illustrated
in the figure. Wall posts are equipped with
for better horizontal adjustment.

English
7
3
3
-
-STRUCTURE AND FIXED PANEL INSTALLATION
Panel post
groove
View from inside
of shower cabin
View from inside
of shower cabin
4
45
5
Lift the frame and maneuver it so that a panel post engages
into the wall profile, as indicated on the figure.
Then, rotate [the shelf] until the other panel post engages
into the other wall profile, as indicated on the figure. Center
the frame over the base threshold.
2
2
1
1
Slide the glass panel
Insert a glass panel in the glass profile of the frame, as indicated
on the figure.
The glass panel then rests on a rail shelf.
Secure the glass panel in position using "A" and "B" glass clips
and # 7 x 7/16" screws, as indicated on the figure.
Repeat the procedure for the glass panel on the other side.
x2 x2
3
3Lightly tighten the top and bottom
screw to hold the structure in place
View from inside of
shower cabin

English
8
4
4
-
-SECURE THE STATIONARY PANELS AND THE STRUCTURE
1
1
Working inside the shower cabin, install the window tabs, as
indicated on the right hand figure.
Install from the bottom of the glass panel the tab [sic]. If necessary,
use a flat and dull tool (paint mixer, for example) to puss the tab
between the glass panel and the panel post GROOVE.
In order to properly install the tab, be careful that its wider side
point toward the glass panel. Cut excess length at the top.
Repeat the procedure for the other side.
Wide side toward
glass panel
View from inside
of shower cabin
2
2
Make sure that the shower cabin is centered over the base
threshold.
Make sure that the rail is laying flat and evenly on the base and
perform any necessary adjustment.
Tighten fully the wall post lower face screws to secure the
structure in place, as indicated on the figure.
View from inside
of shower cabin
View from inside
of shower cabin
x2

English
9
5
5
-
-INSTALLATION OF DOORS
1. Start by disassembling the handle set.
2. Insert the aluminum plat (3), the clear gasket (2) and
the round bushing (1) into the special screw (4).
3. Insert the assembly through the glass panel as shown on the
illustration, the screw head should be on the inside of the
shower.
4. Insert the clear gasket (2) on the screw, on the other side of
the glass panel
5. Repeat step 2 to 4 for the bottom of the handle.
6. Using a Philips screwdriver, tighten the screw (4) onto the
outside handle (8) for the top and bottom of the handle.
7. Insert the inside handle (5) in the screw heads.
8. Using the provided Allen key, tighten the setscrews on the
screw to secure the handle in place.
Note: Use the longer side of the Allen key to screw the
setscrews; it can be angled to facilitate the process. Use the
shorter side of the Allen key to securely tighten the setscrews.
5
1
4
2
7
6
3
8
Glass Panel
6
6
-
-INSTALLATION OF HANDLES
Turn the screw clockwise to raise, and
counterclockwise to lower.
1
1
2
2
3
3
Roller top view.
Groove for rollers.
1- Enter the shower cabin. Lift the
door and tilt it forward to be able
to rest the top rollers in the upper
rail grooves.
2- Press the lower roller
engagement buttons and push for
the doors. Lower rollers must be
aligned in the lower rail grooves.
3- Use the leveling screws on the
top of each door panel to move the
door to its heigthest point without
forcinge the screws.
Doors should open and close easily. Close the doors so that
magnetic strips contact each other, in order to see whether
adjustment is required. Top of doors should be at the same
height, and the space between doors, when they close, should
be uniform.
If the two doors require adjustment, raise or lower one of the
roller assemblies (or both of them) using the top-mounted
adjustment screw.
x2
Inside Shower Outside
Shower

English
10
1
1
8
8
-
-SILICONE APPLICATION
1
1
To ensure tightness of the shower door, apply a high-quality silicone caulk, as indicated.
Let the caulk cure for 24 hours before using the shower.
Note: Apply silicone caulk to the locations outside the shower cabin.
7
7
-
-INSTALLATION OF SEALS
With the sliding doors fully open, install the door seal on the edge
of the stationary panel, as indicated on the figure. Cut it as
required. NOTE: The door seal lip must face inside the cabin, as
indicated. Repeat the procedure for the other stationary panel.
Install the door seal on the rear edge of the sliding door
panels, as indicated on the figure. Cut it as required.
NOTE: The door seal lip must face outside the cabin, as
indicated. Repeat the procedure for the other sliding panel.
The lip is facing toward
the cabin.
NOTE: When the sliding door panels
are closed, the seals are facing each
other, as indicated above.
2
2
x2
x2

11
Problem Cause Solution
The aluminum frame is not level Level the aluminum frame
The aluminum frame is tighten to the wall
channel Untighteen the frame from the wall channel
The door panel comes out of the
bottom track The door panel is not at its highest point
Use the leveling screws on the top of each
door panel to move the door to its heights
point
The door magnets do not seal
properly The doors are not level Using the leveling screws on the top of each
door panel to level the doors.
The handles leak The main screw is not tighten fully Remove the inside handle and retighten the
screw
The fixed glass panels do not fit
in the aluminum frame
If you experience any fo the following difficulties while installing your shower door, use this troubleshooting guide to
help remedy the problem before contacting our support department. Should the problem persist, please contact our
support department.
English
9
9
-
-TROUBLESHOOTING

English
12
TERMS, CONDITIONS AND WARRANTIES
Price
Orders are accepted subject to prices in effect at the time of shipment of this price list and prices are subject to change without notice. The published
pricing schedule shows suggested list prices and is subject to a trade discount as determined by MAAX Canada Inc. (hereafter “MAAX”). Orders will be
invoiced at the price in effect at the time the orders are placed. Selling prices may be readjusted without notice during the year, for instance if
transportation costs increase due to fuel surcharges.
Conditions of acceptance
The acceptance, shipment or delivery of any order is conditional upon approval of MAAX’s credit department and upon these sales terms and conditions
applying to the order and not any others, unless specifically agreed to in writing by MAAX. MAAX reserves the right to require satisfactory security for
performance of the purchaser obligations prior to making shipment on any order. Any sold merchandise remains the property of MAAX until full payment
is received, in accordance with applicable laws, such as the Uniform Commercial Code — Sales in the United States.
Terms of payment
General payment terms are net 30 days. A rate of 2% monthly (26.82% per annum, compounded monthly) will apply on overdue accounts. No goods
will be delivered to customers not complying with our sales and payment conditions.
Taxes
All prices published are exclusive of applicable taxes.
Lost merchandise
If, upon receipt, the recipient notices that certain products are missing, he must immediately notify our customer service department. The recipient must
then indicate which products are missing on the delivery slip and countersign it. The enclosed bill of lading allows you to verify shipped and received
merchandise.
Shipping damage
Damage occurring in transit is the responsibility of the carrier. MAAX will not be held responsible for shipping damage. The product should be carefully
examined by the user or installer at time of receipt to ensure it is damage free. If any damage is discovered, it should be noted on the freight bill, and a
claim should be filed against the carrier as soon as possible. Inspection of the unit prior to installation is the responsibility of the installer or building
contractor who acts on behalf of the user, or the user himself. They are responsible for ensuring that the unit is free of defect or damage. In the event
of a problem, the unit must not be installed. MAAX is not responsible for failures, costs, damages or claims that could have been discovered, repaired
or avoided by proper inspection and testing prior to installation.
Return policy
MAAX provides a selective and conditional merchandise return program. Product may be returned to MAAX under the following conditions:
• Product is in original, new condition – not previously installed or used as display;
• Product has been in the customer’s possession for less than 6 months;
• Product is still available in the most current price list (not discontinued) or has not been announced for discontinuation;
• Product is in a standard color or finish, as indicated in the most current price list;
• Any stock product may be returned. To know if a product is a stock unit, please contact the customer care department; and
• Product was received in error does not represent what the customer ordered or has a manufacturing defect.
Products are not eligible for return to MAAX under the following conditions:
• Product has been previously installed, drilled, permanently marked, spray painted, or in any other way altered from its original condition;
• Product is “weathered”; degraded due to storage outside or exposure to the elements resulting in discoloration;
• Product is defective due to negligent storage; or
• Product is equipped with any accessories or options.
Prior to returning merchandise a MAAX customer must complete and submit the RGA. Request Form supplying general and specific information about
the unit(s) for return. MAAX must then authorize and approve the return in writing by issuing an RGA number.
All products are subject to inspection prior to credit reimbursement and MAAX reserves the right to reduce such reimbursement as follows:
• MAAX will apply a 25% restocking fee against the reimbursement credit for all returns for any reason other than manufacturing defect or MAAX error.
• A repair cost will be applied against the credit reimbursement for any repair required to bring a product back to 100% resalable condition. In these
circumstances the customer will be notified.
• Any unit returned via common carrier must have the freight prepaid by the customer and any unit returned on a MAAX truck will be subject to a $25
per unit transportation fee unless the unit is being returned due to a manufacturing defect or a MAAX error.
• For any product returned that does not qualify for return as specified above or does not match the RGA form, MAAX will charge a $25 per unit handling
fee. MAAX will notify customers in such instances and the customer will be requested to either take the unit back with freight prepaid and charged or
notify MAAX in writing of their desire that it be scrapped.
Cancellation
Orders must be cancelled with in 24 hours of receipt of MAAX’s confirmation. All cancellation requests must be made by fax and be confirmed by MAAX.
Design and dimensions
MAAX reserves the right to discontinue products at any time or change specifications and/or design without notice and without incurring obligation. All
dimensions are approximate and subject to change without notice.
CLIENT SHALL INFORM OWNER/END-USER ABOUT THE FOLLOWING CONDITIONS AND WARANTIES
Color variations
MAAX shall not be responsible for variations in granite color, wood grain, or color shades in the natural wood used; or for slight differences in color or
texture of the material delivered in relation to the sample shown or provided to the purchaser. The purchaser may not use such differences to obtain a
price discount or to cancel the order.
Maintenance
Regular disinfection provides an effective defense against various types of bacteria that can develop in the deposits building up over time in all bathtubs
and showers. For daily maintenance cleaning, use a moist cloth and gentle liquid detergent. For acrylic surfaces, occasional use of a special acrylic
surface cleaner such as Lumashine or Lumacream will add lustre and protect the finish.
Do not use abrasive cleaners, scrapers, metal brushes, or any items or products that could scratch or dull the surface. Mirror should be cleaned with
non-ammonia based cleaner only.

English
13
Limited warranties
MAAX offers the following express limited warranties on each of its products. These warranties extend only to the original owner/end-user for personal
household use and start from the manufacturing date of the unit. For commercial uses, additional limitations apply.
MAAX warrants acrylic units to be free from defects in workmanship and materials under normal use and service for a period of ten (10) years from the
initial date of purchase by the owner/end-user, contractor or builder from an authorized dealer.
MAAX warrants fiberglass units to be free from defects in workmanship and materials under normal use and service for a period of three (3) years from
the initial date of purchase by the owner/end-user, contractor or builder from an authorized dealer.
MAAX warrants ABS to be free from defects in workmanship and materials under normal use and service for a period of three (3) years from the initial
date of purchase by the owner/end-user, contractor or builder from an authorized dealer.
MAAX warrants polystyrene shower kits, tub wall kits, utility tubs and accessories to be free from defects in workmanship and materials under
normal use and service for a period of one (1) year from the initial date of purchase by the owner/end-user, contractor or builder from an authorized
dealer.
MAAX warrants whirlpool motors/pumps to be free from defects in workmanship and materials under normal use and service for a period of five (5)
years from the initial date of purchase by the owner/end-user, contractor or builder from an authorized dealer.
MAAX warrants blowers to be free from defects in workmanship and materials under normal use and service for a period of five (5) years from the initial
date of purchase by the owner/end-user, contractor or builder from an authorized dealer.
MAAX warrants whirlpool and air systems (except perimeter air system check valves that have a 10-year warranty – see below) to be free from defects
in workmanship and materials under normal use and service for a period of two (2) years from the initial date of purchase by the owner/end-user,
contractor or builder from an authorized dealer.
MAAX warrants perimeter air system check valves to be free from defects in workmanship and materials under normal use and service for a period
of ten (10) years from the initial date of purchase by the owner/end-user, contractor or builder from an authorized dealer.
MAAX warrants shower doors to be free from defects in workmanship and materials under normal use and service for a period of ten (10) years from
the initial date of purchase by the owner/end-user, contractor or builder from an authorized dealer.
MAAX warrants grab bars to be free of all material or workmanship defects under normal use and service for a period of four (4) years from the initial
date of purchase by the owner/end-user, contractor or builder from an authorized dealer.
MAAX warrants ceramic cartridges for faucets against any leaks resulting from normal use by the owner/end-user, contractor or builder for a limited
lifetime period.
MAAX warrants thermostatic cartridges to be free from defects in workmanship and materials under normal use and service for a period of five (5)
years from the initial date of purchase by the owner/end-user, contractor or builder from an authorized dealer.
MAAX warrants shower massage systems to be free from defects in workmanship and materials under normal use and service for a period of two (2)
years from the initial date of purchase by the owner/end-user, contractor or builder from an authorized dealer.
MAAX warrants its steam systems to be free from defects in workmanship and materials under normal use and service for a period of five (5) years,
and steam nozzles for two (2) years, from the initial date of purchase by the owner/end-user, contractor or builder from an authorized dealer.
MAAX warrants Chrome, Polished Brass and Brushed Nickel faucet finishes to be free from defects in workmanship and materials under normal use and
service by the owner/end-user, contractor or builder for a limited lifetime period.
MAAX warrants medicine cabinets to be free from defects in workmanship and materials under normal use and service for a period of ten (10) years
from the initial date of purchase by the owner/end-user, contractor or builder from an authorized dealer.
MAAX warrants glass mirrors to be free from defects in workmanship and materials under normal use and service for a period of two (2) years from
the initial date of purchase by the owner/end-user, contractor or builder from an authorized dealer.
MAAX warrants electrical components, including chromatherapy systems, to be free from defects in workmanship and materials under normal use and
service for a period of two (2) years from the initial date of purchase by the owner/end-user, contractor or builder from an authorized dealer.
MAAX warrants the factory treated wood parts to be free of all material or workmanship defects under normal use and service for a period of two (2)
years from the initial date of purchase by the owner/end-user, contractor or builder from an authorized dealer.
Any product reported to the authorized dealer or to MAAX as being defective within the warranty period will be repaired or replaced (with a product of
equal value) at the option of MAAX. Costs for freight associated with shipping of replacement product/parts might be charged to customer. In no event
will MAAX be liable for the cost of repair or replacement of any installation materials, including but not limited to, tiles, marble, etc. This warranty extends
to the original owner/end-user and is not transferable to a subsequent owner.
Neither the distributor, authorized MAAX dealer nor any other person has been authorized to make any affirmation, representation or warranty other than
those contained in this warranty; any affirmation, representation or warranty other than those contained in this warranty shall not be enforceable against
MAAX or any other person.
MAAX reserves the right to modify this warranty at any time, it being understood that such modification will not alter the warranty conditions applicable
at the time of the sale of the products in question.
Limitations
This warranty shall not apply following incorrect operating procedures, breakage or damages caused by normal wear and tear, fault, carelessness,
abuse, misuse, misapplication, improper maintenance, alteration or modification of the unit, as well as chemical or natural corrosion, accident, fire, flood,
act of God or any other casualty. This warranty shall not apply to stain or malfunction caused by ferrous water, hard water or salty water.
The owner/end-user of the product covered by this warranty is entirely responsible for its proper installation and electrical wiring. This warranty is void
if unit is not tested prior to final enclosure as per the installation instructions. MAAX neither installs nor supervises the installation, nor hires a
contractor for this purpose, and consequently cannot be held responsible for any defect, breakage or damage caused thereby or resulting thereof, either
directly or indirectly. The owner/end-user must provide access to the components of the product as described in the installation guide, so that MAAX can
execute the warranty specified herein.

English
14
If such access is not available, all expenses to provide said access will be the responsibility of the owner/end-user.
This warranty does not apply to products or equipment not installed or operated in accordance with instructions supplied by MAAX and all applicable
rules, regulations and legislation pertaining to such installations.
MAAX strongly recommends that its products-for example, but without limitation, shower doors and other items—be installed by professionals with
experience in bathroom products. Installation of shower doors by an inexperienced person may result in glass breakage and, consequently, cause
personal injury or death.
MAAX is not liable for any costs, damages or claims resulting from the purchase of products that do not fit through openings or existing structures. MAAX
is not liable for any costs, damages or claims resulting from defects that could have been discovered, repaired or avoided by inspection and testing prior
to installation.
MAAX is not liable for personal injuries or death to any person or for any direct, special, incidental or consequential damage, loss of use, loss of time,
loss of profits, inconvenience, incidental expenses, labor or material charges, or any other costs resulting from the use of its products or pertaining to
the application of the present warranty, or resulting from the removal or replacement of any product or element or part covered by this warranty.
EXCEPT AS OTHERWISE PROVIDED ABOVE, MAAX MAKES NO WARRANTIES, EXPRESS OR IMPLIED, INCLUDING WARRANTIES OF
MERCHANTABILITY AND FITNESS FOR A PARTICULAR PURPOSE OR COMPLIANCE WITH ANY CODE.
In any case, MAAX cannot be liable for any amount over and above the purchase price paid for the product by the owner/end-user, contractor or builder.
This warranty gives the owner/end-user specific legal rights. The owner/end-user may also have other rights which vary from one state and/or province
to another.
Commercial Limitations
In addition to the above conditions and limitations, the warranty period for products installed for commercial applications or used in commercial ventures
is of one (1) year from the initial date of purchase by the owner/end-user, contractor or builder from an authorized dealer. MAAX is not responsible for
loss of use or profit under any circumstances. If the product is sold by MAAX as a display, MAAX standard warranty applies.
Warranty service
In order to obtain service provided under this warranty during regular business hours, contact the dealer or distributor who sold the unit, or MAAX directly.
MAAX will provide the warranty service described above when the following conditions have been met:
(1) the failure is of the nature or type covered by the warranty;
(2) the user has informed an authorized MAAX Agent or Warranty Service Department representative of the nature of the problem during the warranty
period;
(3) conclusive evidence (e.g., serial number or proof of purchase) is provided to the foregoing by the user proving that the failure occurred or was
discovered within the warranty period; and
(4) an authorized independent service person or company representative has been permitted to inspect the product during regular business hours within
a reasonable time after the problem was reported by the user.
MAAX’s warranty obligation shall be discharged upon tender of replacement or repair. The purchaser refusal to accept the tender terminates MAAX’s
warranty obligation.
MAAX products are certified by one or more of the following certification agencies: CSA, UL, IAPMO, ULI, INTERTEK (ETL), WARNOCK HERSEY and
SGS US TESTING. Certain models are pending certification approval. Certification may be ended by MAAX or certification agencies without notice.
The symbol ® / R indicates a registered trademark of MAAX Canada Inc. or an affiliated company. The symbol TM indicates a trademark of MAAX
Canada Inc. or an affiliated company.
© MAAX Canada Inc., 2007

15

Français
LISTE DES COMPOSANTES
AVANT DE DÉBUTER
• Consulter les codes de construction locaux pour assurer une installation conforme aux normes.
• Retirez l'unité de l'emballage et avant d'en disposer, assurez-vous que l'unité est en bon état. Si l'inspection révèle que l'unité est
endommagée ou qu'il y a un défaut de finition, contactez le distributeur. La garantie ne couvre pas les dommages ou les défauts de finition
une fois l'unité installée. La responsabilité de MAAX quant aux dommages dus au transport cesse lorsque l'unité est transférée au
transporteur. Toute plainte liée à un dommage dû au transport doit être faite directement auprès du transporteur.
• Afin de protéger l'unité lors de l'installation, il est conseillé de placer un morceau de carton dans le fond de l'unité.
Outils requis
- Perceuse électrique
- Foret de 1/8” (pour la pose sur un encadrement en
acrylique).
- Foret de maçonnerie de 1/4 po (pour la pose sur
des carreaux en céramique ou du marbre).
- Ruban à mesurer
- Crayon
- Tournevis à tête philips#1 ou robertson #1
- Niveau, équerre
- Lunettes de sécurité
- Pistolet à calfeutrer.
Matériel requis
- Produit de calfeutrage à base de silicone (haute qualité
résistant aux moisissures)
- Essence minérale (diluant) - PAS DE DILUANT POUR
LAQUE NI D’ACÉTONE
- Chiffons doux propres
16
Description Qté
1 Assembla
g
e de la
p
orte
g
auche 1
2 Assembla
g
e de la
p
orte droite 1
3 Panneaux de verre fixe 2
4 Joint d'étanchéité en PVC 4
5 Montant mural 2
6 Montant mural a
j
ustable 2
7 Rail su
p
érieur et inférieur 2
8 Assembla
g
e de la
p
oi
g
née 2
9 Kit de
q
uincaillerie 1
10 Languette de vitre 2
9 Composition du kit de quincaillerie Qté
A Cheville d'ancrage 9
B Vis de montant mural 10
C Vis d'assemblage 10
D Vis de façonnage des montants muraux 9
E Vis de clip à verre 6
F Clip à verre "A" 2
G Clip à verre "B" 2
H Barrure des montants muraux 9
Si vous avez besoin de pièces de rechange, ne
rapportez pas la porte de douche au magasin, mais
appelez-nous; vous aurez une réponse courtoise et
immédiate. Voir nos coordonnées à l’arrière de ce
manuel.
Lors d’une commande de pièces, ayez sous la main
les renseignements suivants :
Numéro du modèle
Repère
Description
Pour aider à l’identification des bonnes pièces, merci
de vous reporter aux illustrations des pièces de
rechange. La visserie est représentée à sa longueur
réelle.
Des vis est chevilles d’ancrage supplémentaires
sont fournies dans les kit de quincaillerie.
Entretien et nettoyage:
Utiliser uniquement des détergents doux ou de l’eau savonneuse tiède
appliqués avec un chiffon doux. Toujours bien rincer après le nettoyage,
et sécher en tamponnant avec un chiffon humide ou une peau de
chamois. Il est conseillé d’utiliser une raclette en caoutchouc après
chaque douche pour éliminer les taches d’eau sur l’intérieur des
Panneaux de verre. Pour préserver l’aspect neuf de votre porte de
douche, NE JAMAIS utiliser des tampons à récurer, des chiffons
rugueux, des instruments tranchants ou des nettoyants forts ou abrasifs
sur les parties en métal, le mur ou les panneaux de verre.
Éliminer les rayures superficielles avec une pâte de polissage pour
automobile ou un liquide à polir pour automobile suivi d’une pâte de
polissage. NE PAS UTILISER DE LIQUIDE À POLIR ABRASIF.
Remarque: Prendre des précautions lors du déballage de votre porte de douche.
Placer les panneaux de verre à la verticale dans un lieu sûr pour éviter de les endommager.
NE PAS PLACER LES PANNEAUX DE VERRE SUR UNE SURFACE DURE.
Attention - Retirer l’emballage avant de manipuler les portes

17
5
E
F7
44
4
4
6
6
7
G
E
5
10
3
1
3
2
10
C
B
H
IDENTIFICATION DES COMPOSANTES
INTUITION PORTE DE DOUCHE NEO-RONDE
9 - Kit de Quincaillerie
8- Assemblage
poignées
Français

18
ILLUSTRATIONS DES PIÈCES
KIT DE QUINCAILLERIE
ACheville d’ancrage
FClip de vitre
«A»
10 Languette
de vitre
GClip de vitre
«B»
BVis de montant mural
n° 8 x 1 po
CVis d’assemblage
n° 8 x 3/4 po
EVis de clip à verre
n° 7 x 7/16 po
3/4
DVis de façonnage des
montants muraux
M4 x 7/16 po
HBarrure des
montants muraux
4Joint
d’étanchéité en
PVC
7Rail supérieur
et inférieur
5Montant
mural 6Montant mural
ajustable
Français
8Assemblage
de la poignée

Français
19
I
IN
NS
ST
TA
AL
LL
LA
AT
TI
IO
ON
N
D
DE
E
L
L’
’U
UN
NI
IT
TÉ
É
1
1
2
2
Monter la structure comme indiqué sur la figure ci-dessous
utilisant les vis #8 x 3/4 po, comme indiqué.
Note: Utiliser l’aide d’une deuxième personne pour supporter
les rails durant l’assemblage, ou faire le montage à plat au sol
en protégeant les surfaces à l’aide d’une couverture.
1
1
-
-
ASSEMBLAGE DE LA STRUCTURE
Cette étape nécessite deux
personnes.
Assembler les montants
muraux comme illustré dans
la figure ci-dessus.
Note: cette étape doit être
effectuée deux fois.
x2

20
2
2
-
-POSITIONNEMENT ET INSTALLATION DES MONTANTS MURAUX
6
6
La position idéale du rail devrait se situer sur la ligne
centrale du seuil de la base, tel qu’illustré.
+45º
Note: Le bas des
montants muraux devra
être limé pour s’ajuster à
une installation sur une
unité monocoque.
Vue de face du
montant mural
Soulever l’ensemble du cadre et le
placer sur la base. Centrer le cadre
de gauche à droite, tel qu’illustré dans la
figure.
Remarque: En positionnant le cadre sur
la base, les montants muraux peuvent
être poussés plus à l’intérieur des
montants du panneaux.
1
1Avec un niveau, s’assurer que les
montants muraux sont d’aplomb et
tracer une ligne au crayon sur l’intérieur
du montant mural pour marquer sa
position sur le mur, tel qu’illustré dans la
figure.
Pendant qu’une personne maintient le
cadre de douche en position, l’autre doit
s’assurer que les montants muraux sont
en contact avec le mur. Au besoin, les
montants muraux peuvent être retirés ou
insérés. Retirer l’unité de douche de la
base et retirer les montants muraux des
montants du panneaux.
2
2
Répéter pour les deux côtés.
Replacer les montants muraux sur
le mur à la position marquée. Les
bords intérieurs des montants muraux
doivent s’aligner avec les tracés au
crayon, tel qu’illustré à la figure.
3
3
Au crayon, marquer tous les
emplacements des trous de
fixation, tel qu’illustré dans la figure.
4
4Retirer les montants muraux et
percer des trous à chaque
emplacement de fixation, tel qu’illustré
dans la figure .
Pour le montage sur carrelage en
céramique, utiliser un foret à maconnerie
de 1/4”.
5
5
Avec un pointeau, encocher la surface en
céramique aux emplacements des trous
de fixation. Percer, puis insérer les
chevilles.
Pour le montage sur une enceinte en
acrylique, utiliser un foret de 1/8”. Les
chevilles ne sont pas requises.
Replacer les montants muraux et les
fixer au mur avec des vis n° 8 x 1”, tel
qu’illustré dans la figure. Les montants
muraux sont munis de trous oublons
pour un meilleur ajustement horizontal.
Français
Table of contents
Languages:
Other MAAX Shower Cabin manuals
Popular Shower Cabin manuals by other brands

Insignia
Insignia GT8728 installation manual

Alvaro Banos
Alvaro Banos LeonS90.20-V3 Blanco installation manual

albatros
albatros CUBE Instructions for operation

AM.PM
AM.PM SENSE 6 Assembly, installation and maintenance instructions

Radaway
Radaway Classic A Assembly instruction

Glacier bay
Glacier bay WP-GBSH127 installation manual