MAC PARA Salvage SQ 110 User manual

1

2
Contents
MAC PARA COMMUNITY .......................................................................................... 2
01. FOREWORD......................................................................................................... 3
02. INTRODUCTION................................................................................................... 4
03. RESCUE CANOPY SALVAGE SQ ....................................................................... 5
04. SPECIFICATIONS ................................................................................................ 8
05. RELEASING OF THE RESCUE SYSTEM........................................................... 8
06. MAINTENANCE AND INSPECTION................................................................... 11
07. ATTACHMENT TO THE HARNESS .................................................................. 12
08. PACKING INTERVALL ....................................................................................... 13
09. PACKING MANUAL ............................................................................................ 13
10. MAINTENANCE .................................................................................................. 23
11. REPAIRS ............................................................................................................ 23
12. SPARE PARTS ................................................................................................... 23
13. WARRANTY........................................................................................................ 23
14. DISPOSAL .......................................................................................................... 23
15. RISK.................................................................................................................... 24
16. IMPLEMENTATION AND INSTALLING.............................................................. 24
17. CHANGES | PACKINTERVALL | QUALITY ........................................................ 24
INSPECTIONS AND REPAIRS................................................................................. 25
EMERGENCY OPENING REPORT.......................................................................... 26
TYPE OF RESCUE SYSTEM ................................................................................... 27
MAC PARA COMMUNITY
MACPARA.com
OficialMacPara
fb.com/MACPARA
flymacpara

3
01. FOREWORD
Dear Customer,
thank you for choosing a MAC PARA product! With the Salvage SQ you have not only
acquired one of the most modern and innovative rescue equipment, you also opted for
a brand that is committed to the sustainable use of the earth’s resources. The ecological
balance of our products is our priority.
This manual provide important information on how to maintain, throw and repack your
rescue parachute. Please read this manual carefully before installation! It has been written
to serve as a comprehensive guide for the proper handling of your reserve parachute.
If you have any questions related to the use of this rescue system, please contact
MAC PARA directly. If you need professional packing or repair service, please contact
your local dealer or MAC PARA.
The use of a rescue system is complex and it requires some practice to complete a
successful rescue deployment. For this reason, we recommend intense workout for the use
of the Salvage SQ. A perfect way for those who can learn only by themselves by repeating
the exercises in the event of an emergency in the prevailing difficult condition and react
correctly.
We hope and wish you that the Salvage SQ must be used as little as possible.
If nevertheless, the situation requires it, it should not be hesitated and the rescue device
should be activate immediately. For those rare moments we have invested all our
knowledge and our intelligence, so you can count completely on the reliability of the
Salvage SQ.
For more information about this and other MAC PARA products, please visit
www.macpara.com.
We wish you great flights and always safe landings.

4
02. INTRODUCTION
2.1 Safety Instruction
The use of this rescue system is at your own risk. The manufacturer cannot be held liable
for any personal injury or material damage related to the use of this reserve system.
The Salvage SQ is not suitable for speeds in excess of 32 m/s or 115 km/h. The
parachute, the suspension lines and their connection are not designed for an abrupt
opening, because the necessary shock absorbers are missing. Due to its design
characteristics it is not suitable for the free-fall!
An unauthorized use is prohibited. It is essential to ensure the proper installation of the
Salvage SQ in the harness. In the direct connection, a compatibility test must be carried
out by an entitled person, to exclude possible non-compatibility between the harness and
rescue device.
Only a correctly mounted rescue equipment can function properly in case of an emergency
and thus contribute to safety. In case of a release of the rescue device above water, for
example, as part of safety training, should pay attention to the fact that a harness foam
protector generates positive bouncy and can bring the pilots in the „head-down“ position in
the water.
2.2 Intended Use
This rescue systen Salvage SQ has been developed and constructed exclusively for the
paragliding sport. The deployment of the rescue device is carried out manually and is used
for the paraglider pilot and provide if need it an emergency descent. The Salvage SQ
emergency parachute is not steerable.

5
03. RESCUE CANOPY SALVAGE SQ
Through to intensive development work, we have succeeded to develop a square canopy
for the paragliding sport. The Salvage SQ is easy to pack, with a small size and weight and
has very high pendulum stability. Despite a high maximum towing capacity, we were able
to achieve very good sink rate.
3.1 The construction
Legend:
1. Canopy
2. Lines
3. Centre lines
4. Main risers
5. Packing loops (on the top side)
We only use the highest quality materials in order to achieve a unique product. All
materials used are manufactured in Europe. Sophisticated and modern production
methods after ISO 9001 guarantee the best quality and long life. Due to the low pack size
the compatibility is guaranteed with most harnesses.
1
3
2
4
5

6
3.2 Necessary documentation
Operation Manual
Inspection record
3.3 Components of the delivery
MAC PARA Salvage SQ Rescue
Salvage SQ Inner container (Tube container or 4-Leaf Container)
Salvage SQ Pack instructions (in the operations manual for free download)
Salvage SQ Inspection record
Salvage SQ Operation manual
The operation manual is available for download at www.MAC PARA.com
3.4 Quality assurance
The MAC PARA rescue devices go through a step by step control during the whole
production. After every step, the product is accurately checked and only after a successful
pass of the test the following step will be started. The fabric, the straps, lines and also the
sewing machines are verified before use. Continuous quality controls of the production
process ensure an error-free production.
Each rescue unit is subjected to a strict final inspection before it leaves our factory.
3.5 Materials used
The canopy is made of cloth specifically engineered for this application. The cloth is treated
with a material that prevents sticking, to facilitate smooth and rapid deployment. This
meets the required strengths, convinced by good workmanship and promises a longer life.
The main seams are including a webbing, which enhance the strength of the canopy.
The lines are made out of high-strength Dyneema for an enormous weight reduction. Only
the middle lines are made out of polyester. The connection of the lines to the canopy are
also made out of polyester and corresponds to the international parachute workmanship.
3.6 The Components
The Salvage SQ consists of 4 components.
the square form canopy
the suspension lines (sides and middle line)
Main riser
Innercontainer

7
3.7 Certification
The rescue system Salvage SQ by MAC PARA is certified EN and LTF to the EN
12491:2001 and LTF 91/09 standards. The approval is valid only in use with the original
MAC PARA Tube or 4-Leaf innercontainer. Use of any other inner container may produce
different results, including failures. When using a Salvage SQ in the context of a non-
original innercontainer please note the corresponding Release Note in the appendix of this
manual.
3.8 Operational limits
WARNING!
The rescue systems Salvage SQ is not suitable for use at speeds in excess of
32 m/s (115 km/h).
MAC PARA require a mandatory, one-year repacking interval for your parachute reserve.
Shorter intervals than the one-year minimum requirement, to more often air out and repack
your rescue, helps to keep your rescue in good condition.
However, we recommend every 24 months a review of the rescue system.
After each case of a real emergency opening the Salvage SQ rescue device should be
checked by the manufacturer. Permissible operating time: 10 years in compliance with the
pack intervals and storage regulations. An extension up to 12 years is possible after an
inspection of the manufacturer.

8
04. SPECIFICATIONS
Salvage
SQ 110
Salvage
SQ 130
Salvage
SQ 160
Min. Load [kg] 73 kg 87 kg 106 kg
Max. Load [kg] 110 kg 130 kg 160 kg
Weight of the parachute [kg] 1,05 kg 1,20 kg 1,70 kg
Surface [m²] 23,0 m² 27,3 m² 40,0 m²
Sink rate at max. Load [m/s] EN 5,49 m/s EN 5,49 m/s EN 5,35 m/s
Test method LTF / EN LTF / EN LTF / EN
Pattern test number EP_346.2023 EP_347.2023 EP_348.2023
Volume [cm³] 2.90 incl. lines 3.70 incl. lines 5.300 incl. lines
05. RELEASING OF THE RESCUE SYSTEM
The rescue system is very often literally the lifesaver the “Second Chance“ for the
paraglider pilots. In the close flown airspace of many flying areas a collision should not be
underestimated as a danger on good flying days. Collisions with other aircraft are one of
the principal reasons to pull the rescue parachute. Disturbance in the glider as cravats,
which leave the glider in spirals, fast twisted rotation movements or line breaks that make
the steering of the glider impossible are other good reason for throwing the rescue.
Before each flight, check all straps securing the rescue and the front container to the
harness (where applicable). Ensure that the container is securely closed, and visually
inspect that the safety pins are properly seated & secured and that there is no damage.
5.1 Deployment oft the rescue canopy
You grab the handle of the rescue and throw the canopy with a strong lively movement
slightly backwards. The more hard the movement precipitates, the faster the lines stretches
themselves and pulls the canopy out of the container.

9
5.2 After the opening
When the reserve opens (usually behind the pilot) the glider is momentarily unable to fly,
any prior rotation stops immediately. The rescue rises above the pilot, the glider dives
forward or sideways. Now you must immediately attempt to deform the glider strongly (B-
or C-Stall, or pull one line in) that the glider disturbs the rescue in his movements as little
as possible. If one does nothing at all, the glider rises above the pilot, the rescue shifts
backwards and cannot carry properly. This can occur to the dreaded scissoring position
(Down Plane) when the glider and the rescue are at an angle of 45º to each other. The
rescue canopy carries now only one part of the load, the rate of descent is dangerously
high. Try to deflate the glider and don´t let it fly anymore (B- or C-Stall, pull one line in). If
the paraglider flutters only like a flag upwards, the rescue canopy can carry widely
undisturbed and freely of pendulum.
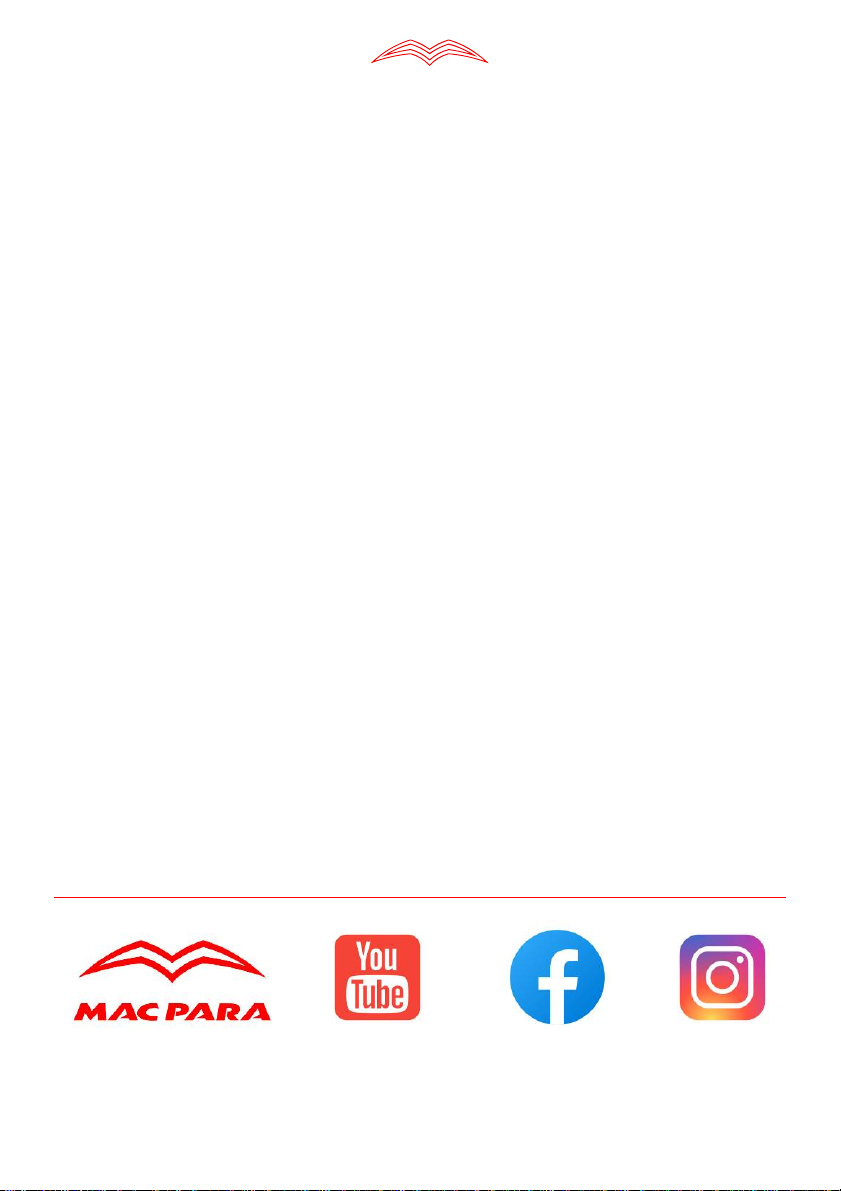
5.3 The scissors position
The Salvage SQ is extremely pendulum stable as a square canopy can be. Nevertheless,
the danger of a scissor position (Down Plane) should be reduced by stabilizing the
paraglider or its retraction.
A scissor position increases the rate of descent and produce an oblique pilot
position when landing and increases the risk of injury!
5.4 Landing with the rescue system
Especially when triggered at low altitude the upright position in the harness is important. If
you have a shoulder mount to the harness, it usually brings you in an upright position. It is
essential to ensure that the paraglider is not deforming the rescue system just before the
ground.
It is important to note the following when landing on the rescue:
Upright pilot position
Legs together and knees slightly bent
be ready to roll over yourself

10
5.5 Potential errors and hazards
Error in the Deployment Rescue response/hazard: Pilot reaction:
Release handle
can not be achieved
Rescue can not be
triggered
Compatility-Check after
each complete new
Closure on the outer
container can not be
opened
Rescue can not be
triggered
C-Check after each
complete new installation
Inner container is not
thrown away aggressively
Rescue does not open or
very delayed
strongly pull on the lines or
riser of the rescue, pull
No deformation of the
paraglider
Scissor position, strong
commuting, uncontrolled
impact
Deform the gilder, get rid
of the glider (Quick-Out)
Too much concentration
on the glider, pilot forget
the upright position
pendulum, uncontrolled
landing
Occupy upright pilot
position, prepare for
landing
During the landing legs not
together, wrong pilot
position
Uncontrolled landing
Ouch!!!

11
06. MAINTENANCE AND INSPECTION
Before each packing the parachute must be inspected by the person who is packing it.
If the rescue system has been deployed in an emergency situation or during a safety
training, it has to be re-checked by the manufaturer or by an authorised service centre.
It must also be thoroughly inspected by a competent person after every larger stress
exposure (e.g. a tree landing).
6.1 Behavior if damaged
If a check of the rescue system found some damage which affect the airworthiness of the
device, the rescue system has to be send to the manufacturer for repair. This also applies
to damages whose impact on the airworthiness of the system and cannot be uniquely
determined.
6.2 Storage
A rescue device exists to save the life of the owner. It needs careful maintenance and care.
UV radiation, moisture and chemicals are the worst enemies of your Salvage SQ rescue
system. Oils, greases, acids and dyes must not be stored in close proximity to the rescue
system. Avoid unnecessary burdens and let your Salvage SQ never unnecessarily lying in
the sun. The rescue equipment should be dried in clean, dry and dark rooms. Rescue
packages that are no longer used should be stored loosely rolled in a bag.
6.3 Cleaning and drying
Dirty canopies and containers can be washed with clean clear water. Acids and mildew can
affect the strength of the components. Such polluted parachutes have to be sent to the
manufacturer for investigation and repaired if necessary.
6.4 Repairs
The manufacturer or an authorised service centre must perform all repairs. Spare parts are
available by the manufacturer.
6.5 Correct disposal of the rescue equipment
As an environmentally conscious manufacturer of rescue equipment we pay great attention
to produce our products Eco social tolerated. The material we use in our products is
evaluated according to environmental criteria and subject to constant control. For the
proper disposal the steel fittings should be separated at the metal disposal point. The
canopy, the lines and straps can be disposed with household waste.

12
07. ATTACHMENT TO THE HARNESS
The Salvage SQ is only available with the short bridle option. The short bridle option is for
harnesses that already have reserve bridles in place.
The Salvage SQ must be connected with a carabiner. Direct connection between the main
riser and the harness bridle is not recommended, as a wrongly installed knot or shock
opening could significantly weaken the system depending on the configuration!
When using a connection carabiner the breaking load of the carabiner must have a min. of
2400 daN. The carabiner has to be secured on both sides with rubber bands or O-rings by
means of a Larks Head knot, with fixing tape or a neoprene jacket to protect against fraying
and abrasion.
It is important to ensure that the connection is centred, that is, the two connecting lines
leading to the shoulder straps are of the same length. If the harness does not have an
integrated/ designated attachment points for the reserve chute on the shoulder straps, then
the reserve chute connecting line can, alternatively, be attached to both main carabiners. If
using the main carabiners, again ensure that the connection is centred(equidistant
connecting lines).
COMPATIBILITY TEST
Each new combination of harness and rescue has to be checked (Compatibility Check)
after the first packing by the manufacturer or by an expert or compatibility-testing authority.
Please refer to the harness or the front container user’s manual if available. This
requirement is necessary to make sure that no unsuitable harnesses with integrated outer
containers are used in combination with our reserve. Deploying the rescue system has to
be possible out from each flying position according with the requirements of the building
regulation. It should be noted that the release force of 7daN is not exceeded.
Please refer to the harness or the front container user’s manual if available. This
requirement is necessary to make sure that no unsuitable harnesses with integrated outer
containers are used in combination with our reserve.
Be careful with back protector manipulation in your harness when the rescue parachute is
already installed. Depending on the design of the harness, protector positioning or the
rescue parachute container may affect the ability to easily pull the rescue parachute out.
After any changes it is absolutely essential to do a simulated deployment under a static
swing, ensuring that the parachute release system operates correctly and the parachute
comes out easily.

13
08. PACKING INTERVALL
Ideally our parachute should be repacked every 6 months, preferably by a qualified
professional to ensure best operation. Maximal interval is 12 months. It makes sense when
you throw the rescue package for training on this occasion in a clean, dry space.
Before the rescue is repacked it must be subjected to a visual inspection by the packer.
The reserve parachute must therefore be aired at a humidity of 60-65% for 24 hours.
The packing shall be done as possible on a packing table, but at least on a clean, antistatic
surface. The following photos below are from packling the Salvage SQ. We remind you
that you fly at your own risk. This also applies to the use of this life-saving device.
09. PACKING MANUAL
Before you start to pack, the Salvage SQ should be checked for any damage to the
canopy, the lines and the main riser. The lines should be checked for proper performance
and to unravel if necessary. The Salvage SQ is a square canopy and has four corners.

14
3) Attach the line on a fixed point.
6) Separate the right panels apart from
the left panels.
2) Move packing loops to get them
closer.
5) When you put the main rescue lines
under tension, the 4 corner lines are
loose.
SALVAGE SQ 110, SALVAGE SQ 130 - PREPARATION FOR PACKING
1) String the packing loops on a line.
4) Separate the lines of the two halves
of the canopy on each side of the
centre thicker white lines.

15
3) Attach the line on a fixed point.
6) Separate the right panels apart from
the left panels.
2) Move packing loops to get them
closer.
5) When you put the main rescue lines
under tension, the 4 corner lines are
loose.
SALVAGE SQ 160, - PREPARATION FOR PACKING
1) String the packing loops on a line.
4) Separate the lines of the two halves
of the canopy on each side of the
centre thicker white lines.

16
9) 1st & 2nd can be laid in perfect
rectangles.
12) Bring the 4th panel to the right.
8) It is the 1st panel on the right.
11) Pull the upper edge of the corner
slot towards the top of the canopy to
stretch the corner line.
7) The bottom panel should be sorted
out to the right.
10) 3rd & 4th panels are corner panels;
stretch out those two panels to the right
and to the left perfectly balanced.

17
15) 9th & 10th panels are corner panels
again; stretch out those two panels to
the right and to the left perfectly
balanced.
18) 9th and 10th panels do have a
peculiar shape (see dashed line).
14) 5th, 6th, 7th & 8th panels can be
laid in perfect rectangles.
17) Bring the 10th panel to the right.
13) 3rd and 4th panels do have a
peculiar shape (see dashed line).
16) Pull the upper edge of the corner
slot towards the top of the canopy to
stretch the corner line.

18
21) 1st & 2nd panels can be laid in
perfect rectangles.
24) Bring the 4th panel to the left.
20) Bring all the remaining left panels to
the right over the right panels.
Left panels are sorted out exactly
like the right panels; visually
speaking, the look of the panels
23) Pull the upper edge of the corner
slot towards the top of the canopy to
stretch the corner line.
19) 11th & 12th can be laid in perfect
rectangles; they are the last panels on
the right side.
22) 3rd & 4th panels are corner panels;
stretch out those two panels to the right
and to the left perfecly balanced.

19
27) 9th & 10th panels are corner panels
again; stretch out those two panels to
the right and to the left perfectly
balanced.
30) 9th and 10th panels do have a
peculiar shape (see dashed line).
26) 5th, 6th, 7th & 8th panels can be
laid in perfect rectangles.
29) Bring the 10th panel to the left.
25) 3rd and 4th panels do have a
peculiar shape (see dashed line).
28) Pull the upper edge of the corner
slot towards the top of the canopy to
stretch the corner line.

20
33) Front view of the Z-folding of the
left panels.
36) Position the inner container with the
elastic towards the top of the canopy.
32) Z-coil the left panels under the
middle of the canopy.
35) Canopy is now narrower and its
width matches the width of the inner
container.
31) 11th & 12th can be laid in perfect
rectangles; they are the last panels on
the left side.
34) Z-fold the right panels over the
middle of the canopy.
This manual suits for next models
2
Table of contents
Other MAC PARA Safety Equipment manuals