Madimack GT560 User manual

Madimack GT560
Installation and Operation Manual
Madimack Installation Manual GT560.indd 1Madimack Installation Manual GT560.indd 1 19/5/2023 5:06 pm19/5/2023 5:06 pm

WARNING
Adherence to the directions for use in this
manual is extremely important for health
and safety. Failure to strictly adhere to the
requirements in this manual may result in personal
injury, property damage and affect your ability to
make a claim under Madimack’s warranty provided
with your product. Products must be used, installed
and operated in accordance with this manual. You
may not be able to claim on the manufacturer’s
warranty in the event that your product fault is due
to failure to adhere this manual.
CONGRATULATIONS AND THANK YOU FOR
PURCHASING OUR GT560.
THIS MANUAL CONTAINS IMPORTANT
INFORMATION THAT WILL HELP YOU IN
OPERATING AND MAINTAINING THIS PRODUCT.
PLEASE READ THE MANUAL CAREFULLY
BEFORE INSTALLATION & OPERATION
AND RETAIN IT FOR FUTURE REFERENCE.
Contents
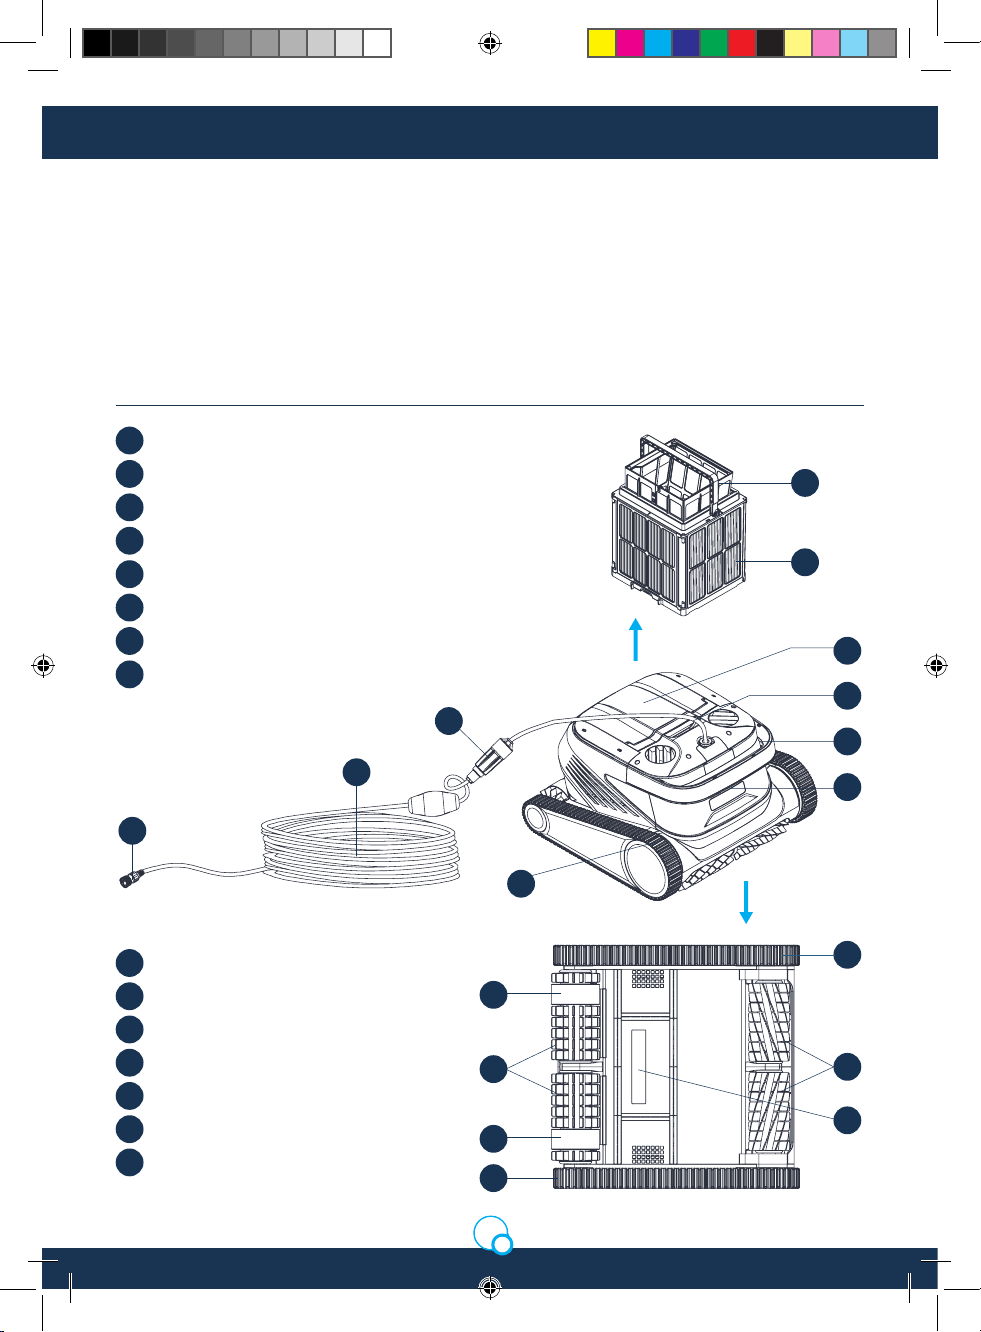
1. Main Components .......................................................03
1.1 Cleaner ......................................................03
1.2 Control Box ......................................................04
1.3 Nylon Mesh Filter Board ......................................................04
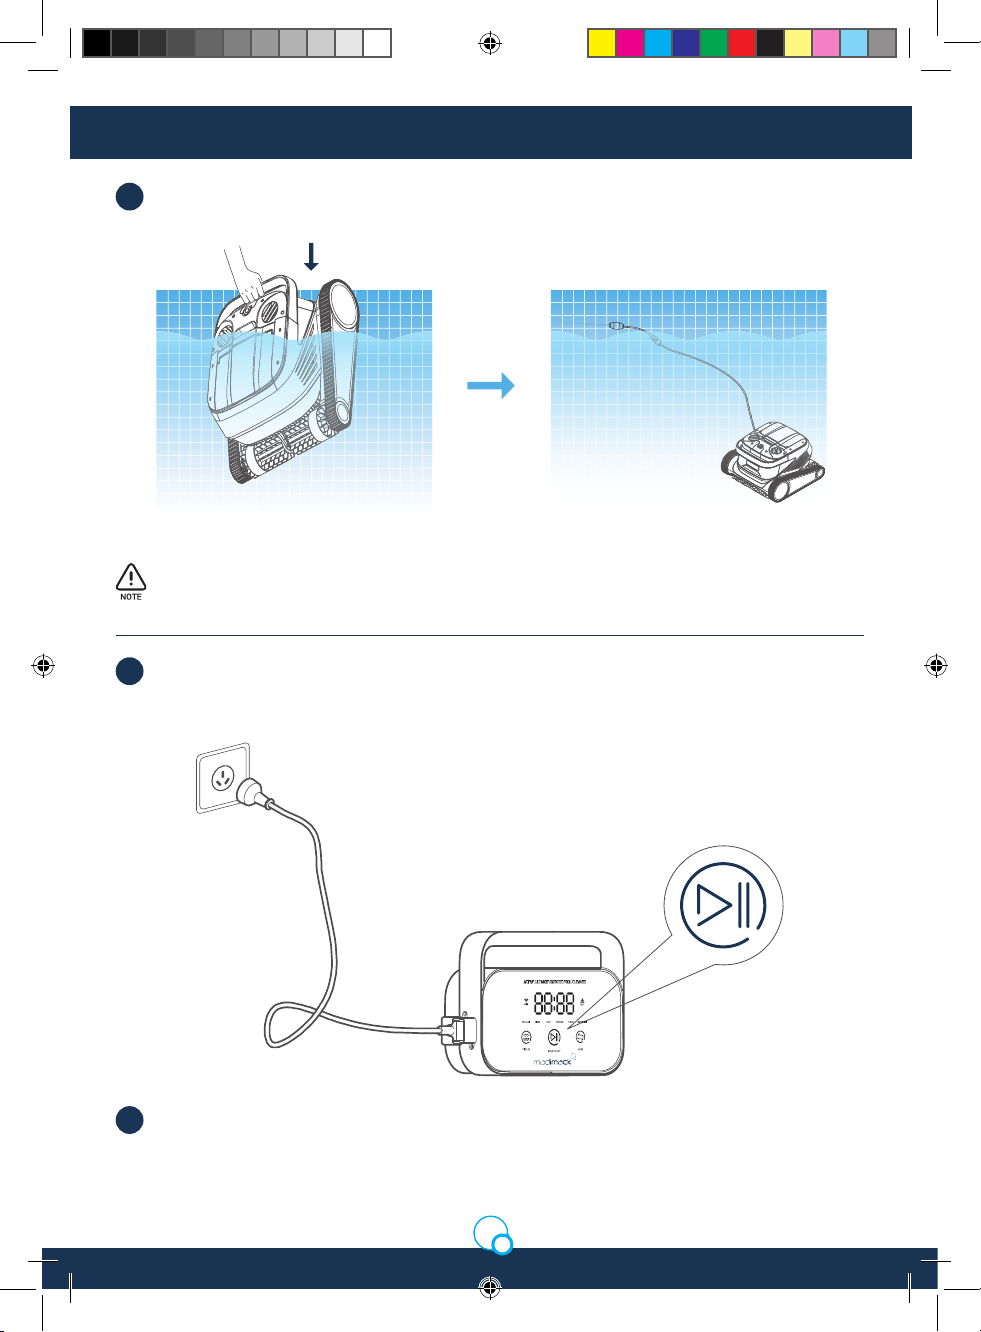
2. Connection and Operation ......................................................05
2.1 Preparation Before Cleaning..................................................05
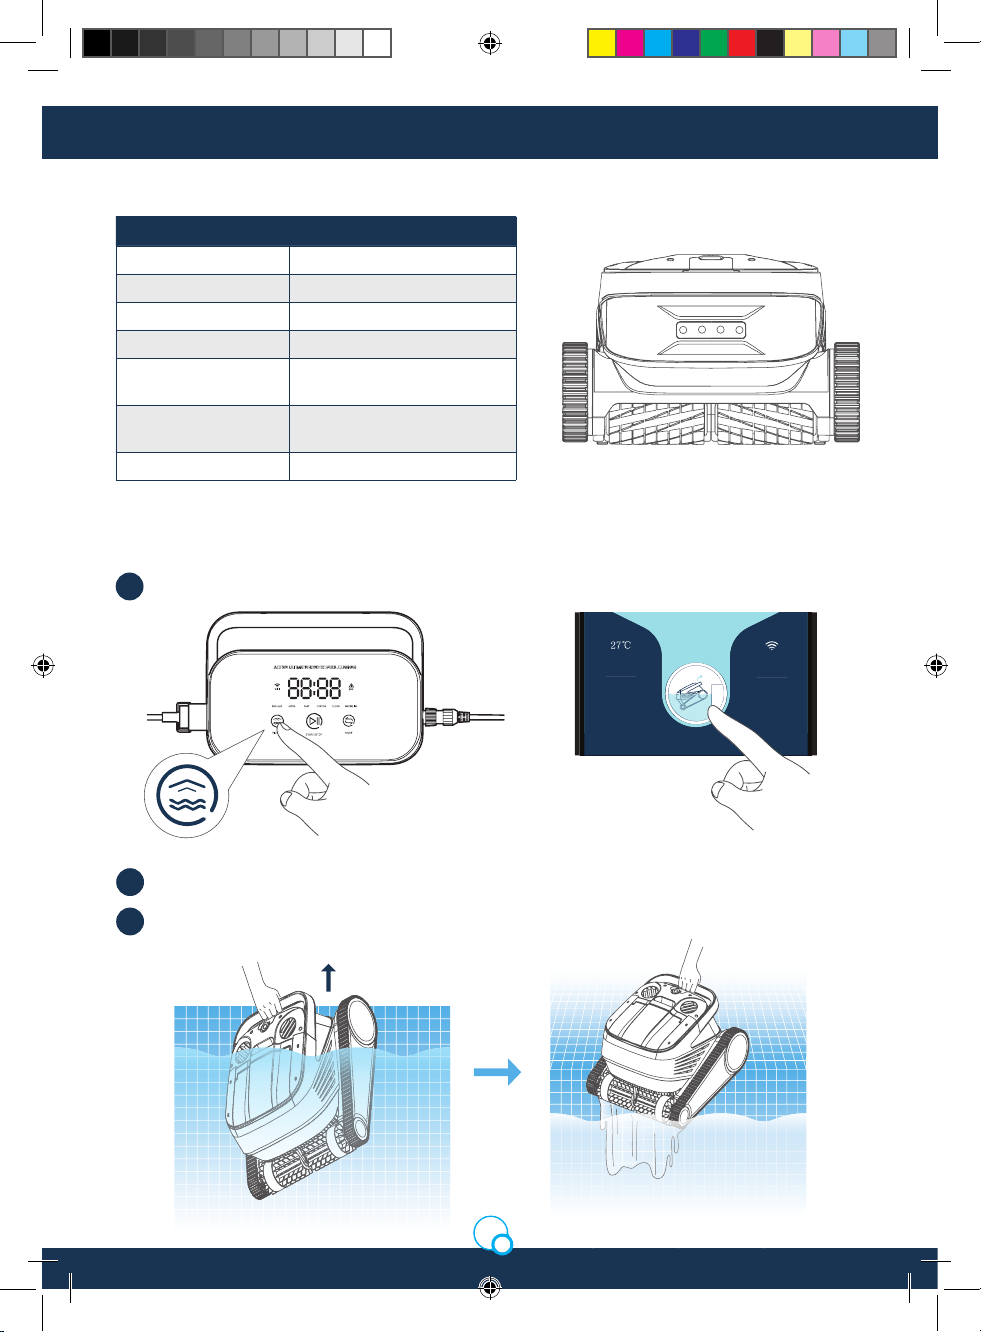
2.2 Control Box ......................................................07
2.3 Indicator Light of the Cleaner................................................08
2.4 After Cleaning ......................................................08
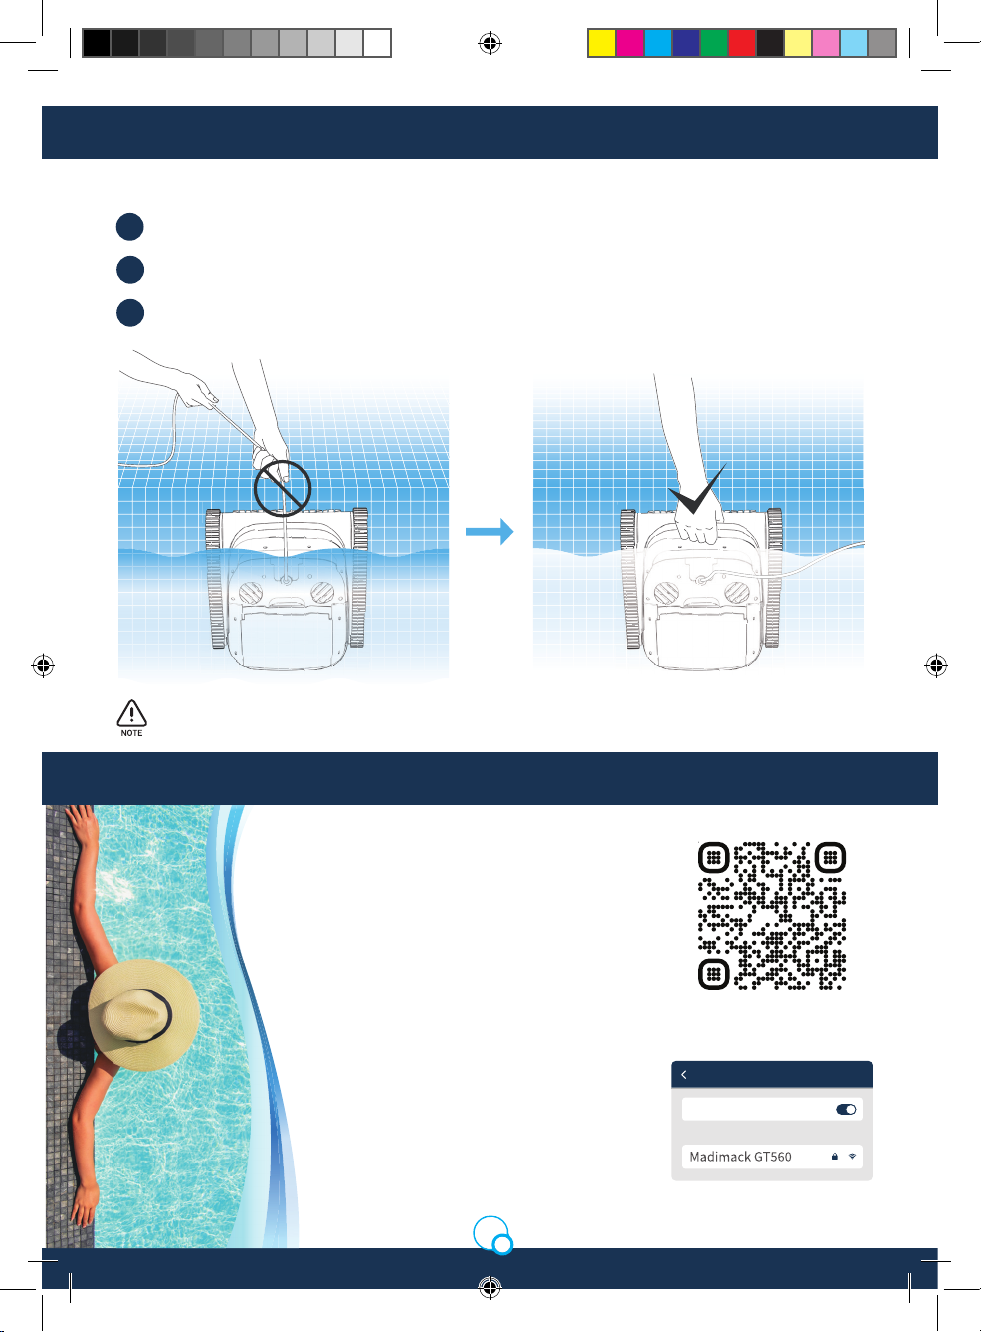
3. APP ......................................................09
3.1 Download Madimack APP......................................................09
3.2 Wi-Fi Connection ......................................................09
3.3 Homepage ......................................................10
3.4 Timer ......................................................10
3.5 Manual Mode ......................................................11
3.6 Me ......................................................11
4. Daily Maintenance ......................................................11
4.1 Clean the Filter Basket ......................................................11
4.2 Disassemble and Replace the Filter Board.........................12
4.3 Storage ......................................................13
5. Fault Information ......................................................13
6. Fault Codes ......................................................13
7. Warranty and Exclusions ......................................................14
Madimack Installation Manual GT560.indd 2Madimack Installation Manual GT560.indd 2 19/5/2023 5:06 pm19/5/2023 5:06 pm

3
5
4
11
12
14
14
13
15
15
2
3
1
9
8
7
6
10
Indicator Light
Drive Wheel
Active Brush
Driven Brush
Water Inlet
Slip Ring
Track
11.
12.
13.
14.
15.
9.
10.
Connector Assembly of the Buoyancy Cable
The Buoyancy Cable
Swivel
Net Inner Filter
Filter Basket (Including 4 Pieces Filter Boards)
Top Cover
Water Outlet
Handle
1.
2.
3.
4.
5.
6.
7.
8.
1.1 Cleaner
Madimack GT560 is an automatic swimming pool robotic cleaner specially created for cleaning swimming
pools, substituting traditional cleaning methods of swimming pool oors, walls and waterline with an
automatic, fully featured, ecient cleaning solution.
Equipped with Madimack’s S-Clean technology, GT560 is suitable for all in-ground swimming pool surfaces
and multiple shapes. Its dual-precision lter screen also lters pool water dirt and pollutants. It comes
equipped with the Madimack App, providing users with a more intelligent, convenient and economic cleaning
method for their pool.
1. Main Components
Madimack Installation Manual GT560.indd 3Madimack Installation Manual GT560.indd 3 19/5/2023 5:06 pm19/5/2023 5:06 pm

4
1. Main Components
1.3 Nylon Net Filter Board (1F&2B)
(In addition to basket boards)
1.2 Control Box
Notices
.
WARNING
WARNING
Please read the Instruction for Use carefully, and use this product according to the Instruction for Use.
Our company is free of liability for any loss or injury from improper use.
Unless supervised by parents on site, children are forbidden from getting close to and using this
product.
WARNING
Not suitable for above ground steel walled vinyl lined pools.
The cleaner can be used in swimming pool water only, not in other working environment; when the
cleaner is working, personnel is forbidden from entering the swimming pool.
WARNING
Only professional personnel of distributors with authorisation and training are allowed to disassemble,
replace and repair parts of this product, otherwise, this product may lose warranty rights, and may
cause personal injury.
WARNING
Protection grade of the control box is IP54. The control box should be used in a dry and shady place
more than 3m away from the pool edge and more than 0.1m above the ground, away from direct
sunshine. In addition, the control box shall be reliably grounded, and must be connected to circuit
with Ground Fault Circuit Interrupter for use, and before use, GFCI shall be tested for normal work.
2
3
4
1
Power Plug 4
Power Cord
1.
2.
3.
4.
Display & Operation Panel
Interface of the Buoyancy Cable
Madimack Installation Manual GT560.indd 4Madimack Installation Manual GT560.indd 4 19/5/2023 5:06 pm19/5/2023 5:06 pm

5
1. Main Components
2. Connection and Operation
Place the control box in a shaded and dry place at least 3m away from
the pool edge, to avoid direct sunlight.
Lay out the cleaner’s buoyancy cable straight without any twists, and then
insert one end of the buoyancy cable into right interface of the control box, and
tighten the nuts.
2.1 Preparation Before Cleaning
The control box should be placed on a table or other platform off the ground.
Do not use this product in the swimming pool immediately after or during the adding of chemicals and
salt. Do not operate with liquid occulating agent or other clarifying agents, otherwise, it may block or
damage lter components of the cleaner.
The cleaner and the control box may power off automatically due to triggering of high-temperature
if used in working temperature beyond stipulation or subject to high-strength and extended direct
sunlight, which may cause damage to the product in severe conditions.
When the cleaner is working, please do not
touch the rotating components with hands
directly.
Please use the cleaner in the following
specied environment:
Hold the handle when placing the cleaner into water or taking it out of water, do not lift the cleaner out
of the pool pulling the buoyancy cable directly.
Working Depth 0.8-5m
pH 7-7.8
Chlorine Maximum 5ppm
Working Temperature 10-35 °C
Salt Maximum 5000 ppm
1.
2.
Madimack Installation Manual GT560.indd 5Madimack Installation Manual GT560.indd 5 19/5/2023 5:06 pm19/5/2023 5:06 pm

6
2. Connection and Operation
Hold handle of the cleaner and place it in water slowly, wait until the cleaner is fully immersed in water
and discharges no air, and conrm that the buoyancy cable is not knotted or tangled by an obstacle.
Only allow enough cable for the robotic cleaner to reach the furtherest point of the pool +1metre.
This will allow the robot to swivel and reduce cable tangling.
a) Insert power line on the left of the control box into the power supply (AC 100-240 V / 50-60 Hz).
b) At this time, START/ STOP button of the control box will be yellow, while the cleaner enters standby
status.
Only put sucient cable into the pool so the cleaner can reach the furthest point + 1 metre. All excess
cable should be outside of the pool water. This will allow the cleaner to reach all areas of the pool
whilst providing some tension for the swivel to operate as intended.
3.
4.
5.
Madimack Installation Manual GT560.indd 6Madimack Installation Manual GT560.indd 6 19/5/2023 5:06 pm19/5/2023 5:06 pm

7
2. Connection and Operation
Basic functional operations of the cleaner
can be performed via the control box (more
functions can be experienced using App),
after selecting corresponding mode, the
cleaner can start automatic cleaning of the
swimming pool by clicking START/STOP.
Interface function and indicator light.
2.2 Control Box
1.
2.
Identication Description Light Status
Button
START/
STOP
Short Press:
Start/Suspend;
Long Press:
Stop
The yellow light is on when stopped
cleaning;
The green light is on when starting to clean;
The green light ickers when suspending
the cleaning;
The red light is on in case of abnormality
with the control box;
The red light ickers in case of abnormality
with the cleaner.
Pick up Short Press: enter the one-
button pick up mode
The light is on when
entering Pick up Mode.
Mode
Switching
Short Press: switch the
cleaning mode (custom
mode shall be set in APP)
The light is on upon
selection.
Indicator
Light
WiFi
Connection
status of the
control box
and WiFi
The light ickers when the mobile phone/
tablet WiFi has access to the control box;
and the light is on after the APP connects
to the cleaner.
Error The cleaner and the control
box prompt error The light ickers in case of
abnormalities
REGULAR Standard
Mode
2h; pool bottom, pool wall
and waterline
ULTRA Enhancement
Mode
3h; pool bottom, pool wall
and waterline
If selecting this mode, light
of corresponding mode will
be on
FAST Rapid Mode 1h; pool bottom, pool wall
and waterline
CUSTOM Custom Mode Set in APP
FLOOR Pool Bottom
Mode 2h; pool bottom
WATER
LINE
Waterline
Mode 2h; pool wall and waterline
Countdown
Display
Cleaning
Countdown
Displays the remaining
cleaning time /
Madimack Installation Manual GT560.indd 7Madimack Installation Manual GT560.indd 7 19/5/2023 5:06 pm19/5/2023 5:06 pm

8
2. Connection and Operation
The Control Box App
Click “One-button Pick up” in the control box or App.
2.3 Indicator Light of the Cleaner
2.4 After Cleaning
Metod 1:
1.
Light Status Description
White light on Self-inspecting
Yellow light on Standby in water
Purple light on Not placed in water
Green light ickers Cleaning suspended
Green light on in a
circular way Cleaning
Yellow light is on in
a circular way The lter basket is blocked
Red light ickers Abnormal errors of the cleaner
Wait for the cleaner to get close to waterline position of the swimming pool automatically.
2.
Hold the handle of the cleaner to pull it out of the water surface, and hang it above the water surface for
10-20s to empty the water inside it.
3.
One-key Pick u p
Connected
Temperature
Madimack Installation Manual GT560.indd 8Madimack Installation Manual GT560.indd 8 19/5/2023 5:06 pm19/5/2023 5:06 pm

9
3.1 Download Madimack APP
Madimack App: (applicable to iOS 9.0/Android
4.4 and above versions) Scan the QR to
download or visit iOS App Store/Google Play/
Ocial Website of Madimack for downloading.
3.2 Wi-Fi Connection
Turn on control box and nd “Madimack GT560”
on your mobile device setting tab “network
selection” and wait for 10-15s, to connect to
Madimack GT560.
Wi-Fi Password: Enter your Wi-Fi password.
2. Connection and Operation
Stop the cleaner.
Metod 2:
1.
Pull the buoyancy cable slightly to enable the cleaner in water to move to water side slowly.
2.
Hold the handle of the cleaner to pull it out of the water, and hang it above the water surface on
pools edge for 10-20s to empty the water inside it.
3.
Do not pull the buoyancy cable directly on water surface, so as to avoid fracture and damage.
3. APP
Wi-Fi
Setting Wi-Fi
Select network
Madimack Installation Manual GT560.indd 9Madimack Installation Manual GT560.indd 9 19/5/2023 5:07 pm19/5/2023 5:07 pm

10
8:30
Timing/Delay
Delay
Enable your cleaner to start
Create Delay Cleaning
Enable your cleaner to start auto
cleaning within designated time
Create timed cleaning
Timing
8:30
Timing/Delay
Modify Timin
g
Start Auto Cleaning
Repeat
Cleaning Mode
waterline and pool wall
Monday, Tuesday, Wednesday,
Thursday, Friday, Saturday
modifying the delay
Start to clean after
8:30
Create timed cleaning
Set times cleaning time
8:30
Create Delay
Standard mode (2h)Cleaning Mode
Set delayed cleaning time
MinutesHours
3. APP
3.3 Homepage
Switch to Required Mode
Connection status
of the control box
One-button pick up
(available when the
cleaner is in water)
OR
Custom Mode
Complete Scheduled
Cleaning Plan
Enter Create Delay Interface
Enter Create Timing Interface
Create Scheduled
Cleaning Plan
Cleaner status
Start cleaning
Water
temperature
Mode
switching
8:30
Normal Mode (2h)
Homepage Appointment Manual Mine
One-key Pick u p
Standby
Start Cleaning
Connected
Temperature
8:30
Select the cleaning mode
Select shape of the swimming pool
Square Round Other Shape
8:30
Square Round Other Shape
Normal Mode
Normal Mode (2h)
Pool bottom, pool wall and waterline
Rapid Mode (1h)
Pool bottom
Enhancement Mode (2h)
Pool bottom, pool wall and waterline
Custom Mode
3.4 Timer
When the cleaner is in standby state and is placed in the swimming pool, create scheduled cleaning for
unattended operation.
Madimack Installation Manual GT560.indd 10Madimack Installation Manual GT560.indd 10 19/5/2023 5:07 pm19/5/2023 5:07 pm

11
8:30
Manual Mode
Homepage Appointment Manual Mine
Mode
switching
Control movement
of the cleaner via
a remote-control lever
3. APP
4. Daily Maintenance
3.5 Manual Mode
4.1 Clean the Filter Basket
3.6 Me
Open top cover of the robot, and take out the lter basket.
1.
Flush inside and outside of the lter basket with a water gun at low to medium pressure.
2.
Place the lter basket back into the cleaner upon cleaning.
3.
Before cleaning, the cleaner shall be disconnected from the power supply rst, and the lter basket
shall be cleaned every time after use, so as to avoid impact on the cleaning performance.
8:30
Me
Homepage Appointment Manual Mine
Store
Video Teaching
History
Firmware Upgrade
Help and Feedbac k
Setting
About
Madimack Installation Manual GT560.indd 11Madimack Installation Manual GT560.indd 11 19/5/2023 5:07 pm19/5/2023 5:07 pm

12
4. Daily Maintenance
4.2 Disassemble and replace the filter board
Take net inner out of the lter basket rst.
1. Disassembly: Press the lter basket with
hands, and then pull out the lter boards
surrounding the lter basket in the sequence
of 1F 2B 3L 4R upward.
2.
Installation: Install the new lter board in the lter basket in the sequence of
4R 3L 2B 1F, and then the replacement is completed.
3.
4.3 Storage
If the cleaner is not used for a long time, please operate according to the following steps:
1. Clean the lter basket and the lter board thoroughly, and then place them in the cleaner.
2. Roll up the buoyancy cable without knots.
Store in shaded and dry place at 5-45°C.
3.
Madimack Installation Manual GT560.indd 12Madimack Installation Manual GT560.indd 12 19/5/2023 5:07 pm19/5/2023 5:07 pm

13
5. Fault Information
Fault Phenomena Possible Causes Exclusion Method
The buoyance cable
fails to be fully
stretched.
Too much cable on the pool.
Unplug power line of the control box, and
re-arrange the buoyancy cable laying
straight in sunlight.
The buoyancy
cable is knotted
The buoyancy
cable is knotted
There are obstacles in the swimming pool. Remove the obstacles.
The cleaner runs for a long time
without being removed from the pool.
Unplug power line of the control box, and
re-arrange the buoyancy cable laying
straight in sunlight.
The cleaner is
not starting
There is no voltage output from the wall
socket.
Inspect whether there is voltage with the
socket on the wall.
The power line fails to be properly inserted. Insert the power line rmly.
The buoyancy cable fails to be
properly connected.
Inspect whether both ends of the buoyance
cable are normally connected.
The track is stuck by foreign matters. Check whether the track is stuck and
remove the foreign matters.
The track falls off. Re-install the track on the drive wheels.
The cleaner is not placed in water. Put the cleaner into water.
The cleaner or the control box is faulty. Check the error code and contact
Madimack after-sales.
The cleaner moves
but fails to clean
the swimming
pool effectively
The lter basket is blocked. Clean the lter basket.
The impellers are blocked by
foreign matters.
Inspect whether the impellers are stuck
and remove the foreign matters.
The cleaner can’t
climb the wall
The impellers are blocked by foreign
matters.
Inspect whether the impellers are stuck
and remove the foreign matters.
The temperature or pH value is improper. Use in swimming pool conforming to
required temperature and PH.
Algae on the wall. Inspect chemical substance content in
water and scrub the wall.
The cleaner only
cleans a part of
the swimming
pool
The control box is unreasonably
positioned.
Place the control box in appropriate
position, enabling it to reach various
regions of the swimming pool.
The buoyancy cable is not long enough. Unplug power line of the control box, and
re-arrange the buoyancy cable.
The lter basket is blocked. Clean the lter basket.
There are obstacles in the swimming pool. Remove the obstacles.
6. Fault Codes
C:00 Robot is out of water
E:00 Communications error
E:01 Abnormal power voltage
E:02 Accelerometer abnormal
E:03 Gyroscope Abnormal
E:15 Left drive motor blockage or failure
E:25 Right drive motor blockage or failure
E:16 Left pump motor blockage or failure
E:26 Right pump motor blockage or
failure
E:07 Abnormal air pressure in main cabin
No power Check power supply
Madimack Installation Manual GT560.indd 13Madimack Installation Manual GT560.indd 13 19/5/2023 5:07 pm19/5/2023 5:07 pm

7. Warranty and Exclusions 2
YEAR
ON ALL PARTS
Standard Conditions
Australia and New Zealand Madimack Pool products. Pty Ltd, distributes Pool products and provides the following
warranties:
Statutory Rights
1. The benets to the consumer under this warranty are in addition to other rights and remedies of the consumer
under the laws in relation to the goods and services to which the warranty relates; and
2. Our good come with guarantees that cannot be excluded under Autralian Consumer Law.
You may be entitled to a replacement or refund for a major failure and for compensation for any other loss or
damage. You are also entitiled to have the goods repaired if the goods l to be of acceptable quality and the
failure does not amount to a major failure.
Limited Warranty
Madimack warrants that its products are free from defects in materials and manufacture for 2years limited from
date of supply by Madimack plus 90 days allow for installation and supply (unless otherwise specied). Madimack
will at its discretion, except in the circumstances described below, other repair or replace any product proven to
be defective during warranty period for either materials or manufacture or alternately pay the cost of repair or
replacement within 90 days of the receipt of the defective product, barring unforeseen delays. This warranty is for
domestic installation only, is personal to the original purchaser and does not pass any subsequent purchaser(s).
— Consumable components such as brushes, basket, lters, slip rings drain, vacuum aps, carry a 12 month
warranty.
—To the extent permitted by law, Madimack will not be liable for products which fail or become defective during
the warranty period as a result of freezing, accident, negligence, improper installation, water chemistry, misuse,
tampering or lack of care.
—To the extent permitted by law, except as set out in this Warranty, Madimack excludes all statutory or implied
conditions and warranties and any other liability it may have to the Customer (including liability for indirect
consequential loss) that may arise under statute or at law including without limitation for breach of contract, in
tort (including negligence) or under any other cause of action.
—To the extent permitted by law, except as set out in this Warranty, Madimack limits its liability under any condition
or warranty which cannot be legally excluded in relation to the supply of Goods and Services to:
1. Reparing the Goods;
Replacing the Good or Supplying equivalent Goods or Services again;
Paying the cost of replacing the Goods or of supplying equivalent Goods or Services again; or
Paying the costs of repairing the Goods.
2.
3.
4.
What To Do If You Have Warranty Claim
—The faulty product is to be retured to the place of purchase, or where installed by an approved agent to an
authorised warranty agent.
—No returns will be received directly from end consumers by Madimack.
You are responsible for arranging removal of the defective product and arranging installation of the repaired or
replacement product, all transportation (and any applicable insurance costs) of transporting the products to the
supplier and transporting the replaced or repaired product from the supplier. All returns are subject to Madimack’s
written approval and must be accompanied by either:
1. A Field Inspection Report authorised by the Local Customer Service Manager or Authorised Agent; or
A “Return Goods Authorisation” from Madimack prior to shipment.
2.
This guide may be updated without notice.
Visit the ofcial Madimack website for the latest version: https://www.madimack.com.au
Madimack Installation Manual GT560.indd 14Madimack Installation Manual GT560.indd 14 19/5/2023 5:07 pm19/5/2023 5:07 pm
Table of contents
Other Madimack Swimming Pool Cleaner manuals
Popular Swimming Pool Cleaner manuals by other brands

Bionizer
Bionizer Eco - Oxidizer Instruction book

Elecro Engineering
Elecro Engineering QUANTUM PRO QP-65 Installation & operating manual

Rainbow
Rainbow Zodiac CX20 owner's manual

Winny
Winny HJ1009 manual

Pentair Pool Products
Pentair Pool Products Kreepy Krauly Kruiser Installation and user guide

Hayward
Hayward AquaVac 6 Series troubleshooting guide