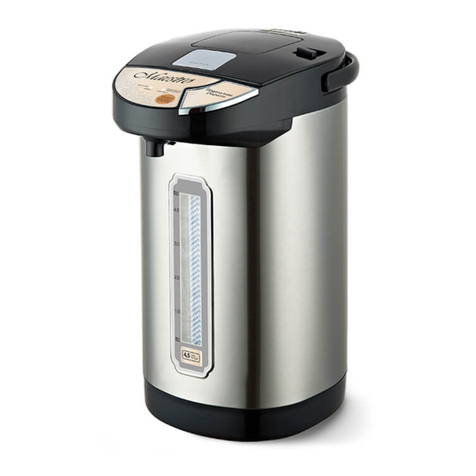
Maestro MR082 User manual

Model/Модель: MR082/084
076
Owners manual. Thermo-pot
Manualul proprietarului. Termopot
Сerticated in Ukraine
Виріб сертифіковано в Україні

2
1
1
2
5
6
3
4
8
10
17
11
12 9
7
Functionality, design and conformity to the quality standards guarantee to you reliability
and convenience in use of this device.
Please read and comply with these original instructions prior to the initial operation of your
appliance and store them for later use of subsequent owners.
The thermos pot is designed only for warming and boiling water for home use.
Under condition of observance of user regulations and a special-purpose designation, a
parts of appliance do not contain unhealthy substances.
Model MR082/084
Capacity 3,3/4,5 L
Electrical supply:
Alternating current- AC;
Rated voltage 220-240V;
Rated frequency 50Hz;
Power consumption 750W
Protective class I
Protection class IPX0
Description of the appliance
Picture1 (page 2)
1. The water level scale
2. Control Panel
3. Dispensing spout
4. Handle for lid opening
5. Lid
6. Mechanical dispensing button
7. Steam vent
8. Carrying handle
9. Power cord
10. Plug for power cord
11. Button for dispensing by a touch of a cup
EN
12. The rotary base for 360 º
13. The indicator of “keep warm” function
14. “Re-boiling” function button
15. Indicator “Boiling” function
16. “Water dispense” button (it turns on
electric pump).
17. The maximum water level mark.

4 5
Safety instructions
SPECIAL INSTRUCTIONS
ATTENTION!
- Do not allow water and moisture ingress to the internal electrical parts of the device
located outside of the water tank.
- Always disconnect thermos pot from the mains to ll it with water or to clean.
- Only plug the appliance into an outlet with an earthed (ground) contact.
Failure to observe these rules may result in electric shock!
- DO NOT let children or untrained persons use the appliance without supervision.
- DO NOT leave the appliance unnecessarily plugged in. Disconnect the plug from the
mains when the appliance is not being used.
- DO NOT use the power cord or the appliance in order to pull the plug out of the socket.
- DO NOT leave the appliance exposed to the weather (rain, sun, etc. ).
- DO NOT leave the appliance without supervision when it is connected to the power
supply.
- Close supervision is necessary when the appliance is used near children.
- Always use the appliance on a dry, level surface.
- Always unplug from the plug socket when not in use and before cleaning.
- Do not operate the appliance if damaged, after an appliance malfunctions or it has been
damaged in any manner, return to at authorized service engineer for repair.
- In the interest of safety, regular periodic close checks should be carried out on the supply
cord to ensure no damage is evident. Should there be any signs that the cord is damaged
it must be replaced with original one.
- Do not let the cord hang over the edge of a table or counter or touch hot surfaces. Allow
unit to cool before storage.
- Do not touch any hot surfaces, do not store or cover the appliance until it has full cooled
down.
- Do not use harsh abrasives, caustic cleaners or oven cleaners when cleaning this
appliance.
- This appliance is not intended for use by persons (including children) with reduced
physical, sensory or mental capabilities, or lack of experience and knowledge, unless they
have been given supervision or instruction concerning use of the appliance by a person
responsible for their safety.
- Children should be supervised to ensure that they do not play with the appliance.
- Do not leave the thermos pot with water if the temperature in the room may fall below
zero.
ATTENTION!
- The surface of the device becomes very hot during operation. Be careful
because you may burn yourself greatly by touching the surfaces of the cover,
case, water of vapor.
- Do not open the cover of the thermos pot during boiling.
- Do not lift the thermos pot by its cover.
- Do not move the thermos pot being power-on.
- Take and carry the thermos pot by the handle, touch only the device buttons.
- Do not ll up the thermos pot with water above level «MAX» .
- Install the thermos pot only on a dry, stable, level, non-slip surface.
- Transfer the thermos pot with the hot water with extreme caution!
- Do not dispense water during the boiling of water or just after it.
- To avoid possible damages by vapor do not install the thermos pot close to walls and
furniture when it is boiling. Use the support to save the sensitive cover of furniture from
damages.
- Do not place the thermos pot on heating devices.
- Do not close the opening for the exit of vapor.
- Do not use the thermos pot without a lid.
- Do not operate the thermos pot without water or with the water level below «MIN» or
less than 0,5 l. If the thermos pot is empty or there is not enough water it will automatically
shut down by safety system. If it happens, disconnect the device and let it cool down,
then ll with water and turn it on, the device will start to boil the water in the normal way of
operation.
protection, the device may malfunction.
- Do not use your thermos pot for purposes other than boiling water, do not try to boil
neither milk in it nor cook any meals.
-THIS APPLIANCE IS FOR HOUSEHOLD USE ONLY. DO NOT USE THE APPLIANCE
FOR ANYTHING OTHER THAN INTENDED USE.
Purchase industrial devices for commercial use.
Actions in extreme situations
- If a device tumbled into water, immediately, unplug the device, not touching to the device
or water.
- In case of appearance from appliance of smoke, sparkling, strong smell of a burn
isolation, immediately stop use the device, unplug the device, appeal to the nearest
service center.
EN

6 7
Operation
Before you use it for the rst time, remove the packing materials, make sure that all parts
of the device are not damaged.
Wipe the inside and outside of the body of the thermos pot with damp cloth, then wipe.
- Set the thermos pot on a dry, at and stable surface Picture 2.
- Open the lid. To open it, lift the button and open
the lid upwards Picture 3a.
In some models, optionally the lid can be
completely removed. To remove the lid holding it
open, press the lock button and remove the lid up
at an angle Picture 3b. To install the lid, follow the
steps in reverse order.
- Fill the thermos pot with cold water up to the
mark «FULL» (MAX) Picture 4. Close the lid until it
clicks, check whether it is securely closed.
- Unwind the power cord completely, connect
the power cord into the plug on the body of the
thermos pot Picture 5.
- Insert the plug into a power outlet. The light
indicator “Boiling” is to go on and the Thermos pot is
to start heating water.
- When the water boils, the light indicator “Keep
warm” is to go on and the thermos pot is to enter this
mode automatically.
- Click on “Water dispense”, and drain into a suitable
container half of water capacity.
Then unplug the thermos pot and pour out the rest of
the water Picture 6.
The thermos pot is now ready for use.
Pour fresh water up to the mark «FULL» (MAX),
set up and connect the thermos pot to the mains as
indicated above.
The thermos pot is to switch on automatically, the
red indicator “Boiling” is to light up.
When the water boils, the green indicator “Keep
warm” is to light up, the Thermos pot is to enter this
mode automatically. The red light is to go off.
Boiling water is over.
ATTENTION!
must be closed.
Note: after a while color of the surface of the
heating element can vary slightly. This is a normal
phenomenon caused by exposure to chemicals in the
water and heating, it is not a malfunction.
Water dispense
After the boiling indicator goes out and the “Keep
warm” indicator lights up, you can start bottling the
water in one of three ways:
1. Bring the cup to the spout unit and press the button
located on the ood water spout by the edge of the
cup Picture 7a.
2. Press and hold the “Water supply” located not on
the device control panel. As long as the button is
pressed, the built in electric pump is to pump water
through the spout Picture 7b.
3. Press the button of mechanical pump on the lid of
the thermos pot Picture 7c.
Automatic heating temperature (keep warm) below the
boiling temperature.
If necessary, you can quickly bring the water to a boil.
To do this, click the “Re-boiling” button.
EN
Picture
Picture
Picture
Picture
Picture
2
4
5
6
3
b
Picture 7
b c

8 9
ATTENTION!
- Never clean a thermos pot connected to the mains.
- Before cleaning, disconnect the thermos pot and let it cool down.
- Do not use abrasive and aggressive detergents.
- Never submerge the thermos pot, power line cord and plug in water or other liquids.
Wipe the inner tank with a sponge and rinse with water for cleaning. Wipe the outer body
and lid with a damp cloth, then wipe dry.
Regular descaling will only improve the device performance.
The number and rate of scale formation and, consequently, the need for cleaning depends
on the hardness of the water in your area and how you use the device.
Attention! Solid plaque deposits on the surface of the tank is not allowed!
It is recommended to clean the thermos pot at least 1 time in 2-3 months and, in any case
until the appearance of the solid plaque and scale.
For removing:
1. Pour citric acid to the thermos pot (20 g of acid for 1 liter of water).
2. Fill the thermos pot with cold water to the maximum level. Thoroughly mix the solution.
3. Connect the thermos pot to the power supply and let it boil. Once the water boils and the
thermos pot goes into heating mode, carefully open the lid and check whether all the scale
is removed from the tank wall. If scale remains, repeat the boiling and allow the solution to
stand for several hours.
4. After that, pour the solution from the device, and carefully rinse the tank with water.
5 To remove the smell of acid – pour fresh water, connect to the power supply and let it
boil.
5. Turn off the thermos pot from the mains, carefully drain the tank with clean water.
Any other maintenance should be performed by qualied personnel in a service center.
- Before storage, disconnect the thermos pot and let it cool down.
- Wipe and dry the thermos pot before storage.
- Store the thermos pot in a cool, dry and clean place beyond the assess of children and
people with limited physical and mental abilities.
Environmental protection
Old appliances contain valuable materials that can be recycled. Please arrange for the
proper recycling of old appliances. Please dispose your old appliances using appropriate
collection systems.
Subject to technical modications!
Funkcjonalność, jakość projektowania i standardy gwarantują Państwu
niezawodność i łatwość korzystania z produktu.
Prosimy o zapoznanie się z instrukcją i zachować ją jako punkt odniesienia w celu
właściwego użytkowania urządzenia.
Podgrzewacz przeznaczony do podgrzewania i gotowania wody, do użytku
domowego.
Jeżeli urządzenie używane jest zgodnie z jego przeznaczeniem nie wytwarza
szkodliwych substancji.
Model: MR082/084
3,3/4,5 L
Zasilanie:
Prąd zmienny
Częstotliwość znamionowa 50 Hz;
Napięcie znamionowe 220-240V;
Nominalna moc: 750W;
odpowiada IP X0;
Budowa produktu
Rysunek 1 (strona 2)
1. Skala poziomu wody
2. Panel zarządzania
3. Nosek do rozlewu wody
4. Uchwyt otwierania pokrywy
5. Pokrywa
6. Przycisk mechanicznego rozlania wody
7. Otwór do wydania pary
8. Uchwyt do przenoszenia
This manual suits for next models
1
Table of contents
Languages:
Other Maestro Kitchen Appliance manuals

Maestro
Maestro MR710 User manual

Maestro
Maestro MR 765 User manual

Maestro
Maestro MR080 User manual

Maestro
Maestro MR795 User manual

Maestro
Maestro MR792 User manual

Maestro
Maestro MR-709 User manual

Maestro
Maestro MR-767 User manual

Maestro
Maestro MR 766 User manual

Maestro
Maestro MR-712 User manual

Maestro
Maestro MR794 User manual