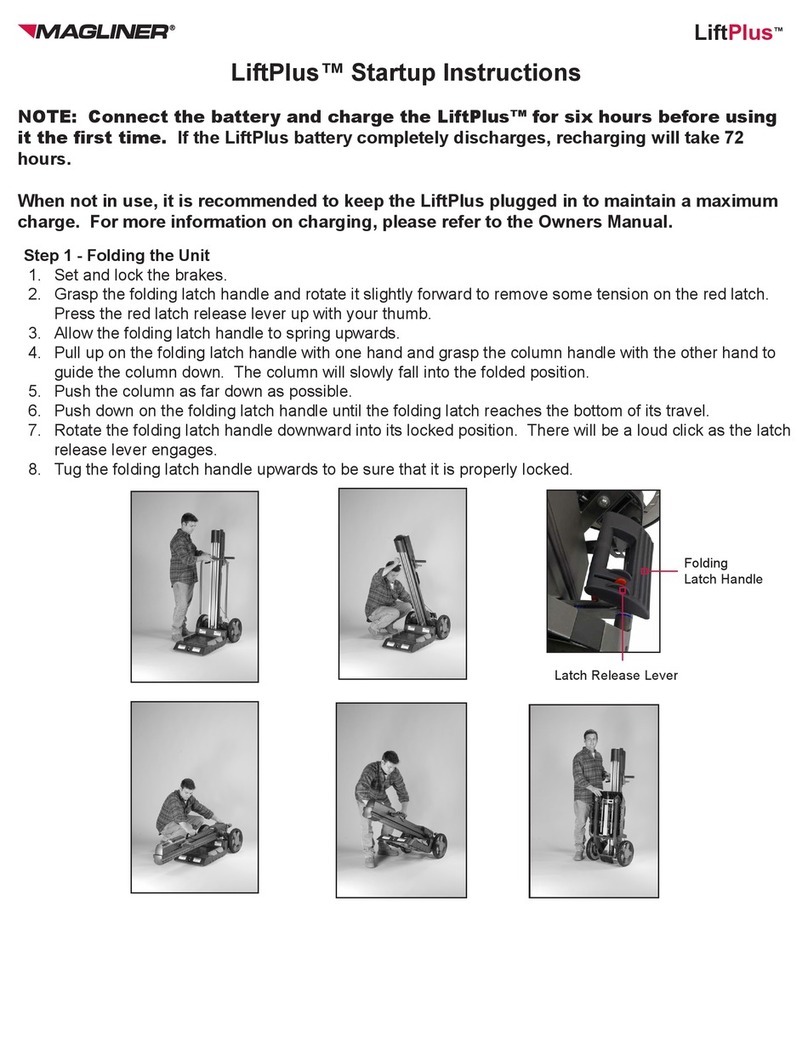
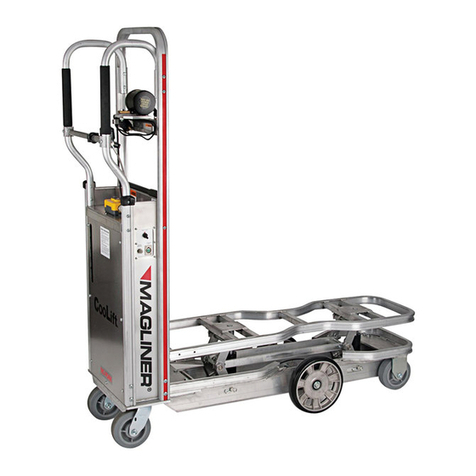
Magliner LiftPlus Lite User manual

1-800-MAGLINE (624-5463) www.magliner.com
1
Serial #: _________________________________
Date of Purchase: ________________________
LiftPlus®Lite
Owner’s Manual
1. Read the Owner’s Manual thoroughly before first use.
2. Charge the LiftPlus for six hours before using it for the first time. If the LiftPlus battery
completely discharges, recharging will take 72 hours. See page 5 for battery and
charging information.
3. The lead screw requires regular lubrication for proper working condition. See page 12
for maintenance schedule.
Important Startup Instructions

1-800-MAGLINE (624-5463) www.magliner.com
2
Table of Contents
General Safety Instructions.......................................................................................................... 3
Startup Instructions ...................................................................................................................... 3
LiftPlus Lite Unit ........................................................................................................................... 4
Charging the Battery .................................................................................................................... 5
Introduction/Assembly.................................................................................................................. 6
Disassembly............................................................................................. ................................... 8
Using the LiftPlus Lite .................................................................................................................. 9-10
End of Day ................................................................................................................................... 10
Replacing the Battery................................................................................................................... 11
Maintenance................................................................................................................................. 12
Troubleshooting Guide ................................................................................................................. 13
Operating Labels.......................................................................................................................... 13
Replacement Parts....................................................................................................................... 14-15
Warranty
Magliner products have a one (1) year warranty unless otherwise specied from the date of
purchase against defects in workmanship or material. Any part or component, except items covered
by warranties of other manufacturers, returned to the factory or service center freight prepaid
by the owner, found upon examination by Magline, Inc. to be defective or the result of improper
workmanship by the factory will be repaired or replaced without charge and returned to the owner
freight prepaid by Magline, Inc.
Alterations of Magliner products void any warranty or liability on the part of Magline, Inc.
Magline, Inc. does not guarantee product capacity if alterations are made.

1-800-MAGLINE (624-5463) www.magliner.com
3
Thank you for purchasing the Magliner LiftPlus®!If you have any questions regarding your new
Magliner product please call our customer service department at 1-800-MAGLINE (624-5463) or
(989) 512-1000. Please read this manual thoroughly to become familiar with the safe operation and
maintenance of your new LiftPlus system.
General Safety Instructions
• Inspect before each use for damaged and loose fasteners/connections.
• Inspect the unit for cracks, wear or damage. Replace damaged components immediately.
• Keep hands and feet away from all moving parts.
• Never stand or sit on the platform.
• Do not use this product to lift or to transport people.
• Never use as a step ladder.
• Never use on a moving vehicle.
• Never operate when any of the housing components have been removed.
• Keep all loose items away from the lift screw, as they may become entangled during use.
• Never use or store in wet environments or get any of the unit wet. The unit may be used
indoors or outside, but always use caution to keep the unit from getting wet; dry as soon as
possible.
• Never exceed 150 lbs. capacity. Damage to the lift and personal injury could result.
• Never raise or lower the platform unless the column is inserted in the chassis socket and
the two spring pins are properly inserted in the chassis socket and column.
• Use extreme care when raising or lowering in close proximity to other objects. Hands
and other items may get pinched or injured as the moving attachment passes non-moving
objects.
• Never place a load’s center of gravity near the platform edge; always keep the load center
of gravity centered on the platform.
• Never tilt the unit back with a raised load.
• Always check that the caster brakes and oor brake are working correctly before operating
with a load.
• Always keep the power switch off when the unit is disassembled into three pieces for
storage or transport.
• Never go over a curb or any other multi-level transition with a raised load.
• Do not operate when the battery charger is plugged in.
• Never attempt to open the battery. If the battery is cracked or leaking, do not recharge it - it
must be replaced.
• Always use a Magliner battery charger to charge your battery.
1. Read this Owner’s Manual thoroughly before first use.
2. Charge the LiftPlus for six hours before using it for the first time. If the LiftPlus battery
completely discharges, recharging will take 72 hours. See page 5 for battery and
charging information.
3. See pages 6-8 for assembly instructions.
4. The lead screw requires regular lubrication for proper working condition. See page 13
for maintenance schedule.
Startup Instructions

1-800-MAGLINE (624-5463) www.magliner.com
4
LiftPlus Lite Unit
On/Off
Switch
Electrical
Interface
Panel
Column Handle
Up/Down
Switch
Quick
Change Latch
Lift Screw
Battery
Compartment
Circuit Breaker
Column Channels
Casters
Column
Rear Rollers
Trolley
Side Plates
Front
Rollers
Wheel
Upper Handle
Lower
Handlebars
Floor Lock
Caster Brake
(optional)

1-800-MAGLINE (624-5463) www.magliner.com
5
Battery
The LiftPlus® must be charged for six hours before using it the rst time. If the LiftPlus battery
completely discharges, recharging will take 72 hours. When not in use, it is recommended to ip the
power switch to the Off position and to keep the LiftPlus plugged in to maintain a maximum charge.
General Battery Warnings
• Do not connect accessories to the battery; this will cause premature battery failure.
• Unauthorized modication could create a hazardous condition and result in serious injury.
• Batteries contain sulfuric acid, which can burn eyes, skin, clothes, etc. Use caution! Always wear
gloves when working with batteries. If contact occurs, ush immediately with water and get
medical attention. Protect surfaces from battery damage by placing batteries on rubber or plastic
surfaces.
• To prevent electrical shock, do not touch non-insulated parts of the charger output connectors,
battery connectors or battery terminals. Do not use connectors that are cracked, corroded, or do
not make adequate electrical contact. Use of damaged or defective connectors could result in re
or electrical shock.
• Keep sparks, ame, and smoking materials away from batteries.
• Batteries can supply a large amount of current. Do not wear jewelry or watches when working on
the batteries as an accidental shorting could occur and cause severe burning.
Battery Life
The LiftPlus is powered by one 12V battery.* The lift motor draws current from the battery based on
the amount of effort required to lift the load. A fully-charged battery will power 60-75 lift cycles with
a median load; however, extreme temperature ranges and extreme loads can have an effect on the
amount of power available during one charging cycle.
General Charging Warnings
• Use only the Magliner 15V charger designated for use with LiftPlus. Charge using a grounded
120V electrical outlet.
• Do not operate the unit when the battery charger is plugged in.
• Do not expose the charger to rain or snow.
• To prevent risk of re, use the charger only in a dry, well ventilated room without ammable uids
or explosive gases.
• Make sure the cord is located such that it will not be a trip hazard or otherwise subject to
damage or stress.
• Do not operate a charger with a damaged cord or plug – replace immediately.
• To reduce risk of electrical shock, unplug the charging unit from the AC power supply source
before attempting any maintenance or cleaning.
• Always use battery chargers supplied by Magline, Inc. Other battery charging units could cause
damage to your batteries or personal injury.
• To avoid damage to battery charger connectors and cords, disconnect by grasping the plug
body and pulling it straight out of the outlet or receptacle. DO NOT pull on the cord. DO NOT
twist, rock, or pull the connector sideways.
• The metal tip on the end of the plug may be hot when it is rst unplugged.
*Battery has a warranty of six (6) months

1-800-MAGLINE (624-5463) www.magliner.com
6
Introduction
Assembly
1. Remove the LiftPlus components from the packaging. The assembled LiftPlus is composed of
the (A) lift section, (B) attachment, and (C) chassis section.
• Charge the LiftPlus for six hours with the included AC plug before using it for the rst time.
• Dispose of the packaging after all components have been removed
• Ensure that the right and left locking pins are securely connecting the lift section to the chassis,
and the detent pin that secures the attachment, before using (see page 8).
A
B
C
2. If your model includes the optional caster brake, lock the casters in place to ensure the chassis
remains stationary.
Unlocked Locked

1-800-MAGLINE (624-5463) www.magliner.com
7
3. To assemble the LiftPlus, lower the lift section into the chassis opening. Insert the right and left
locking pins to secure the lift section in the chassis.
Right Side Left Side
4. Place the platform on the lift section at the quick change latch. Make sure to properly align the
platform hinge with the quick change latch. Please Note: You may reposition quick change latch
to attach the platform at a comfortable height.

1-800-MAGLINE (624-5463) www.magliner.com
8
5. To secure the platform to the lift section, insert the platform pin. The pin is located on the right
side of the quick change latch. The pin must be threaded through the opening on the left side of
the quick change latch to fully secure the platform.
Right Side
Left Side
Disassembly
6. Lock the casters and reverse the above steps for disassembly.
Aligning Platform to Quick Change Latch

1-800-MAGLINE (624-5463) www.magliner.com
9
Using the LiftPlus
NOTE: The LiftPlus must be fully assembled with both pins inserted into the chassis socket and
column before the quick change latch is lifted or lowered. Failure to do so can damage the unit.
General Loading Instructions
1. Do not exceed the load capacity of 150 lbs.
2. Set the caster brakes before loading.
3. Be sure the load center of gravity is located as close as
possible to the center or rear of the attachment.
Lift/Lower Operation
1. Move the power switch to the On position.
2. To lift the load, pull the lift actuation switch toward the back of the unit.
3. To lower the load, press the lift actuation switch toward the front of the unit.
4. When not in use, turn the power switch to the Off position to prevent draining the battery
Lift Overload
1. The overload protection circuit prevents lifting motion when it senses an excessive load. When the
circuit is triggered, a red light illuminates on the back of the LiftPlus.
2. To reset the overload circuit, lower the platform all the way to the bottom. The red light will turn off
when lifting function has been restored.
Circuit Breaker
1. When the circuit breaker trips, the button will pop-up and show a white face.
2. Reset the circuit breaker by pressing the button down until you hear a click. It will not reset for the rst
few seconds after tripping.
3. If the circuit breaker tips repeatedly, contact Magline.
TrippedNormal
Circuit
Breaker

1-800-MAGLINE (624-5463) www.magliner.com
10
Transporting the LiftPlus Lite
Remove the attachment from the lift section; place the lift attachment carefully into vehicle. Secure the
detent pin into the quick change adapter so that the pin and lanyard are not damaged.
Remove the right and left locking pins from the chassis/lift section assembly. Carefully place the lift section
into the vehicle - you may use the loop handle and column handle to lift into the vehicle. HOWEVER - the
nal position of the lift section should be on its back. The lift section should be transported while lying
completely on a moving blanket. A hard surface like a block can be used; if a block is to be used, make sure
it is wider than the battery box and that it is placed as shown below to prevent damage to the circuit breaker.
Place the chassis into the vehicle in a way where it will not impact the lift section during transport.
At the End of the Day
Flip the power switch to the Off position when the LiftPlus is not in use. Leaving the switch in the On
position will drain the battery.
If the LiftPlus battery completely discharges, recharging will take 72 hours. A fully-charged battery will power
60-75 lift cycles with a median load; however, extreme temperature ranges and extreme loads can have an
effect on the amount of power available during one charging cycle.
General Warnings for Moving Loads
• Always stay behind the unit when moving it. Use both hands on the upper or lower handlebars.
• Never turn the unit quickly - this can cause the load to slide off the lift attachment.
• When maneuvering the lift inside a small area, always remain aware of the positioning of the platform.
• Before moving an item, lower the platform into the down position.
• Do not raise the platform until you are ready to move an item.
• Do not raise the platform higher than surface on which the item sits. This will help prevent the user from
accidentally lowering the platform onto a desk or other furniture. The bottom edges of the platform are
sharp and can easily damage surfaces.
If you use a block to stabilize the
unit during transit, make sure it is
wider that the batter box and that it
is placed below the circuit breaker.

1-800-MAGLINE (624-5463) www.magliner.com
11
Replacing the Battery
If the LiftPlus battery completely discharges, recharging will take 72 hours. A fully-charged battery will power
60-75 lift cycles with a median load; however, extreme temperature ranges and extreme loads can have an
effect on the amount of power available during one charging cycle.
If the unit appears sluggish even after charging or if the battery does not hold its charge for very long, the
battery may need to be replaced. Use only Magliner replacement parts. The battery has a warranty of six (6)
months.
Caution: Never attempt to open the battery. If the battery is cracked or leaking, do not recharge it; the battery
must be replaced.
1. Disconnect from the charging port.
2. Turn the power switch to “Off.”
3. Use a Phillips screwdriver to remove the four screws in the battery box cover; lift the cover from the box.
4. Carefully slide the connectors off of the red and black terminals.
5. Using a Phillips screwdriver, remove the battery bracket.
6. Inspect the Battery for cracks, leakage, or corrosion. If you nd cracks, leakage or corrosion on the
battery:
a. Contact Customer Service toll free at (800) 624-5463. Do not operate the unit until repairs are
made.
b. Do not let the leakage get onto your skin. Wear acid-resistant gloves and chemical goggles.
c. If leakage gets onto the skin, ush immediately with water and mild soap. If irritation develops, seek
medical attention. If the leakage gets into the eyes, ush with clean water for 15 minutes and seek
immediate medical attention.
8. Remove the battery.
9. Clean any dirt or debris from the battery compartment.
10. Place the replacement battery into the battery compartment.
11. Slide the red and black wire connectors onto the matching battery terminals. If the connectors do not fit
securely on the battery terminals, contact Customer Service toll free at (800) 624-5463.
12. Reinstall the battery cover and secure with the previously removed screws.
Remove these
four screws

1-800-MAGLINE (624-5463) www.magliner.com
12
Maintenance
Area Inspection
Frequency Procedure/Normal Condition
Outside Surfaces Daily Keep clean and dry. Replace any cracked or missing
covers.
Fasteners Daily Tighten any loose hardware.
Battery Charging Daily Green charging light should turn on when charging.
Rear Wheels Daily Inspect wheels and tires for wear and cracks.
Front Casters Daily Inspect for wear; clean dirt and debris.
Rolling Function Daily Unit should roll easily in all directions: forward/
backward and left/right
Trolley (quick
change latch) Daily Inspect for wear or damage. Trolley should move up
and down smoothly within the lift assembly.
Lift Screw Daily Inspect before each use; keep free of dirt and debris.
Lifting and lowering motions should be smooth.
Attachments/
Accessories Daily Inspect for wear and damage; replace as needed.
Battery Connections Weekly
Tighten any loose connections to the battery terminals.
Check for any cracked or damaged wires; replace parts
as needed.
Lubrication Points
Lubricate with CRC Industrial Technical Grade 3-36 every 30 days.
1. Apply a drop or two of lubricant to the lift screw, the center trolley surface, and front and rear
plastic wheel shafts (see diagram below).
2. Lift and lower unloaded attachment for 5 full cycles to distribute lubricant.
Lift Screw
Center Trolley
Surface
Rear Plastic
Wheel Shafts
(left and right)
Front Wheel Shafts
(left and right)

1-800-MAGLINE (624-5463) www.magliner.com
13
Troubleshooting Guide
Problem Solution(s)
The lift does not respond, and does
not make any noise when the lift
switch is activated.
1. Is the power switch turned on?
2. Has the circuit breaker tripped?
3. Check the battery connections.
4. Recharge the battery.
5. Replace the battery.
The lift struggles to raise objects and
works very slowly.
1. Check for dirt or other obstruction around the lift screw.
2. Recharge the battery.
3. Replace the battery.
The lift will not rise for more than a
second, but it will lower.
1. If the red light is on, you may have exceeded the weight
limit. Try less weight.
2. Lower the lift all the way to the bottom and the red light
should go out, resetting the protection circuit.
3. Check for dirt or other foreign materials in the lift
mechanisms and for interference of the lifting attachment
with other objects. If the lift is obstructed, this may activate
the overload protection circuit. To reset the circuit, repeat
Step 2.
The unit is very difcult to roll. 1. Check that the oor and/or caster brake(s) is/are not
engaged.
2. Lift the lifting attachment and inspect the front casters for
obstructions.
The unit will not charge.
1. Check to make sure the charger is fully plugged into the
outlet and the charging port of the unit.
2. Check that the circuit breaker is not tripped.
3. Check that the battery is connected.
WARNING
Read all labels before use.
Do not exceed rated weight capacity - 150 lbs
1-800-MAGLINE (624-5463) • www.magliner.com
Platform Label
LiftPlus Labels
WARNING
!
Falling Hazard. Do not stand on lift platform.
Do not exceed rated weight capacity - 150 lbs.
Tipping Hazard. Keep load centered.

1-800-MAGLINE (624-5463) www.magliner.com
14
Accessories Part
Number
Platform assembly - 24” x 24” with corner bumpers - 6-1/16” height from
oor (includes parts below) 536130
Corner bumper 33014
Round head machine screw - 10-32 UNF x .875” long 80122
Hex lock nut - 10-32 UNF 80684
Square plug 536127
Work Bench - 18” x 18” (includes platform, vice clamps, vice handle and
back bar) - 6-1/16” height from oor 536020
Quick change adapter for use with 536020 work bench only 536026
Arbor - 1.6” diameter x 24” long 536039
Adjustable boom with chain/hook assembly 536088
Straight forks - 21” wide x 18” long - 10-1/2” height from oor 536060
Straight forks - 20” wide x 32” long - 10-1/2” height from oor 536048
Straight forks - 18-1/2” wide x 18-1/2” long - 10-1/2” height from oor 536053
V-Tray (requires 18-1/2” wide x 18-1/2” long forks) 536054
24” square steel pallet (requires 21” wide x 18” long forks) 536025
34” steel pallet (requires 20” wide x 32” long forks) 536033
Tethered remote control 534200
External battery charger 63027
Tote bag 534500
Lift Section Parts Part
Number
Lift section, complete 531025
Axle, front roller 22145
Front roller 531708
Axle, rear roller 22146
Rear roller 531709
Battery - 12V-7.0 Ah 61024
Battery box (batteries not included) 531020
Charger assembly, 12V with U.S. blade plug 63030
Circuit breaker - 15A, 32VDC, 250 VAC (includes power supply wiring
harness) 64076
Electrical board 63025
Hand grip 532144
Handle, U-Loop 301188
Handlebar kit 86078
Lift screw assembly (includes #4 pulley, 531117) 531121
Limit switch (used for upper and lower) 62067

1-800-MAGLINE (624-5463) www.magliner.com
15
Switch - Up/Down (includes wiring harness) 534416
Timing belt - 5mm pitch x 15mm W x 60 grooves 534118
Top cover assembly 533502
Trolley assembly 531700
Wiring harness for lower limit switch 64079
Wiring harness for upper limit switch 534401
Wiring harness for negative power (ground) 64077
Wiring harness for positive power 64078
Wiring harness for positive power to control board 64078
Wiring harness - adapter for motor solenoid 534421
Wiring harness/connector assembly for remote control input 534409
Wiring harness/connector assembly for power jack (charger input) 534408
Wiring harness for green charging light 534411
Wiring harness for red overload light 534412
Chassis Parts Part
Number
Chassis assembly, standard caster 530124
Chassis assembly, caster with brakes 530110
Axle, 10” wheels 532311
Axle spring pin 190104
Axle cotter pin 81077
Locking pin - 1/2” x 5/8” with lanyard 81194
Caster - 3-1/2” dia. x 1-1/4” wide 130034
Caster with brake - 3-1/2” dia. x 1-1/4” wide 130035
Floor brake 33051
Plug for round tube 530115
Plug for square tube 530123
Washer, thick - 5/8” 80705
Washer, thin - 5/8” x 1/32” 80707
Wheel - 1075 microcellular foam, HDPE hub - 10” x 2-3/4” 111075
Motor assembly - standard speed (includes motor, mounting bracket,
solenoid,brake, pulley #1, pulley #2-3, and timing belt) 534100
Motor cover 533505
Nut, trolley drive 531705
Pin for quick change latch 81169
Pulley assembly #1 (top gear) 534106
Pulley assembly #2-3 (intermediate) 534107
Pulley assembly #4 (lower)(part of 531121 lift screw assembly) 531117
Side plate assembly with quick change latch 536034
Switch - On/Off (includes wiring harness) 534410

1-800-MAGLINE (624-5463) www.magliner.com
16
MAGLINE® INC.
1205 West Cedar Street
Standish, Michigan 48658
1-800-MAGLINE (624-5463)
Email: customerservice@magliner.com
www.magliner.com
Form #B9417
© Copyright 2018-2019, Magline, Inc.
REV 10/19
Table of contents
Other Magliner Lifting System manuals
Popular Lifting System manuals by other brands

Challenger Lifts
Challenger Lifts Versymmetric Installation, operation & maintenance manual

Tiger
Tiger BCF Instruction guide

LGMG
LGMG SS0507 Operation and maintenance manual

Nussbaum
Nussbaum OTTO 18 operating manual

Larzep
Larzep F00643 Operation & maintenance instructions

Challenger Lifts
Challenger Lifts Versymmetric CL9 Installation, operation & maintenance manual

AUTOPSTENHOJ
AUTOPSTENHOJ Masterlift 2.30 installation instructions

QUALITY LIFTS
QUALITY LIFTS Q4P09 Series Installation, operation & maintenance manual

SICO
SICO 3 Series owner's manual

AMF
AMF 90XLi manual

Aqua Creek Products
Aqua Creek Products Revolution F-702RLNA-03 manual

Leggett & Platt
Leggett & Platt Adjustable Base Setup guide