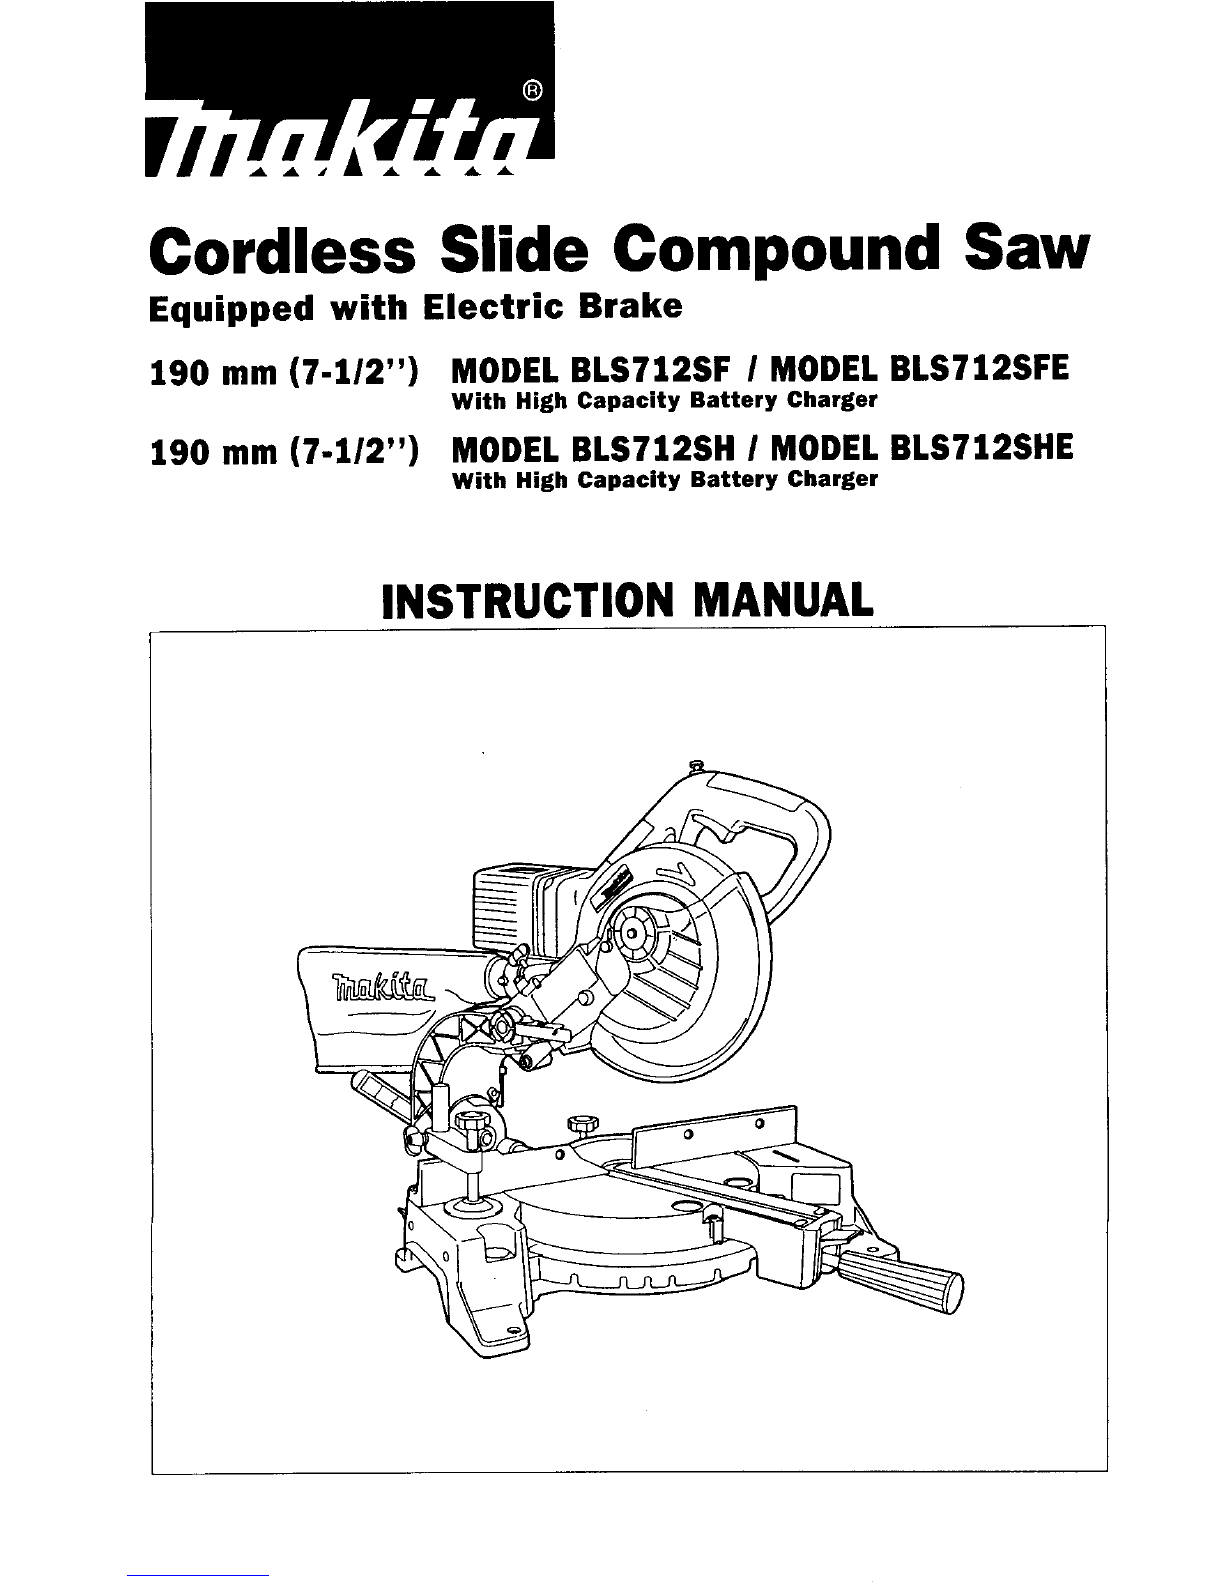
Makita BLS712SF User manual

Cordless Slide Compound
Saw
Equipped with Electric Brake
190
mm
(7-1/2”) MODEL BLS712SF
I
MODEL BLS712SFE
190
mm
(7-1/2”) MODEL BLS712SH
/
MODEL BLS712SHE
With High Capacity Battery Charger
INSTRUCTION MANUAL

S
PE
CI
F
I
CAT1
0
N
S
Model BLS712
Blade diameter
.........................................................
180
mm
(7-1/8")
-
190
mm
(7-1/2")
Hole (arbor)diameter
..............................................................................
15.88
mm
(5/8")
Max. cutting capacities
(H
x
W)
wirh blade
'190
mm
(7-1/2")
in
diameter
00
50
mm
x 182
mm
(2"
x
7-1/8")
00
45O (left)
35
mm
x 182
mm
(
1-3/8"
x
7-1/8")
I
(left and
450
right)
~
Voltage
24 V
50
mm
x 127
mm
(2" x 5")
~
Input output Charging time
D.C. 7.2 V
-
24 V
A.C. only 50
Hz
-
60
Hz
30 min.
35
mm
x 127
mm
(1-3/8"
x
5")
~~~
24 V
(Note)
The max. cutting capacities may vary according
to
workpiece, blade and/or charging condition.
No load speed (RPM)
.......................................................................................
2,30O/min.
Dimensions (Lx W
x
H)
.......................................................
550
mm
x
430
mm
x 454
mm
Net weight (with battery cartridge)
..........................................................
11
.O
kg (24.3 Ibs)
(21-5/8"
x
17"
x
17-7/8")
A.C. only 50
Hz
-
60
Hz D.C. 7.2
V
-
24 V
60
min.
I
Batterv Cartridge B2417
1
Model DC24SA High CaDacitv Batterv Charqer
I
I
Batterv Cartridge 82430
I
Model DC24SA High Capacity Battery Charger
I
I
Voltage
I
Input
I
Output
I
Charging time
I
2

USA005-1
For Your Own Safety Read Instruction Manual
Before Operating
Tool
Save
it
for
future reference
GENERAL SAFETY PRECAUTIONS
(For
All
Tools)
1.
KNOW
YOUR POWER
TOOL.
Read
the owner’s manual carefully. Learn the
tool’s applications and limitations, as well
as
the specific potential hazards
peculiar to
it.
2.
KEEP GUARDS IN PLACE and in working order.
3.
REMOVE ADJUSTING KEYS AND WRENCHES. Form habit of checking to
see that keys and adjustingwrenches are removed from tool before turning
it
on.
4.
KEEP WORK AREA CLEAN. Cluttered areas and benches invite accidents.
5.
DON‘T USE INDANGEROUSENVIRONMENT. Don’t use power tools indamp
or wet locations, or expose them to rain. Keep work area well lighted.
Don’t use tool in presence of flammable liquids or gases.
6.
KEEP CHILDREN AWAY. All visitors should be kept safe distance from work
area.
7.
MAKE WORKSHOP KID PROOF
with
padlocks, master switches, or by
removing starter keys.
8.
DON’T FORCETOOL.
It
will do thejob better and safer at the ratefor which
it
was designed.
9.
USE RIGHT TOOL. Don’t force tool or attachment to do a job for which
it
was not designed.
10.
WEAR PROPER APPAREL. Donot wear looseclothing, gloves, neckties, rings,
bracelets, or other jewelry which may get caught in moving parts. Nonslip
footwear isrecommended.Wear protective haircoveringtocontain longhair.
11.
ALWAYS USE SAFETY GLASSES. Also use face or dust mask
if
cutting
operation
is
dusty. Everyday eyeglasses only have impact resistant lenses,
they are NOT safety glasses.
12.
SECURE WORK. Useclamps or avise toholdwork when practical. It‘s safer
than using your hand and
it
frees both hands to operate
tool.
13. DON‘T OVERREACH. Keep proper footing and balance at all times.
14.
MAINTAIN TOOLS WITH CARE. Keep tools sharp and clean for best and
safest performance. Follow instructions for lubricating andchanging acces-
sories.
15.
DISCONNECT BATTERY FROM TOOL before servicing; when changing
accessories such as blades, bits, cutters, and the like.
3

16.
REDUCE THE RISK OF UNINTENTIONALSTARTING. Make sure switch is
in
off position before inserting battery.
17.
USE RECOMMENDED ACCESSORIES. Consult the owner's manual for
recommendedaccessories.The use of improper accessories may cause risk
of injury to persons.
18.
NEVER STAND ON TOOL. Serious injury could occur if the tool istipped or
if the cutting tool is unintentionally contacted.
19.
CHECK DAMAGEDPARTS. Before further use of the tool, a guard or other
part that is damaged should be carefully checked to determine that
it
will
operate properly and perform its intended function
-
check for alignment
of movingparts, binding of movingparts, breakage of parts, mounting, and
any other conditionsthat may affect itsoperation. A guard or other partthat
is damaged should be properly repaired or replaced.
20.
DIRECTION
OF
FEED. Feedwork into a bladeor cutter against the direction
of
rotation of the blade or cutter only.
21.
NEVER LEAVE TOOL RUNNING UNATTENDED. TURN POWER OFF. Don't
leave tool
until
it
comes to a complete stop.
4

US6033
1
ADDITIONAL SAFETY RULES
1.
Wear eye protection.
2.
Keep hands out of pathof saw blade. Avoid contact with any coastingblade.
It
can
3.
Do not operate saw without guards
in
place.
4.
Do
notperformanyoperationfreehand. Theworkpiece mustbesecuredfirmly against
the turn base and guide fence with the vise during all operations. Never use your
hand to secure the workpiece.
5.
Never reach around saw blade.
6.
Turn off tool and wait for saw blade to stop before moving workpiece or changing
7.
Remove battery from tool before changing blade or servicing.
8.
To
reducethe riskof injury, returncarriage tothefullrear positionaftereach crosscut
9. Always secure all moving portions before carrying the tool.
still cause severe injury.
settings.
operation.
IO.
Stopper pin which locksthe cutter head down isfor carrying and storage purposes
11.
Be aware thatthistoolisalways
in
an operating condition, because
it
does nothave
12.
Don't use the tool
in
the presence of flammable liquids or gases.
13.
Check the blade carefully for cracks or damage before operation.
14.
Use only flanges specified for this tool.
15.
Becarefulnottodamagethearbor, flanges (especiallytheinstallingsurface)or bolt.
16.
Makesurethattheturn baseisproperly secured
so
it
willnotmoveduringoperation.
17.
For your safety, remove the chips, small pieces, etc. from the table top before
18.
Avoid cutting nails. Inspect for and remove all nails from the workpiece before
19. Make sure the shaft lock is released before the switch is turned on.
20.
Be sure that the blade does not contact the turn base
in
the lowest position.
21.
Holdthehandlefirmly. Beawarethat thesaw movesupor downslightlyduring start-up
22.
Makesure the blade isnotcontactingthe workpiece beforethe switchisturned on.
23.
Before usingthe toolon an actual workpiece, let
it
runfor a while. Watch for vibra-
24.
Wait
until
the blade attains fullspeed before cutting.
25.
Stop operation immediately if you notice anything abnormal.
26.
Do not attempt to lock the trigger in the on position.
27.
Be alert at all times, especially during repetitive, monotonousoperations. Don't be
28.
Always use accessories recommended
in
this manual. Useof improper accessories
only and not for any cutting operations.
to be plugged into an electrical outlet.
Replace cracked or damaged blade immediately.
Damage to these parts could result
in
blade breakage.
operation.
operation.
and stopping.
tion or wobbling that could indicate poor installation or a poorly balanced blade.
lulled into a false sense of security. Blades are extremely unforgiving.
such as abrasive wheels may cause an injury.
SAVE THESE INSTRUCTIONS.
5

uscoo2-1
Length of Cord (Feet)
25 50
100
AWG Size
of
Cord
18 18 18
IMPORTANT SAFETY INSTRUCTIONS
FOR CHARGER
&
BATTERY CARTRIDGE
I.
SAVE
THESE INSTRUCTIONS
-
This manual
150
16
contains important safety and operating instructions for battery charger.
2.
Before using battery charger, read all instructions and cautionary markings
on
(1)
battery charger,
(2)
battery, and
(3)
product using battery.
3.
CAUTION
-
To reduce risk of injury, charge only MAKITA rechargeable
batteries marked on the charger label. Other types of batteries may burst
causing personal injury and damage.
4.
Do not expose charger to rain or snow.
5.
Use of an attachment not recommended or sold by the battery charger
manufacturer may result
in
a risk of fire, electric shock, or injury topersons.
6.
To reduce risk of damage to electric plug and cord,
pull
by
plug
rather than
cord when disconnecting charger.
7.
Make sure cord islocated
so
that
it
will
not be stepped on, tripped over, or
otherwise subjected to damage or stress.
8.
An extensioncord should not be used unless absolutely necessary. Use of
improper extension cord could result
in
a risk of fire and electric shock.
If
extension cord must be used, make sure:
a. That pinsonplugof extensioncordarethe same number, size, andshape
b.
That extension cord
is
properly wiredand
in
goodelectrical condition; and
c. That wire size is at least as large
as
the one specified inthe table below.
as those of plug on charger;
them im-
IO.
Do
notoperate charger
if
it
has receiveda sharpblow, beendropped, or other-
wise damaged
in
any way; take
it
to a qualified serviceman.
11.
Do not disassemble charger or battery cartridge; take
it
to a qualified
serviceman when service or repair is required. Incorrect reassembly may
result
in
a risk of electric shock or fire.
12.
To
reduce risk of electric shock, unplugcharger from outlet beforeattempt-
ingany maintenance or cleaning. Turning off controls
will
notreducethis risk.
6

uscoo2
1
ADDITIONAL SAFETY
RULES
FOR CHARGER
&
BATTERY CARTRIDGE
1.
Do
not charge Battery Cartridge when temperature is BELOW 10°C (5OOF)
2.
Do
notattempt touse a step-up transformer, an engine generator or
DC
power
3.
Do
not allow anything to cover or clog the charger vents.
4.
A battery short can cause
a
large current flow, overheating, possible burns
or ABOVE 4OoC (104OF).
receptacle.
and even a breakdown.
(1)
Do
not touch the terminals with any conductive material.
(2)
Avoid storing battery cartridge ina container withother metalobjects such
(3)
Do
not expose battery cartridge to water or rain.
ture may reach or exceed 5OoC (122OF).
completely worn out. The battery cartridge can explode
in
a fire.
as nails, coins, etc.
5.
Do
not store the tool and Battery Cartridge
in
locations where the tempera-
6.
Do
not incinerate the Battery Cartridge even if
it
is severely damaged or is
SAVE THESE INSTRUCTIONS.
Symbols
The followingshow the symbols usedfor the charger. Be sure that you understandtheir meaningbefore use.
@+*
0
Readyto charge
OCharging
0
Chargingcomplete
8
0
Delaycharge (Cooling)
Mx
0
Deffectivebattery
a
0
Conditioning
x
0
Coolingabnormality
7

Installingor removingbattery cartridge
*Always switch off the tool before inser-
tion or removalof the batterycartridge.
*To remove the battery cartridge, with-
draw it from the tool while sliding the
buttonon the side of the cartridge.
*To insert the battery cartridge, align the
tongue on the battery cartridge with the
groove in the housing and slip
it
into
place. Always insert it
all
the way until it
locks in place with
a
little click.
If
you can
see the red Dart on the upper side on the
.
Battery
cartridge
button,
it
is not lockedcompletely. Insert it fully untithe red part cannot be seen. If not,
it
may accidentally fall out
of
the tool, causinginjuryto you or someonearoundyou.
Do
not use force when insertingthe battery cartridge. If the cartridge does not slide in
easily, it is not being insertedcorrectly.
Charging
Your new battery cartridgeis notcharged.
You
will
needto charge it before use.
Use
the high capacity battery charger Model
DC24SAto charge the batterycartridge.
Plug the high capacity battery charger
into the proper
NC
voltage source. Two
charging lights will flash in green color
repeatedly.
Insert the battery cartridge into charger
until it stops adjusting to the guide of
charger.Terminalcover of charger can be
opened with inserting and closed with
pullingout the batterycartridge.
Terminal cover
I
When the batterycartridge
is
inserted, the charging light color
will
changefrom greento
One red charging light indicates chargedcondition in
0
-
80%
and two redones indicates
*When charging
is
completed, the charging lights will change from two red ones to two
The charging time is as follows:
redand chargingwill begin.The charging light
will
remain
lit
steadily duringcharging.
80
-
100%.
green ones.
Battery 8241
7:
approx.
30
minutes
Battery 82430: approx.
60
minutes
If you leave the batterycartridge in the charger after the charging cycle is complete, the
charger will switch into its "trickle charge (maintenancecharge)" mode which will last
approximately24 hours.
*After charging, unplugthe charger from the powersource.
8

Coolingsystem
This charger is equippedwith cooling fan for heated battery in order to enable the battery
to prove its own performance. Sound
of
cooling
air
comes out during cooling, which
means not trouble on the charger.
Yellow light will flash for warning inthe followingcases.
Trouble on coolingfan
Incompletecooldown of battery, such
as,
beingcloggedwith dust
The batterycan be charged in spite
of
the yellow warning light. But the charging time will
be longer than usual in this case.
Check the sound
of
cooing fan, vent on the charger and battery, which can be sometime
cloggedwith dust.
The cooling system is in order although no sound of cooling fan comes out,
if
the yellow
warning lightwill not flash.
Always keepcleanthe vent on charger and batteryfor cooling.
The products should be sent to repair or maintenance,
if
the yellow warning light will
frequently flash.
Conditioningcharge
Conditioningchargecan extend the life of battery by automatically searchingthe optimum
charging condition for the batteriesinevery situations.
The battery employed in the followingconditions repeatedly, will be worn out shortly, and
yellow warning light may flash.
1.
Rechargeof battery with its high temperature
2.
Rechargeof battery with its low temperature
3.
Rechargeof full charged battery
4. Over-dischargeof battery(continueto discharge battery in spite of down of power.)
5.
Rechargeunder brokencooling system
The charging time of such batteryis longer than usual.
CAUTION:
*The high capacity battery charger ModelDC24SA
is
for chargingMakita battery cartridge.
Neveruse itfor other purposes
or
for other manufacturer's batteries.
Whenyou charge
a
new battery cartridgeor
a
battery cartridge which has not been used
for
a
long period of time, it may not accept
a
full charge. This
is
a
normal condition and
does not indicate
a
problem.You can rechargethe batterycartridge fully after
discharging
itcompletely and recharging
a
couple
of
times.
If
you charge
a
batterycartridge from
a
just-operated tool or
a
batterycartridge which has
been left in
a
locationexposed to direct sunlight or heat for
a
longtime, the charging light
may flash in redcolor. If this occurs, wait for
a
while.When the temperature on battery is
more than approx.
70°C.
two charging lights may flash in red color, and when approx.
50°C
-
70°C, one charginglight in redcolor. Chargingwill begin after the battery cartridge
is cooled by the coolingfan installed in the charger.
9

If
the charging light flashes alternately in green and red color, charging is not possible.
The terminals onthe charger or batterycartridgeare cloggedwith dust or the batterycar-
tridge is worn out or damaged.
Trickle charge (Maintenancecharge)
If
you
leavethe batten/ cartridge in the charger
to
prevent spontaneous discharging after
full charge, the charger will switch into its "trickle charge (maintenancecharge)" modeand
keep the batterycartridge freshand fully charged.
Tips
for maintainingmaximumbattery life
1.
Chargethe batterycartridge beforecompletelydischarged.
Always stop tool operation and charge the battery cartridge when you notice less tool
power.
2.
Never recharge
a
fully charged batterycartridge.
Overchargingshortens the battery service life.
3.
Chargethe batterycartridge with room temperature at
10°C
-
40°C
(50°F
-
104°F).
Let
a
hot battery cartridge cool down beforecharging it.
4.
Chargethe Nickel Metal Hydride batterycartridge when
you
do not use it for more than
six months.
Socket wrench
The socket wrench is stored as shown in
the figure. When using the socket wrench,
pull itout of the wrench holder.After using
the socket wrench. returnit to the wrench
holder.
Benchmountingsaw
When the tool is shipped, the handle is
locked in the loweredpositionby the stop-
per pin. Release the stopper pin by lower-
ingthe handle slightly and pullingthe stop-
per pin.
lder
\
10

This tool should be boltedwith two boltsto
a
level and stable surface using the bolt
holes provided in the tool’s base. This will
help preventtippingand possible injury.
Installing
or
removing
saw
blade
CAUTION:
*Always be sure that the tool
is
switched off and the battery cartridge is removed before
installingor removingthe blade.
Use only the Makita socket wrench provided
to
install
or
remove the blade. Failureto do
so
may
result inovertightening
or
insufficienttighteningof the hex bolt.This could cause
serious injury to operator or others inthe general vicinity
of
the tool.
Lock the handle in the raised position by
pushing inthe stopper pin.
Stopper
pin
To remove the blade, use the socket
wrench to loosen the hex bolt holding the
center cover by turning it counterclockwise.
Raise the safety
coverand center cover.
11

Press the shaft lock to lock the spindle and
I
use the socket wrench to loosen the hex
bolt (left-handed)clockwise. Then remove
the hex bolt, outer flange and blade.
Socketwrench Hex bolt
To
install the blade, mount
it
carefully onto the spindle, making sure that the direction of
the arrow on the surface of the blade matches the direction of the arrow on the blade
case. Installthe outer flange and hex bolt, and then use the socket wrench to tighten the
hex bolt (left-handed)securely counterclockwise while pressingthe shaft lock.
Socketwrench
Returnthe safety cover and center cover
to
its original position. Then tighten the hex
bolt clockwise to secure the center cover.
Release the handle from the raised posi-
tion by pulling the stopper pin. Lower the
handle to make sure that the safety cover
moves properly.
12

Safety
cover
When loweringthe handle, the safety cover
rises automatically.The cover returnsto its
original position when the cut is completed
and the handle is raised. NEVER DEFEAT
OR
REMOVE THE SAFETY COVER. In the
interest of your personal safety, always
maintainthesafety cover ingood condition.
Any irregular operation of the safety cover
should be corrected immediately. NEVER
USE THE TOOL WITH A FAULTY SAFETY
COVER. If the see-through safety cover
becomes dirty, or sawdust adheres to
it
in
such away that the blade and/or workpiece
'
cover
is no longer easily visible, removethe battery cartridge and cleanthe cover carefullywith
a
damp cloth.
Do
notuse solvents or any petroleum-basedcleaners on the plasticcover.
Dust
bag
The use of the dust bag makes cutting
operations clean and dust collection easy.
To attach the dust bag, fit the bag's entry
port over the dust nozzle. When the dust
bag is about half full, removethe dust bag
from the tool and pull the fastener out.
Empty the dust bag
of
its contents, tapping
it lightly
so
as to removeparticles adhering
to
the insides which might hamper further
collection.
I
NOTE:
If you connect
a
Makita vacuum cleaner to your saw, more efficient and cleaner opera-
tions can be performed.
13

Positioning
kerf
board
This tool is provided with the kerf boards in the turn base. The kerf boards are factory
adjusted
so
that the
saw
blade does not contact the kerf boards. Before use, adjust the
kerf boardsas follows:
First, remove the battery cartridge. Loosen the
all
screws
(2
each on left and right)secur-
ing the kerf boards. Re-tighten them to the extent that the kerf boards can be easily
moved bv hand. Lower the handle fully and push in the stopper pin to lock the handle in
the lowered position. Loosen the clamp
screw which secures the slide poles. Pull
the carriage toward
you
fully. Adjust the
kerf boards
so
that the kerf boards just
contact the sides of blade teeth slightly.
Tighten the front screws (do not tighten
firmly). Pushthe carriage toward the guide
fence fully and adjust the kerf boards
so
that the kerf boards just contact the sides
of blade teeth slightly. Tighten the rear
screws (donot tighten firmly). After adjust-
ingthe kerf boards, releasethe stopper pin
and raise the handle. Then tighten the
all
screws securely.
Saw blade
1
Blade
teeth
Kerf board
Left
bevel
cut Straight cut
CAUTION:
After changing the bevel angle, always readjust the kerf boards as described above.
14

Maintainingmaximumcutting capacity
This tool is factory adjusted to provide the max. cutting capacity for a
190
mm
(7-1/2")
saw blade. When using
a
saw blade other than 190 mm (7-1/2") saw blade, adjust the
lower limit positionof the bladeas follows:
First, remove the battery cartridge. Push the carriage toward the guide fence fully and
lower the handle completely. Use the socket wrench to turn the adjusting bolt until the
periphery of the bladeextends slightly belowthe top surface of the turn baseat the point
where the front face of the guide fence meetsthe top surface of the turn base.With the
battery cartridge removed, rotate the blade by handwhile holding the handle
all
the way
down to be sure that the blade does not contact any part of the lower base. Re-adjust
slightly, if necessary.
7
Adjusting bolt
Guide'fence Guide fence
Periphery
of
blade
Top
surface
of
turn base
-_____----
'.
CAUTION:
After installing
a
new blade, always be sure that the blade does not contact any part of
the lower base when the handle is lowered completely. Always do this with the battery
cartridge removed.
Stopper arm
The lower limit positionof the bladecan be
easily adjusted with the stopper arm. To
adjust it, move the stopper arm in the
direction of the arrow as shown in the
figure. Adjust the adjusting screw
so
that
the blade stops at the desired p.osition
when lowering the handlefully.
15

Positioningfor adjustingthe miter angle
The turn base turns up to 47" to the left
and 57" to the right. Loosen the grip
by
turning counterclockwise. Turn the turn
base while pressing down the lock lever.
Whenyou have movedthe grip to the posi-
tion where the pointer points to the
desired angle on the miter scale, securely
tightenthe grip clockwise.
I
Miter
scale
Turn
base
Lock
lever
CAUTION:
*When turningthe turn base, be sure to raisethe handlefully.
*After changingthe miterangle, always secure the turn base by tighteningthe grip firmly.
Positioningfor adjustingthe
bevel
angle
The saw bladetilts up to 45" to the left. To adjust the bevel angle, loosenthe lever at the
rear
of
the tool. Push the handleto the left to tilt the saw blade until the pointerpoints
to
the desiredangle on the bevelscale. Tightenthe lever to securethe arm.
I
Lever
CAUTION:
When tilting the saw blade, be sure to raise the handlefully.
*After changingthe bevelangle, always secure the arm
by
tighteningthe lever
Securingworkpiece
WARNING:
It is extremely important
to
always secure the workpiece properly and tightly with the
vise. Failure to do
so
can cause the tool to be damaged and/or the workpiece to be
destroyed. PERSONAL INJURY MAY ALSO RESULT. Also, after
a
cutting operation,
DO
NOT raise the blade untilthe blade has come to
a
completestop.
16

1.
Vertical vise
I
The vertical vise can be installed in two
positions on either the left or right side
of the guide fence, or the holder assem-
bly (optionalaccessory).
Insert the vise rod into the hole in the
guide fence or the holder assembly and
tighten the screw to secure the vise rod.
(Note:When using the holder
assembly,
install it on the holder as shown in the
figure.)
Position the vise arm according to the
thickness and shape of the workpiece
and secure the vise
arm
by tightening
the screw.
Holder Holder assembly Turn base
Make sure that
no
part of the tool contacts the vise when lowering the handle fully or
when pulling or pushing the carriage.
If
some part contacts the vise, re-position the
vise. Press the workpiece flat against the guide fence and the turn base. Position the
workpiece at the desired cutting position and secure it firmly by tightening the vise
knob.The maximumthickness of workpieces which can be secured by the vertical vise
is
50
mm
(2").
2.
Horizontal
vise
(optionalaccessory)
The horizontalvise can be installed on the left side of the base.
By
turning the vise knob
counterclockwise, the screw
is
releasedand the vise shaft can be moved rapidly in and
out.
To
grip workpieces, turn the vise knob gently clockwise untilthe projection reaches
its topmost position, then fasten securely.
If
the vise knob is forced in or pulled out
while being turnedclockwise, the projectionmay stop at an angle. Inthis case, turn the
vise knob back counterclockwise until the screw is released, before turning again gently
clockwise.The maximum width of workpieces which can be secured by the horizontal
vise
is
120
mm
(4-3/4")
Vise knob
I
Vise shaft
1
Projection
17

3.
Holdersand holder assembly (optionalaccessories)
The holders and the holder assembly can be installed on either side as
a
convenient
means
of
supporting workpieces horizontally. Install them as shown in the figures
below.Then tighten the screws firmly to secure the holders and the holder assembly.
II
Screws
Holder assembly
I
Holder Holder assembly
When cutting long workpieces, use the holder-rod assembly (optional accessory). It
consistsof two holder assemblies andtwo rods
12.
Holder assembly
//
CAUTl
ON
:
Always support long workpieces level withthe top surface
of
the turn base
for
accurate
cuts andto prevent dangerous
loss
of
controlof the tool.
18

Switch action
CAUTION:
Before insertingthe battery cartridge into the tool, always check to see that the switch
When not using the tool, remove the lock-off button and store it in a secure place. This
To prevent the switch trigger from being
accidentally pulled,
a
lock-off button is pro-
vided.
To
startthe
tool,
press inthe lock-off
button and pull the switch trigger. Release
the switchtrigger to stop.
trigger actuates properly and returnstothe "OFF" positionwhen released.
prevents unauthorizedoperation.
Operation
CAUTION:
Before use, be sure to release the handlefrom the lowered position by pulling the stop-
per pin.
Makesure the blade isnot contacting the workpiece, etc. beforethe switch isturnedon.
Do
not apply excessive pressure onthe handlewhen cutting. Too much force may result
inoverloadof the motor and/or decreasedcuttingefficiency.
*Gently press down the handle
to
perform the cut. If the handle
is
pressed down with
force or if lateralforce is applied, the blade
will
vibrate and leave
a
mark (sawmark) inthe
workpiece andthe precision of the cut
will
be impaired.
During
a
slide cut, gently push the carriage toward the guide fence without stopping. If
the carriage movement is stopped during the cut,
a
markwill be left in the workpiece and
the precision of the cut
will
be impaired.
1.
Presscutting (cuttingsmallworkpiecesl
*Workpieces up to
50
mm
(2")
high and
97
mm
(3-13/16")
wide can be cut in the
fol-
lowingway.
*Push the carriage toward the guide
fence fully and tighten the clamp
screw to secure the carriage. Secure
the workpiece withthe vise. Switch
on
the tool and
wait
until the blade attains
full speed before lowering gently into
the
cut. When the cut
is
completed,
switch off the tool and WAIT UNTIL
PLETE STOP before returning the
bladeto itsfully elevated position.
THE
BLADE
HAS
COME TO A COM-
CAUTION:
Firmly tighten the clamp screw
so
that the carriage will not move during operation.
Insufficient tightening may cause unexpected kickback of the blade. Possible serious
injury may result.
19

2.
Slide
(push)
cutting (cuttingwide workpieces)
*Workpieces up to
50
mm (2") highand
182
mm(7-1/8") wide can be cut inthe follow-
*Loosen the clamp screw
so
that the carriage can slide freely. Secure the workpiece
ingway.
with the vise. Pull the carriage toward
you fully. Switch on the tool and wait
until the blade attainsfull speed. Press
down the handle and PUSH THE CAR-
RIAGE TOWARD THE GUIDE FENCE
TO CUT THE WORKPIECE. When the
cut is completed, switch off the tool
and WAIT UNTIL THE BLADE HAS
COME TO A COMPLETE STOP before
returningthe blade to its fully elevated
position.
CAUTION:
*Whenever performing the slide cut, FIRST PULL THE CARRIAGE TOWARD YOU
FULLY and press down the handleto the fully loweredposition, the PUSH THE CAR-
RIAGE TOWARD THE GUIDE FENCE. If you performthe slide cut without pullingthe
carriage fully
or
if you performthe slide cut toward
your
direction, the blade may kick
back unexpectedlywith the potentialto cause serious injury.
*Never performthe slide cut with the handle locked inthe loweredposition by pressing
the stopper pin.
*Never loosenthe clamp screwwhich secures the cartridgewhile the blade is rotating.
This may cause serous injury.
3.
Miter cutting
Refer to the previously covered "Positioning for adjustingthe miterangle".
4. Bevel
cutting
At
a
left
45"
bevel angle, workpieces 35 mm (1-3/8") high and 182 mm (7-1/8") wide
can be cut.
Loosenthe lever and
tilt
the saw blade to
set
the bevelangle. Refer to the previously
covered "Positioning for adjustingthe bevelangle". Be sure
to
re-tightenthe lever firm-
ly
to secure the selected bevelangle safely. Securethe workpiece with the vise. Switch
on the tool and wait until the-blade
attains full speed. Then gently lowerthe
handle to the fully lowered position
while applying pressure in parallel with
the blade and PUSH THE CARRIAGE
TOWARD THE GUIDE FENCE
TO
CUT
THE WORKPIECE. When the cut
is
completed, switch off the tool andWAIT
UNTIL THE BLADE HAS COME TO A
COMPLETE STOP before returningthe
blade to its fully elevatedposition.
Apply
pressure
in
parallel
with
blade
20
This manual suits for next models
3
Table of contents
Other Makita Saw manuals

Makita
Makita DPB180RTE User manual

Makita
Makita MTL100 User manual

Makita
Makita SP001G User manual

Makita
Makita JR3050 User manual

Makita
Makita DSP601ZJU User manual

Makita
Makita DJR189 User manual

Makita
Makita LS004GZ User manual

Makita
Makita LS1211 User manual

Makita
Makita Makstar BSS610 User manual

Makita
Makita LS1018 User manual

Makita
Makita DSP600 User manual

Makita
Makita LS1040FS User manual

Makita
Makita 5007MG User manual

Makita
Makita 5104 User manual

Makita
Makita DHS710 User manual

Makita
Makita JR3050T User manual

Makita
Makita 5008B User manual

Makita
Makita DLS110 User manual

Makita
Makita 5008MG User manual

Makita
Makita UC3520A User manual