Makita EH6000W Instruction Manual

Owner’s and Safety Manual
for Hedge Trimmer
Manuel d’emploi et de sécurité
du Taille-Haie Thermique
Manual de empleo y de seguridad
para el Corta Setos a Gasolina
EH5000W
EH6000W
EH7500W
WARNING!
To reduce the RISK of injury, user must read and understand the instruction manual before using the hedge
trimmer.
AVERTISSEMENT!
An de réduire les RISQUES de blessure, l’utilisateur doit lire et comprendre ce manuel d’instructions avant
d’utiliser le taille-haie.
¡ADVERTENCIA!
Para reducir el RIESGO de lesiones, el usuario deberá leer y comprender el manual de instrucciones antes de
usar el cortasetos.

2
Thank you very much for selecting the MAKITA hedge trimmer. We are pleased
to be able to offer you the MAKITA hedge trimmer which is the result of a long
development program and many years of knowledge and experience.
The hedge trimmer models EH5000W, EH6000W and EH7500W combine the
advantages of state-of-the-art technology with ergonomic design, light weight,
handy, compact and represent professional equipment for a great variety of
applications.
Please read, understand and follow this booklet which refers in detail to
the various points that will demonstrate its outstanding performance. This
will assist you to safely obtain the best possible results from your MAKITA
hedge trimmer.
It is very important to understand the following symbols when reading this instructions manual.
SYMBOLS
English
WARNING/DANGER Wear protective helmet,
eye and ear protection!
Read, Understand and Follow
Instruction Manual Fuel and oil mixture
Forbidden Engine-Manual start
No smoking Emergency stop
No open ame First Aid
Protective gloves must be worn ON/START
Keep the area of operation clear of all
persons and pets OFF/STOP
(Original instructions)
Table of Contents Page
Symbols.........................................................................2
Safety instructions .........................................................3
Technical data................................................................6
Designation of parts.......................................................7
Fuels/refueling...............................................................8
Precautions before starting............................................9
Starting the machine....................................................10
Stopping the machine..................................................10
Operation of the machine ............................................ 11
Adjusting rear handle angle......................................... 11
Maintenance instructions.............................................12
Storage........................................................................15
Maintenance schedule.................................................15
Fault location ...............................................................15

3
General Instructions
- THIS MACHINE CAN CAUSE SERIOUS INJURIES. Read the Instructions
carefully for correct handling, preparation, maintenance, starting and stopping of
the machine. Be familiar with all controls and the proper use of the machine. (1)
- It is recommended only to loan the hedge trimmer to people who have proven to
be experienced with hedge trimmers.
Always hand over the instruction manual.
- First-time users should ask the dealer for basic instructions to familiarize
themselves with handling of an engine powered hedge trimmer.
- Children and young persons aged under 18 years must not be allowed to operate
the hedge trimmer. Persons over the age of 16 years may however use the
device for the purpose of being trained only while under the supervision of a
qualied trainer.
- Use the hedge trimmer with the utmost care and attention.
- Operate the hedge trimmer only if you are in a good physical condition. Perform
all work calmly and carefully. The user has to accept liability for others.
- Never use the hedge trimmer after consuming alcohol or drugs, or if feeling tired
or ill. (2)
Intended use of the machine
- The hedge trimmer is designed for only the purpose of trimming bushes and
hedges, and must not be used for any other purpose. Do not abuse the Trimmer.
Personal protective equipment
- The clothing worn should be functional and appropriate, i.e. it should be tight-
tting but not cause hindrance. Do not wear jewelry or loose clothing which could
become entangled with bushes or shrubs, or the machine.
- In order to avoid eye, hand or foot injuries as well as to protect your hearing,
the following protective equipment and protective clothing must be used during
operation of the hedge trimmer.
- During operation of the hedge trimmer always wear goggles or a visor to prevent
eye injuries. (3)
- Wear adequate noise protection equipment to avoid hearing impairment, ear
muffs, ear plugs, etc. (3)
- We strongly recommend that the user wears work overalls. (4)
- Special gloves made of thick leather are part of the prescribed equipment and
must always be worn during operation of the hedge trimmer. (4)
- When using the hedge trimmer, always wear sturdy shoes with a non- slip sole.
This protects against injuries and ensures a good footing. (4)
SAFETY INSTRUCTIONS
(1)
(2)
(3)
(4)

4
Starting up the hedge trimmer
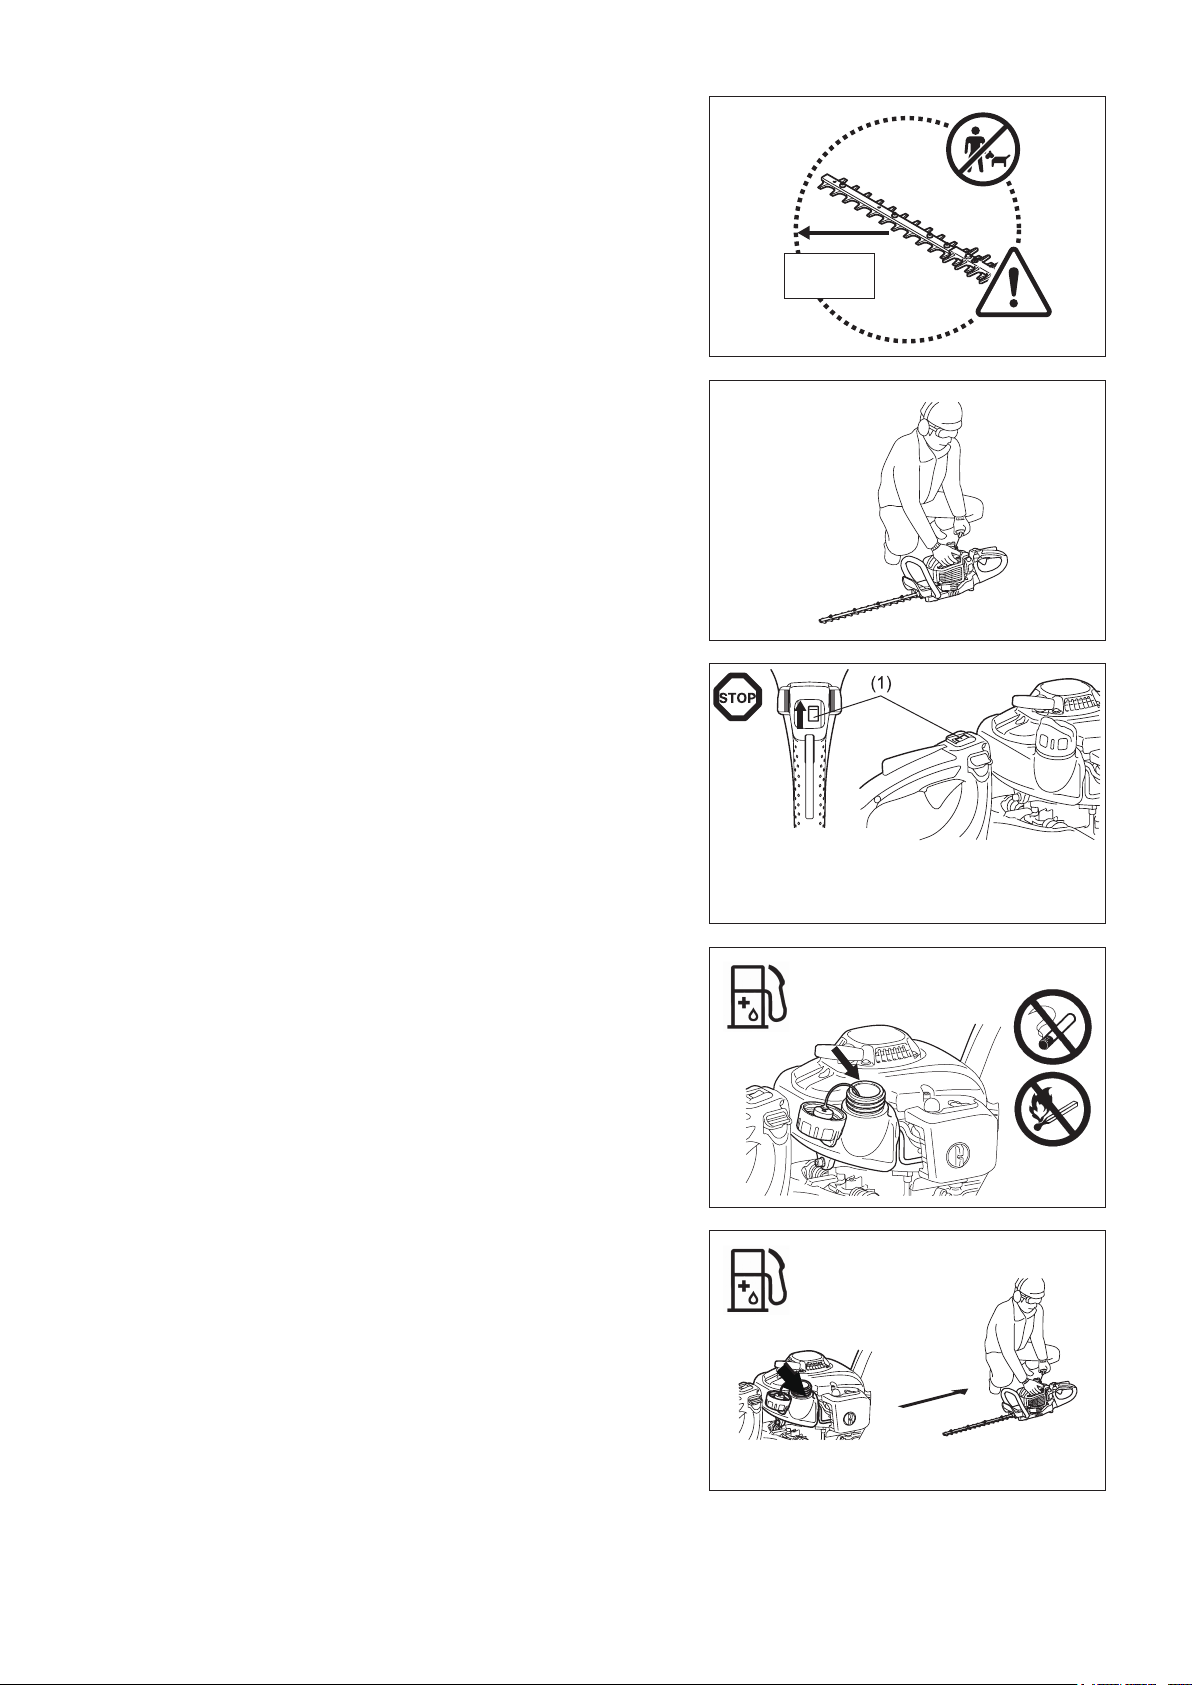
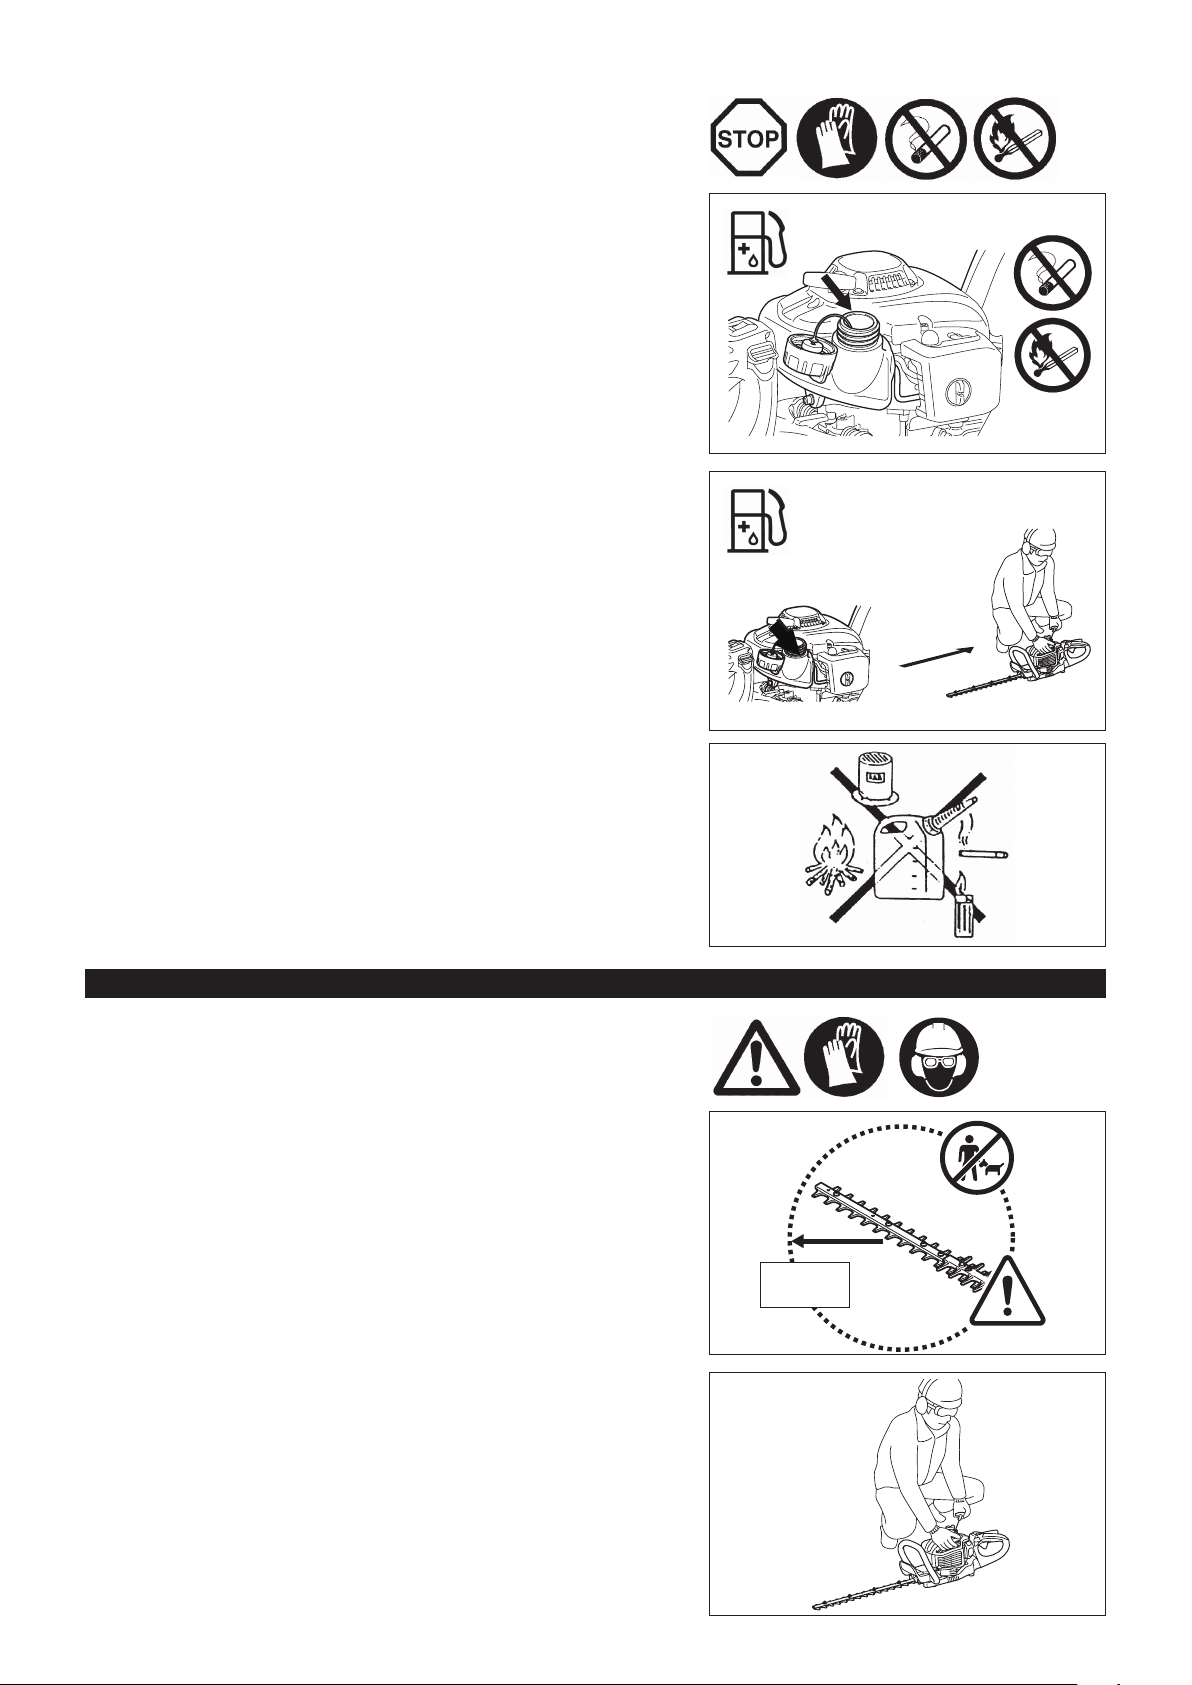
- Please make sure that there are no children or other people within a working
range of 15 meters (5), also pay attention to any animal in the working vicinity.
- Before operating, always check the hedge trimmer is safe for operation.
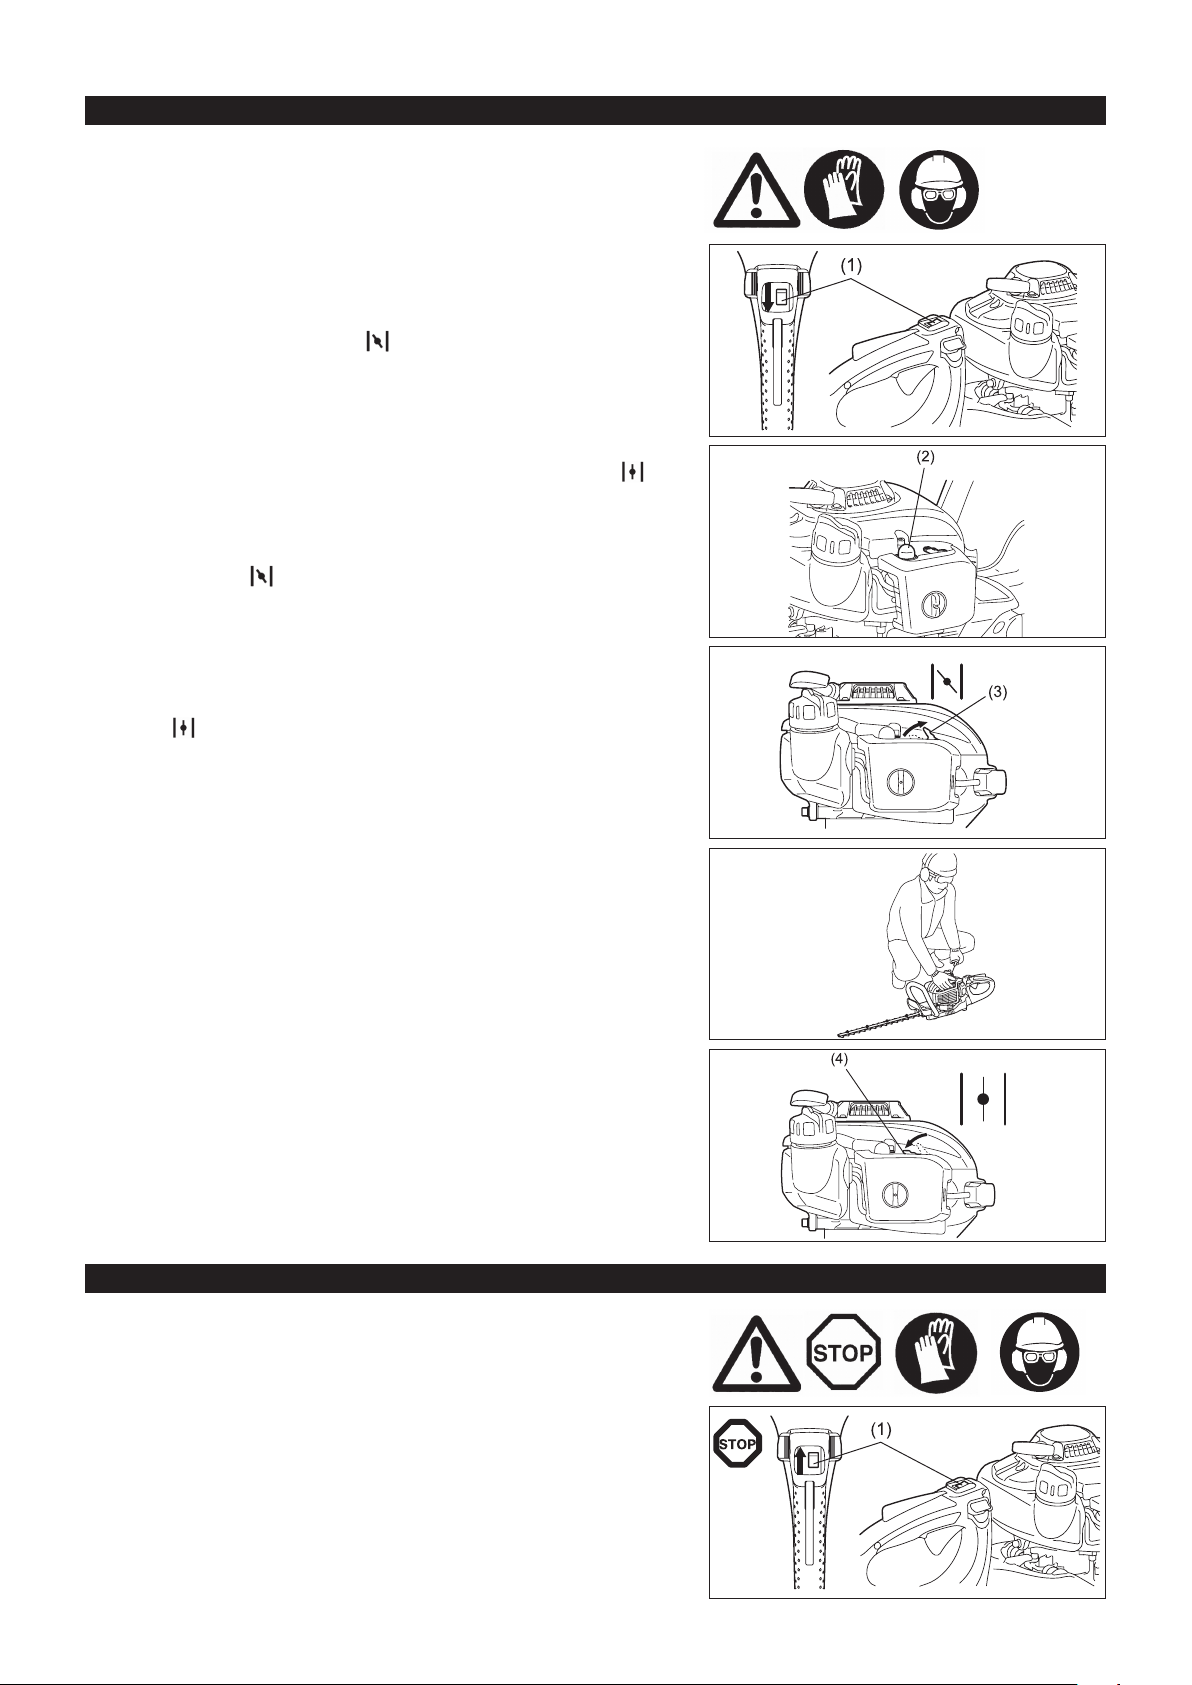
- Check the security of the throttle lever. The throttle lever should be checked for
the smooth and easy actions. Check for proper functioning of the throttle lever
lock. Check for clean and dry handles and test the function of the I-O switch.
Keep handles free of oil and fuel.
Start the hedge trimmer only in accordance with the instructions.
Do not use any other methods for starting the engine (6)!
- Use the hedge trimmer only for applications specied.
- Start the hedge trimmer engine only after the entire assembly is done. Operation
of the hedge trimmer is permitted only after all the appropriate accessories are
attached!
- Before starting, make sure that the cutter blade will not contact any objects such
as branches, stones, etc.
- Stop the engine immediately if there are any engine problems.
- During operation, hold both the front and rear handle rmly by wrapping your
ngers around the handles. Keep handles clean and free of moisture, resin, oil or
grease.
Always ensure a safe, well-balanced footing.
- Only use outdoors.
- Always be aware of your surroundings and stay alert for possible hazards that
you may not hear due to the noise of the machine.
- Operate the hedge trimmer in such a manner as to avoid inhalation of the
exhaust gases. Never run the engine in enclosed rooms (risk of suffocation and
gas poisoning). Carbon monoxide is an odorless gas. Always ensure there is an
adequate ventilation.
- Stop the engine when resting and when leaving the hedge trimmer unattended.
Place it in a safe location to prevent danger to others or, setting re to
combustible materials or damage to the machine.
- Never put the hot hedge trimmer onto dry grass or onto any combustible
materials.
- To reduce re hazard, keep the engine and silencer free of debris, leaves, or
excessive lubricant.
- Never operate the engine with a faulty exhaust mufer.
- Stop the engine during transport (7).
- Stop the engine before:
- Cleaning a blockage;
- Checking, maintenance or working on the machine.
- Position the hedge trimmer safely during car or truck transportation to avoid a fuel
leakage.
- When transporting the hedge trimmer ensure that the fuel tank is completely
empty to avoid fuel leakage.
- When transporting or storing the machine always t the cutting device guard.
Refuelling
- Stop the engine before refuelling (7), keep well away from open ame (8) and do
not smoke.
- Do not attempt to refuel a hot or a running engine.
- Avoid skin contact with petroleum products. Do not inhale fuel vapors. Always
wear protective gloves during refuelling. Change and clean protective clothing at
regular intervals.
- Take care not to spill either fuel or oil in order to prevent soil contamination
(environmental protection). Wipe down the hedge trimmer immediately after fuel
has been spilled. Dry the cloths used for wiping the fuel at a well ventilated area
before disposing them. Failure to do so may cause spontaneous combustion.
- Avoid any fuel contact with your clothes. Change your clothes immediately if fuel
has been spilled on it (dangerous hazard).
- Inspect the fuel cap at regular intervals making sure that it stays securely fastened.
- Carefully tighten the fuel tank cap. Change locations to start the engine (at least 3
meters away from the place of refuelling) (9).
- Never refuel in closed rooms. Fuel vapors accumulate at ground level (risk of
explosions).
- Only transport and store fuels in approved containers. Make sure stored fuel is
not accessible to children.
- When mixing gasoline with two-stroke engine oil, use only gasoline which
contains no ethanol or methanol (types of alcohol).
This will help to prevent damage to fuel lines and other engine parts.
15 meters
(50 feet)
360°
(5)
(6)
(7)
• Resting
• Transporting
• Refuelling
• Maintenance
• Tool Replacement
(8)
(9)
3 meters
(10 feet)

5
Method of operation
- Always use two hands to grip each handle during operation.
- Use the hedge trimmer only in a good light and visibility. During cold seasons
beware of slippery or wet areas, ice and snow (risk of slipping). Always ensure a
safe footing.
- Never work on unstable surfaces or steep terrain.
- Never stand on a ladder and run the hedge trimmer.
- Never climb up onto trees to perform cutting operation with the hedge trimmer.
- To reduce the risk of stumbling and loss of control, do not walk backward while
operating the machine.
- Always stop the engine before cleaning or servicing the unit or replacing parts.
- Do not operate the machine with a damaged or excessively worn cutting device.
Maintenance instructions
- Be kind to the environment. Operate the hedge trimmer with as little noise and
pollution as possible. In particular check the correct adjustment of the carburetor.
- Clean the hedge trimmer at regular intervals and check that all screws and nuts
are securely tightened.
- Never service or store the hedge trimmer in the vicinity of open ames, sparks,
etc. (11).
- Empty the fuel tank before storing the hedge trimmer.
- Never store the hedge trimmer in the vicinity of naked ames to avoid res.
- Store the hedge trimmer in well ventilated and high or locked location out of reach
of children.
- Do not attempt to repair the machine unless you are qualied to do so.
Observe and follow all relevant accident prevention instructions issued by the trade associations safety board and by insurance
companies.
Do not perform any modications to the hedge trimmer as this will risk your safety.
The performance of maintenance or repair work by the user is limited to those activities as described in this instruction manual. All other works
are to be done by Authorized Service Agents.
Use only genuine spare parts and accessories supplied by MAKITA authorized or factory service centers.
Use of non-approved accessories and tools means increased risk of accidents and injuries. MAKITA will not accept any liability for accidents or
damage caused by the use of any non-approved accessories.
First aid
In case of an accident make sure that a well-stocked rst-aid kit according to DIN
13164, is available in the vicinity of the cutting operations.
Immediately replace any item taken from the rst aid kit.
When asking for help, please give the following information:
- Place of accident
- What happened
- Number of injured persons
- Extend of injuries
- Your name
(10)
(11)

6
TECHNICAL DATA
Model EH5000W EH6000W EH7500W
Dimension (L x W x H) mm (inch) 1,014 x 262 x 216
(40” x 10-3/8” x 8-1/2”)
1,119 x 262 x 216
(44” x 10-3/8” x 8-1/2”)
1,259 x 262 x 216
(49-1/2” x 10-3/8” x 8-1/2”)
Mass (without blade cover) kg (lbs) 4.8 (10.5) 5.0 (11.0) 5.2 (11.4)
Volume (fuel tank) L (.oz) 0.4 (13.5)
Engine displacement cm3(cu.in) 22.2 (1.35)
Cutting length mm (inch) 483 (19”) 588 (23-1/8”) 728 (28-3/4”)
Maximum engine performance kW (hp) 0.68 (0.91)
Stroke per minute 4,270
Idling speed RPM 3,000
Clutch engagement speed RPM 4,000
Carburetor type type WALBRO WYL
Ignition system type Solid state ignition
Spark plug type NGK CMR6A
Electrode gap mm (inch) 0.7 - 0.8 (1/32”)
Mixture ratio
(fuel: engine oil)
MAKITA genuine two-stroke
engine oil 50 : 1
Other manufacutrer's two-stroke
engine oil 25 : 1
Gear ratio 9 : 43
(For Canada)
NOTE: This spark ignition system complies with the Canadian standard ICES-002.

7
DESIGNATION OF PARTS
DESIGNATION OF PARTS DESIGNATION OF PARTS DESIGNATION OF PARTS
1 Blade 7 Carburetor (not shown) 13 Release lever
2 Blunt extension 8 I-O switch (ON-OFF) 14 Mufer
3 Front handle 9 Spark plug 15 Primer pump
4 Recoil starter 10 Lock-off lever 16 Fuel tank
5 Fuel tank cap 11 Throttle lever 17 Blade cover
6 Choke lever 12 Rear handle
1
11
12
8
14
10
4
3
2
6
1516
7
13
59
17

8
Fuel and oil mixture
- The engine of the hedge trimmer is a high-efciency two-stroke engine.
It is run with a mixture of fuel and two-stroke engine oil. The engine is designed
for unleaded regular fuel with a min. octane value of 91 ROZ.
In case no such fuel is available, you can use fuel with a higher octane value.
This will not damage the engine, but may cause poor operating behaviour.
A similar situation will arise from the use of leaded fuel.
To obtain optimum engine operation and to protect your health and the
environment, only unleaded fuel should be used!
- For lubricating the engine use a two-stroke engine oil (quality grade: TSC-3),
which is added to the fuel.
The engine has been designed for use with MAKITA two-stroke engine oil and a
mixture ratio of 50:1 only to protect the environment. In addition, a long service
life and a reliable operation with a minimum emission of exhaust gases is
guaranteed. It is absolutely essential to observe a mixture ratio of 50:1 (MAKITA
2-stroke engine oil), otherwise the reliable function of the hedge trimmer cannot
be guaranteed.
- The correct mixture ratio:
Gasoline: Specied two-stroke engine oil = 50 : 1 or
Gasoline: Other manufacturer’s two-stroke engine oil = 25 : 1
recommended
NOTE: For preparing the fuel-oil mixture, rst mix the entire oil quantity with half of
the fuel required in an approved canister which meets or exceeds all local
code standards. Then add the remaining fuel.
Thoroughly shake the mixture before lling it into the hedge trimmer’s tank.
Do not add more engine oil than specied to ensure safe operation. It will
only result in a higher production of combustion residues which will pollute
the environment and clog the exhaust channel in the cylinder as well as the
mufer. In addition, the fuel consumption will rise and the performance will
decrease.
Handling petroleum products
Utmost care is required when handling fuels. Fuels may contain substances similar
to solvents. Refuel either in a well ventilated area or outdoors. Do not inhale fuel
vapors, avoid any contact of fuel or oil with your skin.
If your skin comes in contact with these substances repeatedly and for an extended
period of time, it will desiccate.
Various skin diseases may result. In addition, allergic reactions are known to occur.
Eyes can be irritated by contact with oil, fuel etc.
If oil, fuel, etc., comes into your eyes, immediately wash them with clear water.
If your eyes are still irritated, see a doctor immediately!
FUELS/REFUELING
Observe the Safety Instructions on page 4.
1,000 cm3(1 litter)
5,000 cm3(5 litter)
10,000 cm3(10 litter)
20 cm340 cm3
100 cm3200 cm3
200 cm3400 cm3
Gasoline Oil
+
50:1
50:1 25:1

9
Refuelling
- The engine must be switched off.
- Stop the engine during refuelling, keep away from ames and do not smoke.
- Take care not to spill either fuel or oil in order to prevent soil contamination.
Clean the hedge trimmer immediately after fuel has been spilled.
- Do not spill fuel onto the engine. Wipe down if the fuel is spilled.
- Avoid any fuel contact with your clothes. Change your clothes instantly if fuel has
been spilled on it (to prevent clothes catching re).
- Inspect the fuel cap regularly making sure that it can be securely fastened and
does not leak the fuel.
- Carefully tighten the fuel tank cap. Change location to start the engine (at least
3 meters away from the place of refuelling.)
- Never refuel in closed rooms. Fuel vapors accumulate at ground level. (Risk of
explosions.)
- Transport and store fuel only in approved containers. Make sure the fuel stored is
not accessible to children.
- Thoroughly clean the area around the tank cap to prevent dirt from getting into
the fuel tank.
- Unscrew the plug and ll the tank with fuel. Use a gauze funnel to lter the fuel.
- Tightly screw on the plug by hand only.
- Clean around the screw plug and the tank after refuelling.
- Always wipe up any spilled fuel to prevent a re.
Storage of fuel
- Fuel cannot be stored for an unlimited period of time.
- Purchase only the quantity required for a 4 week operation period.
- Use approved fuel storage containers only.
- Make sure that there are no children or other people within a working range of
15 meters. Also pay attention to any animal in the working vicinity.
- Before use always check that the hedge trimmer is safe for operation. Check the
cutting device is not damaged, the control lever for easy action and check for the
proper function of the I-O switch.
Make sure that the cutting blades do not run when the engine is idling.
Check with your dealer for adjustment if in doubt. Check for clean and dry
handles and test function of the I-O switch.
- Start the hedge trimmer only in accordance with the instructions. Do not use any
other methods for starting the engine. (See Starting)
- Start the engine only after the entire assembly is done. Operation of the engine is
only permitted after all the appropriate accessories are attached. Otherwise there
is a risk of injury.
- Before starting, make sure that the cutting blades have no contact with objects
such as branches, stones, etc.
- Before trimming, inspect the area for wires, cords, glass, or other foreign objects
which could come in contact with the blade.
- Electrical shock. Be aware of any and all electric lines and electric fences. Check
all areas for electrical lines before cutting.
PRECAUTIONS BEFORE STARTING
3 meters
(10 feet)
Diagrammatic
gure
15 meters
(50 feet)
360°

10
Move at least 3 meters away from the place of refuelling. Place the hedge trimmer
on a clean area of ground. Make sure that the cutting blades do not come into
contact with the ground or any other objects.
Cold starting: (When the engine is cold or it has been stopped for more than
5 minutes or when fuel is added to the engine.)
1. Push the I-O switch (1) to “I” position.
2. Repeat pushing the primer pump (2) gently (7 to 10 times) until the fuel comes
into the primer pump.
3. Move the choke lever (3) to position “ ”.
4. Hold the hedge trimmer down rmly to avoid loss of control while cranking the
engine. Failure to do so may cause serious injury and/or property damage due to
falling or contact with the cutting blade.
5. Pull the starter handle slowly for 10 to 15 cm until you feel the resistance.
6. Pull the starter handle strongly with feeling the resistance and start the engine.
7. When the engine starts or pop-up and stop, return the choke lever (4) to “ ”.
8. Run the engine for approximately one minute at a moderate speed before
accelerating to full throttle.
Note: • If the starter handle is pulled repeatedly when the choke lever
remains at “ ” position, the engine will not start easily due to
excessive fuel intake.
• In case of excessive fuel intake, remove the spark plug and pull the
starter handle slowly to remove excess fuel. Also, dry the electrode
section of the spark plug.
Hot starting: (Restarting immediately after the engine has stopped.) When
restarting a hot engine, rst try the above procedure: 1, 2, 4, 5, 6 with the choke
lever (4) to “ ”. If the engine does not start, repeat above steps 1-8.
Note: Do not pull the starter rope to its full extension. Do not allow the
starter grip to be retracted without control. Ensure that it is retracted
slowly.
STARTING THE MACHINE
1. Release the throttle lever completely.
2. Push the I-O switch (1) to “O” position. The engine will slow down and stop.
STOPPING THE MACHINE

11
- Never operate the hedge trimmer with a loose grip.
- Never touch the cutting blades when starting the engine and during operation.
- Operate the hedge trimmer in such a manner as to avoid inhalation of the
exhaust gases. Never run the engine in enclosed rooms (Risk of gas poisoning).
Carbon monoxide is an odorless gas.
- All protective equipment such as a guard supplied with the machine must be used
during operation.
- Never operate the engine if the mufer is faulty or missing.
- Use the hedge trimmer only in good light and visibility.
- During the winter season beware of slippery or wet areas, ice and snow. (Risk of
slipping.) Always ensure a safe footing.
- Never stand on a ladder and run the hedge trimmer. Keep both feet on the
ground.
- Never climb up the trees with the hedge trimmer to perform cutting operation.
- Never work on unstable surfaces.
- Remove sand, stone, nails, wire, etc. found within the working area. Foreign
objects may damage the cutting blades.
- Prior to the cutting operation, cut away 8 mm or thicker branches with pruning
shears.
- Before commencing cutting, the cutting blades must have reached full working
speed.
- Always hold the hedge trimmer rmly with both hands on the handles.
- Use a rm grip with thumbs and ngers encircling the handles.
- When you release the throttle, it takes a few moments before the cutting blades
stop.
- Do not operate the hedge trimmer with high idle speed. You cannot adjust the
cutting speed with the throttle control if the idle speed is too high.
- During the cutting operation, hold the hedge trimmer so that the blades form a
15-30° angle with the cutting line.
- Pay special attention when cutting hedges close to or against wire fences.
- Do not touch hard objects such as wire fence, stone or ground with the cutter
blades. It may cause blades to crack, chip or break.
- Should the cutting blades hit stones or other hard objects, immediately switch off
the engine and inspect the cutting blades for damage. Replace damaged blades
before re-commencing work.
- Take a rest periodically. MAKITA recommends to take a 10- to 20-minute rest
every 50 minutes of use.
- Switch off the engine immediately in case of any engine problems.
- Operate the hedge trimmer with as little noise and contamination as possible. In
particular check the correct setting of the carburetor and the fuel/oil ratio.
- Never attempt to remove jammed cut material when blades are running. Put unit
down, turn it off, and remove necessary cuttings.
The rear handle can be turned down to 90° to the left or right side and set at every
45°.
To change the angle:
1. Press the release lever to release the lock.
2. Turn the handle to an angle of 0°, 45° or 90°.
3. Make sure that the release lever returns to the original position to engage the
lock.
Do not pull the throttle lever while the lock is released.
Do not release the lock during operation.
OPERATION OF THE MACHINE
ADJUSTING REAR HANDLE ANGLE

12
- Turn off the engine and remove the spark plug connector when cleaning/replacing/sharpening the cutting blades or carrying out any
maintenance.
- Never straighten or weld a damaged cutting blade.
- Frequently inspect the cutting blades for damage with the engine switched off.
- Keep the cutting blades sharp.
- Clean the hedge trimmer and check that all screws and nuts are well tightened regularly.
- Never service the hedge trimmer in the vicinity of naked ames to avoid res.
- Always wear leather gloves when handling or sharpening the blades, as they are sharp.
Sharpening blade
If the edges are rounded and do not cut well any more, grind off only the shaded
portions in the gure. Do not grind the contact surfaces (sliding surfaces) of the top
and bottom edges.
- Before grinding, be sure to secure the blade rmly and switch off the engine and
remove the spark plug cap.
- Wear gloves, protective glasses, etc.
- Do not remove too much material. It lose the hardened layer and cause the
blades to get dull very quickly in use.
Adjusting blade clearance
The upper/lower blades wear. If you cannot get a clean cut though the blades are
sharp enough, adjust the clearance as follows.
1. Remove the blunt extension by loosen the screws.
2. Loosen the nut (1) with a box or open-ended wrench.
3. Tighten the truss bolt (2) with a hex wrench lightly till it stops and screw it back a
quarter turn.
4. Tighten the nut (1), holding the truss bolt (2).
5. Apply light oil on the friction surface of the blades.
6. Start the engine, operate the throttle on and off for a minute.
7. Measure the time necessary for the blades to stop after releasing the throttle. If it
is two seconds or longer, stop the engine and repeat the step 2 to 7.
8. Stop the engine and touch the blade surface. If they are not too hot to touch, you have made a proper adjustment. If they are too hot to touch,
turn the truss bolt (2) back a little and repeat the step 6 to 8.
9. Attach the blunt extension by tightening the screws.
NOTE: Before making the adjustment, stop the engine and wait for the blades to stop.
The blades have a slot around screw (2). In case you nd dust in the end of any of the slots, clean it.
MAINTENANCE INSTRUCTIONS
10° 10°
45°
Disk grinder
Edge cross
section
Holding the disk grinder at
a 45° angle, grind the edge
off to the dotted line to
sharpen the rounded tip.
①Nut
②Truss bolt
③Blade guide
④Upper blade
⑤Lower blade

13
Checking and adjusting the idling speed
The cutting blades should not run when the engine is at idle.
- Idle speed should be set to 3,000 min-1 (rpm).
- If necessary, adjust the idle screw (the cutting blades must not run when the
engine is on idle).
• The cutting blades run while idling - turn the idle screw counterclockwise to
decrease the idle speed.
• The engine stops while idling - turn the idle screw clockwise to increase the idle
speed.
- If the cutting blades still continue to run at idle after the adjustment, consult your
nearest authorized service agent.
• The clutch should engage at 3,750 min-1 (rpm) or higher revolution.
• Check the functioning of the I-O switch, the lock-off lever and the throttle lever.
Cleaning the air cleaner
DANGER: Inammables strictly prohibited
Check and clean the air cleaner daily or every 10 operating hours.
- Turn the choke lever to the close side fully, and keep the carburetor free from
dust or dirt.
- Loosen the xing bolt.
- Pull the rear side of the air cleaner cover and move it forward to detach.
- If oil adheres to the element (sponge), squeeze it rmly.
- For heavy contamination:
1) Remove the element (sponge), immerse it in warm water or in water-diluted
neutral detergent, and dry it completely.
2) Clean the element (felt) with gasoline, and dry it completely.
- Before attaching the elements, be sure to dry it completely. Insufcient drying of
the elements may lead to difcult startup.
- Wipe out oil adhering around the air cleaner with waste cloth.
- Immediately after cleaning is nished, attach the cleaner cover and tighten it with
xing bolts. (In remounting, rst place the upper claw.)
Points in handling the air cleaner elements
- Clean the elements several times a day, if excessive dust adheres to it.
- If operation continues with the elements remaining not cleared of oil, oil in
the air cleaner may fall outside, resulting in oil contamination.
Element (Sponge)
Fixing bolt
Element (felt)
Upper claw

14
For any maintenance or adjustment not described in this manual, ask your local MAKITA authorized service center.
Daily checkup and maintenance
To ensure a long service life and to avoid any damage to the equipment, the following servicing operations should be performed at regular
intervals.
- Before use;
• Check the machine for loose screws or missing parts. Pay particular attention to the tightness of the cutter blade screws.
• Check for clogging of the cooling air passage and the cylinder ns. Clean them if necessary.
• Clean and check the fuel tank for fuel leakage or foreign object in the tank.
- After use;
• Clean the hedge trimmer externally and inspect for damage.
• Clean the air lter. When working under extremely dusty conditions, clean the lter several times a day.
• Check the blades for damage and make sure they are rmly mounted.
Checking the spark plug
Check and clean the spark plug daily or every 8 operating hours.
- Only use the supplied universal wrench to remove or install the spark plug.
- The gap between the two electrodes of the spark plug should be 0.7 to
0.8 mm. If the gap is too wide or too narrow, adjust it. If the spark plug is
clogged with carbon or fouled, clean it thoroughly or replace it. Use an exact
replacement.
0.7 - 0.8 mm
Grease nipple
Tank cap
Fuel pipe
Supplying grease and lubricant
- Supply grease through the grease nipple every 50 operating hours. (Shell
Alvania No. 3 or equivalent)
NOTE: Be sure to observe the specied time and amount of grease supply.
Otherwise an insufcient grease supply will cause a machine trouble.
Cleaning the fuel lter (suction head in the fuel tank)
WARNING: Inammables strictly prohibited
Check and clean the fuel lter monthly or every 50 operating hours.
- The felt lter (1) of the suction head is used to lter the fuel required by the
carburetor.
- Visually check the felt lter regularly.
- To check the felt lter, open the tank cap, use a wire hook and pull out the
suction head through the tank opening.
Replace the felt lter if it has hardened, been contaminated or be clogged.
- Replace the felt lter at least quarterly to ensure an enough fuel supply to the
carburetor. Otherwise an insufcient fuel supply will cause the engine start
failure and limited maximum speed.
Replacing the fuel pipe
CAUTION: Inammables strictly prohibited
Check and clean the fuel pipe daily or every 10 operating hours.
Replace the fuel pipe every 200 operating hours or every year regardless of
operating frequency. Otherwise fuel leakage may lead to re.
If you nd any leakage during inspection, replace the oil pipe immediately.
Replacing the tank cap
- If there is any aw or damage on the tank cap, replace it.
- The tank cap wears out in course of time. Replace it every two or three years.

15
- When keeping the machine in storage for a long time, drain fuel from the fuel tank
and carburetor, as follows: Drain all fuel from the fuel tank.
- Remove the spark plug and add a few drops of oil into the spark plug hole. Then,
pull the starter gently to conrm that oil lm covers inside of the engine and
tighten the spark plug.
- Clear dirt or dust from the cutter blade and outside of the engine, wipe them with
a oil-immersed cloth and keep the machine at a place as dry as possible.
STORAGE
After each refuelling Throttle lever
I-O switch
Check the function
Check the function
Before each use Engine assembly,
screws and nuts
Air lter
Cooling air duct
Cutting tool
Idling speed
Fuel tank
Visually check for damage and tightness
Check for general condition and security
Clean
Clean
Check for damage and sharpness
Inspection (cutting tool must not move)
Check and clean
Every 50 hours Gear case Supply grease
Weekly Spark plug Check and replace if necessary
Yearly Fuel pipe Replace
Biyearly Tank cap Replace
Before long term storage Fuel tank
Carburetor
Suction head
Empty and clean
Operate until the engine runs out of fuel
Replace
MAINTENANCE SCHEDULE
FAULT LOCATION
Fault System Observation Cause
Engine not starting or
under difculties
Ignition system Ignition spark is present Faulty fuel supply or compression system, mechanical
defect
No ignition spark I-O switch operated, wiring fault or short circuit, spark
plug or connector defective, ignition module faulty
Fuel supply Fuel tank lled Incorrect choke position, carburetor defective, suction
head (gas line lter) dirty, fuel supply line bent or
interrupted
Compression Inside of engine Cylinder bottom gasket defective, crankshaft seals
damaged, cylinder or piston rings defective
Outside of engine Improper sealing of spark plug
Mechanical fault Starter not engaging Broken starter spring, broken parts inside of the engine
Warm start problems Tank lled Ignition spark
existing
Carburetor contaminated, have it cleaned
Engine starts but dies
immediately
Fuel supply Tank lled Incorrect idling adjustment, suction head or carburetor
contaminated
Fuel tank vent defective, fuel supply line interrupted,
cable or I-O switch faulty
Insufcient performance Several systems may
simultaneously be
affected
Engine idling Air lter contaminated, carburetor contaminated, mufer
clogged, exhaust duct in the cylinder clogged

16
Nous vous remercions d’avoir choisi le taille-haie MAKITA. Nous sommes
heureux d’être en mesure de vous proposer le taille-haie MAKITA qui est le
fruit d’un long programme de développement et de nombreuses années de
connaissances et d’expérience.
Les modèles de taille-haie EH5000W, EH6000W et EH7500W associent les
avantages d’une technologie dernier cri avec un design ergonomique, un
faible poids, une petite taille et une grande praticité. Il s’agit d’un équipement
professionnel adapté pour une grande variété d’applications.
Veuillez lire, comprendre et suivre les instructions de ce document qui
décrit en détails les performances remarquables de cette machine. Il
vous aidera à obtenir les meilleurs résultats possibles de votre taille-haie
MAKITA en toute sécurité.
Il est primordial que vous compreniez les symboles suivants lorsque vous lisez ce manuel d’instructions.
PICTOGRAMMES
Français
AVERTISSEMENT/DANGER Porter le casque, les lunettes et
acoustiques de protection!
Lire, comprendre et suivre
les consignes du manuel d’instructions Mélange d’essence et d’huile
Interdit Démarrage manuel du moteur
Défense de fumer Arrêt d’urgence
Flamme nue interdite Premiers soins
Gants de protection obligatoires MARCHE/DÉMARRAGE
Zone de fonctionnement interdite aux
individus et aux animaux ARRÊT/COUPURE MACHINE
(Mode d’emploi original)
Table des matières Page
Pictogrammes..............................................................16
Consignes de sécurité.................................................17
Données techniques....................................................20
Désignation des pièces ...............................................21
Essence/remplissage du réservoir ..............................22
Précautions avant utilisation........................................23
Démarrage de la machine ...........................................24
Arrêt de la machine .....................................................24
Fonctionnement de la machine ...................................25
Réglage de l’angle de la poignée arrière.....................25
Consignes d’entretien..................................................26
Entreposage ................................................................29
Programme d’entretien................................................29
Emplacement des défaillances....................................29

17
Consignes générales
- L’UTILISATION DE CETTE MACHINE COMPORTE UN RISQUE DE
BLESSURE. Lisez attentivement les instructions an de manipuler, préparer,
entretenir, démarrer et arrêter correctement la machine. Familiarisez-vous avec
toutes les commandes et l’utilisation correcte de la machine. (1)
- Il est recommandé de prêter cet équipement seulement à des personnes ayant
déjà utilisé un taille-haie.
Remettez toujours le manuel d’instructions avec la machine.
- Les utilisateurs inexpérimentés doivent demander des instructions de base au
vendeur an de se familiariser avec la manipulation d’un taille-haie à moteur.
- Les enfants et les mineurs ne doivent pas être autorisés à utiliser le taille-haie.
Les individus âgés de plus de 16 ans peuvent toutefois utiliser la machine en vue
d’apprentissage, mais toujours sous la surveillance d’une personne qualiée.
- Utilisez le taille-haie avec le maximum de soin et d’attention.
- Utilisez le taille-haie seulement si vous êtes en bonne forme physique. Manipulez
délicatement et soigneusement la machine. L’utilisateur doit endosser la
responsabilité du fait d’autrui.
- N’utilisez jamais le taille-haie après avoir consommé de l’alcool ou de la drogue,
ou encore si vous vous sentez fatigué ou malade. (2)
Utilisation normale de la machine
- Le taille-haie est conçu pour tailler les buissons et les haies exclusivement et ne
doit en aucun cas être utilisé dans un autre but. Ne malmenez pas l’équipement.
Équipement de protection personnel
- La tenue portée doit être fonctionnelle et appropriée, autrement dit elle doit
être ajustée et ne pas entraver les mouvements. Ne portez pas de bijoux ni de
vêtements amples qui pourraient s’accrocher dans les buissons, les arbustes ou
la machine.
- An d’éviter les blessures aux yeux, aux mains ou aux pieds et de protéger votre
ouïe, vous devez porter l’équipement et les vêtements de protection indiqués
ci-dessous lorsque vous manipulez le taille-haie.
- Portez toujours des lunettes étanches ou une visière lorsque vous utilisez le
taille-haie, an de prévenir les blessures aux yeux. (3)
- Portez un équipement anti-bruit adéquat an d’éviter une perte auditive :
protège-oreilles, bouchons d’oreilles, etc. (3)
- Il est vivement conseillé à l’utilisateur de porter une combinaison de travail. (4)
- Des gants spéciaux en cuir épais font partie de l’équipement recommandé; vous
devez toujours les porter lors de l’utilisation du taille-haie. (4)
- Lorsque vous utilisez le taille-haie, portez toujours des chaussures robustes
dotées d’une semelle antidérapante. Cela vous protègera des blessures et vous
assurera une bonne stabilité. (4)
CONSIGNES DE SÉCURITÉ
(1)
(2)
(3)
(4)

18
Démarrage du taille-haie
- Veillez à éloigner les enfants ou toute autre personne dans une zone de travail
de 15 mètres (5), et faites également attention aux animaux présents dans cette
zone.
- Assurez-vous toujours que le taille-haie est en bonne condition avant de l’utiliser.
- Vériez l’état du levier d’accélérateur. Vous devez vérier que vous pouvez
l’actionner facilement et sans forcer. Vériez que le système de verrouillage du
levier d’accélérateur fonctionne correctement. Vériez que les poignées sont
propres et sèches, et testez le fonctionnement du commutateur marche/arrêt. Il
ne doit y avoir aucune trace d’huile ou d’essence sur les poignées.
Suivez strictement les instructions pour démarrer le taille-haie.
Ne démarrez pas le moteur d’une autre façon (6) !
- N’utilisez le taille-haie que pour les applications spéciées.
- Ne démarrez le moteur du taille-haie qu’une fois que le montage complet est
terminé. Le fonctionnement du taille-haie n’est possible qu’une fois tous les
accessoires correctement xés!
- Avant le démarrage, assurez-vous que la lame n’entrera pas en contact avec des
objets tels que des branches, des pierres, etc.
- Coupez le moteur immédiatement s’il présente des problèmes.
- Pendant l’utilisation, tenez fermement les poignées avant et arrière. Les poignées
doivent être propres et n’avoir aucune trace d’humidité, de résine, d’huile ou de
graisse.
Assurez-vous toujours de votre stabilité.
- N’utilisez l’équipement qu’à l’extérieur.
- Gardez toujours un œil autour de vous et méez-vous des dangers possibles que
vous pourriez ne pas entendre à cause du bruit de la machine.
- Utilisez le taille-haie de manière à éviter l’inhalation des gaz d’échappement. Ne
faites jamais fonctionner le moteur dans une pièce fermée (risque de suffocation
et d’asphyxie au gaz). Le monoxyde de carbone est un gaz inodore. Assurez-
vous toujours que la zone est sufsamment ventilée.
- Coupez le moteur lorsque vous vous reposez et lorsque vous laissez le taille-
haie sans surveillance. Placez-le dans un endroit sûr an d’éviter de mettre
d’autres personnes en danger, de mettre le feu à des matériaux combustibles ou
d’endommager la machine.
- Ne placez jamais le taille-haie chaud sur de l’herbe sèche ou sur tout matériau
combustible.
- Pour réduire les risques d’incendie, veillez à ce qu’il n’y ait ni débris, ni feuilles, ni
un excès de lubriant sur le moteur et le pot d’échappement.
- Ne faites jamais tourner le moteur avec un silencieux d’échappement défectueux.
- Coupez le moteur pendant le transport (7).
- Coupez le moteur avant de :
- retirer un élément qui bloque la machine;
- vérier, entretenir ou travailler sur la machine.
- Placez le taille-haie dans une position sûre pendant tout transport en voiture ou
camion an d’éviter une fuite d’essence.
- Lorsque vous transportez le taille-haie, assurez-vous que le réservoir est
complètement vide an d’éviter une fuite d’essence.
- Lorsque vous transportez ou entreposez la machine, placez toujours la protection
sur l’outil de coupe.
Remplissage du réservoir
- Coupez le moteur avant de remplir le réservoir (7), maintenez-le éloigné de toute
amme nue (8) et ne fumez pas.
- N’essayez pas de remplir un moteur chaud ou en marche.
- Évitez tout contact des produits pétroliers avec la peau. N’inhalez pas les vapeurs
d’essence. Portez toujours des gants de protection pendant le remplissage du
réservoir. Changez et nettoyez souvent les vêtements de protection.
- Veillez à ne pas renverser l’essence ou l’huile an de ne pas contaminer les sols
(protection de l’environnement). Si de l’essence a été renversée sur le taille-
haie, essuyez-le immédiatement. Faites sécher les chiffons utilisés pour essuyer
l’essence dans un endroit bien ventilé avant de les jeter. Autrement, il y a risque
de combustion spontanée.
- Évitez les projections d’essence sur vos vêtements. Changez immédiatement de
vêtements si de l’essence a été renversée dessus (risque important).
- Vériez à intervalles réguliers que le bouchon du réservoir d’essence est fermé
correctement.
- Serrez bien le bouchon du réservoir d’essence. Déplacez-vous pour démarrer le
moteur (à au moins 3 mètres du lieu de remplissage du réservoir) (9).
- Ne remplissez jamais le réservoir dans une pièce fermée. Les vapeurs d’essence
s’accumulent au ras du sol (risque d’explosions).
- Ne transportez et ne conservez l’essence que dans des conteneurs appropriés.
Veillez à conserver l’essence hors de portée des enfants.
- Lorsque vous mélangez l’essence avec de l’huile pour moteur à deux temps,
n’utilisez que de l’essence qui ne contient ni éthanol, ni méthanol (types d’alcool).
Ceci permettra d’éviter d’endommager les tuyaux d’alimentation en essence ainsi
que d’autres pièces du moteur.
15 mètres
(50 pieds)
360°
(5)
(6)
(7)
• Pause
• Transport
• Remplissage du réservoir
• Entretien
• Remplacement d’outil
(8)
(9)
3 mètres
(10 pieds)

19
Mode de fonctionnement
- Utilisez toujours vos deux mains pour tenir les poignées pendant l’utilisation.
- N’utilisez le taille-haie que dans des environnements bien éclairés et avec une
bonne visibilité. Pendant les saisons froides, faites attention aux sols glissants et
aux zones humides, à la glace et à la neige (risque de glissade). Assurez-vous
toujours de votre stabilité.
- Ne travaillez jamais sur des sols instables ou des terrains en pente.
- N’utilisez jamais le taille-haie en vous tenant sur une échelle.
- Ne montez jamais dans un arbre pour réaliser des opérations de coupe à l’aide
du taille-haie.
- Pour réduire les risques de trébuchement et de perte de contrôle, ne reculez pas
en utilisant la machine.
- Coupez toujours le moteur avant de nettoyer ou de réparer la machine ou avant
de remplacer des pièces.
- N’utilisez pas la machine avec un outil de coupe endommagé ou très usé.
Consignes d’entretien
- Pensez à protéger l’environnement. Utilisez le taille-haie en produisant le
moins de bruit et de pollution possible. Vériez notamment le bon réglage du
carburateur.
- Nettoyez le taille-haie à intervalles réguliers et vériez que toutes les vis et tous
les écrous sont bien serrés.
- Ne réparez ou n’entreposez jamais le taille-haie à proximité de ammes nues,
d’étincelles, etc. (11).
- Videz le réservoir d’essence avant d’entreposer le taille-haie.
- N’entreposez jamais le taille-haie à proximité de ammes nues an d’éviter tout
risque d’incendie.
- Entreposez le taille-haie dans un espace bien ventilé et placez-le en hauteur ou
dans un endroit fermé à clef, hors de portée des enfants.
- N’essayez pas de réparer la machine à moins que vous ne soyez qualié pour le
faire.
Prenez connaissance et suivez toutes les instructions de prévention des accidents émises par le conseil de sécurité des associations
professionnelles ainsi que par les compagnies d’assurance.
N’apportez aucune modication au taille-haie, cela vous mettrait en danger.
Les travaux d’entretien ou de réparation réalisables par l’utilisateur sont ceux décrits dans le manuel d’instructions. Tous les autres travaux
doivent être réalisés par des techniciens agréés.
N’utilisez que des pièces de rechange et accessoires d’origine fournis par des services après-vente ou des centres agréés MAKITA.
L’utilisation d’accessoires et outils non agréés accroît le risque d’accidents et de blessures. MAKITA ne pourra être tenue pour responsable en
cas d’accidents ou de dommages dus à l’utilisation d’accessoires non agréés.
Premiers soins
Au cas où un accident surviendrait, assurez-vous qu’une trousse de premiers soins
complète conforme à la norme DIN 13164 est disponible à proximité de la zone de
coupe.
Remplacez sans délai tout article utilisé dans la trousse de premiers soins.
Si vous demandez de l’aide, veillez à donner les informations suivantes :
- lieu de l’accident;
- conditions de l’accident;
- nombre de personnes blessées;
- gravité des blessures;
- votre nom.
(10)
(11)

20
DONNÉES TECHNIQUES
Modèle EH5000W EH6000W EH7500W
Dimensions (L x P x H) mm (pouce) 1 014 x 262 x 216
(40” x 10-3/8” x 8-1/2”)
1 119 x 262 x 216
(44” x 10-3/8” x 8-1/2”)
1 259 x 262 x 216
(49-1/2” x 10-3/8” x 8-1/2”)
Poids (sans le couvercle de
lame) kg (lb) 4,8 (10,5) 5,0 (11,0) 5,2 (11,4)
Volume (réservoir d’essence) l (oz liq) 0,4 (13,5)
Cylindrée cm3(pouce cube) 22,2 (1,35)
Longueur de coupe mm (pouce) 483 (19”) 588 (23-1/8”) 728 (28-3/4”)
Rendement maximal du moteur kW (hp) 0,68 (0,91)
Course par minute 4 270
Vitesse au ralenti tr/min 3 000
Vitesse d’embrayage tr/min 4 000
Type de carburateur type WALBRO WYL
Système d’allumage type Allumage transistorisé
Bougie d’allumage type NGK CMR6A
Distance entre les électrodes mm (pouce) 0,7 - 0,8 (1/32”)
Dosage du mélange
(essence :
huile moteur)
Huile pour moteur à deux
temps MAKITA d’origine 50 : 1
Huile pour moteur à deux
temps d’autres fabricants 25 : 1
Rapport de transmission 9 : 43
(Pour le Canada)
REMARQUE : Le système d’allumage par bougie est conforme à la norme canadienne ICES-002.
This manual suits for next models
2
Table of contents
Languages:
Other Makita Trimmer manuals

Makita
Makita DUR366L User manual

Makita
Makita DUH521 User manual

Makita
Makita RT001G User manual

Makita
Makita UR012G User manual

Makita
Makita DUR189 User manual

Makita
Makita DRT50 User manual

Makita
Makita UH004G User manual

Makita
Makita DUH551 User manual

Makita
Makita DUR193 User manual

Makita
Makita XRU12 User manual

Makita
Makita XRU01 User manual

Makita
Makita DUR369A User manual

Makita
Makita EH5000W User manual

Makita
Makita DUR182U User manual

Makita
Makita UR100DZ User manual

Makita
Makita EN4950H User guide

Makita
Makita DUH501 User manual

Makita
Makita UR002G User manual

Makita
Makita EN402MP User manual

Makita
Makita EN5550SH Instruction Manual