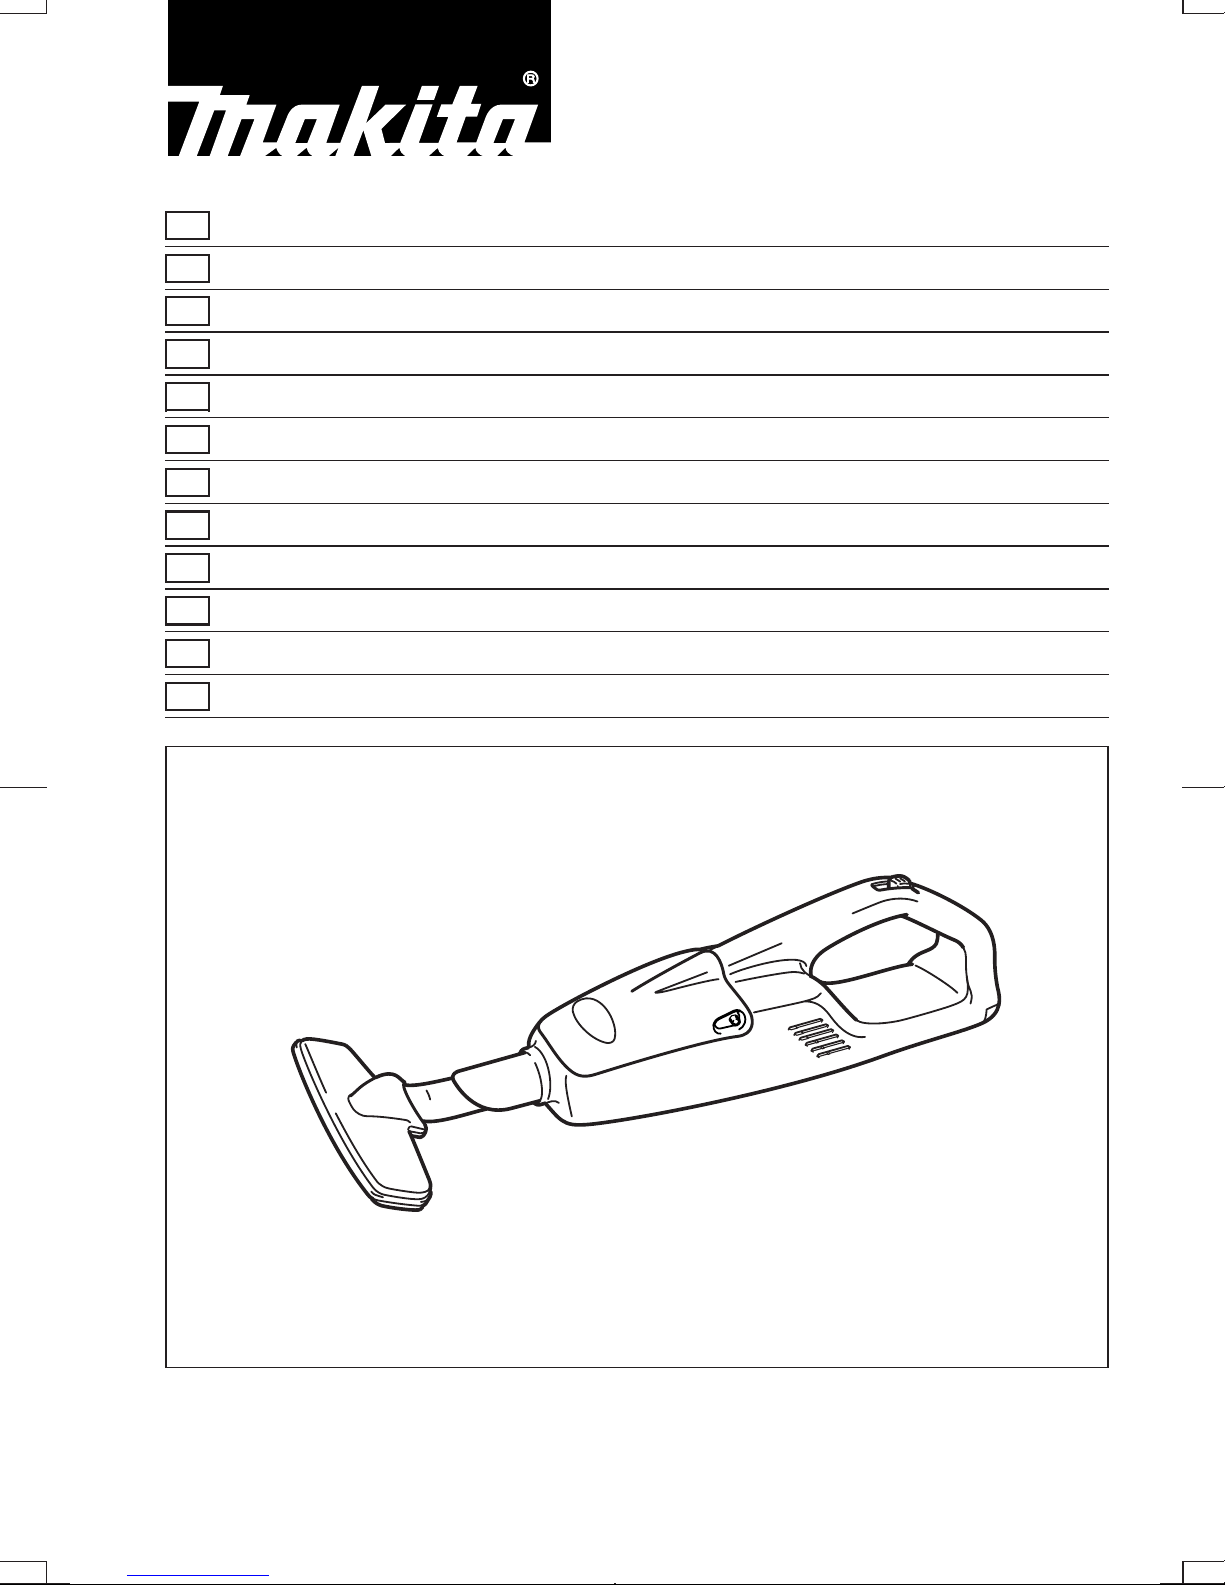
ITALIANO Visione generale
1Coperchio posteriore
2Capsula delle batterie
3Interruttore
4Convogliatore
5Corpo aspiratore
6Tubo di estensione
(tubo diritto)
7Convogliatore per angoli
8Coperchio anteriore
9Premere
0Aprire
qSacchetto polvere
wAgganciare il coperchio
anteriore al bordo anteriore
eChiudere
rOrlo anteriore
DATI TECNICI
Modello 4093D
Capacità ......................................................... 500 ml
Operazione continua
(con batteria 9000) ....................... Alta: circa 13 min.
Bassa: circa 23 min.
Lunghezza totale ......................................... 484 mm
Peso netto ....................................................... 1,3 kg
Tensione nominale ..................................... 9,6 V DC
•
Per il nostro programma di ricerca e sviluppo continui, i
dati tecnici sono soggetti a modifiche senza preavviso.
•Nota: I dati tecnici potrebbero differire a seconda del
paese di destinazione del modello.
Consigli per la sicurezza
Per la vostra sicurezza, riferitevi alle accluse istruzioni
per la sicurezza.
ULTERIORI REGOLE DI SICUREZZA
1. Prima dell’uso, leggere attentamente questo
manuale di istruzioni e il manuale di istruzioni
del caricatore.
2. Non aspirare oggetti bagnati, sigarette accese
e simili.
3. Smettere immediatamente di usare l’aspira-
tore se si nota qualcosa di anormale.
4. Se si lascia cadere l’aspiratore o se dovesse
subire un colpo, controllare con cura che non
sia crepato o danneggiato prima di usarlo.
5. Non avvicinare l’aspiratore alle stufe o alle
sorgenti di calore.
6. Non bloccare il foro di aspirazione o i fori di
ventilazione.
CONSERVATE QUESTE ISTRUZIONI.
ISTRUZIONI PER L’USO
Installazione o rimozione della cartuccia bat-
teria (Figg.1e2)
•Spegnere sempre l’aspiratore prima di inserire o
togliere la cartuccia batteria.
•Per togliere la cartuccia batteria, togliere il coper-
chio posteriore dall’aspiratore spingendolo nella
direzione della freccia e poi estrarre la cartuccia
batteria dall’aspiratore.
•Per inserire la cartuccia batteria, allineare la
linguetta sulla cartuccia batteria con la scanalatura
nell’aspiratore e far scivolare in posizione. Poi chi-
udere il coperchio posteriore.
•Non usare forza quando si inserisce la cartuccia
batteria. Se la cartuccia batteria non scorre facil-
mente, significa che non è stata inserita corretta-
mente.
Carica
Caricare correttamente la cartuccia batteria con il
caricatore Makita prima dell’uso.
Con questo aspiratore si possono usare le batterie
seguenti:
Tipo di batteria Capacità
(mAh) Numero di
celle
9000 1.200 8
9002 2.000 8
9033 2.200 8
Funzionamento dell’interruttore (Fig. 3)
ATTENZIONE:
•Accertarsi sempre che il sacchetto della polvere o il
sacchetto di carta siano installati correttamente
nell’aspiratore prima di usarlo. L’installazione sba-
gliata potrebbe far entrare la polvere nel motore,
causando un difetto di funzionamento dell’aspira-
tore.
•Spegnere sempre l’aspiratore ogni volta dopo l’uso,
per impedire che si danneggi e per prolungare la
vita di servizio della batteria.
Questo aspiratore può funzionare nei due modi di
aspirazione ‘‘standard’’ e ‘‘forte’’. Per l’aspirazione
standard, spingere l’interruttore verso la posizione
LOW. Per l’aspirazione forte, spingere ulteriormente
l’interruttore sulla posizione HIGH.
Per arrestare l’aspiratore, spingere indietro
l’interruttore sulla posizione OFF.
Pulizia (aspirazione)
Convogliatore (Fig. 4)
Attaccare il convogliatore per ripulitura di tavole,
tavoli, mobili, etc. Il convogliatore scivola facilmente.
Convogliatore + tubo di estensione (tubo diritto)
(Fig. 5)
Il tubo di estensione va montato tra il convogliatore e
l’aspiratore. Questa combinazione è comoda per
pulire il pavimento restando eretti.
Convogliatore per angoli (Fig. 6)
Montare il convogliatore per angoli per pulire gli angoli
e gli interstizi dell’automobile o di un mobile.
10
4093D (It) (’99. 12. 1)