Mamiya PRESS SUPER 23 User manual
MIYA
PRESS
•
SUPER
23

· -

The 100mm f/ 3.5 lens is a
retracting
type
.
When
the
lens has been
retracted,
focus
cannot
be
adjusted
although
the
two
images on
the
rangefinder
coincide.
When
the
back
mount
has been
pulled
out,
focus
cannot
be
adjusted
although
the
two
images on
the
rangefinder
are
coincided.
Always
pull
out
the press focus
lever
after
cocking
the
shutter
Push
it
in
after
adjusting
the
focus.
When
framing
a
composition
with
the
finder's
brilliant
frame,
compose
it
within
the
inner
edge
of
the
frame
width
for
short
distances i
for
long
distances, use
the
outer
edge
as
a
guide
.
When
taking
a
photograph
with
the
vertical
camera
posi
tion
on a
tripod,
use a
tripod
adapter
on
the
hand
grip
socket
for
vertical
photography
When
using a
roll
holder
Set
the
figure
in the film
indicator
window
and adjust
installation
of
the
pressure
plate
to
the film
to
be
used
(120
or
220)
.

3
The
Mamiya
Press
Super
23,
offering
the
distinct
advantage
of
its
large
film
size
while
maintaining
extremely
facile
operational
features,
is
amazingly
versatile
for
news
photography,
commercial
work,
scientific
and
industrial
applications,
or
as a
camera
lover
's
personal
choice.
*
Large
size
film
presents
sharp,
fine
rendition
of
every
detail
*
Variety
of
interchangeable
lenses
ranging
from
65
mm
wide
angle
to
250
mm
telephoto.
*
Quick
interch
.
ange
of
lenses
through
bayonet
ring
mounting
* Focusing
by
coupled
rangefinder
*
Direct
focusing
through
focusing
screen
possible.
*
Brilliant
frame
finder
with
switch-ov
er
frame
masks.
*
Viewfinder
features
automatic
parall
ax
correction
.
*
Hand
grip
makes
camera
easy
to
carry
about
*
Roll
holder
with
film
advance
lever
enables
quick
snapshots.
*
Accepts
both
No
.
120
and
No.
220
roll
films.
*
Also
accepts
dry
plates,
cut films, and
film
packs
by
using
exclusive
holders.
*
Wonderful
close-up
photography
by
extending
back
mount
*
Advanced
close-up
photography
by
using
extension
rings.
* Back
mount
swings
to
achieve
control
of
perspective,
depth
of
field,
distortion,
or
special
effects
.
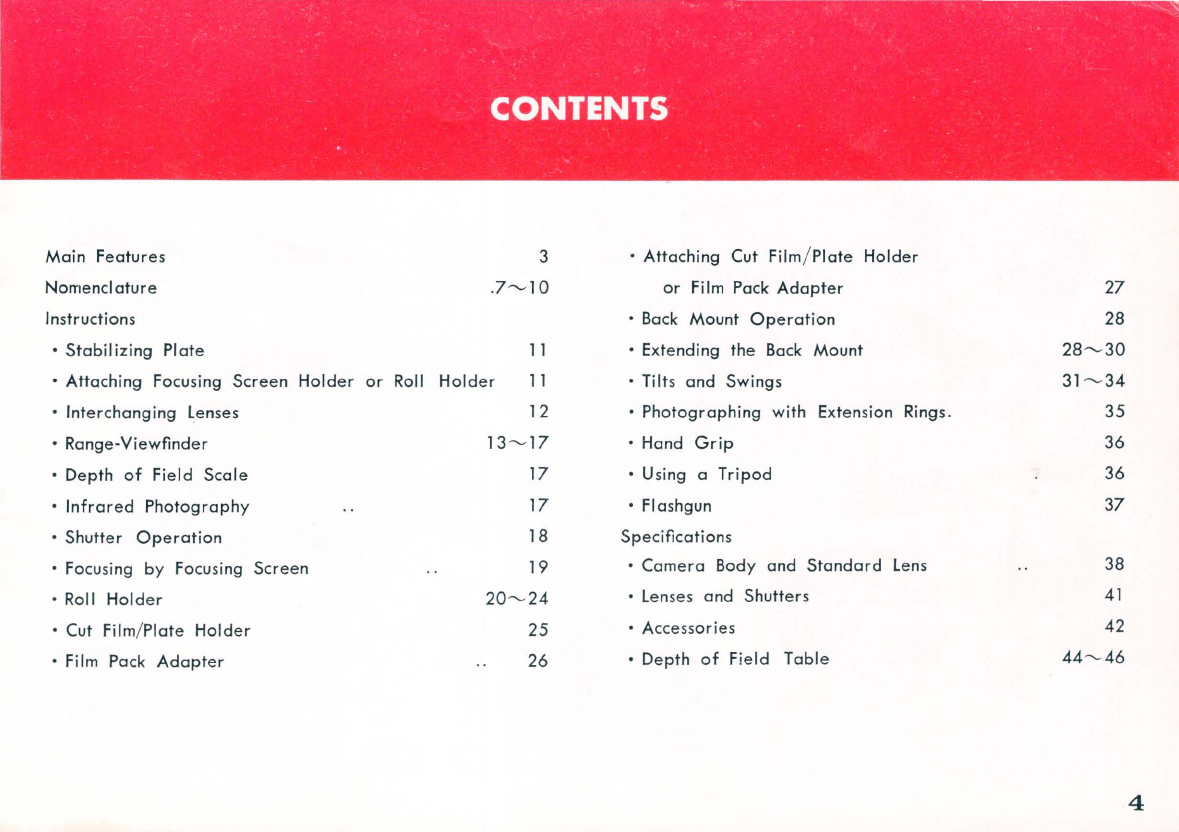
Main
Features
Nomencl
ature
Instructions
•
Stabilizing
Plate
11
•
Attaching
Focusing Screen
Holder
or
Roll
Holder
11
•
Interchanging
lenses 12
•
Range-Viewfinder
•
Depth
of
Field
Scale
•
Infrared
Photography
•
Shutter
Operation
• Focusing
by
Focusing Screen
• Roll
Holder
• Cut Film/Plate
Holder
• Film Pack
Adapter
13-----17
17
17
18
19
20-----24
25
26
•
Attaching
Cut Film/Plate
Holder
or
Film Pack
Adapter
• Back
Mount
Operation
• Extending the Back
Mount
• Tilts
and
Swings
•
Photographing
with
Extension Rings.
• Hand
Grip
• Using a
Tripod
•
FI
ashgun
Specifications
•
Camera
Body
and
Standard
lens
• lenses and Shutters
• Accessories
•
Depth
of
Fi
eld
Table
27
28
28-----30
31
-----34
35
36
36
37
38
41
42
44
"-
46
4

.-,
@ @ ®
000
5

1. 65mm f/ 6.3 lens
2. Lens hood for
l00mm
f/
3.5
lens
3. 100mm f/ 3.5 lens
4.
Lens
hood
for
100mm f/
2.8
lens
5. 100mm f/ 2.8 lens
6. Lens
hood
for 150mm f/
5.6
lens
7.
150mm f/ 5.6 lens
8. Lens
hood
for 250mm f/ 5 lens
9. 250mm f/ 5 lens (exclusively
for
Super
23)
10
. Flashgun for Mamiya Press
11
. Flashgun mounting piece
12. Mounting
bracket
for Heiland fh:uhgun
13. Mounting
bracket
for
Graflex
flashgun
14. Viewflnder for 65mm wi
de
angle
lens
15. Sportsflnder 6 X 9
cm
for
100
mm
and
150
mm
focal length lenses (exclusively for Super
23)
16. Sportsflnder, 6 X 7
em
for
100
mm
and
150
mm
focal length lenses (exclusively for
Super
23)
17.
Strap
18.
Camera
body
19. Hand
gr
ip
20
. Tripod
adapler
for vertical
photography
21
. Extension rings
22
.
Fi
l
ter,
40
.5mm
dia.
for 100mm f/ 3.5
and
150mm
f/ 5.6 lenses
23.
Filter,
43
mm
diu. for 65mm f/ 6.3 lens
24
. Filter, 72
mm
dia.
for
100
mm
f/ 2.8 lens
25
. Filter, 1
05
mm
dia. for
250
mm
f/ 5 lens
26
. Focusing screen hol
der
27.
Cut
fllm
/
plate
holder
(type
J)
28
. Cut film
adapter
frame
for
one-quarter
size
of
43j. X
6'
j,
in.
29.
Cut
fllm
/
plate
holder
(type
A)
30
. Cut
fllm
adapter
frame for
2'
j. X
3'
j. in.
31.
Film
pack
adapter
32
. 6 X 9
em
roll hol
der
33.
6 X 7
cm
roll hol
der
34.
Mamiya
cutter
35.
Super
23
carrying
bag
6

7
• NOMENCL
ATURE
-l
:: 1
; 2
; 3
Accessory Shoe
Strap
Eyelet
(2)
lock
Knob (4)
for
Swing Back
Mount
:: 4 Flashgun
Mount
if
5 Flashgun
Mounting
Socket
; 6
:±
7
~
8
~
9
;10
;;
11
#
12
#
13
#14
#15
#16
#17
#18
Bayonet
Ring
M-X
Selector
Synchroflash
Terminal
Shutter
Release
lever
Aperture
Control
lever
Cable
Release Socket
Press Focus
lever
(Blade
Arrester
Shutter
Speed
Dial
Shutter Cocking
lever
Focusing Ring
Distance
Scale
Depth
of
Field
Scale
lens
Coupl
ing
Mark
~
19
Cable
Release
Holder
#
20
Hand
Grip
Socket
#
21
Hand
Grip
lock
Ring
#
22
Shutter
Release
Trigger
#
23
Hand
Grip
#
24
Cable
Release
2
4--
-
5--
--;t-;
6
--
-i!-
___
t-
8 9
10

18
14 13
8
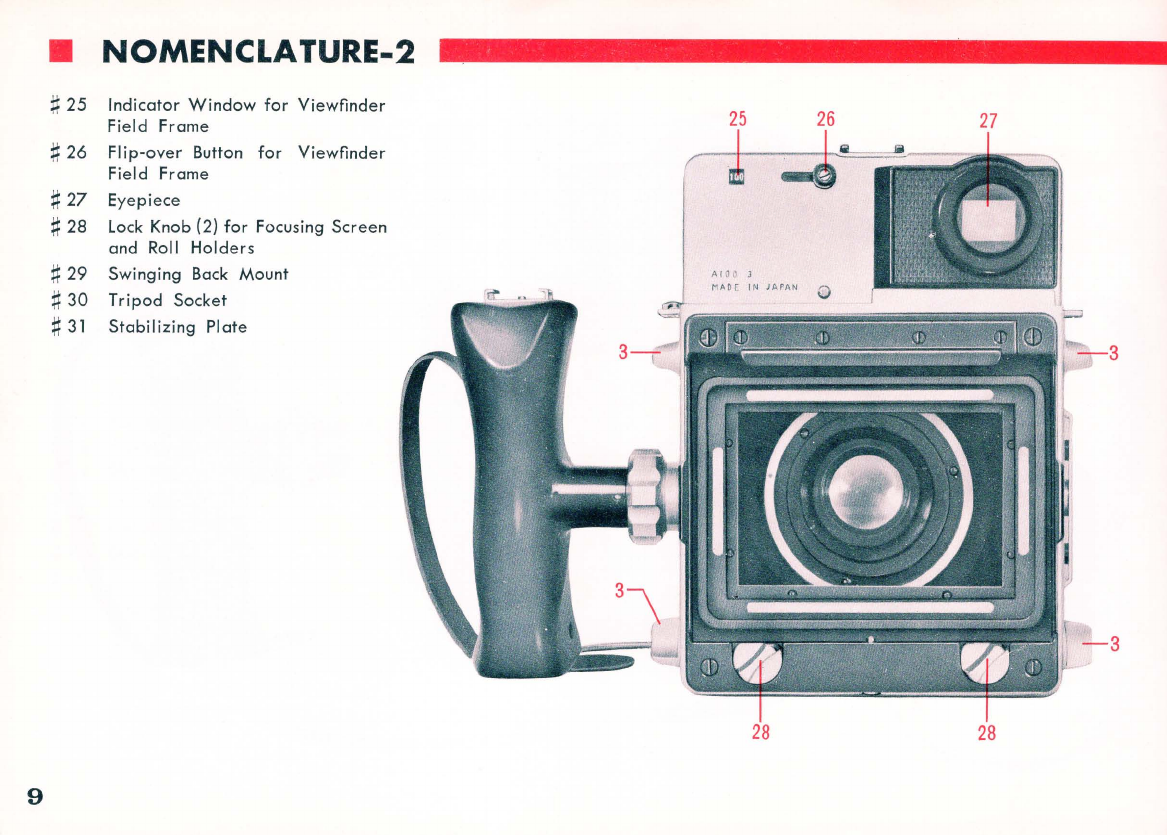
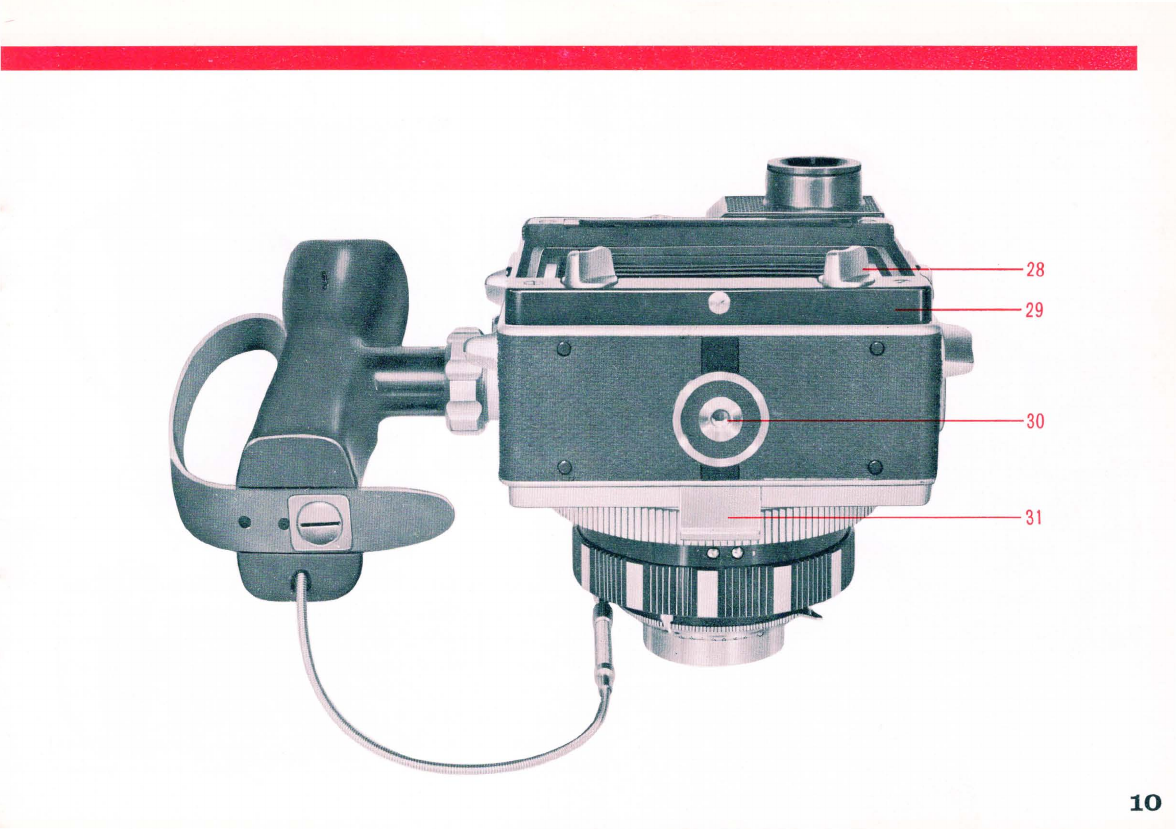
• NOMENCLATURE-2
~
25
Indicator
Window
for
Viewfinder
Field Frame
25
26
~
26
FI
ip-over
Button
for
Viewfinder
Field Frame
~
27
Eyepiece
~
28 Lock Knob (2)
for
Focusing Screen
and Roll
Holders
~
29 Swinging
Back
Mount
~
30
Tripod
Socket
~
31
Stabilizing
Plate
9
"'::::"
~
~----28
---29
+----30
-M:l
+l+l+mmu:
nc::=:::.
_--
31
10
11
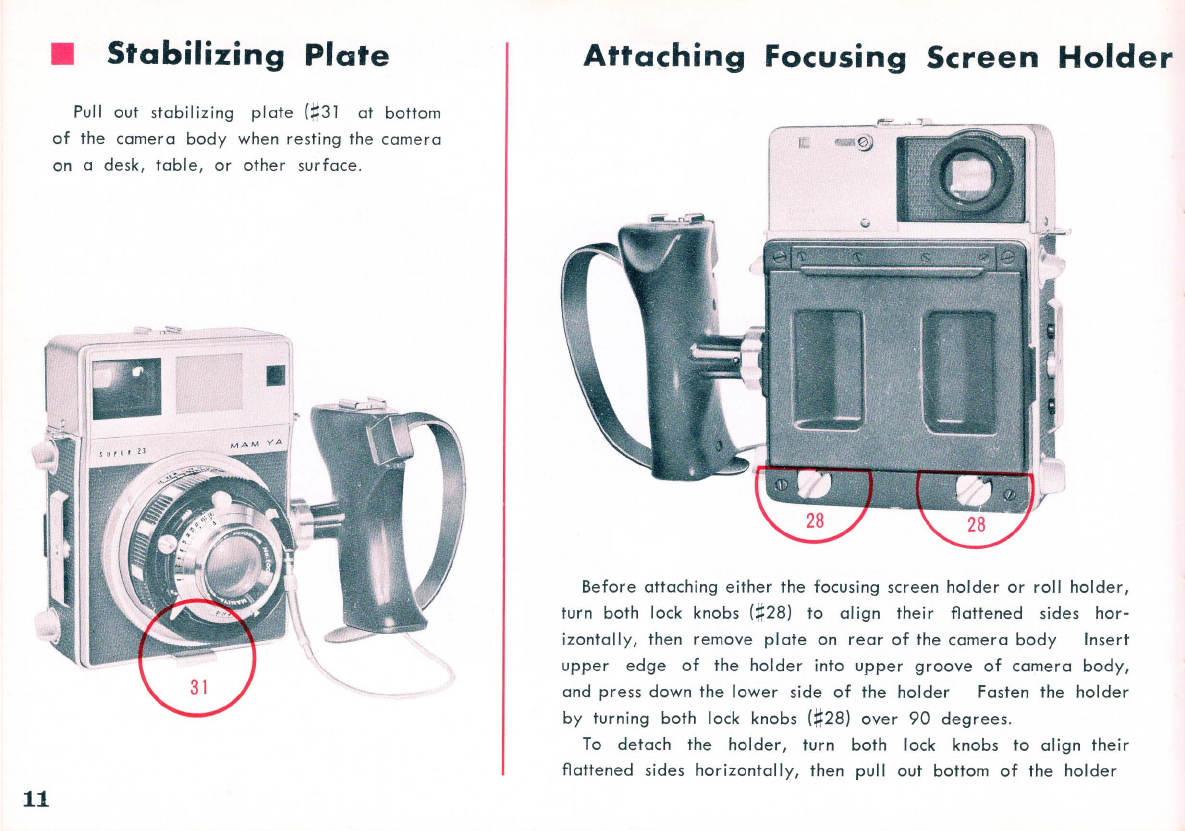
•
Stabilizing
Plate
Pull
out
stabilizing
plate
(#31
at
bottom
of
the
camera
body
when
resting
the
camera
on a desk,
table,
or
other
surface.
Attaching
Focusing
Screen
Holder
Before
attaching
either
the
focusing
screen
holder
or
roll
holder,
turn
both
lock
knobs
(#28)
to
align
their
flattened
sides
hor-
izontally,
then
remove
plate
on
rear
of
the
camera
body
Insert
upper
edge
of
the
holder
into
upper
groove
of
camera
body,
and
press
down
the
lower
side
of
the
holder
Fasten
the
holder
by
turning
both
lock
knobs
(#28)
over
90
degrees
.
To
detach
the
holder,
turn
both
lock
knobs
to
align
their
flattened
sides
horizontally,
then
pull
out
bottom
of
the
holder

or
Roll
Holder
Interchanging
.Lenses
While
holding
the
lens,
rotate
the
bayonet
ring
(#6)
counterclockwise,
as seen
from
the
front,
until
it
stops;
then
remove
the
lens.
When
mounting
the
lens,
turn
bayonet
ring
until
the
r
ed
mark
(#
18)
on
the
ring
is
at
the
top,
insert
the
lens
while
keeping
red
mark
on
the
lens
close
to
r
ed
mark
on
bayonet
ring;
then
turn
the
bayonet
ring
clockwise,
grip-
ping
the
lens
to
prevent
it
from
moving
.
PRECAUTION!
Be
sure
to
insert
a
dark
sl
ide
into
the
holder,
if
the lens
is
interchanged
wh
i
le
a
loaded
holder
is
attached
to
the
camera
.
12
.•
Range-Viewfinder
13
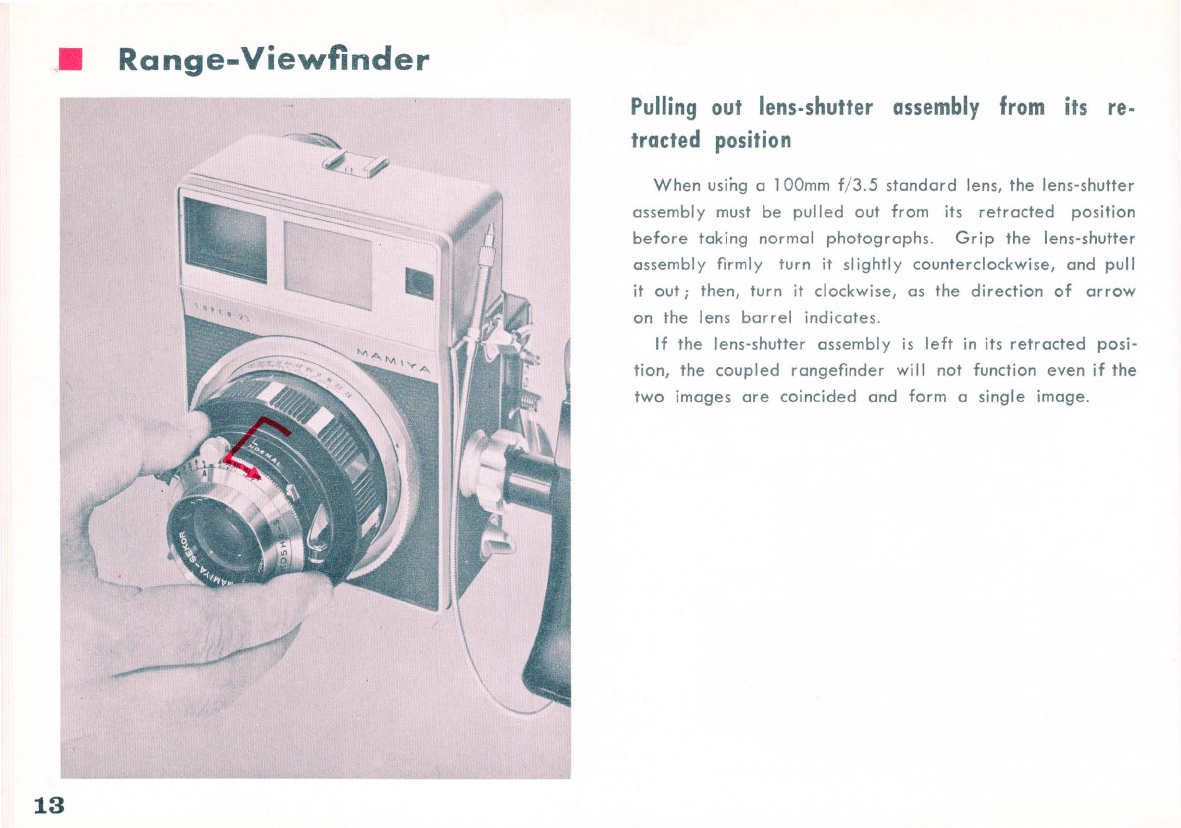
Pulling
out
lens-shutter
assembly
from
its
re-
tracted
position
When
using a
100mm
f/
3.5
standard
lens,
the
lens-shutter
assembly
must
be
pulled
out
from
its
retracted
position
before
taking
normal
photographs.
Grip
the
lens-shutter
assembly
firmly
turn
it
sl
ightly
counterclockwise,
and
pull
it
out
i
then,
turn
it
clockwise,
as
the
direction
of
arrow
on
the
lens
barrel
indicates
.
If
the
lens-shutter
assembly
is
left
in
its
retracted
posi-
tion,
the
coupled
rangefinder
wi
II
not
function
even
if
the
two
images
are
coincided
and
form
a
single
image.
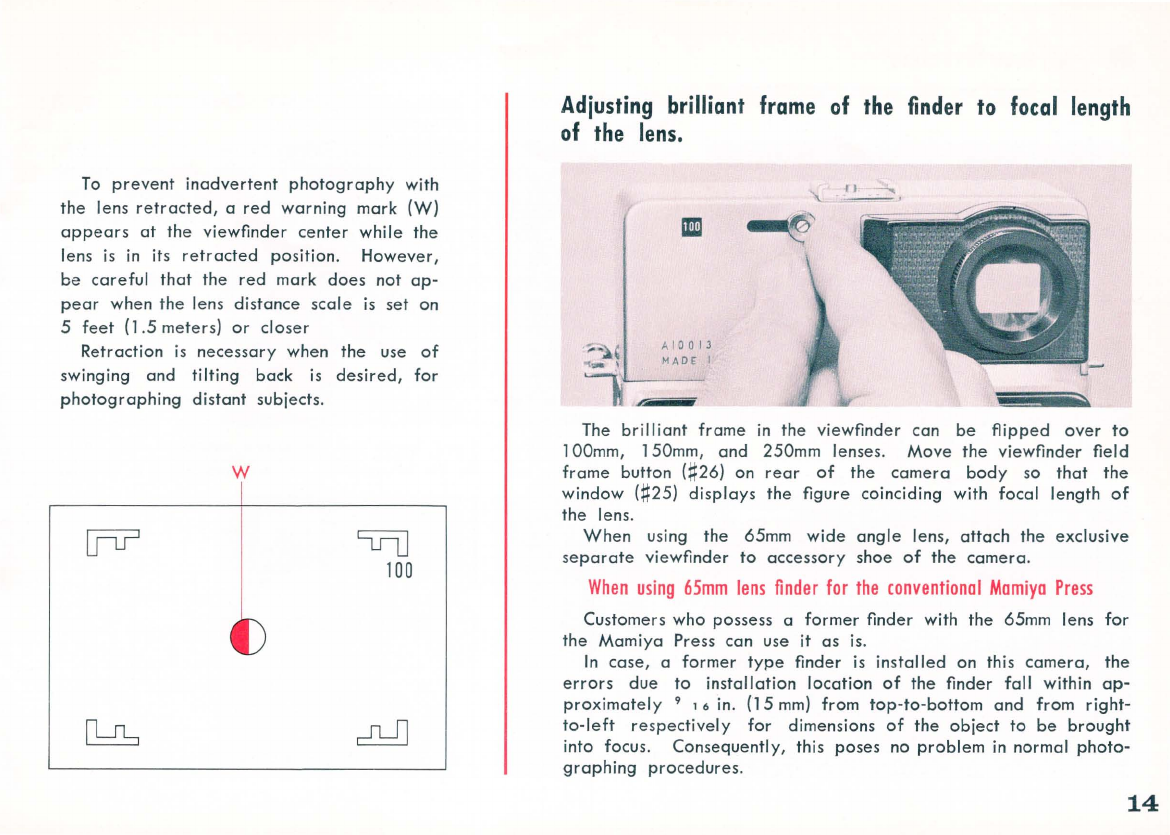
To
prevent
inadvertent
photography
with
the
lens
retracted,
a
red
warning
mark
(W)
appears
at
the
viewfinder
center
while
the
lens is in its
retracted
position.
However,
be
careful
that
the
red
mark
does
not
ap-
pear
when
the
lens
distance
scale
is
set on
5
feet
(1
.5
meters)
or
closer
Retraction
is
necessary
when
the
use
of
swinging
and
tilting
back
is
desired,
for
photographing
distant
subjects.
W
cu=o
100
Adjusting
brilliant
frame
of
the
finder
to
focal
length
of
the
lens.
A' 0 0 , 3
MADE
I
II
-..
>
The
brilliant
frame
in
the
viewfinder
can
be
flipped
over
to
100mm,
150mm,
and
250mm
lenses.
Move
the
viewfinder
field
frame
button
(#26)
on
rear
of
the
camera
body
so
that
the
window
(#25)
displays
the
figure
coinciding
with
focal
length
of
the
lens.
When
using
the
65mm
wide
angle
lens,
attach
the
exclusive
separate
viewfinder
to
accessory
shoe
of
the
camera.
When
using
65mm
lens
finder
for
the
conventional
Mamiya
Press
Customers
who
possess a
former
finder
with
the
65mm lens
for
the
Mamiya
Press can use
it
as is.
In case, a
former
type
finder
is
installed
on
this
camera,
the
errors
due
to
installation
location
of
the
finder
fall
within
ap-
proximately
9
16
in.
(15
mm)
from
top-to-bottom
and
from
right-
to-left
respectively
for
dimensions
of
the
object
to
be
brought
into
focus.
Consequently,
this
poses
no
problem
in
normal
photo-
graphing
procedures.
14
•
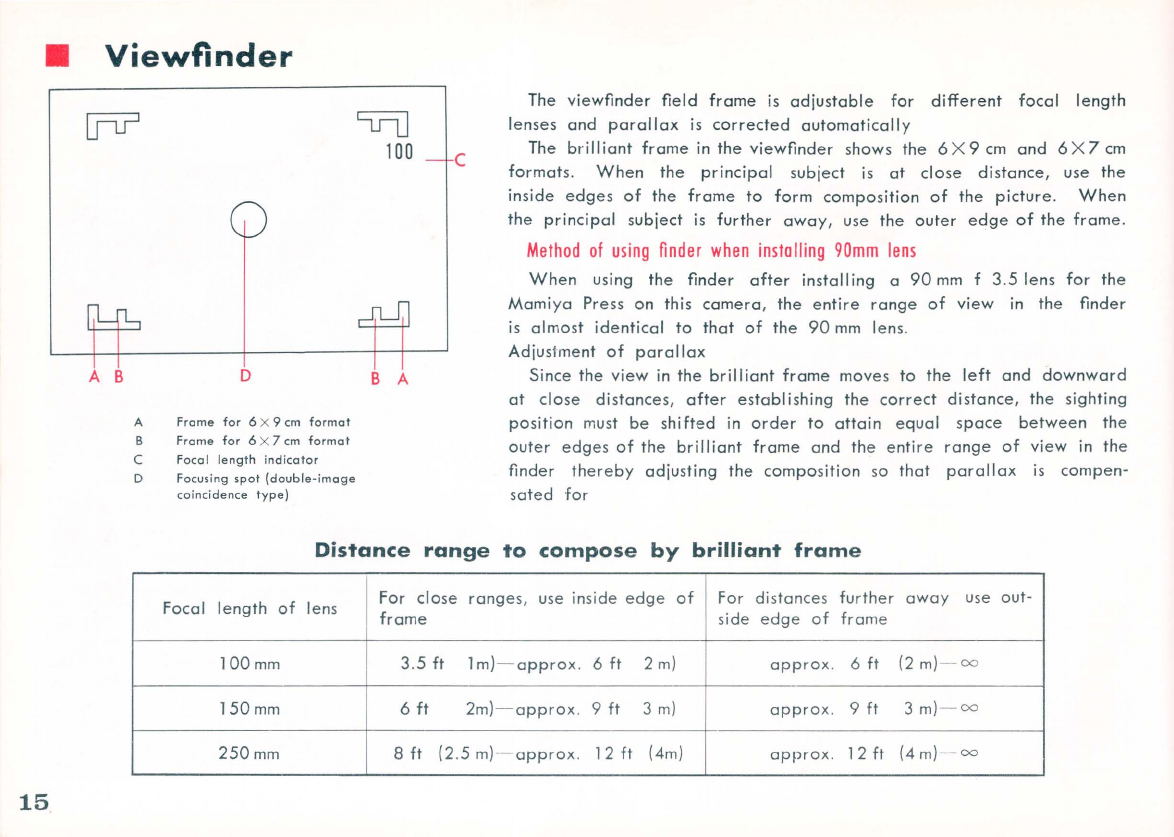
Viewfinder
A B
A
B
C
D
D
Frome
for
6 X 9
em
format
Frome
for 6 X 7
em
forma
t
Focal
le
ng
th
ind
i
cator
Focusing
spot
(double-ima
ge
coincidence
type)
cv=u
100
c
B A
The
viewfinder
field
frame
is
adjustable
for
different
focal
length
lenses
and
parallax
is
corrected
automatically
The
brilliant
frame
in
the
viewfinder
shows
the
6 X
9cm
and
6 X
7cm
format
s.
When
the
principal
subiect
is
at
close
distance,
use
the
inside
edges
of
the
frame
to
form
composition
of
the
picture.
When
the
principal
subject
is
further
away,
use
the
outer
edge
of
the
frame
.
Method
of
using
finder
when
instolling
90mm
lens
When
using
the
finder
after
installing
a
90
mm
f 3.5 lens
for
the
Mami
ya Press
on
this
camera,
the
ent
i
re
range
of
view
in
the
finder
is
almost
identical
to
that
of
the
90
mm
lens.
Adjus
l
ment
of
parallax
Since
the
view
in
the
br
i
lliant
frame
moves
to
the
left
and
downward
at
clo
se
di
stances,
after
establishing
the
correct
distance,
the
sighting
posit
i
on
mus
t
be
shifted
in
order
to
attain
equal
s
pace
between
the
outer
edge
s
of
the
brilliant
frame
and
the
entire
range
of
view
in
the
finder
thereby
adjusting
the
compo
s
ition
so
that
paralla
x is
comp
en-
sated
fo
r
Distance
range
to
compose
by
brilliant
frame
Foc
al
length
of
lens
For
close
rang
es, use in
si
de ed
ge
of
For
di
s
tan
ces
furth
er
away
use o
ut-
frame
s
ide
edge of frame
100m
m 3.5
ft
1
m
)
~
app
r
o
x
.
6
ft
2
m)
approx
. 6
ft
(2
m)
~
oo
1
50mm
6
ft
2m
)
~
approx
.
9
ft
3
m)
ap
pr
ox
.
9ft
3
m
)
~
oo
250m
m
8ft
(2.5
m)
~
appr
o
x
.
12
ft (4
m)
approx.
12
ft
(4
m)
-
-oo
15

Areas
of
viewfinder
field
to
be
composed
Close
range
--------
6 X 9
------+-----
6 X 7
----
Further
distance
16
17
Focusing
with
coupled
rangefinder
A small
circle
in
the
center
of
the
view-
finder
field
shows
the
rangefinder
images
for
focusing.
Turn
the
focusing
ring
(
~
15)
in
either
direction
so
that
the
two
images
are
coin-
cided
and
form
a
single
image
i
then,
the
lens
will
be
automatically
and
critically
focused
.
PRECAUTION!
Do
not
turn
the
bayonet
ring
(
~
6)
while
focusing
. The
rangefinder
will
not
function
for
focusing
when
the
lens-
shutter
assembly
is
retracted
or
when
the
back
mount
(~29)
is
extended
or
swung.
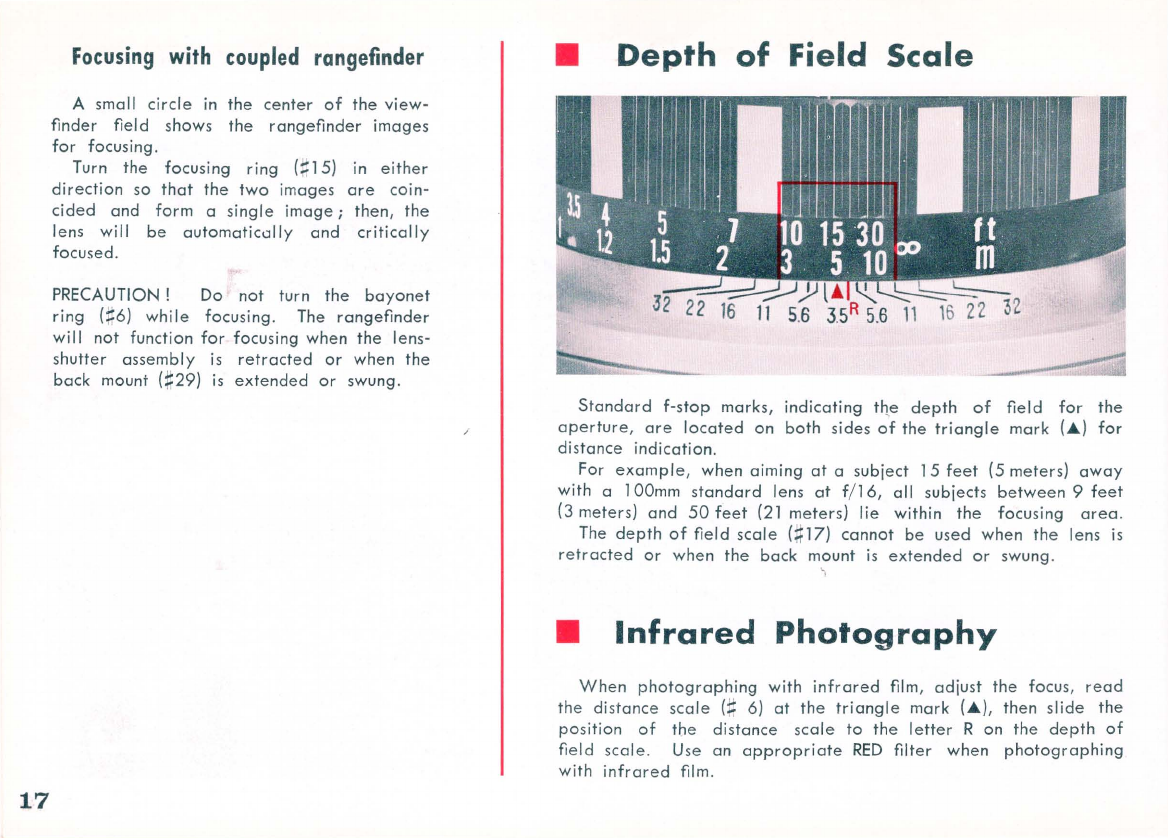
•
Depth
of
Field
Scale
Standard
f-stop
marks,
indicating
tfle
depth
of
field
for
the
aperture
,
are
located
on
both
sides
of
the
triangle
mark
(A)
for
distance
indication
.
For
example,
when
aiming
at
a subject
15
feet
(5
meters)
away
with
a 100mm
standard
lens
at
f/
16,
all
subjects
between
9
feet
(3 meters)
and
50
feet
(21
meters)
lie
within
the
focusing
area
.
The
depth
of
field
scale
(
~
17)
cannot
be used
when
the
lens is
retracted
or
when
the
back
mount
is
extended
or
swung.
"
•
Infrared
Photography
When
photographing
with
inf
r
ared
film,
adjust
the
focus,
read
the
di
s
tance
scale (; 6)
at
the
triangle
mark
(A),
then
slide
the
position
of
the
distance
scale
to
the
letter
R on
the
depth
of
field
scale
. Use an
appropriate
RED
filter
when
photographing
with
infrared
film.

•
Shutter
Operation
Cock
the
shutter
by
moving
the
shutter
cocking
lever
(
~
14)
.
To
release
the
shutter,
press
the
shutter
release
trigger
Screw
the
end
of
the
cable
release
(
~
24)
which
extends
(
~
22)
of
the
hand
grip
with
the
left
forefinger;
or
the
shutter
from
the
hand
grip
into
the
cable
release
socket
(~ll)
.
can
be
released
by
tripping
the
shutter
release
lever
(~9)
.
Keeping
the
shutter
open
for
focusing
by
focusing
screen
With
lOOmm
f/ 3.5 lens:
Cock
the
shutter
regardless
of
the
shutter
speed,
pullout
the
press
' focus
lever
(~l
2),
and
the
shutter
wi
II
remain
open
.
After
focusing
,
replace
the
I
ever
(
~
l
2)
to
close
the
shutter
ready
-
ing
it
for
immediate
shutter
release.
PRECAUTION
:
Do
not
pull
the
press
focus
lever
(~12)
before
cocking
the
shutter
With
65mm f/ 6.3,
lOOmm
f/ 2.8,
and
150mm
f/ 5.6 lenses:
Turn
the
shutter
speed
dial
(
~
l
3)
to
"B,
cock
the
shutter,
pull
the
time
lever
knob
(L
1
outward
,
and
the
shutter
will
remain
open
.
Depress
the
time
lever
knob
to
close
the
shutter
With
250mm f/ 5 lens:
Turn
the
shutter
speed
dial
to
"B
,
cock
the
shutter,
move
the
time
lever
knob
fully
toward
the
letter
0
(open),
and
the
shutter
wi
ll
remain
open.
To
close
the
shutter,
move
the
ti
me
lever
knob
to
the
letter
C (close).
*
When
the
shutter
has
been
opened
by
T-setting,
turning
the
shutter
speed
dia
l is
impossible.
*The
time
lever
can
be
moved
only
when
the
shutter
speed
dial
is
set
at
"B
.
18

•
Focusing
by
Focusing
Screen
19
Opening
the
back
cover:
To
observe
the
ground
glass
image,
open
the
back
cover
(F
1
by
moving
the
back
cover
catch
button
(F4) in
the
direction
of
the
arrow
By
pull
ing
out
the
back
cover
opening
angle
adjustment
slide
(F2},
the
cover
will
full
y
open;
by
retracting
the
angle
adjustment
slide,
the
cover
will
open
to
the
horizontal
line.
F1 Back
Cover
F2.
Opening
Angle
Adjustment
Slide
F3. Focusing
Screen
Release
Lever
F4. Back
Cover
Catch
Button
~
...
'
Focusing
For
focusing
by
the
ground
glass
image,
keep
the
shutter
open
and
the
lens
at
its
fullest
aperture;
then
turn
the
focusing
ring
(::15).
The
depth
of
field
can
be
observed
on
the
screen
by
turning
the
aperture
control
lever
(#10).
*Full
size
of
the
focusing
screen
glass
is
for
6X9
cm
format;
the
vertical
Iines on
the
screen
indicate
the
size
for
6 X 7 cm
format
Table of contents
Other Mamiya Digital Camera manuals

Mamiya
Mamiya 645DF User manual

Mamiya
Mamiya RB67 Pro-S User manual

Mamiya
Mamiya 645 SV Pack Assembly instructions

Mamiya
Mamiya ZD User manual

Mamiya
Mamiya M645 1000S User manual

Mamiya
Mamiya RB67 Pro-S User manual

Mamiya
Mamiya M645 Super User manual

Mamiya
Mamiya 6MF User manual

Mamiya
Mamiya RZ67 User manual

Mamiya
Mamiya 7 II User manual

Mamiya
Mamiya M645 Super User manual

Mamiya
Mamiya C330 User manual

Mamiya
Mamiya 645 AFD III User manual

Mamiya
Mamiya RZ67 User manual

Mamiya
Mamiya 645DFplus User manual

Mamiya
Mamiya Leaf Credo User manual

Mamiya
Mamiya RZ67 PRO II User manual

Mamiya
Mamiya 6 User manual

Mamiya
Mamiya ZD User manual

Mamiya
Mamiya DM System User manual


