• Installaons of these surfaces generally require a professional and are not
“do-it-yourself” projects.
• Review surface specicaons before purchasing this type of surfacing. Ask
the installer/ manufacturer for a report showing that the product has been
tested to the following safety standard: ASTM F1292 Standard Specicaon
for Impact Aenuaon of Surfacing Materials within the Use Zone of
Playground Equipment. This report should show the specic height for which
the surface is intended to protect against serious head injury. This height
should be equal to or greater than the fall height-vercal distance between
a designated play surface (elevated surface for standing, sing, or climbing)
and the protecve surfacing below-of your play equipment.
• Check the protecve surfacing frequently for wear.
PLACEMENT
Proper placement and maintenance of protecve surfacing is essenal. Be sure to:
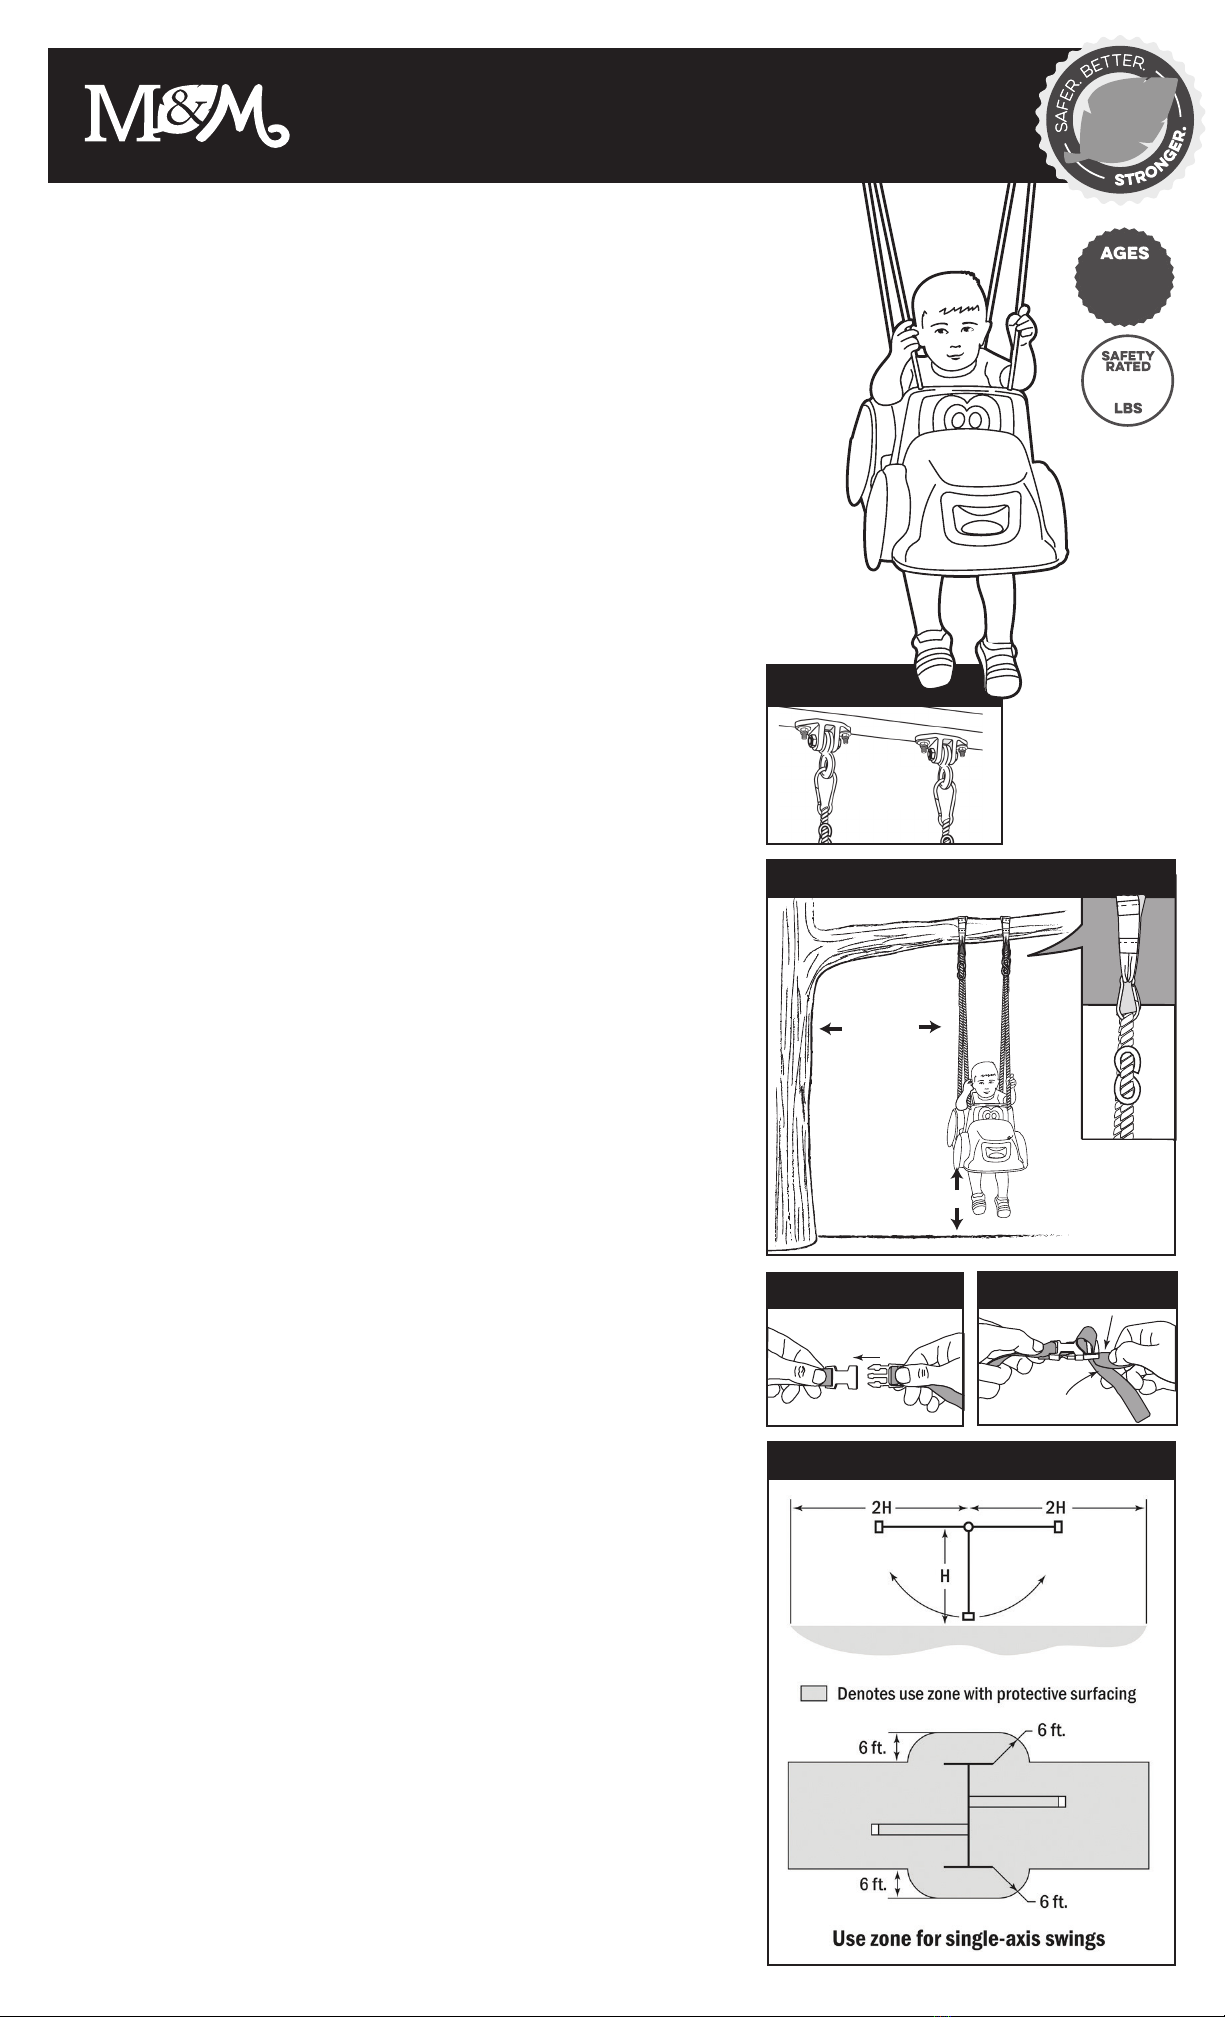
• Extend surfacing at least 72 in. from the equipment in all direcons.
• For to-and-fro swings, extend protecve surfacing in front of and behind the
swing to a distance equal to twice the height of the top bar from which the
swing is suspended.
• For re swings, extend surfacing in a circle whose radius is equal to the
height of the suspending chain or rope, plus 6 feet in all direcons.
OPERATION INSTRUCTIONS
• An adult should supervise play on this product for children of all ages.
• Only for family residenal domesc use.
• Designed for single rider. LIMIT: 1 child per swing.
• Maximum fall height 6.5 . (determined by swing pivot point, maximum
hanging rope length and 24 in. above ground surface).
OPERATION WARNING:
Riders should be dressed appropriately including wearing well-ng shoes that
fully protect feet. Remove arcles before swinging that create hazards when they
get tangled and caught (examples include ponchos, scarves, and other loose-ng
clothing, bike or sports helmets). Adhere to the following guidelines for operaon: Do
not swing the swing higher than hook aachment (See Figure: 7) • Remove rider from
the swing only aer it has completely stopped • Do not twist swing chains or ropes or
loop them over the top support bar since this may reduce the strength of the chain
or rope • Avoid swinging empty seats • Do not walk close to, in front of, or behind, or
between moving items (See Figure: 8) • Rider should sit in center of the swing with full
weight in the seat • Do not use the equipment in a manner other than intended
• Do not aach items to the playground equipment or support structure that the
swing is aached to that are not specically designed for use with the equipment,
such as, but not limited to, jump ropes, clothesline, pet leashes, cables and chain as
they may cause a strangulaon hazard • Do not climb swing when it is wet • When the
swing is in direct sunlight, check that seang surface is not too hot.
Maintenance Instructions
MAINTENANCE WARNING: Failure to carry out these checks and inspecons could
result in a fall or injury. Owners shall be responsible for maintaining the legibility of
the warning labels.
AT THE BEGINNING OF EACH PLAY SEASON:
• Check all moving parts including swing seat, ropes, cables, and chains for
excessive wear, fractures, breaks, sharp edges, rust, or other deterioraon.
Replace as needed.
• Treat ropes with a Teon-based lubricant.
• Tighten all hardware.
• Check metal parts for rust. If found, sand and repaint using a non-lead-based
paint meeng the requirements of 16 CFR 1303.
• Reinstall any plasc parts, such as swing seat or any other items that were
removed for the cold season.
• Rake and check depth of loose ll protecve surfacing materials to prevent
compacon and maintain appropriate depth. Replace as necessary.
(1) ONCE A MONTH DURING PLAY SEASON:
• Check all moving parts including swing seats, ropes, cables, and chains for wear, rust, or other deterioraon. Replace as needed.
(2) TWICE A MONTH DURING PLAY SEASON:
• Treat ropes with a Teon-based lubricant.
• Tighten all hardware.
• Rake and check depth of loose ll protecve surfacing materials to prevent compacon and maintain appropriate depth. Replace as necessary.
• Check all moving parts including swing seats, ropes, cables, and chains for wear, rust, or other deterioraon. Replace as needed.
AT THE END OF EACH PLAY SEASON OR WHEN THE TEMPERATURE DROPS BELOW 32°F:
• Remove plasc swing seats and other items and take indoors or do not use.
• Rake and check depth of loose ll protecve surfacing materials to prevent compacon and to maintain appropriate depth. Replace as
necessary.
SWING DISPOSAL: When you are ready to dispose of swing, make sure that all swing components are disposed of in accordance with local waste
ordinances. Swing should be disassembled and disposed of in such a way that no unreasonable hazards exist at the me the swing is discarded.
SAFETY INFORMATION: To reduce the likelihood of injury please follow the guidelines as outlined in this instrucon manual. You can visit our
website www.mandmsalesinc.com to review the instrucon manual in the future or keep this instrucon sheet for reference: MM00197 Tractor
Toddler Swing Instrucon Manual. The installaon instrucons above are reecve of the U.S. Consumer Product Safety Commission’s Outdoor
Playground Safety Handbook. For a complete descripon of installaon instrucons and warnings for outdoor playground equipment you can visit
our website www.mandmsalesinc.com to link to the current CPSC handbook and review in its enrety.
Our products are tested to ensure safety and compliance with Consumer Product Safety Improvement Act of 2008 (CPSIA) including specicaons
for lead paint and phthalates and ASTM Internaonal F1148 Standard Consumer Safety Performance Specicaons.
CALIFORNIA PROPOSITION 65 WARNING: THIS PRODUCT CONTAINS CHEMICALS KNOWN TO THE STATE OF CALIFORNIA TO CAUSE CANCER
AND BIRTH DEFECTS OR OTHER REPRODUCTIVE HARM.
DO NOT WALK IN FRONT OR BEHIND
SWING WHILE IN MOTION.
M&M Sales Enterprises, Inc.
1300 Synergy Court, Dubuque, IA 52002 | 877-242-0154 www.mandmsalesinc.com
NEVER SWING HIGHER THAN
HOOK AT TACHMENT
Figure: 6
SECURE YOUR CHILD
Cross Bar or Branch
Carabiner
Close and
lock carabiner
after hanging
Rope
Swing ring
Securely tie rope around the cross bar
or tree branch. Use a carabiner to attach swing
to rope as shown above.
Simply slip the swing hooks through the
existing swing set cross bar hook eyes
on the swing set as shown above.
Swing ring
Swing set cross bar
Open hook
and hang swing
Close hook
after hanging
INSTALLATION
To install on an existing swing set. Cross bar or Tree branch installation
Anchor end
Extrémité de l'attache
Free end/Extrémité libre
Place your child in the swing, then place the safety belt over your child’s lap and snap the connectors
together as shown below.
Tighten belt by pushing the anchor end of the belt up through the buckle, creating a loop. Now pull the
free end of the belt to secure it in place. Repeat until the belt ts snuggly around your child’s waist. Do not
over tighten.
To loosen the belt push the free end of the belt up through the buckle, creating a loop, then pull the
anchor end of the belt.
OPERATION INSTRUCTIONS
1. An adult should supervise play on this product for children of all ages.
2. Limit: 1 child per swing.
3. Only for family domestic indoor or outdoor use by children 9 to 36 months old.
4. Dress children appropriately, including wearing well-tting shoes that fully protect the feet.
5. Follow these guidelines:
• avoid swinging empty seats or swings.
• do not swing higher than hook attachment.
• remove child from the swing only after it has completely stopped.
• remove articles before playing on equipment that create hazards. Examples include: ponchos, scarves,
and other loose-tting clothing, bike or other sports helmets.
• do not walk close to, in front of, behind, or between moving swing.
DO NOT walk in front or behind swing while in motion
WARNING: Never swing higher than hook attachment
MAINTENANCE INSTRUCTIONS
1. At the beginning of each season and at least twice monthly during usage, treat ropes with aTeon-based
lubricant.
2. Before each use, check the rope, knots, support and all connections for evidence of deterioration,
excessive wear, fractures, breaks or sharp edges and replace as necessary. 3. Take tire swing indoors when
the temperature drops below 32 degrees Fahrenheit. WARNING: Failure to carry out these checks and
inspections could result in a fall or injury.
Figure: 7
SECURE YOUR CHILD
Cross Bar or Branch
Carabiner
Close and
lock carabiner
after hanging
Rope
Swing ring
Securely tie rope around the cross bar
or tree branch. Use a carabiner to attach swing
to rope as shown above.
Simply slip the swing hooks through the
existing swing set cross bar hook eyes
on the swing set as shown above.
Swing ring
Swing set cross bar
Open hook
and hang swing
Close hook
after hanging
INSTALLATION
To install on an existing swing set. Cross bar or Tree branch installation
Anchor end
Extrémité de l'attache
Free end/Extrémité libre
Place your child in the swing, then place the safety belt over your child’s lap and snap the connectors
together as shown below.
Tighten belt by pushing the anchor end of the belt up through the buckle, creating a loop. Now pull the
free end of the belt to secure it in place. Repeat until the belt ts snuggly around your child’s waist. Do not
over tighten.
To loosen the belt push the free end of the belt up through the buckle, creating a loop, then pull the
anchor end of the belt.
OPERATION INSTRUCTIONS
1. An adult should supervise play on this product for children of all ages.
2. Limit: 1 child per swing.
3. Only for family domestic indoor or outdoor use by children 9 to 36 months old.
4. Dress children appropriately, including wearing well-tting shoes that fully protect the feet.
5. Follow these guidelines:
• avoid swinging empty seats or swings.
• do not swing higher than hook attachment.
• remove child from the swing only after it has completely stopped.
• remove articles before playing on equipment that create hazards. Examples include: ponchos, scarves,
and other loose-tting clothing, bike or other sports helmets.
• do not walk close to, in front of, behind, or between moving swing.
DO NOT walk in front or behind swing while in motion
WARNING: Never swing higher than hook attachment
MAINTENANCE INSTRUCTIONS
1. At the beginning of each season and at least twice monthly during usage, treat ropes with aTeon-based
lubricant.
2. Before each use, check the rope, knots, support and all connections for evidence of deterioration,
excessive wear, fractures, breaks or sharp edges and replace as necessary. 3. Take tire swing indoors when
the temperature drops below 32 degrees Fahrenheit. WARNING: Failure to carry out these checks and
inspections could result in a fall or injury.
Figure: 8