WWW.MARETTI.COM
2/3
2/3
Installatie voorbeeld / Installation example
Input Output
LED Controller
DC+
DC-
Receiver Power
V+
V-
V-
V-
DC+
DC-
V+
Input Output
V+
V-
Power
V-
V-
CH1
CH2
CH3
DC+
DC-
V+
Input Output
V+
V-
Power
V-
V-
CH1
CH2
CH3
POWER SUPPLY
POWER SUPPLY
POWER SUPPLY
AMPLIFIER
POWER SUPPLY CONTROLLER
Note: Profiles, opal covers and end caps are ordered separately. Opmerking: De accessoires zijn apart te bestellen.
The LED strip must be mounted on an aluminum profile due to heat dissipation.
Peel off the tape backing so you can stick the LED strip on an aluminium profile.
De led strip moet op een aluminium profiel gemonteerd worden i.v.m. warmte afvoer.
Haal het papier van de plakband eraf om de LED strip op een aluminium profiel te kunnen plakken.
Note: First degrease the profile
before placing the LED strip
LED strip
Double-sided tape for affixing the strip
Peel off the tape backing
Close-up profile
Note: First degrease the profile
before placing the LED strip
Opal cover 2M on
the aluminium profile
19.7342.05.A
Opal cover 3M
19.7347.05
Opal cover 2M
19.7346.05
Mounting clip
19.7353.17.A
LED strip
Peel off the tape backing
End cap
19.7354.07.A
Aluminium profile 2M
19.7348.14
Black profile 2M
19.7348.04
Aluminium profile 3M
19.7350.14.A
Black profile 3M
19.7350.04.A
Aluminium profile 2M
19.7340.14.A
! !
Note: First degrease the profile
before placing the LED strip
LED strip
Double-sided tape for affixing the strip
Peel off the tape backing
Close-up profile
Note: First degrease the profile
before placing the LED strip
Opal cover 2M on
the aluminium profile
19.7342.05.A
Opal cover 3M
19.7347.05
Opal cover 2M
19.7346.05
Mounting clip
19.7353.17.A
LED strip
Peel off the tape backing
End cap
19.7354.07.A
Aluminium profile 2M
19.7348.14
Black profile 2M
19.7348.04
Aluminium profile 3M
19.7350.14.A
Black profile 3M
19.7350.04.A
Aluminium profile 2M
19.7340.14.A
! !
1 1
2 2
3 3
Square opal cover
2M
19.7345.05
Round opal cover
2M
19.7342.05.A
ULTRA LED
WARM WHITE
INSTRUCTIONS
“No rights can be derived from the information provided on this Instruction Manual. Information on the Instruction Manual has been compiled with the utmost care and is updated on a continuous basis. Nevertheless Maretti cannot guarantee that all information is free of errors, complete or fully up to date.”
19.8501.82*
19.8502.82*
!
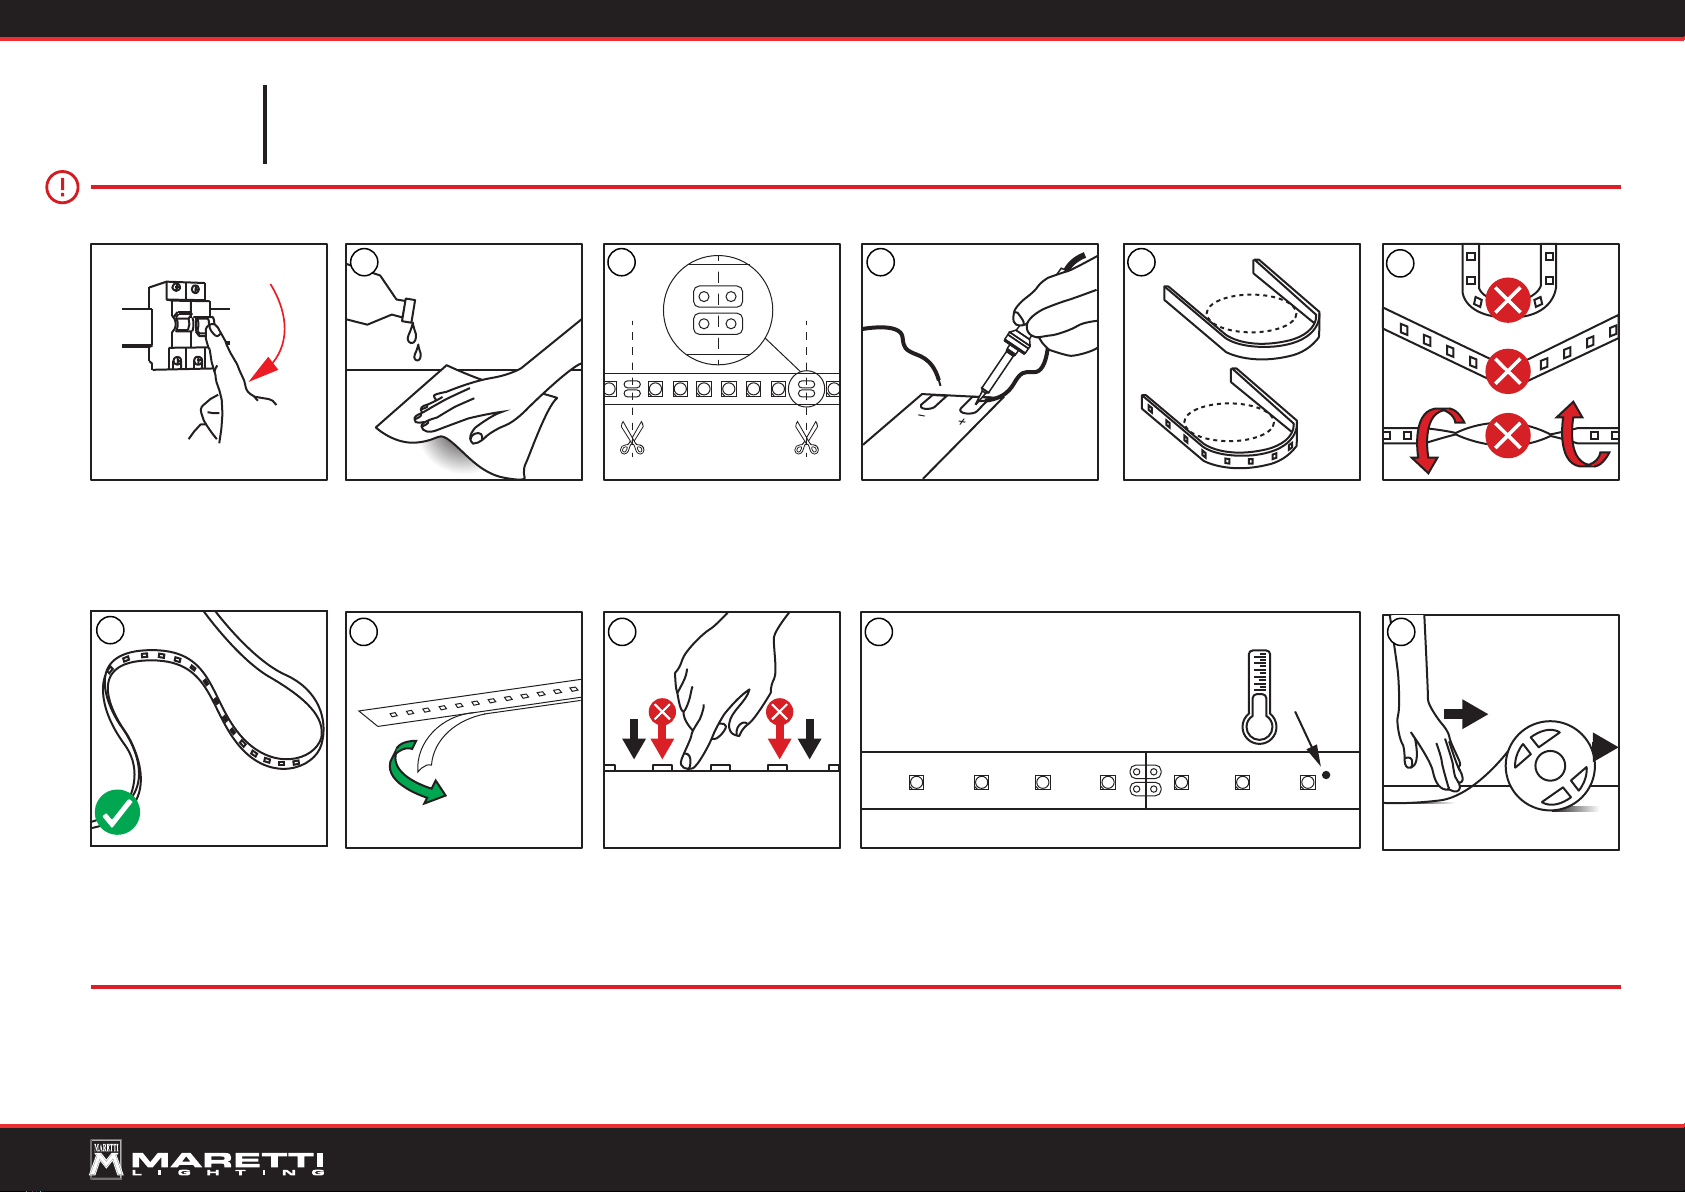
Installation instructions:
• Ensure at all times that all power is shut down.
• LED strip is supplied with self-adhesive heat-transporting tape.To bond this LED tape, the surface must be clean and free of grease.
• It’s important to provide sufficient cooling and air circulation. Mounting on an aluminum strip or heat conductive material is necessary. (The LED strip must
be mounted on an aluminum profile due to heat dissipation.). Don’t forget to peel off the tape backing so you can stick the LED trip on an aluminium profile.
• To prevent short circuit the LED strip can only be shortened at the indicated cutting lines, and if cut there it needs to be insulated. Also after soldering the
strip, it needs to be insulated.
• LED strip can be bent only once and NOT on the places where the electronic components are located.
• The LED strip can only be soldered to the appropriate contact parts, besides the cutting lines.
• Maximum soldering temperature is 273 degrees Celsius. MAXIMUM duration of heating is 8 seconds.
Additional cautions:
• The electronic components on the LED strip should NOT be burdened or clamped in any mechanical way.
• Make sure that the LED strip is NOT damaged or obstructed during assembly.
• LED strip may only be connected in parallel; series connection can cause an asymmetric voltage distribution on the module, thereby providing an overload,
which may lead to a malfunction.
• The power source must have sufficient power for the connected LED strip.
• Installation must be carried out according to the ESD standards (Electrostatic Discharge). Not working according to these standards may cause a malfunc-
tion in the LED strip.
• When installing into damp, dusty and dirty mounting spaces, adequate measures should be taken to make sure these circumstances don’t affect the LED
strip.
• Protective and insulating materials that are used in assembly should have a good light transmission, be UV-stable and be resistant to changes in tempera-
ture and atmospheric corrosive conditions.
• LED strip should only be installed by trained personnel, executing the installation of the LED strip in accordance with the applicable directives and standards.
• Cleaning and maintenance of the LED strip is only allowed with dry cloth and NEVER with liquid and/or abrasives. If the LED strip does get wet or damp,
immediately disconnect the power of the LED strip and dry all components.
Maretti Project Lighting BV. is not liable for any damage caused by misuse or incorrect installation of the LED strip. Also the warranty will be invalid if any of
these points are not respected.
Montage instructies:
• Zorg te allen tijde dat alle spanning is afgesloten.
• LED strip is voorzien van zelfklevende warmte transporterende tape. Om deze LED tape te kunnen verlijmen moet de ondergrond goed schoon en vetvrij zijn.
• Er moet voldoende koeling en luchtcirculatie aanwezig zijn, het monteren op een aluminium strip of warmtegeleidend materiaal is noodzakelijk. (De led strip moet op een
aluminium profiel gemonteerd worden i.v.m. warmte afvoer.). Haal A.U.B. het papier van de plakband eraf om de LED strip op een aluminium profiel te kunnen plakken.
• De LED strip is in te korten maar alleen op de aangegeven kniplijn, dit ter voorkoming van kortsluiting. Na het inkorten dient deze dan wel geïsoleerd te worden. Dit
geldt ook na solderen van de strip.
• LED strip mag eenmalig gebogen worden, echter NIET op de plekken waar de elektronica componenten zich bevinden.
• De LED strip mag enkel gesoldeerd worden op de daarvoor bestemde contactdelen, naast de inkortposities.
• Maximale soldeertemperatuur is 273 graden Celsius. De MAXIMALE verhittingstijd is 8 seconden.
Extra attentiepunten:
• De elektronicacomponenten op de LED strip mogen mechanisch NIET belast of afgeklemd worden.
• Let op dat de LED strip bij montage NIET beschadigd of onderbroken wordt.
• LED strip mag alleen parallel geschakeld worden; serieschakeling kan een asymmetrische spanningsverdeling op de module veroorzaken, waardoor er overbelasting
ontstaat die kan leiden tot een defect.
• De voedingsbron dient van voldoende vermogen te zijn voor de aangesloten LED strip.
• Montage dient te geschieden volgens de ESD normen (Elektrostatische Ontlading). Bij het niet in acht nemen van deze normen kan er een defect ontstaan in de LED strip.
• Bij montage in vochtige, stoffige en vuile inbouw gelegenheden dient er voldoende maatregelen genomen te worden om eventuele inwerking hiervan op de LED strip
tegen te gaan.
• Beschermende en isolerende materialen die toegepast worden bij montage dienen een goede lichttransmissie te hebben, UV-stabiel te zijn, bestand te zijn tegen tempe-
ratuurschommelingen en tegen corrosieve atmosferische omstandigheden.
• LED strip dient uitsluitend gemonteerd te worden door elektrisch geschoold personeel, die de installatie van de LED strip volgens de daartoe geldende richtlijnen en
normen uitvoert.
• Reiniging en onderhoud van de LED strip mag alleen met droge doek en NOOIT met vloeibare en/of schuurmiddelen. Als het toch nat/vochtig is geworden dan direct de
installatie spanningloos maken en alles droog maken.
Maretti Projectverlichting BV. is niet aansprakelijk voor enige schade, ontstaan door foutief gebruik of verkeerde installatie van de LED strip.Tevens vervalt de garantie als
een van deze punten niet wordt nageleefd.