Mark MBAR 4 72 BAT User manual

MBAR 4 72 BAT
User Manual – Version 1.2

1
SAFETY INSTRUCTIONS
1. Read the instructions of this manual.
2. Keep these instructions in a safe place.
3. Heed and follow all warnings and instructions.
4. Please, respect your country safety regulations.
5. Don’t use this device close to the water or high humidity places. Clean only with dry cloth.
6. Don’t install near any heat sources such as radiators, heat registers, stoves, or other apparatus
(including amplifiers) that produce heat. Make certain that the equipment is always installed so that is
cooled and can’t overheat.
7. Don’t block any ventilation openings. Install in accordance with the manufacturer’s instructions.
8. Protect the power cord from being walked on or pinched, particularly at plugs, convenience
receptacles, and the point where they exit from the apparatus.
9. Only use attachments/accessories specified by MARK.
10. Unplug this device during lightning storms or when unused for long periods of time.
11. The technical service is required when the device has been damaged in any way, such as power
supply cord or plug is damaged, liquid has been spilled or objects have fallen into the device, doesn’t
operate normally or has been dropped.
12. To completely disconnect this apparatus from the AC mains, disconnect the power supply cord
plug from the AC receptacle.
13. The mains plug of the power supply cord shall remain readily operable.
14. WARNING – to reduce the risk of fire or electric shock, don’t expose this device to rain or humidity.
15. Don’t expose this equipment to dripping or splashing and ensure that no objects filled with liquids,
such as vases, are placed on the equipment.
16. For rigging installation, please, follow the recommendations included in this user manual.
17. This device includes rechargeable battery (lithium-ion). Please, follow the local laws for disposing
the battery, removing it from the device and recycling in an appropriate recycling plant.

2
OVERVIEW
MBAR 4 72 BAT is a lighting bar which includes 24x 3W RGB (3 in 1) LEDs. These brilliant LEDs allow to
obtain a rich colour spectrum mixing the red, green and blue colours.
The configuration interface has a display with all the information and buttons to navigate through
menus, selecting parameters such as: manual level of each colour, strobe or inner effects.
MBAR 4 72 BAT integrates a rechargeable lithium-ion battery to operate autonomously.
The device includes several DMX modes (5, 8, 14, 26 & 50 channels) with individual colour dimming,
built-in effects, and strobe function.
Technical Data:
Power Supply
AC 100-240 V 50/60 Hz + rechargeable battery
Light source
24x 3W RGB (3 in 1) LEDs
Dimmer
0-100 Linear Adjustment
DMX Channels
5, 8, 14, 26 & 50 channels
Mode
DMX 512 /Auto/Manual/Audio/Master-Slave
Input connections
3 pin XLR
Output connections
3 pin XLR
Dimensions (WxHxD)
1050 x 60 x 60 mm
Weight
2.75 Kg
Features:
- Lighting projector that includes 24x 3 W RGB (3 in 1) LEDs.
- Display and interface for setting functions.
- Lithium-ion battery integrated.
- Strobe function.
- Double wings for fixation.
Rechargeable Lithium ion battery
- 11.6V, 7200 mA
- 4 hours working time

3
INSTALLATION
This product is only suitable for professional use. This device should be kept dry to avoid moisture,
overheating or dusty environment. Ensure that the unit does not come into contact with water or any
other liquid.
MBAR 4 72 BAT can be placed in a stable surface or stand but the common operating mode is rigging
it in a truss system. Please, check and follow the next recommendations for safe use of this device:
- The truss system must be built in a way that it can hold 10 times the weight of all rigging
elements for 1 hour without any harming deformation.
- The fixation system (clamps or hangs) must be able to hold 10 times the weight of the device.
- The device must always be secured with a safety attachment, e.g. steel cable.
- The operator must check that the installation meets the safety standards and the device
installation is approved by a skilled person.
DMX Connection.
The DMX cable must use the professional shielded twisted pair cable. Standard loudspeaker cable is
not reliable to control the long-range data. 24AWG cable is suitable for up to 300 meters long-distance
signal transmission; for longer distances, a DMX 512 signal amplifier should be used.
Don’t overload the connection. One continuous connection can only support up to 30 devices. It is
advisable to use a DMX splitter in order to distribute the signal without losing its integrity.
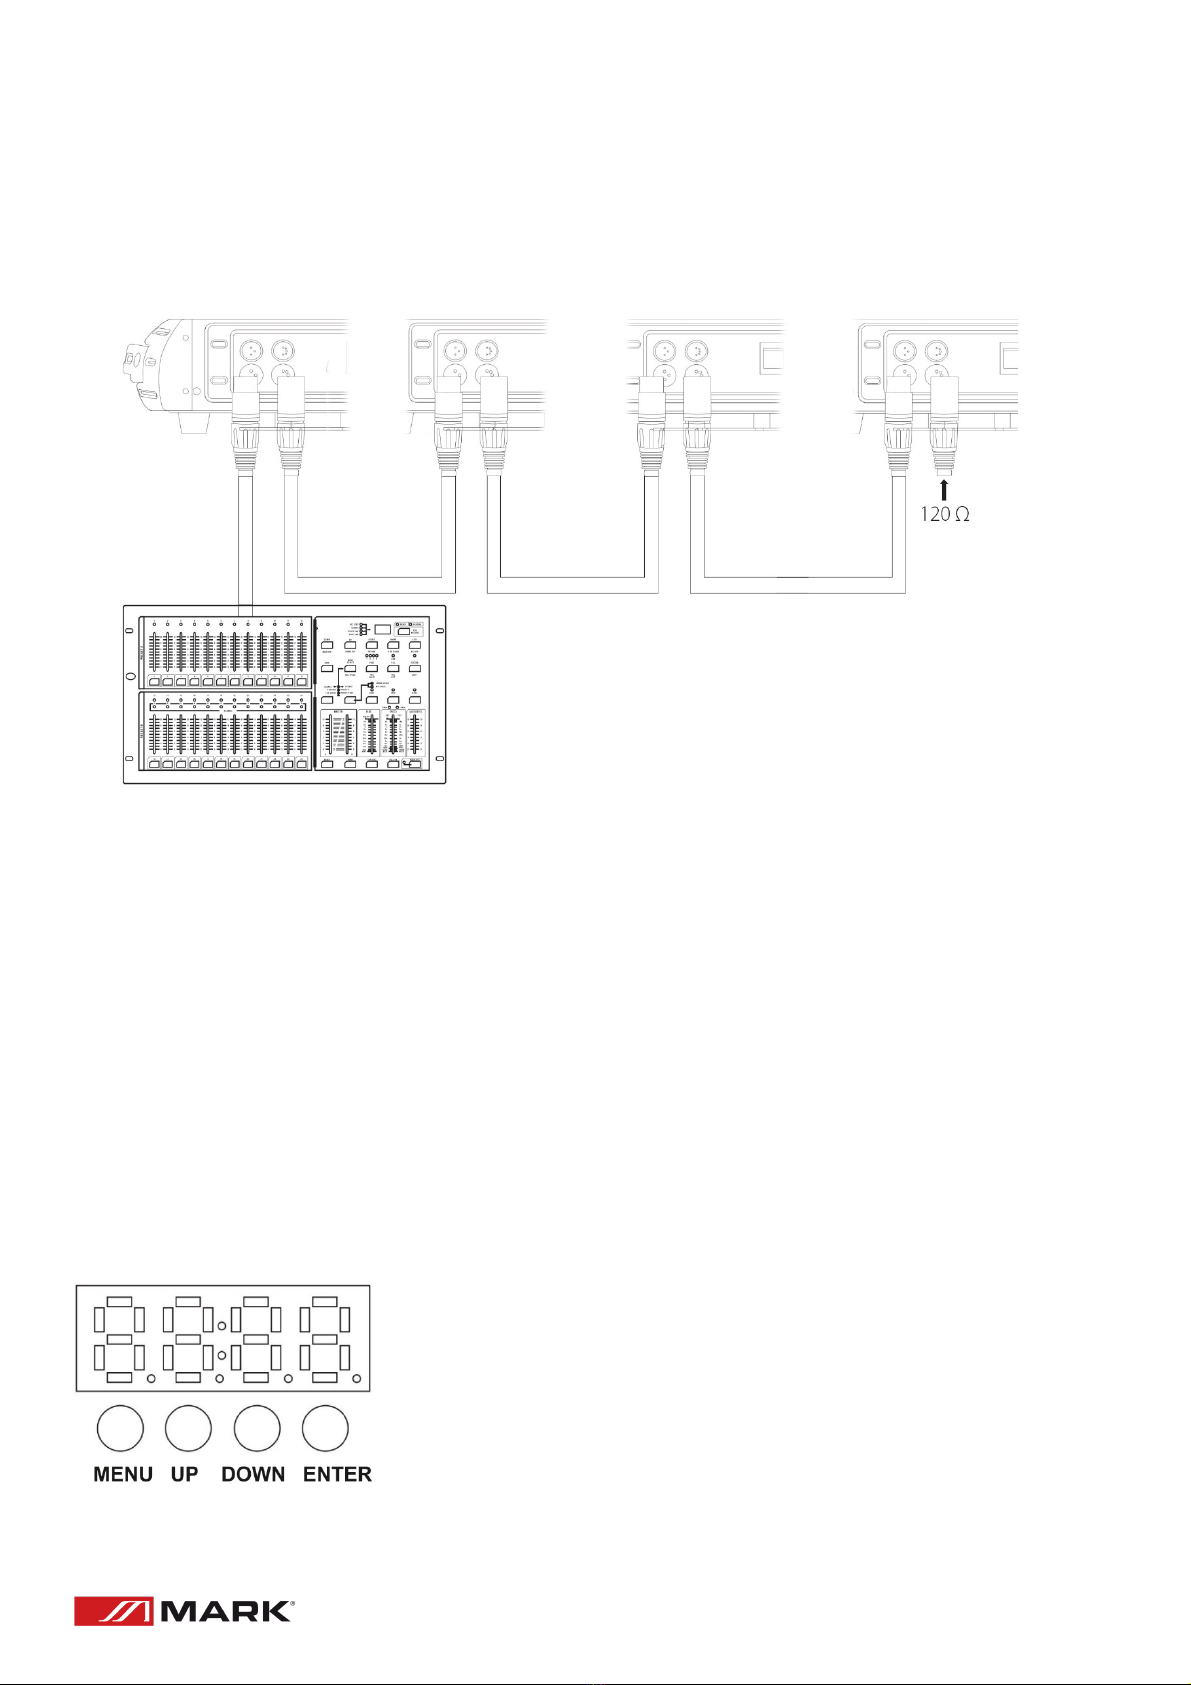
Connect the DMX512 input terminal to the controller. After that, connect the output terminal to the
next device. Repeat this step with all fixtures in the chain. To prevent system errors, the last device in
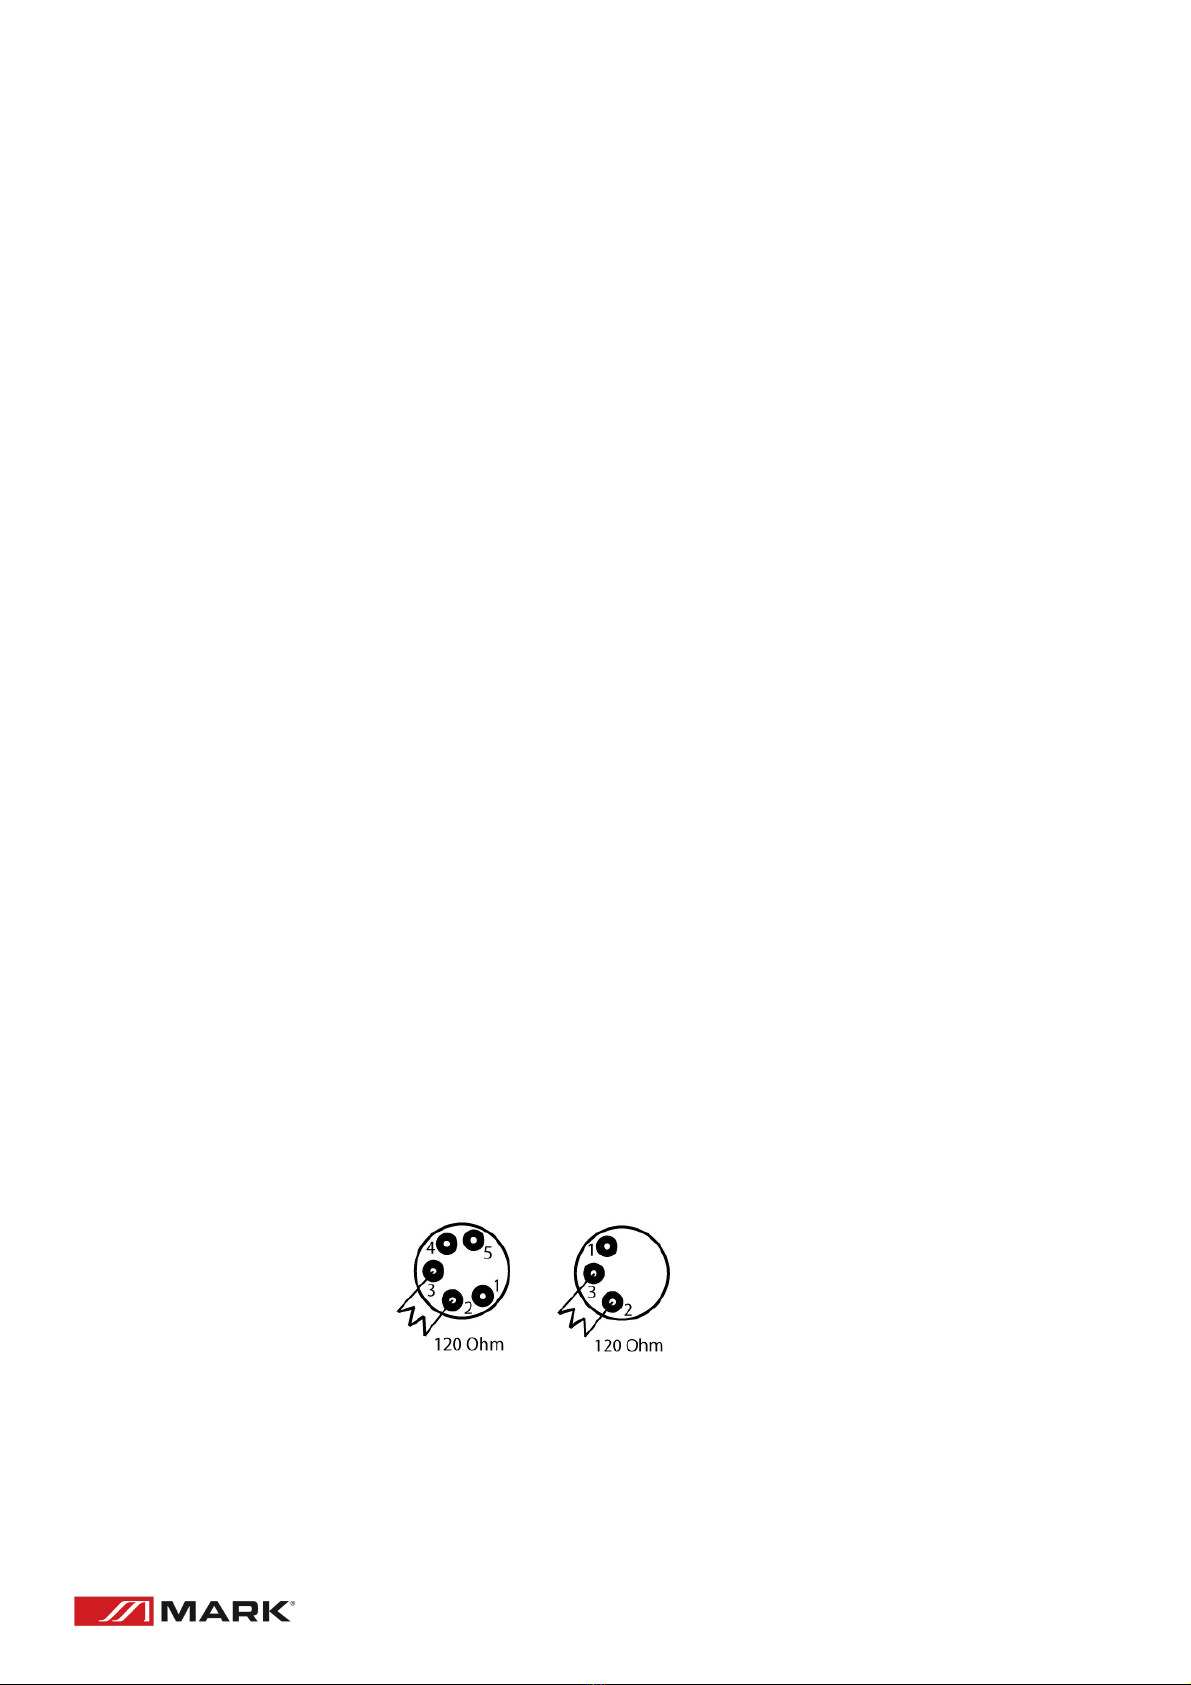
a DMX chain needs to be equipped with a terminating resistor (120 ohm, 1/4 Watt).
Pin occupation
Pin 1: Ground
Pin 2: Pin -
Pin 3: Pin +
4
To connect more than one unit in a chain, please, follow this picture. The output of the first unit must
provide to the next DMX input of the signal, this way it is possible to send the signal to all the devices
in the chain.
ADVANCED USE
RECHARGEABLE BATTERY
The unit can operate with the internal battery after to be charged. The process is automatic while the
device is connected to an adequate AC plug. You can check the charge level through LED bar closed
the display.
CONTROL PANEL
MBAR 4 72 BAT can be configured in different ways thanks to its panel and selection buttons.
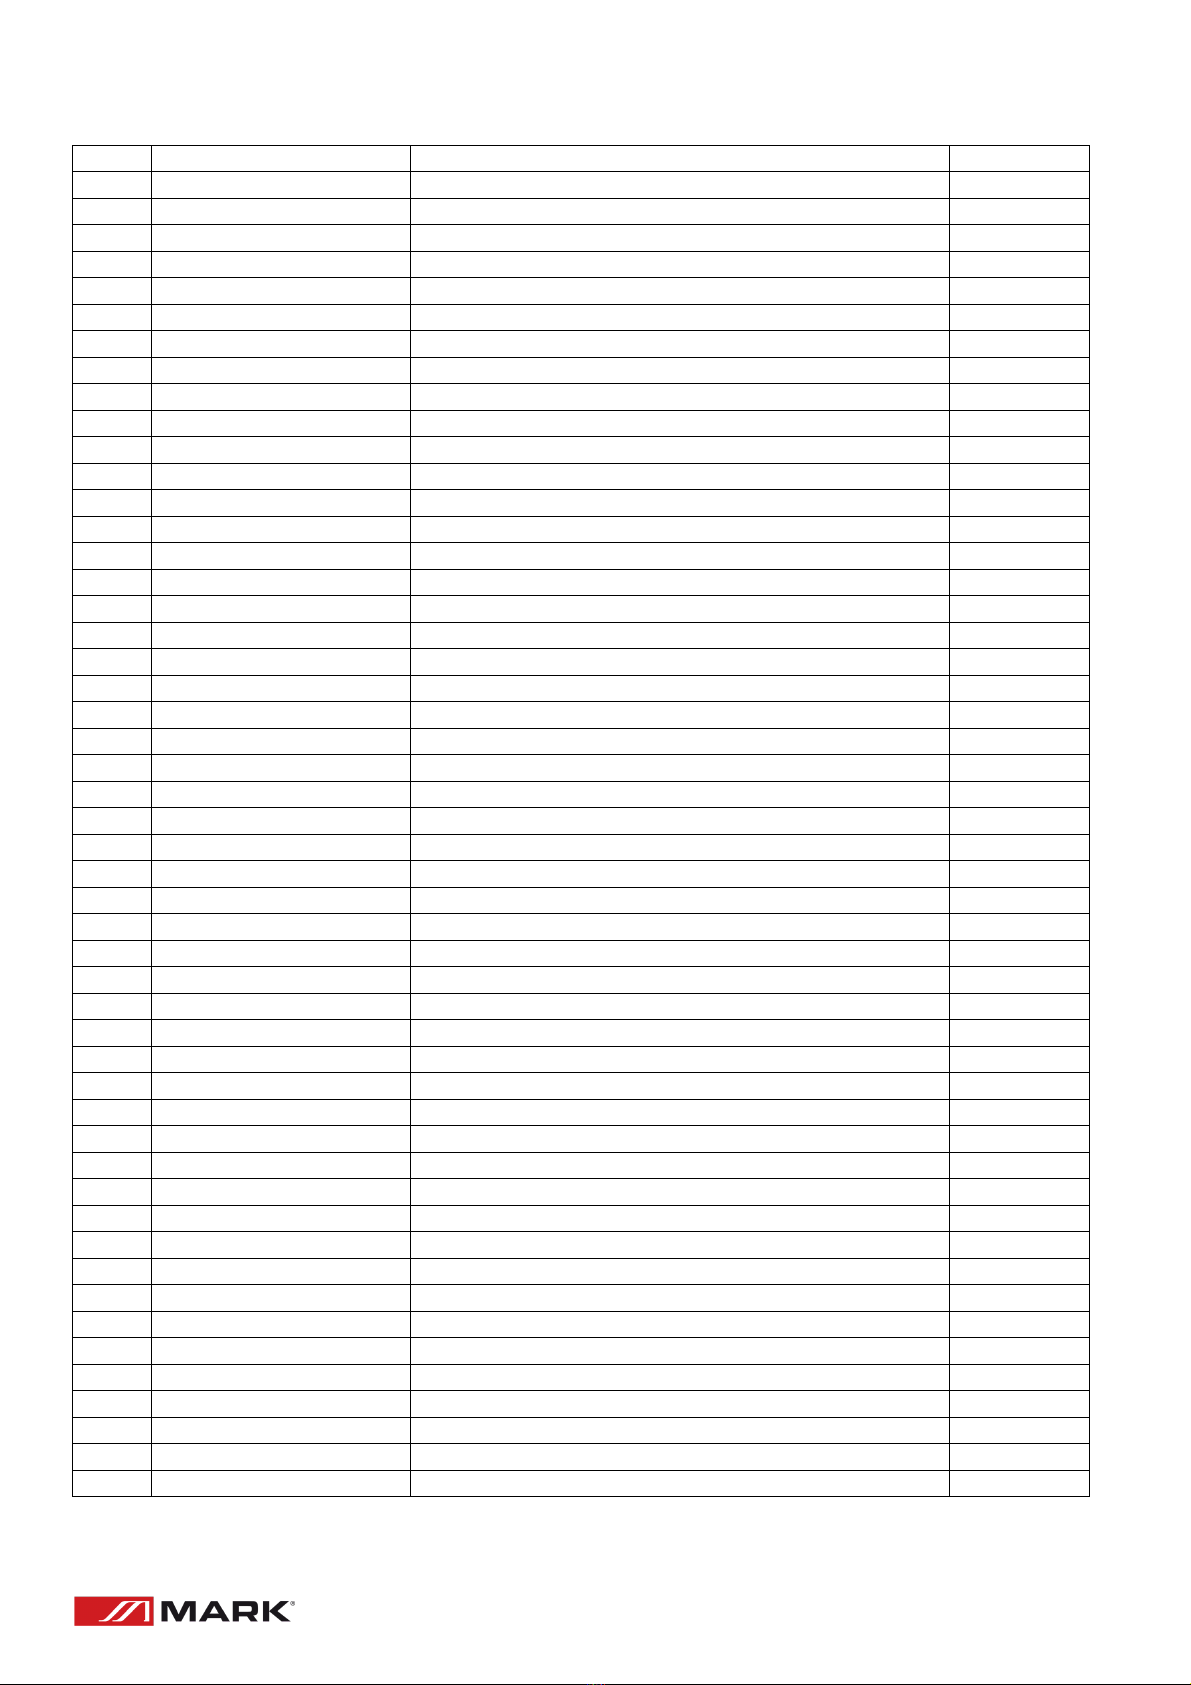
Press the MENU button (once or several times) until you get to the
desired function (according to the following chart), and press ENTER
to confirm your selection.
Use the UP & DOWN buttons to navigate between each function to
select the correct value. (Press ENTER to confirm the setting).

5
DMX CONTROL MODE
The following tables show the DMX channel functions:
5 channels mode
No
Function
Description
Value
1
R dimming
Red dimming from minimum to maximum
0 - 255
2
G dimming
Green dimming from minimum to maximum
0 - 255
3
B dimming
Blue dimming from minimum to maximum
0 - 255
4
Color chase
* See chase table
0 - 255
5
Chase speed
From slow to fast
0 - 255
8 channels mode
No
Function
Description
Value
1
Master dimmer
General dimmer
0 - 255
2
Strobe
From slow to fast
0 - 255
3
R dimming
Red dimming from minimum to maximum
0 - 255
4
G dimming
Green dimming from minimum to maximum
0 - 255
5
B dimming
Blue dimming from minimum to maximum
0 - 255
6
Auto program
One program with increasing speed
0 - 255
7
Color chase
* See chase table
0 - 255
8
Chase speed
From slow to fast
0 - 255

6
14 channels mode (2 groups of 12 LEDs)
No
Function
Description
Value
1
Master dimmer 1
General dimmer
0 - 255
2
Strobe 1
From slow to fast
0 - 255
3
R dimming 1
Red dimming from minimum to maximum
0 - 255
4
G dimming 1
Green dimming from minimum to maximum
0 - 255
5
B dimming 1
Blue dimming from minimum to maximum
0 - 255
6
Auto program 1
One program with increasing speed
0 - 255
7
Master dimmer 2
General dimmer
0 - 255
8
Strobe 2
From slow to fast
0 - 255
9
R dimming 2
Red dimming from minimum to maximum
0 - 255
10
G dimming 2
Green dimming from minimum to maximum
0 - 255
11
B dimming 2
Blue dimming from minimum to maximum
0 - 255
12
Auto program 2
One program with increasing speed
0 - 255
13
Color chase
* See chase table
0 - 255
14
Chase speed
From slow to fast
0 - 255
26 channels mode (4 groups of 6 LEDs)
No
Function
Description
Value
1
Master dimmer 1
General dimmer
0 - 255
2
Strobe 1
From slow to fast
0 - 255
3
R dimming 1
Red dimming from minimum to maximum
0 - 255
4
G dimming 1
Green dimming from minimum to maximum
0 - 255
5
B dimming 1
Blue dimming from minimum to maximum
0 - 255
6
Auto program 1
One program with increasing speed
0 - 255
7
Master dimmer 2
General dimmer
0 - 255
8
Strobe 2
From slow to fast
0 - 255
9
R dimming 2
Red dimming from minimum to maximum
0 - 255
10
G dimming 2
Green dimming from minimum to maximum
0 - 255
11
B dimming 2
Blue dimming from minimum to maximum
0 - 255
12
Auto program 2
One program with increasing speed
0 - 255
13
Master dimmer 3
General dimmer
0 - 255
14
Strobe 3
From slow to fast
0 - 255
15
R dimming 3
Red dimming from minimum to maximum
0 - 255
16
G dimming 3
Green dimming from minimum to maximum
0 - 255
17
B dimming 3
Blue dimming from minimum to maximum
0 - 255
18
Auto program 3
One program with increasing speed
0 - 255
19
Master dimmer 4
General dimmer
0 - 255
20
Strobe 4
From slow to fast
0 - 255
21
R dimming 4
Red dimming from minimum to maximum
0 - 255
22
G dimming 4
Green dimming from minimum to maximum
0 - 255
23
B dimming 4
Blue dimming from minimum to maximum
0 - 255
24
Auto program 4
One program with increasing speed
0 - 255
25
Color chase
* See chase table
0 - 255
26
Chase speed
From slow to fast
0 - 255
7
50 channels mode (8 groups of 3 LEDs)
No
Function
Description
Value
1
Master dimmer 1
General dimmer
0 - 255
2
Strobe 1
From slow to fast
0 - 255
3
R dimming 1
Red dimming from minimum to maximum
0 - 255
4
G dimming 1
Green dimming from minimum to maximum
0 - 255
5
B dimming 1
Blue dimming from minimum to maximum
0 - 255
6
Auto program 1
One program with increasing speed
0 - 255
7
Master dimmer 2
General dimmer
0 - 255
8
Strobe 2
From slow to fast
0 - 255
9
R dimming 2
Red dimming from minimum to maximum
0 - 255
10
G dimming 2
Green dimming from minimum to maximum
0 - 255
11
B dimming 2
Blue dimming from minimum to maximum
0 - 255
12
Auto program 2
One program with increasing speed
0 - 255
13
Master dimmer 3
General dimmer
0 - 255
14
Strobe 3
From slow to fast
0 - 255
15
R dimming 3
Red dimming from minimum to maximum
0 - 255
16
G dimming 3
Green dimming from minimum to maximum
0 - 255
17
B dimming 3
Blue dimming from minimum to maximum
0 - 255
18
Auto program 3
One program with increasing speed
0 - 255
19
Master dimmer 4
General dimmer
0 - 255
20
Strobe 4
From slow to fast
0 - 255
21
R dimming 4
Red dimming from minimum to maximum
0 - 255
22
G dimming 4
Green dimming from minimum to maximum
0 - 255
23
B dimming 4
Blue dimming from minimum to maximum
0 - 255
24
Auto program 4
One program with increasing speed
0 - 255
25
Master dimmer 5
General dimmer
0 - 255
26
Strobe 5
From slow to fast
0 - 255
27
R dimming 5
Red dimming from minimum to maximum
0 - 255
28
G dimming 5
Green dimming from minimum to maximum
0 - 255
29
B dimming 5
Blue dimming from minimum to maximum
0 - 255
30
Auto program 5
One program with increasing speed
0 - 255
31
Master dimmer 6
General dimmer
0 - 255
32
Strobe 6
From slow to fast
0 - 255
33
R dimming 6
Red dimming from minimum to maximum
0 - 255
34
G dimming 6
Green dimming from minimum to maximum
0 - 255
35
B dimming 6
Blue dimming from minimum to maximum
0 - 255
36
Auto program 6
One program with increasing speed
0 - 255
37
Master dimmer 7
General dimmer
0 - 255
38
Strobe 7
From slow to fast
0 - 255
39
R dimming 7
Red dimming from minimum to maximum
0 - 255
40
G dimming 7
Green dimming from minimum to maximum
0 - 255
41
B dimming 7
Blue dimming from minimum to maximum
0 - 255
42
Auto program 7
One program with increasing speed
0 - 255
43
Master dimmer 8
General dimmer
0 - 255
44
Strobe 8
From slow to fast
0 - 255
45
R dimming 8
Red dimming from minimum to maximum
0 - 255
46
G dimming 8
Green dimming from minimum to maximum
0 - 255
47
B dimming 8
Blue dimming from minimum to maximum
0 - 255
48
Auto program 8
One program with increasing speed
0 - 255
49
Color chase
* See chase table
0 - 255
50
Chase speed
From slow to fast
0 - 255

8
Colour Chase Table
No
Function
Color Chase
000 – 007 No function
008 – 022 Colour chase 1
023 – 037 Colour chase 2
038 – 052 Colour chase 3
053 – 067 Colour chase 4
068 – 082 Colour chase 5
083 – 097 Colour chase 6
098 – 112 Colour chase 7
113 – 127 Colour chase 8
128 – 142 Colour chase 9
143 – 157 Colour chase 10
158 – 172 Colour chase 11
173 – 187 Colour chase 12
188 – 202 Colour chase 13
203 – 217 Colour chase 14
218 – 232 Colour chase 15
233 – 247 Colour chase 16
248 – 255 Sound active
CAUTIONS
Prevention of electric shock
The electrical connection must only be carried out by qualified personal. Before installing, make sure
you use the same power voltage marked in the MBAR 4 72 BAT (AC 100-240V/50-60Hz). Each device
must be properly grounded and installed in accordance with the relevant standards. Don’t use the
device in a lightning storm or wet environment.
To prevent burning of fire
1. Never install the device directly on the surface of ordinary combustible material.
2. The equipment must be installed away from inflammable and explosive materials.
3. Keep at last 0,5 m around the unit for ventilation purposes.
4. Do not place any object on the lens.
5. Do not replace with non-original spare parts. Contact your MARK dealer.
Unpacking
Note: Before unpacking, check it for possible damage that might have occurred during transportation.
If you find any damage, please do not use the unit and contact the MARK dealer.

9
TROUBLESHOOTING
This short guide is meant to help and try to solve simple problems. If they continue and the device
cannot operate, please, don’t try to repair it by yourself, return the device to your MARK dealer.
If a problem occurs, carry out the following steps in sequence until find the problem solved. If the light
effect does not operate properly, refer servicing to a technician.
No Light:
Response: Suspect two potential problem areas: the power supply or the LEDs.
1- Power supply. Check that the unit is plugged into an appropriate power supply.
2- Check if the fuse is not blown. If yes, change it with one that keeps the same technical features.
If the fuse blowns again, please, don’t change it, contact the MARK technical service.
3- If all the above appears to be OK, plug the unit in again.
4- If you are unable to determine the cause of the problem, do not open the device, as this may
damage the unit and the warranty will become void.
5- Return the device to your MARK dealer.
No DMX:
Response: Suspect the DMX cable or connector, a controller wrong function, a previous light effect
DMX in the chain.
1- Check the DMX settings. Make sure that DMX addresses are correct.
2- Check the DMX cable: Unplug the unit; change the DMX cable; then reconnect to electrical
power. Try to use your DMX controller again.
3- Determine whether the controller or light effect is at fault. Does the controller operate properly
with other DMX products? If not, take the unit to a qualified technician.

10
INDICACIONES DE SEGURIDAD
1. Lea detenidamente las siguientes instrucciones y preste atención a éstas.
2. Guarde en un lugar seco y seguro este manual.
3. Siga una a una todas las instrucciones.
4. Respete las instrucciones de seguridad de su país cuando instale este dispositivo.
5. No use este dispositivo cerca del agua o zonas altamente húmedas. A la hora de limpiarlo, utilice un
paño seco.
6. No instale el dispositivo cerca de ninguna fuente de calor o fuego tales como calefactores, estufas o
incluso amplificadores que produzcan calor. Asegúrese de que, una vez instalado el dispositivo, esté
en un lugar fresco y seco.
7. No obstruya ninguna de las salidas. Cuando instale el dispositivo hágalo tal y como lo indican estas
instrucciones.
8. Proteja el cable de alimentación para no ser pisado o manipulado, particularmente en los conectores
(mural y de entrada a la unidad).
9. Utilice únicamente accesorios especificados por MARK.
10. Desconecte el dispositivo si no va a ser utilizado durante largos periodos de tiempo.
11. El dispositivo será reparado por el servicio técnico oficial cuando esté dañado, el cable este
deteriorado o el conector estropeado, así como si el dispositivo ha entrado en contacto con líquidos o
no opera correctamente.
12. Para desconectar totalmente la unidad de la red eléctrica principal desconecte el cable de la toma
mural eléctrica.
13. El conector principal debe poder conectarse y desconectarse de la red eléctrica de manera fácil.
14. ATENCIÓN. Para reducir el riesgo de fuego o shock eléctrico, no exponga este dispositivo bajo la
lluvia o la humedad.
15. No exponga este equipo a líquidos, ni salpicaduras, así como su ubicación cerca de recipientes o
posibles fuentes con líquidos.
16. Si la unidad va a ser volada en un truss, por favor, siga las recomendaciones incluidas en este
manual de usuario.
17. Este dispositivo incluye una batería recargable (de ión de litio). Por favor, siga las leyes locales para
ocuparse de la batería, retirándola del dispositivo y reciclándola en una planta de reciclaje adecuada.

11
VISTA GENERAL
MBAR 4 72 BAT es una barra de iluminación que incluye 24 LEDs RGB (3 en 1) de 3W cada uno. Estos
brillantes LEDs permiten obtener un rico espectro de colores mezclando los colores rojo, verde y azul.
La interfaz de configuración tiene una pantalla con toda la información y botones para navegar por los
menús, seleccionando parámetros tales como: nivel manual de cada color, efecto estrobo o efectos
internos.
MBAR 4 72 BAT integra una batería recargable de ión de litio para operar de manera autónoma.
El dispositivo incluye varios modos DMX (5, 8, 14, 26 y 50 canales) con dimmerización de color
individual, efectos incorporados y función estrobo.
Datos Técnicos:
Alimentación
AC100-240 V 50/60 Hz + batería recargable
Fuente lumínica
24x LEDs RGB (3 en 1) de 3W cada uno.
Dimmer
0-100 ajuste lineal
Canales DMX
5, 8, 14, 26 y 50 canales
Modos
DMX 512 /Auto/Manual/Audio/Master-Slave
Conexiones de entrada
3 pin XLR
Conexiones de salida
3 pin XLR
Dimensiones
(AnxAlxPr)
1050 x 60 x 60 mm
Peso
2.75 Kg
Características:
- Proyector de iluminación que incluye 24x LEDs RGB de 3W cada uno (3 en 1).
- Pantalla e interfaz para funciones de ajuste.
- Batería recargable de ión de litio integrada
- Función strobo.
- Dos alas de fijación.
Batería recargable de ión de litio
- 11.6V, 7200 mA
- 4 horas de funcionamiento
12
INSTALACIÓN
Este producto sólo es adecuado para uso profesional. Este dispositivo debe mantenerse seco para
evitar la humedad, el sobrecalentamiento o el ambiente polvoriento. Asegúrese que la unidad no entre
en contacto con agua o cualquier otro líquido.
MBAR 4 72 BAT se puede colocar en una superficie plana y estable o en un soporte, pero el modo de
funcionamiento común es el rigging en un sistema truss. Por favor, compruebe y siga las siguientes
recomendaciones para un uso seguro de este dispositivo:
- El sistema de truss debe ser construido de tal manera que pueda soportar 10 veces el peso de
todos los elementos de rigging durante 1 hora sin causar deformación.
- El sistema de fijación (abrazaderas o garras) debe ser capaz de soportar hasta 10 veces el peso
del dispositivo.
- El dispositivo debe asegurarse siempre con un accesorio de seguridad, p. e. un cable de acero.
- El operador debe comprobar que la instalación cumple con las normas de seguridad y la
instalación del dispositivo es aprobada por un experto en la materia.
Conexión DMX
Para el conexionado DMX debe utilizar el cable de par trenzado blindado profesional. El cable de
altavoz estándar no es fiable para controlar los datos a grandes distancias. El cable 24AWG es
adecuado para distancias de hasta 300m, a partir de esta distancia se debe utilizar un amplificador de
señal DMX.
No sobrecargue la conexión. Una conexión continua sólo puede soportar hasta 30 dispositivos. En
todo caso se recomienda la utilización de un splitter DMX para distribuir la señal sin pérdida de
integridad.
Conecte el terminal de entrada DMX512 al controlador. Después, conecte el terminal de salida al
siguiente dispositivo. Repita el paso anterior para conectar otro dispositivo y así sucesivamente. Para
evitar errores en el sistema, el último dispositivo de una cadena DMX debe estar equipado con una
resistencia de terminación (120 Ohmios, 1/4 W).
Ocupación de los pines
Pin 1: Masa
Pin 2: Pin -
Pin 3: Pin +

13
Para conectar más de una unidad, siga el siguiente esquema. La salida de la primera unidad se conecta
a la entrada de la siguiente y así sucesivamente, de esta manera es posible enviar la señal a todos los
dispositivos de la cadena.
USO AVANZADO
BATERÍA RECARGABLE
La unidad puede operar con la batería interna después de haber sido cargada. El proceso es
automático mientras el dispositivo está conectado a toma de AC. Puede comprobar el nivel de carga
gracias a la barra de LEDs junto al display.
PANEL DE CONTROL
MBAR 4 72 BAT permite ser configurado de diferentes maneras, gracias a su panel y botones de
selección.
Presione el botón MENU (una o varias veces) hasta llegar a la función
deseada (según el siguiente cuadro), y presione ENTER para
confirmar su selección. Utilice los botones UP y DOWN para navegar
entre cada función para seleccionar el valor correcto. (Pulse ENTER
para confirmar la configuración).

14
MODO DE CONTROL DMX
Las siguientes tablas muestra las funciones de los canales DMX:
Modo 5 canales
No
Función
Descripción
Valor
1
Dimmer R
Dimmer rojo de mínimo a máximo
0 - 255
2
Dimmer G
Dimmer verde de mínimo a máximo
0 - 255
3
Dimmer B
Dimmer azul de mínimo a máximo
0 - 255
4
Color chase
* Ver tabla Chases
0 - 255
5
Velocidad Chase
De lento a rápido
0 - 255
Modo 8 canales
No
Función
Descripción
Valor
1
Master dimmer
Dimmer general
0 - 255
2
Strobo
De lento a rápido
0 - 255
3
Dimmer R
Dimmer rojo de mínimo a máximo
0 - 255
4
Dimmer G
Dimmer verde de mínimo a máximo
0 - 255
5
Dimmer B
Dimmer azul de mínimo a máximo
0 - 255
6
Auto program
Un programa con incremento de velocidad
0 - 255
7
Color chase
* Ver tabla Chases
0 - 255
8
Velocidad Chase
De lento a rápido
0 - 255

15
Modo 14 canales (2 grupos 12 LEDs)
No
Función
Descripción
Valor
1
Master dimmer 1
Dimmer general
0 - 255
2
Strobo 1
De lento a rápido
0 - 255
3
Dimmer R 1
Dimmer rojo de mínimo a máximo
0 - 255
4
Dimmer G 1
Dimmer verde de mínimo a máximo
0 - 255
5
Dimmer B 1
Dimmer azul de mínimo a máximo
0 - 255
6
Auto program 1
Un programa con incremento de velocidad
0 - 255
7
Master dimmer 2
Dimmer general
0 - 255
8
Strobo 2
De lento a rápido
0 - 255
9
Dimmer R 2
Dimmer rojo de mínimo a máximo
0 - 255
10
Dimmer G 2
Dimmer verde de mínimo a máximo
0 - 255
11
Dimmer B 2
Dimmer Azul de mínimo a máximo
0 - 255
12
Auto program 2
Un programa con incremento de velocidad
0 - 255
13
Color chase
* Ver tabla Chases
0 - 255
14
Velocidad Chase
De lento a rápido
0 - 255
Modo 26 canales (4 grupos de 6 LEDs)
No
Función
Descripción
Valor
1
Master dimmer 1
Dimmer general
0 - 255
2
Strobo 1
De lento a rápido
0 - 255
3
Dimmer R 1
Dimmer rojo de mínimo a máximo
0 - 255
4
Dimmer G 1
Dimmer verde de mínimo a máximo
0 - 255
5
Dimmer B 1
Dimmer azul de mínimo a máximo
0 - 255
6
Auto program 1
Un programa con incremento de velocidad
0 - 255
7
Master dimmer 2
Dimmer general
0 - 255
8
Strobo 2
De lento a rápido
0 - 255
9
Dimmer R 2
Dimmer rojo de mínimo a máximo
0 - 255
10
Dimmer G 2
Dimmer verde de mínimo a máximo
0 - 255
11
Dimmer B 2
Dimmer azul de mínimo a máximo
0 - 255
12
Auto program 2
Un programa con incremento de velocidad
0 - 255
13
Master dimmer 3
Dimmer general
0 - 255
14
Strobo 3
De lento a rápido
0 - 255
15
Dimmer R 3
Dimmer rojo de mínimo a máximo
0 - 255
16
Dimmer G 3
Dimmer verde de mínimo a máximo
0 - 255
17
Dimmer B 3
Dimmer azul de mínimo a máximo
0 - 255
18
Auto program 3
Un programa con incremento de velocidad
0 - 255
19
Master dimmer 4
Dimmer general
0 - 255
20
Strobo 4
De lento a rápido
0 - 255
21
Dimmer R 4
Dimmer rojo de mínimo a máximo
0 - 255
22
Dimmer G 4
Dimmer verde de mínimo a máximo
0 - 255
23
Dimmer B 4
Dimmer azul de mínimo a máximo
0 - 255
24
Auto program 4
Un programa con incremento de velocidad
0 - 255
25
Color chase
* Ver tabla Chases
0 - 255
26
Velocidad Chase
De lento a rápido
0 - 255

16
Modo 50 canales (8 grupos de 3 LEDs)
No
Función
Descripción
Valor
1
Master dimmer 1
Dimmer general
0 - 255
2
Strobo 1
De lento a rápido
0 - 255
3
Dimmer R 1
Dimmer rojo de mínimo a máximo
0 - 255
4
Dimmer G 1
Dimmer verde de mínimo a máximo
0 - 255
5
Dimmer B 1
Dimmer azul de mínimo a máximo
0 - 255
6
Auto program 1
Un programa con incremento de velocidad
0 - 255
7
Master dimmer 2
Dimmer general
0 - 255
8
Strobo 2
De lento a rápido
0 - 255
9
Dimmer R 2
Dimmer rojo de mínimo a máximo
0 - 255
10
Dimmer G 2
Dimmer verde de mínimo a máximo
0 - 255
11
Dimmer B 2
Dimmer azul de mínimo a máximo
0 - 255
12
Auto program 2
Un programa con incremento de velocidad
0 - 255
13
Master dimmer 3
Dimmer general
0 - 255
14
Strobo 3
De lento a rápido
0 - 255
15
Dimmer R 3
Dimmer rojo de mínimo a máximo
0 - 255
16
Dimmer G 3
Dimmer verde de mínimo a máximo
0 - 255
17
Dimmer B 3
Dimmer azul de mínimo a máximo
0 - 255
18
Auto program 3
Un programa con incremento de velocidad
0 - 255
19
Master dimmer 4
Dimmer general
0 - 255
20
Strobo 4
De lento a rápido
0 - 255
21
Dimmer R 4
Dimmer rojo de mínimo a máximo
0 - 255
22
Dimmer G 4
Dimmer verde de mínimo a máximo
0 - 255
23
Dimmer B 4
Dimmer azul de mínimo a máximo
0 - 255
24
Auto program 4
Un programa con incremento de velocidad
0 - 255
25
Master dimmer 5
Dimmer general
0 - 255
26
Strobo 5
De lento a rápido
0 - 255
27
Dimmer R 5
Dimmer rojo de mínimo a máximo
0 - 255
28
Dimmer G 5
Dimmer verde de mínimo a máximo
0 - 255
29
Dimmer B 5
Dimmer azul de mínimo a máximo
0 - 255
30
Auto program 5
Un programa con incremento de velocidad
0 - 255
31
Master dimmer 6
Dimmer general
0 - 255
32
Strobo 6
De lento a rápido
0 - 255
33
Dimmer R 6
Dimmer rojo de mínimo a máximo
0 - 255
34
Dimmer G 6
Dimmer verde de mínimo a máximo
0 - 255
35
Dimmer B 6
Dimmer azul de mínimo a máximo
0 - 255
36
Auto program 6
Un programa con incremento de velocidad
0 - 255
37
Master dimmer 7
Dimmer general
0 - 255
38
Strobo 7
De lento a rápido
0 - 255
39
Dimmer R 7
Dimmer rojo de mínimo a máximo
0 - 255
40
Dimmer G 7
Dimmer verde de mínimo a máximo
0 - 255
41
Dimmer B 7
Dimmer azul de mínimo a máximo
0 - 255
42
Auto program 7
Un programa con incremento de velocidad
0 - 255
43
Master dimmer 8
Dimmer general
0 - 255
44
Strobo 8
De lento a rápido
0 - 255
45
Dimmer R 8
Dimmer rojo de mínimo a máximo
0 - 255
46
Dimmer G 8
Dimmer verde de mínimo a máximo
0 - 255
47
Dimmer B 8
Dimmer azul de mínimo a máximo
0 - 255
48
Auto program 8
Un programa con incremento de velocidad
0 - 255
49
Color chase
* Ver tabla Chases
0 - 255
50
Velocidad Chase
De lento a rápido
0 - 255

17
Tabla Chases de color
No
Función
Chase de color
000 – 007 Sin función
008 – 022 Chase de color 1
023 – 037 Chase de color 2
038 – 052 Chase de color 3
053 – 067 Chase de color 4
068 – 082 Chase de color 5
083 – 097 Chase de color 6
098 – 112 Chase de color 7
113 – 127 Chase de color 8
128 – 142 Chase de color 9
143 – 157 Chase de color 10
158 – 172 Chase de color 11
173 – 187 Chase de color 12
188 – 202 Chase de color 13
203 – 217 Chase de color 14
218 – 232 Chase de color 15
233 – 247 Chase de color 16
248 – 255 Activación por audio
PRECAUCIONES
Prevención frente a shock eléctrico
La conexión eléctrica al dispositivo debe ser realizada por personal cualificado. Antes de instalar,
asegúrese de conectarla a una red eléctrica que trabaje bajo los mismos parámetros que MBAR 4 72
BAT (AC100-240V/50-60Hz). Cada dispositivo debe ser adecuadamente conectado a una toma de
tierra de acuerdo con las normas establecidas. No use la unidad durante una tormenta eléctrica.
Prevención frente incendios
1. Nunca instale el dispositivo cerca de una fuente de combustión.
2. El equipo debe instalarse lejos de materiales inflamables y explosivos.
3. Deje al menos 0,5 m alrededor de la unidad para su ventilación.
4. No cubra la lente.
5. Si cambia alguna de las partes del dispositivo hágalo siempre con repuestos originales. Para
ello contacte a su proveedor MARK.
Desempaquetado
Nota: Antes de desembalar compruebe si ha habido daños y se han debido al transporte o no. Si
encuentra algún daño, no utilice este dispositivo y póngase en contacto con el distribuidor de MARK.

18
POSIBLES PROBLEMAS Y SOLUCIÓN
Esta guía pretende ayudar a resolver problemas simples y comunes que pueden aparecer en el uso del
dispositivo. Si los problemas persisten, no intente abrir y reparar la unidad por sí solo, contacte con su
distribuidor más cercano y devuélvalo para su reparación.
Si el dispositivo tiene un problema, siga los siguientes puntos hasta que lo encuentre y pueda
solucionarlo. Si la iluminación no funciona correctamente, envíe el dispositivo al servicio técnico
MARK.
Si el dispositivo no enciende:
Posibles problemas: Fuente de alimentación.
1- Fuente de alimentación: Asegúrese de que la unidad esté correctamente conectada.
2- Compruebe que el fusible no está dañado. En caso de estarlo, reemplácelo por otro de las
mismas características. Si una vez reemplazado vuelve a fundirse y la unidad sigue sin
funcionar, contacte con el servicio técnico de MARK.
3- Si todo lo anterior es correcto, puede conectar la unidad a la red eléctrica.
4- Si usted no puede determinar la causa de los problemas que presenta la unidad, no la desmonte
o intente reparar por sí mismo ya que perderá la garantía.
5- Devuelva la unidad a servicio técnico de MARK.
Si no responde el protocolo DMX:
Posibles problemas: Verifique que el cable de conexión DMX está correctamente insertado en el
dispositivo, verifique que el propio cable no está defectuoso o que el controlador funciona
correctamente.
1- Verifique las características DMX y que la dirección asignada es correcta.
2- Verifique el cable DMX: Desinstale la unidad, cambie el cable DMX y vuelva a conectar el
dispositivo a la red eléctrica. Verifique de nuevo el control DMX.
3- Determine si el control está defectuoso. ¿El dispositivo opera correctamente con otras unidades
DMX? Si no es así, lleve la unidad a ser reparada al servicio técnico oficial o a un técnico
cualificado.

19
Table of contents
Languages:
Other Mark Lighting Equipment manuals

Mark
Mark SIDIUS LED 368 Z User manual

Mark
Mark DECO PAR 16 User manual

Mark
Mark SUPERPARLED ECO 36 User manual

Mark
Mark Infra Mono 50-18 User guide

Mark
Mark BLINDER 4L User manual

Mark
Mark BEAM 201 User manual

Mark
Mark PAR 36 ECO User manual

Mark
Mark SIDIUS ZOOM 555 User manual

Mark
Mark PAR-16 User manual

Mark
Mark MULTIPAR 575/2 User manual


Popular Lighting Equipment manuals by other brands

ADJ
ADJ FOCUS BEAM LED User instructions

Thorn
Thorn ALG5-504L installation instructions

Glow Bricks
Glow Bricks The Lord of the Rings Rivendell installation guide

Lake Lite
Lake Lite LL-BHL-LED-KIT quick start guide

SICK
SICK C 4000 operating instructions

Larson Electronics
Larson Electronics EPL-QP-2X50LED-RT-100 instruction manual


