marsden M300 User manual

1
M300 BABY SCALE
OPERATION MANUAL

2
Introduction
Thank you for purchasing a Marsden Professional Medical Scale. This is a precision Class III
Weighing Instrument and considerate use will result in many years of accurate weighing results.
Description
Capacity: 0 ~ 6 kg 6 ~ 15 kg
Division: x 2g x 5g
Power Supply: Marsden mains adaptor
or
2 x 1.5V AA alkaline batteries
(operating time typically over 300 hours + 1 year standby)
Operating temperature: 5 ~ 35 °C.
Three function keys: On/Zero/Off Tare Hold
Auto-Off function: Adjustable (1 ~ 5 min, Off)
Stabilisation time: 1 ~ 2 seconds
Scale weight: 3.5 kg
Dimensions: 590 mm x 370 mm x 125 mm {TBC}
Approval: Class III {TBC !}

3
Useage
The scale is designed to measure the weight of a baby placed in the weighing area.
Do not overload the scale.
The scale should only be used in accordance with the supplied operating instructions.
Do not operate the scale in a hazardous environment.
The Service mode, to adjust the calibration of the Baby Scale, is only accessible to the service
agent.
If the tamper-proof seal is broken, then the calibration is not guaranteed and the scale must not be
used until it has been re-calibrated (and sealed) by an authorised service agent.
Declaration of Conformity ?

4
Power Supply
Either
a) insert two alkaline AA batteries in the battery compartment, taking care to match + and –,
Or
b) connect the mains adaptor lead to the baby scale and plug the mains adaptor to a mains supply,
matching the input voltage marked on the adaptor.
HOLD
NET
kg
On/Zero/Off
button
Stable reading
indicator
Weight or message
display
Tare
button
Zero load
indicator
Battery
level
Hold function active
indicators
Tare function active
indicators
Hold
button
5
Quick Start
Place the Baby Scale on a firm, level surface. Adjust the feet of the Baby Scale (by rotating) so
that the spirit bubble is in the centre of the circle and all four feet are touching the surface.
Ensure that there is nothing on the Baby Scale and nothing to obstruct its free movement.
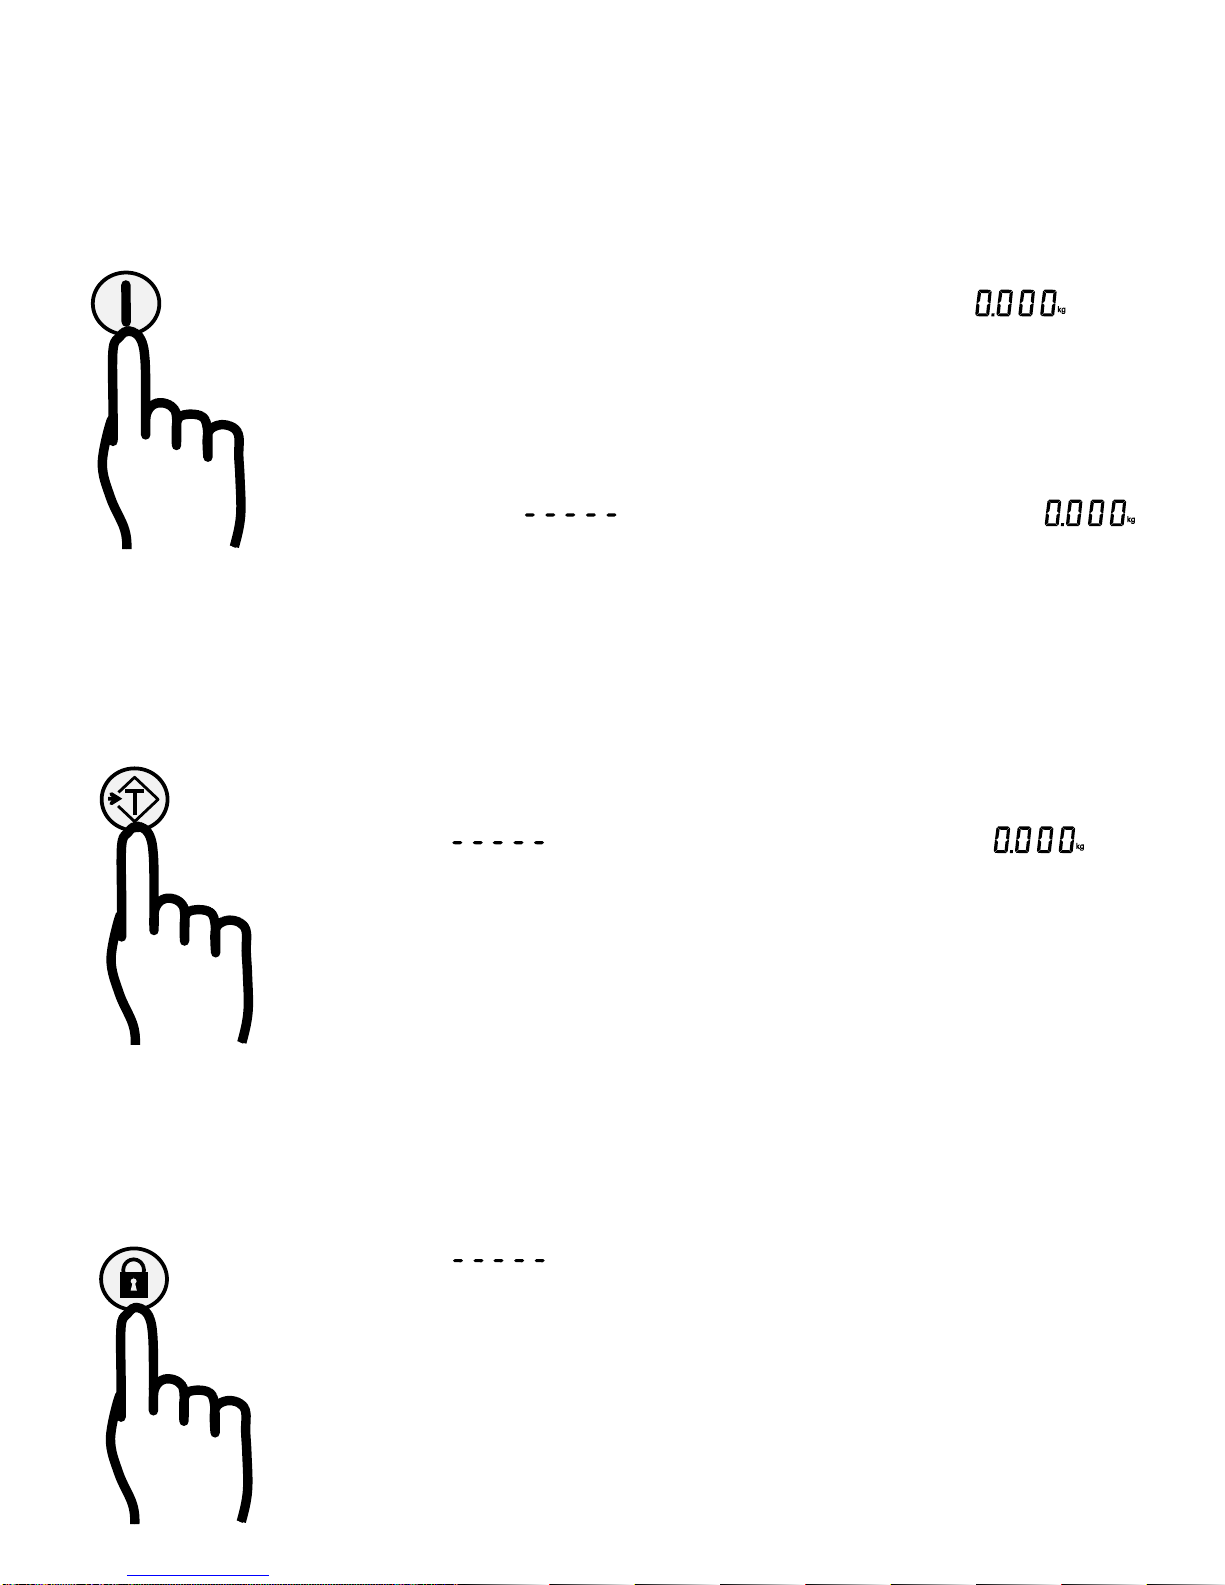
Press and hold the On/Zero/Off button for one second
- The Baby Scale turns on, first displaying a segment check pattern then
Place the baby on the scale
- The scale beeps when the weight is displayed.
Pressing the On/Zero/Off button will re-zero the scale. This also turns off the tare
and hold functions. The Baby Scale should only be zeroed with no load present.
- The display shows whilst setting the new zero, then displays
Pressing the On/Zero/Off button for one second will turn the Baby Scale off.
~~~~~~~~~~~~
Tare
If an extra item is to be weighed with the baby, but not included in the weight measurement, then:
Place the extra item (e.g. a towel) on the Baby Scale and press the Tare button
- The display shows whilst measuring, then beeps and displays
- The scale displays the ‘NET’symbol and an arrow beside the Tare button.
Place the baby on the scale - the scale beeps as the baby’s weight is displayed.
Press the Tare button again, or turn the Baby Scale off, to cancel the tare function.
~~~~~~~~~~~~
Hold
If the baby is moving too much for a stable measurement, press the Hold button to select the Hold
function. The hold function may be selected before placing the baby on the scale.
- The display shows until the baby is on the scale and a steady reading is
acquired, then the scale beeps and displays the weight.
- The scale also displays the HOLD symbol and an indicator beside the Hold button.
- This measurement will be held on the display, even if the baby is removed.
- Pressing the Hold button again, or turning the Baby Scale off, will turn off the
hold function.
6
Battery Level
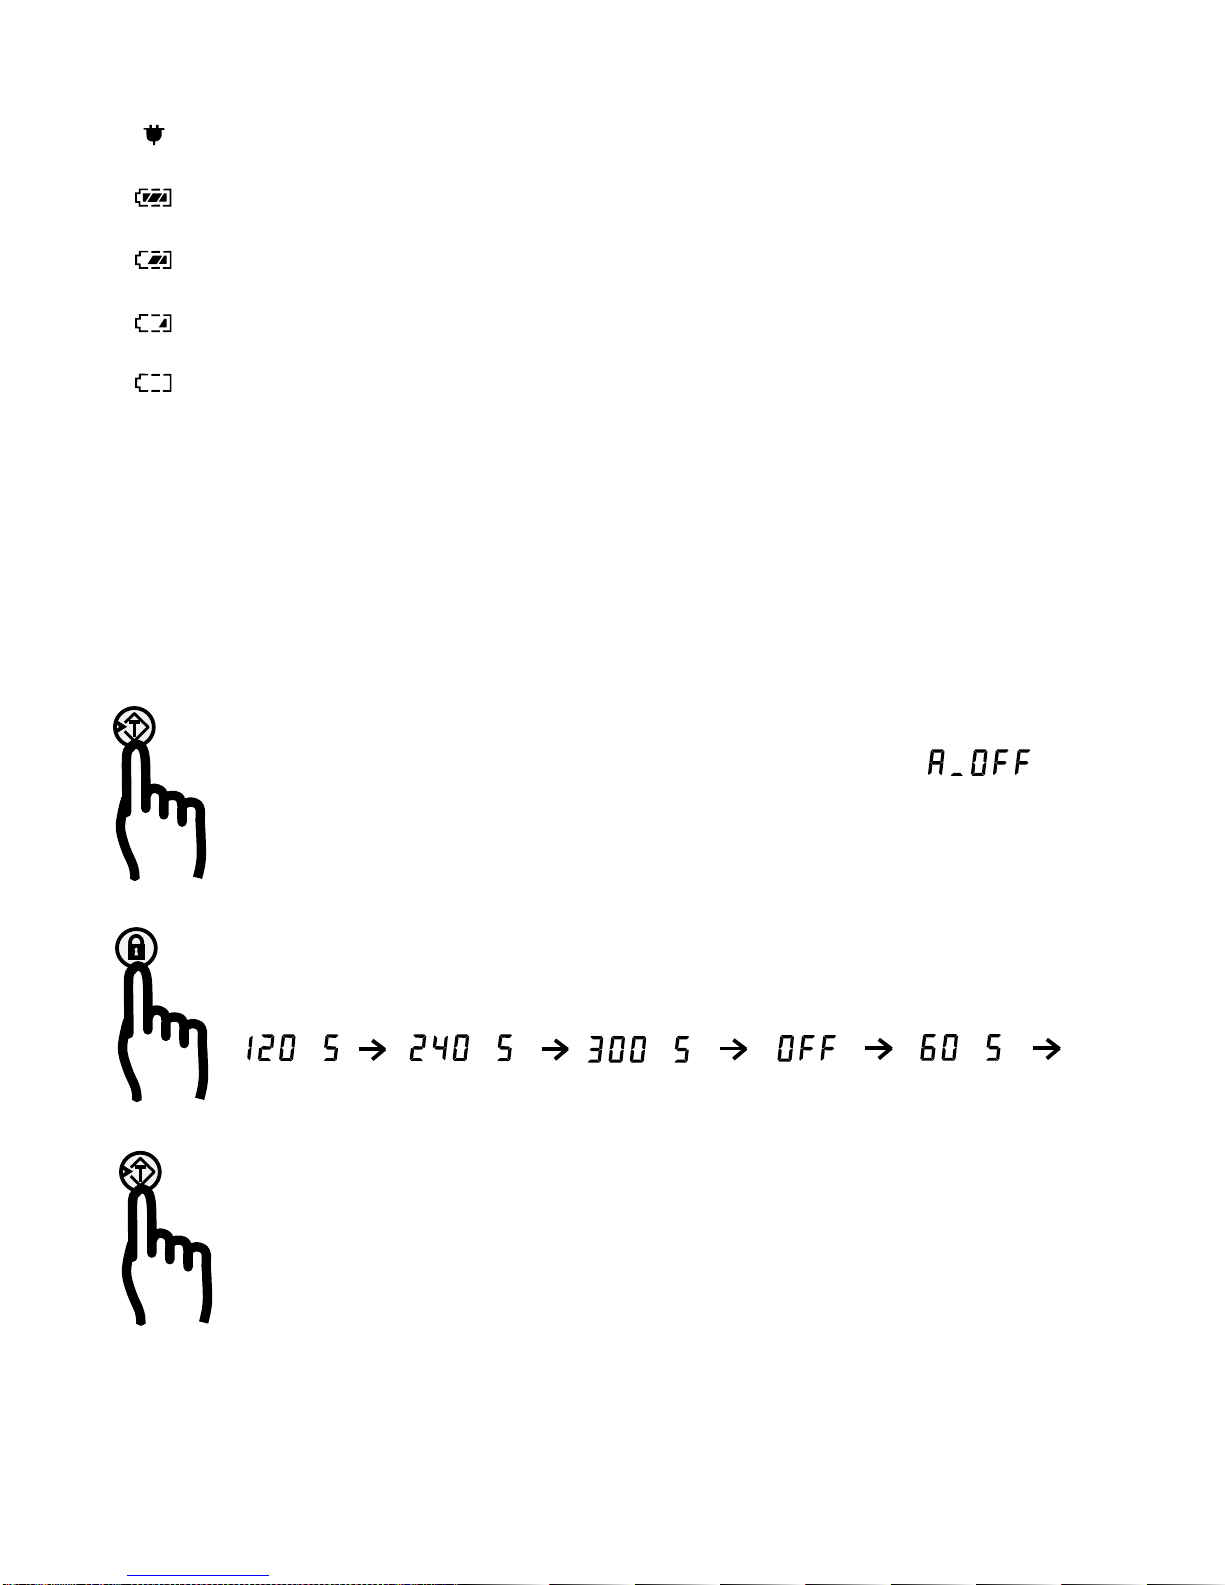
.kg Mains adaptor power.
.kg Full battery.
.kg Battery OK.
.kg Low battery.
Very low battery. Measurement disabled until batteries replaced.
~~~~~~~~~~~~
Automatic Power Down
There is no automatic power down when the Baby Scale is powered from a mains adaptor.
Otherwise the Baby Scale will turn off automatically, to preserve battery power.
The automatic power down measures the time elapsed since the last button press or change in
scale load. The automatic power down timeout can be adjusted from the front panel.
Press and hold the Tare button for 8 seconds, until the display shows
When the Tare button is released, the display will show the current auto-off setting.
Repeatedly pressing the Hold button will step the display through the available options:
When the desired setting is displayed, press the Tare button to save the setting and to
return to normal weighing mode.
7
Troubleshooting
Display off: - try pressing the On/Zero/Off button for at least 2 seconds;
- or disconnect and reconnect the mains supply,
- or replace the batteries ensuring the correct polarity.
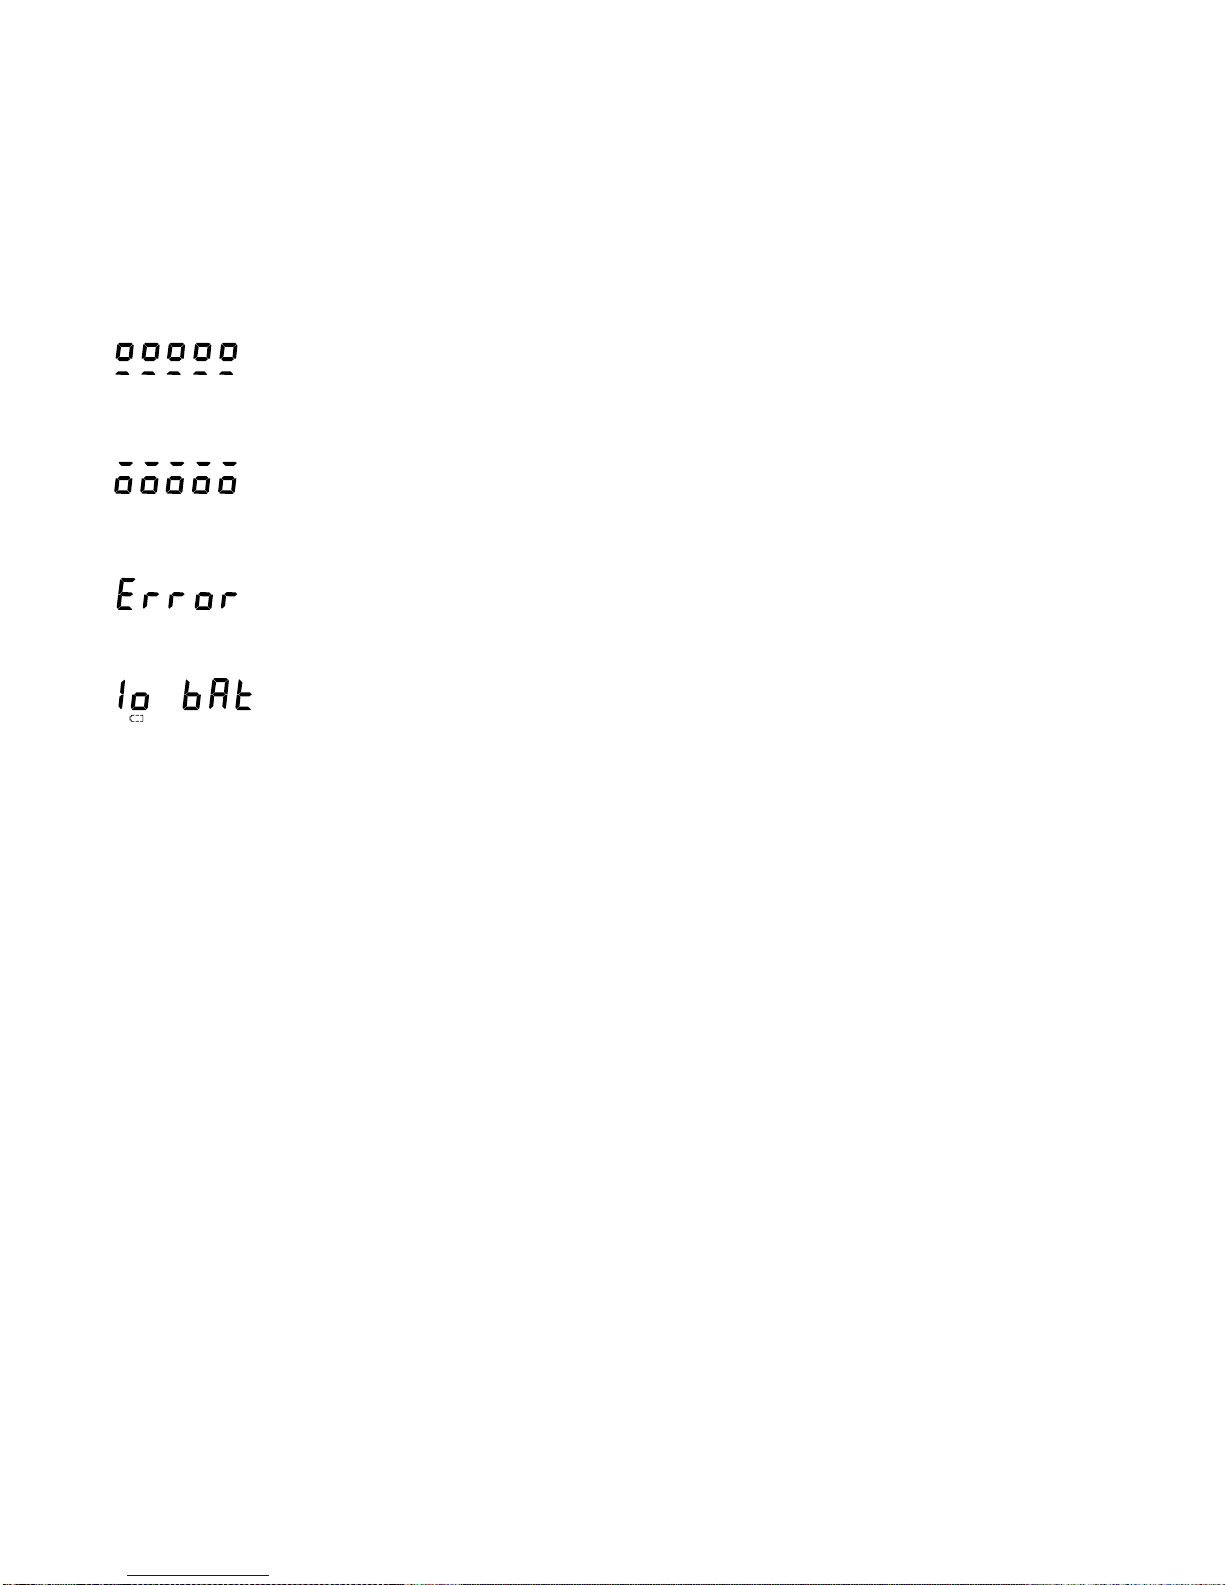
Display - this may be caused by external vibrations, wind or air movement.
fluctuating - try turning the scale off and on again, or move the scale to a different location.
- load on scale when it is trying to zero.
- remove load from the Baby Scale
- ensure firm and level surface and free movement.
- negative load on scale when trying to zero –possible obstruction.
- remove load from the Baby Scale
- ensure firm and level surface and free movement.
- the load (including tare) is outside the weighing range.
- If the scale is successfully zeroed and the load is known to be within the weighing
range, then contact your service agent.
- replace batteries.
If the advice above does not clear the fault, then try turning the scale off and on again, or
disconnect and reconnect the supply, or remove and re-fit the batteries.
If the fault is still present, then contact your service agent.

8
FREEPHONE: 0800 169 2775
HEAD OFFICE:
SALES, SERVICE, MARKETING, ACCOUNTS
ANVIL HOUSE
TUNS LANE
HENLEY ON THAMES
RG9 1SA
Telephone:
0845 130 7330
Fax:
0845 130 7440
E-mail:
NORTHERN OFFICE:
DESPATCH, PRODUCTION, TECHNICAL SUPPORT
Unit 7
Centurion Business Park
Coggin Mill Way
Rotherham
S60 1FB
Telephone:
01709 364296
Fax:
01709 364293
E-mail:
9
M300 BABY SCALE
SERVICE MANUAL
Service Menu
Service mode can only be selected by breaking the tamper-proof seal, on the underside of the scale, to gain
access to the hidden Service switch.
If the Service switch is pressed whilst the scale is ‘on’, using a suitable tool (e.g. a cocktail stick), then the
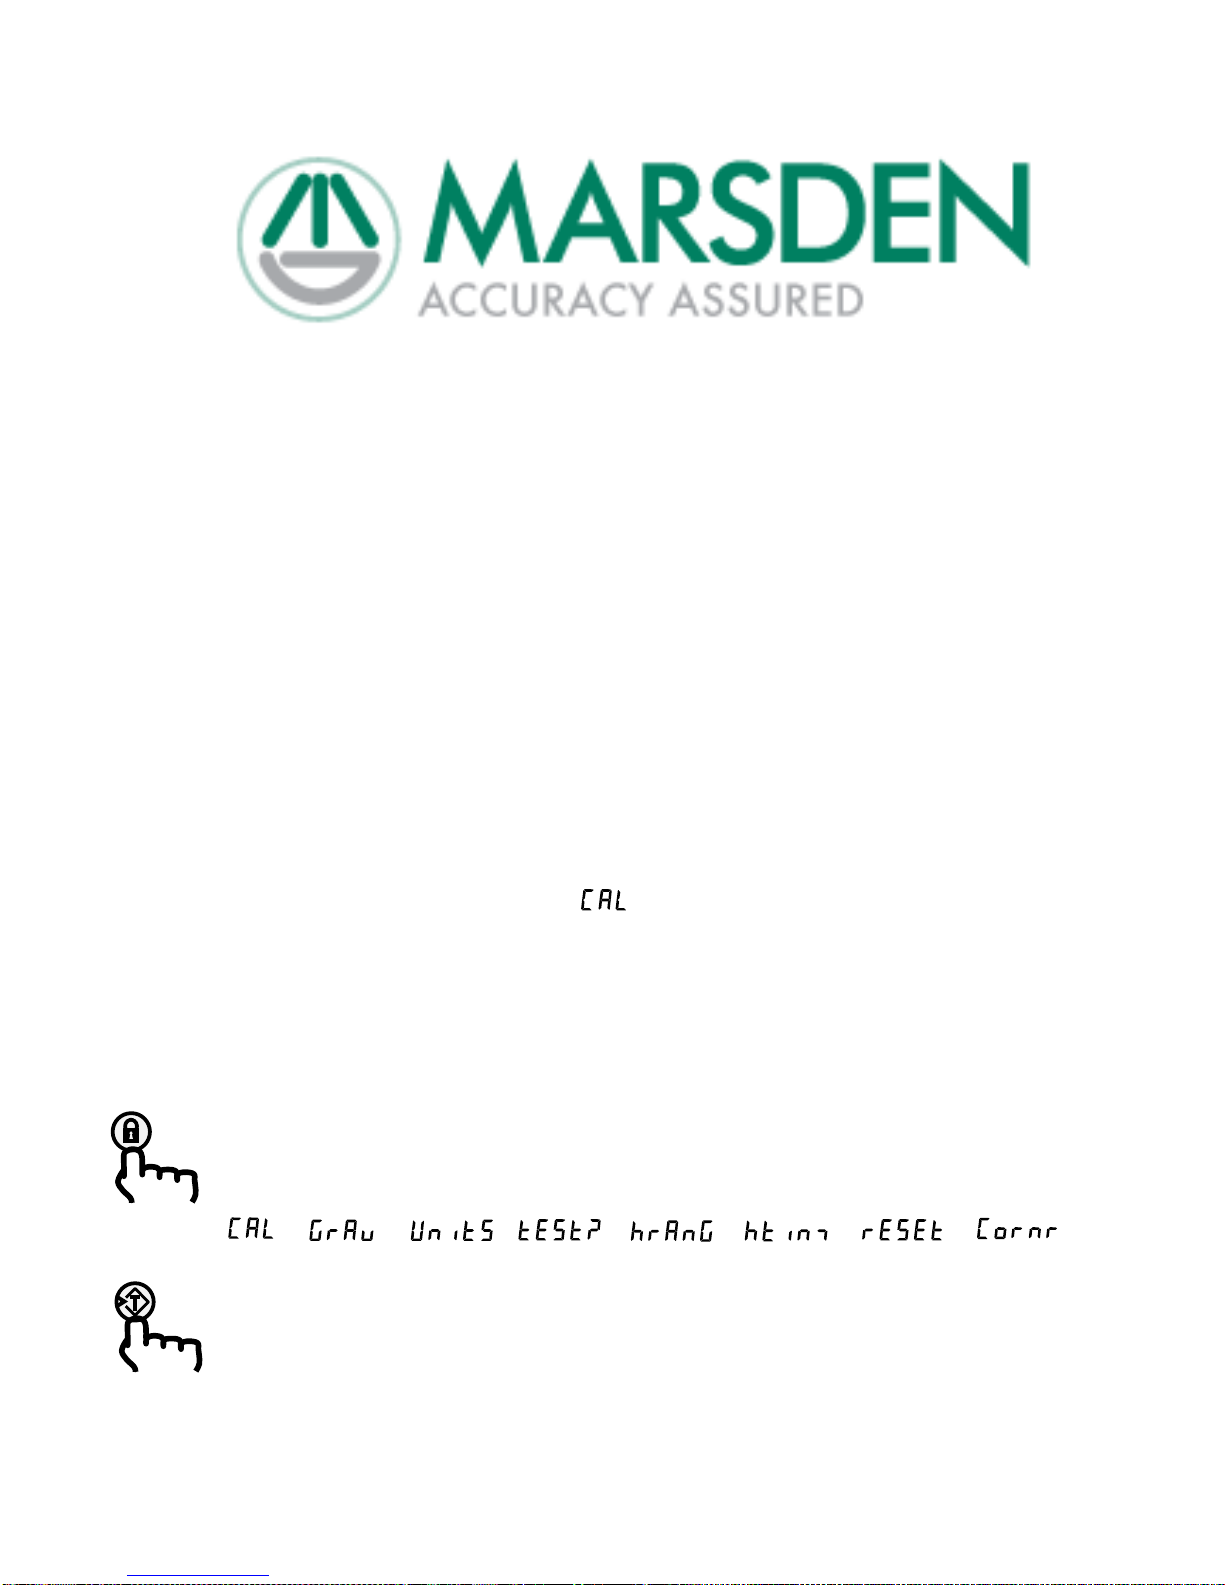
scale enters service mode, and the display shows .
The service switch does not need to be pressed again, whilst the scale is in service mode, so the scale can
be replaced on a firm surface.
Selecting service mode cancels both the tare and hold functions.
Repeatedly pressing the Hold button sequences through the service menu:
Calibrate → Gravity → Units → 10x res → HOLD range → HOLD time → Defaults → Corner →…
Display:
Pressing the Tare button selects the displayed service function (see following pages).

10
- Calibration mode
When is selected, by pressing the Tare button, the display shows the currently stored ‘calibration
gravity’, but to only one decimal place.
The ‘calibration gravity’ is the local gravity where the calibration is performed. Whilst adjusting the
‘calibration gravity’, the top left arrow is illuminated, as a reminder that the display is showing ‘calibration
gravity’.
Each time the Tare button is pressed adds an extra decimal place (up to four decimal places) and, unless
the Hold button is pressed, the display continues to show the currently stored ‘calibration gravity’,
e.g.
If the Hold button is pressed at any stage in this sequence, then it increments the least significant digit
(within the gravity range 9.7800 ~ 9.8299 m/s2) and clears any following digits to zero (subject to the range
restriction). The Tare button is used to proceed to the next digit, e.g.
When the correct ‘calibration gravity’ is displayed (to four decimal places), the Tare button is pressed to start
the calibration.
If a mistake is made, at any time during calibration, then turning the scale off and on again will cancel
service mode without saving any new settings.
11
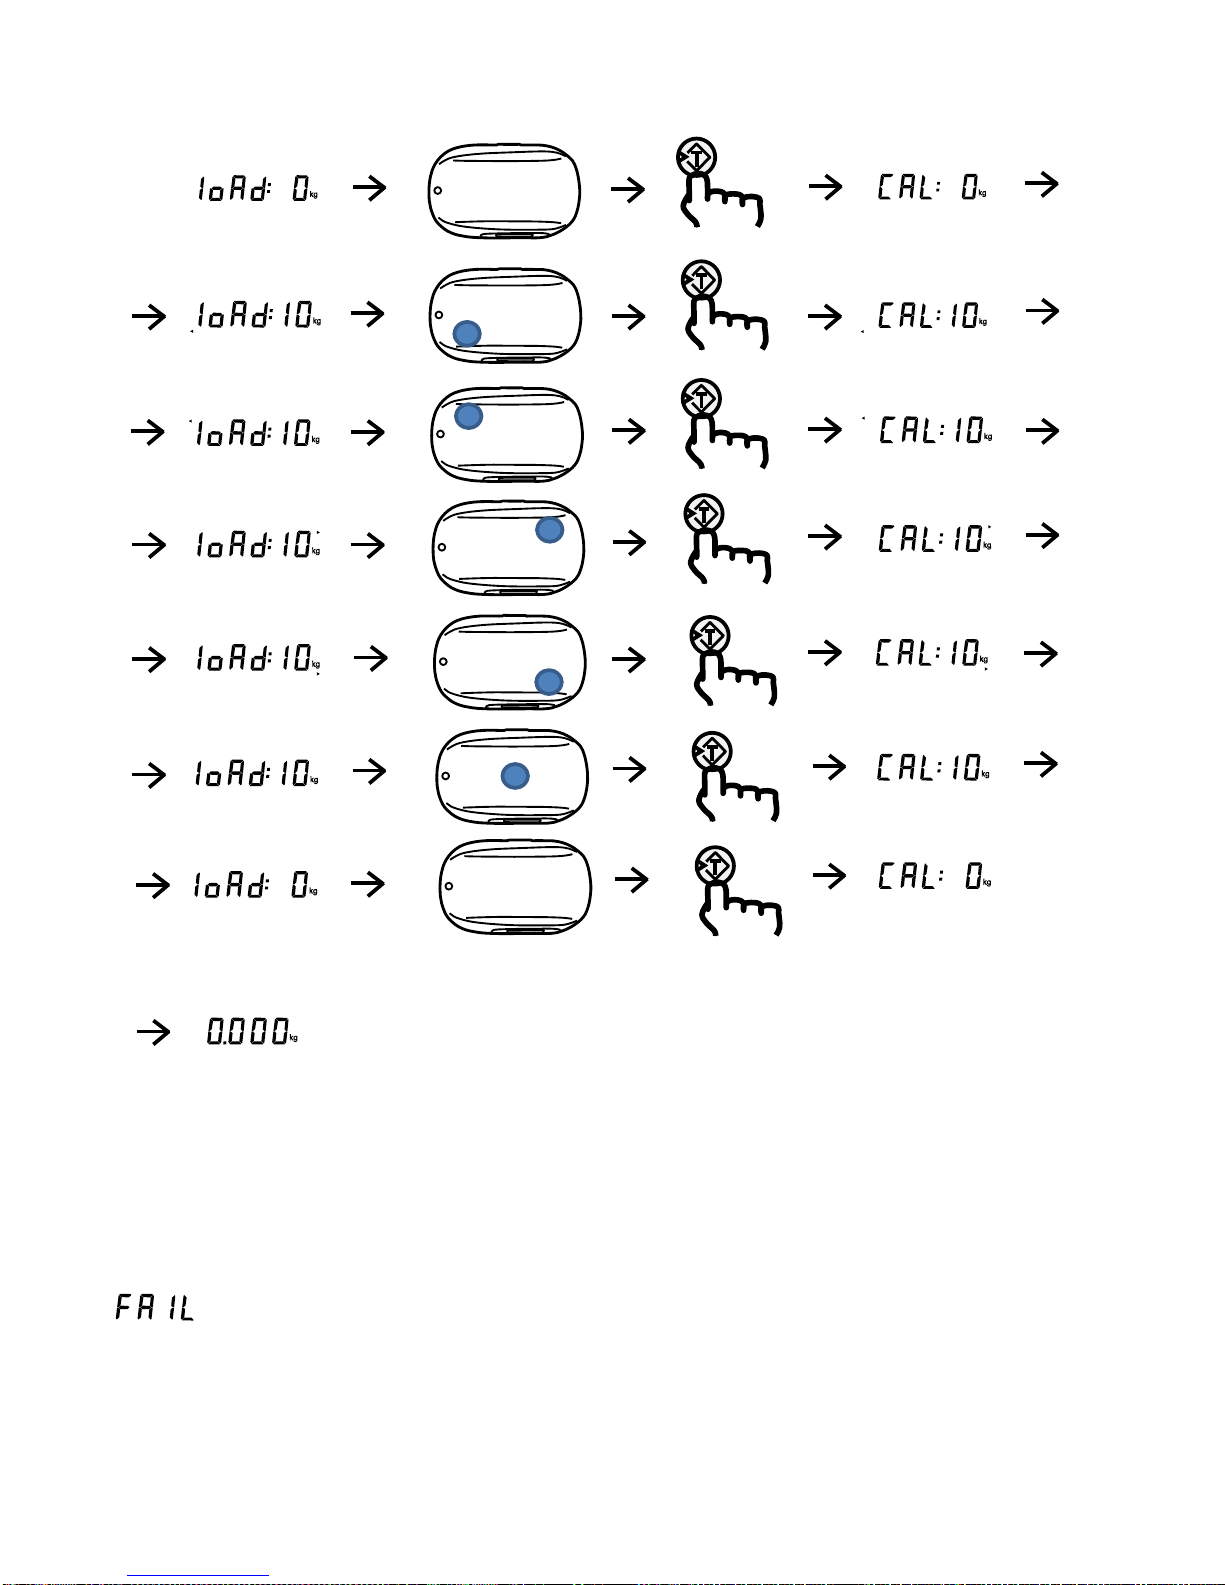
The Tare button is used to sequence through the calibration, loading the Baby Scale with a 10kg calibrated
load in five different positions, as directed by a small arrow on the display (either off or pointing to a corner).
Calibration is then complete, the scale leaves Service mode, and the display shows .kg.
The new calibration and ‘calibration gravity’ values are both stored together at this time.
If the calibration is interrupted, e.g. turning off the scale by holding the On/Zero/Off button down for one
second, then the stored calibration and ‘calibration gravity’ values are unchanged.
Any disturbance or vibration of the scale during the measurement stages ( :kg or :kg) will affect
the calibration accuracy, so care should be taken in this respect.
If calibration fails (e.g. due to a faulty load cell or a misplaced calibration load), then the scale displays
and waits until the Tare button is pressed, to continue.
When the Tare button is pressed, the scale returns to normal measurement mode, but it is not calibrated.
The calibration setting is returned to the default value. {TBC}
12
G
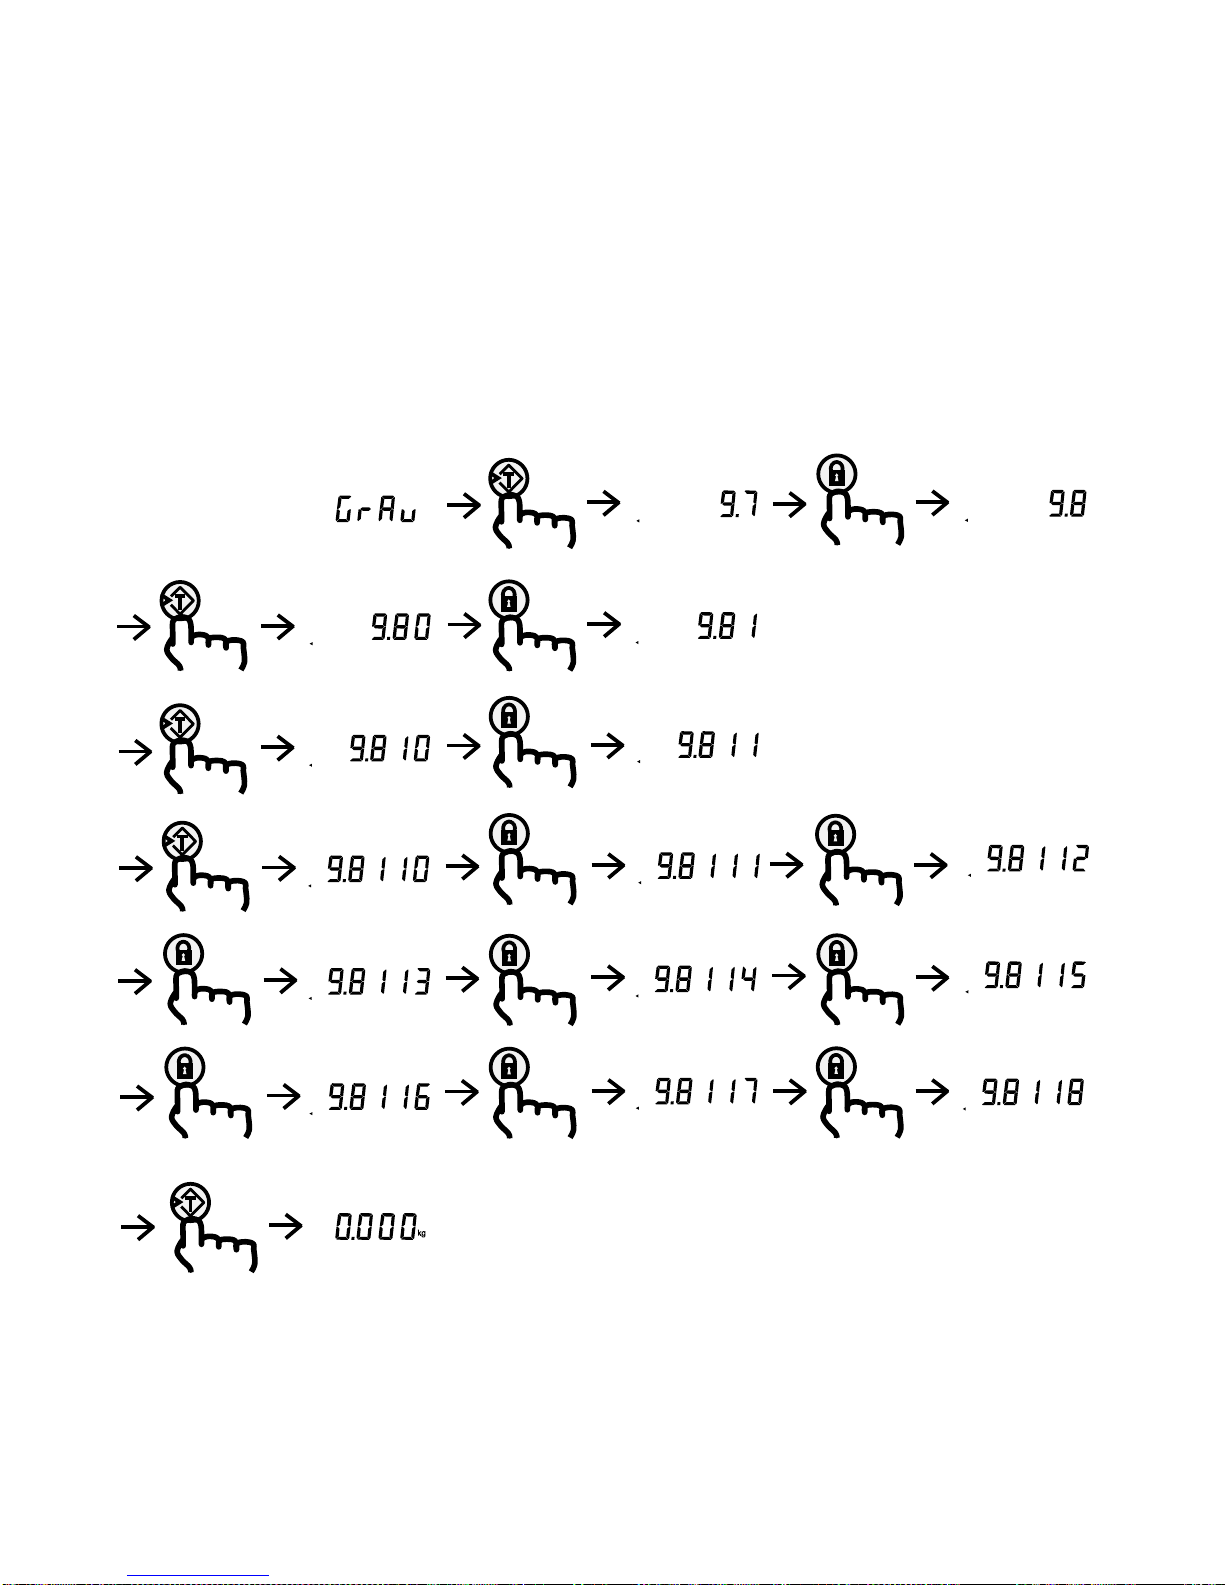
- Local Gravity Setting mode
If
G
mode is selected, by pressing the Tare button, the display shows the currently stored ‘local gravity’
to one decimal place.
The ‘local gravity’ is the local gravity where the scale is to be used. Whilst adjusting the ‘local gravity’, the
bottom left arrow is illuminated, as a reminder that the display is showing ‘local gravity’ not ‘calibration
gravity’, e.g. .
The Hold and Tare buttons are used to increment the least significant displayed digit or to display the next
digit, respectively, in the same way as setting the ‘calibration gravity’.
When the correct ‘local gravity’ is displayed (to four decimal places), the Tare button is pressed to store the
‘local gravity’ setting and the scale returns from service mode to normal measurement mode, e.g.

13
-Measurement Units mode
If mode is selected, by pressing the Tare button, the display shows the currently selected units.
Pressing the Hold button toggles the display between kg and lb.
When the desired units are displayed, the Tare button is pressed to store the units selection and to return
from service mode to normal measurement mode.
~~~~~~~~~~~~
-Test mode
If mode is selected, by pressing the Tare button, the display shows the current selection –either or
. Pressing the Hold button toggles the display between or .
Pressing the Tare button selects or deselects ‘test’ mode, and returns the scale from service mode to
normal measurement mode.
In ‘test’ mode, the display shows the measurement with 10x resolution (e.g. .kg instead of .kg) and
several features are disabled (e.g. auto-off, out-of-range, etc.).
~~~~~~~~~~~~
G
-Hold Range mode
If the
G
mode is selected, by pressing the Tare button, the display shows the current selection, e.g. .
Pressing the Hold button sequences the display through the available settings, e.g.
…
Pressing the Tare button selects the displayed setting and the scale returns to normal measurement mode.
~~~~~~~~~~~~
-Hold Time mode
If the mode is selected, by pressing the Tare button, the display shows the current selection, e.g.
. Pressing the Hold button sequences the display through the available settings, e.g.
…
Pressing the Tare button selects the displayed setting and the scale returns to normal measurement mode.
14
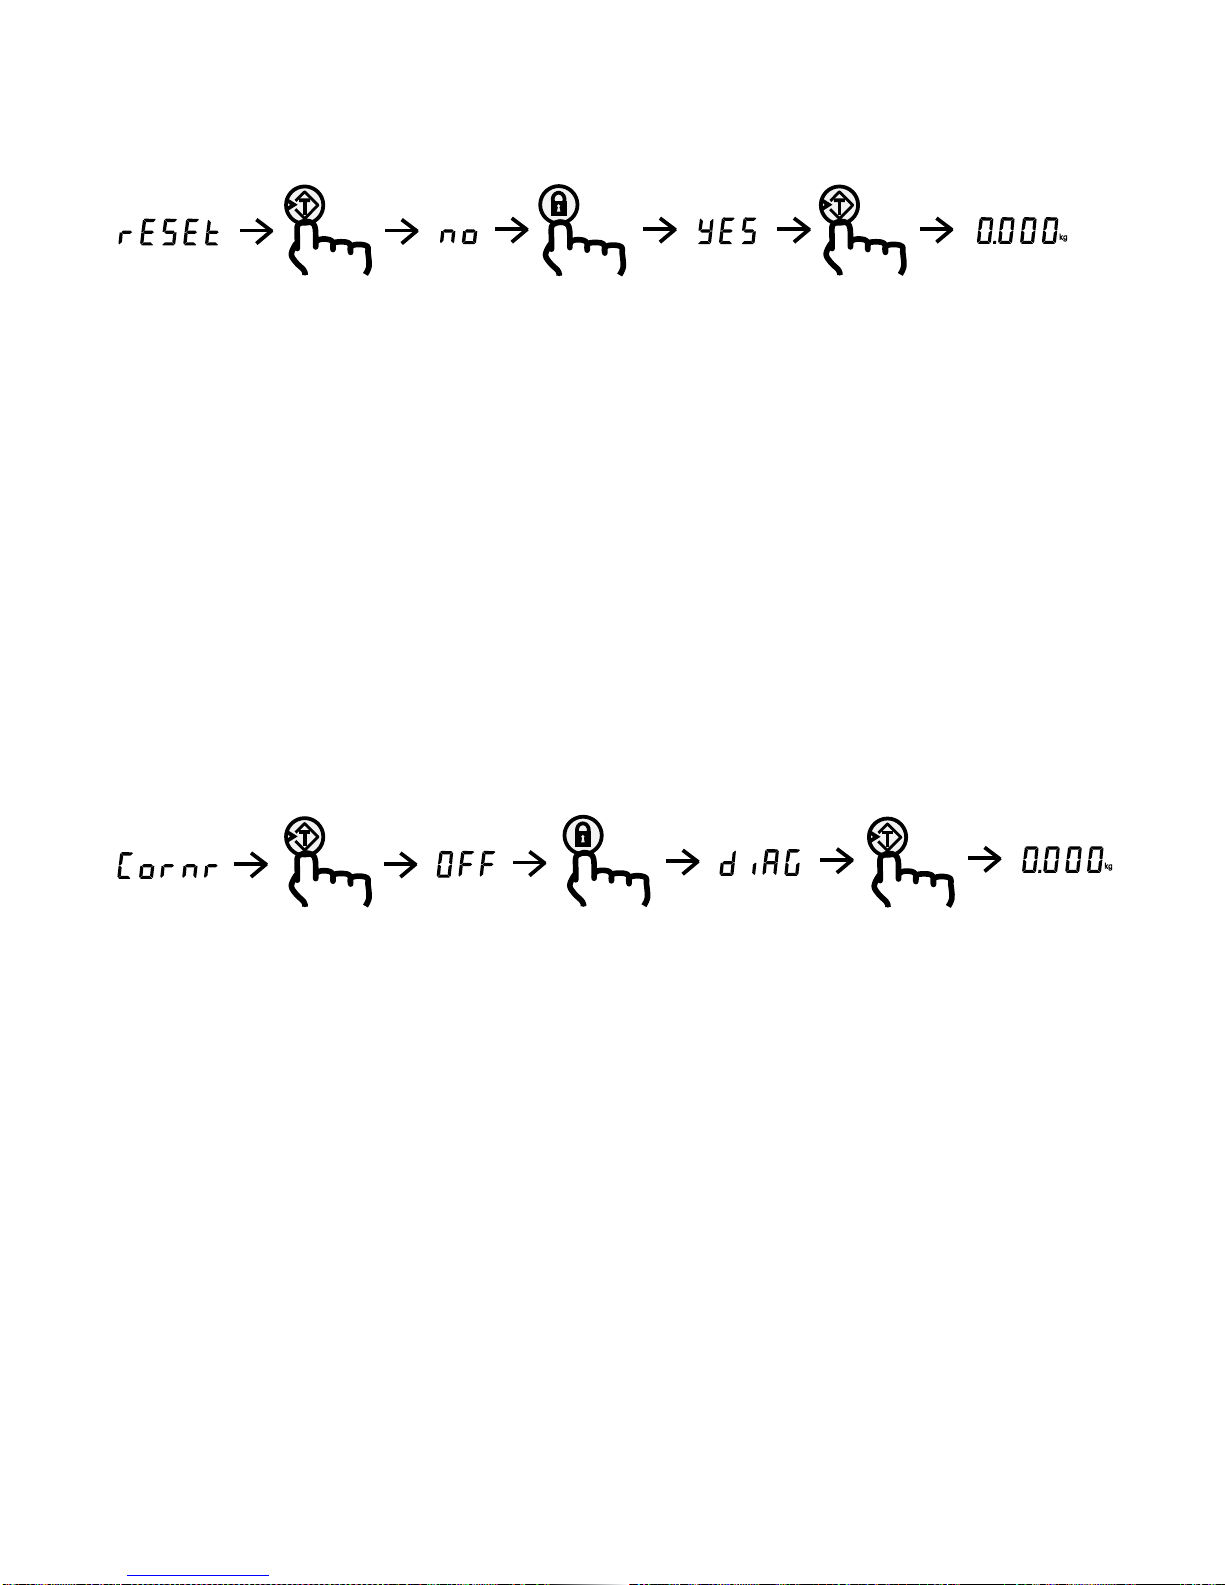
-Reset mode
If the mode is selected, by pressing the Tare button, the display shows .
Pressing the Hold button toggles the display between and .
If the display shows and the Tare button is pressed to select this setting, then the scale returns to normal
measurement mode with no changes made.
If the Tare button is pressed whilst the display shows , then the scale returns to default settings,
i.e. auto_off timeout is reset to 2 minutes ( );
local gravity is reset to UK ( . );
measurement units are reset to kg;
test mode is turned off;
corner diagnostic mode is turned off;
hold range is set to ;
hold time is set to ;
calibration is set to the default value and calibration gravity is set to factory ( . )
~~~~~~~~~~~~
-Corner mode
If the mode is selected, by pressing the Tare button, the display shows .
Pressing the Hold button toggles the display between and
G
.
If the display shows and the Tare button is pressed to select this setting, then the diagnostic function is
disabled and the scale returns to normal measurement mode.
If the Tare button is pressed whilst the display shows
G
, then the diagnostics mode is enabled.
In diagnostic mode, the approximate output of each individual load cell can be monitored.
Each time the Hold button is pressed, the display sequences to the next diagnostic measurement, e.g.
.kg . . .. .kg …
(combined) (load cell 1) (load cell 2) (load cell 3) (load cell 4) (combined)
The ‘combined’ measurement is the normal measurement value.
The individual load cell measurements show the approximate contribution of each individual load cell to the
combined measurement, with a pointer to indicate which load cell output is displayed.
In addition to the pointer, the ‘kg’ symbol is not illuminated whilst the individual load cell outputs are
displayed.
The Hold function is disabled whilst in diagnostic mode, to allow the Hold button to be used.
The diagnostics mode is disabled when the scale is turned off, or automatically turns itself off.

15
Software Version and Serial Number
In normal measurement mode, but not in diagnostic mode, if the Hold button is pressed for more than 8
seconds, then the display shows the software version number, e.g.
When the Hold button is released, the display shows the 5 digit serial number of the scale, with an indicator
to signify that this is the serial number, e.g. .
Pressing the Hold button again will display the software version number, for as long as the button is
pressed, and releasing the Hold button will again display the serial number.
If the Tare button is pressed, then the scale returns to normal measurement mode.
If the scale is turned off, or automatically turns itself off, then it will be in normal measurement mode when it
is next turned on.
~~~~~~~~~~~~
LCD Segment Check
For reference:
Table of contents
Other marsden Scale manuals

marsden
marsden M-610 User manual

marsden
marsden Jadever JCO User manual

marsden
marsden B-450 User manual

marsden
marsden Boxer MPS 30 User manual

marsden
marsden M-225 User manual

marsden
marsden M-200 User manual

marsden
marsden M-100 User manual

marsden
marsden IP 2101 User manual

marsden
marsden M-565 User manual

marsden
marsden M-560 User manual

marsden
marsden B-100 User manual

marsden
marsden VT-250 User manual

marsden
marsden M-510 User manual

marsden
marsden IP 2101 User manual

marsden
marsden M-310 User manual

marsden
marsden M-530 User manual

marsden
marsden C-100 User manual

marsden
marsden MS-4200 User manual

marsden
marsden M-925 User manual

marsden
marsden M-150 User manual


