MASCHIO GASPARDO DINO Guide

USO E MANUTENZIONE / PARTI DI RICAMBIO
USE AND MAINTENANCE / SPARE PARTS
사용설명서 및부품리스트
DINO
Cod. F07010616 2010-03
MASCHIO GASPARDO S.p.A.
IT
EN
KO

2
ITALIANO ENGLISH KOREAKOREA
1.0 IDENTIFICAZIONE
Ogni singola macchina, è dotata di una targhetta di identi-
ficazione (A Fig. 3), i cui dati riportano:
1) Indirizzo del Costruttore.
2) Tipo della macchina.
3) Modello della macchina.
4) Numero di matricola.
5) Anno di costruzione.
6) Peso standard.
Si consiglia di trascrivere i propri dati sulla matricola
qui sotto rappresentata con la data di acquisto (7) ed il
nome del concessionario (8).
1.0 IDENTIFICATION
Eachindividualmachinehas anidentification plate(AFig.3)
indicating the following details:
1) The Manufacturer’s address.
2) Machine type.
3) Machine model.
4) Serial number.
5) Year of manufacture.
6) Standard weight.
You are advised to note down your data on the form
below, along with the date of purchase (7) and the
dealer’s name (8).
(8)
(7)
(2)
(3)
(4)
(6)
(1)
(5)
1.0 형식표지판
각기대에는 아래 사항들이 표기된 형식표지판(A Fig.3)이
부착되어 있습니다.
1) 제조자 주소
2) 시리즈명
3) 형식명
4) 제조번호
5) 제작년도
6) 표준중량
구매일(7), 대리점명(8)과함께 상기 사항들을 아래 표에
적어두십시오.

3
ITALIANO ENGLISH KOREAKOREA
INDICE
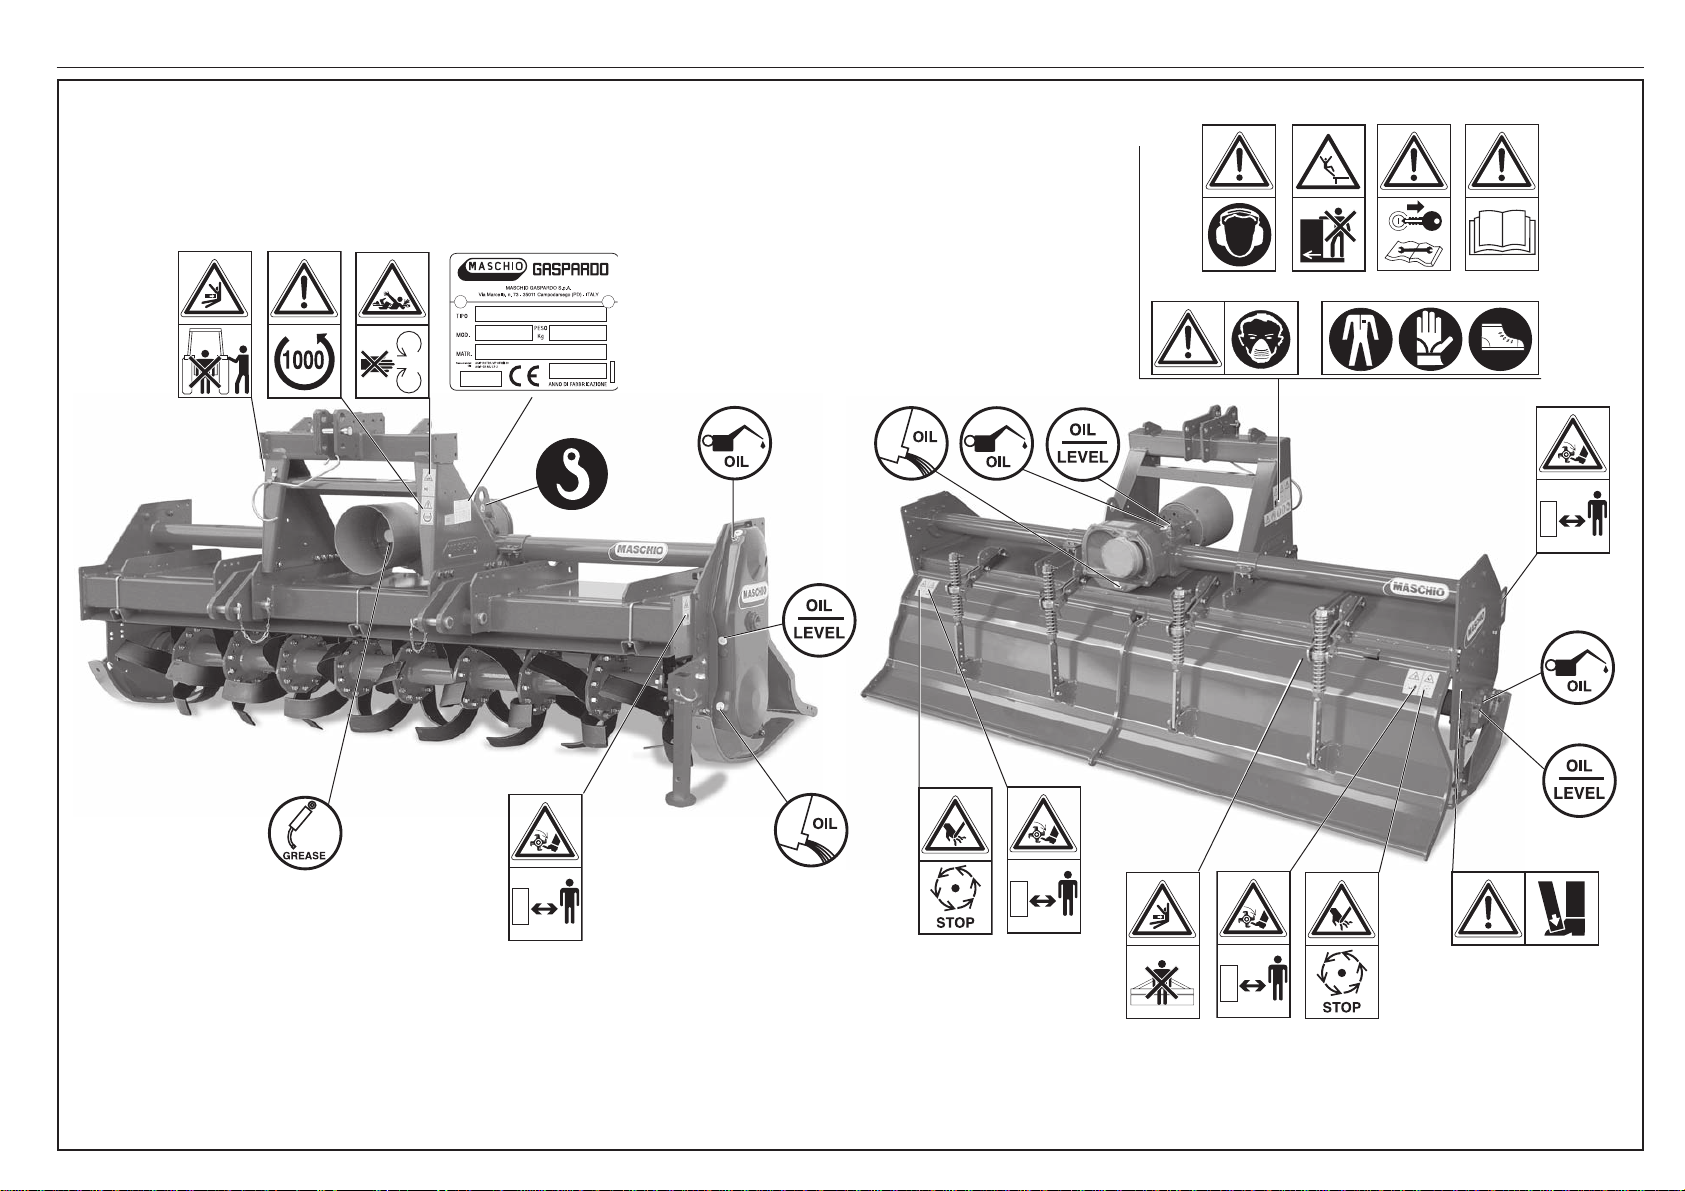
1.0 IDENTIFICAZIONE ...............................................2
1.1 Dati tecnici .............................................................4
1.2 Premessa...............................................................6
1.3 Segnali di avvertenza.............................................8
1.4 Segnali di pericolo..................................................8
1.5 Segnali di indicazione.............................................9
1.6 Garanzia.................................................................9
1.7 Scadenza della garanzia........................................9
2.0 NORME DI SICUREZZA E
PREVENZIONI INFORTUNI ...............................10
3.0 NORME D’USO ..................................................15
3.1 Trasporto..............................................................15
3.2 Macchine fornite parzialmente montate ...............16
3.3 Prima dell’uso.......................................................17
3.4 Applicazione al trattore.........................................17
3.5 Verifica capacità di sollevamento e stabilità
della trattrice abbinata alla macchina...................19
3.6 Albero cardanico ..................................................21
3.7 Macchina combinata con seminatrice..................25
3.8 Profondità di lavoro ..............................................25
3.9 Zappe...................................................................26
3.10 Cambio di velocità................................................27
3.11 In lavoro................................................................28
3.12 Come si lavora .....................................................29
3.13 Consigli utili per il trattorista .................................31
3.14 Parcheggio...........................................................32
4.0 MANUTENZIONE ..............................................33
4.1 Prime 8 ore lavorative ..........................................33
4.2 Ogni 8 ore lavorative............................................34
4.3 Ogni 50 ore lavorative..........................................34
4.4 Ogni 400 ore lavorative........................................34
4.5 Messa a riposo.....................................................34
4.6 Tabella riassuntiva di manutenzione ....................36
4.7 Lubrificazione.......................................................37
4.8 Inconvenienti, cause e rimedi...............................38
5.0 PARTI DI RICAMBIO ..........................................44
INDEX
1.0 IDENTIFICATION .................................................2
1.1 Technical data .......................................................4
1.2 Foreword................................................................6
1.3 Warning signals......................................................8
1.4 Danger signals .......................................................8
1.5 Indicator signals .....................................................9
1.6 Warranty ................................................................9
1.7 Warranty becomes void .........................................9
2.0 SAFETY AND ACCIDENT
PREVENTING PROVISIONS .............................10
3.0 USE INSTRUCTIONS .........................................15
3.1 Transport..............................................................15
3.2 Machines supplied partly broken-down................16
3.3 Before use............................................................17
3.4 Hitching to the tractor...........................................17
3.5 Check the lifting capacity and stability of
the tractor to which the machine is hitched..........19
3.6 Cardan shaft.........................................................21
3.7 Combine-machine with seed drill .........................25
3.8 Work depth...........................................................25
3.9 Hoe blades...........................................................26
3.10 Gearshift...............................................................27
3.11 In work..................................................................28
3.12 How it works.........................................................29
3.13 Troubleshooting hints for the tractor operator ......31
3.14 Parking.................................................................32
4.0 MAINTENANCE ..................................................33
4.1 Firsts 8 work hours service ..................................33
4.2 Every 8 work hours service .................................34
4.3 Every 50 work hours service ...............................34
4.4 Every 400 work hours service .............................34
4.5 Storage ................................................................34
4.6 Maintenance recapitulatory chart ........................36
4.7 Lubrication ...........................................................37
4.8 Inconveniences, causes and remedys.................40
5.0 SPARE PARTS ...................................................44
목차
1.0 형식표지 ............................................................... 2
1.1 기술 제원..................................................................4
1.2 머리말 .................................................................. 6
1.3 경고 표지 .............................................................. 8
1.4 위험 표지 .............................................................. 8
1.5 알림 표지 .............................................................. 9
1.6 품질보증 ............................................................... 9
1.7 품질보증 예외 사항........................................................9
2.0 안전 및사고예방 규칙 ....................................... .10
3.0 사용방법 ............................................................ 15
3.1 운반 .................................................................... 15
3.2 부분품이 일부 분리되어 공급된 경우 ................... 16
3.3 사용전 점검 ........................................................ 17
3.4 트랙터 연결 ........................................................ 17
3.5 트랙터의 승강력과 안정성 점검 ........................... 19
3.6 P.T.O 죠인트 ........................................................ 21
3.7 씨드드릴과 함께 사용시.................................25
3.8 경심 ..................................................................... 25
3.9 칼날 .................................................................... 26
3.10 기어변속 ...........................................................27
3.11 작업 .................................................................. 28
3.12 작업 방법 ........................................................... 29
3.13 작업불량 조치 요령 ............................................ 31
3.14 정치 ................................................................... 32
4.0 유지.보수.. ......................................................... 33
4.1 최초 8시간 작업 후.............................................. 33
4.2 매8시간 작업 후. ................................................ 34
4.3 매50 시간 작업 후 .............................................. 34
4.4 매400 시간 작업 후 ............................................ 34
4.5 보관 .................................................................... 34
4.6 유지.보수 도표 .................................................... 36
4.7 윤활 .................................................................... 37
4.8 이상 원인과 조치. ............................................... 40
5.0 부품리스트. ........................................................ 44

4
ITALIANO ENGLISH KOREAKOREA
1.1 DATI TECNICI 1.1 TECHNICAL DATA
Larghezza di lavoro Work width
110-180
120-180
135-190
150-190
60 951
60 980
66 1018
72 1088
DINO 255 2570 2730
DINO 265 2650 2830
DINO 285 2830 2980
DINO 305 3050 3230
MOD.
mm mm mm HP nr. Kg
1285 1285
1325 1325
1415 1415
1525 1525
AB
LIVELLO SONORO
Rilevamenti della rumorosità a vuoto, (UNI EN
1553/2001):
Livello di pressione acustica: Lpam dB .......................81.7
Livello di potenza acustica: LWAdB............................97.4
NOISE LEVEL
No- load niose detection (UNI EN 1553/2001):
Level of acoustic pressure: Lpam dB ..........................81.7
Level of acoustic power: LWA dB................................97.4
AB1230
1510
Fig. 1
540 rpm rpm
16 - 24 220
17 - 23 198
1000 rpm rpm
24 - 16 181
23 - 17 201
21 - 19 246
19 - 21 300
STANDARD
OPTIONAL
1.1 기술제원
소음레벨
무부하 소음 측정(UNI EN 1553/2001):
음향압력레벨: Lpam dB.......................................81.1
음향크기레벨: LWA dB........................................97.3
경폭

5
ITALIANO ENGLISH KOREAKOREA
Fig. 2
II
III
I
IV
1) Attacco «3° punto» superiore
2) Sostegno albero cardanico
3) Castello attacco tre punti
4) Staffa sollevamento fresatrice
5) Gruppo cambio
6) Gruppo trasmissione laterale
7) Lamiera o barra livellatrice
8) Slitte di regolazione profondità lavoro
9) Rotore con zappe
10) Attacchi «3° punto» inferiori
11) Presa di forza
12) Protezione albero cardanico
13) Piede d’appoggio
I Davanti
II Dietro
III Lato sinistro
IV Lato destro
1) Upper «3rd point» hitch
2) Cardan shaft support
3) Three-point coupling
4) Lifting stirrup
5) Gearbox unit
6) Side trasmission unit
7) Levelling plate or bar
8) Work dept adjusters
9) Rotor with hoe blades
10) Lower «3rd point» hitches
11) Pto
12) Cardan shaft guard
13) Support
I In front
II Rear
III Left side
IV Right side
12
5
67
8
8
9
10
10 12 11 13
3 4
1) 상부 링크
2) 죠인트 걸이
3) 마스트
4) 견인바
5) 밋션케이스
6) 기어케이스
7) 리어카바
8) 스키드
9) 경운축
10) 하부 링크
11) PTO축
12) 안전카바
13) 롤러조정잭
14) 주차대
I전방
II 후방
III 왼쪽
IV 오른쪽

6
ITALIANO ENGLISH KOREAKOREA
1.2 PREMESSA
Questoopuscolodescrivelenorme d’uso, dimanutenzionee
le parti che vengono fornite di ricambio per la zappatrice.
La macchina è progettata per la lavorazione del terreno
dopo aratura, per la preparazione del letto di semina o per
la pulizia del terreno da erbe infestanti.
Questa attrezzatura agricola, può operare solo tramite un
albero cardanico applicato alla presa di forza di un trattore
agricolomunitodi grupposollevatore,conattacco universale
ai tre punti.
Grazie alla sua concezione e specificità questa macchi-
na, oltre che a lavorare il terreno in aree aperte, si rende
particolarmente adatta per la preparazione del terreno nei
frutteti, vigneti, ecc.
La macchina è destinata ad una utenza professionale, se
ne consente l’utilizzo ai soli operatori specializzati.
Nonèconsentito l’usodaparte diminori,analfabeti, persone
in condizione fisiche o psichiche alterate.
Non è consentito l’uso a personale sprovvisto di patente
di guida adeguata o non sufficientemente informato ed
addestrato.
L’operatore è responsabile del controllo della funzionalità
della macchina, la sostituzione e la riparazione delle parti
soggette ad usura che potrebbero causare danni.
Dal corretto uso e dall’adeguata manutenzione dipende il
regolare funzionamento dell’attrezzatura. È consigliabile
quindi, osservare scrupolosamente quanto descritto allo
scopodi prevenireun qualsiasiinconveniente che potrebbe
pregiudicare il buon funzionamento e la sua durata.
Èaltresìimportante attenersiaquanto descrittonelpresente
opuscolo in quanto la Ditta Costruttrice declina ogni e
qualsiasi responsabilità dovuta a negligenza ed alla
mancata osservanza di tali norme.
La Ditta Costruttrice, è comunque a completa disposizione
per assicurare un’immediata e accurata assistenza tecnica
e tutto ciò che può essere necessario per il miglior funzio-
namento e la massima resa dell’attrezzatura.
1.2 FOREWORD
This handbook contains the use and maintenance instruc-
tions plus a list of the parts supplied as spares for the rotary
cultivator. The machine has been designed to work the soil
after ploughing, to prepare the seeding bed or to weed the
land.
This agricultural implement can only operate by means of
a cardan shaft applied to the pto of an agricultural tractor
equipped with lift and universal three-point hitch.
Besides working the soil in open areas, the particular and
specific design of this implement makes it ideal for work
between the rows of orchards and vineyards, etc.
The machine is dedicated to a professional user. Only spe-
cialized workers should be allowed to use it.
Persons under age, illiterate persons or those with physical
or mental disorders are not allowed to use the machine.
Only persons holding adequate driving licenses must be
allowed to use the machine after having been sufficiently
informed and trained.
The Operator is responsible for making sure that the ma-
chineisfunctional andforreplacing andrepairingparts liable
to wear that could otherwise cause damage.
Regular and satisfactory operation together with economic
andlong-lastinguse of theimplementdependon compliance
with the instructions given in this handbook. It is therefore
advisable to strictly comply with the following instructions
in order to prevent faults which could jeopardize the correct
and long-lasting operation of the implement.
Compliance with the instructions in this handbook is also
important since the Manufacturer declines all and every
responsibility fordamage to persons orproperty caused
by negligence and failure to comply with these instruc-
tions.
The Manufacturer shall, however, remain at the customers’
disposal for immediate and thorough assistance together
with anything else that may be required in order to ensure
the correct operation and maximum efficiency of the imple-
ment.
1.2 머리말
이책자는 사용설명서와 부품리스트로 구성되어
있습니다.
로타베이터는 토양의 경운과 쇄토작업을 위해 사용되는
농기계입니다.
이작업기는 승강장치와 범용 3점히치가 있는 농용트랙터의
pto축에 죠인트를 연결하여 구동합니다.
이작업기의 특별한 구조는 개방된 지역에서의 작업은 물론
과수원, 포도밭 등의 작업에도 이상적 입니다.
숙련된 작업자만 이기계를 사용하십시요.
년소자, 문맹인, 신체적 또는 정신적 결함이 있는 사람이
사용해서는 안됩니다.
적절한 면허증을 소지한 자가 충분한 정보와 교육을 받은
후사용하여야 합니다.
기계의 손상을 줄이기 위해 작업자는 기계의 작동 점검과
소모성 부품의 교환 또는 수리를 확실히 하시기 바랍니다.
만족스러운 작업과 기대를 경제적으로 장기간 사용하기
위해서는 이책자의 지시사항들이 중요합니다.
따라서 정확하고 장기적 사용에 치명적인 과실을 방지하기
위해 지시사항들을 철저히 따라 주시기 바랍니다.
지시사항들을 무시하거나 따르지 않아 발생된 모든
신체상 또는 재산상의 손해에 대해서는 회사가 책임 지지
않습니다.
그러나 회사는 작업기의 정확한 사용과 최고의 효율성을
위해 요구되는 사항들에 대해 신속하고 철저한 지원을
고객들께 제공할 것입니다.

7
ITALIANO ENGLISH KOREAKOREA
Fig. 3
13
14 7
16
A
5
6
19
17
56
5
18 1917
10
17
19
18
20
21
12 15
8
3
5
11

8
ITALIANO ENGLISH KOREAKOREA
1.3 SEGNALI DI AVVERTENZA
1) Prima di iniziare ad operare, leggere attentamente il
libretto di istruzioni.
2) Prima di qualsiasi operazione di manutenzione e/o
registrazione, arrestare e bloccare il trattore in piano,
abbassare la macchina a terra e leggere il libretto di
istruzioni.
3) Rumorosità elevata.
Munirsi di adeguati strumenti protettivi per l’udito, tipo
cuffie.
1.4 SEGNALI DI PERICOLO
4) Pericolo per possibile lancio di oggetti contunden-
ti.
Tenersi a distanza di sicurezza dalla macchina.
5) Pericolo per possibile cesoiamento degli arti infe-
riori.
Tenersi a distanza di sicurezza dalla macchina.
6) Pericolo di cesoiamento delle mani.
Non rimuovere le protezioni e non avvicinarsi con gli
organiin movimento.Attendere l’arrestocompleto degli
organi in movimento.
7) Pericolo di essere agganciati dall’albero carda-
nico.
Non avvicinarsi agli organi in movimento.
8) Pericolo di caduta.
Non salire sulla macchina in movimento.
9) Pericolo per possibile cesoiamento degli arti supe-
riori.
Tenersi a distanza di sicurezza dalla macchina in lavo-
ro.
10) Pericolo di schiacciamento.
Non frapporsi tra la macchina e il trattore.
11) Pericolo per possibile schiacciamento degli arti
inferiori.
Tenersi a distanza di sicurezza dalla macchina.
12) Pericolo di respirazione di sostanze nocive.
Munirsi di mascherina antipolvere nel caso di utilizzo di
trattrice senza cabina e filtri.
13) Pericolo di schiacciamento.
Non stare dietro la macchina.
14) Prima di inserire la presa di forza, accertarsi del nu-
mero di giri prestabilito. Non scambiare il regime di 540
g/1’ con i 1000 g/1’.
1.3 WARNING SIGNALS
1) Before operating machine, carefully read the instruc-
tion book.
2) Before any operation of maintenance a/o adjustment,
stop, brake the tractor on level ground, lower the ma-
chine to the ground and read the instruction book.
3) Loud noise.
Wear adequate hearing protection, e.g. headphones.
1.4 DANGER SIGNALS
4) Danger of possible flying blunt objects.
Keep a safe distance from the machine.
5) Danger of possible shearing of lower limbs.
Keep a safe distance from the machine.
6) Danger of injury to the hands. Never remove the
guards while the parts are mowing.
Wait until all moving components have completely
stopped.
7) Danger of being hooked by the cardan shaft.
Do not go near the members of the machine while mov-
ing.
8) Danger of falling.
Do not get up on the machine while it is moving.
9) Danger of possible shearing of upper limbs.
Keep a safe distance from the machine while it is work-
ing.
10) Danger of being crushed.
Do not get between the tractor and the machine.
11) Danger of possible shearing of lower limbs. Keep a
safe distance from the machine.
12) Risk of inhaling harmful substances.
Wear a dust mask if the tractor is used without cab and
filters.
Never remove the guards while the parts are mowing.
13) Danger of being crushed.
Do not get rear the machine.
14) Before engaging the pto, check that the rpm rate is
that prescribed. Never exchange the 540 rpm rate for
1000 rpm.
1.3 경고 표지
1) 작업기를 사용하시기 전에 사용설명서를 주의깊게 읽어
주시기 바랍니다.
2) 유지.보수 또는 조정 작업 시에는 먼저 트랙터를 평지에
정지시키고 브레이크를 채운십시요. 지면에 작업기를 내린
후책자의 지시사항을 참고 하십시요.
3) 소음
헤드폰과 같은 청각보호구를 착용하십시요.
1.4 위험 표지
4) 이물질 비산 위험
작업기로부터 안전거리를 유지하십시요.
5) 발부상 위험
작업기로부터 안전거리를 유지하십시요.
6) 손부상 위험
작동중에는 보호카바를 절대로 제거하지 마십시요.
모든 움직이는 부분이 완전히 멈출 때까지 기다리십시요.
7) 감김 위험
죠인트가 회전할 때가까이 접근하지 마십시요.
8) 낙상 위험
작업기 위에 탑승하지 마십시요.
9) 손부상 위험
작업기로부터 안전거리를 유지하십시요.
10) 신체 부상 위험
트랙터와 작업기 사이로 들어가지 마십시요.
11) 발부상 위험
작업기로부터 안전거리를 유지하십시요.
12) 유해 물질 흡입 위험
트랙터에 캐빈과 필터가 없는 경우 마스크를
착용하십시요.
절대로 보호카바를 제거하지 마십시요.
13) 신체 부상 위험
작업기 뒤에 있지 마십시요.
14) pto 연결
규정된 회전수를 확인하십시요. 절대로 540rpm을
1000rpm으로 바꾸지 마십시요.

9
ITALIANO ENGLISH KOREAKOREA
1.5 SEGNALI DI INDICAZIONE
15) Munirsi di un’abbigliamento antinfortunistico.
16) Punto di aggancio per il sollevamento.
17) Tappo per l’introduzione dell’olio.
18) Tappo per lo scarico dell’olio.
19) Tappo per il controllo dell’olio.
20) Punto di ingrassaggio.
A) Targhetta d’identificazione.
1.6 GARANZIA
Verificareall’atto dellaconsegna che lamacchina nonabbia
subito danni durante il trasporto e che gli accessori siano
integri e al completo.
EVENTUALI RECLAMI DOVRANNO ESSERE PRESEN-
TATI PER ISCRITTO ENTRO 8 GIORNI DALRICEVIMEN-
TO PRESSO IL CONCESSIONARIO.
L’acquirente potrà far valere i suoi diritti sulla garanzia solo
quandoegli abbiarispettatole condizioniconcernenti lapre-
stazione della garanzia, riportate nel contratto di fornitura.
1.7 SCADENZA DELLA GARANZIA
Oltre a quanto riportato nel contratto di fornitura, la
garanzia decade:
- Qualora si dovesse oltrepassare il limite di potenza con-
sentito riportato nella tabella dei dati tecnici a pag. 4.
- Qualora, mediante riparazioni eseguite dall’utilizzatore
senza il consenso della Ditta Costruttrice o a causa del
montaggio di pezzi di ricambio non originali, la macchina
dovesse subire cambiamenti e il danno dovesse essere
causato da tali cambiamenti.
- Qualora non fossero state seguite le istruzioni descritte
in questo manuale.
1.5 INDICATION SIGNALS
15) Wear safety clothing.
16) Coupling point for lifting.
17) Oil fill plug.
18) Oil drain plug.
19) Oil level plug.
20) Greasing point.
A) Identification plate.
1.6 WARRANTY
When the machine is delivered, check that it has not been
subjected to damage during transport and that the acces-
sories are in a perfect condition and complete.
ANYCLAIMS FOLLOWING THE RECEIPTOF DAMAGED
GOODS SHALL BE PRESENTED IN WRITING WITHIN 8
DAYS FROM RECEIPT OF THE GOODS THEMSELVES
FROM YOUR LOCAL DEALER.
The purchaser may only make claims under guarantee
when he has complied with the warranty conditions in the
supply contract.
1.7 WHEN THE WARRANTY BECOMES
VOID
Besides the cases specified in the supply agreement,
the guarantee shall in any case become void:
- Whenthe implementhas been usedbeyond thespecified
power limit, as given in the Technical features chart on
page 4.
- When, following repairs made by the customer without
authorization from the Manufacturer or owing to instal-
lation of spurious spare parts, the machine is subjected
to variations and the damage can be ascribed to these
variations.
- When the user has failed to comply with the instructions
in this handbook.
1.5 지시 표지
15) 안전한 복장을 착용하십시요.
16) 견인포인트
17) 오일주입구
18) 오일배출구
19) 오일레벨플러그
20) 구리스 주입점
A) 형식표지판
1.6 품질보증
작업기 인수시에 운송중 파손 여부와, 부대품들을
확인하십시요.
파손된 작업기의 받았을 때에는인수일로부터 8일
이내에클레임 신청서를 제출하셔야 합니다.
구매자는 매매계약서의 품질보증 사항에 해당될 때만
클레임을 제기할 수있습니다
1.7 품질보증 제외 사항
매매계약서에 명기된 품질보증 사항 외에는 보증이 되지
않습니다.:
- 4페이지 기술제원에 규정된 회전수를 초과한 상태에서
사용했을 경우
- 고객께서 회사의 승인없이 임의로 수리하거나 사제
부품을
장착하여 작업기가 변형되고 이로인해 파손이 생겼을
경우
- 사용설명서의 지시사항를 따르지 않았을 경우

10
ITALIANO ENGLISH KOREAKOREA
2.0 NORME DI SICUREZZA E
PREVENZIONE INFORTUNI
Fare attenzione al segnale di pericolo, dove riportato,
in questo opuscolo.
I segnali di pericolo sono di tre livelli:
PERICOLO: Questo segnale avverte che se le operazioni
descritte non sono correttamente eseguite, causano gravi
lesioni, morte o rischi a lungo termine per la salute.
AVVERTENZA: Questo segnale avverte che se le opera-
zioni descritte non sono correttamente eseguite, possono
causare gravi lesioni, morte o rischi a lungo termine per
la salute.
CAUTELA: Questo segnale avverte che se le operazioni
descritte non sono correttamente eseguite, possono cau-
sare danni alla macchina.
Leggere attentamente tutte le istruzioni prima dell’im-
piego della macchina, in caso di dubbi rivolgersi
direttamente ai tecnici dei Concessionari della Ditta
Costruttrice.
La Ditta Costruttrice declina ogni e qualsiasi responsa-
bilità per la mancata osservanza delle norme di sicurez-
za e di prevenzione infortuni di seguito descritte.
1) Fare attenzione ai simboli di pericolo riportati in questo
opuscolo e sulla macchina.
2) Evitare assolutamente di toccare in qualsiasi modo le
parti in movimento.
3) Interventi e regolazioni sulla macchina devono essere
sempre effettuate a motore spento e trattore blocca-
to.
4) In caso di manutenzione della macchina disinnestare i
tubi idraulici dalle prese del trattore.
5) Prima di effettuare qualsiasi operazione sotto la mac-
china, accertarsi che la trasmissione cardanica sia
staccatadalla presadiforza, edassicurare lamacchina
con dei supporti in modo da evitarne la discesa acci-
2.0 SAFETY AND ACCIDENT
PREVENTING PROVISIONS
Pay great attention to the danger signal where indicated
in this handbook.
There are three types of danger signal:
DANGER: This signal warns when serious injuries, death
or long-term health risks would be caused by failure to cor-
rectly carry out the described operations.
WARNING: This signal warns when serious injuries, death
or long-term health risks could be caused by failure to cor-
rectly carry out the described operations.
CAUTION: Thissignal warns when damage tothe machine
could be caused by failure to carry out the described op-
erations.
Become thoroughly familiar with all the instructions
before using the machine. Contact the technicians of
the Manufacturer’s concessionaires in case of doubt.
The Manufacturer declines all and every responsibil-
ity for failure to comply with the safety and accident-
prevention regulations described herein.
1) Comply with the instructions given by the danger
symbols in this handbook and affixed to the machine
itself.
2) Never ever touch any moving part.
3) Operations and adjustments to the implement must
always be carried out when the engine is off and the
tractor braked.
4) Disconnect the hydraulic pipes from the tractor taps
when the machine is serviced.
5) Before proceeding with any work under the machine,
make sure that the driveline has been detached from
the PTO and secure the machine itself with supports
to make sure that it is unable to accidentally drop.
2.0 안전과 사고예방 규칙
사용설명서에 명시된 위험 표지에 최대한 주의하시기
바랍니다.
세가지 종류의 위험 표지가 있습니다 :
위험: 기술된 사항을 정확하게 따르지 않았을 때심각한
부상, 사망 또는 장기적인 건강상의 문제를 초래할 수
있음을 경고합니다.
경고: 기술된 사항을 정확하게 따르지 않았을 때심각한
부상, 사망 또는 장기적인 건강상의 문제를 초래할 수
있음을 경고합니다.
주의: 기술된 사항을 정확하게 따르지 않았을 때작업기가
파손될 수있음을 경고합니다.
작업기를 사용하기 전에 지시사항들을 철저히 숙지하여
주시기 바랍니다. 의문 사항이 있는 경우 문의하여 주시기
바랍니다.
회사는 안전과 사고예방 규정을 준수하지 않아 발생한
사고에 대해서는 책임지지 않습니다.
1) 사용설명서에 설명되고 작업기에 부착된 위험 표지의
지시사항을 준수하십시요.
2) 움직이고 있는 부위는 절대로 만지지 마십시요.
3) 유지.보수와 조정작업은 반드시 트랙터 엔진이
꺼져있고 제동된 때에만 수행하십시요.
4) 수리작업을 할때에는 유압호스를 트랙터에서
빼주십시요.
5) 작업기 밑에서 작업할 때에는 PTO에서 죠인트를
확실하게 떼어낸 후작업기가 떨어지지 않도록
지지대로 견고하게 고정시키십시요.

11
ITALIANO ENGLISH KOREAKOREA
dentale.
6) È assolutamente vietato condurre o far condurre il trat-
tore,conlamacchina applicata,dapersonalesprovvisto
di patente di guida adeguata, inesperto e non in buone
condizioni di salute.
7) Osservare scrupolosamente tutte le misure di pre-
venzione infortuni raccomandate e descritte in questo
opuscolo.
8) L’applicazione dellamacchina altrattore, comportauna
diversa distribuzione dei pesi sugli assi. È consigliabile
pertantoaggiungere apposite zavorrenella parte ante-
riore del trattore in modo da ripartire adeguatamente il
peso sugli assi.
9) La macchinaapplicata,può esserecomandatosolo con
albero cardanico completo delle necessarie sicurezze
perisovraccarichi edelleprotezionifissateconl’apposi-
ta catenella. Fare attenzione al cardano in rotazione.
10) Prima di mettere in funzione il trattore e la macchina
stessa, controllare la perfetta integrità di tutte le sicu-
rezze per il trasporto e l’uso.
11) Le etichette con le istruzioni, applicate sulla macchina,
danno gli opportuni consigli in forma essenziale per
evitare gli infortuni.
12) Per la circolazione su strada, è necessario attenersi
allenormative del codice stradalein vigorenel relativo
Paese.
13) Iltrasporto sustrada avvienesottola totaleresponsabi-
lità dell’utente, che è tenuto a verificare l’adeguatezza
alle norme del codice della strada in vigore nel Paese
di utilizzo.
Rispettare il peso massimo previsto sull’asse del
trattore, il peso totale mobile, la regolamentazione sul
trasporto e il codice stradale.
14) Primadi iniziare illavoro, familiarizzarecon idispositivi
di comando e le loro funzioni.
15) Usare un abbigliamento idoneo. Evitare assolutamen-
te abiti svolazzanti o con lembi che in qualche modo
potrebbero impigliarsi in parti rotanti e in organi in
movimento.
16) Agganciarelamacchina, come previsto,sudiun trattore
diadeguata potenzae configurazionemediante l’appo-
sito dispositivo (sollevatore), conforme alle norme.
17) Prestare la massima attenzione nella fase di aggancio
e sgancio della macchina.
18) Lamacchina edi suoieventualiaccessori peril traspor-
6) It is absolutely forbidden for persons without a driv-
ing license, inexpert persons or those in precarious
health conditions to drive the tractor with the machine
mounted.
7) Strictly comply with all the recommended accident
preventing measures described in this handbook.
8) Assembly of a implement on the tractor will shift the
weights on the axles.
It is there fore advisable to add weights to the front part
of the tractor in order to balance the weights on the
axles themselves.
9) The coupledimplement mayonly becontrolled through
the cardan shaft complete with the necessary safety
devices for overloads and with the guards fixed with
the relative latch.
Keep away from the cardan shaft while it is turning.
10) Beforestarting thetractorand implement,alwayscheck
that all safety devices guarding transport and use are
in a perfect condition.
11) Theinstruction labelsaffixed tothemachine giveuseful
advice on how to prevent accidents.
12) Always comply with the highway code in force in your
country when travelling on public roads.
13) Transport on roads takes place under the total respon-
sibilityof theuser, whois obligedto verifythe adequacy
of the machine to the rules of the road traffic code in
force in that country.
Comply with the maximum permissible weight on the
axleof the tractor,the totaladjustable weight,transport
regulations and the highway code.
14) Always become familiar with the controls and their
operation before starting work.
15) Always wear suitable clothing.
Never ever wear loose garments or those with edges
that could in some way become caught up in rotating
parts or moving mechanisms.
16) As indicated, couple the implement to a tractor of ad-
equate power and configuration, using a device (lift)
conforming to the prescriptions.
17) Take the utmost care during the implement coupling
and release phases.
6) 면허증이 없는 자, 초보자 또는 건강상태가 불확실한
자가 작업기가 부착된 트랙터을 운전해서는 절대로
안됩니다.
7) 사용설명서의 모든 사고예방 권장사항들을 철저하게
따라주십시요.
8) 작업기를 트랙터에 연결하면 축하중이 변동됩니다.
축하중의 균형을 유지하기 위해 트랙터 전면에
웨이트를 추가하시기 바랍니다.
9) 연결된 작업기는 과부하에 대한 안전장치와
랫치에 고정된 보호가드가 장착된 죠인트를 통해
작동됩니다.
죠인트가 회전중에는 접근하지 마십시요.
10) 트랙터와 작업기를 시동하기 전에 항상 운반과 사용을
위한 모든 안전장치들을 점검하십시요.
11) 작업기에 부착된 라벨들은 사고예방을 위한 유용한
정보를 제공합니다.
12) 공공도로로 이동할 때는 고속도로 통행법을
준수하십시요.
13) 도로 이동은 도로교통법에 작업기 운송의 적절성을
확인해야될 고객의 책임하에 이루어져야 합니다.
트랙터 축의 최대 허용 중량, 총조정중량, 운송규정 및
고속도로 통행법을 준수하십시요
14) 작업 전에 조작장치들과 작동을 숙지하십시요.
15) 적절한 복장을 작용하십시요.
헐겁거나 헤진 옷은 절대로 착용하지 마시시요.
회전부나 움직이는 부위에 감길 수있습니다.
16) 작업기를 적정한 마력과 사양의 트랙터에 적절한 도구
(리프트)를이용하여 부착하십시요.
17) 작업기를 트랙터에 부착 또는 탈착할 때는 최대한
주의를 기울이 십시요.

12
ITALIANO ENGLISH KOREAKOREA
to su strada devono essere muniti di segnalazioni e
protezioni adeguate.
19) Con trattore in moto, non lasciare mai il posto di gui-
da.
20) È molto importante tenere presente che la tenuta di
strada e la capacità di direzione e frenatura, possono
essere influenzati, anche in modo notevole, dalla pre-
senza della macchina portata o trainata.
21) Incurva, fareattenzione allaforza centrifugaesercitata
in posizione diversa, del centro di gravità, con e senza
macchina portata.
22) Primadi inserirelapresa diforza,accertarsi delnumero
di giri prestabilito. Non scambiare il regime di 540 g/1’
con i 1000 g/1’.
23) È assolutamente vietato stazionare nell’area d’azione
della macchina, dove vi sono organi in movimento.
24) Primadiabbandonare iltrattore,abbassarela macchina
agganciata al gruppo sollevatore, arrestare il motore,
inserire il freno di stazionamento e togliere la chiave di
accensione dal quadro comandi.
25) È assolutamente vietato interporsi tra il trattore e la
macchina(Fig. 4)conmotore accesoecardano inserito
nonché senza aver azionato il freno di stazionamento
ed aver inserito, sotto le ruote, un ceppo o un sasso
di bloccaggio.Mantenersi ad una distanza di sicurezza
dalla macchina in lavoro, per possibili lanci di corpi
contundenti.
18) Any accessories for transport must be equipped with
adequate signals and guards.
19) Never ever leave the driving seat whilst the tractor is
moving.
20) It is very important to remember that the road holding,
steering and braking capacity may be even notably
influenced by the presence of a towed or mounted
implement.
21) Always take care of the centrifugal force exercised by
the furthered position of the center of gravity, when
turning corners with the implement mounted.
22) Beforeengaging the pto,check that the rpm rateis that
prescribed.
Never exchange the 540 rpm rate for 1000 rpm.
23) It is absolutely forbidden to stand withinthe operative
range of the machine where there are moving parts.
24) Beforeleaving thetractor, lowerthe implementcoupled
to the lift unit, stop the engine, engage the hand brake
and remove the ignition key from the control panel.
25) It is absolutely forbidden to stand between the tractor
and the machine (Fig. 4) when the engine is running
and the cardan shaft is engaged without having first
engaged the hand brake and placed a block or stone
under the wheels to prevent them from moving.
Keepa safedistance from theshredder atworkto avoid
being hit by possible flying stones, etc.
26) Always set the lift control lever to the locked position
before coupling or releasing the implement from the
Fig. 4 Fig. 5
18) 운반을 위한 부대품은 안전표지, 가드와 함께 부착되어
있어야 합니다.
19) 트랙터가 가동중일 때에는 절대로 운전석을 비우지
마십시요.
20) 견인 또는 장착된 작업기에 의해 도로접지력,
조향력, 제동력이 영향을 받을 수있습니다.
21) 회전할 때에는 무게중심의 이동에 따라 원심력이
발생되는 것을 주의하십시요.
22) pto를연결하기 전에 규정된 rpm을
확인하십시요.
절대로 540 rpm을1000 rpm으로 변경하지 마십시요.
23) 작업기의 작업범위 내에 절대로 접근하지
마십시요.
24) 트랙터에서 내릴 때에는 작업기를 내리고
엔진을정지시키고 핸드브레이크를 채운 후시동키를
빼내십시요.
25) 트랙터와 작업기 사이에 절대로 서있지 마십시요.
(Fig.4)엔진이 켜져있고 핸드브레이크가 채워지지 않은
상태에서 죠인트가 연결되 있는 경우에는 고임목이나
돌을 바퀴에 끼워 움직이지 않도록 하십시요.
작업중에는 이물질의 비산 등에 의해 부상을 당할 수
있으므로 안전한 거리를 유지하십시요.

13
ITALIANO ENGLISH KOREAKOREA
26) Prima di agganciare o sganciare la macchina dall’at-
tacco tre punti, mettere in posizione di blocco la leva
di comando sollevatore.
27) La categoria dei perni di attacco della macchina deve
corrispondere a quella dell’attacco del sollevatore.
28) Fare attenzione quando si lavora nella zona dei bracci
del sollevamento, è un’area molto pericolosa.
29) È assolutamente vietato interporsi fra il trattore e
l’attacco della macchina per manovrare il comando
dall’esterno per il sollevamento (Fig. 4).
30) In fase di trasporto, fissare con le relative catene e
tenditori i bracci laterali di sollevamento.
31) Infasedi trasportosustrada,con lamacchinasollevata,
mettere in posizione di blocco la leva di comando del
sollevatoreidraulico del trattore.In fasedisollevamento
dal terreno, i giunti dell’albero cardanico vengono pie-
gati a più di 40° (P.d.F. ferma), staccare l’albero dalla
P.d.F. della trattrice.
32) Utilizzare esclusivamente l’albero cardanico previsto
dal Costruttore.
33) Controllarespessoe conperiodicitàle protezionidell’al-
bero cardanico, deve essere sempre in ottimo stato e
saldamente fissato.
34) Fare molta attenzione alla protezione dell’albero car-
danico , sia in posizione di trasporto che di lavoro.
35) L’installazione e lo smontaggio dell’albero cardanico
deve essere sempre fatta a motore spento.
36) Fare molta attenzione al corretto montaggio e alla
sicurezza dell’albero cardanico, (e sia alla P.d.F. della
macchina che alla P.T.O. del trattore).
37) Bloccare la rotazione della protezione dell’albero car-
danico con la catenella in dotazione.
38) Prima di inserire la presa di forza, assicurarsi che non
vi siano persone o animali nella zona d’azione e che
il regime scelto corrisponda a quello consentito. Mai
superare il massimo previsto.
39) Non inserire la presa di forza a motore spento.
40) Disinserire, sempre, la presa di forza quando l’albero
cardanico fa un angolo troppo aperto (mai oltre i 10
gradi - Fig. 5) e quando non viene usata.
41) Pulire e ingrassare l’albero cardanico solo quando la
presa di forza è disinserita, il motore è spento, il freno
di stazionamento è inserito e la chiave staccata.
42) Quando non serve, appoggiare l’albero cardanico sul
supporto previsto.
three-point coupling.
27) The category of the implement coupling pins must cor-
respond to that of the lift coupling.
28) Take care when workingnear thelift links.This isa very
dangerous zone.
29) It is absolutely forbidden to stand between the tractor
and the implement when manoeuvering the lift control
from the outside (Fig. 4).
30) Fix the side lift links with the relative chains and idlers
during the transport phase.
31) Set the control lever of the hydraulic lift to the locked
position during road transport with the implement
raised.
Whenhoisting fromthe ground, thejoints ofthe cardan
shaft are bent to more than 40° (power takeoff turned
off).
Detach the shaft from the power takeoff of the tractor.
32) Only use the cardan shaft recommended by the Manu-
facturer.
33) Frequently and periodically check the cardan shaft
guard. It must always be in an excellent condition and
well-welded.
34) Take great care of the the cardan shaft guard, both in
the transport and work positions.
35) The cardan shaft must only be installed or dismantled
whilst the engine is off.
36) Take great care to ensure that the cardan shaft is cor-
rectly assembled and safe, (and carefully check the
P.d.F. of the machine and the P.T.O. of the tractor).
37) Usethesupplied latchtoprevent thecardanshaft guard
from turning.
38) Before engaging the pto, ensure that there are no per-
sons or animals in the field of action of the machine
and that the selected running rate corresponds to the
permissible value.
Never exceed the recommended maximum rate.
39) Never engage the pto when the engine is off.
40) Always disengage the pto when the cardan shaft is set
atanexcessively openangle(never beyond10degrees
- Fig. 5) and when it is not in use.
41) Only clean and grease the cardan shaft when the pto
is disengaged, the engine off, the hand brake engaged
and the ignition key removed.
42) Rest the cardan shaft on its stand when not in use.
43) Refit the protective cap on the pto shaft after having
26) 3점커플링에 작업기를 부착 또는 탈착하기 전에
승강조절레버를 항상 잠금 위치에 두십시요.
27) 작업기 연결 핀의 카타고리는 트랙터 승강장치의 것과
맞아야 합니다.
28) 승강장치 주위는 매우 위험한 지역입니다. 이곳에
있을 때에는 각별한 주위을 기울이십시요.
29) 외부에서 승강장치를 작동중에는 절대로 트랙터와
작업기 사이에 서있지 마십시요(Fig.4).
30) 이동할 때에는 양쪽승강링크를 체인과 아이들러로
고정하십시요.
31) 도로이동 시에는 작업기를 올린 상태에서
유압승강장치의 조정레버를 잠금위치에 두십시요.
지면에서 들어 올릴 때죠인트는 40도이상 꺾입니다
(pto 정지상태).
32) 죠인트는 회사에서 권장하는 것만 사용하십시요.
33) 수시로 죠인트의 보호가드를 점검하시시요. 항상
양호한 상태로 부착되어져 있어야 합니다.
34) 이동이나 작업시 죠인트 보호가드가 파손되지 않도록
주의하십시요.
35) 죠인트의 장착, 탈착은 반드시 엔진이 꺼진 상태에서
하십시요.
36) 죠인트가 정확하고 안전하게 장착되었는 지
확인하십시요. ( 작업기의 P.d.F. 와트랙터의 P.T.O. 를
주의깊게 점검하십시요.)
37) 랫치를 이용하여 죠인트의 보호가드가 회전하지
않도록 하십시요.
38) pto 를체결하기 전에 작업할 지역 안에 사람이나
동물이 있지 않도록 하시고 선택한 회전수가 허용값에
맞도록 하십시요. 절대로 권장 최대회전수를 초과하지
마십시요.
39) 엔진이 꺼져 있을 때절대로 pto를체결하지 마십시요.
40) 죠인트의 각도가 과도하게 클때(10도이상 절대 금지 –
Fig.5), 사용하지 않을 때에는 pto 체결을 해지하십시요.
41) 청소와 구리스 주입은 pto 체결 해지하고 엔진을
정지시키고 핸드브레이크 체결한 후시동키를 제거한
상태에서만 하십시요.
42) 죠인트를 사용하지 않을 때는 죠인트 걸이에 걸어
두십시요.

14
ITALIANO ENGLISH KOREAKOREA
43) Dopo lo smontaggio dell’albero cardanico, rimettere il
cappuccio di protezione sull’albero della presa di forza.
44) L’usoprolungato dellamacchina può darecome effetto
secondario un riscaldamento della scatola del moltipli-
catore e degli eventuali elementi del circuito idraulico,
evitareditoccare questi elementidurantee subitodopo
l’uso, per pericolo di scottature.
45) Non procedere con i lavori di manutenzione e di pulizia
seprima nonèstata disinseritala presadiforza, spento
il motore, inserito il freno di stazionamento e bloccato
il trattore con un ceppo o un sasso sotto le ruote.
Controllarel’integrità delle bandellediprotezione edella
struttura.
46) Periodicamente verificare il serraggio e la tenuta delle
viti e dadi, eventualmente riserrarli.
47) Nei lavori di manutenzione e di sostituzione dei coltelli
con la macchina sollevato, mettere per precauzione
adeguati sostegni sotto l’attrezzatura.
48) Prima di lavorare sugli utensili da taglio; staccare la
presa di forza, spegnere il trattore, inserire il freno di
stazionamento ed assicurarsi che gli utensili siano
completamente fermi.
49) Rispettare la conformità degli olii consigliati.
50) Leparti diricambio devono corrisponderealle esigenze
definite dal costruttore. Usare solo ricambi originali.
51) Le decalcomanie relative alla sicurezza devono esse-
re sempre ben evidenti; vanno tenute pulite e vanno
sostituite se diventano poco leggibili (eventualmente
possono essere richieste al concessionario).
52) Il libretto delle istruzioni per l’uso, deve essere conser-
vato per tutta la durata della macchina.
ATTENZIONE
Nel caso si utilizzi una trattice priva di cabina insono-
rizzata e pressurizzata, è necessario che l’operatore
utilizzi sistemi individuali di protezione:
- Cuffia protettiva per il rumore, se si eccedono i livelli di
esposizione di norma.
- Maschera antipolvere, se a causa del tipo di prodotto
lavorato o del terreno molto polveroso, o uso di macchina
aperta, si sollevi una notevole quantità di polvere.
dismantled the cardan shaft.
44) Lengthy use of the machine can, as secondary effect,
overheattheoverdrive andpartsof thehydraulic circuit.
Never touch these parts immediately after use as they
are very hot and can cause burns.
45) Never carry out maintenance or cleaning work unless
the pto has been disengaged, the engine switched off,
the hand brake engaged and the tractor locked in posi-
tion by a block or stone under the wheels.
Check the state and condition of the protection bars.
46) Periodically check that all nuts and bolts are fully tight-
ened. Re-tighten them if necessary.
47) Always place adequate supports under the implement
whenservicing themachineor replacingthehoe blades
with the implement raised.
48) Before working on the cutting tools, disengage the pto,
switchoffthe tractor engine,engagethehand brakeand
check that the blades are completely at a standstill.
49) Only use the recommended oils.
50) The spare parts must correspond to the requirements
established by the manufacturer. Only use genuine
spare parts.
51) The safety transfers must always be perfectly visible.
They must be kept clean and should be replaced if
they become illegible. Replacements are available on
request from your local dealer.
52) The instruction manual must be kept for as long as the
machine lasts.
ATTENTION
In the event a tractor is used that has no pressurized,
soundproof cabin the operator must use individual
methods of protection.
- Protective headphones for noise in case the standard
levels of exposure are exceeded.
- Anti-dustmask, if a considerable quantityof dustis raised
caused by the type of product cut, by very dusty earth, or
by the use of an open machine.
43) 죠인트를 떼어낸 후에는 pto 축에 보호캡을 씌우십시요.
44) 장시간 사용은 구동부와 유압계통의 부품들에 고열을
발생시킬 수있습니다. 고열로 화상을 입을 수있으니
이러한 부분은 사용 후즉시 만지지 마십시요.
45) 유지.보수나 청소는 pto 체결을 해지 하고 엔진을 끈
후핸드브레이크를 걸고 트랙터 바퀴에 고임목이나
돌을 채워 고정시킨 상태에서만 하십시요.
방호카바의 상태를 점검하십시요.
46) 모든 볼트와 너트가 단단히 조여져 있는지 수시로
확인하십지요. 필요시 다시 조여 주십시요.
47) 작업기를 들어 올린 상태로 수리 또는 칼날을 교체할
때에느 작업기 밑에 적절한 지지대를 넣어
받쳐주십시요.
48) 칼날부으 점검, 수리는 pto체결을 해지하고 엔진을 끈
후핸드브레이크를 걸고 칼날이 완전이 멈추었을 때
하십시요.
49) 권장 오일만 사용하십시요.
50) 부품은 회사가 정한 규격 요구사항에 일치해야 합니다.
반드시 순정 부품만 사용하십시요.
51) 안전표지는 항상 잘보여야 합니다.
깨끗하게 유지하시고 잘보이지 않을 경우
교체하십시요.
교체품은 대리점에서 구하실 수있습니다.
52) 사용설명서는 항상 기대와 함께 보관하십시요.
주의
트랙터에 캐빈이 없는 경우에 작업자는 반드시 개별
보호장비를 사용하시기 바랍니다.
- 기준레벨을 초과하는 소음을 위한 소음차단 해드폰
- 절단할 작물의 종류,건조한 곳또는 개방된 기계의 사용에
의해 많은 양의 먼지가 발생할 경우 먼지차단 마스크

15
ITALIANO ENGLISH KOREAKOREA
3.0 NORME D’USO
3.1 TRASPORTO
Se si rendesse necessario trasportare la macchina su di un
lungo percorso, questa può essere caricata sia su vagoni
ferroviari che su autocarri.
A tale scopo consultare «Dati tecnici», per il peso e le
dimensioni specifiche. Queste ultime sono molto utili per
controllare la possibilità di passaggio in zone anguste.
La macchina viene solitamente fornita libera da imballi e in
posizione orizzontale, è necessario quindi adottare un si-
stemadi sollevamentocon gru efuni, ocatene, diadeguata
portata, agganciandolo ai punti di sollevamento predisposti
e segnalati con il simbolo «gancio» (16 Fig. 3).
CAUTELA
Prima di procedere alle operazioni di sollevamento, as-
sicurarsi che eventuali elementi mobili della macchina
siano ben bloccati.
Assicurarsi di avere una gru di portata adeguata al
sollevamento della macchina.
Sollevare la macchina con estrema cautela e trasferirlo
lentamente, senza scosse o movimenti bruschi.
PERICOLO
Le operazioni di sollevamento e trasporto possono
essere molto pericolose se non effettuate con la mas-
sima cautela: allontanare perciò i non addetti; pulire,
sgomberare e delimitare la zona di trasferimento; veri-
ficare l’integrità e l’idoneità dei mezzi a disposizione;
non toccare i carichi sospesi e rimanervi a distanza di
sicurezza; durante il trasporto, i carichi non dovranno
essere sollevati più di 20 centimetri dal suolo.
Ci si deve accertare inoltre che la zona in cui si opera,
sia sgombra da ostacoli e che vi sia un sufficiente
«spazio di fuga», intendendo con questo termine, una
zona libera e sicura, in cui potersi spostare rapidamente
qualora il carico cadesse. Il piano su cui si intende ca-
ricare la macchina, deve essere orizzontale per evitare
possibili spostamenti del carico.
3.0 USE INSTRUCTIONS
3.1 TRANSPORT
If it becomes necessary to transport the mabhine for a
long distance, it can be loaded onto a railway wagon or a
truck.
For this purpose, consult «Technical Features» for weight
and specific dimensions. The latter are very useful to check
the possibility of driving along all types of roads.
The machine is generally supplied in a horizontal position
with no packing material. It is therefore necessary to use
a system of hoisting with a crane and cables, or chains of
adequatecapacity,hooking onto theoachine atthe hoisting
points marked with the «hook» symbol (16 Fig. 3).
CAUTION
Before proceeding to the hoisting operations, make
sure that any any mobile elements of the machine are
blocked.
Make sure to use a crane with an adequate hoisting
capacity to lift the machine.
Hoist the machine with extreme caution and transfer it
slowly, without jerks or abrupt movements.
DANGER
The operations of hoisting and transport can be very
dangerous if not carried out with the maximum caution;
persons not directly involved should be moved away.
Clean, evacuate the area and delimit the transfer zone.
Check the state, condition and suitability of the means
at disposition.
Do not touch suspended loads, keeping them at a safe
distance. During transport, the loads should not be
raised more than 20 cm. from the ground.
It most be further ascertained that the operational area
is free of obstacles and that there is sufficient «escape
space», meaning an area which is free and secure into
which one could move rapidly in case a load should fall.
The surface on which the machine is to be loaded must
be horizontal in order to prevent possible shifting.
3.0 사용법
3.1 운송
장거리 운송이 필요할 경우 화물열차나 트럭으로 운송할
수있습니다.
이를 위해 기술제원 상의 무게와 부피를 참고하시기
바랍니다.
각종 도로에서의 운송가능 여부를 확인하기 위해 부피를
잘알아 두십시요.
작업기는 일반적으로 수평상태로 공급되어 짐니다. 따라서
<<견인>> 표지가(16 Fig.3) 붙은 견인고리에 걸어 들어
올릴 수있는 크레인과 케이블이 장비된 호이스트나 적절한
용량의 체인블럭이 필요합니다.
주의
들어 올리기 작업 전에 작업기의 움직이는 부분들이 잘
고정되어 있는 지확인하십시요.
적절한 용량의 크레인을 사용하십시요.
주의깊게 들어 올리고 불규칙한 흔들림이나 갑작스런
움직임이 없도록 천천히 옮기십시요.
위험
호이스트작업 및운반작업은 매우 위험하여 세심한
주의가 필요합니다; 관계자 이외는 접근하지 못하도록
하십시요. 구역내 방해물이 없도록 치우시고 운반지역의
범위를 정하십시요. 운반방법의 상태와 여건, 적절성을
점검하십시요.
매달려 있는 운반물에 손대지 마시고 안전거리을
유지하십시요.
운반중에 운반물이 지면에서 20 cm 이상 들리지 않도록
하십시요.
작업구역내 장애물이 없고 충분한 공간이 있어 운반물이
떨어져도 신속이 피할 수있으면 더욱 안전합니다.
작업기가 넘어지는 것을 방지하기 위해 작업기가 실릴 곳은

16
ITALIANO ENGLISH KOREAKOREA
Unavoltaposta lamacchinasull’eventualemezzo ditraspor-
to, assicurarsi che rimanga bloccata nella sua posizione.
Fissare la macchina al piano su cui è appoggiato mediante
l’ausilio di funi adatte alla massa di cui si intende bloccare
il movimento (vedere «Dati tecnici» per il peso).
Dettefunidevono essere fissatesaldamente allamacchinae
ben tese verso il punto di ancoraggio sul piano di appoggio.
Unavoltaeffettuatoil trasporto, primadiliberare lamacchina
da tutti i vincoli, verificare che lo stato e la posizione dello
stesso siano tali da non costituire pericolo.
Togliere quindi lefuni, eprocedere alloscarico congli stessi
mezzi e modalità previsti per il carico.
Transito e trasporto su strade pubbliche
Quandositransita su stradepubblicheènecessario montare
i triangoli posteriori catarifrangenti, le luci di segnalazione
degliingombri, illampeggiante ecomunque accertarsi delle
leggi e regolamentazioni vigenti per il transito.
ATTENZIONE
Prima di immettersi su strade pubbliche con la mac-
china agganciata al trattore verificare la presenza e
l’efficienza dei dispositivi sopra descritti e/o del segnale
di veicolo lento e/o di carico sporgente.
Questi indicatori devono trovarsi sul retro della macchi-
na operatrice in posizione ben visibile da ogni mezzo
che sopraggiunga posteriormente.
3.2 MACCHINE FORNITE
PARZIALMENTE MONTATE
Per motivi d’ingombro, possono essere fornite macchine
con gruppi staccati, comunque contenuti e fissati nello
stesso imballo.
Normalmente è il castello 3° punto, viene staccato e suc-
cessivamente montato dal cliente.
Curare il montaggio di queste parti, riferendosi anche
alle tavole del catalogo ricambi.
In particolare, rispettarei valori della coppiedi serraggio
delle viti a corredo, come indicato in tabella a pag. 19.
Once the machine is positioned on the vehicle, make sure
that it remains blocked in its position.
Fastenthe machineon theplatform ofthe vehicle bymeans
of cables suitable for the mass which must be blocked (see
«Technical Features» for the weight).
The cables must be firmly fastened to the machine and
pulled taut to the anchorage point on the platform.
Once transport has been carried out and before freeing the
machine from all its fastenings, make sure that its state and
position are such as not to constitute danger.
Removethe cablesand proceedto unloadingwiththe same
means and methods used for loading.
Transit and transporting on the public highways
When driving on the public roads, fit on the rear reflector
triangles, side lights and flashing beacon and always make
sure that you comply with the Highway Code and any other
applicable regulations.
ATTENTION
Before driving on to the public roads with the machine
hitched to the tractor, make sure that the devices listed
above and/or the slow vehicle signal and/or the project-
ing load signal operate correctly.
These indicators must be affixed to the rear of the im-
plement in a position where they can be clearly seen
by any other vehicle that drives up behind.
3.2 MACHINES SUPPLIED
PARTLY BROKEN-DOWN
Owing to their size, the machines may be supplied with
detached parts, always fixed in the same pack.
Normally, thepartthat isdetachedand subsequentlyassem-
bled by the customer are the 3rd point mounting frame.
Execute these installation operations with the utmost
care.
Refer to the list of parts in the Spare Parts Catalogue. In
particular, apply the screw tightening torques as listed
in the Chart on page 19.
수평이 되어야 합니다.
작업기를 차량에 실은 후에는 움직이지 않도록
고정하십시요.
작업기를 차량의 적재대에 적절한 밧줄로 감은 후
고정시키십시요.(기술제원의 중량 확인)
밧줄로 작업기를 확실하게 감아 팽팽하게 잡아당겨
적재대의 고리에 거십시요.
운송 목적지에 도착하면 작업기를 풀어 내리기 전에 위험이
발생하지 않도록 작업기의 상태와 위치를 확인하십시요.
밧줄을 풀어 적재할 때와 같은 방법으로 내리십시요.
공공도로에서의 이동과 운송
공공도로를 주행할 때는 후방에 삼각 반사경, 측면라이트와
경고등을 달고 고속도로 통행법과 기타 규정을
준수하십시요.
주의
트래터에 작업기를 부착하여 공공도로를 주행하기 전에
위의 도로주행 장치나 서행차량 신호, 돌출물 신호가
바르게 작동되는 지확인하시시요.
이표식들은 뒤에 주행하는 차량들이 잘볼수 있도록
작업기의 후방에 부착하십시요.
3.2 부분 분리되어 공급되는 작업기
작업기의 크기에 따라 부품들이 분리되어 공급될 수있으며
이부품들은 항상 동일한 포장 상태로 고정되어 있습니다.
일반적으로 분리되어 공급되어 고객께서 조립해야 하는
부품은 약60kg 의3점마스트프레임과 약500kg 의
케이지롤러에서 650kg의팩커롤러까지 종류에 따라
무게가 다른 롤러유니트가 있습니다.
장착할 때에 세심한 주의를 기울이십시요. 부품리스트를
참고하시기 바라며 19페이지 차트에 명기된 스크류 조임
토크를 적용하십시요.

17
ITALIANO ENGLISH KOREAKOREA
3.3 PRIMA DELL’USO
Prima di mettere in funzione la macchina, eseguire le se-
guenti operazioni:
- Controllare che la macchina sia perfettamente in ordine,
che i lubrificanti siano al giusto livello (vedere capitolo
«Manutenzione») e che tutti gli organi soggetti ad usura
e deterioramento siano pienamente efficienti.
AVVERTENZA
Tutte le seguenti operazioni di manutenzione, rego-
lazione e di approntamento alla lavorazione, devono
essere eseguite tassativamente con presa di forza del
trattore disinserita, macchina a terra e trattore spento
e ben fermo.
3.4 APPLICAZIONE AL TRATTORE
L’applicazione della macchina al trattore deve avvenire con
la macchina posata a terra e su terreno piano.
Tutte lemacchinesono applicabilia qualsiasitrattoremunito
di attacco universale a tre punti di 2ae 3acategoria.
In base alle dimensioni specifiche di questi 2 tipi di attac-
chi dei trattori è necessario determinare la posizione più
favorevole della macchina spostando opportunamente sul
tubo quadro le piastre (1 Fig. 6) e inserendo i perni (2 Fig.
6) nei fori corrispondenti al giusto diametro delle parallele
del trattore.
ATTENZIONE
Le piastre (1 Fig. 6) vanno montate sempre e solo come
mostrato in Fig. 6 con i fori posizionati anteriormente
al tubo quadro.
La ditta costruttrice declina ogni responsabilità per
rotture sulla macchina o sul trattore conseguenti al
mancato rispetto di questa indicazione.
PERICOLO
L’applicazione al trattore è una fase molto pericolosa.
Fare molta attenzione effettuare l’intera operazione
seguendo le istruzioni.
3.3 BEFORE USE
Before starting the machine, check that:
- The machine is perfectly in order, that the lubricants are
at the correct levels (see «Maintenance» chapter) and
that all parts subject to wear and deterioration are fully
efficient.
WARNING
None of the following servicing, adjustment and
preparation operations must be carried out unless the
pto is disengaged, the machine is on the ground, the
tractor engine is off and the tractor itself is safely at a
braked.
3.4 HITCHING TO THE TRACTOR
The machine is coupled to the tractor with the cultivator on
the ground. The ground area should be flat.
All the machine can be attached to any tractor with a class
2 or 3 universal 3-point hitch.
Depending on the precise dimensions of these two types
of hitches, find the best position for the machine by moving
the plates (1 Fig. 6) along the square tubular and inserting
the pin (2 Fig. 6) in the holes corresponding to the correct
diameter for the tractor’s parallel arms.
IMPORTANT
The plates (1 Fig. 6) must always and only be mounted
as shown in Fig. 6 with the holes towards the front of
the square tubular.
The Manufacturer declines any liability for damage to
the machine or the tractor if this essential installation
requirement is not observed.
DANGER
Application of any implement to a tractor is a very dan-
gerous operation and must only be carried out with the
utmost care in compliance with the instructions.
3.3 사용전 점검
기대를 사용하기 전에 아래 사항을 점검하십시요.
- 오일량이 정상 레벨에 있는 지확인하시고(<<유지.보수
>>참고) 소모성 부품의 상태를 점검하십시요.
- 롤러가 장착된 경우 적정한 경심을 유지할 수있도록
롤러가 정확하게 장착되었는 지확인하십시요.
경고
정비, 조정, 준비 작업은 pto 연결을 해지하고 작업기를
지면에 내려 놓은 후트랙터 엔진을 끄고 트랙터가 안전하게
제동된 상태에서만 하십시요.
3.4 트랙터에 연결하기
지면이 평평한 곳에서 작업기를 트랙터에 부착하십시요.
모든 작업기는 카타고리 2 또는 3의범용 3점히치에 연결될
수있습니다.
이두가지 종류 히치의 정확한 규격에 따라 플레이트(1
Fig.6)를사각관을 따라 이동하고 핀(2 Fig.6)을트랙터
수평암의 정확한 크기에 맞는 구멍에 삽입하여 작업기의
적절한 위치를 찾으십시요.
중요
플레이트(1 Fig.6)은항상 Fig.6과같이 사각관 앞쪽을
향한 구멍에 장착되어져야 합니다.
회사는 이장착사항을 준수하지 않아 발생된 작업기나
트랙터의 손상에 대해서는 책임을 지지 않습니다.
위험
작업기를 트랙터에 부착하는 것은 매우 위험한 작업이므로
지시사항에 따라 세심한 주의를 기울여 수행하시기
바랍니다.
트랙터와 작업기의 정확한 위치는 범용 커플링이 최대한

18
ITALIANO ENGLISH KOREAKOREA
Lacorretta posizione trattore/macchina, viene determinata,
ponendo la macchina ad una distanza, dal trattore, tale che
il giunto cardanico resti esteso 5-10 cm dalla posizione di
massima chiusura.
A questo punto, procedere come segue:
1) Accostarele paralleledel sollevatoreponendole all’inter-
no delle piastre (1 Fig. 6), inserire il perno (2 Fig. 6) nel
foro predisposto e bloccare con le copiglie a scatto.
2) Bloccare le parallele del sollevatore con le apposite ca-
tene e tenditori paralleli sul trattore. Tale accorgimento
deve essere messo in atto per evitare qualsiasi sposta-
mento, in senso orizzontale, della macchina.
3) Innestarel’albero cardanico eassicurarsi chesia perfet-
tamente bloccato sulla presa di forza.
Verificare che la protezione ruoti liberamente e fissarla
con l’apposita catenella.
Rimuovere il sostegno dall’albero cardanico (2 Fig. 2) e
riporlo fissandolo nell’apposito aggancio.
4) Collegare il terzo punto superiore ed effettuare una cor-
rettaregolazione conil tirante(1 Fig.7) verificandoche il
pianosuperiore della macchina(AFig.7) risulti parallelo
al piano terra (B Fig. 7).
Ciò è molto importante allo scopo di ottenere il paralleli-
smotra l’assedellamacchina equello dellapresadi forza
deltrattore. Operareinqueste condizionisignificalimitare
le sollecitazioni sulla presa di forza stessa e prolungare
la durata dell’albero cardanico e della macchina stessa.
5) Posizionare il piedino d’appoggio come in figura 8.
6) Il martinetto a molla (1 Fig. 9) oltre a sostenere la lamie-
The correct tractor/machine position is established by set-
ting the implement at such a distance from the tractor that
the universal coupling remains 5-10 cm from its maximum
closing position. Now proceed in the following way:
1) Nearthe liftbars, setting themin themost suitableplates
(1 Fig. 6). Insert the pin (2 Fig. 6) into the relative hole
and lock in place with the snap-in split pins.
2) Lock the lift links using the relative chains and couplings
parallel to the tractor.
Thisoperationmust becarriedout topreventthemachine
from moving in a horizontal direction.
3) Engage the cardan shaft and check that it is perfectly
locked on the pto. Check that the guard is free to turn
and fix it with the relative latch.
Remove the cardan shaft support (2 Fig. 2) and re-
position it by fixing it on the relative hook.
4) Connect the upper third-point and correctly regulate by
means of the adjuster (1 Fig. 7), checking that the upper
surface of the machine (AFig. 7) is parallel to the ground
(B Fig. 7).
This is very important since it achieves parallelism
between the axis of the machine and that of the tractor
pto.
When the implement operates in these conditions, there
will be less stress on the pto itself while the cardan shaft
and implement will be much less subject to wear.
5) Position the support foot as shown in the figure 8.
Fig. 6
A
B
Fig. 7
1
1212
닫힌 상태에서 5-10cm가남도록 트랙터와 작업기의 거리를
조정하시면 됩니다. 다음과 같이 진행하시기 바랍니다.
1) 승강암을 플레이트(1 Fig.6)에접근시키십시요. 핀(2
Fig.6)을구멍에 넣은 후분할핀으로 잠그십시요.
2) 트랙터와 평행한 체인과 커플링을 이용하여 승강링크를
잠그십시요.
이작업은 작업기가 수평방향으로 움직이는 것을
방지하기 위해 필요합니다.
3) 죠인트를 연결하고 pto에확실하게 체결되었은 지
확인하십시요.
방호가드가 원활하게 회전하는 지확인하고 랫치에
고정시키십시요.
죠인트 지지대(2 Fig.2)를내려 고리에 고정시키십시요.
4) 상부 3점히치를 연결하고 조절기(1 Fig.7)를이용하여
조절하여 작업기의 상부면(A Fig.7)이지면에 평행이
되게 하십시요. (B Fig.7).
이 작업은 트랙터의 pto와 작업기 중심축을 수평하
해주는 중요한 작업입니다.
이 상태에서 작업해야 pto와 죠인트에 부하를 줄여주여
작업기를 오래 사용하실 수 있습니다.
5) 주차대를 그림 8과같이 위치시키십시요.
6) 스프링 로드(1 Fig.9)는뒷카바를 지지하고 도로이동중

19
ITALIANO ENGLISH KOREAKOREA
ra livellatrice ed ammortizzarla nel trasporto su strada,
serve a evitare il ribaltamento della macchina durante il
parcheggio.
La regolazione del precarico sulla molla si effettua avvi-
tando e svitando il dado superiore (2 Fig. 9), agendo con
l’apposita leva.
A seconda della posizione, determinata del bullone (2
Fig. 9) sui vari fori posti nel martinetto (3 Fig. 9) si riesce
ad aumentare o diminuire l’effetto della lamiera livellante
sul terreno.
3.5 VERIFICA CAPACITÀ DI
SOLLEVAMENTO E STABILITÀ
DELLA TRATTRICE ABBINATA
ALLA MACCHINA
L’applicazione di una macchina al trattore, comporta una
diversa distribuzione dei pesi sugli assi (Fig. 10).
È consigliabile pertanto aggiungere apposite zavorre nella
parte anteriore del trattore in modo da ripartire adeguata-
mente il peso sugli assi.
La zavorra da applicare si calcola con la seguente formu-
la:
S = S1 + S2
6) Besides supporting the levelling plate and acting as a
shock absorber for it during road transport, the spring
ram (1 Fig. 9) prevents the machine from overturning
when parking.
To adjust the spring pre-loading, screw or unscrew the
upper nut (2 Fig. 9) using the spring adjuster.
The effect of the levelling plate on the soil can be in-
creased or decreased depending on the position, estab-
lished by of the nut (2 Fig. 9) in the various holes in the
ram (3 Fig. 9).
3.5 CHECK THE LIFTING CAPACITY
AND STABILITY OF THE TRACTOR
TO WHICH THE MACHINE IS
HITCHED
Assemblyof aimplement on thetractor willshift theweights
on the axles (Fig. 10).
It is there fore advisable to add weights to the front part
of the tractor in order to balance the weights on the axles
themselves.
The ballast required is calculated by means of the following
formula:
S = S1 + S2
Z > M x S - 0.2 x T x
d + i
Z > M x S - 0.2 x T x
d + i
TABELLA COPPIE DI SERRAGGIO VITI (valori espressi in Nm)
CHART: SCREW TIGHTENING TORQUES (settings given in Nm)
표: 스크류 조임 강도(단위 Nm)
1
Fig. 9
Fig. 8
CLASSE
CLASS
종류
6.6 8.8 10.9 12.9
VITE PASSO FINE
FINE PITCH SCREWS
스크류 규격
M8 x 1 15 26 36 44
M10 x 1.25 30 52 74 88
M12 x 1.25 51 91 127 153
M14 x 1.5 81 143 201 241
M16 x 1.5 120 214 301 361
M18 x 1.5 173 308 433 520
M20 x 1.5 242 431 606 727
M22 x 1.5 321 571 803 964
M24 x 2 411 731 1028 1234
M27 x 2 601 1070 1504 1806
M30 x 2 832 1480 2081 2498
2
1
3
충격흡수 작용을 할뿐만 아니라 작업기를 정치시킬 때
뒤집어 지는 것을 방지합니다.
작업 또는 이동중에는 분할핀(4. Fig.9)를로드에서 빼내
주십시요.
뒷카바의 토양 정지 효과는 분할핀(2.Fig.9)을로드
구멍(3.Fig.9)에꽂는 위치를 변경하여 증가시키거나
감소시킬 수있습니다.
3.5 트랙터의 승강능력과 안전성 점검
작업기를 트랙터에 부착하면 트랙터 전후축 하 (Fig.10)이
변동됩니다.
따라서 축하중의 균형을 유지하기 위해 트랙터 전면에
이트를 추가하시기 바랍니다.
발라스트 값은 다음 공식에 의해 계산됩니다.
S = S1 + S2
만일 작업기가 1997년5월6일이전에 등록, 승인된
Z > M x S - 0.2 x T x
d + i

20
ITALIANO ENGLISH KOREAKOREA
Qualora l’attrezzatura venga montata su trattici agricole
omologate ed immatricolate prima del 6 Maggio 1997, oc-
corre verificare anche il rispetto della seguente relazione:
M < 0.3 x T
I= Interasse ruota trattrice (cm).
d= Distanza dell’asse anteriore dalle zavorre (cm).
T= Massa della trattrice + operatore (75 kg).
Z= Massa della zavorra (kg).
M= Massa della macchina operatrice (kg).
S= Sbalzo dall’asse posteriore della macchina operatrice
(cm).
S1= Distanza dall’asse posteriore all’attacco parallele
(cm).
S2= Distanza tra foro attacchi barre e baricentro macchina
operatrice (cm).
S2 = 140 cm: calcolato con macchina Mod. 5000 e rullo
Packer più seminatrice max. 1500 Kg a 800 mm di
sbalzo max.
CAUTELA
Nel caso di utilizzo con Seminatrice è opportuno mon-
tare perni e bielle della 3aCategoria.
If the implement is hitched to approved agricultural tractors
registered before 6th May 1997, also check to make sure
that the following relation has been complied with:
M < 0.3 x T
I= Tractor wheelbase (cm).
d= Distance of front axle from ballast (cm).
T= Weight of tractor + operator (75 kg).
Z= Weight of ballast (kg).
M= Weight of implement (kg).
S= Overhang from rear axle of the machine (cm).
S1= Distance of rear axle from parallel hitch (cm).
S2= Distance between bar hitch hole and center of gravity
of machine (cm).
S2 =140 cm: calculated with machine Mod. 5000 and
Packer roller, plus seed drill max. 1500 Kg with max.
800 mm overhang.
CAUTION
If used with a seeder, it is advisable to mount Class 3
pins and connecting rods.
Macchina in manovra nel campo
Machine manoeuvring in the field
작업기 단독
Macchina con seminatrice in manovra nel campo
Machine with seed drill manoeuvring in the field
작업기와 파종기
Macchina con attacco e seminatrice a sbalzo in manovra nel campo
Machine with hitch and overhanging seed drill manoeuvring in the field
작업기와 히치, 오버행잉 파종기
Z
T
S1d
0,2 T
i
M
S2
S2 (63 cm) S2 (80 cm)
Z
T
S1d
0,2 T
i
M
S2
Fig. 10
i
M
S2
Z
d
T
S1
0,2 T
S2 (140 cm)
트랙터에 부착되었을 경우에는 아래 사항에 일치하는 지
확인하십시요.
M < 0.3 x T
I = 트랙터 휠베이스 (cm)
d = 전륜축과 발라스트와의 거리 (cm)
T = 트랙터 무게 + 작업자 무게(75 kg)
Z = 발라스트 무게 (kg)
M = 작업기 무게(kg)
S = 작업기 뒤축으로 부터의 오버행 (cm)
S1 =후륜축과 수평히치의 거리(cm)
S2 = 작업기 무게중심과 히치구멍과의 거리(cm)
S2 = 140 cm: 작업기 Mod.5000과팩커롤러, 파종기 최대
1500Kg 최대800 mm 오버행 부착시의 거리
주의
파종기와 함께 사용할 경우 Cat.3 핀과 연결로드를
사용하십시요.
Table of contents
Other MASCHIO GASPARDO Farm Equipment manuals
Popular Farm Equipment manuals by other brands

Ferrari
Ferrari FPA MULTIPLA Operating and service manual

Land Pride
Land Pride RB16 Series Manual instruction

SKY Agriculture
SKY Agriculture Easy Drill 3000 Original instructions

SaMASZ
SaMASZ KDT 180 Operator's manual

Martin-Till
Martin-Till SmartClean installation instructions

aivituvin
aivituvin AIR 48 instruction manual