MASINGO Soprano X1 User manual


4 5
[Welcome]

6 7
[Parts & Features]
1. Master Volume Control
2. DC12V Car Battery Input
3. Mode
4. Chanels Control
5. Digital Display
6. Record
7. Repeat/Mic Priority
8. LED Lights and Disco Ball On/O
9. Echo Volume
10. Mic Volume
11. Mic Input
12. Micro TF
13. USB Port
14. Audio Input
15. DC15V/2A Charging Cable Input
16. Power
17. Master Equalizer
Function Board
TF
PO WER
ON
OF F
ON
OFF
LE D
53
1 2 87
1615
14131211109
17
6
4

8 9

10 11
Do not expose this product
to water, moisture, heat, or
steam. Do not place objects
filled with liquid on this
product.
Replace battery only with
the same or equivalent type
and size. Danger of explosion
if battery is incorrectly
replaced.
Check the machine for
damage before each use.
Clean and store the machine
after each use.
Do not expose battery to
excessive heat such as
sunshine, fire, or other heat
sources to reduce risk of fire
or explosion.
Do not use the machine with
attachments not approved
by the manufacturer.
y the manuf
by the manufacturer
by the manufacturer.
ed
attachments not approved
attachments not approv
e the machine with
e the machine with
Do not use the machine with
xplosion.
or explo
or explosion.
e risk of fir
s to reduc
f fire
k o
e ris
educe ris
educ
o reduc
s to r
es t
ce
ourc
sour
sources to reduce risk of fir
educ
our
unshine, fire, or other heat
sunshine, fire, or other heat
ive heat such as
uch as
uch as
uch as
e heat s
e heat s
e heat s
e heat s
ss
es
ce
xc
e
excessive heat such as
e bat
Do not expose battery to
t expose battery t
after each us
er each use
er each us
er each us
er each us
er each us
ter each us
after each us
er each us
e.
Clean and store the machine
damage before each use
e.
Check the machine for
eplaced.
replac
ed.
if battery is incorrectly
y is incorrectly
if battery is inc
and size. Danger of explosion
the same or equivalent type
ame or equivalent type
y only with
Replace battery only with
y only with
ery only with
product.
product.
oduct.
filled with liquid on this
steam. Do not place objects
s
eam. Do not place object
to water, moisture, heat, or
Do not expose this product
Machine
How to charge the machine
Connect the charger plug into the machine’s DC15V/2A Charging
Cable Input and to a polarized outlet. Be sure to charge fully before
each use. The indicator light will turn on to indicate charging.
How to turn the machine on/off
Depress the Power (insert diagram number) switch towards the side
labeled ON to turn the machine on.
To turn it off, depress the same switch towards the side labeled OFF.
How to turn the LEDs (lights) and disco ball on/off:
Depress the LED (insert diagram number) switch towards the side
labeled ON to turn the lights and disco Ball on.
To turn them off, depress the same switch towards the side labeled
OFF.

12 13
Microphones
How to charge the microphones
Plug the MicroUSB included into the bottom of the microphone
and into a wall outlet. Be sure to charge fully before each use.
While charging, the battery icon on the display will flash, then
stop flashing when the battery is full.
How to turn the microphones on
Turn on the microphones using the Power button on each handle.
They will automatically connect to the machine.
Note: The microphones will automatically turn o after 15 minutes
of no use.
How to set up the microphone
he A-B button controls both the microphone’s channel and the
microphone’s frequency band.
IMPORTANT: When using both microphones simultaneously, each
microphone must be set to a dierent frequency band (that is,
one must be set to CHA while the other one is set to CHB). If both
microphones are set to the same frequency band, the microphone
audio may cut in and out.
Changing the Frequency Band: The frequency band is represented
by the letters CHA or CHB in the bottom left corner of the LED
display. To change the microphone’s frequency band, hold the
A-B button for one second until the desired band is reached. One
microphone MUST be set to CHA while the other MUST be set to
CHB.
Changing the Microphone Channel: Channel is represented on
the microphone LED screen as a number from CH1 to CH8. To
cycle through possible channels, click the A-B button until the
desired channel is reached. Unlike frequency bands, having both
mics on the same numbered channel will not negatively impact
performance.
How to customize your microphone vocal mix
To adjust the volume of your singing over the music, click the
Volume +/- buttons up or down as desired. Use the EQ button to
choose between 5 dierent equalizer selections.
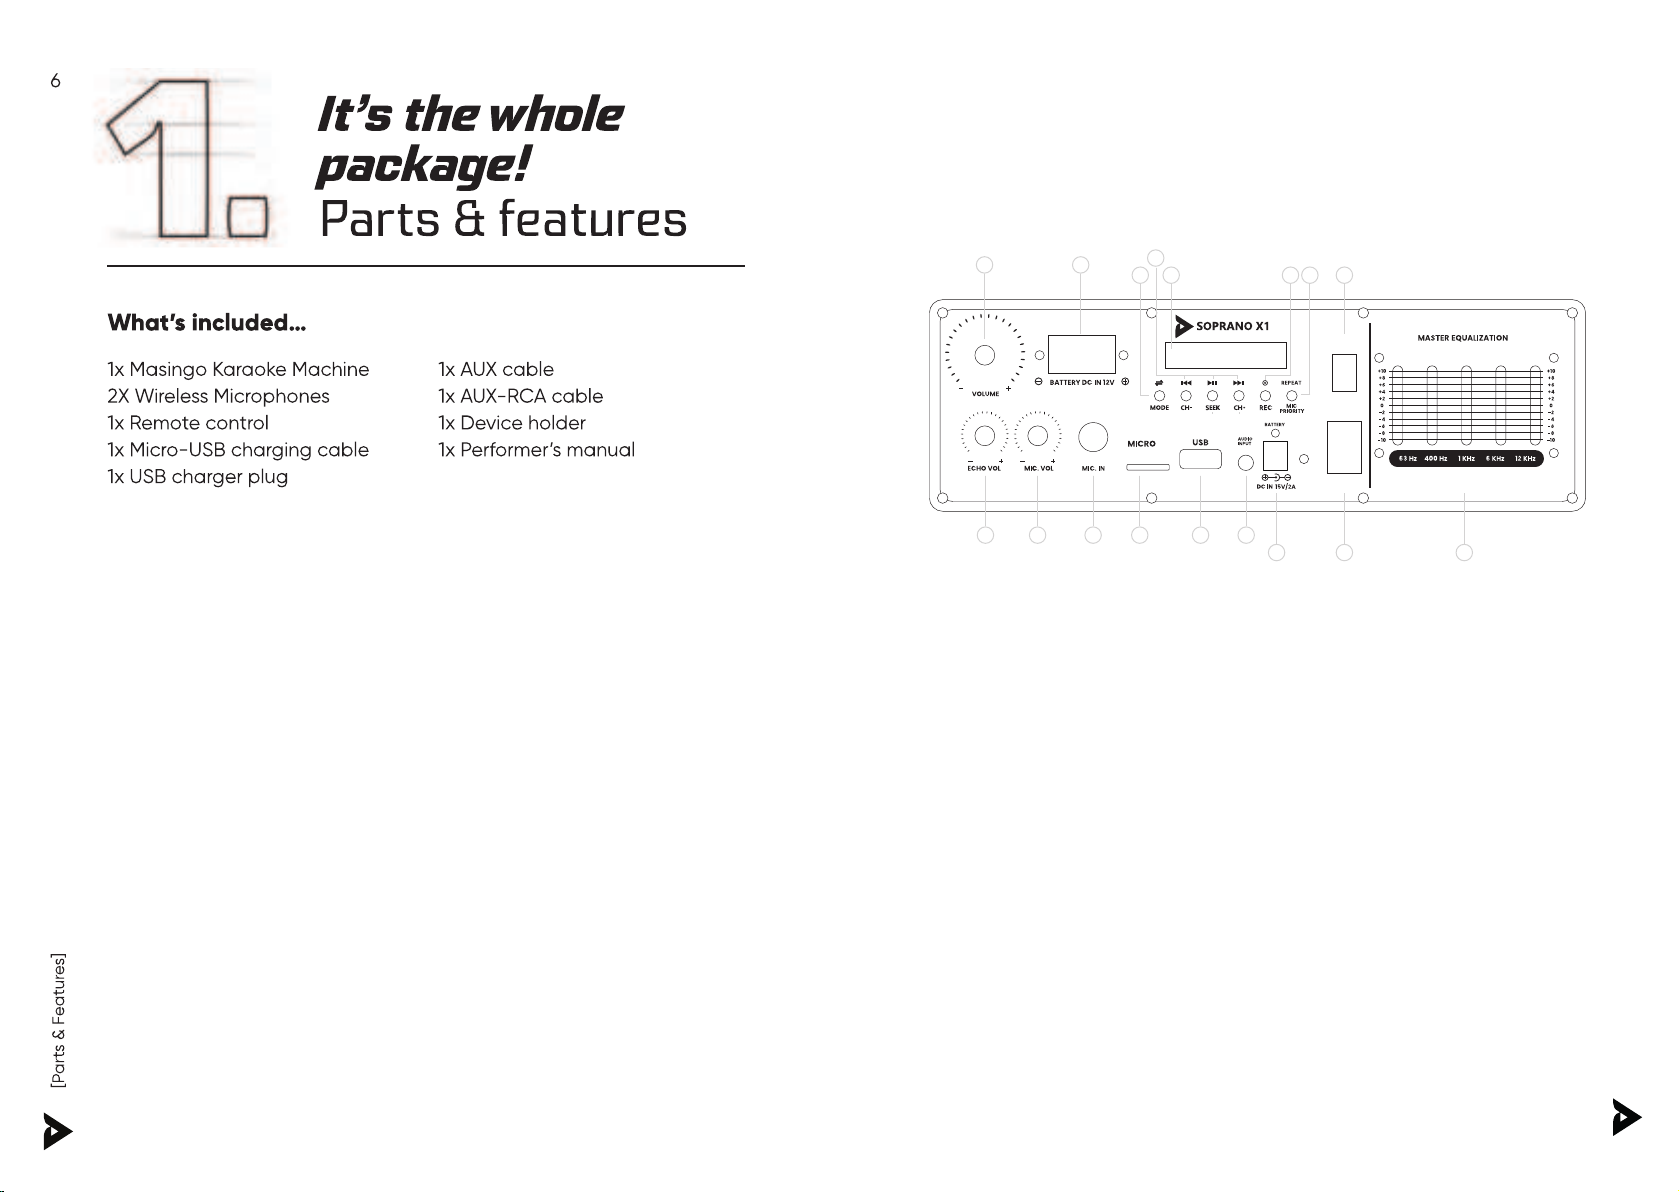
Music
How to set up playback
Your machine has 6 dierent playback options: Bluetooth, SD,
AUX, USB, FM, and PA. Each has its own hook up location (diagram
on page 7) and set-up method (see the subsections below).
How to connect to Bluetooth
Playing music from your device
Click the Mode button on the machine’s function board until the
digital display indicates you are in Bluetooth mode. Then, search
for the machine name “MASINGO” under your device’s Bluetooth
connection settings and click to connect.
How to use SD mode
Playing music from an SD card
Plug your MicroSD card into the MicroSD Slot on the machine’s
function board. The stored music on your SD card will begin
playing automatically.
How to start AUX mode
Playing music from an AUX-compatible device
Plug the AUX cable into the AUX Input on the machine’s function
board to activate AUX mode. Plug the other end of the cable into
the designated input on your device and play your music just as
you normally would.

14 15
How to connect to a TV
Plug the AXU-RCA cable into the AUX input on the machine’s
function board to activate AUX mode in order to connect a TV.
Insert the other end into the designated port on your TV and play
your music just as you would in regular AUX mode.
How to start USB mode
Playing music from a USB drive
Plug your USB into the USB Port on the machine’s function board.
The stored music on your USB will begin playing automatically.
How to connect to FM mode
Playing music from an FM radio station
Click the Mode button on the function board of the machine until
“FM” appears on the display screen.
Once the FM mode has been activated, press and hold the
button on either the remote control or function board for the
machine to begin seeking and storing all of your local radio station
channels.
After the scanning is complete, you can browse your saved
channels by pressing SCAN on the remote control or simply
switching through the channels by clicking or on either the
remote control or function board to select the radio station of your
choice..
How to use PA mode
When there is no music playing, this machine will automatically
start PA Mode. Simply use the microphones by ensuring that they
are turned on. Adjust the microphone’s volume and echo on the
machine’s function board or the microphone itself.
How to record
Begin by inserting a suitable recording device into the function
board via the MicroSD slot or USB port. Ensure that the microphone
is turned on and then proceed to press REC on the function board.
Speak or sing into the microphone and when finished recording,
click REC again to stop it.
To listen to the recorded audio, remove and then reinsert the USB
or MicroSD recording device. The recording will begin playing
automatically.
How to use multiple playback modes
To use playback modes interchangeably, simply activate each
mode according to the instructions above, then click Mode to
switch between the inputs.

16 17
[Troubleshooting Guide]
Maintenance
How to clean
Turn the machine and microphone o and unplug all wires.
Gently wipe the outside of the machine using a clean, dry cloth.
Keep all vents, buttons, and openings free of lint and dirt. Do not
immerse the machine in water and do not use any harsh cleaners.
How to store
Charge the machine so that it’s ready the next time you want to
use it.
Make sure that the machine is clean and dry.
Bind the unplugged cord gently with an electrician-approved
fastener.
Do not wrap the cord around the machine.
Store the machine in a cool, dry place away from damaging
elements.
For best results, clean and store the machine after each use.
How to transport
The Soprano X1 was designed intentionally with wheels at the
bottom for easy transportation.
Simply unplug all wires and extend the handle on the machine to
roll it around just like a suitcase.
Place the microphones in a suitable bag and carry them
separately.
ely
at
ately
eparat
epar
epar
separ
s
epar
ely.
ely.
able
Plac
uit
in
micr
them
and
bag
able
ophone
the
Plac
them
uit
the
them
them
carr
c
and
and
bag
bag
able
uitable
s
a
in
ophones
ophone
ophone
ophone
ophone
microphone
micr
micr
the
Place
Plac
Plac
arr
arr
micr
arry
uit
uit
in
micr
t lik
oll it ar
oll it ar
uit
t lik
ound jus
oll it ar
t lik
ound jus
uit
ound just lik
oll it ar
ase
as
cas
uitc
e a s
e a s
t like a s
ound jus
ound jus
oll it around jus
oll it ar
roll it ar
oll it ar
r
uit
uit
t lik
ound jus
ound jus
ound jus
oll it ar
e.
handle
all
all
unplug
Simply
Simply
machine
wir
Simply
machine
the
handle
handle
the
end
and
t
the
the
xt
to
machine
machine
machine
machine
machine
the
on
on
handle
handle
handle
the
end
xtend
e
and
and
es
wire
all
unplug
unplug
unplug
Simply
Simply
wir
machine
ext
wir
wir
unplug
unplug
Simply
Simply
om f
ation.
bo
ation.
ansport
y tr
tt
bot
ation.
ation.
tation.
anspor
anspor
anspor
anspor
y transpor
or eas
or eas
or eas
om for eas
om f
tom f
bo
anspor
y tr
or eas
ation.
or easy tr
ation.
wheels
entionally
entionally
S
with
entionally
int
igned
the
wheels
with
igned
de
X1
X1
The
The
the
at
with
entionally
int
the
at
wheels
wheels
wheels
entionally
entionally
entionally
entionally
intentionally
int
igned
igned
igned
des
de
as
was
ano
ano
oprano
opr
opr
The
opr
wheels
with
with
entionally
entionally
int
igned
w
Ho
ansport
o tr
w t
anspor
anspor
anspor
anspor
o transpor
w to tr
Ho
anspor
o tr
How t
, clean and s
ult
e the machine af
e the machine af
er each us
e the machine af
e the machine af
, clean and s
For be
For be
t
e the machine af
, clean and st
ult
st r
er each use
er each us
er each us
er each us
er each us
ter each us
e the machine af
e the machine af
e the machine af
e the machine af
e the machine af
e the machine af
e the machine af
ore the machine af
tor
, clean and s
, clean and s
, clean and s
, clean and s
, clean and s
, clean and s
, clean and s
ults
es
t re
For bes
For be
For be
er each us
or
t r
For be
er each us
e the machine af
ult
e.
, clean and s
element
element
elements
element
element
element
element
element
.
plac
ool,
fr
S
damaging
in
machine
damaging
dr
machine
the
the
St
damaging
damaging
damaging
damaging
damaging
damaging
om
from
away
aw
place
plac
plac
plac
ool,
cool,
c
a
in
machine
machine
machine
machine
machine
the
ore
tor
fr
dr
or
damaging
ay
aw
dry
in
machine
ool,
ound the machine
ound the machine
ound the machine
ound the machine
ord ar
ap the c
Do no
ound the machine
ap the c
Do not wr
ound the machine
ound the machine
ound the machine
ound the machine
ound the machine
ound the machine
ound the machine
d around the machine
d ar
ap the cor
ap the c
ap the c
ap the c
t wrap the c
Do no
Do no
Do no
d ar
or
t wr
ound the machine
ound the machine
t wr
ound the machine.
f
ast
ener
ener
tener
as
fas
ener
ener.
electrician-appr
gently
unplugged
electrician-appr
electrician-appr
with
Bind
ed
with
ord
unplugged
the
Bind
Bind
electrician-appr
with
gently
the
ed
electrician-appro
electrician-appr
electrician-appr
electrician-appr
electrician-appr
electrician-appr
electrician-appr
electrician-appr
electrician-appr
electrician-appr
an
an
gently
gently
gently
cor
c
unplugged
unplugged
unplugged
unplugged
unplugged
the
Bind
electrician-appr
electrician-appr
or
ov
electrician-appr
electrician-appr
with
with
gently
unplugged
unplugged
Bind
electrician-appr
e that the machine is clean and dr
Mak
Mak
e that the machine is clean and dr
ure that the machine is clean and dr
e s
Make s
Mak
e that the machine is clean and dr
ur
e that the machine is clean and dry.
e that the machine is clean and dr
ur
y.
e it.
e it.
use it.
us
e it.
us
e it.
Char
time
it
machine
the
eady
’
that
machine
the
Char
t
ant
time
xt
the
it
that
that
the
to
ant
want
ou
time
time
ne
ne
the
eady
ready
’s
that
so
s
machine
machine
machine
machine
machine
the
ge
Charge
Char
r
Char
w
ou
y
time
next
eady
it
machine
Ho
o st
w t
ore
tor
o s
w to s
Ho
or
How t
cleaner
in
machine
immer
h
har
do
and
machine
the
not
at
e the
cleaners
cleaner
cleaner
cleaner
cleaner
cleaner
hars
har
an
an
use
us
no
no
do
and
and
ater
wat
in
machine
machine
machine
machine
machine
the
se
immers
immer
immer
immer
cleaner
har
er
immer
any
us
in w
in
machine
immer
.
lint
all
all
of
fr
dir
lint
openings
Do
dir
and
and
but
K
not
dirt.
lint
butt
but
ent
no
no
Do
and
and
lint
o
ee
free
openings
openings
openings
openings
openings
openings
openings
and
and
ons
ons
tons
ents
ent
ent
all
eep
eep
Keep
dir
fr
dir
lint
openings
but
v
t.
,
,
clo
clean,
Gently
of
Gently
ing
machine
ide
wipe
th.
dr
machine
the
ide
the
cloth.
the
out
the
Gently
clo
clo
clean,
clean,
clean,
clean,
a
ing
ing
us
machine
machine
machine
machine
machine
the
o
ide
outs
out
the
wipe
wipe
Gently
Gently
dr
dry
ing
us
machine
ide
out
wipe
wipe
Gently
th.
clean,
and unplug all wir
and unplug all wir
and unplug all wir
ophone o and unplug all wir
and unplug all wir
urn the machine and micr
and unplug all wir
ophone o
urn the machine and micr
Turn the machine and micr
urn the machine and micr
es
and unplug all wire
and unplug all wir
and unplug all wir
and unplug all wir
and unplug all wir
and unplug all wir
and unplug all wir
ophone o
ophone o
ophone o
ophone o
ophone o
urn the machine and microphone o
urn the machine and micr
and unplug all wir
urn the machine and micr
and unplug all wir
and unplug all wir
and unplug all wir
and unplug all wir
urn the machine and micr
Turn the machine and micr
.
le
Ho
w t
an
lean
le
o c
w to c
Ho
How t
Maint
Maint
Maint
enance
enanc
enanc
enanc
enanc
Maintenanc
Maint
Maint
Maint
Problem
Solution
Machine will not turn on or
powers on and then shuts
down
The battery is depleted. Be
sure to charge the machine
after each use.
USB or Micro-SD mode will
not work
Turn o the selected mode,
unplug either the USB or Micro-
SD, turn it back on, and plug the
USB or Micro-SD back in.
Please note that the MicroSD
card can only be inserted in one
direction. Do not force it into
its slot. If the card cannot be
inserted easily, remove it and try
reinserting in another direction.
Microphone audio output is
low quality or experiencing
interference
To prevent interference, do
not hold the microphones too
close to the karaoke machine.
The maximum distance for
the microphones to wirelessly
connect and work properly is
approximately 30 meters or 98
feet from the machine.
The microphone’s sound
quality and wireless range
may also be aected by low
battery. Ensure that both
microphones are adequately
charged before use.
ged befor
ged be
ged be
char
e use
e us
ore us
for
ged be
ged be
charged be
char
char
or
char
e us
e.
ely
micr
adequat
ophone
adequat
adequately
adequat
adequat
adequat
adequat
are
ar
ophones
ophone
ophone
ophone
ophone
microphone
micr
micr
ar
micr
ely
adequat
micr
th
bo
that
Ens
bat
both
that
that
batt
bat
bo
that
ure
Ens
Ens
ter
bat
ur
er
ur
ery.
y.
lo
als
aect
b
ed
be
ect
lo
ected
ect
aect
a
be
also
als
als
may
may
low
by
may
ele
qualit
wir
qualit
and
qualit
ange
ange
ange
range
ss
eles
ele
wirele
and
and
qualit
qualit
r
wir
wir
wir
quality
qualit
qualit
micr
ound
ophone’
ophone
The
The
ound
sound
s
’s
ophone
ophone
ophone
ophone
microphone
micr
micr
The
micr
ound
micr
t fr
fee
om the machine
om the machine
om the machine
om the machine
eet fr
om the machine
om the machine
om the machine
om the machine
om the machine
om the machine
om the machine
t from the machine
ee
fee
t fr
om the machine
om the machine.
ely
98
98
30
ximat
30
met
ximat
or
ers
ter
me
me
ximately
ximat
ximat
appro
appr
appr
appr
or
er
appr
ely
ximat
oximat
operly
is
ork
and
onnect
is
operly
operly
properly
pr
work
and
and
onnect
onnect
onnect
onnect
connect
c
operly
pr
ork
is
operly
w
ly
ele
wir
micr
ophone
the
t
the
ss
eles
ele
wirele
to
ophones
ophone
ophone
ophone
ophone
microphone
micr
micr
the
wir
micr
ly
wir
wir
micr
for
dis
maximum
dis
The
The
dist
for
ance
anc
anc
tanc
dis
maximum
maximum
maximum
maximum
The
or
dis
maximum
maximum
maximum
clo
e machine
e machine
aoke machine
o the kar
o the k
o the k
e t
e machine
e machine
e machine
e machine
e machine
aoke machine
aok
araok
o the kar
o the k
e to the k
se t
clos
clo
clo
ar
e machine
e machine.
hold
micr
ophone
the
hold
hold
t
the
not
oo
too
ophones
ophone
ophone
ophone
ophone
microphone
micr
micr
the
hold
no
no
micr
micr
erfer
int
do
To
int
ent
do
ence
enc
enc
erenc
erfer
interf
int
ent
ent
pre
pr
To
er
erf
pr
int
ev
e,
erf
int
int
ence
enc
enc
erenc
erfer
interf
int
er
erf
int
w qualit
lo
xperiencing
xperiencing
w qualit
w qualit
xperiencing
xperiencing
xperiencing
xperiencing
xperiencing
xperiencing
xperiencing
y or e
y or e
w qualit
w qualit
lo
xperiencing
y or e
xperiencing
xperiencing
y or experiencing
w quality or e
w qualit
w qualit
low qualit
ophone audio output is
Micr
ophone audio output is
Micr
ophone audio output is
Microphone audio output is
Micr
Micr
ophone audio output is
Micr
ection.
ther dir
ting in ano
ting in ano
eins
ther dir
ther dir
ection.
ting in another dir
erting in ano
ection.
ection.
ection.
ther direction.
ther dir
ting in ano
ting in ano
ting in ano
ting in ano
ting in ano
ting in ano
einser
eins
eins
reins
ther direction.
ther dir
er
reins
ection.
ther dir
ting in ano
ting in ano
eins
ection.
ily
it
ily
ins
and
ed
and tr
it
ert
and
and
ve
emov
emo
remo
eas
eas
eas
ted
inser
ins
ins
tr
remo
er
try
it
emove
ily,
ily
ins
ily,
lo
If
it
be
ard
the
If
annot
the
lot.
it
be
anno
anno
anno
canno
c
car
c
the
lo
s
its
ard
it
t.
for
int
it
ection.
dir
Do
dir
int
it
not
ection.
into
int
ce
orc
for
no
no
Do
ection.
ection.
ection.
direction.
orc
direction.
int
it
ection.
dir
ection.
only
in
ins
ed
be
ard
ert
one
one
one
in
ted
inser
ins
ins
be
only
only
an
can
c
car
c
er
ard
in
ins
only
Pleas
oS
Micr
D
Micr
the
that
Pleas
the
that
that
not
MicroS
Micr
the
that
te
no
no
Please
Pleas
Pleas
Pleas
MicroS
Micr
o-S
US
D back in.
B or Micr
D back in.
D back in.
D back in.
B or Micr
B or Micr
US
D back in.
D back in.
D back in.
B or Micro-
B or Micr
B or Micr
B or Micro-
B or Micr
D back in.
B or Micr
o-
D back in.
plug
S
it
the
and
back
back
D
plug the
it
, turn
the
plug
plug
and
and
on,
on,
back
back
turn
turn
plug
it
turn
on,
D,
unplug
US
Micr
either
Micr
B
US
the
either
the
either
Micro-
Micr
or
the
either
either
unplug
unplug
unplug
Micro-
or
either
Micr
either
unplug
unplug
o-
elect
o
mode
ed
the
Turn
elect
the
mode
mode
mode
elected
elect
elect
select
s
the
o
urn
urn
Turn
mode,
ork
not w
t work
no
no
ork
t w
will
will
o-S
US
will
Micr
mode
D
Micr
B
US
mode
mode
mode
Micro-
Micr
or
Micr
or
will
will
Micr
o-
af
er each us
t
er each use
er each us
er each us
er each us
er each us
ter each us
af
er each us
er each us
e.
machine
machine
the
char
the
t
machine
machine
machine
machine
machine
the
ge
charge
char
char
to
ure
s
char
ur
machine
ur
deple
is
Be
ed.
deple
bat
The
The
deplet
batt
bat
Be
ted.
deple
deple
deple
is
ter
bat
The
er
is
ery
ed.
do
wn
do
down
hut
then
and
hut
then
huts
s
then
then
and
and
on
on
ers
wer
po
po
er
hut
pow
will
will
will
Machine
Machine
Machine
turn
not
or
on
on
turn
no
no
Machine
Machine
Machine
Machine
or
turn
turn
will
will
Machine
olut
ion
S
olut
ion
ion
olut
ion
olut
oblem
oblem
P
oblem
oblem
roblem
Pr

18 19
The remote control is not
working
Because the remote control
is wireless, it must be within
close proximity to the karaoke
machine and pointed towards
it in order to work.
If the remote control is still
not working, try replacing the
battery.
No sound is playing from the
speaker
Ensure that the volume on the
machine, remote, and your
device (if applicable) are all
turned up.
Also check to see whether you
are on Mute mode by pressing
Mute on the remote control to
see if the audio resumes.
Button or knob on the
machine/remote control is
not working properly
Power o the machine and
turn it back on.
Display screen on the
function board is not working
or showing anything while
LED lights are functioning as
usual
Charge the machine’s battery
for at least 8 consecutive
hours before trying to power
it back on. Low battery is
sometimes able to power the
LED lights but will not be able
to power the whole machine
and all its functions.
Machine is not playing the
microphone vocals
Ensure that each microphone
is on a separate frequency
band. This is represented by
CHA or CHB in the bottom left
corner of the microphone LED
screen. (To switch channels,
hold down the A-B button for
one second). Microphones will
not work properly unless one
mic is set to CHA while the
other mic is set to CHB.
After 15 minutes of inactivity,
the microphones will turn o.
If any of these issues persist or if any part of the machine becomes
damaged, discontinue use and consult a licensed electrician for repair.
Do not attempt to modify or repair the machine yourself. You can also
contact our customer service department (see back cover).

20
We’re here for you.
If you encounter any issues with your machine or
have any questions or comments, please feel free
to contact us. Have your warranty information on
hand for faster service.

FCC Warning
This device complies with part 15 of the FCC rules. Operation is subject to the following two
conditions: (1) this device may not cause harmful interference, and (2) this device must accept
any inte rference received, including interference that may cause undesired operation.
Changes or modifications not expressly approved by the party responsible for compliance could
void the user's authority to operate the equipment.
NOTE: This equipment has been tested and found to comply with the limits for a Class B digital
device, pursuant to part 15 of the FCC Rules. These limits are designed to provide reasonable
protection against harmful interference in a residential installation. This equipment generates
uses and can radiate radio frequency energy and, if not installed and used in accordance with the
instructions, may cause harmful interference to radio communications. However, there is no
guarantee that interference will not occur in a particular installation. If this equipment does
cause harmful interferenceto radio or television reception, which can be determined by turning
the equipment off and on, the user is encouraged to try to correct the interference by one or
more of the following measures:
•Reorient or relocate the receiving antenna.
•Increase the separation between the equipment and receiver.
•Connect the equipment into an outlet on a circuit different from that to which the receiver is
connected.
•Consult the dealer or an experienced radio/TV technician for help.
Radiation Exposure Statement
This equipment complies with FCC radiation exposure limits set forth for an uncontrolled
environment. This equipment should be installed and operated with minimum distance 20cm
between the radiator and your body.
Other manuals for Soprano X1
2
Table of contents
Other MASINGO Karaoke System manuals

MASINGO
MASINGO Burletta C10 User manual

MASINGO
MASINGO Burletta C10 User manual

MASINGO
MASINGO Presto G2 User manual

MASINGO
MASINGO Lento X5 User manual

MASINGO
MASINGO Spinto G3 - Shark User manual

MASINGO
MASINGO Illuminato Q4 User manual

MASINGO
MASINGO Presto G2 User manual

MASINGO
MASINGO Soprano X1 User manual

MASINGO
MASINGO Soprano X1 User manual

MASINGO
MASINGO Allegro X8 User manual