Mass Portal Pharaoh ED User manual

Mass Portal Pharaoh ED
Desktop 3D Printer
User Manual
MP Delta Manual ENG +.indd 1 15/04/15 17:03

© 2014 MASS PORTAL SIA — ALL RIGHTS RESERVED
MASS PORTAL IS A REGISTERED TRADE MARK OF MASS PORTAL SIA
PHARAOH AND ED ARE TRADE MARKS OF MASS PORTAL SIA
ALL OTHER TRADE MARKS ARE USED FOR INFORMATIONAL PURPOSES ONLY
AND ARE PROPERTY OF THEIR RESPECTIVE OWNERS
English language version 1.4
If you have any comments about this user manual
Mass Portal Pharaoh ED
Desktop 3D Printer
User manual
MP Delta Manual ENG +.indd 2 15/04/15 17:03

3
Contents
Contents. . . . . . . . . . . . . . . . . . . . . . . . . . 3
Getting started
Welcome . . . . . . . . . . . . . . . . . . . . . . . . . 4
Printer overview . . . . . . . . . . . . . . . . . . . . . 6
Safety . . . . . . . . . . . . . . . . . . . . . . . . . . . 8
Printer Setup . . . . . . . . . . . . . . . . . . . . . . . 10
My First Print . . . . . . . . . . . . . . . . . . . . . . . 11
Printing process overview . . . . . . . . . . . . . . . .12
Printer operation & software
Print Bed Coating and Heating . . . . . . . . . . . . . 14
Print Bed Leveling / Calibration . . . . . . . . . . . . . 15
Standalone Printing . . . . . . . . . . . . . . . . . . . 16
Using the Printer Control Panel . . . . . . . . . . . . . 17
Printing Software Owerview . . . . . . . . . . . . . . 24
Software: Simplify3D . . . . . . . . . . . . . . . . . . 25
Software: Simplify3D . . . . . . . . . . . . . . . . . . 26
Software: Repetier Host . . . . . . . . . . . . . . . . 30
Printing materials
Printing Materials Overview . . . . . . . . . . . . . . .34
PLA. . . . . . . . . . . . . . . . . . . . . . . . . . . . 36
ABS and HIPS. . . . . . . . . . . . . . . . . . . . . . .37
PET / Copolymer materials . . . . . . . . . . . . . . 38
Nylon . . . . . . . . . . . . . . . . . . . . . . . . . . 39
Post Processing of Prints . . . . . . . . . . . . . . . 40
Maintenance
Printer maintenance . . . . . . . . . . . . . . . . . . 42
Troubleshooting
Troubleshooting . . . . . . . . . . . . . . . . . . . . .44
MP Delta Manual ENG +.indd 3 15/04/15 17:03

4
Welcome
Thank you for your purchase of the Mass Portal
Pharaoh ED 3D printer. We hope that it will serve you
well and help you create many beautiful and useful
things.
Getting started
Please take your time and read through at least the Getting
started chapter of this manual – it will introduce you to some
of the terms you will stumble upon when printing and generally
give you a good overview of the printing process and printer
operation. Basically, it’s a bird’s eye view on how it all works and
at the same time a step by step guide to your first print.
Safety
Please read the safety chapter. Mass Portal printers are designed
to be safe to use, but you need to have a general understanding
of it’s safe operation.
User manual
Please familiarize yourself with this manual before connecting the
printer to your computer, installing the Simplify3D software and
tinkering with settings.
Successful prints
The manual is designed to guide your attention to the important
steps and settings first, so you can get great results faster. It
should cover most commom use cases and settings, and enable
to get reasonable quality results when printing common objects
with standard materials. If that works for you, leave the advanced
stu for later experimentation.
Dicult prints
If you are about to print complex objects or have special
requirements for the printed object properties, you will most
likely have to experiment a bit untill you find the perfect settings
for your objects and the particular material. You may need to
consider using a particular print material for your object that will
deliver the best results.
Getting started
MP Delta Manual ENG +.indd 4 15/04/15 17:03

5
WELCOME CONTINUED
Experimenting
Once you start printing, you will want to tweak this or that. Of
course, 3D printing is all about experimentation and going where
no one has gone before, but the possibilities can be intimidating
at first. This manual is NOT designed to cover all possible printing
situations, but rather to help you start along the path. Discussing
every last software setting is beyond the scope of this manual as
well — the best places for that are online forums, local FabLabs
or 3D printing meetups.
Printing Material — 1,75mm filament
Mass Portal 3D printers are designed to work with print material
from any vendor — 1,75 mm thermoplastic filament — as long
as it’s a good quality product, with uniform diameter. We try to
find and recommend the best materials on the market, since the
materials play the most important role for quality printouts.
Software
Mass Portal 3D printers ship with Simplify3D — a computer
program that you use to prepare models for printing and control
the printer when printing from a desktop PC or a Mac. Simplify 3D
can be used with Windows, Mac and Linux systems. Simplify3D
is licenced commercial software, that is registered to your e-mail
address. You can also use it with other 3D printer you own.
Maintenance
Mass Portal 3D printers are known to work for extended
durations wihtout requiring attention and are actually designed
and built for just that. Please follow the advice in the chapter on
Printer maintenance to keep your printer in top shape.
Community
Share the results of your experiments, your progress and along
the way you will help out somebody who is starting after you.
Support
Whenever you need support for your Mass Portal 3D printer,
best to answer promptly.
Getting started
MP Delta Manual ENG +.indd 5 15/04/15 17:03

6
Printer overview
Pause button
Aluminum
frame Grab handles
and ventilation
Not shown:
LED lights for print
chamber illumination
Not shown:
vbuilt-in power
supply
LCD display
Bowden tube
Printing head
Heated print bed
Removable door
hinges
Automatic calibration
sensor
Exchangeable nozzle
Part cooling fans
Part ilumination LED
Airflow guides
Delta arm rod ends
Pharaoh Print Head
Front
Backside — radiator
cooling fan
Print head console
Print head radiator
5-way navigation
button
Heat indicator LEDs
below the heated
printbed
Linear guide rails
Drive belts
Linear guide carriage
Not shown:
axis endstops
MP Delta Manual ENG +.indd 6 15/04/15 17:03

7
PRINTER OVERVIEW CONTINUED
SD card slot
Filament feed hole
Filament feed hole
Filament spool
holder
Filament Extrduder
Back
Extruder body
Bowden tube
Bowden tube mount
Back-operated
filament load /
release lever
(pushknob
not shown)
Filament drive gear
USB cord socket
On / O switch,
Power cord socket,
Fuse panel
Ventilation
— do not cover
Filament load /
release lever
Removable magnetic
side panels
MP Delta Manual ENG +.indd 7 15/04/15 17:03

8
Safety
Mass Portal 3D printer is an electro-mechanical
robotic device that has hot and moving parts when
operating. You should always operate the printer with
caution and follow instructions in this manual.
INDOOR USE ONLY
The printer is intended to be used only indoors — ambient
temperature must be between 15°C and 30°C. The Mass Portal
3D printer under no circumstances must be subjected to high
levels of humidity, excess heat, water, frost or other condition
which may damage the electronics or mechanical parts. When
transported or unpacked, it must be left to warm up to room
temperature before operation.
SAFE PLACEMENT
The printer, filament and power cable must be placed so that it
cannot be unintentionally touched or hooked by clothing. The
printer is considerably heavy, extra care must be taken when
moving. Do not use unneccesary force.
HOT SURFACES AND PARTS
To avoid burns and physical damage do not touch the printer’s
head and heated print bed unless they have cooled down to
40°C or less. These temperatures are displayed on the built in
LCD display and in the printing software interface. If in doubt,
double check. Keep in mind that the readings could be incorrect.
HOT PRINT BED
Brass print bed can be heated up to 120°C. Keep in mind that
close metal surfaces can be warm. When coated with Kapton
tape, the heating bed can be sprayed lightly with non-flammable
consumer plastics or glass cleaner and then wiped o with a
clean wipe.
HOT PRINT HEAD
Print head heating block and nozzle can be heated up to 300°C.
Keep in mind that surrounding parts can be hot.
HOT MELTED PLASTIC
The melted plastic extruded from the nozzle can reach near
300°C. Care and caution must be taken when operating.
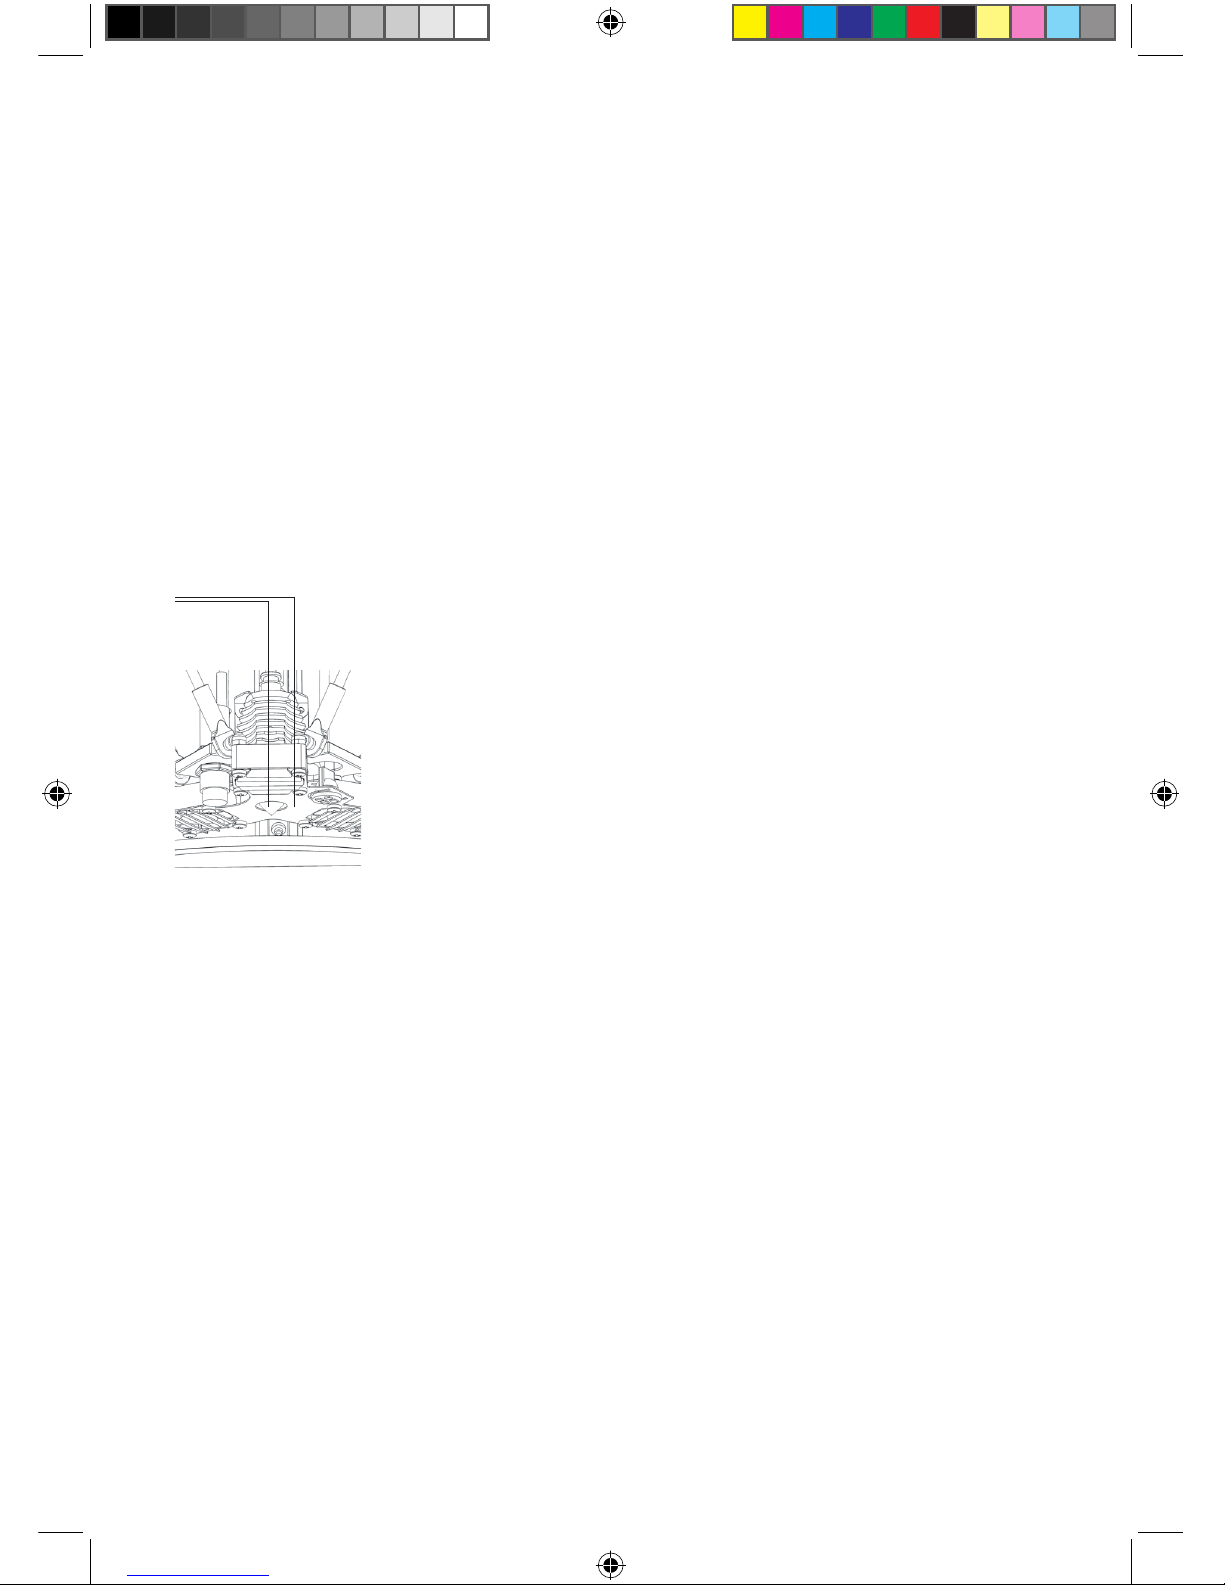
WARNING The
nozzle and the
metal plate below
the printhead are
extremely hot when
printing. Do not
touch.
TIP Use paper towel
to clean the nozzle
from excess material
before printing. This
must be done when
the nozzle is heated
with extreme caution.
MP Delta Manual ENG +.indd 8 15/04/15 17:03

9
SAFETY CONTINUED
WARM PARTS
The printer frame and outer parts can be warm during operation,
reaching temperatures up to 60°C after extended use.
CLEANING
DO NOT USE FLAMMABLE LIQUIDS TO CLEAN HOT PARTS.
Use dry paper towel to clean print bed and print head. If more
thorough cleaning is needed, the printer must be turned o and
cooled down to room temperature.
MOVING PARTS
The printer mechanics consist of moving parts while operational.
Care must be taken not to touch them during operation.
ELECTRICAL SAFETY
Do not place the printer where it could come in contact with
moisture, especially near open windows. Do not leave the printer
operational unattended. ALWAYS USE GOOD QUALITY CABLE
WITHOUT ANY SIGNS OF DAMAGE OR MALFUNCTION. DO
NOT USE WORN ELECTRICAL SOCKETS.
STATIC ELECTRICITY
Release your body’s static electricity by touching a grounded
object before any repair or service operation. POWER MUST BE
OFF AND CABLE UNPLUGGED BEFORE ANY WORK.
TOXIC FUMES
When printing especially with ABS plastic it will lightly emit fumes
and smell, so the premises where the printer is located, must be
well ventilated, but must avoid draught. The odour, toxicity and
intensity of fumes vary with the type of material used.
NOT A TOY FOR CHILDREN
The printer must not be left unattended with children. Children
must always be accompanied and supervised by an adult when
using or abserving this product. Do not leave the printed objects,
waste filament and tools unattended in the reach of small
children to avoid harm and choking hazard. Be careful when
tooling printed objects.
MP Delta Manual ENG +.indd 9 15/04/15 17:03

10
Printer Setup
1. Unbox the printer
Be careful, the printer is not very light — 16,5kg.
Open the box — there’s a side door.
Pull the printer out of the box carefully, grabbing at the sides.
It’s easier ir somebody can help holding the box.
Take the printer out of the plastic bag.
Place the printer on it’s box or other stable surface.
Open the front door and take out the bundled filament box and
the accessories box.
You can move the printhead up, gently pushing it with hands.
Remove the protective foam plate from the printhead.
2. Let the printer warm up to room temperature
Unbox and inspect everytnig — the power cord, filment spool
holder, sample filament roll.
This is important — especially in cold weather. In winter, it may
take a long time, don’t rush it.
4. Attach the filament spool holder
It’s in the cardboard box in the printer.
It simply slides in to the filament spoll holder on the back side of
the printer.
5. Browse the manual and read the Getting Started
chapter
If you have not read it yet, do it now.
6. Connect the power cord and plug it in
Now the printer is ready to go.
The printer can print g-code files form the SD Card now, in
standalone mode. Setting up software on the computer and
connecting the printer to computer are discussed later in the
manual.
INFO The filament
spool holder is
designed to be
compatible with
dierent form
factor filament
spools from various
manufacturers.
INFO The power
switch, power cord
connector and fuse
panel.
MP Delta Manual ENG +.indd 10 15/04/15 17:03

11
My First Print
The printer comes with a SD card already inserted, so you can
print a test print without connecting computer.
1. Turn on the printer
The power switch is on the back of the printer. Make sure there
are no objects on the printbed. You may keep the doors closed
or open for the first test print.
2. Place the sample filament spool on the holder
Unbox the bundled filament and place the spool on the holder on
the backside of the printer.
3. Insert the filament into the extruder
Firmly push the filament release lever on the back side of the
printer and insert filament into the filament hole besides the
release lever. Push in the filament untill it stops. You should see
filament moving through the bowden tube.
4. Select MyFirstPrint from Printing Menu
Use the navigation buttons on the printer:
1. Press > (Right arrow button)
2. Select Mount SD Card (using up / down arrow buttons) and
press OK button (if not alread wwy mounted)
3. Select Print File and Press OK button
4. Select Samples Folder and press OK button
5. Select MyFirstPrint and press OK button — then wait
5. Wait until the printhead and heated bed warm up
The printer will start printing only when printbed and printhead
are heated up to the neccessary temperatures; both printbed and
printhead will be hot when printing. Do NOT touch the moving
parts while printing. The LED lights below the printbed will turn
yellow and gradually red with temperature increase.
6. Watch it print
7. Let it cool down for a while after printing
Wait untill the lights below printbed are yellow or white.
You can also see the temperatures on the LCD screen.
You can remove the filament while the printhead is still hot.
8. Remove the print from the print bed
Use the supplied tool to gently peel o the object.
INFO Instert filament
into this hole on the
back side of the
printer. You need to
firmly press and hold
the filament release
lever to do so.
TIP You should see
the filament moving
down thru the
bowden tube when
insterting it. Firmly
push the filmanent in
untill it stops.
TIP To remove or
change the filament,
the printhead must
be heated or still hot
after printing.
TIP You don’t need
to remove the
filament after each
print.
MP Delta Manual ENG +.indd 11 15/04/15 17:03

12
Printing process overview
Mass Portal 3D printers use process called Fused
Filament Fabrication or FFF — printing objects out of
melted plastic layer by layer.
How it works
Wire of thermoplastic printing material is melted in the 3D printers
printing head, and pushed through a nozzle. This process is
called extrusion. The nozzle moves according to the geometry
of printable object, depositing the melted plastic and drawing
the object layer by layer. When a layer is finished, printing head
moves up a single layer and draws the next layer of melted
plastic upon the previous, that has now somewhat hardened,
untill the object is finished. The layers of plastic bond or melt
together, forming a single finished object.
Slicing and G-code
The movements of the nozzle, the temperature settings of the
printing head and of the printing bed are controlled by computer
instructions called G-code files, that are generated from 3D
drawings or 3D scanned models by software programs called
slicers. The process of generating the G-codes is usually aslo
called slicing. Mass Portal uses the Simplify3D program for slicing
and printer control.
Although G-code is used to control many 3D printers, it generally
must be created for each particular printer. You can store the
generated G-code files for later use on the computer or on SD
card for printing in standalone mode.
Standalone printing and host software
When using the printer in standalone mode, printing G-code
files prepared earlier and stored on the SD card, no computer is
needed to operate the printer. The printing is controlled by the
5-way navigation button and printers LCD screen using built-in
sofware. This can be useful for longer prints when you don’t want
to leave your laptop connected to the printer, or when what you
do on the PC might interfere with the printing. In other cases it
makes sense to control the printing process from a computer
using so called host software, because it allows more detailed,
easier and faster control of the printing process that the built-
in software, and also displays printing progress visualization,
temperature graphs and more. We recommend Repetier-Host or
Simplify3D, but there are also other options.
MP Delta Manual ENG +.indd 12 15/04/15 17:03

13
PRINTING PROCESS OVERVIEW CONTINUED
STL or OBJ files
G-code is usually generated from 3D models, that are saved in
the STL or OBJ format. Most 3D software today can export to
these formats, and printable files on the Internet are also usually
found in these formats.
3D models
You can generally print 3 kinds of things:
• Printable 3D models downloaded from the Internet — either
free or commercial
• Objects, that are scanned on a 3D scanner and prepared for 3D
printing
• Your own 3D models, designed in any 3D drawing, modeling or
CAD software, that can export to a printable 3D format such as
STL or OBJ
In all cases it is important that the 3D object geometry forms a
solid, dimensional object, that would be possible to print — you
cannot print objects like infinitely thin walls for example, although
you can have such objects on the computer. Sometimes the STL
or OBJ files to be printed can be repaired with the built-in tools or
host or slicing software, and there are also software applications
just for that purpose.
Infill and perimeters of walls
You can choose whether the printed object will be hollow, filled
or partially filled when preparing the model for print with slicing
software. Some software allows for smart infill, placing it only
where neccessary. Wall thickness is also set before printing.
Support
It is impossible to print material, that is “hanging in the air” —
not at least partially supported by the underlying layer. You
can generally print slopes (overhangs) about 45%, when the
underlying layer supports some of the next layer’s plastic; or short
“bridges”. Dierent slicing software provides dierent controls,
but there are also tools like the free Autodesk MeshMixer
that can create supports with detailed control. The bundled
Simplify3D software allows to place supports manually and to
remove automatically generated supports.
TIP Test and sample
files for the bundled
material are provided
on the SD card
included with the
printer.
MP Delta Manual ENG +.indd 13 15/04/15 17:03

14
Print Bed Coating and Heating
Mass Portal printers are equipped with a heated glass print
bed. Although you can print directly to the glass surface, some
materials work better on a dierent coating. Work better means
they adhere firmly or “stick” to the print bed while printing, but still
come o easily.
Even surface
Glass is the most resonable choice for print surface, because it’s
straight and level, even when heated.
Heated or not?
You can print some materials on some surfaces and they will
ususally work just fine — like PLA on blue painters tape, but some
materials just will not stick to cold surfaces.
Kapton tape
Kapton tape is the recommended coating for Mass Portal printers.
It is quite durable, and allows printing of PLA, ABS, PET and other
materials with good results. It can be cleaned between prints.
Blue painters tape (masking paper tape)
Blue painters tape is the material of choice for printing PLA,
especially when printing without heated bed. Sometimes,
material may stick too well to it and the objects may be dicult to
remove.
Other coatings
Some materials can be used with dierent coatings. There’s a
Custom menu option for that.
Glue
Glue can be used to get dicult prints to stick — for example,
usual oce glue stick. You should apply the glue before heating
up the printbed.
Automatic Calibration
Bed coating will be taken into account when calibrating the print
bed — as the dierent coatings have dierent thicknesses, the
correct coating must be selected. This can be done before or
after the calibration. You can change the bed coating setting as
often as needed. There’s no need to recalibrate after changing
the bed coating if the first layer prints correctly.
Printer operation & software
TIP The print bed
must be kept clean.
If prints do not stick
after multiple prints
on the same coating,
try cleaning or
replacing the coating.
WARNING The
correct bed coating
must be selected
on the printer, so
it “knows” how to
print the first layer,
because accounts for
the thickness of the
coating.
TIP The print bed
is replaceable. The
glass surface can be
removed or installed,
by gently pressing
it down and turning
counterclockwise so
it can be lifted. You
do not need to undo
the thumbscrews
holding the glass in
place to remove or
install it.
WARNING Do not
remove the printbed
while it’s hot. Let it
cool down.
MP Delta Manual ENG +.indd 14 15/04/15 17:03

15
Print Bed Leveling / Calibration
The print bed on Mass Portal printers is held in place with three
thumbscrews. The slope and height of the print bed can be
adjusted by turning the thumbscrews. As a general rule, the
printbed should not be slanted — the thumbscrews are used
to keep it level. Normally the thumbscrews would not need
adjusting by more than 1mm or 2mm at max.
Mass Portal printers have a built in sensor, that can measure the
printbed height and slant. The built in firmware (software that
runs on the printer) can use these measurements to automatically
calibrate the printer — use these measurements to set the
printhead in correct distance from the printbed. This is done to
ensure that first layer of prints is correctly printed — that it is not
too high (material not sticking to the printbed) or too low (nozzle
too close to the printbed, material “smeared” into printbed).
It is not neccessary to use automatic calibration before each print,
or even regularly. If the first layer of the print is correctly printing,
there is no need to recalibrate the printer. The printer can go for
a long time before needing to be recalibrated.
Automatic Calibration
To use automatic calibration, on the printer control panel:
1. Press OK button to bring up the main menu
2. Scroll down, select Calibration
3. Select Calibrate Printbed
4. The printhead will move down to make the measurements
5. You will see a message on screen, confirming that the printer
has been calibrated. You can print now.
WARNING Before automatic
calibration the inner screw
should not poke out from any of
the thumbscrews (they should
be approximately level) — the
thumbscrews MUST NOT be
screwed in till lowest possible
position. The printbed must have
some play, so the springs below
it can compress — you must be
able to move printbed down a bit
when pressing on it. This is also
a safety measure in case if the
printhead moves too low.
TIP The printbed can
be leveled manually
by adjusting the
three thumbscrews
that hold the glass
printbed.
INFO To
ensure correct
measurements,
Automatic calibration
works ONLY when
the printer is at room
temperature. If you
attempt using the
auto calibration when
the printer is hot,
you’ll see a warning
and the calibaration
will not be done.
WARNING The
printhead will
move down when
calibrating to make
the measrurements.
Make sure there
are no objects or
previous prints on
the printbed before
performing the
automatic calibration,
otherwise the
printhead can hit
them.
MP Delta Manual ENG +.indd 15 15/04/15 17:03

16
Standalone Printing
You can use the control panel on the printer to see current
status of the printer on the built in display, control printing
parameters and printer settings, and print in standalone
mode – without connecting computer.
Standalone use
The printer can be used in computer mode or standalone
mode. When using the printer standalone, it is controlled by the
navigation button, LCD screen and pause button on the printer.
SD card
To print using standalone mode, you need to have the G-codes
prepared for printing and stored on the supplied or your own
SD-card. The SD card must be “mounted” after inserting,
and “unmounted” before taking it out of the printer. All the
temperature and setting options work also when SD card is not
present.
When to print in standalone mode
- When printing takes a long time for larger objects, independent
of computer
- When printing repeat objects, when you know that all the
settings in your G-code are just fine
- To save electricity by not having the computer turned on
- When taking the printer to other places like shows or meetings
Power management
The printer will cool down printhead and heated bed when print
is finished (depending on settings in g-code file or after an hour
of inactivity), but it will not turn itself o.
TIP Pause button
allows pausing print
for inspection or
filament change.
Press it shortly to
pause, and again
to resume. When
paused, the light
is o.
WARNING The
printer will not start
printing if the pause
button has been
pressed — if the light
around the button is
not on.
INFO Printer control
panel consists of
a dediated pause
button, built in
display and five-way
navigation button.
TIP When paused,
you can change to
dierent colored
filament to print
objects with multiple
colors.
MP Delta Manual ENG +.indd 16 15/04/15 17:03

17
Using the Printer Control Panel
Home screen (Status display)
This is the main status display of the printer. This is what you see
when the printer is turned on. It is the top level for the menus.
It shows the most important parameters at a glance and status
messages.
WARNING Future
firmware updates
(if installed on your
printer) might slightly
dier and therefore
following images
and descriptions in
this manual version
might not 100%
accurately represent
your LCD panel
setup. Download
the latest version
of this manual at
MassPortal.com
TIP Press OK from
the Home screen to
bring up the Main
menu, listing all
available commands.
T240.0/240°B120/120°
Z: 222.40 Buf : 0
Mul: 100 E: 0.00
Printer ready
OK Button
Quick Access mode:
Brings up the Main
menu from the Home
screen. In other
screens, confirms and
executes menu items
Printbed temperature —
Celsius degrees
Actual / Target
Amount of filament
printed for the current
print, mm
Command count in the
buer. Pause will work
when it’s down to 0
Actual current
location (height) of
the printhead
Printhead temperature
— Celsius degrees
Actual / Target
Print speed multiplier,
percentage of the
speed set in g-code Status messages
Right arrow button
Quick Access mode:
Brings up the Printing
menu from the Home
screen, if the SD Card
is mounted, if not it will
allow mounting an SD
Card. When printing,
displays the name of
the file being printed.
Left arrow button
Quick Access
mode: Brings
up the Preheat
menu from the
Home screen. In
other screens, a
Back button to go
back to previous
screen.
Down arrow button
Quick Access
mode: Brings up the
Control menu from
the home screen.
Use this to adjust
printing settings
while printing
Up arrow button
Quick Access
mode: Brings up the
Utilities menu from
the Home screen
Navigation button
The five-way navigation button is the main tool for controlling
the printer. From the Home screen the arrow buttons function
as shortcuts. In other screens, Up and Down arrows are used to
scroll and select menu items, and to change numeric values up
and down when a menu item is selected. The Left arrow is the
Back button for going back to a higher menu. The right arrow can
be used to select options and doubles as another OK button.
MP Delta Manual ENG +.indd 17 15/04/15 17:03

18
Main menu
Lists all available commands and groups them into logical groups.
Press OK at the Home screen to bring up the Main menu.
Scroll down using arrow buttons to see more commands.
The last menu item is About, that displays information abut the
printer. Other menu items will bring up lists of reated commands.
Press < (Left arrow) to go back to the home screen.
About command
Displays information about the printer: serial number, harware
version, firmware version.
Pharaoh ED
by MASS PORTAL
HW: v1.4 ID: 12345
FW ver.: 123-4567890
>Control ->
Preheat ->
Utilities ->
SD Card ->
Fan Speed ->
Bed Coating ->
Calibration ->
About ->
The > at the
left indicates
selected menu
item. Press OK
button or > (right
arrow button) to
execute it
–> at the right
side indicates this
item is a list or
folder
USING THE PRINTER CONTROL PANEL CONTINUED
MP Delta Manual ENG +.indd 18 15/04/15 17:03

19
Control menu
Lists commands for to adjusting the printing parameters while
printing.
Preheat menu
Lists commands for preheating the printer to print with the
selected kind of filament. The temperatures can be adjusted
later in the control menu or you can select custom temperatures
for your filament. When selected, printer will start heating up and
display a corresponding stats message. You will also hear the
head radiator fan turn on. Cooldown turs o the heating for both
the printhead and the printbed.
Custome Preheat menu
Select the manufacturer suggested temperatures for your
filament. Bed heating is optional, you can preheat the printhead
only.
>Speedrate : 100%
Flowrate : 100%
Fan Speed : 0%
Head Temp : 210°C
Bed Temp : 210°C
Change Filament
>Preheat PLA
Preheat ABS/HIPS
Preheat PET/XT
Preheat Custom ->
Cooldown
Head Temp : 240°C
Bed Temp : 120°C
The > at the
left indicates
selected menu
item. Press OK
button or > (right
arrow button) to
execute it
USING THE PRINTER CONTROL PANEL CONTINUED
TIP Fan speed
percentage is
estimated, and fans
will not work all
the way down to 0
percent.
TIP Printhead must
be heated to remove
/ change filament.
You need to heat up
to the corresponding
temperature to
remove a particuar
kind of filament.
Example: If you have
been printing PET
and need to remove
it to cahnge to PLA,
first heat up for the
PET (higher temp)
to remove it, then
change to the lower
printing temperature
for the PLA. You
usually do not need
to fully reach the
target temperature to
remove the filament.
MP Delta Manual ENG +.indd 19 15/04/15 17:03

20
USING THE PRINTER CONTROL PANEL CONTINUED
>Home All
Change Filament
Release Printhead
Extrude ->
Cooldown
Turn Fan Off
Bed LED: 25%
Utilities menu
Lists commands for various maintenance tasks.
Home All — Moves the printhead to it’s default position at the top
of the printing chamber.
Change Filament — Pulls out the filament. Printhead must be
heated for this command to work.
Release Printhead — Disables the stepper motors that hold the
printhead in place, so you can move it around with your hads —
useful for printer maintenance.
Extrude — Extrudes the filament. Useful to check the flow and
loading of the filament before starting a print. The printhead
must be heated to the temperature neccessary for the particular
filament for this command to work. To extrude, press and hold the
Down arrow button while in this screen. Also shows the amount
of filament printed.
Cooldown — Turns o heating for both printhead and printbed.
Bed LED — set the brightness of LED temperature indicator lights
below the printbed. Set it to 0 to turn the lights o completely.
E: 0.00 mm
1 click = 1 mm
E:240.0/240°C-> 0.00
100.0 m printed
MP Delta Manual ENG +.indd 20 15/04/15 17:03
Table of contents
Other Mass Portal 3D Printer manuals
Popular 3D Printer manuals by other brands

Dremel
Dremel 3D20 Idea Builder quick start guide

Bego
Bego VARSEO S Basic Translation of the original operating instructions

KNP3D
KNP3D KLIC-N-PRINT 3D user manual

ShenZhen BigTree Technology
ShenZhen BigTree Technology BIQU-B1 user manual

eka
eka Delta 900 user guide

zortrax
zortrax M200 Unpacking & setup instructions