manuals.online logo
Brands
  1. Home
  2. •
  3. Brands
  4. •
  5. Mattel
  6. •
  7. Toy
  8. •
  9. Mattel HOT WHEELS MONSTER TRUCKS GYL14 User manual

Mattel HOT WHEELS MONSTER TRUCKS GYL14 User manual

Other Mattel Toy manuals

Mattel Hot Wheels TRACK BUILDER DPF21 User manual

Mattel

Mattel Hot Wheels TRACK BUILDER DPF21 User manual

Mattel Barbie DMC37 User manual

Mattel

Mattel Barbie DMC37 User manual

Mattel Grow With Me RC Rally Repair Kit User manual

Mattel

Mattel Grow With Me RC Rally Repair Kit User manual

Mattel Mojang FDC43 User manual

Mattel

Mattel Mojang FDC43 User manual

Mattel PollyWorld J1659 User manual

Mattel

Mattel PollyWorld J1659 User manual

Mattel Cars 2 T9482 User manual

Mattel

Mattel Cars 2 T9482 User manual

Mattel HOT WHEELS RACE CRATE GKT87-0970-G1 User manual

Mattel

Mattel HOT WHEELS RACE CRATE GKT87-0970-G1 User manual

Mattel Matchbox User manual

Mattel

Mattel Matchbox User manual

Mattel HotWheels VOLCANO ESCAPE User manual

Mattel

Mattel HotWheels VOLCANO ESCAPE User manual

Mattel J1053 User manual

Mattel

Mattel J1053 User manual

Mattel Monster High BJR25 User manual

Mattel

Mattel Monster High BJR25 User manual

Mattel Hot Wheels STO & GO User manual

Mattel

Mattel Hot Wheels STO & GO User manual

Mattel Disney PIXAR Cars 2 V9861 User manual

Mattel

Mattel Disney PIXAR Cars 2 V9861 User manual

Mattel JURASSIC WORLD CAMP CRETACEOUS EPIC ROARIN TYRANNOSAURUS... User manual

Mattel

Mattel JURASSIC WORLD CAMP CRETACEOUS EPIC ROARIN TYRANNOSAURUS... User manual

Mattel DC Justice League User manual

Mattel

Mattel DC Justice League User manual

Mattel Barbie 28990 User manual

Mattel

Mattel Barbie 28990 User manual

Mattel Tyco RC Disney Pixar Toy Story N9119 User manual

Mattel

Mattel Tyco RC Disney Pixar Toy Story N9119 User manual

Mattel Tony Hawk User manual

Mattel

Mattel Tony Hawk User manual

Mattel Hot Wheels DAREDEVIL DOUBLE LOOP User manual

Mattel

Mattel Hot Wheels DAREDEVIL DOUBLE LOOP User manual

Mattel Disney PIXAR Cars 2 V6235 User manual

Mattel

Mattel Disney PIXAR Cars 2 V6235 User manual

Mattel Thomas & Friends TRACK MASTER DARING DERAIL... User manual

Mattel

Mattel Thomas & Friends TRACK MASTER DARING DERAIL... User manual

Mattel Jimmy Neutron Radio Control K-9 Goddard User manual

Mattel

Mattel Jimmy Neutron Radio Control K-9 Goddard User manual

Mattel Fisher-Price LIL Laugh & Learn L7336 User manual

Mattel

Mattel Fisher-Price LIL Laugh & Learn L7336 User manual

Mattel BOOMco DYNAMAG User manual

Mattel

Mattel BOOMco DYNAMAG User manual

Popular Toy manuals by other brands

FUTABA GY470 instruction manual

FUTABA

FUTABA GY470 instruction manual

LEGO 41116 manual

LEGO

LEGO 41116 manual

Fisher-Price ColorMe Flowerz Bouquet Maker P9692 instruction sheet

Fisher-Price

Fisher-Price ColorMe Flowerz Bouquet Maker P9692 instruction sheet

Little Tikes LITTLE HANDIWORKER 0920 Assembly instructions

Little Tikes

Little Tikes LITTLE HANDIWORKER 0920 Assembly instructions

Eduard EF-2000 Two-seater exterior Assembly instructions

Eduard

Eduard EF-2000 Two-seater exterior Assembly instructions

USA Trains EXTENDED VISION CABOOSE instructions

USA Trains

USA Trains EXTENDED VISION CABOOSE instructions

Modellbau Laffont Z1601 Assembly instructions

Modellbau Laffont

Modellbau Laffont Z1601 Assembly instructions

NOCH 12905 instruction manual

NOCH

NOCH 12905 instruction manual

Eduard Ki-61-Id quick start guide

Eduard

Eduard Ki-61-Id quick start guide

Viessmann Vollmer 45616 Mounting instruction

Viessmann

Viessmann Vollmer 45616 Mounting instruction

Vollmer 42004 Mounting instruction

Vollmer

Vollmer 42004 Mounting instruction

Phoenix Model CLASSIC-EP instruction manual

Phoenix Model

Phoenix Model CLASSIC-EP instruction manual

H-KING Sopwith Camel British WW1 Fighter instruction manual

H-KING

H-KING Sopwith Camel British WW1 Fighter instruction manual

MODSTER Predator 4x4 Crawler user manual

MODSTER

MODSTER Predator 4x4 Crawler user manual

DHK Hobby 8136 User instruction manual

DHK Hobby

DHK Hobby 8136 User instruction manual

THUNDER TIGER Raptor 50 V2 kit manual

THUNDER TIGER

THUNDER TIGER Raptor 50 V2 kit manual

Timberkits Skateboarder instructions

Timberkits

Timberkits Skateboarder instructions

Hangar 9 Funtana 125 Assembly manual

Hangar 9

Hangar 9 Funtana 125 Assembly manual

manuals.online logo
manuals.online logoBrands
  • About & Mission
  • Contact us
  • Privacy Policy
  • Terms and Conditions

Copyright 2025 Manuals.Online. All Rights Reserved.

GYL14-4B70
1102639462-4LB G1
4+
P
ERFORMANCE
T
IPS •
C
ONSEJOS
D
E
R
ENDIMIENTO
C
ONSEILS
D
’UTILISATION •
D
ICAS
D
E
D
ESEMPENHO
INSTRUCTIONS • INSTRUCCIONES
MODE D’EMPLOI • INSTRUÇÕES
AA (LR6)x3
NOT INCLUDED
NO INCLUIDAS
NON INCLUSES
NÃO INCLUÍDO
H
H
Colors and decorations may vary. • Los colores y las decoraciones pueden variar.
Les couleurs et les motifs peuvent varier. • As cores e as decorações podem variar.
Not for use with some Hot Wheels®vehicles. Two vehicles included.
Additional vehicles sold separately.
No compatible con algunos vehículos Hot Wheels. Incluye dos vehículos.
Los vehículos adicionales se venden por separado.
Non compatible avec certains véhicules Hot Wheels. Contient deux véhicules.
Autres véhicules vendus séparément.
Não é compatível com alguns veículos Hot Wheels. Dois veículos incluídos.
Veículos adicionais vendidos separadamente.
Please keep these instructions for future reference as they contain important information.
Lee y guarda estas instrucciones para futura referencia, ya que contienen información
importante acerca de este producto.
Conserver ce mode d’emploi pour s’y référer en cas de besoin,
car il contient des informations importantes.
Guarde estas instruções para futura referência, pois contêm informações importantes.
24
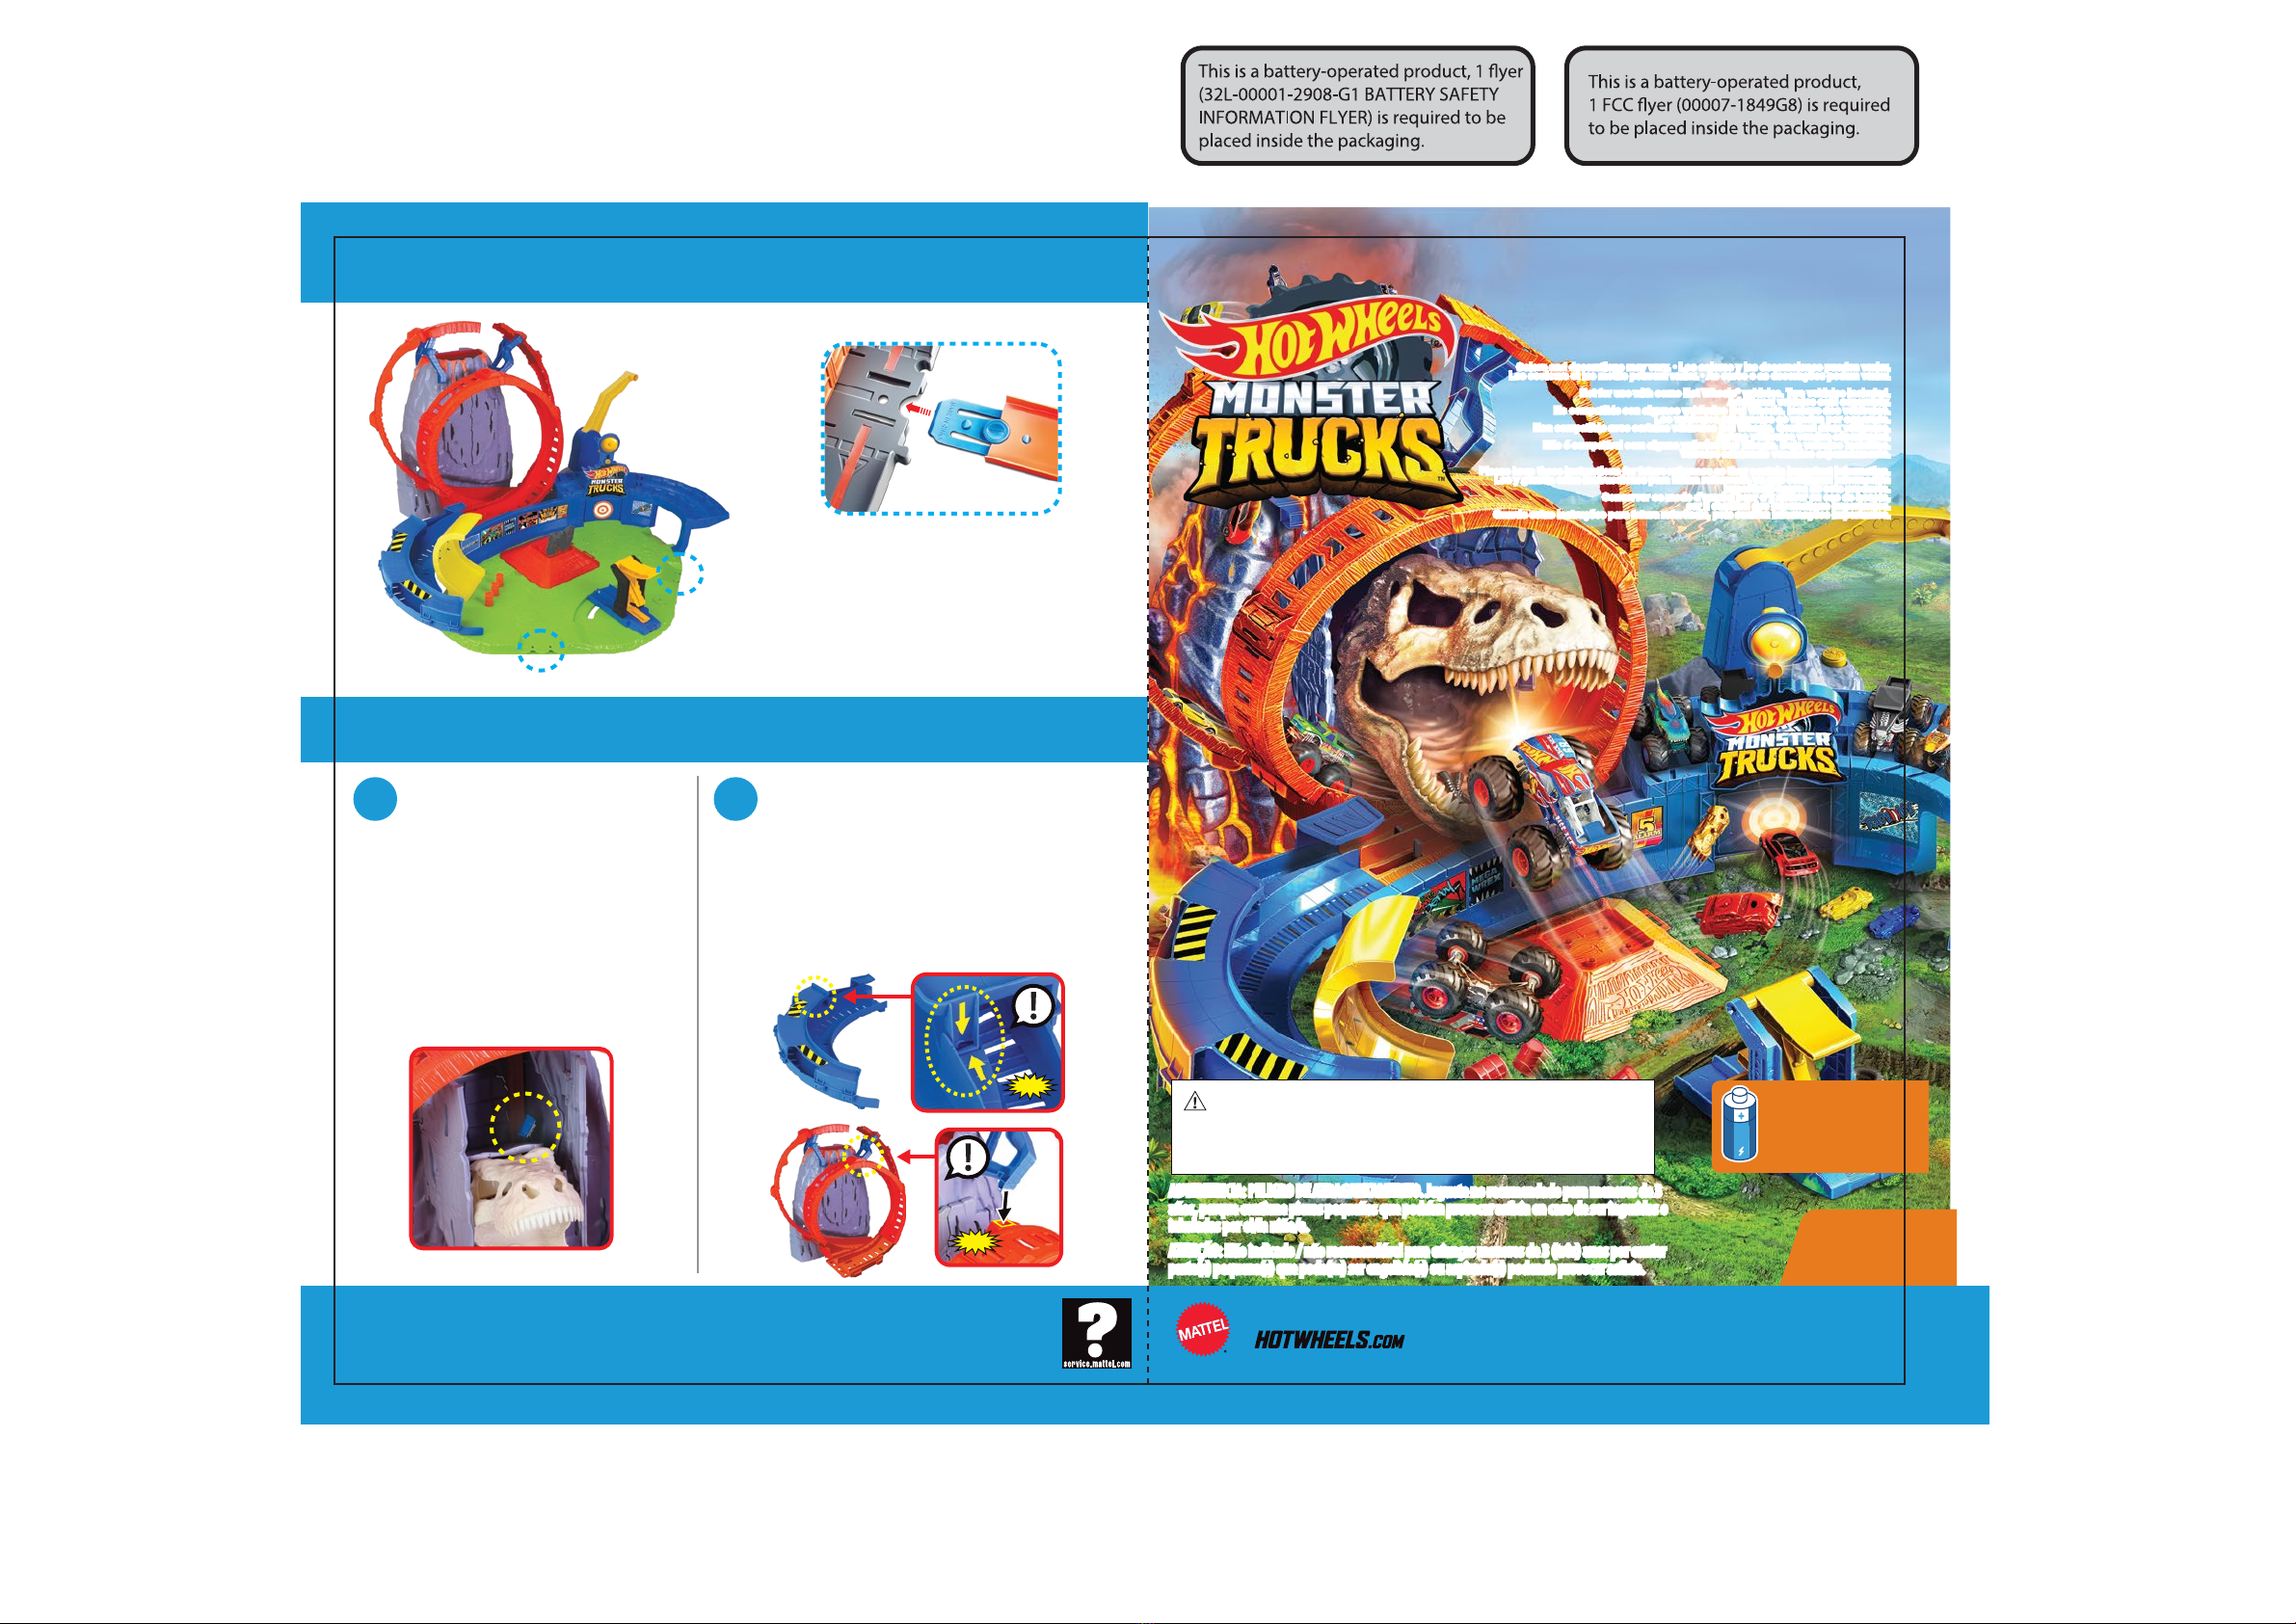
TO RESET THE T-REX SKULL PROPERLY,
CHECK INSIDE AND REMOVE JAMMED CARS.
PARA RESTABLECER EL CRÁNEO DE T-REX
CORRECTAMENTE, REVISA SU INTERIOR Y
QUITA LOS VEHÍCULOS ATASCADOS.
POUR RÉINITIALISER LE CRÂNE DE
TYRANNOSAURE REX CORRECTEMENT,
VÉRIFIER S’IL Y A DES VOITURES COINCÉES À
L’INTÉRIEUR ET LES RETIRER.
PARA REDEFINIR A CABEÇA DO T-REX
CORRETAMENTE, VERIFIQUE A PARTE
INTERNA E REMOVA OS CARROS PRESOS.
TO AVOID CRASH ALONG THE CURVE, CHECK TO
MAKE SURE ALL PARTS ARE CORRECTLY ASSEMBLED.
PARA EVITAR UN CHOQUE EN LA CURVA, ASEGÚRATE
DE QUE TODAS LAS PIEZAS ESTÉN CONECTADAS
CORRECTAMENTE.
POUR ÉVITER D’AVOIR UN ACCIDENT DANS LA COURBE,
S’ASSURER QUE TOUTES LES PIÈCES SONT BIEN ASSEMBLÉES.
PARA EVITAR COLISÕES NA CURVA, VERIFIQUE SE TODAS
AS PEÇAS ESTÃO MONTADAS CORRETAMENTE.
ADVERTISEMENT • AVISO • PUBLICITÉ • PUBLICIDADE
M
ORE
W
AYS
T
O
P
LAY •
M
ÁS
M
ANERAS
D
E
J
UGAR
A
UTRES
F
AÇONS
D
E
J
OUER •
O
UTRAS
M
ANEIRAS
D
E
B
RINCAR
©2021 Mattel. Mattel, Inc., 636 Girard Avenue, East Aurora, NY 14052, U.S.A. Consumer Services 1-800-524-8697. Mattel Canada Inc., Mississauga, Ontario L5R 3W2. You may call us free at / Composez sans frais le
1-800-524-8697. Mattel Europa B.V., Gondel 1, 1186 MJ Amstelveen, Nederland. Mattel U.K. Limited, The Porter Building, 1 Brunel Way, Slough SL1 1FQ, UK. Mattel Australia Pty. Ltd., 658 Church St., Richmond, Victoria,
3121. Consumer Advisory Service - 1300 135 312. Mattel East Asia Ltd., Room 503-09, North Tower, World Finance Centre, Harbour City, Tsimshatsui, HK, China. Tel.: (852) 3185-6500. Diimport & Diedarkan Oleh: Mattel
Continental Asia Sdn Bhd. Level 19, Tower 3, Avenue 7, No. 8 Jalan Kerinchi, Bangsar South, 59200 Kuala Lumpur, Malaysia. Mattel South Africa (PTY) LTD, Office 102 I3, 30 Melrose Boulevard, Johannesburg 2196.
Importado y distribuido por Mattel de México, S.A. de C.V., Miguel de Cervantes Saavedra No. 193, Pisos 10 y 11, Col. Granada, Alcaldía Miguel Hidalgo, C.P. 11520, México, Ciudad de México. R.F.C. MME-920701-NB3.
Tels.: 59-05-51-00 Ext. 5206 ó 01-800-463-59-89. Mattel Chile, S.A., Avenida Américo Vespucio 501-B, Quilicura, Santiago. Tel.: 1230-020-6213. Servicio al consumidor Venezuela: Tel.: 0-800-100-9123. Mattel Argentina,
S.A., Av. Libertador 1000, Piso 11 – Oficinas 109 y 111, Vicente López – Prov. Buenos Aires. Tel.: 0800-666-3373. Mattel Colombia, S.A., Calle 123#7-07 P.5, Bogotá. Tel.: 01800-710-2069. Mattel Perú, S.A., Av. Juan de
Arona # 151, Centro Empresarial Juan de Arona, Torre C, Piso 7, Oficina 704, San Isidro, Lima 27, Perú. RUC: 20425853865. Reg. Importador: 02350-12-JUE-DIGESA. Tel.: 0800-54744. E-mail Latinoamérica:
[email protected]. Distribuído por : Mattel do Brasil Ltda.- CNPJ : 54.558.002/0001-20 - Rua Verbo Divino, 1488 - 2º. Andar - 04719-904 - Chácara Santo Antônio - São Paulo - SP - Brasil. Serviço de
Atendimento ao Consumidor: fone 0800 575 0780. E-mail: [email protected]. Mattel France, Parc de la Cerisaie, 1/3/5 allée des Fleurs, 94260 Fresnes Cedex. N° Cristal 0969 36 99 99 (Numéro non surtaxé)
ou www.lesjouetsmattel.fr. Mattel España, S.A., Aribau 200. 08036 Barcelona. [email protected] Tel: 900 102 390 http://www.service.mattel.com/es.
ADULT ASSEMBLY REQUIRED
REQUIERE MONTAJE POR UN ADULTO
ASSEMBLAGE PAR UN ADULTE REQUIS
REQUER MONTAGEM POR UM ADULTO
CONNECT TO EXTRA HOT WHEELS® TRACKS AND SETS!
¡CONÉCTALO A PISTAS Y SETS HOT WHEELS ADICIONALES!
CONNECTER À D’AUTRES COFFRETS ET PISTES HOT WHEELS!
CONECTE A OUTRAS PISTAS E CONJUNTOS HOT WHEELS!
Not for use with some Hot Wheels® vehicles. Two vehicles included. Additional
vehicles, tracks and sets sold separately.
No compatible con algunos vehículos Hot Wheels. Incluye dos vehículos. Los
vehículos, las pistas y los sets adicionales se venden por separado.
Non compatible avec certains véhicules Hot Wheels. Contient deux véhicules.
Autres véhicules, pistes et coffrets de jeu vendus séparément.
Não é compatível com alguns veículos Hot Wheels. Dois veículos incluídos.
Veículos, pistas e conjuntos adicionais são vendidos separadamente.
1 2
DANGERD'ÉTOUFFEMENT -
Petitséléments. Ne convient pas
aux enfants de moins de 36 mois.
ATTENTION :
PELIGRO DEASFIXIA. Juguete no recomendado para
menores de 3años. Contiene piezaspequeñas que podrían
provocar asfixia en caso de ser ingeridas por elniño/a.
ADVERTENCIA:
CHOKING HAZARD – Small parts.
Not for children under 3 years.
WARNING:
ADVERTENCIA: PELIGRO DE ATRAGANTAMIENTO. Juguete no recomendado para menores de 3
años, porque contiene piezas pequeñas que podrían provocar asfixia en caso de ser ingeridas o
inhaladas por el/la niño/a.
ATENÇÃO: Não indicado / não recomendável para crianças menores de 3 (três) anos por conter
parte(s) pequena(s) que pode(m) ser engolida(s) ou aspirada(s) podendo provocar asfixia.
2 3
I
NDEX •
Í
NDICE •
I
NDEX •
Í
NDICE
COLORS AND DECORATIONS MAY VARY. • LOS COLORES Y LAS DECORACIONES PUEDEN VARIAR.
LES COULEURS ET LES MOTIFS PEUVENT VARIER. • AS CORES E AS DECORAÇÕES PODEM VARIAR.
G1 G2
G2 G3
G3 G4
G4 G5
F2 F3
F1 F2
F1
E2 E3
E1 E2
E1
B
D
C2 C D H
BG5
E3
G1
F3 A
K
NL
A
C2
C
R
J
J
K L
R
P
PN
ZONE 1 • ZONA 1
ZONE 2 • ZONA 2
ZONE 3 • ZONA 3
ALIGN MOLDED LETTERS ON PARTS.
ALINEA LAS LETRAS ESTAMPADAS EN LAS PIEZAS.
ALIGNER LES LETTRES MOULÉES INDIQUÉES SUR LES PIÈCES.
ALINHE AS LETRAS MOLDADAS NAS PEÇAS.
ASSEMBLY COMPLETED!
¡MONTAJE COMPLETADO!
ASSEMBLAGE TERMINÉ!
MONTAGEM CONCLUÍDA!
SNAP TO CONNECT!
¡ENCAJA PARA CONECTAR!
ENCLENCHER POUR CONNECTER!
ENCAIXE PARA CONECTAR!
ONE-TIME ASSEMBLY
MONTAJE PERMANENTE
ASSEMBLAGE PERMANENT
MONTAGEM UMA ÚNICA VEZ
3
4
5
6
11
14
CONTENTS • CONTENIDO • CONTENU • CONTEÚDO
APPLY LABELS • PEGA LAS CALCOMANÍAS
APPOSER LES AUTOCOLLANTS • COLAR ADESIVOS
BATTERY INSTALLATION • COLOCACIÓN DE LAS PILAS
INSTALLATION DES PILES • INSTALAÇÃO DAS BATERIAS
ZONE 1 ASSEMBLY • MONTAJE DE LA ZONA 1
ASSEMBLAGE DE LA ZONE 1 • MONTAGEM DA ZONA 1
ZONE 2 ASSEMBLY • MONTAJE DE LA ZONA 2
ASSEMBLAGE DE LA ZONE 2 • MONTAGEM DA ZONA 2
ZONE 3 ASSEMBLY • MONTAJE DE LA ZONA 3
ASSEMBLAGE DE LA ZONE 3 • MONTAGEM DA ZONA 3
18
TO PLAY • PARA JUGAR • POUR JOUER • COMO BRINCAR
22
STORAGE • ALMACENAMIENTO • POUR RANGER • PARA GUARDAR
24
MORE WAYS TO PLAY • MÁS MANERAS DE JUGAR
AUTRES FAÇONS DE JOUER • OUTRAS MANEIRAS DE BRINCAR
24
PERFORMANCE TIPS • CONSEJOS DE RENDIMIENTO
CONSEILS D’UTILISATION • DICAS DE DESEMPENHO
KEY • CONSEJO • LÉGENDE • CHAVE
C
ONTENTS •
C
ONTENIDO
C
ONTENU •
C
ONTEÚDO
Align MOLDED LETTERS on parts.
Alinea las LETRAS ESTAMPADAS en las piezas.
Aligner les LETTRES MOULÉES indiquées sur les pièces.
Alinhe as LETRAS MOLDADAS nas peças.
A
PPLY
L
ABELS •
P
EGA
L
AS
C
ALCOMANÍAS
A
PPOSER
L
ES
A
UTOCOLLANTS •
C
OLAR
A
DESIVOS
B
ATTERY
I
NSTALLATION •
C
OLOCACIÓN
D
E
L
AS
P
ILAS
I
NSTALLATION
D
ES
P
ILES •
I
NSTALAÇÃO
D
AS
B
ATERIAS
4 5
• Unscrew battery cover with a Phillips head screwdriver (not included).
• Install 3 new AA (LR6) alkaline batteries in battery box.
• Replace battery cover and tighten screw.
• Replace batteries if lights dim or sounds distort.
• Dispose of batteries safely.
• For longer life, use alkaline batteries.
• When exposed to an electrostatic source, the product may malfunction.
To resume normal operation, switch the power OFF for a few seconds, and then ON again.
• Desatornilla la tapa del compartimiento de pilas con un destornillador de cruz (no incluido).
• Instala 3 pilas alcalinas AA (LR6) nuevas en el compartimiento de pilas.
• Cierra la tapa del compartimiento y aprieta el tornillo.
• Sustituye las pilas si las luces se atenúan o el sonido se oye distorsionado.
• Desecha las pilas gastadas apropiadamente.
• Para una mayor duración, usa solo pilas alcalinas.
• Es posible que el producto no funcione correctamente si se expone a una fuente electrostática.
Para reanudar el funcionamiento normal, pon el interruptor de encendido en APAGADO por unos cuantos
segundos y nuevamente en ENCENDIDO.
• Dévisser le couvercle du compartiment des piles avec un tournevis cruciforme (non inclus).
• Insérer 3 piles alcalines AA (LR6) neuves dans le compartiment des piles.
• Remettre le couvercle et serrer la vis.
• Changer les piles si les lumières faiblissent ou si les sons se déforment.
• Jeter les piles usées dans un conteneur réservé à cet usage.
• Utiliser des piles alcalines pour une autonomie prolongée.
• Le produit peut ne pas fonctionner correctement s’il est exposé à une source d’électricité statique.
Pour rétablir le fonctionnement normal, mettre l’interrupteur à ARRÊT pendant quelques secondes,
puis le remettre à MARCHE.
• Solte o parafuso da tampa do compartimento de pilhas com uma chave Phillips (não incluída).
• Instale 3 pilhas alcalinas AA (LR6) novas no compartimento das pilhas.
• Volte a colocar a tampa do compartimento e aperte o parafuso.
• Troque as pilhas se o som ficar distorcido ou se as luzes falharem.
• Descarte as pilhas gastas em local apropriado.
ATENÇÃO: A colocação e substituição das pilhas devem ser realizadas por um adulto, utilizando a ferramenta
adequada para abrir e fechar o compartimento de pilhas.
• Para maior durabilidade, use pilhas alcalinas.
• Não coloque o produto perto de nenhuma fonte eletrostática, para evitar problemas de funcionamento.
Para voltar à operação normal, desligue o brinquedo por alguns segundos e depois torne a ligar.
AA (LR6) 1.5V
x3
I
O
ON • ENCENDIDO
MARCHE • LIGADO
OFF • APAGADO
ARRÊT • DESLIGADO
5
2
1
1
783469
AB
AB
DD
C
C
C2
C2
BACK VIEW • VISTA DE ATRÁS
VUE ARRIÈRE • VISÃO DE TRÁS
BACK VIEW
VISTA DE ATRÁS
VUE ARRIÈRE
VISÃO DE TRÁS
12
Assembly steps marked with a
indicate a permanent assembly.
Once these parts are assembled,
they cannot be taken apart.
Los pasos de montaje marcados
con un indican que es un
montaje permanente. Una vez que
estas piezas están ensambladas,
no se pueden separar.
Les étapes d’assemblage
marquées d’une indiquent un
assemblage permanent. Une fois
assemblés, ces éléments ne
peuvent plus être démontés.
As etapas de montagem marcadas
com uma indicam uma
montagem permanente. Uma vez
que as peças são montadas, elas
não podem ser retiradas.
6 7
13
2
Parts You Need: • Piezas Necesarias:
Pièces Nécessaires: • Peças Que Você Precisa:
G1 G2
G2 G3
G3 G4
G4 G5
F2 F3
F1 F2
F1
E2 E3
E1 E2
E1
B
D
C2 C D H
BG5
E3
G1
F3 A
K
NL
A
C2
C
ONE-TIME ASSEMBLY
MONTAJE PERMANENTE
ASSEMBLAGE PERMANENT
REQUER MONTAGEM UMA ÚNICA VEZ
ZONE 1 • ZONA 1
Z
ONE
1
A
SSEMBLY •
M
ONTAJE
D
E
L
A
Z
ONA
1
A
SSEMBLAGE
D
E
L
A
Z
ONE
1
•
M
ONTAGEM
D
A
Z
ONA
1
E1
E1
E2 E2 F2
F2
F1
F3
F3
F1
E3
E3
F3
F3
E3
E3
Z
ONE
1
A
SSEMBLY •
M
ONTAJE
D
E
L
A
Z
ONA
1
A
SSEMBLAGE
D
E
L
A
Z
ONE
1
•
M
ONTAGEM
D
A
Z
ONA
1
4
5
8 9
6
7
ZONE 1 • ZONA 1
ONE-TIME ASSEMBLY
MONTAJE PERMANENTE
ASSEMBLAGE PERMANENT
REQUER MONTAGEM UMA ÚNICA VEZ
ZONE 2 • ZONA 2
10 11
G2 G3
G3
G4
G4
G2
G1
G5
J
J
H
H
G1
G1
G5
G5
G1 G5
H
Parts You Need: • Piezas Necesarias:
Pièces Nécessaires: • Peças Que Você Precisa:
8
1
2
R
J
J
K L
R
Z
ONE
1
A
SSEMBLY •
M
ONTAJE
D
E
L
A
Z
ONA
1
A
SSEMBLAGE
D
E
L
A
Z
ONE
1
•
M
ONTAGEM
D
A
Z
ONA
1Z
ONE
2
A
SSEMBLY •
M
ONTAJE
D
E
L
A
Z
ONA
2
A
SSEMBLAGE
D
E
L
A
Z
ONE
2
•
M
ONTAGEM
D
A
Z
ONA
2
ZONE 2 • ZONA 2
12 13
R
R
a
b
Z
ONE
2
A
SSEMBLY •
M
ONTAJE
D
E
L
A
Z
ONA
2
A
SSEMBLAGE
D
E
L
A
Z
ONE
2
•
M
ONTAGEM
D
A
Z
ONA
2
4
5
3 6
ONE-TIME ASSEMBLY
MONTAJE PERMANENTE
ASSEMBLAGE PERMANENT
REQUER MONTAGEM UMA ÚNICA VEZ
14 15
ZONE 3 • ZONA 3
K
K
L
P
P
L
K
L
K
L
N
N
BACK VIEW • VISTA DE ATRÁS
VUE ARRIÈRE • VISÃO DE TRÁS
BACK VIEW
VISTA DE ATRÁS
VUE ARRIÈRE
VISÃO DE TRÁS
45
2 3
Parts You Need: • Piezas Necesarias:
Pièces Nécessaires: • Peças Que Você Precisa:
1
P
PN
Z
ONE
3
A
SSEMBLY •
M
ONTAJE
D
E
L
A
Z
ONA
3
A
SSEMBLAGE
D
E
L
A
Z
ONE
3
•
M
ONTAGEM
D
A
Z
ONA
3
ZONE 1 • ZONA 1
ZONE 2 • ZONA 2
ONE-TIME ASSEMBLY
MONTAJE PERMANENTE
ASSEMBLAGE PERMANENT
REQUER MONTAGEM UMA ÚNICA VEZ
16 17
ZONE 3 • ZONA 3
BACK VIEW • VISTA DE ATRÁS
VUE ARRIÈRE • VISÃO DE TRÁS
6
7 8
ONE-TIME ASSEMBLY
MONTAJE PERMANENTE
ASSEMBLAGE PERMANENT
REQUER MONTAGEM UMA ÚNICA VEZ
Z
ONE
3
A
SSEMBLY •
M
ONTAJE
D
E
L
A
Z
ONA
3
A
SSEMBLAGE
D
E
L
A
Z
ONE
3
•
M
ONTAGEM
D
A
Z
ONA
3
18 19
TOP VIEW • VISTA DE ARRIBA
VUE DE DESSUS • VISÃO SUPERIOR
a
b
2
112
3
TO PLAY • PARA JUGAR
POUR JOUER • COMO BRINCAR
T
O
P
LAY •
P
ARA
J
UGAR •
P
OUR
J
OUER •
C
OMO
B
RINCAR
LOOP STUNT • ACROBACIA EN EL LOOP
BOUCLES ET CASCADES • ACROBACIAS NO LOOP DINO BATTLE • BATALLA CONTRA EL DINOSAURIO
COMBAT CONTRE LE DINOSAURE • BATALHA DINOSSAURO
LOAD CARS INTO LOOP LAUNCHER.
COLOCA LOS VEHÍCULOS EN EL LANZADOR DEL LOOP.
INSÉRER LES VOITURES DANS LE LANCEUR DE LA BOUCLE.
COLOQUE OS CARROS NO LANÇADOR DO LOOP.
LOAD CAR ONTO SLAM LAUNCHER AND AIM AT
THE T-REX SKULL.
PON EL VEHÍCULO EN EL LANZADOR Y APUNTA HACIA
EL CRÁNEO DEL T-REX.
INSÉRER UNE VOITURE DANS LE LANCEUR ET VISER
LE CRÂNE DU TYRANNOSAURE REX.
COLOQUE O CARRO NO LANÇADOR E APONTE PARA A
CABEÇA DO T-REX.
HIT ITS UPPER JAW TEETH TO DEFEAT THE T-REX!
¡GOLPEA LOS DIENTES DE LA MANDÍBULA SUPERIOR DEL T-REX PARA DERROTARLO!
FRAPPER LES DENTS DE LA MÂCHOIRE SUPÉRIEURE DU TYRANNOSAURE REX POUR LE VAINCRE!
ACERTE OS DENTES DA MANDÍBULA SUPERIOR PARA DERROTAR O T-REX!
SLAM TO LAUNCH ATTACK!
¡DALE UN GOLPE PARA LANZAR UN ATAQUE!
FRAPPER POUR LANCER L’ATTAQUE!
APERTE PARA LANÇAR!
STUNT THROUGH THE LOOPS OR FALL INTO THE VOLCANO! WATCH OUT!
YOU MAY WAKE THE T-REX INSIDE!
¡HAZ ACROBACIAS EN EL LOOP O CAE EN EL VOLCÁN! ¡CUIDADO! ¡PUEDES
DESPERTAR AL T-REX DENTRO!
PASSER À TRAVERS LES BOUCLES OU TOMBER DANS LE VOLCAN! ATTENTION!
IL SE POURRAIT QUE LE TYRANNOSAURE REX SE RÉVEILLE À L’INTÉRIEUR!
FAÇA ACROBACIAS NOS LOOPS OU CAIA NO VULCÃO! CUIDADO! VOCÊ PODE
ACORDAR O T-REX!
ab
Tip: Adjust slamming power for best performance.
Consejo: Ajusta la fuerza del golpe para obtener mejores resultados.
Conseil: Ajuster la force de frappe pour une performance optimale.
Dica: Ajuste a força para melhor desempenho.
PULL BACK HANDLE TO LOCK. PRESS BUTTON TO LAUNCH!
TIRA DE LA MANIJA HACIA ATRÁS PARA BLOQUEARLO.
¡PRESIONA EL BOTÓN PARA LANZAR!
TIRER LA POIGNÉE VERS L’ARRIÈRE POUR ENCLENCHER.
APPUYER SUR LE BOUTON POUR LANCER!
PUXE A ALÇA PARA TRÁS PARA TRAVAR.
APERTE O BOTÃO PARA LANÇAR!