manuals.online logo
Brands
  1. Home
  2. •
  3. Brands
  4. •
  5. Maxon
  6. •
  7. Indoor Furnishing
  8. •
  9. Maxon Surpass User manual

Maxon Surpass User manual

INSTALLATION INSTRUCTIONS
SIDE 1 OF 8 (3/12)
309-1980
FREESTANDING DESK APPLICATIONS
Failure to install product as instructed, use of hardware other than that which is provided with the product,
or failure to comply with all instructions can result in personal injury.
WARNING
Surpass®
Illustration 1. Configure Full End Panel Support to a Left-Hand or Right-Hand Application:
Full end panel support
assembled for left-hand
application
Full end panel support
assembled for right-hand
application
Attachment bracket
Machine screwMachine screw
Attachment bracket
Leveler Leveler
SIDE 2 OF 8 (5/03)
FREESTANDING DESK APPLICATIONS
Illustration 2. Primary Desk with Modesty Panel:
Full end panel
support
Modesty panel
Worksurface
3rd - Wood screws
(three per modesty
panel, at each end and
at center location):
Install through top
flange of modesty
panel and into
worksurface.
2nd - Sheet metal screws (three per side of modesty panel):
Install through modesty panel and into full end panel supports.
1st - Machine screw (three per full end
panel support): Install into worksurface
inserts.
Surpass worksurfaces, full end panel supports, and modesty panels can be configured as freestanding desks. For
ease of assembly, assemble unit upside down onto cardboard or a carpeted surface.
Surpass®
309-1980
309-1980
SIDE 3 OF 8 (3/12)
FREESTANDING DESK APPLICATIONS
Illustration 3. Primary Desk with Gussets:
Full end panel
support
Gusset - Position rear edge
of gusset 17/8" from rear
edge of worksurface (gus-
set should run parallel with
rear edge of worksurface).
Worksurface
3rd - Wood screws (three
per gusset): Install
through top flange of
gusset and into
worksurface.
2nd - Sheet metal screws (two per gusset): Install
through gusset and into full end panel supports.
1st - Machine screw (three per full
end panel support): Install into
worksurface inserts.
Surpass worksurfaces, full end panel supports, and gussets can be configured as freestanding desks. For ease of
assembly, assemble unit upside down onto cardboard or a carpeted surface.
Note: Dependent on user preference, cosmetic side
(flat side) of gusset can face either front or
rear edge of worksurface.
Surpass®
309-1980
SIDE 4 OF 8 (3/12)
FREESTANDING DESK APPLICATIONS
Illustration 4. Bridge / Return to Desk:
Surpass®
Illustration 4A. Attach Modesty Panel Bracket:
1. Place primary desk upside down onto cardboard or a carpeted surface.
2. On side of primary desk that bridge or return is to be attached, position modesty panel bracket against interior surface of full
end panel support.
If assembling a U-shaped configuration with a peninsula, align holes in bottom flange of modesty panel bracket with the first
pair of holes in bottom of full end panel support.
For all other configurations, align holes in bottom flange of modesty panel bracket with the second pair of holes in bottom of
full end panel support.
3. Install two sheet metal screws through holes in bottom flange of modesty panel bracket and into full end panel support.
4. Install a wood screw through top flange of modesty panel bracket and into primary desk worksurface.
5. Remove front machine screw securing full end panel support to worksurface. Save screw for later use.
Modesty panel
attachment bracket
Remove front machine
screw (save screw for
later use)
Sheet metal screw
First pair of holes - use for
U-shaped configuration with
peninsula
Second pair of holes - use
with all other configurations
Wood screw
Primary desk
Note: If attaching bridge or return to a panel hung worksurface, attach modesty panel
bracket to full end panel support prior to attaching full end panel support to primary
worksurface.
309-1980
SIDE 5 OF 8 (3/12)
FREESTANDING DESK APPLICATIONS
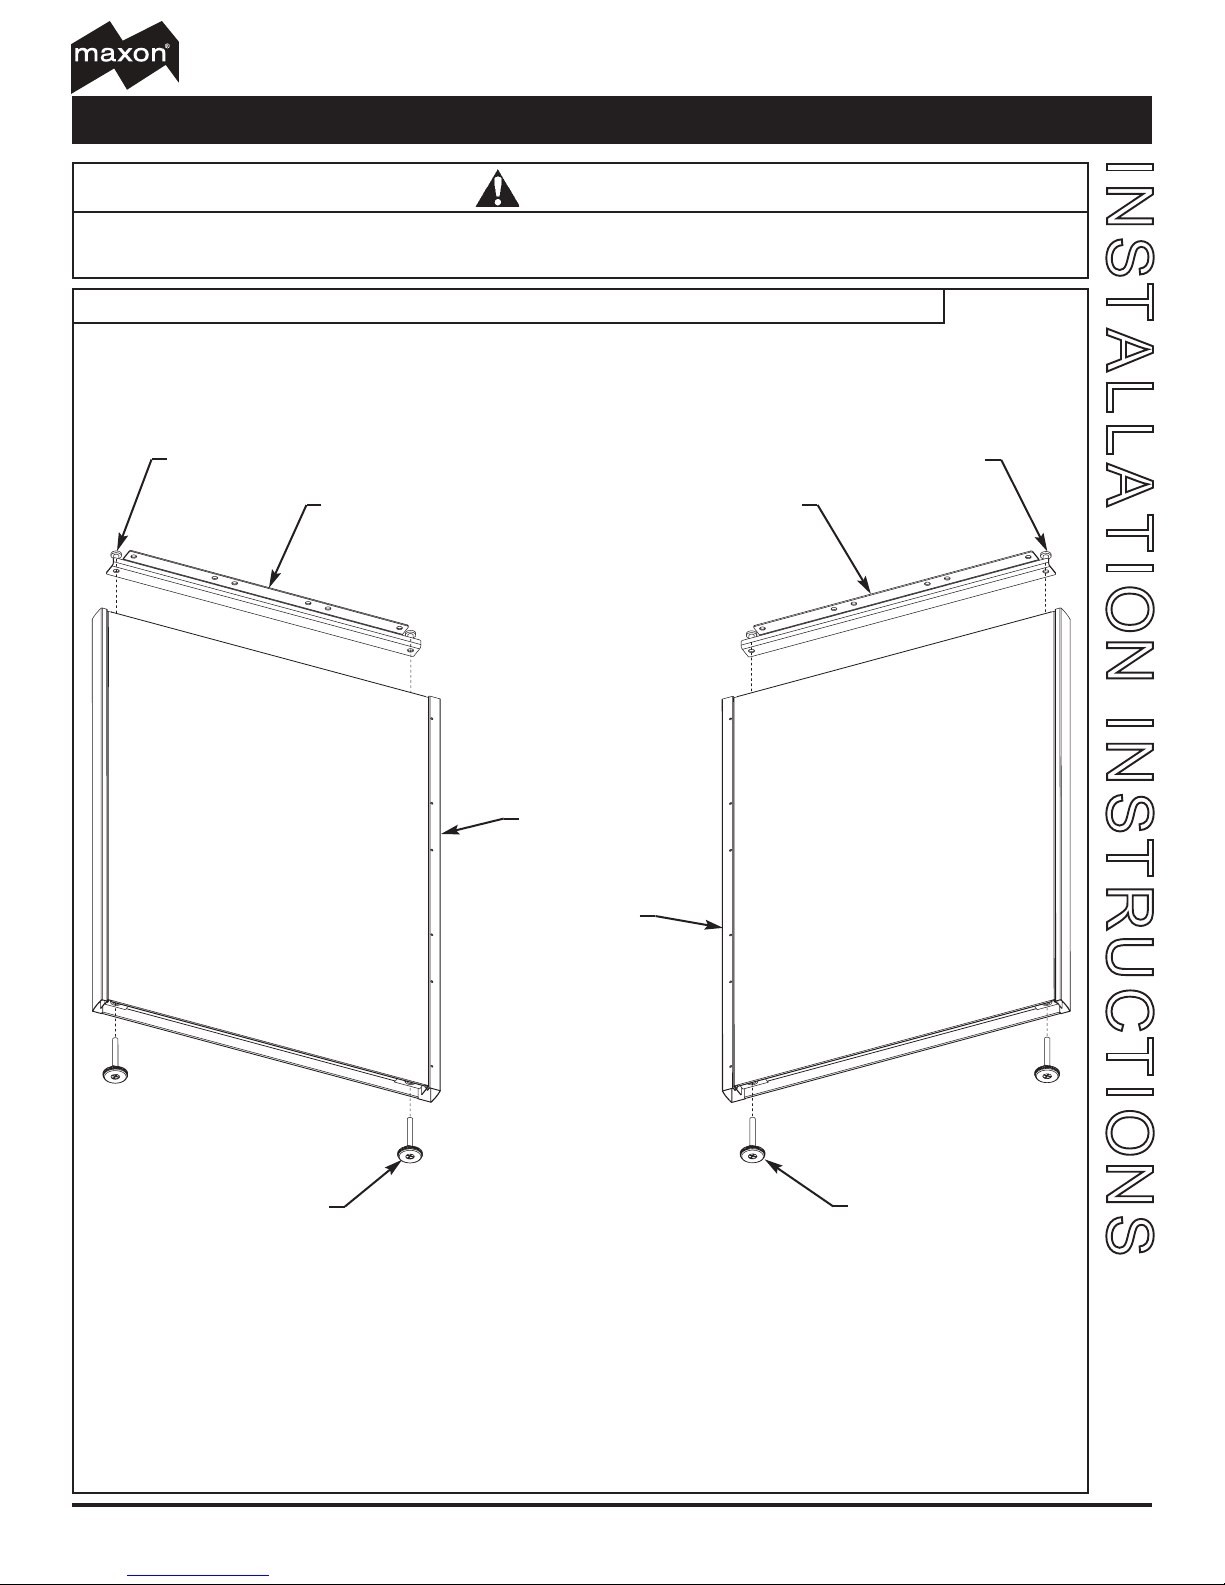
Illustration 4. Bridge and Return Attachment (continued):
Surpass®
Illustration 4B. Attach Return or Bridge to Primary Desk:
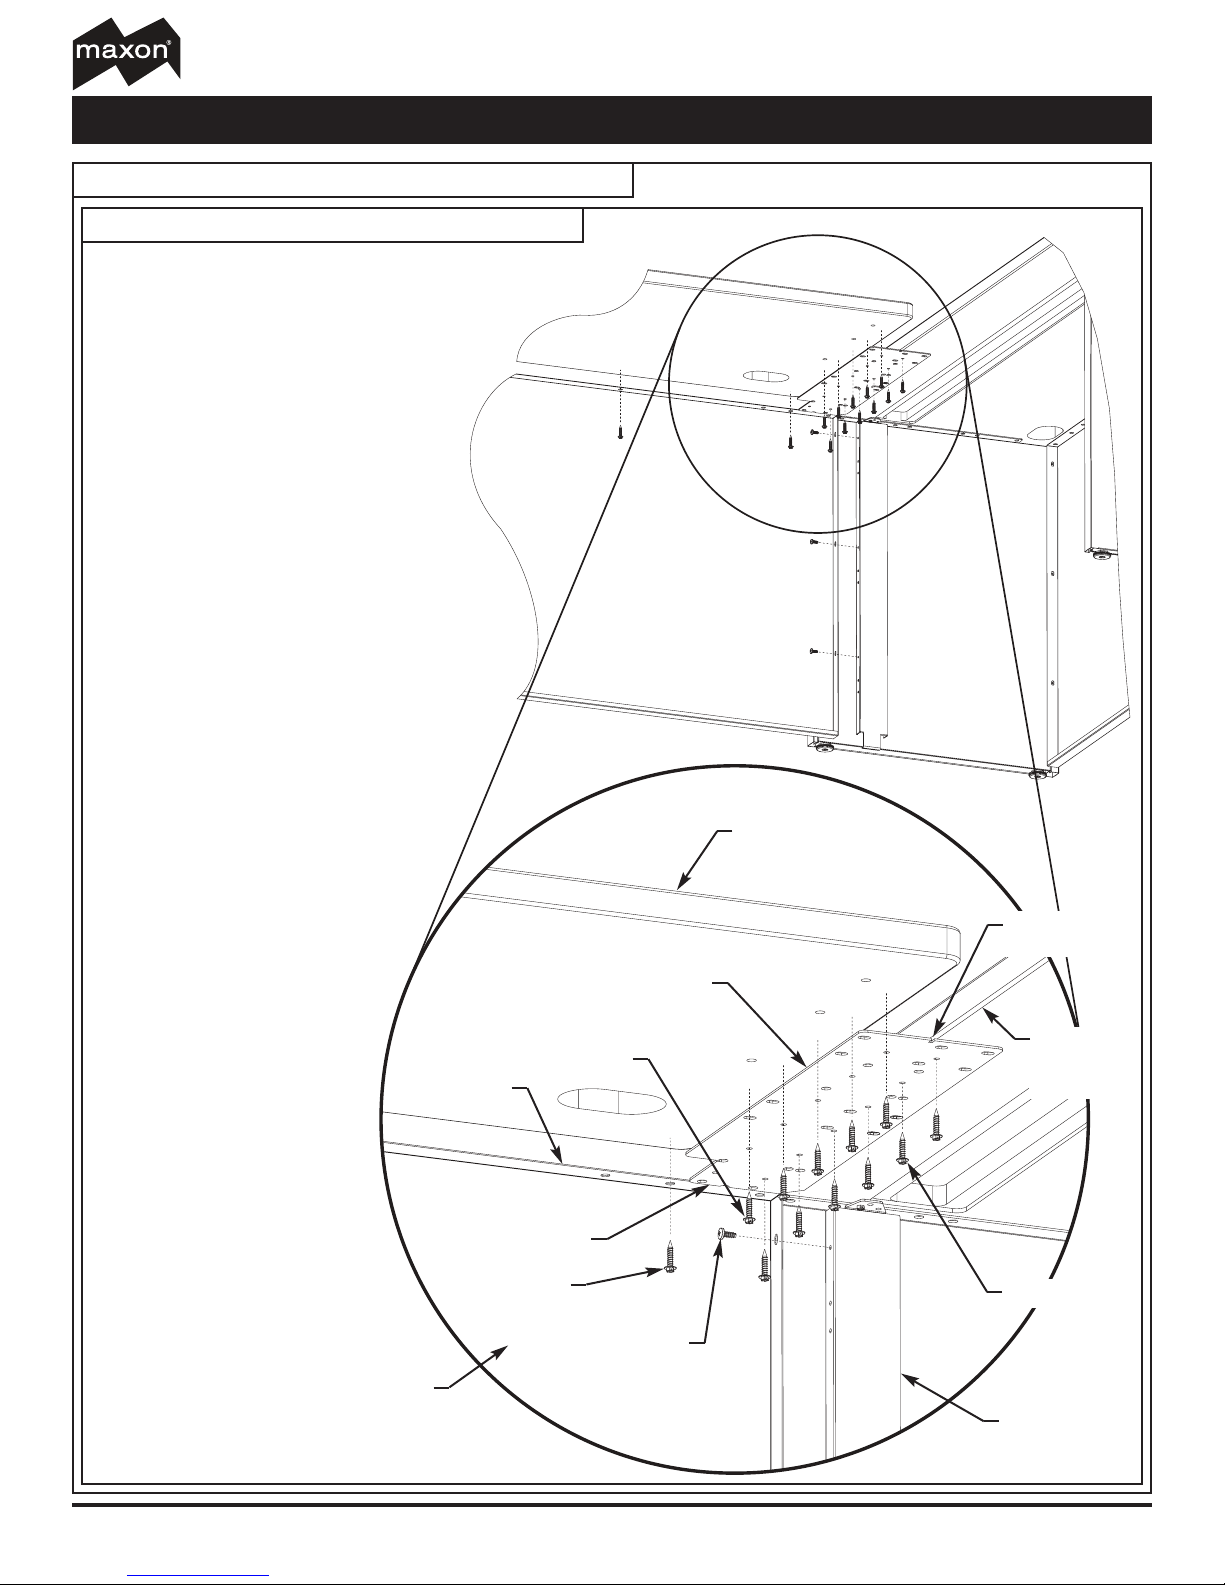
Bridge Attachment:
1. Use three sheet metal screws to attach bridge modesty
panel to modesty panel bracket (attached to primary
desk full end panel support). Repeat procedure
at opposite end of modesty panel.
2. Attach a flat bracket to each primary desk
worksurface. Align center line locating notch
with front edge of primary worksurface and
rear edge with modesty panel top flange.
Attach each flat bracket with six wood
screws.
3. Position bridge worksurface onto flat brackets.
Check alignment of bridge worksurface with
each primary worksurface. Install six wood
screws through each flat bracket and into bridge
worksurface. Install wood screws through bridge
modesty panel (at each end and at center location)
and into bridge worksurface.
4. Reinstall machine screw removed in Illustration 4A.
Step 5.
Return Attachment:
1. Use three sheet metal screws to attach return
modesty panel to modesty panel bracket
(attached to primary desk full end panel sup-
port).Attach a full end panel support to
opposite end of modesty panel (refer to pri-
mary desk assembly instructions).
2. Attach flat bracket to primary desk work-
surface. Align center line locating notch
with front edge of primary worksurface
and rear edge with modesty panel top
flange. Attach flat bracket with six
wood screws.
3. Position return worksurface onto
flat bracket and full end panel
support. Attach full end panel
support to return worksurface
with three machine screws
(refer to primary desk assem-
bly instructions).Check align-
ment of return worksurface with
primary worksurface and install
six wood screws through flat
bracket and into return worksur-
face. Install wood screws
through return modesty panel (at
each end and at center location)
and into return worksurface.
4. Reinstall machine screw removed in
Illustration 4A.Step 5. Sheet metal
screw
Wood screw Wood screw
Center line
locating notch
Front edge
of primary
worksurface
Wood screw
Flat bracket
Return/bridge
worksurface
Return/bridge
modesty panel Modesty panel
bracket
~
Rear edge
Top flange
309-1980
SIDE 6 OF 8 (3/12)
FREESTANDING DESK APPLICATIONS
Surpass®
Illustration 5. Support Leg:
Flat bracket
Machine screw
Notch - Position at rear
and shared worksurface
side of support leg. Flat
bracket should not inter-
fere with worksurface
grommet.
Support leg
Note: Use desk support legs to:
· Attach a bridge to a peninsula (refer to
Illustration 6).
· Attach a return or bridge to a corner
desk (refer to Illustration 7).
309-1980
SIDE 7 OF 8 (3/12)
FREESTANDING DESK APPLICATIONS
Illustration 6. Attach a Return or Bridge to a Peninsula Worksurface Using a Support Leg:
1. Position support leg under peninsula
worksurface. Align flat bracket center
line locating notch with front edge of
peninsula worksurface and rear edge
with modesty panel top flange. Attach
support leg to peninsula worksurface
by installing two machine screws
through flat bracket and into inserts in
peninsula worksurface.
2. Use three sheet metal screws to
attach peninsula modesty panel to
support leg.
3. Use three sheet metal screws to
attach return/bridge modesty panel to
opposite side of support leg.
4. Position return/bridge worksurface
onto flat bracket. Install two machine
screws through flat bracket and into
inserts in return/bridge worksurface.
Install wood screws through return/
bridge modesty panel (at each end
and at center location) and into
return/bridge worksurface.
Sheet metal
screw
Sheet metal screw
Wood screw
Center line
locating notch
Peninsula
worksurface
Machine screw
Flat bracket
Return/bridge
worksurface
Return/bridge
modesty panel
Return/bridge modesty panel
Support leg
~
~
Surpass®
309-1980
SIDE 8 OF 8 (3/12)
FREESTANDING DESK APPLICATIONS
Illustration 7. Bridge / Return to Corner:
1. Assemble return desks using support legs under return desk side of worksurface.
2. Use three sheet metal screws to attach a corner desk modesty panel to each support leg.
3. Use six sheet metal screws to attach corner desk support leg to free ends of corner desk modesty panels.
4. Position corner desk worksurface onto flat brackets. Install two machine screws through each flat bracket and into inserts in
corner desk worksurface. Install two machine screws through each corner desk modesty panel and into inserts in corner desk
worksurface. Install wood screws through remaining holes in corner desk modesty panels and into corner desk worksurface.
Sheet metal screw
Sheet metal screw
Sheet
metal
screw
Wood screw
Wood screw
Corner desk support leg
Machine
screw
Machine
screw
Corner desk
worksurface
Corner desk modesty panel
Corner desk
modesty panel
Support leg
Wood
screw
Machine
screw
Corner
worksurface
Return worksurface
Return desk
Return desk
Center line
locating
notch
Flat
bracket
~~
Surpass®

Other Maxon Indoor Furnishing manuals

Maxon Surpass User manual

Maxon

Maxon Surpass User manual

Maxon M-KIT100 User manual

Maxon

Maxon M-KIT100 User manual

Maxon M-KIT118 User manual

Maxon

Maxon M-KIT118 User manual

Maxon Nesting Table Service manual

Maxon

Maxon Nesting Table Service manual

Maxon M-KIT112 User manual

Maxon

Maxon M-KIT112 User manual

Popular Indoor Furnishing manuals by other brands

HON basyx BSXLMOL quick start guide

HON

HON basyx BSXLMOL quick start guide

RH Focus user guide

RH

RH Focus user guide

Safavieh Luigi BST7000A quick start guide

Safavieh

Safavieh Luigi BST7000A quick start guide

SIT&MORE LUXOR V Assembly instructions

SIT&MORE

SIT&MORE LUXOR V Assembly instructions

Furniture of America CM7420Q Assembly instructions

Furniture of America

Furniture of America CM7420Q Assembly instructions

Rauch M1742 Assembly instructions

Rauch

Rauch M1742 Assembly instructions

TUHOME Furniture VARESE ALB5605 Assembly instructions

TUHOME Furniture

TUHOME Furniture VARESE ALB5605 Assembly instructions

Bertini Lafayette BR1510-1 instruction manual

Bertini

Bertini Lafayette BR1510-1 instruction manual

Northern Daybe user manual

Northern

Northern Daybe user manual

HOME MERIDIAN PULASKI FURNITURE P053100 Assembly instructions

HOME MERIDIAN

HOME MERIDIAN PULASKI FURNITURE P053100 Assembly instructions

Oypla Leisure 4197 user manual

Oypla Leisure

Oypla Leisure 4197 user manual

Crosley Furniture CF100160 manual

Crosley Furniture

Crosley Furniture CF100160 manual

J.Burrows JBWASHCHBK Assembly instructions

J.Burrows

J.Burrows JBWASHCHBK Assembly instructions

kleankin 834-390V80 Assembly instruction

kleankin

kleankin 834-390V80 Assembly instruction

New Classic Furniture GIA S1701-BS Assembly instructions

New Classic Furniture

New Classic Furniture GIA S1701-BS Assembly instructions

Germania PC Table 0482 Assembly instruction

Germania

Germania PC Table 0482 Assembly instruction

Kartell Foliage Assembly instructions

Kartell

Kartell Foliage Assembly instructions

The bedboss RELAX 404 Series owner's manual

The bedboss

The bedboss RELAX 404 Series owner's manual

manuals.online logo
manuals.online logoBrands
  • About & Mission
  • Contact us
  • Privacy Policy
  • Terms and Conditions

Copyright 2025 Manuals.Online. All Rights Reserved.