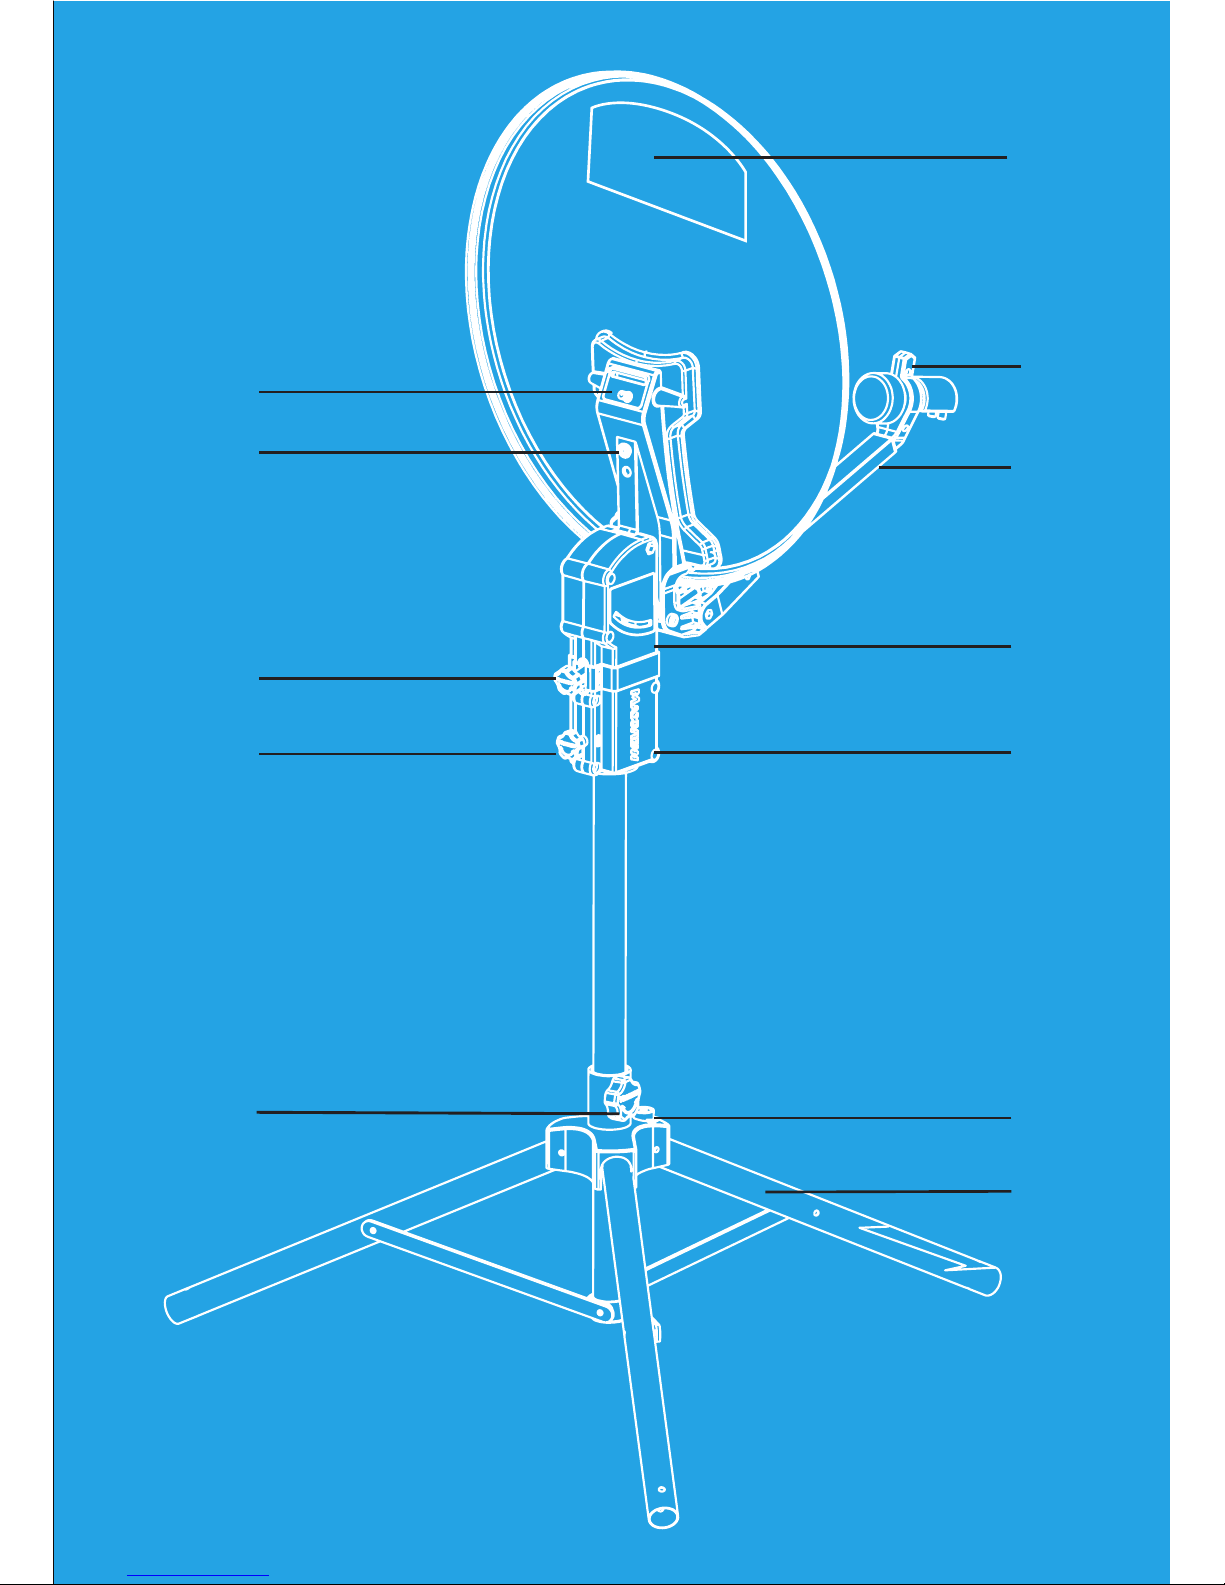
Maxview MXL012/55 User manual

SIMPLICITY AT IT’S BEST
MODELS...
MXL012/55
MXL012/65
MXL012/75
REGISTERED COMMUNITY
DESIGN NO.2207746.
PATENT PENDING
SET UP &
USER MANUAL
AUFBAU- &
BEDIENUNGS-
ANLEITUNG

THANK YOU!
For purchasing this product, we trust that you will
get many years of enjoyment with this product.
Should you have any difficulty using your
Precision Portable Satellite System please contact
our friendly Customer Helpline on
+44 (0)1553 811000.
Please retain these instructions for future
reference.
SIMPLICITY AT IT’S BEST
VIELEN DANK!
Vielen Dank und herzlichen Glückwunsch, dass Sie
sich für die Maxview Precision Portable- Sat-Anlage
entschieden haben.
Sollten sich bei der Inbetriebnahme Schwierigkeiten
ergeben kontaktieren Sie bitte unseren
Kundendienst unter +49 (0) 8145 9969980.
Bitte bewahren Sie diese Anleitung gut auf.
CONTENTS
4-5 Get To Know Your Precision
6-10 Detailed Set Up Guide
11 Line Of Sight information
12 Using Your Integrated Sat Finder
14 Connecting Your Precision
14 Guidelines for SKY Reception
15 Glossary Of Terms
16 Satellite Azimuth Guide
16 Adjusting LNB Skew
17 Skew Map
18-19 Elevation Map & Quick Set Up Guide
20 Fault Finding
22 Satellite Footprint Maps
22 Dish stowage
23 Care & Maintenance/Safety/Guarantee
24 Maxview Contact Details
INHALTSVERZEICHNIS
4-5 Lernen Sie Ihre Precision kennen
6-10 Aufbauanleitung
11 Freie Sicht zum Satelliten
13 Verwendung des integrierten Sat-Finder
14 Anschlussschema
15 Fachbegriffe
16 Einrichten der Antenne auf den
richtigen Azimuthwinkel
16 Einstellen des Skew-Winkel
17 Skew-Winkel-Karte
18-19 Elevationseinstellung - Aufbauanleitung
21 Fehlerbehebung
22 Ausleuchtzone
22 Abbau und Verpackung
23 Pflege und Wartung/Sicherheit/Garantie
24 Kontakt
2
*Weatherproof Socket.
Provides a waterproof and neat cable
entry into your vehicle.
*Available separately from
Maxview visit www.maxview.co.uk
or visit your local leisure stockist.
*Außensteckdose. bietet eine
wasserdichte und ordentliche
Kabeleinführung in das Fahrzeug.
* Separat erhältlich von Maxview.
Besuchen Sie www.maxview.de.
OPTIONAL EXTRAS OPTIONALE EXTRAS

KIT CONTENTS /LIEFERUMFANG
Other equipment you will need to get started:
> TV (digital or HD models)
> Satellite Receiver OR TV with built in
satellite tuner
Dish Unit
Sat-Spiegel
Tripod Stand
Sat-Stativ
Dish Unit Holdall
Transporttasche für
Sat-Spiegel
Tripod Holdall
Transporttasche für Stativ
10m Push Fit
‘F’ to ‘F’ Flexible Cable
10 m Koaxial-Kabel
mit Quick-Steckern
Ground Pegs
Heringe
Compass
Kompass
3
Before you use your Precision you will need to attach the dish to
the bracket. You will find the screws/washers required for fitting the
dish already inserted in the bracket.
Remove these with a screwdriver taking note of the hole position
you removed these from. Offer up dish to bracket and re-insert
screws/washers to the matching holes. Firmly tighten screws
against dish.
Bevor Sie die Precision verwenden können müssen Sie zuerst
den Sat-Spiegel montieren
Die dafür benötigten Schrauben und Unterlegscheiben befinden
sich in den dafür vorgesehenen Bohrungen am Spiegelhalter
Drehen Sie die Schrauben mit einem
Kreuzschlitzschraubendreher heraus, merken Sie sich
die Bohrungen in welchen die Schrauben waren.
Legen Sie den Sat-Spiegel auf den Spiegelhalter und
befestigen Sie diesen mit den Kreuzschlitzschrauben
samt Unterlegscheiben. Ziehen Sie die Schrauben fest.
DISH ASSEMBLY /SPIEGEL MONTAGE
Andere geråte die sie benötigen um zu starten
> 12/24/230 V Fernseher
> Satelliten Receiver oder Fernseher mit
eingebautem Satelliten Receiver

GET TO KNOW
YOUR PRECISION KIT
A. Quick Set UpGuide
Helps you get up and running quickly and
easily.
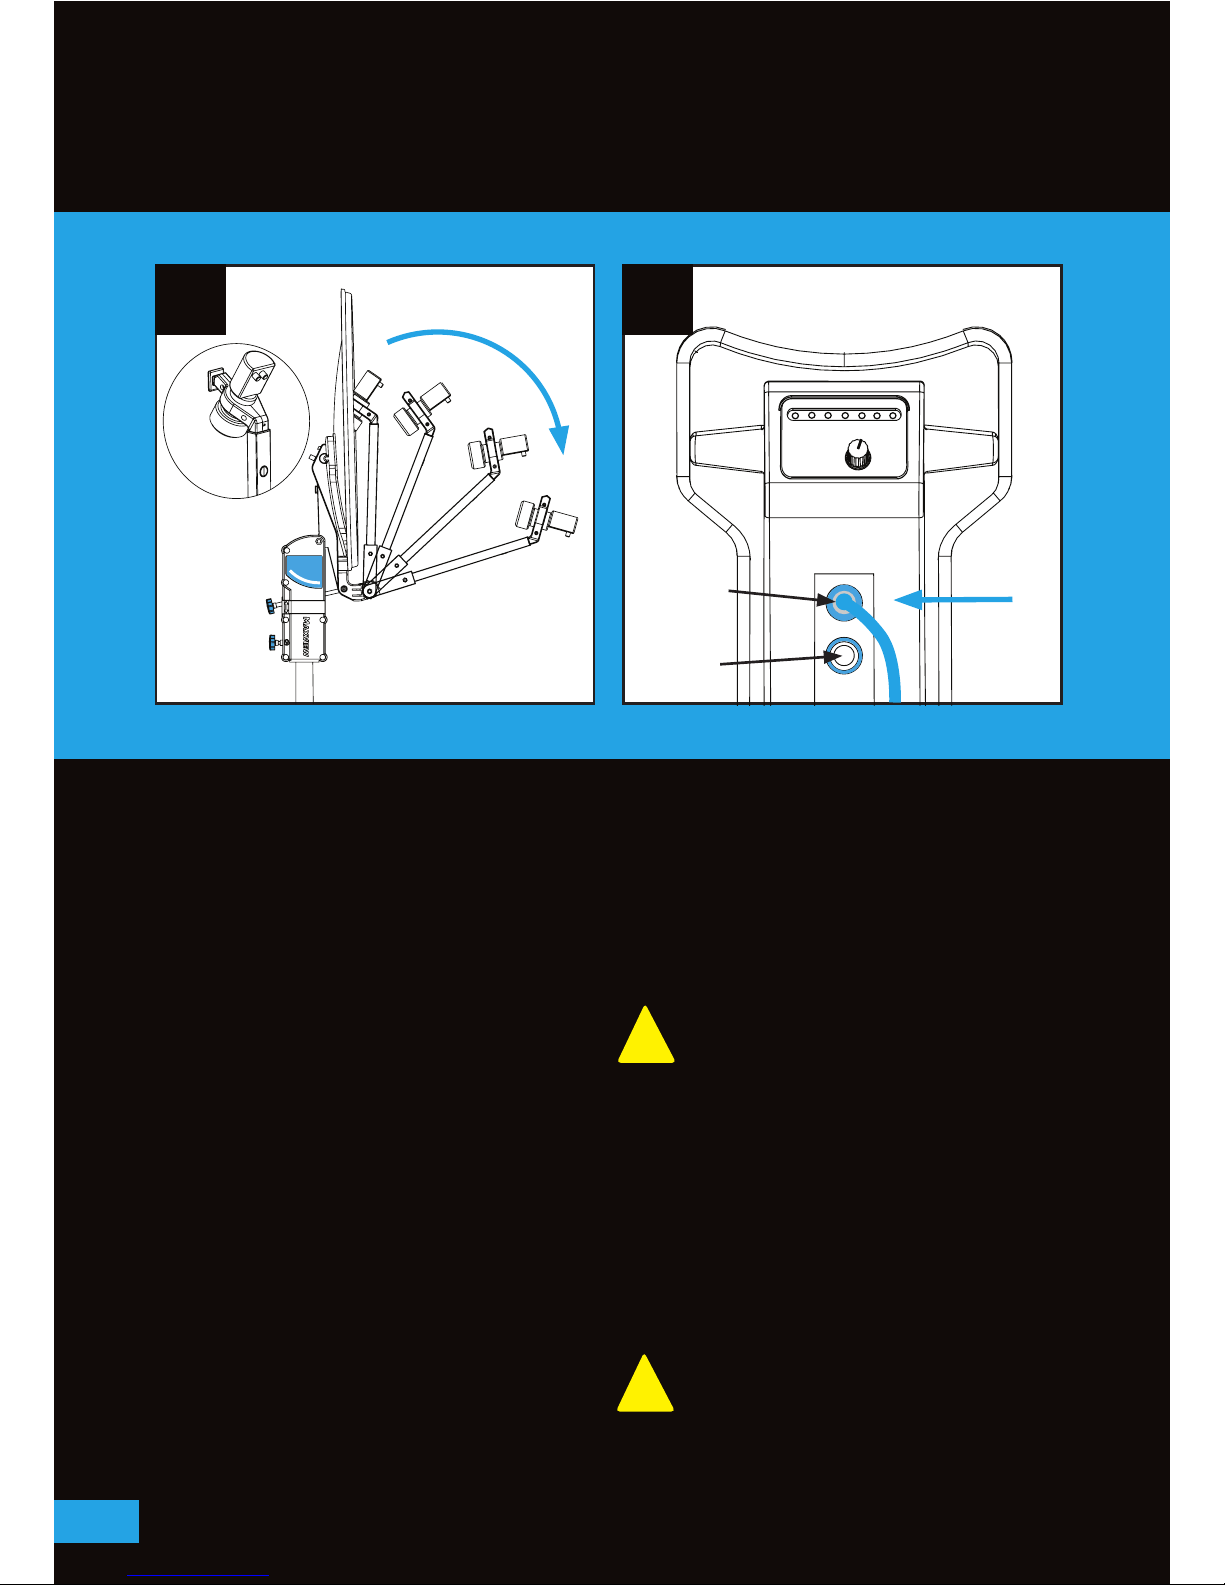
B. Magnetic Arm Lock
To secure the LNB arm in a closed position.
C. Integrated Sat Finder
To help you align your satellite dish to the
satellite.
D. Folding LNB Arm
For compact storage of the system.
E. Coaxial Cable Ports
Easy access ports to attach your coaxial
cable.
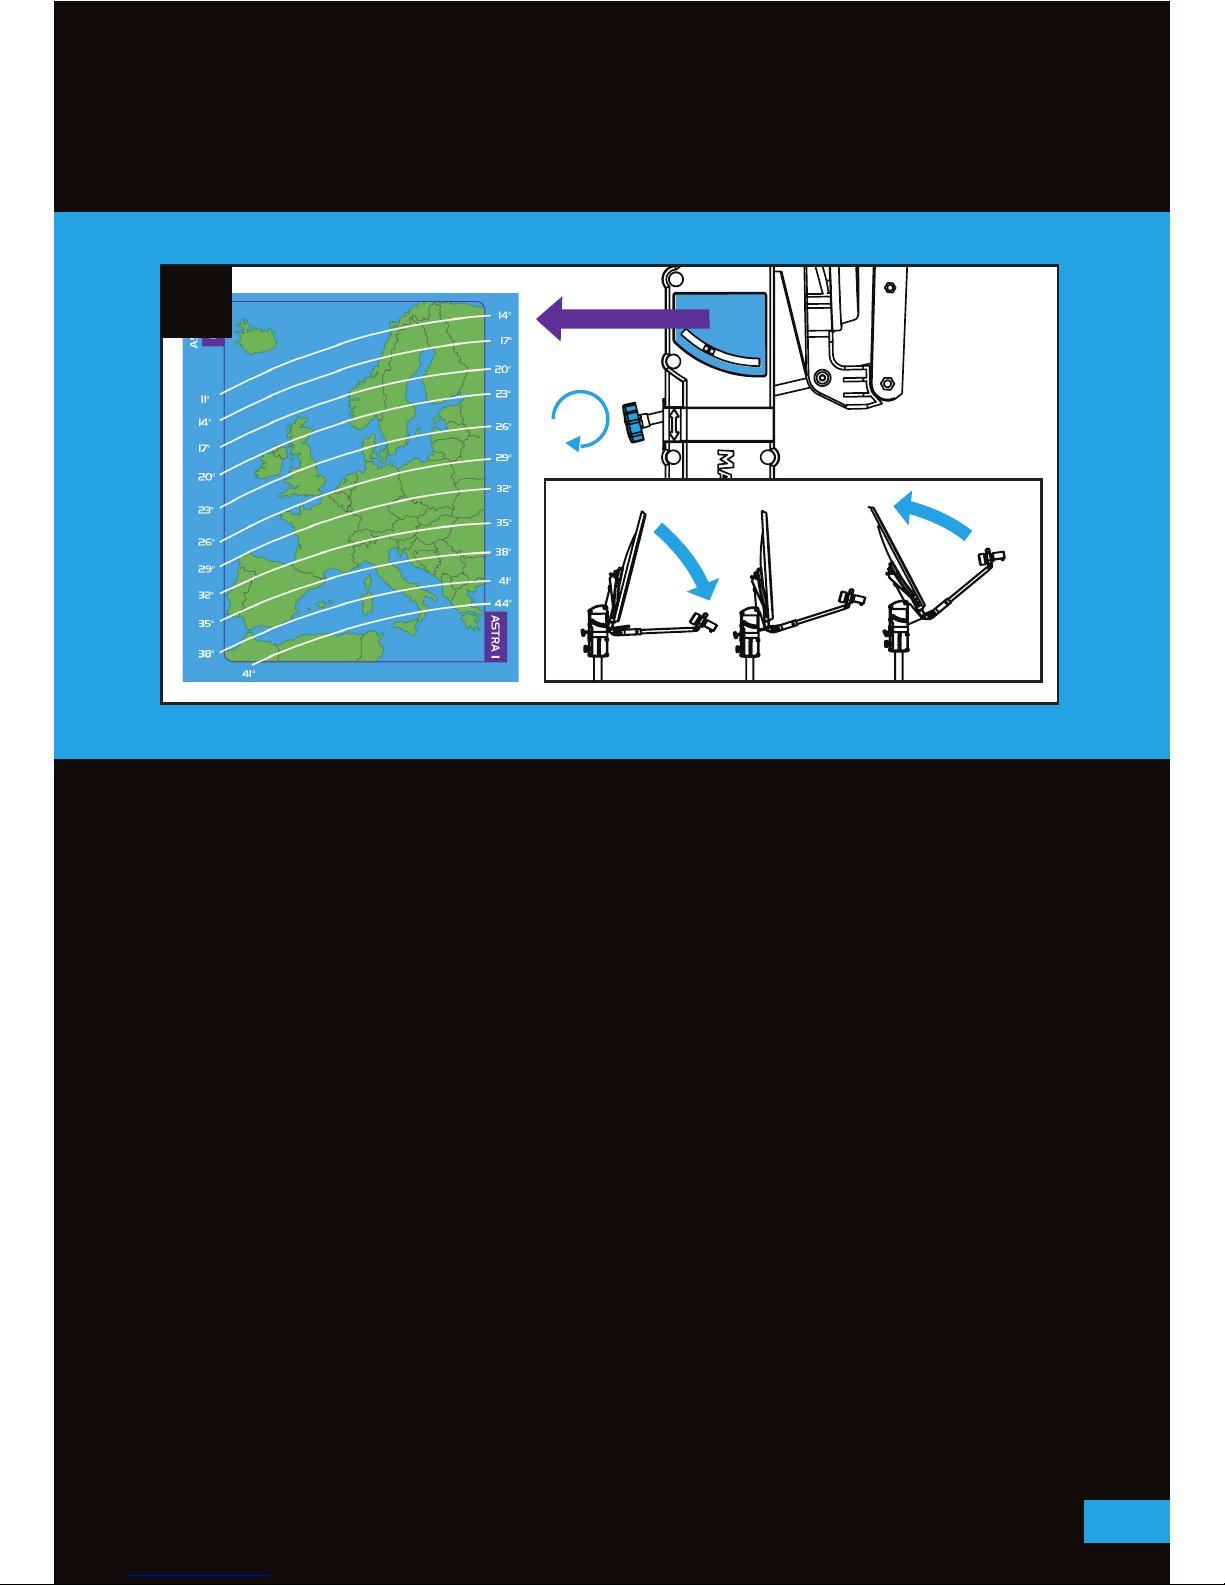
F. Elevation Indicator
Easy to view elevation angle read out.
G. Elevation Adjustment Knob
Turn to adjust elevation angle.
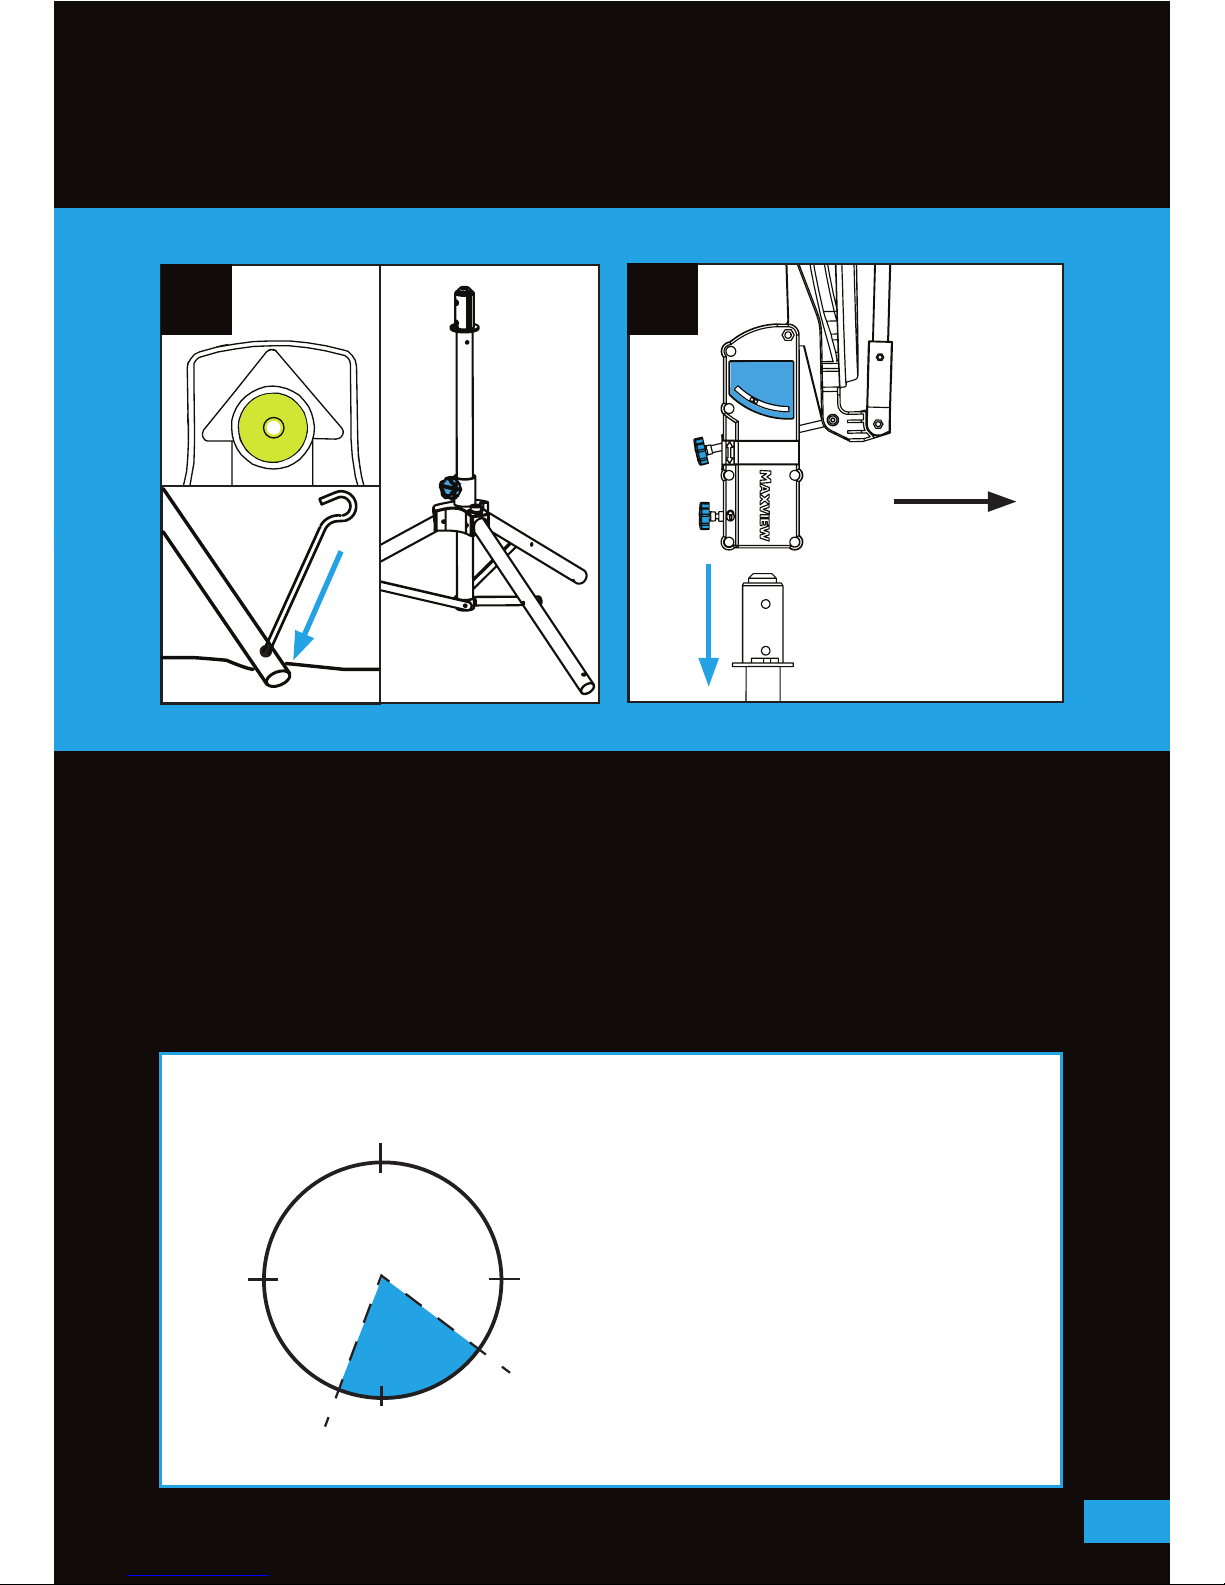
H. Tripod - Dish Unit Interface
Also contains Azimuth rotation stops.
This allows scanning in satellite zone only.
I. Azimuth Lock
To lock off system in correct position once
satellite has been located.
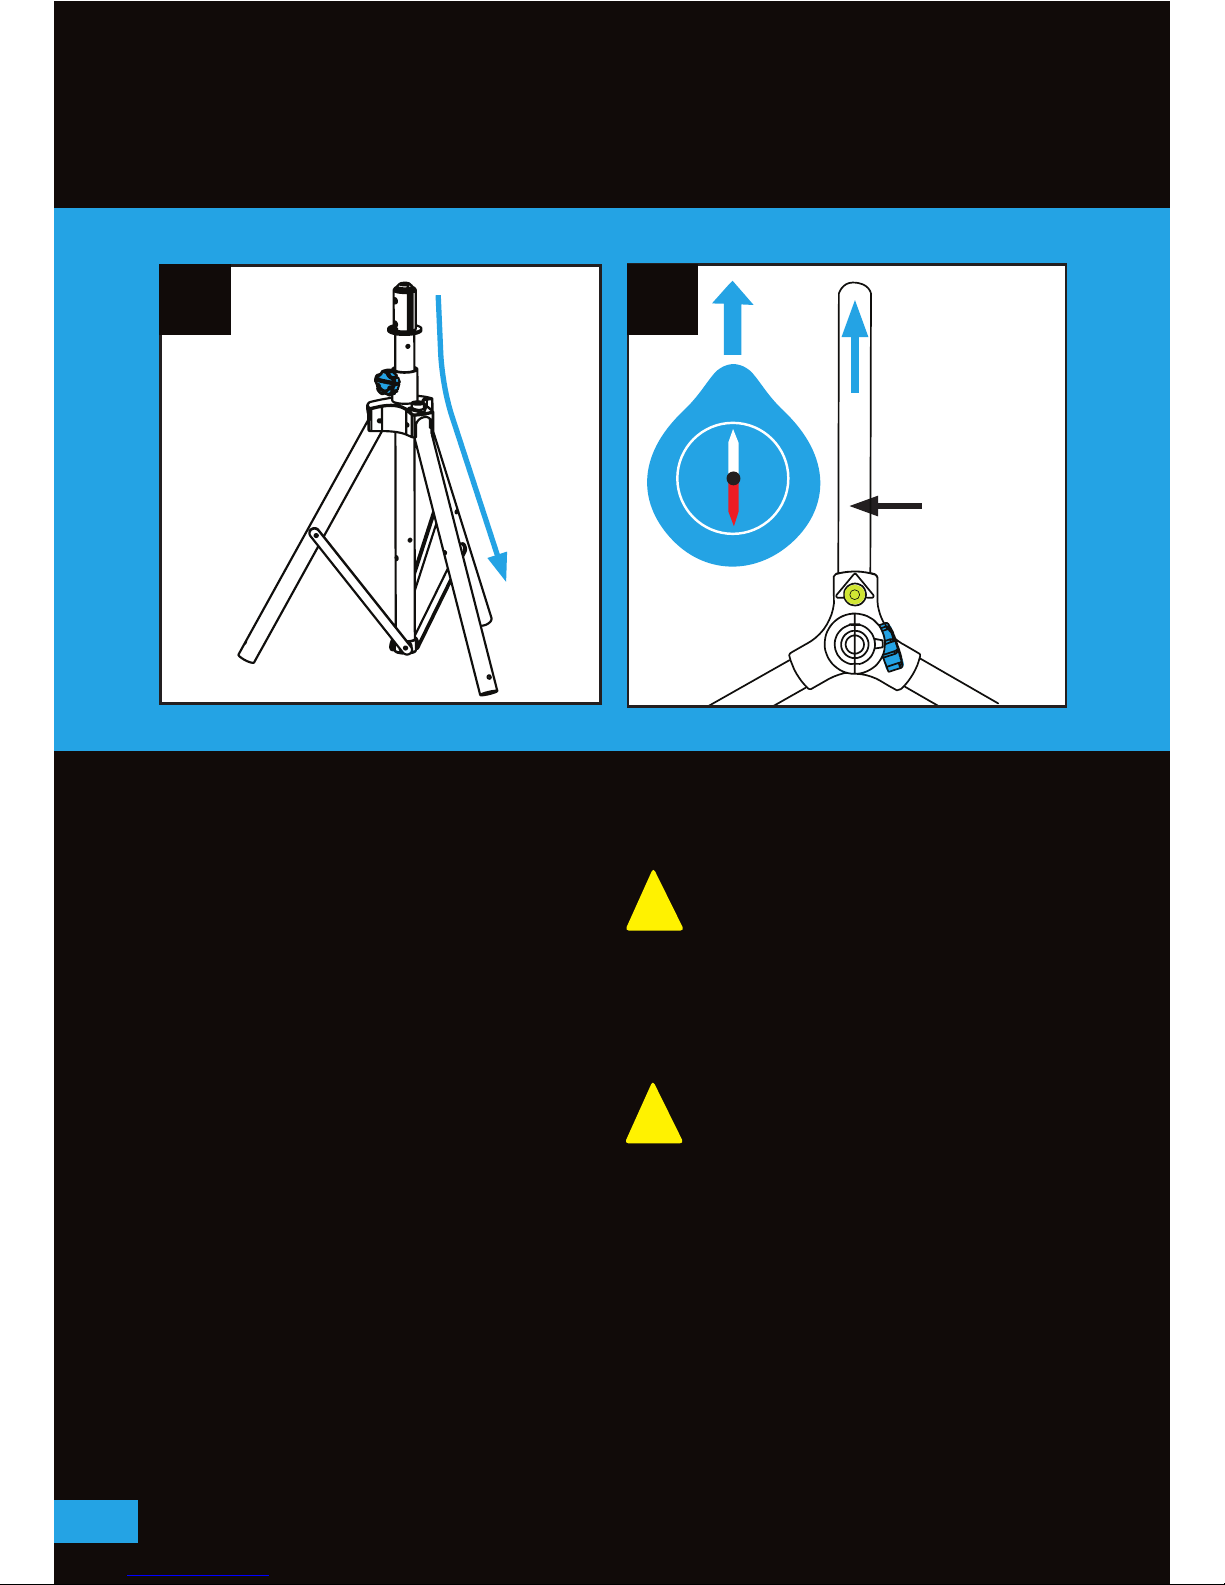
J. Tripod Lock
Used to secure the tripod in assembled
position.
K. Level indicator
A level tripod will allow for quicker set up
and a more accurate elevation reading.
L. South Leg
To point south using compass during set up.
A. Kurzanleitung
Zur schnellen und einfachen Inbetriebnahme.
B. Magnetische LNB-Arm-Befestigung
Zum sichern des LNB-Arms beim Transport
C. Integrierter Sat-Finder
Zur Unterstützung der Ausrichtung der Maxview
Precision Sat-Antenne.
D. Klappbarer LNB-Arm
Für einfaches und leichtes verstauen.
E. Anschlüsse für Koax-Kabel
Einfacher Zugang zum anschließen des
Koax-Kabels
F. Elevations Indikator
Einfaches ablesen des Elevationswinkels
G. Elevations Arretierung
Einfache Arretierung des Elevationswinkels
H. Vormontierte Spiegeleinheit
Begrenzter Schwenkbereich zur leichteren
Ausrichtung.
I. Azimuth Arretierung
Zur Arretierung der Sat-Antenne, wenn Sie den
gewünschten Satelliten gefunden haben.
J. Stativ Feststeller
Zur Arretierung des Statives, wenn das Stativ in
der gewünschten Position steht.
K. Wasserwaage
Unterstützt den schnellen Aufbau, Sie können
ablesen ob das Stativ gerade steht.
L. “Süd-Bein“ Markierung
Um das „Süd-Bein“ richtig Auszurichten
benützen Sie den beiliegenden Kompass.
LERNEN SIE IHR PRECISION
SAT-ANTENNE KENNEN
4

C
E
G
I
J
L
B
D
F
H
K
A
5

1. Erect tripod by pushing firmly down to open
legs. Secure in open position by turning
knob.
1. Öffnen Sie das Sat-Stativ indem Sie die
Beine nach unten ziehen. Sichern Sie das
Stativ in der geöffneten Position mit Hilfe
des Feststellers.
2. Use compass to align the tripod’s south leg
with South on the compass.
Ensure no line of sight obstructions in
South area. e.g. tall buildings or trees,
reference page 11.
2. Benützen Sie den Kompass um das
“Süd-Bein“ optimal nach Süden auszurichten.
Vergewissern Sie sich, dass keine Hindernisse
die Sicht zum Satelliten versperren.
z.B. hohe Gebäude oder
Bäume (Seite 11).
1. 2.
SET UP GUIDE
AUFBAUANLEITUNG
S
W
E
N
!
!
South Leg
Süd-Bein
6

3. Level the tripod (use the level indicator as an
approximate guide only - not critical).
Use the pegs provided to secure tripod to the
ground.
3. Stellen Sie das Stativ gerade hin (Benutzen
Sie dafür die integrierte Wasserwaage als
Richtwert). Um das Stativ zu sichern verwenden
Sie die im Lieferumfang enthaltenen Heringe.
4. Mount dish unit onto tripod with the LNB
arm facing towards the south leg.
(Reference Image 2).
4. Installieren Sie die Spiegeleinheit auf das
Sat-Stativ. Der LNB-Arm muss in Richtung des
“Süd-Beins“ zeigen.
4.
3.
Limited
Satellite Zone (Z).
Limitierter Drehbereich (Z).
SOUTH
SÜDEN
NOTE/MERKE
All TV satellites used in Europe are located
within the zone highlighted in blue.
Your precision tripod has been limited to
this zone to reduce scanning ensuring
satellite location is quick and easy.
Alle TV Satelliten die in Europa Verwendung
finden befinden sich in der blauen Zone.
Das Precision-Stativ hat einen limitierten
Schwenkbereich, so dass Sie den Sat-Spiegel
nur im Segment der blauen Zone bewegen
können. Somit finden Sie Ihren gewünschten
Satelliten schnell und einfach.
NORTH
NORDEN
EAST
OSTEN
WEST
WESTEN
South
Süden
(Z)
7

5. Pull down LNB arm from magnetic lock.
5. Ziehen Sie den LNB-Arm von der
magnetischen LNB-Befestigung nach unten.
6. Plug in the 10m Push Fit ‘F’ to ‘F’ Flexible Cable to
the cable connection port. See page 14 for receiver
end connections.
Note: The Flexible Cable has been designed to push
directly onto the ‘F’ Connector Port for quick and easy
set up.
The sat finder is wired
to the single port.
6. Stecken Sie einfach das Koaxial-Kabel mit den
Quick-Steckern auf den Gewindestutzen. Das Kabel
muss nicht verschraubt werden. (Siehe S. 14 für
Receiver und Verbindungen).
Achtung: Das flexible Koaxial-Kabel kann zur einfachen
Handhabung, einfach auf die Gewindestutzen an der
Antenne sowie am TV-Gerät/Receiver aufgesteckt
werden.
Das Koax-Kabel muss an dem Eingang
(Single-Anschluss) angeschlossen werden.
5. 6.
Single port.
Single-
Anschluss.
Twin port.
TWIN-
Anschluss.
!
!
8

7. Use the elevation map to determine the required angle for your location.
Set the dish to this angle using the elevation knob and indicator.
7. Verwenden Sie die Elevations Landkarte auf Seite 18, um den erforderlichen Winkel für Ihren
Standort zu ermitteln. Stellen Sie nun den gewünschten Elevationswinkel an Ihrer Precision
Sat-Antenne mit Hilfe der Elevationsanzeige ein.
7.
-°+°
9

8. Slowly rotate your dish from left to right
through the zone until the correct satellite
is located and a picture appears on your TV.
To aid the satellite location process you can
use the following methods:
1. Use the integrated sat finder (page 12).
2. Use your receivers built in sat finder.
Please see overleaf for more information on
both of these methods.
8. Drehen Sie nun langsam den Spiegel von
links nach rechts bis der gewünschte Satellit
gefunden ist. Für die Satellitensuche können
Sie folgende Methoden anwenden:
1. Benutzen Sie den integrieten Sat-Finder
(Seite 13).
2. Benutzen Sie den eingebauten Sat-Finder
Ihres Receivers.
Siehe Rückseite für weitere Informationen über
diese beiden Methoden.
9. Once satellite is located, lock off the rotation
by turning Azimuth lock knob. If you are
experiencing signal drop out, fine tune your
signal by slightly adjusting the elevation to
improve TV picture quality. Again, you can aid
this process by using:
1. The integrated sat finder.
2. Your receivers built in sat finder.
9. Wenn der gewünschte Satellit gefunden wurde
fixieren Sie den Sat-Spiegel um ein Verdrehen
zu Verhindern. Um eine evtl. erforderliche
Feineinstellung vorzunehmen gehen Sie bitte
wie folgt vor:
1. Verwenden Sie den integrierten Sat-Finder.
2. Verwenden Sie den eingebauten Sat-Finder
in Ihrem Receiver.
8. 9.
10

SATELLITE LINE OF SIGHT
FREIE SICHT ZUM SATELLITEN
IMPORTANT
Do not block the antenna’s line of sight to satellites in the southern sky at any time.
Make sure your dish has clean line of sight avoiding, buildings, trees and any other close
by obstacles.
!
!
WICHTIG
Versperren Sie nie die freie Sicht zum Satelliten.
Gehen Sie sicher, dass Sie freie Sicht zum Satelliten haben und dieser nicht durch Gebäude,
Bäume oder andere Hindernisse versperrt wird.
Did you know?
Some satellite receivers have a sat finder built in with audio tone. Turn on this tone if you
cannot see your TV.
Wussten Sie, dass?
Alle digitalen Sat-Receiver einen eingebauten Sat-Finder haben. Sollten Sie Ihr Fernsehgerät nicht
sehen können machen Sie einfach den Ton lauter. So können Sie die Sat-Antenne auch ausrichten.
11

USING YOUR SAT FINDER
Your Sat Finder is used to help you locate and find the best signal quality received from satellites.
Using the integrated sat finder.
Tune the sat finder by turning the knob fully anti-clockwise and then slowly clockwise until a deep
tone is heard and until 2-3 red LEDs are lit. Slowly rotate the dish from left to right until the pitch of
the sat finder tone peaks and more LEDs light up.
You should now have a picture on your TV.
Please note if you have a high tone on your sat finder and receiving no reception, you
may have located a different satellite as the sat finder is unable to distinguish between
different satellites. If this happens, repeat the above process, searching a slightly
different area and dish angle.
Also ensure your receiver box is set to the correct satellite.
Fine tuning using the integrated sat finder.
Once a picture has been found, turn the sat finder down to a
deep tone and finely adjust your elevation and azimuth to
improve your signal and receive a higher tone with more lights lit.
Using the receiver sat finder.
Firstly, ensure your built in sat finder is turned off by turning it
fully anti-clockwise so only the green light shows.
Turn your box onto the correct satellite (e.g. Astra 2 for UK)
and bring up the satellite finder menu. (see receiver instructions).
Slowly rotate the dish from left to right until the signal quality
and intensity increases.
Fine tuning using the receiver sat finder.
Once a picture has been found, bring up the satellite finder
menu and finely adjust your elevation and azimuth controls to
improve your signal quality and intensity.
Did you know?
Most receivers have a built in audio tone which sounds when a signal is located.
Please check your receiver instructions.
Use this when you are unable to see your TV screen.
ASTRA 2 (UK TV)
!
12

VERWENDUNG DES INTEGRIERTEN SAT-FINDER
Mit dem integrierten Sat-Finder ist es einfach den gewünschten Satelliten zu finden.
Anleitung für den integrierten Sat-Finder
Starten Sie die Suche indem Sie den Knopf am Sat-Finder gegen den Uhrzeigersinn drehen bis Sie
einen tiefen Ton hören, des weiteren leuchten 2-3 rote LED’s auf. Drehen Sie nun den Spiegel
langsam von links nach rechts bis der Ton immer höher wird und mehr LED’s aufleuchten.
Jetzt sollten Sie ein Bild an Ihrem Fernsehgerät haben.
Bitte beachten Sie, wenn Ihr Sat-Finder einen hohen Ton von sich gibt und
mehrere Leuchtdioden leuchten und Sie kein Bild an Ihrem Fernsehgerät haben
dann haben Sie einen anderen Satelliten gefunden. Wenn das passiert, dann
einfach den Suchvorgang fortsetzen bis der gewünschte Satellit gefunden ist.
Beachten Sie auch, dass Ihr Receiver auf den gewünschten
Satelliten eingestellt ist.
Feineinstellung mit Hilfe des integrierten Sat-Finders
Wenn Sie ein Bild auf Ihrem Fernsehgerät haben drehen Sie den
Knopf an den Sat-Finder gegen den Uhrzeigersinn bis er einen
tiefen Ton von sich gibt und nur noch zwei oder drei Leuchtdioden
am Sat-Finder leuchten. Verändern Sie nun den Elevations- und den
Azimutwinkel um ein verbessertes Signal zu empfangen, so dass
der Ton höher wird und mehr Leuchtdioden aufleuchten.
Verwendung des eingebauten Sat-Finders in Ihrem Receiver
Vergewissern Sie sich, dass der integriert Sat-Finder ausgeschalten
ist. Drehen sie den Knopf gegen den Uhrzeigersinn bis nur noch
die grüne Diode am Sat-Finder leuchtet. Nun stellen Sie den
gewünschten Satelliten an Ihrem Receiver ein (z.B.: Astra 1 für
deutsche Sender). Jetzt müssen Sie das Sat-Finder Menü an Ihrem
Receiver aufrufen. Drehen Sie jetzt wieder den Spiegel von links
nach rechts bis die Signalqualität und Signalstärke Balken steigen.
Feineinstellung mit Hilfe des eingebauten Sat-Finders in Ihrem Recveiver
Wenn Sie ein Bild auf Ihrem TV-Gerät gefunden haben, stellen Sie nun den Elevationswinkel und die
Azimut so ein, bis die beiden Balken den höchsten Wert anzeigen.
Wussten Sie, dass?
Die meisten Receiver mit eingebautem Sat-Finder verfügen über einen akustischen Ton verfügen
der von der Lautstärke ansteigt je besser das Bild wird. Bitte überprüfen Sie in der Anleitung
Ihres Sat-Receivers ob Ihr Receiver über einen akustischen Sat-Finder verfügt.
ASTRA 1 (DE TV)
!
13

GUIDELINES FOR SKY™ SATELLITE RECEPTION
To align the dish to Astra 2 using the sky receiver, use the SIGNAL TEST menu built into the SKY™
digibox. To access this menu:
Press the SERVICES button on the remote control. Enter SYSTEM SETUP (number 4).
Enter SIGNAL TEST (number 6). The display will then show, from top to bottom:
SIGNAL STRENGTH - SIGNAL QUALITY- LOCK INDICATOR - NETWORK ID - TRANSPORT STREAM.
You will need to adjust the dish until there is at least a quarter of the SIGNAL QUALITY bar display,
the LOCK INDICATOR shows OK and the NETWORK ID is displaying 0002. If the NETWORK ID is
showing any other details, you have locked onto the wrong satellite and will need to re-align the dish.
Press BACK Up to exit menu’s.
SKY is a registered Trademark
CONNECTING YOUR PRECISION SYSTEM
ANSCHLUSS SCHEMA
LNB 1
Power
Steckdose
Main TV
Fernsehgerät
Scart or HDMI cable
Scart oder HDMI-Kabel
A. Single LNB
B. Twin LNB - Only available on models MXL012/65TWIN, MXL012/55TWIN, MXL075TWIN
Twin-LNB – Nur bei den Modellen 40043 und 40045 vorhanden.
Note: A twin LNB system can also be connected to 2 receivers. Or 2 TV’s with in-built sat tuners.
Satellite Receiver/Satelliten-Receiver
SIGNAL STRENGTH METER ON SKY™ BOX
For SKY™ box users only: Outside of the UK, problems of reception and aligning the dish can start to
occur. The default frequency of the SKY™ ‘Digi box’ is set to a transponder on the North beam.
As you travel south and move out of the north footprint, you may need to change the default
transponder of the ‘Digi box’ to match the South beam.
To change the default transponder setting you will first need to access the hidden ‘INSTALLER SETUP’
menu. Then press the ’SERVICES’ button on your SKY™ remote and then ‘4’ to access ‘SYSTEM SETUP’.
Although it is not displayed, you will need to press ‘0’ then ‘1’ then ‘SELECT’ to access the ‘INSTALLER
SET UP’ menu, then ‘2’ to enter ‘DEFAULT TRANSPONDER’. The display will then show, from top to
bottom: Frequency, Polarisation, Symbol Rate, FEC and Save New Settings. Select ‘FREQUENCY’ and
by typing in the relevant numbers, change the settings from ‘11.778’ to ‘12050’. Using the arrow keys,
change the settings to 27.5, 2/3, vertical (V). When the changes have been made you will then need to
‘SAVE NEW SETTINGS’. Press ‘BACK UP’ to return to main screen. Note this information is subject to
change check our website for any possible updates.
LNB 2
A
B
14

Free to air/Free to air
Describes any products that receives free
non-encrypted television and radio channels
from a transmitter.
Free to Air bezeichnet alle frei empfangbaren
TV-Sender die ohne Karte empfangbar sind.
GLOSSARY OF TERMS
FACHBEGRIFFE
Line Of Sight/Frei Sicht zum Satelliten
This is a straight line between your
satellite dish antenna and the satellite.
The line between the two needs to be
clear, as anything blocking the path will
result in a signal disruption. See page 11.
Die Sat-Antenne muss freie Sicht zum
Satelliten haben. Die Sicht darf nicht durch
Hindernissen gestört werden.
Elevation/Elevation
The angle between the earth’s surface and a particular
satellite at a given reception point. This is the vertical angle adjustment
of your dish. The elevation angle increases the closer you travel towards
the equator.
Der Winkel zwischen der Erdoberfläche und dem Satelliten hat einen
bestimmten Winkel. Dies ist der Neigungswinkel Ihres Sat-Spiegels. Der
Elevationswinkel wird steiler umso näher man an den Äquator kommt.
Azimuth/Azimuth
The angle between true north and a particular satellite. This is limited
on your Precision Tripod Kit as all European TV satellites are near South.
Das ist der limitierte Schwenkbereich bei der Precision Sat-Antenne.
Alle europäischen TV-Satelliten befinden sich im Süden.
LNB (Low Noise Block)/LNB
The device which receives and collects the
satellite signal reflected from the dish.
Das Gerät empfängt und sammelt die Satelliten
Signale die vom Sat-Spiegel reflektiert werden und
schickt Sie weiter zum Receiver
Footprint/Ausleuchtzone
This represents the broadcasting coverage area
of a particular satellite depending on your dish
size. See page 22 for reference.
Diese zeigt an wo Sie welche TV-Sender
empfangen können. Ist sehr stark abhängig von
der Spiegelgröße siehe Seite 22.
Skew/Skew
This is the rotational position of an LNB on the
dish arm. Skew can be used to maximise signal
in fringe reception areas.
Der Skew (engl. Schiefe, Schrägstellung) gibt
bei Empfangsanlagen für geostationäre
Satelliten die Abweichung der vertikalen
Polarisation des Empfangssignals von der
geografischen Vertikalen an.
Für optimalen Empfang muss das LNB vor der
Satellitenschüssel um den Skew-Winkel geneigt
montiert werden. Deshalb wird für Skew auch
der Begriff LNB-Tilt (engl.: Neigung, Schieflage,
Verkippung) verwendet. Das ist die
Drehungsposition von einem LNB am
Spiegel-Arm .
S
15

ADJUSTING LNB SKEW
EINSTELLEN DES
SKEW-WINKELS
Align Skew angle indication with arrow point or split line (highlighted in red).
Twist LNB to desired angle as shown. For correct angle see the next page for Skew Map.
Entnehmen Sie den richtigen Skew-Winkel entsprechend Ihres Standorts von der Tabelle auf
Seite 17. Verändern Sie den Skew-Winkel nur wenn Sie sich sehr weit Richtung Westen z.B
Portugal, Gibraltar bewegen oder in östliche Richtung z.B. Ungarn, Griechenland reisen.
NORTH
NORDEN
ASTRA 1 ASTRA 2 HOTBIRD
SATELLITE AZIMUTH ALIGNMENT GUIDE
EINRICHTEN DER ANTENNE AUF
DEN RICHTIGEN AZIMUTHWINKEL
Use this general guide to help
determine the direction your desired
satellite is located in the Southerly zone.
Verwenden Sie diese Anleitung Sie wird
Ihnen bei Ihrer Suche nach dem
gewünschten Satelliten sicher helfen.
Alle TV Satelliten befinden sich im Süden.
SOUTH
SÜDEN
EAST
OSTEN WEST
WESTEN
Skew can be adjusted to maximise signal
in fringe areas.
Mit der Skew-Einstellung optimieren Sie den
Empfang Ihrer Sat-Antenne am Rand der
Ausleuchtzone
20°
0°
20°
10°
10°
+
16
30°
30°

SKEW MAP
SKEW KARTE
-30°-28° -26°-24° -22°-20° -18°-16° -14°-12° -10°-8° -6° -4° -2°
6°
4°
2°
0°
17

ELEVATION ZONE MAP
LANDKARTE ZUR ELEVATIONSEINSTELLUNG
18

QUICK SET UP GUIDE
AUFBAUANLEITUNG
19

FAULT FINDING
Remember, to recieve a clear satellite reception and picture, the dish must have the correct vertical
(elevation) and horizontal (azimuth) alignment.
1. I don’t want to use the Sat Finder, can I turn it off?
Simply turn the knob fully to the left. Your sat finder will now be silent and just a green light will be
illuminated. Keeping it in-line doesn’t affect your signal quality and uses very little power.
2. I can’t seem to get my tripod flat using the level indicator.
This is only a guide. As long as your tripod is on relatively flat ground you should locate the right
satellite. If you are on a more uneven surface, this is ok, however, your elevation may
need to be different to the map in order to offset the uneven surface.
3. My Sat Finder has a high pitched tone but I have no picture.
You may have located a different satellite to the one your receiver is set to. E.g. If your receiver is set
to Astra 2 (for UK), you may have located the wrong satellite. You will need to realign your dish. See
page 16 to gain an idea of where you should point your dish and check elevation also.
4. The dish unit doesn’t seem to be dropping onto the tripod.
Ensure you rotation lock is not in the locked position. To do this you will need turn the knob
anti-clockwise.
5. I cant find any satellites in the zone I am limited to by the tripod.
Ensure the south leg is correctly positioned. This means it will be parallel to the South needle (white)
on the compass.
6. I am using one output on my twin kit and my Sat Finder isn’t working.
The Sat Finder is internally wired to the top output. Therefore, if you wish to use your Sat Finder in a
twin kit, but are only using one coaxial connection, ensure you connect the cable to the top output.
Refer to page 12 for more information.
7. Will my satellite system work when pointing through trees and buildings?
Satellite, unlike TV signals, will not work through objects. The satellite dish must have a clear line of
sight to the satellite in the sky.
8. My dish unit does not rotate smoothly.
Ensure the Azimuth lock is fully released before rotating the system.
9. My system appears to have excessive movement between dish unit and tripod.
This is normal and required for rotation, however once you secure the azimuth lock, the system will
become stable and will not affect signal reception or quality.
10. I have noticed water inside my system, is this a problem?
The Precision kit has been designed for outdoor use. Therefore, it has been designed for water to
pass through the unit and exit easily. The system will dry out very quickly.
20
This manual suits for next models
3
Table of contents
Other Maxview Satellite TV System manuals