Mecon RE 250 User manual

© MECON GmbH BA / RE 250 / EN / V17-11
Operating Instructions
RE 250 Variable Area Flowmeter

age 2 / 32 www.mecon.de BA / RE 250 / EN / V17-11
Imprint
All rights reserved. It is prohibited to reproduce this document, or any parts thereof, without prior written
authorization of MECON GmbH.
Subject to change without notice.
Copyright 2017 by
MECON GmbH - Röntgenstraße 105 - 50169 Kerpen - Germany

BA / RE 250 / EN / V17-11 www.mecon.de age 3 / 32
Contents
Contents
1 Safety instructions _________________________________________________________ 4
1.1 Intended use _____________________________________________________________ 4
1.2 Certifications ______________________________________________________________ 5
1.3 Safety instructions from the manufacturer _______________________________________ 5
2 Start-up _________________________________________________________________ 6
3.1 Standard device ___________________________________________________________ 6
3.2 Device with electrical output (MEM) ____________________________________________ 7
3.3 Device with limit switches ____________________________________________________ 7
3 Installation ode of operation _______________________________________________ 8
2.1 Notes on installation ________________________________________________________ 8
2.2 Installation _______________________________________________________________ 8
2.3 Operating principle ________________________________________________________ 10
2.4 Classification according the ressure Equipment Directive 2014/68/EU ________________ 10
4 Service ________________________________________________________________ 11
4.1 Storage _________________________________________________________________ 11
4.2 Maintenance and cleaning __________________________________________________ 11
4.3 Replacing float ___________________________________________________________ 12
4.4 Replacing float damping ____________________________________________________ 12
4.5 Returning the device to the manufacturer ______________________________________ 13
5 Device description _______________________________________________________ 14
5.1 Scope of delivery _________________________________________________________ 14
5.2 Device versions ___________________________________________________________ 14
5.3 Name plate ______________________________________________________________ 16
6 Description code _________________________________________________________ 17
7 Technical Data ___________________________________________________________ 21
7.1 ressure limits vs. temperature stainless steel ___________________________________ 23
7.2 Dimensions and weights ____________________________________________________ 24
8 Electrical connections _____________________________________________________ 28

age 4 / 32 www.mecon.de BA / RE 250 / EN / V17-11
Safety Instructions
1 Safety Instructions
1.1 Intended use
The series RE 250 of flowmeters with a standard length of 250 mm (9.84 inch) and a completely
metal design is suitable for measuring different liquids and gases in closed piping.
The robust design enables the operation in rough conditions. Different types of flanges, liners and
float materials meet the requirements of the pharmaceutical and chemical industries.
The devices are particularly suitable for the easure ent of:
• Water
• Fluids
• Corrosion protection agents
• Lubricants
• Saturated and superheated steam
• Food and beverages
• Industrial gases
Warning!
The operator of these measuring devices is solely responsible for the
suitability, intended use and corrosion resistance of the selected mate
rials. It must be particularly ensured that the materials selected for the
wetted parts of the flowmeter are suitable for the process media to be
measured.
The manufacturer is not liable for any damage resulting from improper or
unintended use of these devices.
No external loads may act upon the meter. The flowmeters are primarily designed for static
applications.
Caution!
Hot surfaces resulting from hot process media.
Danger of burns resulting from surface temperatures above 70 °C.
● Take appropriate protective measures, for example contact protection.
● The design of the contact protection must meet the maximum permissible
ambient temperature of the meter..
Caution!
For devices used in hazardous areas, additional safety notes
apply; please refer to the Ex documentation!
The flowmeter may only be operated within the pressure and voltage limits specified on the name
plate.
Before taking the flowmeter out of operations, check that the unit is free of hazardous media and
de-pressurized.

BA / RE 250 / EN / V17-11 www.mecon.de age 5 / 32
Safety Instructions
1.2 Certifications
CE arking
The anufacturer certifies for the device RE 250 eets all statutory require ents of the
following EC directives by applying the CE arking:
• ressure equipment directive 2014/68/EU
• Low voltage directive 2014/35/EU *
• EMC-directive 2014/30/EU
• NAMUR recommandation NE21 *
• ATEX directive 94/9/EC **
(*Devices with electrical installations)
(**Devices for use in hazardous areas)
1.3 Safety instructions fro the anufacturer
Disclai er
The manufacturer will not be liable for any damage resulting from the use of its product, including,
but not limited to direct, indirect, incidental, punitive and consequential damages.
Any product purchased from the manufacturer is warranted in accordance with the relevant product
documentation and our Terms and Conditions of Sale.
The manufacturer reserves the right to revise the content of its documents, including this disclaimer,
without prior notification, and will not be liable in any way for possible consequences of such changes.
Product liability and warranty
MECON GmbH assumes no guarantee for repair work carried out by the customer without prior
notification and consultation. Any instruments or parts rejected by a customer must be returned to
us, if no other arrangement has been made.
General infor ation
This manual is intended for the correct installation as well as operation and maintenance of the
devices. Read the instructions carefully before installing the device and placing it into operation.
Specially designed or customized models and specialized applications are not included in this
manual.

age 6 / 32 www.mecon.de BA / RE 250 / EN / V17-11
Start up
2 Start-up
2.1 Standard device
When starting up the device, the following points must be observed:
● Ensure that the actual operation conditions (pressure, temperature) do not exceed the limits
which are given on the nameplate of the device
● Avoid float impacts!
Therefore it is recommended to start up with a closed shut-off valve to be opened slowly. The use
of solenoid valves is not recommended.
● When measuring liquids, the pipes must be vented slowly to prevent shock pressure due to gas
bubbles.
● When measuring gases, the pressure must be increased slowly in order to prevent high shock
pressure.
● During start-up of new systems, residual materials may be carried in the medium and could
adhere to the float. In such cases it is recommended to clean the instrument after a relatively
short period of operation.
● When operating the flowmeter at low flowrates, the device has to start-up with a high flowrate to
allow the float to level out. This will ensure measurements within the specified accuracy class.
Special issues for easuring gas flow:
● Valves have to be installed downstream of the device if p
abs
>1.013 bar and upstream of the
device if p
abs
=1.013 bar (free outflow).
● Install a throttle just downstream of the device to prevent compression oscillations during
measurement.
● Ensure that the operating pressure for the flowmeter corresponds to the calibration reference
pressure to avoid erroneous measurements.
Float da ping
A float damping is recommended
● in general for measuring gases
● where piping vibrations can not be avoided
It is also strongly recommended in the case of:
● applications where air bubbles in the medium cannot be avoided
● possibility of shock pressure in the piping, e.g. due to rapid throttling or process shut-off
● turbulence, pulsations, etc. which could lead to vibrations of the flowmeter
● rapid pressure build-up in the piping

BA / RE 250 / EN / V17-11 www.mecon.de age 7 / 32
Start up
2.2 Device with current output (MEM)
The magneto-electrical measuring transducer (MEM) is factory-set when it is delivered to the
customer.
After applying the supply voltage to the device, initially the current output will be about 3.5 mA
to 4 mA for a few seconds. After that a current corresponding to the pointer deflection will flow.
Important!
Due to the influence of the float magnet, the MEM transmitter will only
output the correct current if the pointer position is caused by the float.
Turning the pointer manually will cause incorrect values, but it is suitable
for testing the unit.
2.3 Device with li it switches
The limit switches can be set over the entire measuring range by varying the position of the limit
pointers.
Important!
Unless otherwise specified by the customer, the factory set value for the
switching point on versions with one limit switch is about 0% of URV
and for devices with two limit switches it is about 20% / 80% of URV.
To set the limit switches at the desired position the following steps have to be observed:
● Unloosen the two small fixing screws (2) before moving the pointer (1).
● Move the pointer to the desired position.
● Tighten the screws to fix the pointer.
Fig. 2 Adjustment of the switching point (limit switch)
1 Limit pointer
2 Fixing screw

age 8 / 32 www.mecon.de BA / RE 250 / EN / V17-11
Installation
3 Installation and ode of operation
3.1 Notes on installation
Information !
All instruments are carefully checked for functional capability before
shipment. Upon receipt of the device please carry out a visual inspection
of the outer packing for damage or improper handling.
Please contact the delivery carrier if you discover any defects. In such
cases a description of the defect, the type and the serial number of the
device are needed.
Information !
Unpack the equipment with care to prevent damage.
Information !
All instruments are carefully checked for order conformity.
Please check the delivery for completeness using the packing list. Please
examine the flowmeter nameplate to verify that the device was built
according to your order. Particularly check devices with electrical
components for the correct supply voltage.
3.2 Installation
Below the essential points concerning installation are described and have to be observed:
● Remove the transport securing device from the fitting.
● rior to the installation verify that the float slides smoothly in the fitting without canting or
deadlocking. The pointer must follow the float movement smoothly.
● Verify that all accessories such as spring stop, gas/fluid damping are still correctly fixed in the
fitting.
● In the zero position (no flow) the pointer must be at the marked reference point (first line on
the scale). When moving the float manually to the end position, the pointer must be above the
final value of the scale.
● The flowmeter must be installed vertically – flow direction from bottom to top. For installation
recommendations refer to guideline VDI/VDE 3513 art 3.
● The installation in the piping must be tension-free – therefore the piping must be positioned
parallel and aligned with each other.
● Avoid a corrosive atmosphere –provide ventilation where necessary.
● Ensure a sufficient distance of at least 200 mm to magnet-influencing parts such as solenoid
valves or ferromagnetic components e.g. steel brackets.
● Observe a lateral distance of at least 300 mm between two devices mounted next to one
another. The distance can be reduced by mounting the devices staggered by the length of one
device. To eliminate doubt the influence can be tested by moving the instrument up and down

BA / RE 250 / EN / V17-11 www.mecon.de age 9 / 32
Installation
ca. 200 mm at a selected distance while observing whether the position of the pointer on the
display changes.
● Specify the installation zone regarding a reliable reading of the displayed values and adequate
spacing for servicing.
● An inlet run upstream and an outlet run downstream the device is not necessary in case of a
linear media flow profile. In cases of highly asymmetrical flow profiles, however, additional
measures (e.g. inlet tracks, flow rectifiers) with a length of at least 250 mm could be
appropriate to ensure the measuring accuracy.
● Avoid the installation of unilaterally constricting fittings upstream of the device.
● Ensure that the piping is installed securely to avoid vibration or oscillation of the devices.
● The nominal width of the flowmeter and the connected piping must be identically.
● Use connectors connecting bolts suitable for the particular device version (dimension, pressure
rating).
● Ensure that the clearance between the flanges of the piping corresponds to the device
dimension in addition to two gaskets.
● Before connecting the device, blow or flush out the pipes leading to the device.
● The surface roughness of the flange sealing areas must be appropriate for the used gaskets.
● The gaskets and bolts of the prescribed dimensions must be appropriate for the operating
pressure, the temperature and the media.
● Do not use carbon steel ounting brackets for the device!
Additionally for devices with PTFE liner:
● Use gaskets which conform to the inner and outer dimensions of the raised face of the
flowmeter.
● Tighten the screws crosswise to ensure the tightness of the process connections. For tightening
torques please refer to Tab. “2.2 Tightening torques”.
● If the instrument is absolutely calibrated for a pressure exceeding 1.013 bar any valve is
usually installed at the rear of the flowmeter, at 1.013 bar absolute (free emanation) in front
of the instrument.
Special issues for easuring gas flow:
● Valves have to be installed downstream of the device if p
abs
>1.013 bar and upstream of the
device if p
abs
=1.013 bar (free outflow).
● Install a throttle just downstream of the device to prevent compression oscillations during
measurement.
● Ensure that the operating pressure for the flowmeter corresponds to the calibration reference
pressure to avoid erroneous measurements.
Tightening torques
The flange bolts for devices with TFE liner may be tightened with the following torques (acc.
guideline VDI/VDE 3513):

age 10 / 32 www.mecon.de BA / RE 250 / EN / V17-11
Installation
Process connection ax. torque
EN1092-1 ANSI B16.5 N ft
lbf
15 ½” 14 10
25 1” 14 10
40 1 ½” 25 18
50 2” 25 18
80 3” 35 25
100 4” 42 30
Tab 2.2 Tightening torques for devices with TFE liner
Magnetic filters
To prevent a malfunction of the flowmeter caused by ferromagnetic substances contained in the
medium (such as weld beads) a magnetic filter should be mounted in flow direction upstream of
the instrument.
This kind of filter is also recommended if such particles cannot be avoided in standard operation.
3.3 Operating principle
Like other devices of this series the variable area flowmeter RE 250 operates according to the
principle of flotation:
The measuring unit consists of a metal tube with a measuring ring in which a float can move up
and down. The media is flowing upwards through the tube and raises the conical float. Here the
annular gap enlarges until the equilibrium between the buoyancy force F
A
, the drag force F
S
and
the weight of the float F
G
is reached. The adjusted height of the float is directly proportional to
the flowrate. The movement of the float is transmitted via a magnet inside the float to a
corresponding magnet inside the display unit outside of the measuring pipe.
Fig. 1 Operating principle of the RE 250

BA / RE 250 / EN / V17-11 www.mecon.de age 11 / 32
Service
3.4 Classification
Classification in accordance with the ressure Equipment Directive 2014/68/EU:
Process connection Ad issible edia Category
EN1092-1 ANSI B16.5
DN 15 ½ ” Gases and fluids of fluid group 1 Art. 3.3
DN 20 ¾ ” Gases and fluids of fluid group 1 Art. 3.3
DN 25 1 ” Gases and fluids of fluid group 1 Art. 3.3
DN 32 1 ¼ ” Gases and fluids of fluid group 1 III
DN 40 1 ½ ” Gases and fluids of fluid group 1 III
DN 50 2 ” Gases and fluids of fluid group 1 III
DN 65 2 ½ ” Gases and fluids of fluid group 1 III
DN 80 3” Gases and fluids of fluid group 1 III
DN 100 4” Gases and fluids of fluid group 1 III
DN 125 5” Gases and fluids of fluid group 1 III
DN 150 6” Gases and fluids of fluid group 1 III
4 Service
4.1 Storage
● Store the device in a dry and dust-free place.
● Keep away from direct sun and heat.
● Avoid external loads to the device.
● The storage temperature range for standard devices with electrical components is
-40 … +70 °C / -40 … +158 °F.
4.2 Maintenance and cleaning
The devices are built for low maintenance operations but periodically the flowmeters should be
inspected for signs of corrosion, mechanical wear as well as damage to the fitting and the display
unit.
We advise to carry out inspections at least once a year.
For a
detailed inspection and cleaning the device must be removed from the piping.
Caution!
Appropriate safety precautions have to be taken when removing the device.
Always use new gaskets when reinstalling the device in the piping.

age 12 / 32 www.mecon.de BA / RE 250 / EN / V17-11
Service
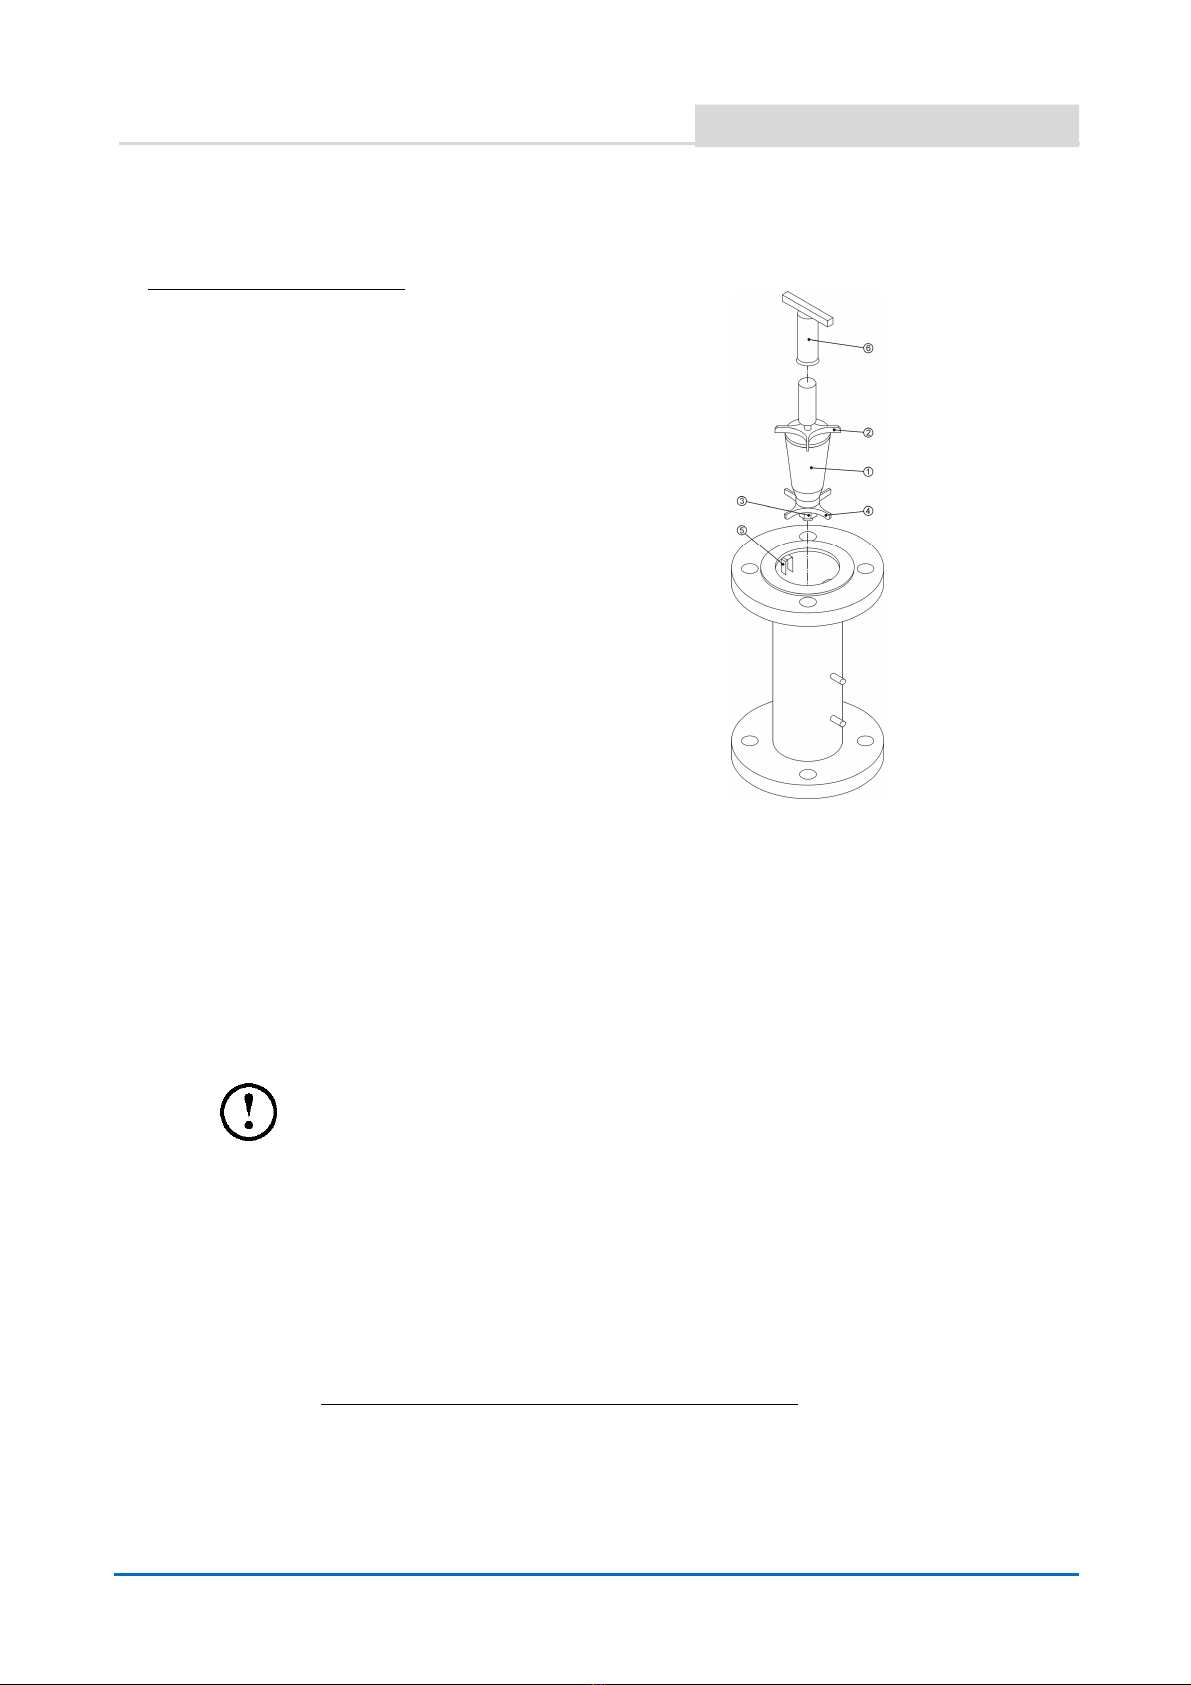
4.3 Replacing float
Devices with measuring ring
For devices with standard measuring ranges
starting from 5 - 50 l/h (gases: 0.15 – 1.5 m³/h)
the replacement of the float can be provided by the
customer:
● Remove the device from the piping.
● Fix the device ideally in a horizontal position,
ensuring that the fitting will not be damaged.
● revent the float
from torsion by fixing the
upper guide bracket
using a suitable tool.
● Remove the self-locking nut
which fixes the
lower guide bracket
and take the guide
bracket out of the fitting.
● Take the float upwards out of the measuring
unit.
● Insert the new float into the fitting from the top.
At the same time carefully guide the bottom
end of the float through the measuring ring.
● Slip the lower guide bracket through the thread at the bottom end of the float and fix it with
the self-locking nut.
● Install the device back into the piping.
Important!
Avoid damaging both float and measuring ring.
Important!
After float replacement a recalibration of the flowmeter is highly
recommended, otherwise the measurement accuracy cannot be ensured.
Devices with cone
● Replacing floats for devices with cone (standard measuring ranges up to 5 - 50 l/h (gases:
0.15 – 1.5 m³/h) cannot be done by the customer. The device has to be returned to the
manufacturer. For details please refer to chapter “6.4 Returning the device to the
manufacturer”.
Fig. Replacing floats
1 Float
2 Upper guide bracket
3 Self-locking nut
4 Lower guide bracket
BA / RE 250 / EN / V17-11 www.mecon.de age 13 / 32
Device Description
4.4 Replacing float da ping
Devices with measuring ring
For devices with standard measuring ranges starting from
5 - 50 l/h (gases: 0.15 – 1.5 m³/h) the float damping can
be replaced by the customer:
● Remove the device from the piping.
● Fix the device, ensuring that the fitting will not be
damaged.
● The damping cylinder is fixed by retaining clamps .
Bend up these two clamps carefully using a suitable tool.
● Move the damping cylinder slightly to the bottom end of
the fitting, make a quarter turn and take the cylinder out
of the fitting.
● Insert the new damping cylinder into the fitting from the
top, slide it over the damping part of the float and
arrange it into the retaining clamps.
● Fix the cylinder by bending the retaining clamps
together.
● Install the device back into the piping.
4.5 Returning the device to the anufacturer
This device has been carefully manufactured and tested. Should you nevertheless need to return
a device to MECON GmbH please observe the following points:
Caution!
According to the actual waste disposal directives, the owner/customer is
responsible for the waste management of hazardous and toxic waste.
For reasons of environmental protection and safeguarding the health and
safety of our personnel all devices sent to MECON GmbH to be
repaired must be free of toxic and hazardous substances. This also
applies to cavities of the devices. If necessary the customer is
kindly requested to neutralize or rinse the devices before returning
them to MECON.
The customer has to confirm this by filling in an appropriate form which is
available for download on the MECON website:
www.mecon.de/en/Declaration/Decontamination.pdf
Fig. 3 Replacing float damping
1 Float with damping
2 Upper guide bracket
3 Self-locking nut
4 Lower guide bracket
5 Retaining clamp
6 Damping cylinder

age 14 / 32 www.mecon.de BA / RE 250 / EN / V17-11
Device Description
5 Device Description
5.1 Scope of delivery
Fig. 5 Scope of delivery
Information!
Please check the delivery for completeness using the packing list.
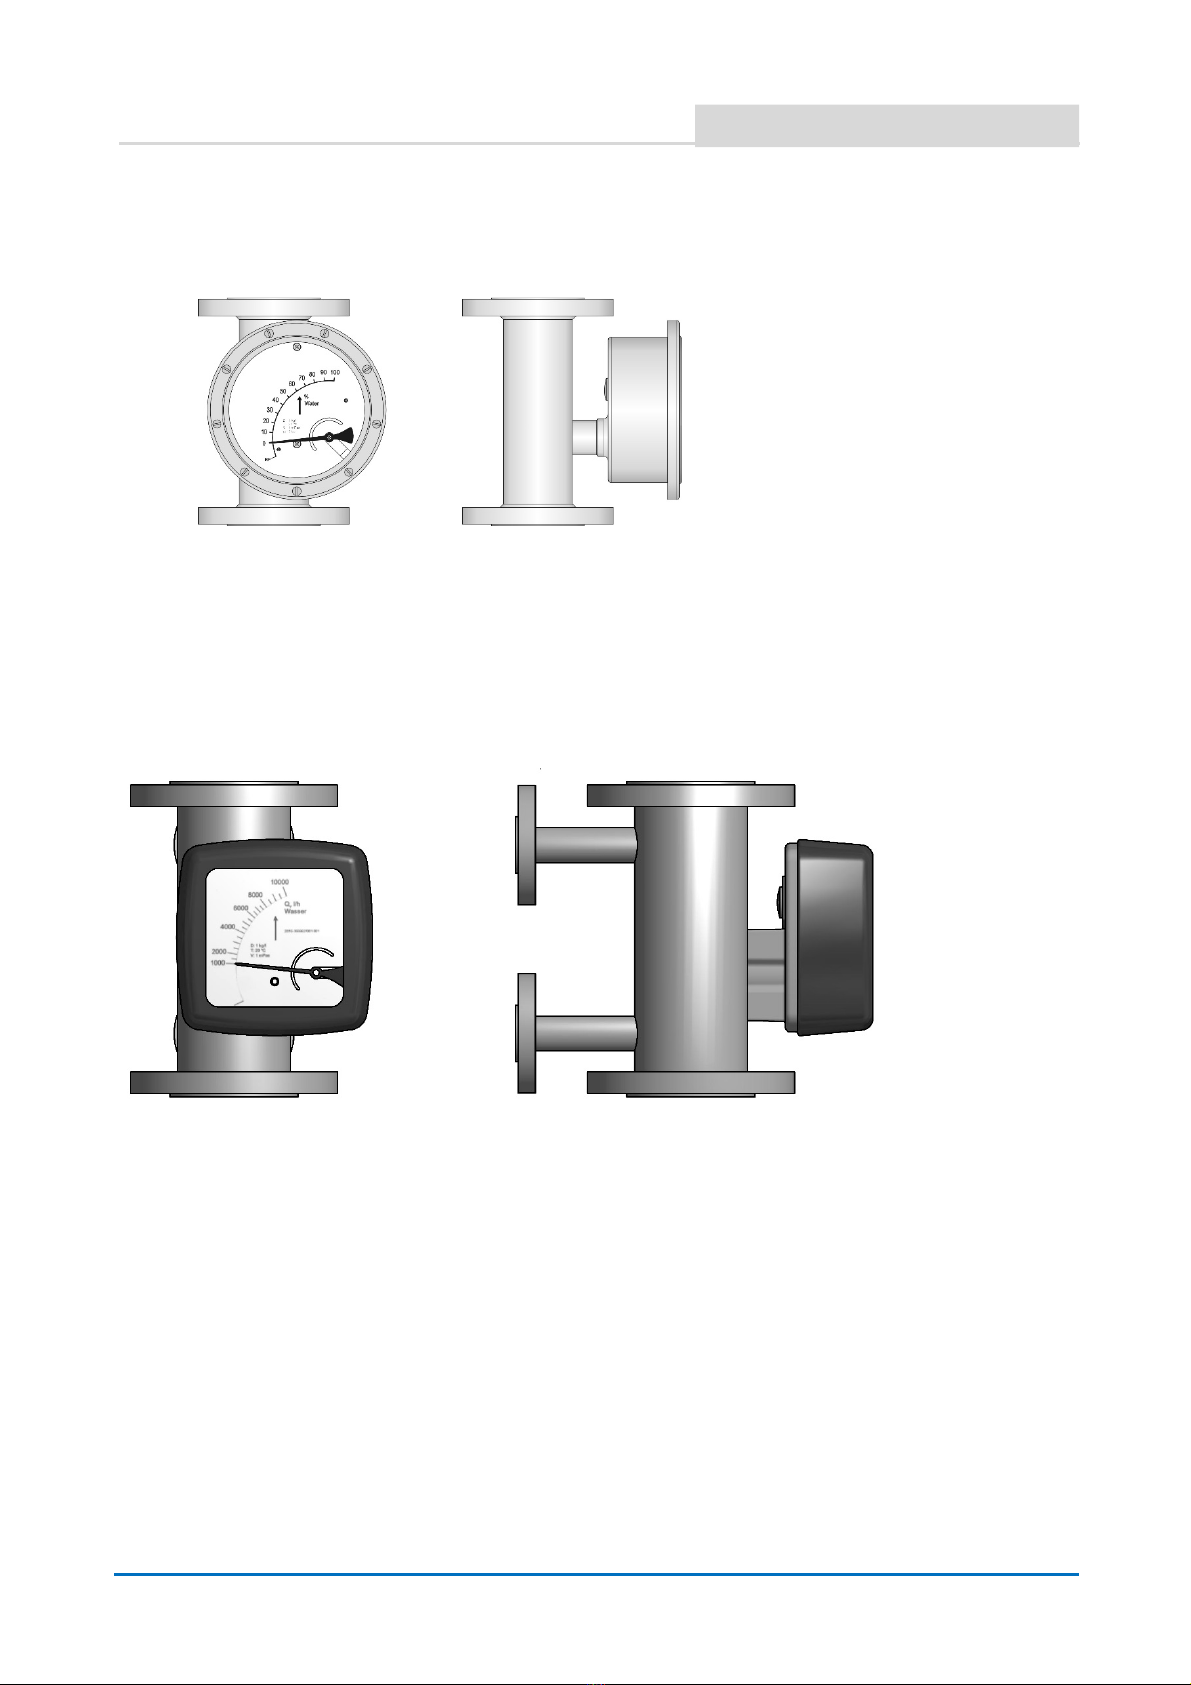
5.2 Device versions
Display unit ade of alu iniu
Fig. 6 Standard device with display unit made of aluminium
The measurement range is indicated directly on the scale. The equipment can be supplied with
auxiliary electrical components and touch-sensitive switches for process monitoring and control.
1 Flowmeter RE 250
2 Operating Instructions
3 Certificates (optional)
4 Software (optional)
BA / RE 250 / EN / V17-11 www.mecon.de age 15 / 32
Device Description
Display unit ade of stainless steel
Fig. 7 Standard device with display unit made of stainless steel
For applications with requirements for higher protection category or corrosion resistance the
devices are available with a display unit made of stainless steel.
Heating shield
Fig. 8 Device with heating sheath
For installations where temperature drops are unacceptable the devices are available with an
external heating shield.

age 16 / 32 www.mecon.de BA / RE 250 / EN / V17-11
Device Description
5.3 Na eplate
Important!
Please refer to the device nameplate to ensure that the device is built
according to your order.
Check particularly for the correct supply voltage.
Fig. 9 Nameplate of the RE 250
BA / RE 250 / EN / V17-11 www.mecon.de age 17 / 32
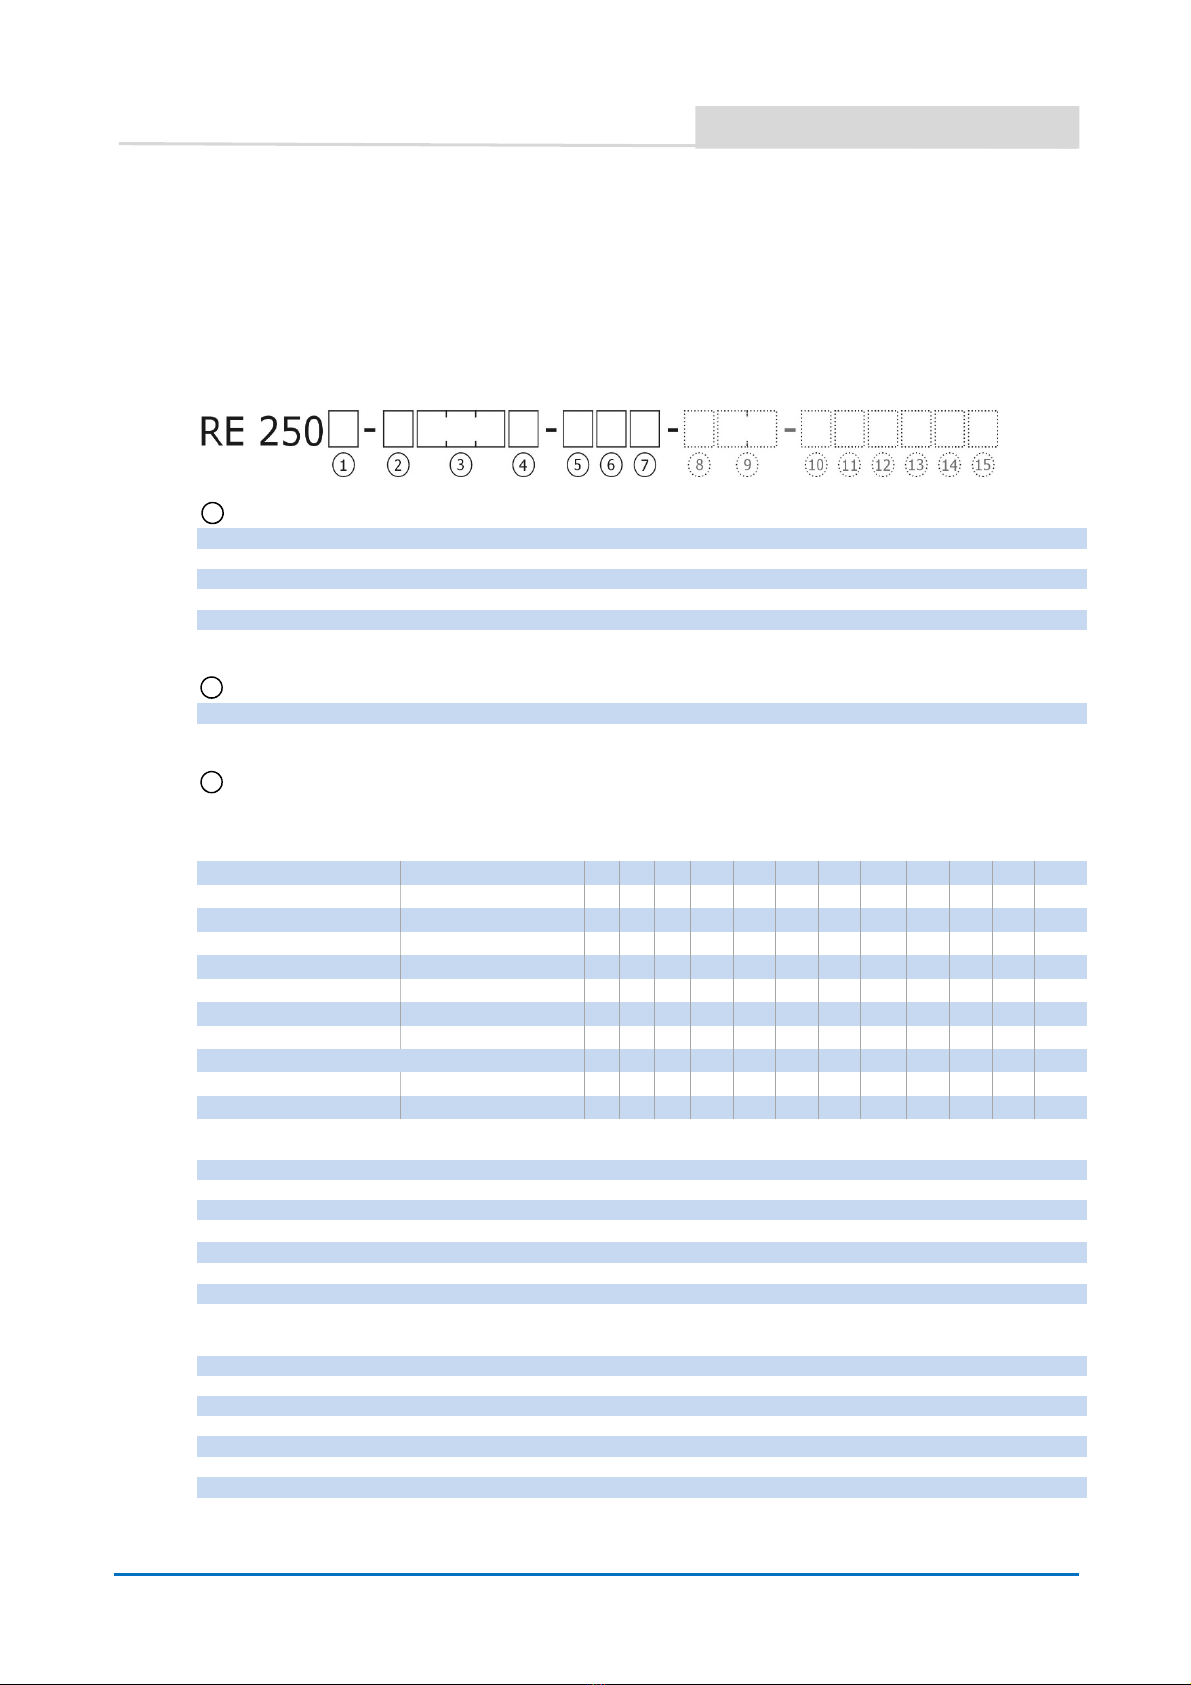
Description Code
6 Description code
Individual part for versions CF-S (stainless steel) and EF-H (Hastelloy
®
)
The description code consists of the following elements:
1
Flow tube
A DN 15
B DN 25
C DN 40
D DN 50
E DN 80
F DN 100
2
Version
1 CF-S wetted parts: stainless steel
2 EF-H wetted parts: Hastelloy
®
3
Process connections
Flanges
EN1092-1 ANSI B16.5
Flow tube EN Flow tube ANSI
A
B
C
D
E
F
A
B
C
D
E
F
No inal size
Axx DN 15 ½ ”
Bxx DN 20 ¾ ”
Cxx DN 25 1 ”
Dxx DN 32 1 ¼ ”
Exx DN 40 1 ½ ”
Fxx DN 50 2 ”
Gxx DN 65 2 ½ ”
Hxx DN 80 3”
Jxx DN 100 4”
Kxx DN 125 5”
Lxx DN 150 6”
= available = reduced scale raised face
Pressure rating
xBx N 16 (EN 1092-1) DN 65 - DN 150
xDx N 40 (EN 1092-1) DN 15 - DN 150
xEx N 63 (EN 1092-1) DN 50 - DN 150
xFx N 100 (EN 1092-1) DN 15 - DN 150
xGx N 160 (EN 1092-1) DN 15 - DN 150 (DN 20 and DN 32 not available)
xHx 150 lbs (ASME B16.5) ½ ” – 6 ”
xJx 300 lbs (ASME B16.5) ½ ” – 6 ”
xKx 600 lbs (ASME B16.5) ½ ” – 6 ”
Flange for
xxA B1 (EN 1092-1) N 16 / N 40
xxB B2 (EN 1092-1) N 63 / DN 100
xxC Form D (EN 1092-1) DN 15 - DN 150
xxD Form C (EN 1092-1) DN 15 - DN 150
xxG Form RF (ASME B16.5) ½ ” – 6 ”
xxH Form FF (ASME B16.5) ½ ” – 6 ”
xxJ Form RTJ (ASME B16.5) 1 ” – 6 ”

age 18 / 32 www.mecon.de BA / RE 250 / EN / V17-11
Description Code
3
Process connections (continued)
Threaded connection
Txx Female thread Flow tube EN
xTx DIN ISO 228 1500lbs 1500lbs 1500lbs 900lbs
xNx N T ANSI B 1.20.1 N100 N100 N100 N63
DIN ISO 228
ANSI B1.20.1
A B C D
xx7 G ¼ N T ¼”
xx8 G ⅜ N T ⅜”
xx1 G ½ N T ½”
xx2 G ¾ N T ¾”
xx3 G 1 N T 1”
xx4 G 1 ¼ N T 1 ¼”
xx5 G 1 ½ N T 1 ½”
xx6 G 2 N T 2”
4
Heating sheath
0 Without
1 With flange connection DN 15 DIN 2501 N 40 in stainless steel
2 With flange connection DN 25 DIN 2501 N 40 in stainless steel
3 With flange connection ½ “ ANSI B16.5 150 RF in stainless steel
4 With flange connection 1 “ ANSI B16.5 150 RF in stainless steel
5
Maxi u range values / Measuring ranges
Fluids Gases Ratio
Pressure drop
[ bar]
[l/h]
[USgp ]
[ ³/h]
[scf ]
A
B
C
D
E
F
1 5 0,022
0,15
0,088
1:10
40
2 10 0,044
0,30
0,177
1:10
40
3 16 0,07
0,48
0,283
1:10
40
4 25 0,11
0,75
0,441
1:10
40
5 40 0,18
1,3 0,765
1:10
40
A 50 0,22
1,5 0,883
1:10
40
B 70 0,31
2,1 1,24
1:10
40
C 100 0,44
3,0 1,77
1:10
60
D 160 0,70
4,6 2,71
1:10
60
E 250 1,10
7,0 4,12
1:10
60
F 400 1,76
11 6,47
1:10
70
G 600 2,64
17 10,00
1:10
80
H 1000 4,40
30 17,66
1:10
60
J 1600 7,0 46 27,07
1:10
70
K 2500 11,0
70 41,20
1:10
100 50
L 4000 17,6
110
64,74
1:10
240 120 80
M 6000 26,4
170
100,0
1:10
180 90
N 10.000
44,0
290
170,7
1:10
110
P 16.000
70,0
460
270,7
1:10
230 70
Q 20.000
88,0
550
323,7
1:10
230 70
R 25.000
110,0
700
412,0
1:10
500 100
S 40.000
176,0
1.100
647,4
1:10
350 120
T 50.000
220,0
1.350
794,6
1:10
350 120
U 60.000
264,0
1.700
1.000
1:10
360
V 80.000
352,0
2.400
1.413
1:10
600
W 100.000
440,0
3.000
1.766
1:10
600
* devices for media with higher viscosity on request = not available
6
Measured ediu
1 Water (η= 1 m as, ρ = 1 kg/l)
2 Air (T = 0 °C, pe = 0 bar, η= 0.0181 m as, ρ = 1,293 kg/m³)
3 Specify in plain text
7
Float da ping
0 Without float damping
1 With float damping
= available

BA / RE 250 / EN / V17-11 www.mecon.de age 19 / 32
Description Code
Individual part for version FF-P (PTFE liner)
The description code consists of the following elements:
1
Flow tube
A DN 15
B DN 25
D DN 50
E DN 80
F DN 100
3
Process connections
EN1092-1
ANSI B16.5
Flow tube EN Flow tube ANSI
No inal Size
A
B
D
E
F
A
B
D
E
F
Axx DN 15 ¾”
Cxx DN 25 1”
Fxx DN 50 2”
Hxx DN 80 3”
Jxx DN 100 4”
Pressure
rating
xBx N 16 B1 (EN 1092-1)
DN 100
xDx N 40 B1 (EN 1092-1)
DN 15 - DN 100
xHx 150 lbs (ASME B16.5)
¾” – 4 ”
xJx 300 lbs (ASME B16.5)
¾” – 4 ”
Flange
for
xxA B1 (EN 1092-1)
N 16 / N 40
xxG Form RF
(ASME B16.5)
½ ” – 4 ”
5
Maxi u range values / Measuring ranges
Fluids Gases Ratio Viscosity
li its* Pressure drop [ bar]
[l/h]
[USgp ]
[ ³/h]
[ Pa
s]
[ Pa
s]
A
B
D
E
F
C 100 0,44 3,0 1,77 1:10 ≤ 1,0 60 60
D 160 0,70 4,6 2,71 1:10 1 … 3 60 60
E 250 1,10 7,0 4,12 1:10 1 … 3 60 60
F 400 1,76 11 6,47 1:10 1 … 3 70 70
G 600 2,64 17 10,00 1:10 1 … 5 80 80
H 1000 4,40 30 17,66 1:10 1 … 5
60
J 1600 7,0 46 27,07 1:10 1 … 5
70
K 2500 11,0 70 41,20 1:10 1 … 5
100
L 4000 17,6 110 64,74 1:10 1 … 8
80
M 6000 26,4 170 100,0 1:10 1 … 8
90
N 10.000
44,0 290 170,7 1:10 1 … 8
110
P 16.000
70,0 460 270,7 1:10 1 … 10
230
Q 20.000
88,0 550 323,7 1:10 1 … 10
230
R 25.000
110,0 700 412,0 1:10 1 … 10
100
S 40.000
176,0 1.100 647,4 1:10 1 … 15
120
* devices for media with higher viscosity on request
= not available
6
Measured ediu
1 Water (η= 1 m as, ρ = 1 kg/l)
2 Air (T = 0 °C, pe = 0 bar, η= 0.0181 m as, ρ = 1,293 kg/m³)
3 Specify in plain text

age 20 / 32 www.mecon.de BA / RE 250 / EN / V17-11
Description Code
Description code – co on part for all versions
The description code consists of the following elements:
9
Outputs
A A With local display
C
J With local display, 1 inductive contact SJ 3,5N
C
L With local display, 2 inductive contacts SJ 3,5N
E A With local display, electric remote sensor 4
-
20 mA
E
L With local display, electric remote sensor 4
-
20 mA, 2 inductive contacts SJ 3,5N
E
J With local display, electric remote sensor 4
-
20 mA, 1 inductive contact, 1 pulse output
F
A With HART protocol, 4
-
--
-
20mA
F
L With HART protocol, 4
-
--
-
20mA, 2 inductive contacts
F
J With HART protocol, 1 inductive contact, 1 pulse output
P
A With ROFIBUS A interface
10
Certification of accuracy
0 Without calibration certificate
1 Certification of accuracy class (4.2.1)
2 With calibration report (5 points)
3 With calibration report incl. Electrical output (min. 5 points)
11
Leak / pressure test
0 Without leak/pressure test
1 ressure test acc. to EN 10204 with inspection certificate 3.1
2 Leak test acc. to EN 10204 with inspection certificate 3.1
3 ressure test + leak test (acc. to EN 10204 with inspection certificates 3.1)
12
Material certificates
A Without certificate
B Certificate of Compliance with the Order 2.1 according to DIN EN 10 204
C Inspection certificate 3.1 with material analysis (DIN EN 10204:2004) for wetted parts
13
Cleaning to factory standard
A Without cleaning
B Cleaning class VA – with marking: free of oil and grease
C Cleaning class VA – with marking: free of oil, grease and silicone
14
Approvals
0 Without
1 Explosion protection – mechanical approval ATEX EX II 2 GDC
2 Explosion protection – mechanical and electrical (MEM/MEM- A) approval ATEX EX ia IIC T6
15
Marking
0 Without marking
1 Cardboard plate with a cable tie
2 Stainless steel plate (dimensions 70 x 30mm)
3
Cardboard plate with cable tie + sta
inless steel plate (dimensions 70 x 3
0 mm)
8
Display unit / Process te perature
0 Standard (aluminium) – up to 200 °C for local display / 150 °C for electric output)
1 Standard (aluminium) – with displaced display (extension made of stainless steel)
2 Stainless steel I 66 – up to 150 °C
3 Stainless steel I 66 – with displaced display
Other manuals for RE 250
1
Table of contents
Other Mecon Measuring Instrument manuals


Popular Measuring Instrument manuals by other brands


Industrial Scientific
Industrial Scientific GasBadge Pro manual

infrared industries
infrared industries IR208 Operator's manual

Renishaw
Renishaw PH10 PLUS Series Installation and user guide

SATAM
SATAM 7888 Series Description, Installation, Operations and Maintenance Manual

ABB
ABB 4690 Series user guide

ThermoWorks
ThermoWorks I.R.K. operating instructions

RedBack Lasers
RedBack Lasers ARL509 instruction manual

ENDA
ENDA EPV141 quick start guide

International Light Technologies
International Light Technologies ILT1400 instruction manual

Technoline
Technoline Mobile Alerts MA10001 quick reference

red lion
red lion DITAK 8 manual

sauter
sauter FP Series instruction manual