Medion MD 81460 User manual

MD 81460 1
EN
OVERVIEW
Operating Part
1. AF: Set the Radio Data System Mode
2. SCN: Search for AF transmitters
3. REL: RELEASE Remove operating part
4. EJ: EJECT Eject CD
5. MULTIJOG: Induction regulator: control the selected audio setting (SEL)
6. CD compartment
7. Display
8. BND: BBand selection in the Radio Mode; display ID3 tag Information in the
MP3 Mode
9. MU: Mute
10. MMC/SD slot
11. TA : Traffic alarm
12. PTY: Display PTY information
13. SEL: Press for a short time repeatedly, to select the following audio settings:
Volume, bass, treble, balance, fader; in car radio: press longer repeatedly,
to select between different car radio settings
In the case of an MP3 title search: Confirm each entry with letters in the case
of an MP3 search;
EON Settings menu
14. A.P.: Automatic storage of station / play station,
MP3 title, file and directory search
15.19.: M1M6 station buttons
15. TOP/PLAY/PAUSE: Start / interrupt reproduction /
Play the first title, number button M1
16. INT: Play the title, number button M2
17. RPT: Set the Repeat function, number button M3
18. RDM: Random, number button M4
19. Number button M5, number button M6
20. TUNE/ TRACK/ SKIP +: Forwards search for station / CD title
TUNE/ TRACK/ SKIP -: Backwards search by station / CD title
21. MOD: MODE Choose between radio and CD operation
22. CL:Set / display the time; Call up information in the Radio Mode Radio Data
System;
If no Radio Data System information has been received: Call up the frequency
and the time

Overview
2
23. POWER OFF: Press briefly to switch the radio off.
To switch the radio on, press any button except for the buttons EJ and REL.
24. USB: USB connector
25. Covering for the USB connection
Behind control panel
26. RESET: reset to factory settings
27. Theft LED: flashes if the operating part has been removed

Contents
MD 81460 3
EN
CONTENTS
Safety instructions. . . . . . . . . . . . . . . . . . . . . . . . . . . . . . . . . 4
Keep electrical equipment out of reach of children . . . . . . . . . . . . . . . . . 4
Road safety . . . . . . . . . . . . . . . . . . . . . . . . . . . . . . . . . . . . . . . . . . . . . . . . 4
Never undertake your own repairs . . . . . . . . . . . . . . . . . . . . . . . . . . . . . . 4
The CD player . . . . . . . . . . . . . . . . . . . . . . . . . . . . . . . . . . . . . . . . . . . . . . 4
Cleaning the device . . . . . . . . . . . . . . . . . . . . . . . . . . . . . . . . . . . . . . . . . . .
Installation . . . . . . . . . . . . . . . . . . . . . . . . . . . . . . . . . . . . . . . . . . . . . . . . . 5
Installation . . . . . . . . . . . . . . . . . . . . . . . . . . . . . . . . . . . . . . 6
Installation instructions . . . . . . . . . . . . . . . . . . . . . . . . . . . . . . . . . . . . . . . 6
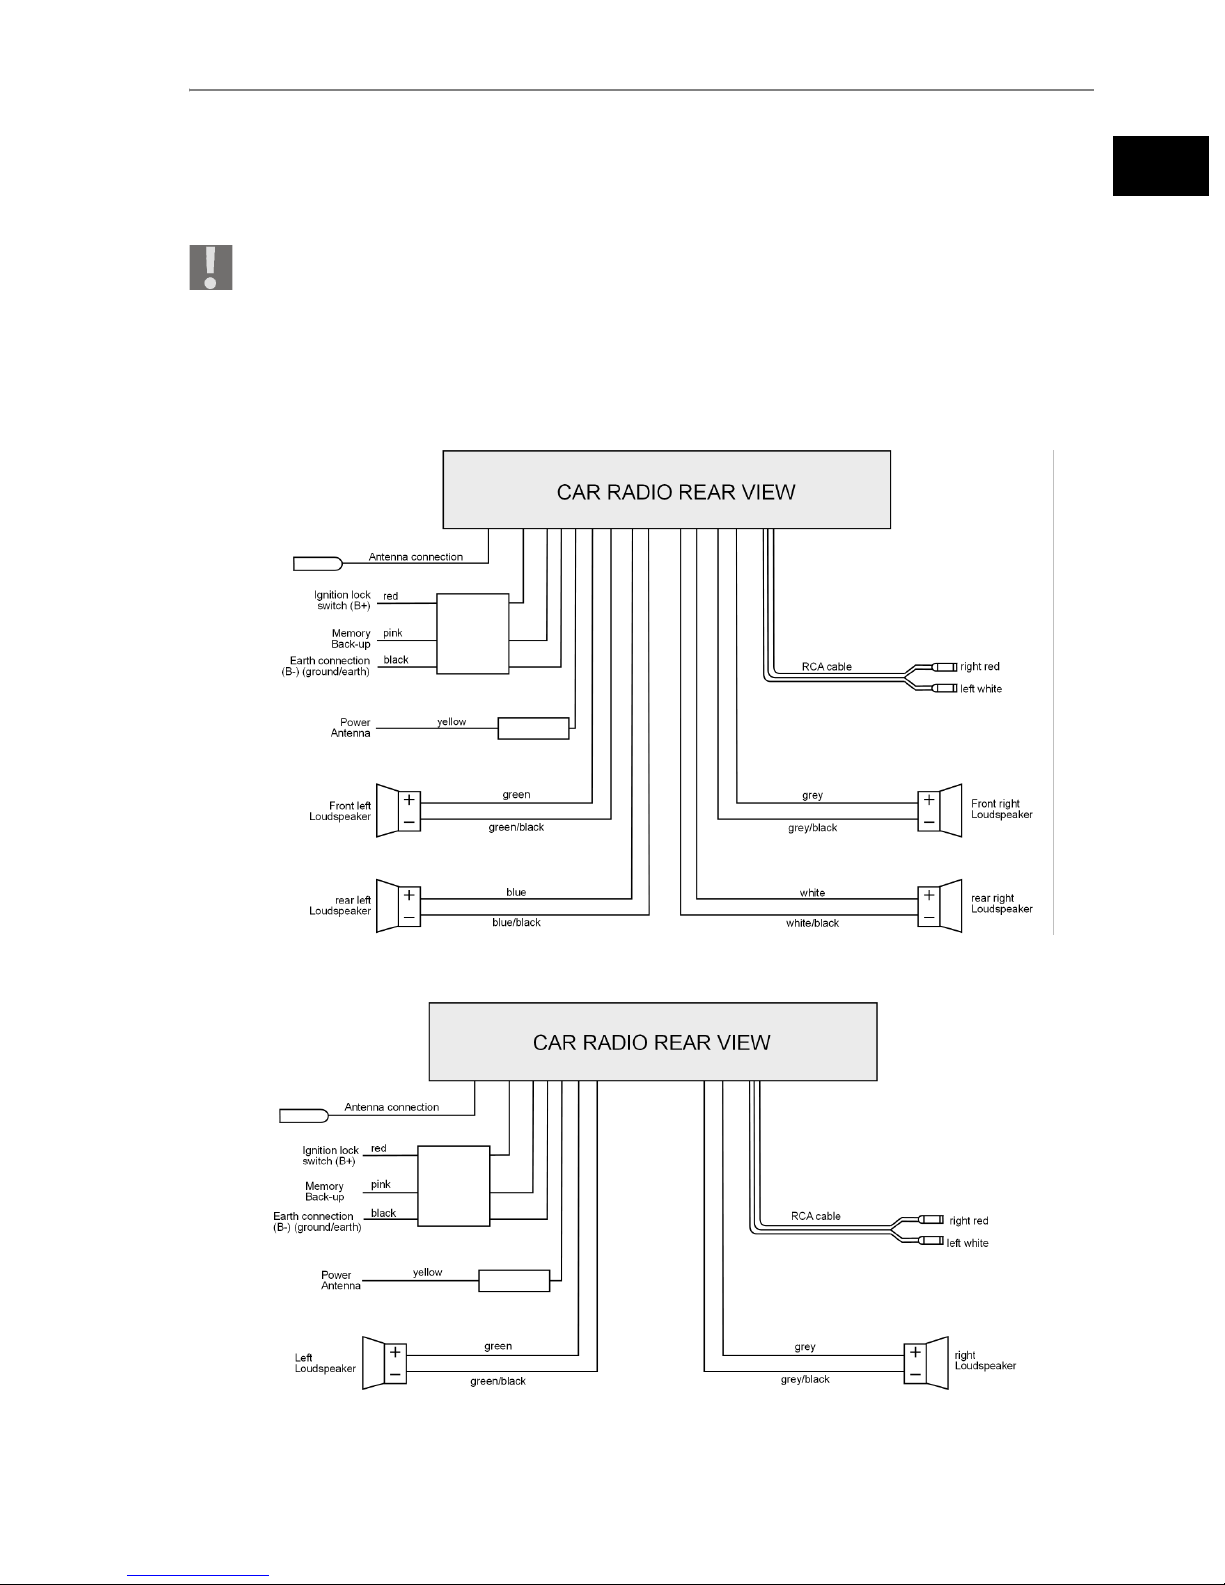
Examples of connection . . . . . . . . . . . . . . . . . . . . . . . . . . . . . . . . . . . . . . . 7
Fit the installation frame . . . . . . . . . . . . . . . . . . . . . . . . . . . . . . . . . . . . . . 8
The ISO adapter plug . . . . . . . . . . . . . . . . . . . . . . . . . . . . . . . . . . . . . . . . 9
Removing the unit . . . . . . . . . . . . . . . . . . . . . . . . . . . . . . . . . . . . . . . . . . 10
Operating part . . . . . . . . . . . . . . . . . . . . . . . . . . . . . . . . . . . . . . . . . . . . . 11
Operation . . . . . . . . . . . . . . . . . . . . . . . . . . . . . . . . . . . . . . . . 12
Basic operation . . . . . . . . . . . . . . . . . . . . . . . . . . . . . . . . . . . . . . . . . . . . 12
Radio functions . . . . . . . . . . . . . . . . . . . . . . . . . . . . . . . . . . . . . . . . . . . . 14
Radio Data System . . . . . . . . . . . . . . . . . . . . . . . . . . . . . . . . . . . . . . . . . . 15
EON settings menu . . . . . . . . . . . . . . . . . . . . . . . . . . . . . . . . . . . . . . . . . 16
PTY Functions . . . . . . . . . . . . . . . . . . . . . . . . . . . . . . . . . . . . . . . . . . . . . 19
Playing Audio CDs . . . . . . . . . . . . . . . . . . . . . . . . . . . . . . . . . . . . . . . . . . 20
Playing MP3 CDs . . . . . . . . . . . . . . . . . . . . . . . . . . . . . . . . . . . . . . . . . . . 21
Playing the Data from USB/SD/MMC Data Media . . . . . . .23
Troubleshooting . . . . . . . . . . . . . . . . . . . . . . . . . . . . . . . . . 24
Disposal information . . . . . . . . . . . . . . . . . . . . . . . . . . . . . .25

Safety instructions
4
SAFETY INSTRUCTIONS
Keep electrical equipment out of reach of children
The appliance is not intended for use by young children or infirm persons without
supervision.
Batteries / transformers can be highly dangerous if they are swallowed. Keep
the device and the batteries inaccessible to small children for this reason. You
should keep the device out of reach of children. If a battery is swallowed, please obtain
immediate medical assistance.
Keep the packaging foil away from children. There is a danger of suffocation.
Road safety
Road safety should be your top priority. Use your car radio only in
suitable traffic conditions. Please ensure that you are familiar with
the radio before setting off.
You should always be able to hear police, fire and other emergency
service sirens immediately while you are in your vehicle. For this
reason, please play your radio at an appropriate volume while dri
ving.
Never undertake your own repairs
Under no circumstances should you attempt to open and/or repair
this unit on your own. There is a danger of an electrical shock. Con
tact our Service Centre or another suitable specialist workshop in
the case of a fault.
The CD player
The CD player is a Class 1 laser product. The device is equipped
with a safety system that prevents the escape of dangerous la
ser rays during normal use. Never manipulate or damage the
safety system of the device, to avoid eye injuries.
About these instructions
Please read these instructions carefully before using the device.
Note the warnings on the device and in the operating instructions
Store the operating instructions in the car. If you sell
or give the car
radio away, please ensure that you also pass on these instructions.

Safety instructions
MD 81460 5
EN
Treat the disk compartment gently
Do not introduce any other objects into the disk compartment apart from CDs.
That could lead to damage to the precise intake mechanism.
Cleaning the device
Use a soft, dry cloth to clean the device. Avoid the use of chemical solutions and
cleaning products, because these may damage the unit's surface and/or the la
bels on it.
Installation
Read the installation and connection information in this introduction, if you want
to install your car radio yourself.

Installation
6
INSTALLATION
Installation instructions
• Place the device in the shaft provided for it or select a position, where it will
not impair the driving tasks of the driver, for the installation of the device.
• Connect the cable for a short time, before you finally install the device. Ensure
that the cable is plugged in correctly and that the system functions correctly.
• If changes have to be made to the vehicle, consult your vehicle dealer/spe
cialist garage.
• Install the device so that no injuries can occur in the case of heavy braking.
• f the unit is installed at an angle of over 30° off the hori
zontal, this may reduce its optimal output capacity..
• Avoid installing the unit near strong heat (e.g. direct sun
light or heated air), dust, dirt or strong vibrations.

Installation
MD 81460 7
EN
Examples of connection
Information
Please pay attention that the pink memory backup cable must be connected
at continuous plus. Otherwise, the station memory will be unable to function.
You can connect an external amplifier to the RCA cable (red and white
Cinch connection). Pay attention to the operating instructions of the external
amplifier for this.
Four loudspeakers (Quad system))
Two loudspeakers (Dual system)

Installation
8
Fit the installation frame
• Before installation remove the two transport
safety screws in the top part of the radio casing
(marked with red flags)!
Installation
The car radio is designed to be fitted in a standard
ISO installation slot. If your vehicle has no ISO slot, please consult a specialist
garage, dealer, or the specialist department of a large store.
• Remove the mounting frame from the car radio casing.
• Insert the mounting frame in the ISO installation slot.
• Bendtheflapsof
the installation
frame with a
screwdriver, so
that it is fixed
firmly in the in
stallation shaft
(see illustration).
• Check that the
frame fits tightly.
• Connect the ISO socket block of the car radio to both the ISO plugs of your
vehicle.
• Connect the aerial cable of the vehicle aerial to the aerial socket of the car ra
dio.
• Push the car radio carefully into the installation frame until it clickst.
Please use the ISO block of the car radio during the installation. You will ob
tain the vehiclespecific ISO adapter that you may need in specialist work
shops, in specialist shops or in the specialist departments of department
stores.
The guarantee claim will lapse if the ISO block has been separated!

Installation
MD 81460 9
EN
Pay attention to the fact that they could be damaged when inserting the
laying of the cables.
• Operate the RESET button (26) with a ballpoint pen or another pointed ob
ject.
• Insert the component as described below.
The ISO adapter plug
Use the ISO adapter plug of your vehicle for the ISO socket block of the car radio,
to create a safe electrical connection.
Backup cable
Pay attention to the fact that the pink backup cable for the station memory is
lying at continuous plus.
Press the RESET button (26) after all the connections have been made.
Antenna relay cable
The blue cable is available for a relaycontrolled antenna. The relay extends the
antenna automatically when the radio is switched on. When it is switched off, the
antenna is retracted.
This relay cable can also be used to control an external amplifier. Please refer to
the amplifier's operating instructions for the correct connections.
Never connect the blue cable to the engine cable; this could damage the
radio!

Installation
10
Occupation of the ISO blocks
Problems due to switched cables
In some vehicle models, the standard arrangement of cables[4] and [7] n the
ISO block A (see above) are switched at the factory.
If this is the case in your vehicle, certain functions may be impaired: stations may
not be stored properly, for example.
To solve this, the red cable (switched plus) and the pink cable (permanent plus)
will need to be reversed in the ISO block.
Removing the unit
Remove the sunvisor frame initially, to
uninstall the device and insert the right
and left keys in the slots on the sides of
the set. The flaps will be bent back and
you can remove the set.
BLOCK B Loudspeaker BLOCK A Power Supply
1 Lower right + 1
2 Lower right 2
3 Front right + 3
4 Front right 4 Continuous plus (perma
nent 12V onboard voltage)
5 Front left + 5 Car aerial (also for external
amplifiers, etc.)
6Frontleft 6
7 Lower left + 7 Switch plus (switched for
12V voltage through ignition
key)
8 Lower left 8 Mass

Installation
MD 81460 11
EN
Operating part
Inserting the operating part
• Insert the operating part to the right in the frame
and then press it into the frame on the left side.
You will hear a click when it has engaged correct
ly.
• Check that the operating part is sitting correctly
and firmly in its position. Incorrect information
and / or some buttons will have incorrect
functions if the operating part has not been cor
rectly installed.
Removing the operating part
• Press the REL button (3).
The operating part will be re
leased and you will be able
to remove it to the left.
Always keep the operating part
in the case for protection.

Operation
12
OPERATION
Basic operation
Switching on/off
• Press any button, apart from the EJ (4) or REL (3) buttons, to switch on the
radio. The radio will also switch itself on as soon as a data medium (USB /
MMC / SD) has been inserted
• Press the POWER button (23) down for a short time to switch off.
Volume
• TurntheknobMULTIJOG (5) to turn the volume up or down.
Always set the volume so that you can still clearly hear the sirens from
emergency vehicles!
Volume / bass / treble / balance / fader
• Press the SEL button (13), to display the current volume (VOL), bass (BAS),
treble (TRE), balance (BAL) and fader (FAD) settings.
• You can change the settings with the MULTIJOG induction regulator (5). You
can control the volume distribution to the left and the right in the balance set
ting and to the front (F) and the back (R) in the fader setting.
Mute
• Press the MU button (9), to switch the sound off completely.
• You will be able to release the mute switching with any button. The mute swit
ching will also be released at the reception of a PTY or TA station (traffic ra
dio).
MODE
• Press the MOD button (21), to change between radio reception (display: RA
DIO) and CD / MP3 operation (display: DISC). You will be able to choose bet
ween the reproduction of these data media in addition, if a USB data media
has been connected (display: USB) or an SD / MMC card has been inserted
(display: CARD).

Operation
MD 81460 13
EN
RESET
• To reset the car radio to the factory settings, press the RESET button (26)
with a pointed object, such as a pen.
• ConfirmwithRESET (26)
before first use, after connecting the cable,
if not all function keys are working,
when an error message appears in the display.
Setting the time
Press the CL button (22), to display the time.
The time will be set automatically with the Radio Data System at the reception of
a station, after the device has been switched on for the first time or after a RESET
(26). Proceed as follows to set the time manually:
Press the CL button (22) down while the time is being displayed. The time display
will flash.
Turn the MULTIJOG induction regulator (5) to the right to set the hours or to the
left to set the minutes.
Press the CL button (22) again or wait until the display has switched back, to
store the new time.

Operation
14
Radio functions
Selecting the radio frequencyn
• Press the BAND/ENTER button (19) to switch between FM (FM1, FM2 & FM3)
and AM (AM1 & AM2). You can store up to 6 stations in each band.
Searching for a station
• Press down either of the TUN / TRK / SKIP+ / buttons (22) for two seconds,
to switch on the automatic station search. The device will now search for the
nearest station automatically. Press either of the TUN / TRK / SKIP+ / but
tons (22), to stop the automatic search again.
• You will be able to change the station frequency upwards or downwards ma
nually if you press either of the buttons for a short time.
Searching for an AF transmitter
Press the SCN button (2) in one of the three FM1, FM2 or FM3 band ranges, to
search the UKW band range for stations transmitting an AF signal. Stations that
transmit an AF signal broadcast alternative frequencies that will also transmit the
channel set.
The search process will stop for five seconds on every station found and will then
continue. Press the SCN button (2), to stop the search process
Save station
• After the search function has found a station, press one of the 1-6 (1015) sta
tion buttons for around three seconds. A beep will sound to indicate that the
station has been stored.
The radio will switch back into automatic search mode after a few seconds.
Selecting stations
• Select the radio frequency by pressing BND (8).
• You can open one of the saved stations by pressing one of the station buttons
M1-M6 (1519).

Operation
MD 81460 15
EN
Running through saved stations
• Press the A.P. button (14), to play each stored station on each band range for
about 5 seconds.
• Press down the A.P. button (14) for about 2 seconds. The three FM1, FM2 and
FM3 band ranges will be searched through for the six strongest stations and
the stations found will be stored respectively at channel positions 16 of a
band range. The station deposited at memory position 1 in the FM1 band ran
ge will then be played.
• Press one of the M1M6 buttons (1519), to stop the search.
Radio Data System
A service of the radio stations is understood under Radio Data System. Additio
nal information, which can be evaluated and displayed by the car radio, is trans
mitted in the form of encoded digital signals, apart from the usual musical and
speech contributions. The channel name and other information (traffic informa
tion, title of the music currently being played, etc.) will be shown in the display.
Alternative frequencies (AF button
• Press the AF button (1) for a short time, to switch the AF function for the Radio
Data System Mode on or off. AF will appear in the display if the function has
been switched on. The radio will automatically switch to a Radio Data System
station transmitting the same channel if the reception is now weak.
The AF reading in the display will flash if Radio Data System information is being
received.
Regional Channel Mode (AF button)
Some stations transmit regional channels at particular times of day
• Press down the AF button (1) for longer than 2 seconds to switch the Regional
Channel Mode on or off. The REG ON reading will appear in the display. Wait
until the display changes back to the radio display, to switch the Regional
Mode off.
REG ON: The radio will search for stations with traffic announcements only
within the region.
REG OFF: The radio will search for stations with traffic announcements only
outside the region.

Operation
16
TA (Traffic Announcement) TRAFFIC RADIO
The radio will be changed to automatically in CD operation if traffic radio is trans
mitted, if the TA function has been switched on (TA will appear in the display).
Stations transmitting traffic announcements will be indicated by TP in the dis
play. Switching over to the EON connection station will take place occasionally
(see below) if EON has found traffic radio on a different channel. The volume le
vel will be raised at the same time, provided that is lying under the threshold.
Only stations that transmit a traffic radio signal can be stored or found during an
automatic station search process or with the TUN / TRK / SKIP+ / buttons (22),
if the TA function has been switched on.
You will be able to interrupt the process, if the radio has switched from the CD /
MP3 Mode to or from a station without traffic announcements to a station with
traffic announcements. Press the TA button (11) to do this. The TA function will
now be interrupted, without switching the TA Mode off
EONTA („Enhanced Other Network Information“)
Additional functions will be available to you, if a traffic radio station with the ex
tended 'EON' station information has been found. In particular, the device will
then switch to a station with traffic radio, if you are listening to a station that does
not transmit any traffic radio. The previous station position will be switched back
to after the traffic message.
EON-TA LOCAL and EON-TA DISTANCE
• Press down the TA button (11) for a longer time, to select the EON TA LOCAL /
EON TA DISTANCE Mode.
EONTA-LO – Local Mode: Traffic stations from the local area will be searched for
in this mode. EON TA LO will flash in the display
EONTA-DX – Remote Mode: Traffic stations from a more remote area will also be
searched for in this mode. EON TA DX will flash in the display.
EON settings menu
• Press down the SEL button (13) in the Radio Mode. You will reach the EON set
tings menu.
• Press the SEL button (13) again for a short time, to call up the submenus. You
will change the setting of a submenu with the MULTIJOG induction regulator
(5). The settings do not need to be confirmed and will be stored as soon as
the display has switched back to the radio or CD display.

Operation
MD 81460 17
EN
TA SEEK or TA ALARM
TA SEEK: The search process will be started and will search for the strongest
TA station (station with traffic announcements), if you have left a reception
area or the signal for traffic announcements has become weaker.
TA ALARM: An alarm sound will be emitted, if you have left a reception area
or the signal for traffic announcements has become weaker.
PI SOUND or PI MUTE
PI SOUND: Station search process with sound.
PI MUTE: The sound will be switched to mute during the station search pro
cess.
RETUNE L or RETUNE S
RETUNE L („long“): The search process for a station with the correct PI coding
(channel identification) will last for 90 seconds.
RETUNE S („short“): The search process for a station with the correct PI co
ding (channel identification) will last for 30 seconds.
MASK DPI or MASK ALL
MASK DPI: Conceals the AF transmitters that have a different PI coding.
MASK ALL: Conceals the AF transmitters that have a different PI coding and
all disruptive nonPI stations that have the same transmitting frequency.
BEEP 2ND, BEEP ALL or BEEP OFF
BEEP 2ND: A beeping sound will be emitted at a long button press.
BEEP ALL: A beeping sound will be emitted at each button press
BEEP OFF: Beeping sound off.
SEEK1 or SEEK2
SEEK1: Station search stops when the nearest station is being received.
SEEK2: Station search stops if either of the TUN / TRK / SKIP+ / buttons (22)
has been released and the nearest station is being received.
DSP OFF,FLAT,POP M,CLASSICS or ROCK
DSP OFF: Audio output without digital effects (Digital Sound Processing)
FLAT,POP M,CLASSICS or ROCK: different digital effects for the audio out
put.
Please pay attention to the fact that the BAS (bass) and TRE (treble) set
tings will not be available by pressing the SEL button (13), if the digital ef
fect has been switched on.

Operation
18
LOUD ON or LOUD OFF
LOUD ON: Loudness switched on (sound amplification).
LOUD OFF: Loudness switched off (no sound amplification).
STEREO/MONO
Set audio output to stereo or monotone. The stereo symbol will appear in the
display when a stereo station is being received .
DX or LOCAL
DX: The sensitivity of the reception is aligned to stations outside the region.
LOCAL: The sensitivity of the reception is aligned to regional (local) stations.
VOL LAST or VOL ADJUST
VOL LAST: The volume setting before the last switching off will be taken over
after switching on.
VOL ADJ: A fixed volume setting, which you can set in the VOL ADJ submenu,
will be taken over after switching on. To do this, press SEL (13), to reach the
A VOL setting. Set the volume value that should be taken over after the next
switching on here with the MULTIJOG induction regulator (5). The lowest va
lue is 10.

Operation
MD 81460 19
EN
PTY Functions
PTY (Channel Type Code channel type / type of coding)
• Press the PTY button (12), to activate the PTY menu. Then press one of the
M1M6 number buttons, to select a PTY entry for musical tastes.
• .
• Press the PTY button (12) again, to select a PTY entry for speech contributions
with the number buttons.
• An automatic search for stations corresponding to the PTY entry selected will
start if you now release the button. The search process will stop at the first
station found. Take the PTY entries from the Table below:
Please pay attention to the fact that this information depends on the region, the
radio station and the broadcaster.
'PTY NONE' will appear in the display if you are not receiving any Radio Data
System or PTY information.
Musical alignment Speech contributions
M1 POP M NEWS, AFFAIRS, INFO (Information)
M2 EASY M, LIGHT M SPORT (education), EDUCATE (education),
DRAMA
M3 CLASSICS;
OTHER M (other music)
CULTURE, SCIENCE, VARIED
M4 JAZZ, COUNTRY WEATHER, FINANCE, CHILDREN
M5 NATION M; OLDIES SOCIAL, RELIGION
M6 FOLK M TRAVEL, LEISURE, DOCUMENT

Operation
20
Playing Audio CDs
Inserting and removing CDs
• Insert the CD into the slot with the labelled side upwards (6). Die Wiedergabe
der CD beginnt automatisch.
• To remove the CD press the button EJ (4). he CD will be ejected. The car radio
will change back to radio mode.
Do not drive with a CD sticking out of the player. Remove the CD right
away.
.
Skipping a track/skipping 10 tracks
• By pressing the TUNE/TRACK/SKIP+/- (20) buttons, you can select the pre
vious or next track on the CD. The track number is shown on the display.
• By pressing the buttons M5 (18) and M6 (19) you can skip 10 Titel backward
or forward.
Pausing the CD
• You can pause the CD by pressing the PLAY/PAUSE (15). Pressing the button
again will restart CD playback.
Fast forward/rewind
• HolddowntheTUNE/TRACK/SKIP+/- (20) buttons for longer, to start fast for
ward or fast rewind.
Playing a title for a short time
• Press the INT button (16). The SINT reading will appear in the display. All the
titles will be played one after the other for approximately 10 seconds. One re
peated press will get the normal reproduction going. Press the INT button
(16) for longer in MP3 operation. The DINT reading will appear in the display
and the first 10 seconds of each title in the current file will be played for ap
proximately 10 seconds.
• Pressing the INT button (16) again will continue normal reproduction.
Further information on playing CDs
Moisture and high humidity may cause the CD player to malfunction. If this
occurs, switch on the vehicle's heater to evaporate the moisture before use.
Do not expose the CD player to extremely high or low temperatures.
Table of contents
Other Medion Car Receiver manuals

Medion
Medion MD 81485 User manual

Medion
Medion MD 41550 User manual

Medion
Medion MD 80907 User manual

Medion
Medion MD 80555 User manual

Medion
Medion MD 42540 User manual

Medion
Medion Car Audio User manual

Medion
Medion MD 4295 User manual

Medion
Medion P62033 User manual

Medion
Medion Car Audio User manual

Medion
Medion E65114 User manual
Popular Car Receiver manuals by other brands

Scion
Scion 2012 xB owner's manual

Pioneer
Pioneer DEH-P7050BT XN Operation manual

Sony
Sony MEX-BT38UW - Bt Slot Usb 1wire operating instructions

Sony
Sony CDX-C880R Installation/connections

Sony
Sony XR-C8100R operating instructions

Antique Automobile Radio
Antique Automobile Radio 472205B operating instructions