Medion MD 42540 User manual

2
OVERVIEW
1. OPEN : Open control panel
2. SEL: Press repeatedly to call up the following audio settings: volume, bass,
treble, balance, fader;
SEL: Press repeatedly for a little longer to call up the various traffic
announcement settings
SEL: When carrying out an MP3 search using letters, confirm every entry
3. PWR: turn device on/off (the device can also be turned on with any other key
except OPEN)
DIM (tap): dim display
Turn knob: adjust selected audio setting (see Item 2)
4. Display
5. REC: record on device connected via USB
TA (Traffic Announcement): activate the TA function
6. EQ (Equaliser): press repeatedly to change sound settings
7. USB connection (behind protective cover)
8. AS/PS: save stations automatically
9. 0 / DSP: number key 0 / switch display mode
10. 1/ PAU: number and station key 1 / pause play in CD/MP3 mode
11. 2 / SCN: number and station key 2 / scan function in CD/MP3 mode
12. 3 / RPT: number and station key 3 / repeat function in CD/MP3 mode
13. 4 / SHF: number and station key 4 / shuffle function in CD/MP3 mode
14. 5 / DIR : number and station key 5 / MP3 search downwards
15. 6 / DIR : number and station key 6 / MP3 search upwards
16. 7 / MOD: number key 7 / select operating mode Radio CD/MP3 USB card
reader
17. 8 / TUN/TRK : number key 8 / station search backwards
18. 9 / TUN/TRK : number key 9 / station search forwards
19. LOU: loudness/BND: band selector/enter: confirm selection.
20. PTY (Program Type): press once to search for stations from the PTY group
“music”; press twice to search for stations from the PTY group “speech”; press
three times to turn off PTY
21. RESET opening: reset to factory settings
22. AF/REG: press for a short time to start RDS mode
press longer to switch to regional mode
23. Card reader
24. Red LED (antitheft protection)
25. CD compartment
26. EJECT: eject CD
Autoradio MD 42540_AUS.fm Seite 2 Mittwoch, 30. November 2005 9:01 09

MD 42540 3
CONTENTS
Safety instructions . . . . . . . . . . . . . . . . . . . . . . . . . . . . 4
What’s in the box? . . . . . . . . . . . . . . . . . . . . . . . . . . . . 6
Installation . . . . . . . . . . . . . . . . . . . . . . . . . . . . . . . . . . 6
Installation instructions . . . . . . . . . . . . . . . . . . . . . . . . . . . . . . . . . . . . . . 6
Fit the installation frame . . . . . . . . . . . . . . . . . . . . . . . . . . . . . . . . . . . . . . 7
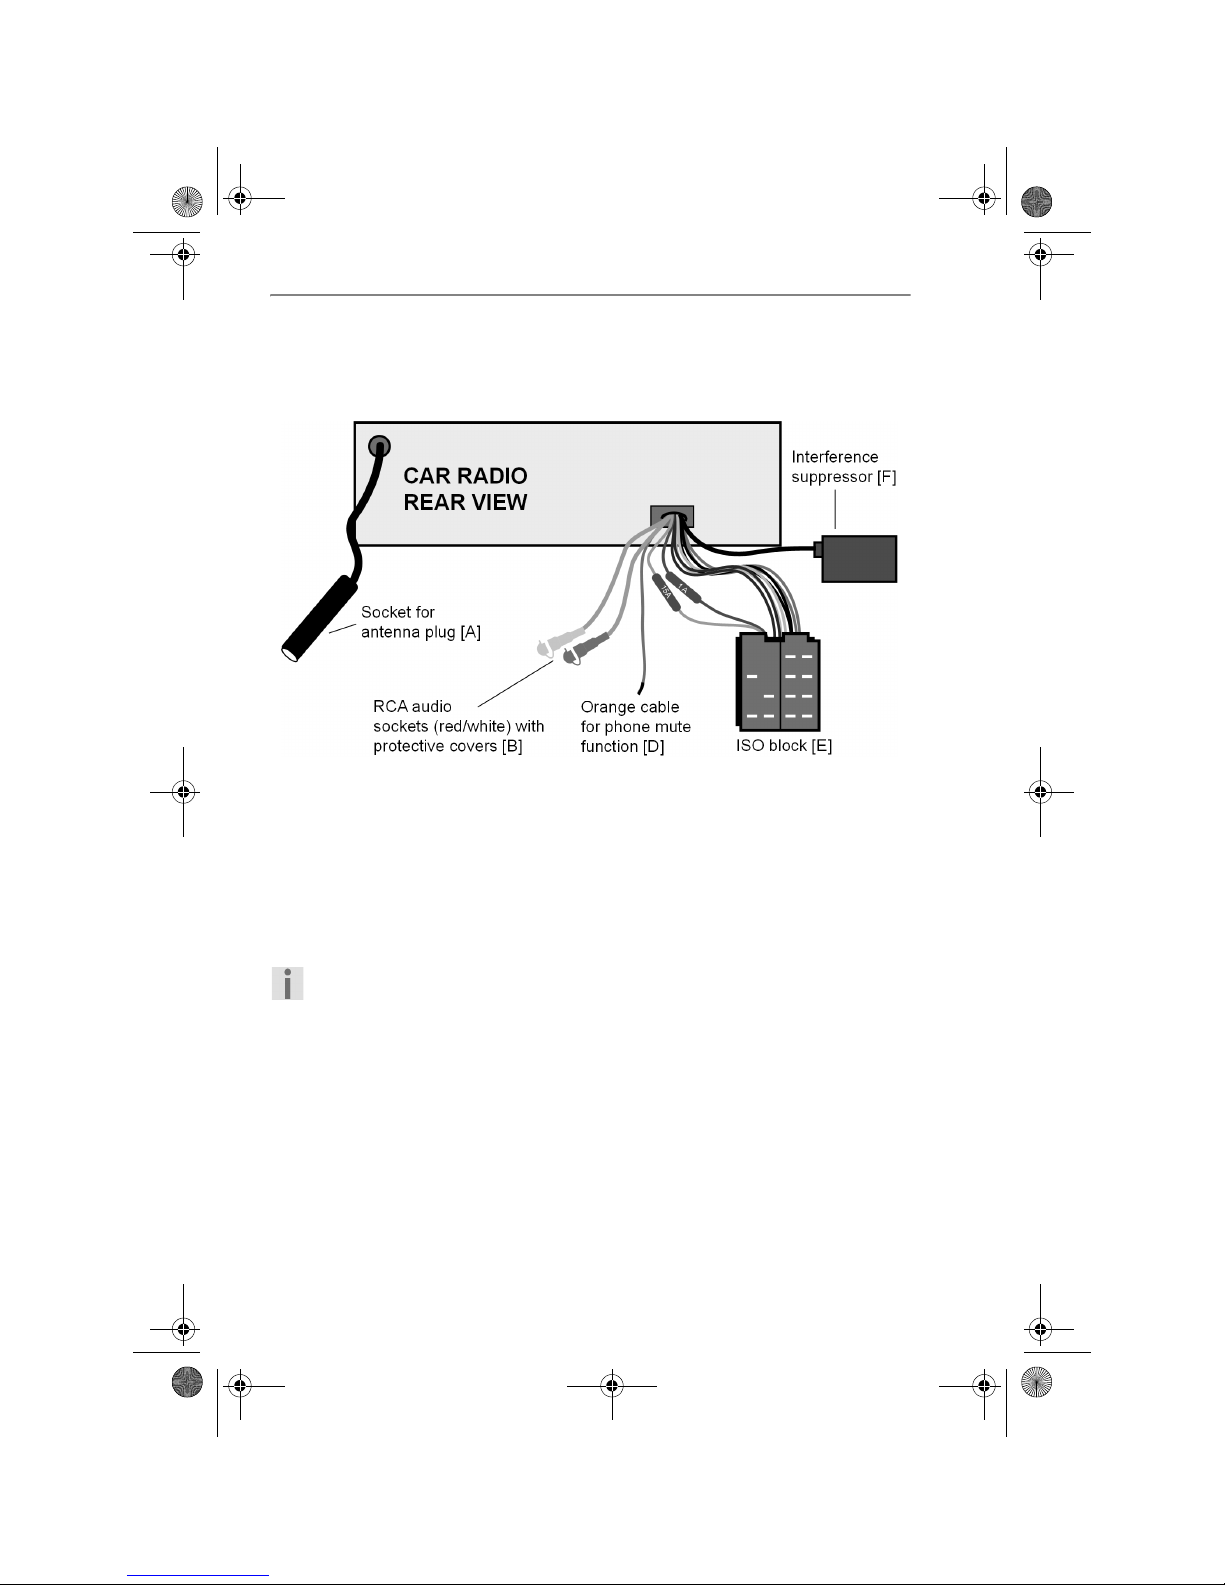
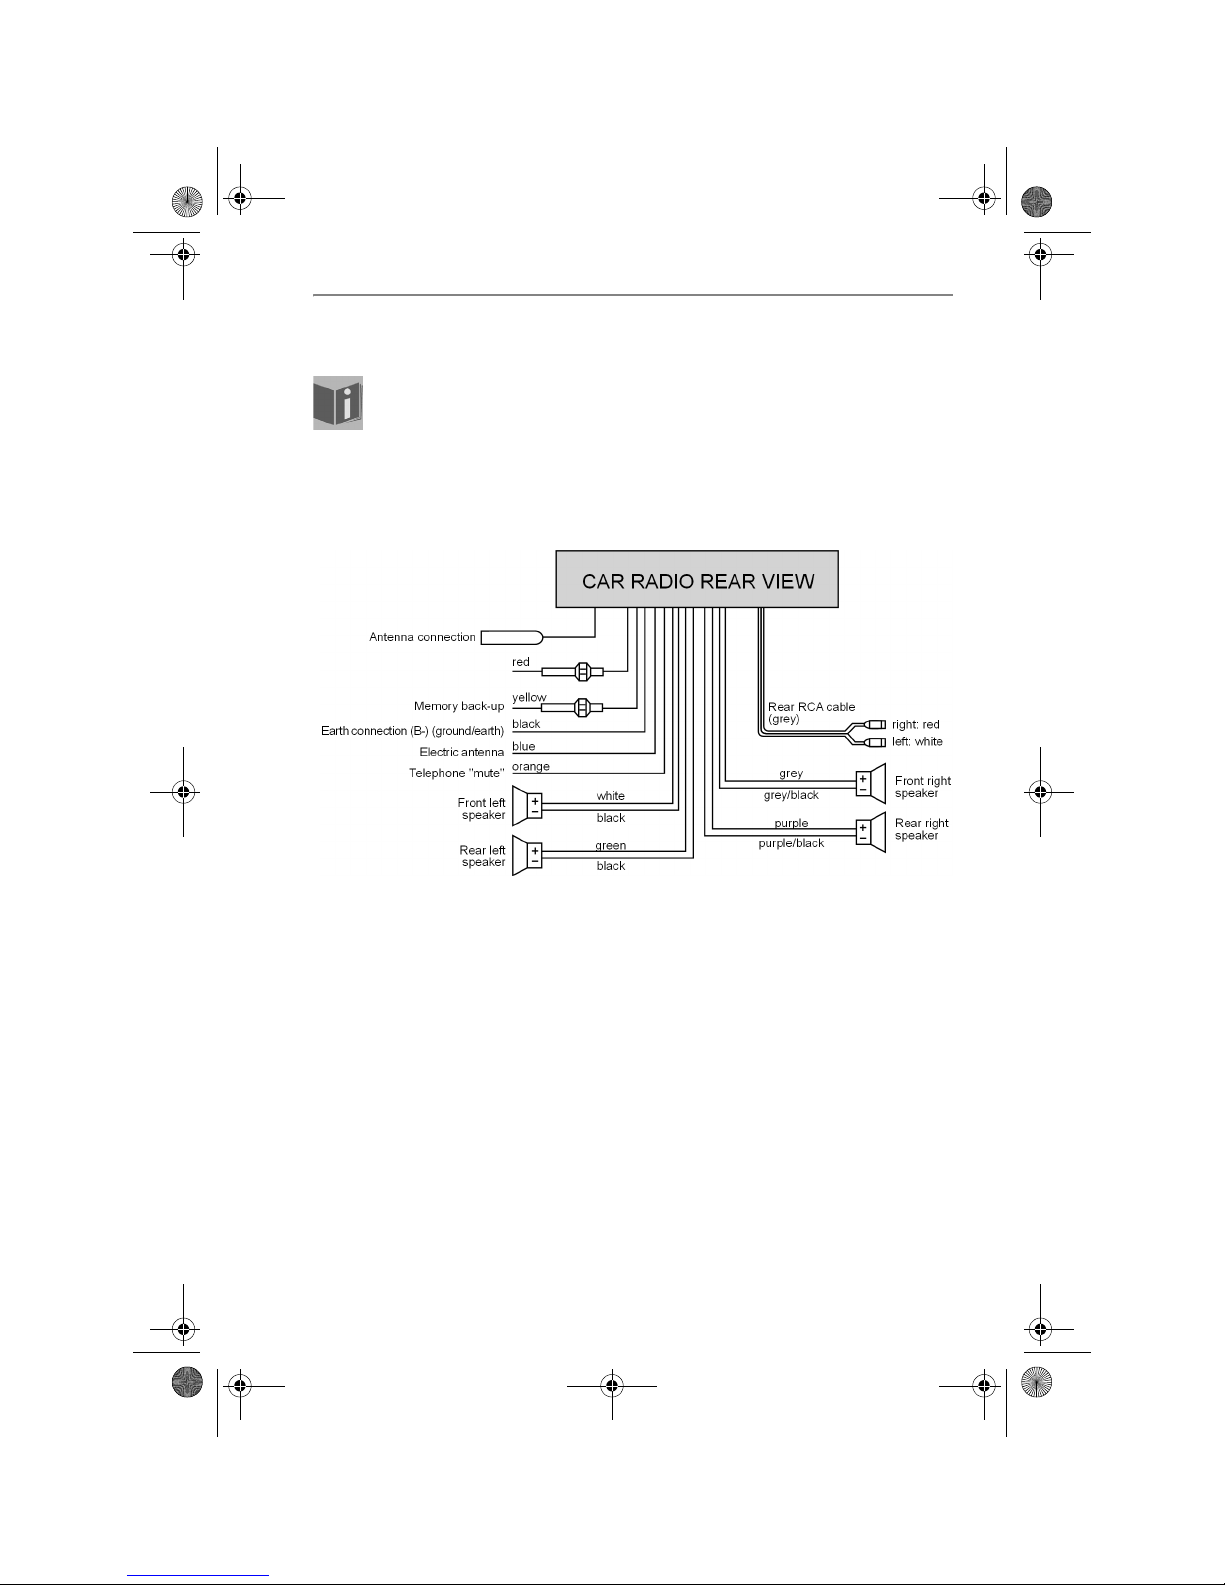
Cable connections . . . . . . . . . . . . . . . . . . . . . . . . . . . . . . . . . . . . . . . . . . 8
Inserting the car radio . . . . . . . . . . . . . . . . . . . . . . . . . . . . . . . . . . . . . . . 9
Control pane . . . . . . . . . . . . . . . . . . . . . . . . . . . . . . . . . . . . . . . . . . . . . . 10
RESET . . . . . . . . . . . . . . . . . . . . . . . . . . . . . . . . . . . . . . . . . . . . . . . . . . . 10
Removing the unit . . . . . . . . . . . . . . . . . . . . . . . . . . . . . . . . . . . . . . . . . . 10
Explanation for using the cables . . . . . . . . . . . . . . . . . . . . . . . . . . . . . . . 11
Operation. . . . . . . . . . . . . . . . . . . . . . . . . . . . . . . . . . . 13
Basic operation . . . . . . . . . . . . . . . . . . . . . . . . . . . . . . . . . . . . . . . . . . . . 13
RDS clock feature . . . . . . . . . . . . . . . . . . . . . . . . . . . . . . . . . . . . . . . . . . 14
Radio functions . . . . . . . . . . . . . . . . . . . . . . . . . . . . . . . . . . . . . . . . . . . . 15
Playing Audio CDs . . . . . . . . . . . . . . . . . . . . . . . . . . . . . . . . . . . . . . . . . 20
Playing MP3 CDs . . . . . . . . . . . . . . . . . . . . . . . . . . . . . . . . . . . . . . . . . . 21
WMA files . . . . . . . . . . . . . . . . . . . . . . . . . . . . . . . . . . . . . . . . . . . . . . . . . 23
USB connection . . . . . . . . . . . . . . . . . . . . . . . . . . . . . 24
Playback . . . . . . . . . . . . . . . . . . . . . . . . . . . . . . . . . . . . . . . . . . . . . . . . . 24
Recording . . . . . . . . . . . . . . . . . . . . . . . . . . . . . . . . . . . . . . . . . . . . . . . . 24
Card reader . . . . . . . . . . . . . . . . . . . . . . . . . . . . . . . . . 25
Playback . . . . . . . . . . . . . . . . . . . . . . . . . . . . . . . . . . . . . . . . . . . . . . . . . . 25
Recording . . . . . . . . . . . . . . . . . . . . . . . . . . . . . . . . . . . . . . . . . . . . . . . . 25
Troubleshooting . . . . . . . . . . . . . . . . . . . . . . . . . . . . . . 26
Disposal information . . . . . . . . . . . . . . . . . . . . . . . . . 27
Technical data . . . . . . . . . . . . . . . . . . . . . . . . . . . . . . 28
Autoradio MD 42540_AUS.fm Seite 3 Mittwoch, 30. November 2005 9:01 09

4
SAFETY INSTRUCTIONS
Keep electrical equipment out of reach of children
The appliance is not intended for use by young children or infirm persons without
supervision.
Young children should be supervised to ensure that they do not play with the
appliance.
Road safety
Road safety should be your top priority. Use your car radio only in
suitable traffic conditions. Please ensure that you are familiar with
the radio before setting off.
You should always be able to hear police, fire and other emergency
service sirens immediately while you are in your vehicle. For this
reason, please play your radio at an appropriate volume while
driving.
Never undertake your own repairs
Under no circumstances should you attempt to open and/or repair
this unit on your own. Refer all servicing to MEDION Help Desk on
1300 884 987.
CD player
The CD player is a Class 1 laser product. The device has a safety
system that prevents dangerous laser rays escaping from the
device during normal use. In order to avoid injury to the eyes,
never interfere with or damage the unit's security system.
About these instructions
Please read these instructions carefully before using the device.
Note the warnings on the device and in the operating instructions
Store the operating instructions in the car. If you sell
or give the car
radio away, please ensure that you also pass on these instructions.
Autoradio MD 42540_AUS.fm Seite 4 Mittwoch, 30. November 2005 9:01 09

Safety instructions
MD 42540 5
Using the CD player
Never place any objects other than CDs into the disc compartment. Otherwise
you might damage the precisely enigineered pullin mechanism.
Moisture and high humidity may cause the CD player to malfunction. If this
occurs, switch on the vehicle's heater to evaporate the moisture before use.
Do not expose the CD player to extremely high or low temperatures.
Installation
Before installation, disconnect the battery first. There is a risk of short-
circuit and electric shock!
Please use the car radio's ISO block for installation. Never disconnect the ISO
block. Disconnecting the cables voids the guarantee!
Avoid installing the set in the following circumstances:
high temperatures (e.g. caused by strong sunlight or direct heated air),
dust, dirt
and vibrations.
This can damage the device.
Cleaning the device
Use a soft, dry cloth to clean the device. Avoid the use of chemical solutions and
cleaning products, because these may damage the unit's surface and/or the
labels on it.
IMPORTANT!
We recommend that you have this product installed by a qualified
installer. The supplier will not be liable for any damages caused to this
product or to other devices in the car as a result of incorrect installation.
Autoradio MD 42540_AUS.fm Seite 5 Mittwoch, 30. November 2005 9:01 09

6
WHAT’SIN THE BOX?
The following are included in the delivery pack:
INSTALLATION
Before installation, disconnect the car battery! There is a risk of short-
circuit and electric shock!
The car radio is designed to be fitted in a
standard ISO installation slot. The
dimensions of this slot are 182mm x 53mm. It
has two ISO plugs and an antenna plug.
If your vehicle has no ISO slot, please
consult a specialist garage, dealer, or the specialist department of a large
store.
Installation instructions
• Place the set in the ISO slot provided for it.
• If changes have to be made to the vehicle, consult your vehicle dealer/
specialist garage.
• If the unit is installed at an angle of over 30° off
the horizontal, this may reduce its optimal
output capacity.
• Avoid installing the unit near strong heat (e.g.
direct sunlight or heated air), dust, dirt or strong
vibrations. This can damage the set.
Car radio Control panel
Mounting frame (clipped on) Control panel case
Frame (clipped on) ISO connector
2 fitting wrenches Operating instructions and guarantee
documents
Maximal installation angle
Autoradio MD 42540_AUS.fm Seite 6 Mittwoch, 30. November 2005 9:01 09

Installation
MD 42540 7
Fit the installation frame
• Before installation, always use a phillips
screwdriver to remove the two transport
safety screws in the top part of the radio
casing (marked with red flags)!
• The car radio is delivered with the
installation frame fitted over it. Firstly
remove the mounting frame from the car
radio casing. To do this, push down the two
clips on the sides of the car radio (1) and
push the mounting frame off the radio from
behind (2).
• Insert the mounting frame in the ISO
installation slot.
• In order to fix the mouinting frame in the
installation slot, use a screwdriver to bend
out as many clips as possible. Choose the
clips which fit tightly against the installation
slot casing.
Next, check that the frame fits tightly
The frame must be tightly fitted, to prevent it from coming loose if the
driver brakes sharply.
Autoradio MD 42540_AUS.fm Seite 7 Mittwoch, 30. November 2005 9:01 09

Installation
8
Cable connections
A general view of the back of the car radio:
Connect up the cables
• Pull out the connections in your car's ISO slot far enough for you to join them
to the ones from the car radio.
Please use the car radio's ISO block for installation. Never disconnect the ISO
block If your car's ISO plugs do not fit the car radio's ISO sockets, you can buy
suitable adapters in specialist garages, from dealers and the specialist
departments of large stores.
Secure, proper electrical connections are provided by your car' s two ISO
plugs (for the loudspeakers and the power connections). In case you still
wish to lay the cables yourself, we explain in detail the uses of the cables
at the end of this chapter.
[A] Connect the vehicle's antenna plug to the radio's antenna socket.
[B] If you use an external amplifier, you can connect it to the red/white RCA
audio sockets. Please also refer to your instructions for the amplifier.
[C] The orange cable may be connected to a handsfree mobile phone kit. The
type of connection depends on the cable and the connecting piece between it
and the handsfree kit. Please also refer to the operating instructions for the
Autoradio MD 42540_AUS.fm Seite 8 Mittwoch, 30. November 2005 9:01 09

Installation
MD 42540 9
handsfree kit. If the vehicle does not have a handsfree kit, the orange cable
stays unconnected in the slot.
[D] Connect the vehicle's two ISO plugs (one ISO plug for ISO Block A and one
for ISOBlock B) to the car radio's ISO block.
[E] The interference suppressor is used to repel disturbing irradiation. It is also
led into the slot and remains there unconnected.
Test station memory
In some vehicle models the standard arrangement for the standard plus and
permanent plus cables has been switched in the factory (see“Arrangement of
the ISO block” on page 12). This can lead to the station memory not working.
Before you finally install the car radio, try the following to find out if you have
saved the stations.
• Reconnect the car battery.
• Turn on the ignition.
• Switch the radio on.
• Go through the automatic station saving process, holding down the AMS
[20]key for approx. two seconds (see also“Automatic saving” on page 15).
• Switch the ignition off.
• Switch on the ignition again and find out if the stations have been saved (press
the station buttons 1bis 6 [13-18]).
• If the stations have been saved, you can install the radio.
• If the stations are no longer in the memory, you should use an adapter,
obtainable from the specialist store, or have the cable adapted in a specialist
garage. If this is the case, refer to Chapter “Explanation for using the cables”
on page 11.
Inserting the car radio
• Push the car radio carefully into the slot until it
clicks into place.
While pushing the radio in, be careful how you fit
the cables; they should not be kinked, crushed or
stretched.
Autoradio MD 42540_AUS.fm Seite 9 Mittwoch, 30. November 2005 9:01 09

Installation
10
Control panel
Inserting the control panel
• First place the right side of the
control unit with its lower right
corner on the pin in the lower right
corner of the frame.
• Then press the lower left side until
it clicks into place.
• Flip the control panel upwards.
Check that the control panel is
properly in place and secure. If the
control panel is not fitted properly, error messages appear in the display and/or
several keys will not function properly.
Removing the control unit
• Press the OPEN button [1].
• Push the control unit slightly to the
right and pull down first the lefthand
side and then the right.
If the control unit has not been inserted in the frame, the antitheft LED will
flash on the unit.
For protection, always keep the control unit in its case.
RESET
In order to start the radio working, press the RESET [21]
button with the point of a ballpoint pen or something else
sharp.
Removing the unit
• Removethecontrolunit.
• Pull out the frame.
• Insert the right and left keys in the
slots on the sides of the set. The flaps
will be bent back and you can remove
the set.
Autoradio MD 42540_AUS.fm Seite 10 Mittwoch, 30. November 2005 9:01 09

Installation
MD 42540 11
Explanation for using the cables
The explanatory notes for using the cables are intended for when the
cables have to be fitted individually. Consult a specialist garage and pass
on the information contained in this chapter.
To connect the radio to your vehicle's ISO plugs, you do not need these
explanatory notes.
Overview of the connected cables:
Notes on fitting cables.
Memory back-up (yellow)
The yellow memory backup cable needs to be connected to the permanent plus.
Otherwise the station memory will not work (see “Arrangement of the ISO block” on
page 12).
Phone cable (orange)
The orange cable can be connected to a mobile phone handsfree system and
is intended for use with the MUTE function.
Antenna relay cable (blue)
The blue cable is available for a relaycontrolled antenna. The relay extends the
antenna automatically when the radio is switched on. When it is switched off, the
antenna is retracted.
Autoradio MD 42540_AUS.fm Seite 11 Mittwoch, 30. November 2005 9:01 09

Installation
12
This relay cable can also be used to control an external amplifier. Please refer to
the amplifier's operating instructions for the correct connections.
Never connect the blue cable to the engine cable; this could damage the
radio!
Arrangement of the ISO block
Problems due to switched cables
In some vehicle models, the standard arrangement of cables [4] and [7] in the
ISO block A (see above, "ARRANGEMENT OF THE ISO BLOCK") is switched at
the factory.
If this is the case in your vehicle, certain functions may be impaired: stations may
not be stored properly, for example.
To solve this, the red cable (switched plus) and the yellow cable (permanent
plus) will need to be reversed in the ISO block.
BLOCK B – speakers BLOCK A – electricity supply
1 right rear + 1
2 right rear 2
3rightfront+ 3
4 right front 4 Permanent plus (permanent
12V supply from main
electrical system)
5 left front + 5 Car antenna (also for
external amplifiers, etc.)
6 left front 6
7 left rear + 7 Switched plus (switched 12V
voltage, via ignition)
8 left rear 8 Earth
Autoradio MD 42540_AUS.fm Seite 12 Mittwoch, 30. November 2005 9:01 09

MD 42540 13
OPERATION
Basic operation
Switching on/off
Press the POWER button (3) to switch the radio on or off. You can also switch on
the radio by pressing any other button, except OPEN and EJECT.
• BrieflytapthePOWER button (3) to dim the illumination on the display
through three levels.
Volume
• Turn the volume control knob (3) to turn the volume up or down.
Always set the volume so that you can still clearly hear the sirens from
emergency vehicles!
Bass/treble/balance/fader
• Press the SEL (2), button to display the current bass, treble, balance and
fader settings.
• You can change the settings using the volume control knob (3).
Loudness
• Hold down the
BND/LOUD/ENTER
button (19) to strengthen the bass.
Display
• By pressing the DSP button (11) you can change the screen display as
follows:
• During radio operation:
Name of program
Time (will be set automatically when receiving RDS)
Frequency
PTY settings (these RDS functions are sent in different scope by different
stations; see also Chapter “Radio functions” on page 15).
• During CDoperation:
CD/MP3 information
Time
Radio information
Frequency
PTY settings
Autoradio MD 42540_AUS.fm Seite 13 Mittwoch, 30. November 2005 9:01 09

Operation
14
If no RDS or PTY information is received NO CLOCK or NO PTY is displayed on the
screen. Each notice appears for just a few seconds.
MODE
• Press the MOD button (16) to switch between radio reception, CD/MP3
operation, USB connection and card reader.
Equalizer
• By pressing the EQ (6) button you turn on the equaliser and choose between
FLAT, CLASSICS, POP M,JAZZ or DSP OFF.
If FLAT is set, all equaliser settings are set to zero (0). DSP OFF means that
Digital Sound Processing (DSP) is switched off.
RESET
• To reset the car radio to the factory settings, press the
RESET button (21) with a pointed object, such as a pen.
• Press RESET (21)
before first use, after connecting the cable,
if not all function keys are working,
when an error message appears in the display.
RDS clock feature
Your car radio is fitted with an RDScontrolled clock. The clock will be set
automatically while an RDS station is received.
Once the unit is switched off and the on again, it will take approximately one
minute for the clock time to be displayed again. The clock display will not show
while the radio is tuned to a nonRDS station.
Reception of RDS signal and clock depends on location and signal strength.
Autoradio MD 42540_AUS.fm Seite 14 Mittwoch, 30. November 2005 9:01 09

Operation
MD 42540 15
Radio functions
Selecting the waveband
• Press the BND/LOUD/ENTER button (19) to switch between FM (FM1, FM2 &
FM3), medium wave (MW) and long wave (LW). You can store up to 6 stations
in each band.
Searching for a station
• Briefly press the TUN/TRK 8(17) or TUN/TRK 9 (18) scan buttons. The set will
search for the next station.
• Switch to manual station search by pressing one of the two buttons for two
seconds. The display shows MANUAL.
Save station
• After the search function has found a station, press one of the 1-6 (1015)
station buttons for around three seconds. A beep will sound to indicate that
the station has been stored.
The radio will switch back into automatic search mode after a few seconds.
Selecting stations
• Select the waveband by pressing BND/LOUD/ENTER (19).
• You can open one of the saved stations by pressing one of the station buttons
1-6 (1015).
Automatic saving
• Press the AS/PS button (8) until you hear a beep. The display shows SEARCH.
The scan stops for five seconds each time a station is found. The number
flashing on the display is the number of the button which saves the station.
The search continues automatically on weak stations.
Running through saved stations
• You can call up the saved stations for the current transmission areas.
• Select the waveband by pressing BND/LOUD/ENTER (19).
• Press the AS/PS button (8) briefly. All stations are now briefly selected.
• When you hear the station you require press the AMS button (8) briefly.
Autoradio MD 42540_AUS.fm Seite 15 Mittwoch, 30. November 2005 9:01 09

Operation
16
Regional programme mode
Some stations broadcast regional programmes.
• So that only these alternative frequencies for the required regional
programmes are selected, hold down the AF/REG (22) button until a beep is
heard and AF starts to flash in the display.
• Now briefly press the AF/REG (22) button, to select either REG ON or REG OFF.
After a short time, the display changes back and REG appears.
PTY (Program Type Code)
• To enable the menu, press the PTY button (20).
You can now search for or select your preset stations by the following
categories:
Please note that this information will vary accorrding to region, broadcaster and
station.
TA (Traffic Announcement)
• Brieflypressthe REC/TA button (5) to switch this mode on or off.
If the set is in TA mode and a CD is playing or USB is in use, the radio is switched
on immediately if a traffic announcement is transmitted. There is an occasional
switch to the EON relay station (see following section), if EON finds a traffic
service on another station. The volume will be increased if it is below the
threshold.
The TA function can be interrupted by pressing the REC/TA (5) button, without
the TA mode being switched off.
Music genre Voice programmes
1POP M NEWS AFFAIRS (Current Events), INFO
2EASY M, LIGHT M SPORT , EDUCATE, DRAMA
3CLASSICS;
OTHER M
CULTURE, SCIENCE, VARIED
4JAZZ, COUNTRY WEATHER, FINANCE,CHILDREN
5NATION M; OLDIES SOCIAL, RELIGION
6FOLK M TRAVEL, LEISURE,
DOCUMENT(documentaries)
Autoradio MD 42540_AUS.fm Seite 16 Mittwoch, 30. November 2005 9:01 09

Operation
MD 42540 17
EONTA (Enhanced Other Network Information)
The extended other network information (EON) provides additional functions for
locating a station with traffic announcements. Specifically, the set also then
switches to a station with traffic announcements if you are listening to a station
that does not provide any. After the announcement, it switches back to the
previous station.
Please note that the EON service involves an RDS function. Not all radio
stations have RDS (see following page).
EON reception setting menu
• Hold down the SEL button (2) in the radio mode. The EON reception setting
menu opens.
• Press the SEL button (2) repeatedly to open the following options.
TA SEEK: If you leave a reception area, a search is started for the strongest
TA station;
TA ALARM: If you leave the reception area, an alarm signal sounds;
PI SOUND: The radio continues during the search;
PI MUTE: The sound is switched off during searching;
RETUNE L (long): The search for a station with the correct PI code lasts for 90
seconds.
RETUNE S (short): The search for a station with the correct PI code lasts for
30 seconds.
MASK DPI: Hides the AF stations that have a different PI code;
MASK ALL: Hides the AF stations that have a different PI code and all
interfering stations that do not have a PI but have the same transmission
frequency;
EON-TA-LO ("EONTA LOCAL"): Searches for traffic announcement stations
from the local area.
EON-TA-DX ("EONTA DISTANCE"): This mode searches for traffic
announcement stations over a wider area.
BEEP 2ND: There is a beep if a button is pressed for a long time;
BEEP ALL: There is a beep whenever a button is pressed;
BEEP OFF: Beep off.
Autoradio MD 42540_AUS.fm Seite 17 Mittwoch, 30. November 2005 9:01 09

Operation
18
RDS (RADIO DATA SYSTEM)
RDS is a service provided by radio stations. In addition to conventional music
and voice services, they also broadcast additional information in the form of
encrypted digital signals and these are analysed and displayed by the car radio.
RDS is not a very common used feature in Australia. However, there are
some Australian radio stations that transmit RDS signals that could be
picked up by you car radio. Please refer to the list below showing stations
transmitting RDS signals. You may also refer to the following websites :
www.sutcliffetech.com.au/rdsinfo.htm or www.sutcliffetech.com.au/
rdsstations.htmll
Location Station Frequency
(MHz) PSN PTY
Adelaide Nova FM 91.9 , 99.1 NOVA 919 MOR MUSIC
Mix 102.3 102.3; 96,7 MIX 1023 Pop Music
Triple M 104.7 ; 98,3 TRIPLE M none
SAFM 107.1 ; 90.3 SAFM none
Brisbane 97 3 97.3 97 3FM POP
NOVA 106.9 NOVA none
B105 105.3 B105 FM Pop Music
Triple M 104.5 TRIPLE M Rock Music
Deniliquin 102.5 2MORFM
Gold Coast Gold FM 92.5 Gold FM
Sea FM 90.9 Sea FM
Gosford Star 104.5 104.5 STAR1045 Pop Music
Ipswich River 94.9 94.9 River949 CULTURE
Melbourne Fox FM 101.9 Fox FM Pop Music
Nova 100 100.3
mix 101.1 101.1 mix1011 Pop Music
gold 104.3 gold104 other music
Triple M 105.1
Moree NOW FM 98.3 NOW FM
Sydney 2MMM 104.9 TRIPLE M Rock Music
2DAY 104.1 2DAY FM POP MUSIC
MIX 106.5 106.5 MIX106.5 Pop Music (10)
101.7 WSFM 101.7 , 88.3 , 99.1 WSFM OtherMusic(15)
THE EDGE 96.1 96.1 THE EDGE Pop Music (10)
NOVA 96.9 NOVA969 ?
Perth NOVA 93.7 NOVA 937
Toowoomba CFM ? ? ?
Autoradio MD 42540_AUS.fm Seite 18 Mittwoch, 30. November 2005 9:01 09

Operation
MD 42540 19
• Briefly press the AF/REGbutton (22) to switch the RDS mode on or off. On the
display, you can now see the programme name and other information (traffic
information, the title of the tune currently being played, etc.).
RDS reception depends on location and signal emitted from RDS radio
station.
The following different kinds of RDS services may be available:
PI (Programme Identification Code): The PI code is used by the radio to identify
the station being received.
PS (Programme Service Name): This service allows the station's name to be
displayed.
AF (Alternative Frequencies): The car radio automatically searches for an
alternative frequency for the current station with the strongest signal.
TP/TA (Traffic Programme / Traffic Announcement): Traffic information
EON (Enhanced Other Network Information): If there is a traffic
announcement, then this enables the radio to switch to the radio station
broadcasting it, even if you are currently listening to another station.
PTY (Programme Type Code): This code enables you to search for your
selected type of programme, for example a sports broadcast (see the table
on page 16).
Please note that the information displayed will vary according to region,
broadcaster and station.
Autoradio MD 42540_AUS.fm Seite 19 Mittwoch, 30. November 2005 9:01 09

Operation
20
Playing Audio CDs
Inserting and removing CDs
• Fold down the control panel (Button 1).
• Insert the CD into the slot with the labelled side upwards (25).
• Then close the control panel again. The CD will start to play. The display shows
[S-CDP].
• To remove the CD open the control panel again. Press the EJECT (26) button.
The CD will be ejected. The car radio will change back to radio mode.
Do not drive with a CD sticking out of the player. Remove the CD right away.
Skipping tracks
• By pressing the TUN/TRK 8(17) or TUN/TRK 9 (18) buttons, you can select
the previous or next track on the CD. The track number is shown on the
display.
Pausing the CD
• You can pause the CD by pressing the PAU button (10). Pressing the button
again will restart CD playback.
Fast forward/rewind
• HolddowntheTUN/TRK 8(17) or TUN/TRK 9 (18) buttons for longer, to start
fast forward or fast rewind.
Preview tracks
• Press the SCN button (11). All tracks are played for around 10 seconds each.
Pressing the button again will change the playback mode back to normal.
ESP Electric Shock Protection
The device is equipped with an antishock function. This function
compensates for vibrations, for instance, from a bumpy road, and ensures
playback without interruption, even if the player is moving around.. When the
player is switched on, the memory is automatically filled with data:
with audio CDs it is for 40 seconds;
with MP3 CDs it is for 120 seconds;
Further information on playing CDs
Moisture and high humidity may cause the CD player to malfunction. If this
occurs, switch on the vehicle's heater to evaporate the moisture before use.
Do not expose the CD player to extremely high or low temperatures.
Autoradio MD 42540_AUS.fm Seite 20 Mittwoch, 30. November 2005 9:01 09

Operation
MD 42540 21
Repeat a track
• Press the RPT button (12) to repeat the current track. Pressing the button
again will change the playback mode back to normal.
Random track playback
• Press the SHF button (13). The player will "shuffle" through the tracks, playing
them in random order. Pressing the button again will change the playback
mode back to normal.
Playing MP3 CDs
The basic functions are the same as those for audio CDs (refer to previous
chapter). However, for MP3 CDs you can select the track and artist directly. The
use of this function and other MP3specific functions will depend to some
degree on the MP3 CD itself. Please bear this in mind when producing this type
of CD (refer to next chapter).
All common encodings can be played back.
Producing MP3 CDs; ID3 tags
As with data CDs, MP3 CDROMs may contain individual tracks or folders.
When producing an MP3 CD, please ensure that you do not save tracks on
the same level as directories but only inside the directories. Mixing tracks
and directories at the same level may produce playback problems.
When producing an MP3 CD you can also save socalled "ID3 tags" (we
recommend using an ID3 tag editor for entries). This is a block of information
stored on an MP3 CD lying "behind" the actual music information of the MP3.
This may include such items as the artist, track, album name, year of publication
and a short comment. The car radio can read this information block and show it
on the display.
• To display the ID3 tags press DSP (9). The category changes each time you
press the button: > TRACK > ARTIST > ALBUM NAME > YEAR OF RELEASE >
COMMENT.
Searching for tracks (numbers)
Search for track numbers
• Press the AS/PS (8) button briefly. Now enter the desired track number using
the number keys.
• Confirm by pressing LOUD/ENTER/BND (19).
Autoradio MD 42540_AUS.fm Seite 21 Mittwoch, 30. November 2005 9:01 09
Table of contents
Other Medion Car Receiver manuals

Medion
Medion MD 80555 User manual

Medion
Medion MD 80907 User manual

Medion
Medion Car Audio User manual

Medion
Medion LIFE P62024 User manual

Medion
Medion Car Audio User manual

Medion
Medion P62033 User manual

Medion
Medion E65114 User manual

Medion
Medion MD 4295 User manual

Medion
Medion MD 41550 User manual

Medion
Medion MD 81485 User manual
Popular Car Receiver manuals by other brands

JVC
JVC KD-A805 Brochure & specs

Kenwood
Kenwood KDC-4070RA/RG instruction manual

Hyundai
Hyundai DVD/CD/MP3 Receiver with Bluetooth H-CMD7086 instruction manual

Panasonic
Panasonic CQ-DP34LEE operating instructions

Panasonic
Panasonic C3303N operating instructions

Sony
Sony MEX-1HD - Audio Library System Service manual