Medion E65114 User manual

MSN 5005 0339
Deckless Car Stereo with Bluetooth
MEDION®E65114 (MD 80005)
Instruction Manual
08/2015
MEDION Australia Pty Ltd
St Leonards, NSW 2065
Australia
Hotline: 1 300 884 987
Opening hours: Mon - Fri 08:30AM to 06:00PM EST
Internet
www.medion.com.au
Please use the contact form at:
www.medion.com/contact
AUS
80005 DE for AUS ALDI Cover RC1.indd Alle Seiten80005 DE for AUS ALDI Cover RC1.indd Alle Seiten 29.05.2015 14:30:2529.05.2015 14:30:25

AFTER SALES SUPPORT
1300 884 987 www.medion.com.au
AUS
3
Contents
1. Warranty Details..................................................................................................5
2. About these Instructions....................................................................................6
2.1. Warning symbols and key words used in these instructions.............................6
2.2. Intended use........................................................................................................................7
3. Safety instructions..............................................................................................8
3.1. Keep electrical equipment out of reach of children..............................................8
3.2. Purpose..................................................................................................................................8
3.3. Road safety...........................................................................................................................8
3.4. Never carry out repairs yourself....................................................................................8
3.5. Sunlight .................................................................................................................................9
3.6. Drives and connections ...................................................................................................9
3.7. Cleaning the device...........................................................................................................9
4. Package contents ............................................................................................. 10
5. Installation........................................................................................................ 10
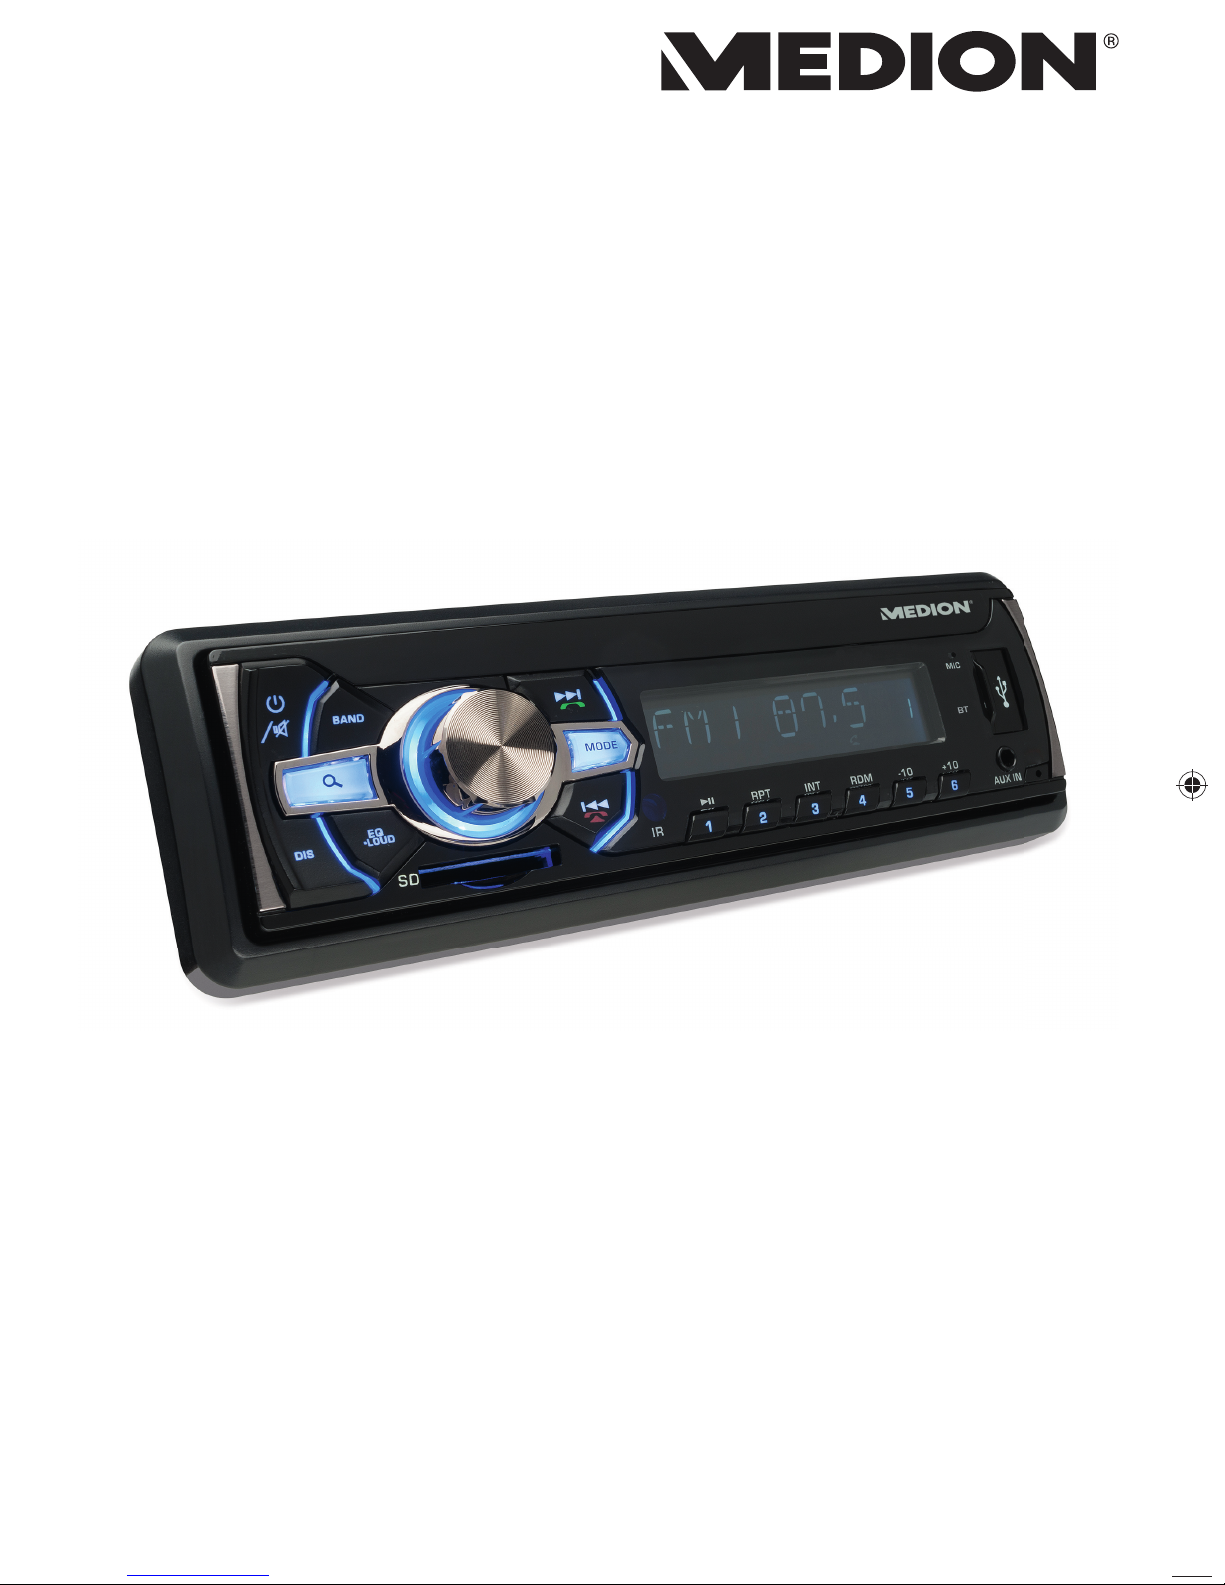
6. Overview of the device .................................................................................... 11
6.1. Front view ..........................................................................................................................11
6.2. Rear view............................................................................................................................13
7. Installation and initial use............................................................................... 14
7.1. The ISO slot .......................................................................................................................14
7.2. Fitting the mounting frame in the ISO slot............................................................14
7.3. Connections on the back of the radio .....................................................................16
7.4. Test station memory ......................................................................................................16
7.5. Using the car radio..........................................................................................................17
7.6. Reset ....................................................................................................................................17
8. Information on the cables ............................................................................... 18
8.1. Overview of the power cables....................................................................................18
8.2. Overview of the speakers cables...............................................................................19
9. Operation.......................................................................................................... 21
9.1. Basic functions .................................................................................................................21
10.Radio functions ................................................................................................ 23
10.1. Operation with data media (USB, CARD, AUX IN)................................................24
11.USB and SD-card media................................................................................... 25
11.1. Device connected to AUX IN....................................................................................... 25
12.Playback functions........................................................................................... 26
13.Bluetooth function........................................................................................... 27
13.1. Pairing .................................................................................................................................27
13.2. Telephone calls ................................................................................................................28
80005 DE for AUS ALDI Content RC3.indd 380005 DE for AUS ALDI Content RC3.indd 3 16.07.2015 13:55:3716.07.2015 13:55:37

AFTER SALES SUPPORT
1300 884 987www.medion.com.au AUS
4
13.3. A2DP mode .......................................................................................................................28
14.Troubleshooting............................................................................................... 29
15.Disposal ............................................................................................................ 30
16.Technical data................................................................................................... 31
17.Declaration of conformity ............................................................................... 32
18.Legal notice ...................................................................................................... 32
19.Repair and Refurbished Goods
or Parts Notice ....................................................................................................... 33
80005 DE for AUS ALDI Content RC3.indd 480005 DE for AUS ALDI Content RC3.indd 4 16.07.2015 13:56:0516.07.2015 13:56:05

Deckless Car Stereo with Bluetooth
E65114 (MD 80005)
1. Warranty Details
The product is guaranteed to be free from defects in workmanship and parts for a pe-
riod of 12 months from the date of purchase. Defects that occur within this warran-
ty period, under normal use and care, will be repaired, replaced or refunded at our
discretion. The benefits conferred by this warranty are in addition to all rights and re-
medies in respect of the product that the consumer has under the Competition and
Consumer Act 2010 and similar state and territory laws.
Our goods come with guarantees that cannot be excluded under the Australian
Consumer Law. You are entitled to a replacement or refund for a major failure and for
compensation for any other reasonably foreseeable loss or damage. You are also entit-
led to have the goods repaired or replaced if the goods fail to be of acceptable quality
and the failure does not amount to a major failure.
AFTER SALES SUPPORT
1300 884 987 www.medion.com.au
AUS
80005 DE for AUS ALDI Content RC3.indd 580005 DE for AUS ALDI Content RC3.indd 5 16.07.2015 13:56:0516.07.2015 13:56:05

2. About these Instructions
Please be sure to read these operating instructions carefully and follow all
instructions given. The instructions will help you to operate the device
reliably and help increase its service life. Always store these instructions
near the device. Keep these operating instructions so that you can pass
them on with the device if you sell it.
2.1. Warning symbols and key words used in these
instructions
DANGER!
Warning of immediate risk of fatal injury!
WARNING!
Warning: possible mortal danger and/or serious irre-
versible injuries!
CAUTION!
Warning: possible light or moderate injuries!
CAUTION!
Please follow the guidelines to avoid property damage.
PLEASE NOTE!
Additional information on using the device!
PLEASE NOTE!
Please follow the guidelines in the operating instructions.
WARNING!
Warning: danger of electric shock!
• Bullet point/information on operating steps and results
Tasks to be performed
AFTER SALES SUPPORT
1300 884 987www.medion.com.au AUS
About these Instructions
6
80005 DE for AUS ALDI Content RC3.indd 680005 DE for AUS ALDI Content RC3.indd 6 16.07.2015 13:56:0516.07.2015 13:56:05

2.2. Intended use
The car radio is an audio device for playing and listening to music (e.g. from USB, SD-
cards or radio) and has an additional Bluetooth function. The Bluetooth function
enables you to connect your mobile phone to the car radio and make calls. The car
radio is only designed for use in a motor vehicle.
The device is intended for private use only and not for industrial/commercial use.
Please note that we shall not be liable in case of improper use:
• Do not modify the device without our consent and do not use any auxiliary
equipment which we have not approved or supplied.
• Use only spare parts and accessories which we have supplied or approved.
• Follow all the instructions in these directions for use, especially the safety
information. Any other use is deemed improper and can cause personal injury or
damage to the product.
• Do not use the device in areas where there is a risk of explosion. This includes e.g.
tank farms, fuel storage depots or areas in which solvents are processed.It is also
not permitted to use this device in those areas where the air is polluted with fine
particles (e.g. flour dust or sawdust).
• Do not expose the device to any extreme conditions. The following should be
avoided:
−High humidity or moisture
−Extremely high or low temperatures
−Direct sunlight
−Open fire
AFTER SALES SUPPORT
1300 884 987 www.medion.com.au
AUS
About these Instructions
7
80005 DE for AUS ALDI Content RC3.indd 780005 DE for AUS ALDI Content RC3.indd 7 16.07.2015 13:56:0616.07.2015 13:56:06

3. Safety instructions
3.1. Keep electrical equipment out of reach of
children
• Ensure that children do not play with the device by never allowing
them to use it unsupervised.
• This device is not intended for use by people (including children)
with reduced physical, sensory or mental abilities or by those
without experience and/or knowledge, unless they are supervised
by a person responsible for their safety or they have been instructed
in its use by that person.
DANGER!
Keep plastic packaging out of the reach of children. There is
a risk of suffocation.
3.2. Purpose
• The car radio has only been designed for installation and operation
in cars.
3.3. Road safety
• Road safety should be your top priority. Use your car radio only in
suitable traffic conditions. Please ensure that you are familiar with
the radio before setting off.
• You should always be able to hear police, fire and other emergency
service sirens in good time while in your vehicle. For this reason,
please play your radio at an appropriate volume while driving.
3.4. Never carry out repairs yourself
• Do not use the device if the casing or cable is damaged.
WARNING!
Never try to open and/or repair the device yourself. There is
a risk of electric shock.
AFTER SALES SUPPORT
1300 884 987www.medion.com.au AUS
Safety instructions
8
80005 DE for AUS ALDI Content RC3.indd 880005 DE for AUS ALDI Content RC3.indd 8 16.07.2015 13:56:0616.07.2015 13:56:06

• If there is a fault, please contact our Service Centre or another
suitably qualified specialist workshop to avoid putting yourself at
risk.
3.5. Sunlight
If the inside of the vehicle has become very hot, e.g. because of lengthy
exposure to sunlight, do not operate the car radio immediately.
• Wait until you have been driving for a while and the car radio has
had a chance to cool down.
3.6. Drives and connections
• Do not insert any foreign bodies into the openings of the car radio
(disc compartment, USB slot, card slot, AUX slot). This could damage
the compartments and slots.
• Always insert discs into the disc compartment with the title side
upwards. Never apply excessive force to insert a disc or card or
connect an external device. If you feel resistance, try a different
method or medium.
3.7. Cleaning the device
• Use a dry, soft cloth to clean the device. Do not use chemical
solutions and cleaning products because these may damage the
surface and/or the inscriptions on the product.
WARNING!
Protect the device from moisture. Do not touch the device
with wet hands. There is a risk of electric shock!
AFTER SALES SUPPORT
1300 884 987 www.medion.com.au
AUS
Safety instructions
9
80005 DE for AUS ALDI Content RC3.indd 980005 DE for AUS ALDI Content RC3.indd 9 16.07.2015 13:56:0616.07.2015 13:56:06

4. Package contents
Please check your purchase to ensure that all items are included. If anything is
missing, please contact us within 14 days of purchase.
The following items are supplied with the product you have purchased:
• Car radio
• Cable connector
• Mounting frame (inserted)
• 2 keys to remove the mounting frame and remove the device
• Additional mounting material for individual installation
• These operating instructions
• Warranty card
5. Installation
We recommend that the device is installed by a trained technician. This ensures
that the device will work perfectly. Incorrect cabling may result in damage to the
device and your car. If you wish to install your car radio yourself, please refer to the
installation and connection instructions in this manual.
WARNING!
Disconnect the minus pole from the car battery before
installation! There is a risk of short-circuit and electric
shock!
• Check whether the terminal assignment of your vehicle matches the assignment
of the car radio.
• Do not install the cables under tension, across sharp edges or close to parts that
could heat up. Make sure you do not kink the cables or twist them.
• Insert the device into the proper slot or choose an installation location that will
not affect the driver’s ability to drive normally.
• Connect the cable briefly before finally installing the device. Ensure it has been
connected correctly and that the system is working properly.
• If changes have to be made to the vehicle, consult your vehicle dealer/specialist
workshop.
• Your warranty will be invalidated if you disconnect the adapter socket from the
cable or cut the cable!
• Make sure that the device is installed in such a way that injuries cannot occur due
to heavy braking.
AFTER SALES SUPPORT
1300 884 987www.medion.com.au AUS
Package contents
10
80005 DE for AUS ALDI Content RC3.indd 1080005 DE for AUS ALDI Content RC3.indd 10 16.07.2015 13:56:0616.07.2015 13:56:06

• Avoid installing the unit near strong heat sources (e.g. direct sunlight or heating
air), dust, pollution or excessive shocks. This could damage the device.
• If the unit is installed at an angle of over 30° from the
horizontal it may adversely affect performance.
• You must follow these instructions precisely during the
assembly. Before reconnecting the car battery, check all of
the connections.
6. Overview of the device
6.1. Front view
1920 18 17 16 15 14 13 12 11 10 9
1 2 3 4 5 6 7 8
1) POWER/ MUTE: Press and hold down to switch the car radio off,
Press briefly to switch the car radio on; Press briefly to switch off sound;
2) BAND: Select frequency band in radio mode; press repeatedly to toggle
MP3-tag informations in MP3-mode
3) Dial/button:
Press repeatedly to select different settings:
change settings with the dial
Each setting only remains active for a few seconds before switching back to the
default volume setting (“VOL”).
Briefly press the dial to select the following audio settings:
Volume VOL Set the volume
Bass BAS Set the bass
30°
AFTER SALES SUPPORT
1300 884 987 www.medion.com.au
AUS
Overview of the device
11
80005 DE for AUS ALDI Content RC3.indd 1180005 DE for AUS ALDI Content RC3.indd 11 16.07.2015 13:56:0616.07.2015 13:56:06

Treble TRE Set the treble distribution
Balance BAL Regulate right/left volume distribution
Fader FAD F/ RSet the volume distribution between front
(F)/rear (R)
Loudness LOUD Switch the loudness function on (ON) to
increase bass and treble or off (OFF)
Equalizer EQ OFF
Use the dial to select between the au-
dio settings FLAT (normal), CLASSIC,
ROCK and POP
Local Stations DX
Select DX for the long distance radio sta-
tion mode, select OFF for short or local dis-
tance radio stations (LOC).
Mono/stereo
setting STEREO
In FM band select stereo or mono mode
(MONO). The MONO setting can improve
the reception if stereo reception is poor
4) MODE: Select operating mode (RADIO - USB - CARD - AUX IN - BT);
5) / : Fast rewind; Previous track; Accept call/ Fast forward; Next
track; Reject call
6) Display
7) Microphone
8) USB connection
9) Reset button: Restore device to factory settings
10) AUX IN: Audio input (3.5 mm jack socket)
11) 6 10+: Memory Button 6; During MP3 playback: play back next directory
12) 5 10-: Memory Button 5; During MP3 playback: play back previous directory
13) 4 RDM: Memory Button 4; Random function (random playback) for MP3
playback
14) 3 INT: Memory Button 3; Intro function (play track) for MP3 playback
15) 2 RPT: Memory Button 2; Repeat (repeat function) for MP3 playback
16) 1II: Memory Button 1; Start/pause playback
17) SD card slot
18) EQ/LOUD: EQ: Use the dial to select between the audio settings FLAT
(normal), CLASSIC, ROCK and POP and EQ OFF / Switch on loudness
to increase bass and treble (ON) or switch off (OFF)
19) DIS: Display time, hold down for longer to set the time
20) SEARCH: Automatic station search; Track search for MP3 playback
AFTER SALES SUPPORT
1300 884 987www.medion.com.au AUS
Overview of the device
12
80005 DE for AUS ALDI Content RC3.indd 1280005 DE for AUS ALDI Content RC3.indd 12 16.07.2015 13:56:0616.07.2015 13:56:06

6.2. Rear view
21 2322
21) Antenna socket
22) Audio cinch sockets (red/white)
23) Connector with cables
AFTER SALES SUPPORT
1300 884 987 www.medion.com.au
AUS
Overview of the device
13
80005 DE for AUS ALDI Content RC3.indd 1380005 DE for AUS ALDI Content RC3.indd 13 16.07.2015 13:56:0716.07.2015 13:56:07

7. Installation and initial use
DANGER!
Disconnect the minus pole from the car battery before
installation!
There is a risk of short-circuit and electric shock!
7.1. The ISO slot
The car radio has been designed for installation in a standard ISO installation slot. It
must measure at least 53x182mm.
182 mm
53 mm
NOTE!
Use the cable sockets supplied to connect the car radios cables directly
to the corresponding connections on the ISO block of your vehicle. Or
use an ISO block adapter. Contact your specialist workshop, retailer or
departments in department stores. See also section„8. Information on the
cables“ on page 18.
7.2. Fitting the mounting frame in the ISO slot
CAUTION!
Follow the safety instructions for installation on „5. Installation“
on page 10.
Before installation, always remove the two transportation safety screws in the top
radio casing (recognizable by a red flag)!
On delivery, the mounting frame (1) is pulled over the car radio (2). First remove the
mounting frame from the casing of the car radio.
AFTER SALES SUPPORT
1300 884 987www.medion.com.au AUS
Installation and initial use
14
80005 DE for AUS ALDI Content RC3.indd 1480005 DE for AUS ALDI Content RC3.indd 14 16.07.2015 13:56:0716.07.2015 13:56:07

To do so, insert the two keys (3) supplied to the left and right between the device
and mounting frame until the keys click into place.
Then use the key to slide the installation frame over the device towards the rear.
Insert the mounting frame into the ISO installation slot (4).
To fix the mounting frame in the installation slot, use a screwdriver to bend as
many flaps as possible outwards (5). Select the flaps that connect with the housing
of the installation slot.
5
4
1
2
3
NOTE!
Check that the installation frame is held securely. The frame must be fixed
securely so that it cannot release – even during sudden braking.
Before using the car radio, make the electrical connections.
AFTER SALES SUPPORT
1300 884 987 www.medion.com.au
AUS
Installation and initial use
15
80005 DE for AUS ALDI Content RC3.indd 1580005 DE for AUS ALDI Content RC3.indd 15 16.07.2015 13:56:0716.07.2015 13:56:07

7.3. Connections on the back of the radio
Prepare the cable connections
Pull the connections in the ISO slot of your car out far enough that you can
connect them to the connections on the car radio.
Plug the cable-connector into the socket on the rear of the car radio.
Connect the cables
NOTE!
Please use the cable-connector for installation.
If your car’s ISO plug does not match the car radios cables, you can buy
appropriate adapters in specialist workshops, retailers or department stores.
Connect the cables to the corresponding connections of your car
If, however, you want to route cables individually, we will explain the relevance of
the cables at the end of this section.
Connect the vehicle’s antenna plug to the car radio’s antenna socket.
If you want to use an external amplifier, you can connect it with the red/white
audio cinch sockets. Please refer to the operating instructions for the amplifier..
7.4. Test station memory
In some types of vehicle, the default assignment of permanent plus and alternating
plus has been exchanged by the factory for the ISO block A in the ISO plug. This
means that the station memory does not work.
Before finally inserting the car radio, use the following procedure to check whether
the stations stay saved:
Reconnect the car battery.
Switch the vehicle’s ignition on.
Switch the radio on.
Save stations automatically by holding down the SEARCH button for around
two seconds (see also„Auto memory store“ on page 23).
Switch the vehicle’s ignition off.
Switch the ignition on again and test whether the stations are still saved (to do so
press the station buttons 1to 6).
If the stations have been saved you can insert the radio.
If the stations are no longer saved, you should use an adapter, available from specialist
retailers, or arrange for a specialist workshop to modify the cables. In this case, please
observe the information in chapter„8. Information on the cables“ on page 18.
AFTER SALES SUPPORT
1300 884 987www.medion.com.au AUS
Installation and initial use
16
80005 DE for AUS ALDI Content RC3.indd 1680005 DE for AUS ALDI Content RC3.indd 16 16.07.2015 13:56:0816.07.2015 13:56:08

7.5. Using the car radio
Push the car radio carefully into the slot until it clicks into place.
NOTE!
When inserting the radio, make sure that the cables are not kinked,
squashed or pulled tight.
7.6. Reset
If the car radio displays a defect that cannot be remedied through switching it
off and back on, press the tip of a ballpoint pen or other sharp object into the
RESET button opening.
Removing the unit
To dismantle the unit, insert the left and right keys into the relevant slots on the
sides of the device. The flaps will be bent back and you can remove the unit.
AFTER SALES SUPPORT
1300 884 987 www.medion.com.au
AUS
Installation and initial use
17
80005 DE for AUS ALDI Content RC3.indd 1780005 DE for AUS ALDI Content RC3.indd 17 16.07.2015 13:56:0816.07.2015 13:56:08

8. Information on the cables
NOTE!
The information on the cables is to be used to route the cables to your
vehicles ISO block. To do so, contact a specialist workshop and hand over
the information from this section.
8.1. Overview of the power cables
Red: Ignition lock (switched plus)
The red cable must be connected to the switched plus.
Black: Earth (groud)
The black cable must be connected to the earth (ground) of the vehicle.
Blue: Antenna relay cable
The blue cable is available for a relay-controlled antenna. The relay extends the
antenna automatically when the radio is switched on. When it is switched off the
antenna is retracted.
This relay cable can also be used to control an external amplifier. Please refer to the
amplifier’s operating instructions for the correct connections.
CAUTION!
Never connect the blue cable to the engine cable of the relay
controlled antenna; this could damage the radio!
Yellow: Memory back-up
The yellow memory back-up cable must be connected with the permanent plus.
Otherwise the station memory function will not work.
AFTER SALES SUPPORT
1300 884 987www.medion.com.au AUS
Information on the cables
18
80005 DE for AUS ALDI Content RC3.indd 1880005 DE for AUS ALDI Content RC3.indd 18 16.07.2015 13:56:0916.07.2015 13:56:09

8.2. Overview of the speakers cables
Green/Green-Black
Left rear speaker
Purple/Purple-Black
Right rear speaker
White/White-Black
Left front speaker
Grey/Grey-Black
Right front speaker
NOTE!
If the vehicle only has front speakers and the cables for the rear speakers
are not needed, you must correctly insulate the exposed ends of these
cables
Assignment of a standard ISO socket block
ISO block BLOCK B -
Speakers
BLOCK A -
Electricity supply
B135 7
246 8
135 7
246 8
A
1rear right + 1
2rear right - 2
3front right + 3
4front right - 4
Permanent plus (per-
manent 12V supply
from main electrical
system);
terminal 30
5front left + 5
Car antenna (also for
external amplifiers,
etc.)
6front left - 6
7rear left+ 7
Alternating plus (al-
ternating 12V volt-
age, via ignition); ter-
minal 15
8rear left - 8Earth; terminal 31
AFTER SALES SUPPORT
1300 884 987 www.medion.com.au
AUS
Information on the cables
19
80005 DE for AUS ALDI Content RC3.indd 1980005 DE for AUS ALDI Content RC3.indd 19 16.07.2015 13:56:0916.07.2015 13:56:09

Problems due to incorrect cable connections
In some types of vehicle, the default assignment of permanent plus and alternating
plus has been exchanged by the factory for the ISO block A in the ISO plug. If this is
the case in your vehicle, certain functions may be impaired: for example, stations may
not be stored properly.
To solve this, the red cable (alternating plus) and the yellow cable (permanent plus)
will need to be reversed in the ISO block. The specialist dealer has the appropriate
adapters for this.
AFTER SALES SUPPORT
1300 884 987www.medion.com.au AUS
Information on the cables
20
80005 DE for AUS ALDI Content RC3.indd 2080005 DE for AUS ALDI Content RC3.indd 20 16.07.2015 13:56:0916.07.2015 13:56:09

9. Operation
9.1. Basic functions
Switching on/off
Press the POWER button to switch the radio on. The radio will also switch on as
soon as a data medium (USB/CARD) has been inserted.
Press the POWER button for approx. 0.5 seconds to switch the radio off.
Dial/button - Set the volume and sound
You can use the multifunctional dial/button to call up the volume and other sound
settings
Setting Display Function
Volume VOL Set the volume
Bass BAS Set the bass
Treble TRE Set the treble distribution
Balance BAL Regulate right/left volume distribution
Fader FAD F/ RSet the volume distribution between front
(F)/rear (R)
Loudness LOUD Switch the loudness function on (ON) to
increase bass and treble or off (OFF)
Equalizer EQ OFF
Use the dial to select between the au-
dio settings FLAT (normal), CLASSIC,
ROCK and POP
Local Stations DX
Select DX for the long distance radio sta-
tion mode, select OFF for short or local dis-
tance radio stations (LOC).
Mono/stereo
setting STEREO
In FM band select stereo or mono mode
(MONO). The MONO setting can improve
the reception if stereo reception is poor
You can change the volume at any time by turning the dial/button. If you are in a
menu, wait for around 5 seconds before the radio automatically leaves the menu.
NOTE!
Always set the volume to a level that you can still clearly hear the sirens of
emergency vehicles!
Press the dial/button to select another sound setting. The current value of the
setting is shown in the display.
You can turn the dial/button to change the setting
AFTER SALES SUPPORT
1300 884 987 www.medion.com.au
AUS
Operation
21
80005 DE for AUS ALDI Content RC3.indd 2180005 DE for AUS ALDI Content RC3.indd 21 16.07.2015 13:56:0916.07.2015 13:56:09
This manual suits for next models
1
Table of contents
Other Medion Car Receiver manuals

Medion
Medion MD 41550 User manual

Medion
Medion MD 80907 User manual

Medion
Medion MD 80555 User manual

Medion
Medion MD 81460 User manual

Medion
Medion Car Audio User manual

Medion
Medion P62033 User manual

Medion
Medion Car Audio User manual

Medion
Medion MD 4295 User manual

Medion
Medion MD 81485 User manual

Medion
Medion LIFE P62024 User manual