MedRock HipTrac User manual

Instruction Manual
HIP TRACTION UNIT


Instruction Manual
3
CONTENTS
Letter to Patient ............................................................ 4
Introduction ................................................................... 5
How the HipTrac Works................................................. 6
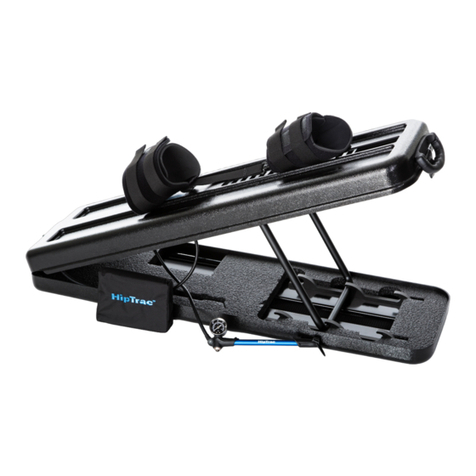
HipTrac System Components ....................................... 7
HipTrac Device Features and Controls.......................... 8
Notes on Hip Traction and the HipTrac ...................... 10
Getting Started ........................................................... 10
Using the HipTrac........................................................ 11
Orientation Test and Sample Treatment Protocol........ 13
Care for Your HipTrac .................................................. 14
Warranty Information ................................................... 15

Instruction Manual
4
LETTER TO PATIENT
Thank you for choosing the HipTrac to help you achieve your goal of a more
active and less painful lifestyle. Your health care provider has prescribed
the HipTrac system to help improve your current condition. Please read this
instruction manual carefully before using your HipTrac. The instructions on the
following pages are very specic and will show you how to use and care for
your HipTrac.
NOTE: Please read the information on precautions, indications, and
contraindications in this manual before using the HipTrac (Page 10).
Always consult your physician, physical therapist, or chiropractor if you have
any specic questions or problems regarding the use of your HipTrac.
Your health care provider possesses technical knowledge about the HipTrac
and is familiar with your specic condition and personal needs. Always follow
the instructions of your health care provider to safely obtain the greatest
benet from your HipTrac.
CAUTION: Federal (U.S.A.) law restricts this device to sale by,
or on the order of, a licensed health care provider. This device should
only be used under medical supervision for adjunctive therapy for the
treatment of medical diseases and conditions.

Instruction Manual
5
INTRODUCTION
There are millions of individuals suffering from hip (acetabulofemoral) pain
related to a variety of conditions, such as osteoarthritis, femoral acetabular
impingement and labral tears. For over a hundred years, the rst and most
widely used hands-on treatment has been long axis hip traction. Traditionally,
a health care provider uses his/her hands to manually perform the technique
of grasping the patient’s leg and distracting the hip. This has been proven
very effective in reducing pain and improving joint mobility.
Hip traction provides natural pain relief while stretching tight tissues around
the joint. This allows the individual to improve their mobility and increase their
activity level with less pain.
Some individuals that benet from hip traction may begin to reduce their use
of pain medications. As the individual increases their activity level with less
pain, they will then be able to perform more therapeutic exercise to make
gains in strength, mobility, and weight loss. These gains have been shown to
also further improve conditions of the hip and increase functionality.
The HipTrac is a light-weight, portable device that replicates this same
hip traction at home. Until now, there has not been an effective way for
patients to easily and safely perform this technique without the assistance
of another person.
The HipTrac will help many individuals with hip pain signicantly improve their
quality of life.

Instruction Manual
6
HOW THE HIPTRAC WORKS
Your HipTrac is a pneumatic device that provides home hip (acetabulofemoral)
traction in an easy to use, comfortable, and effective way. It is designed to
replicate traction treatment you may receive from your health care provider.
The HipTrac is designed to use traction to relieve pain, increase joint mobility,
and relax surrounding musculature. It is important to follow your health care
provider’s recommendations precisely with regard to treatment force
(correlating to the pressure reading on the hand pump gauge), usage,
position, and treatment duration.
Your health care provider will provide you with specic directions on
the proper use of the HipTrac for your condition. Do not deviate from
his/her directions.
It is important to understand that pain is a symptom of an underlying condition,
and the HipTrac device has no curative effect on the cause of your pain.
Therefore, home hip traction is not a substitute for proper medical evaluation
and treatment, but rather a supplement and/or extension of them.
CAUTION: A slight stretching sensation and/or some mild
discomfort may occur during the use of this traction device.
However, at no time should you feel any pain. If pain is increased
in your foot, ankle, knee, hip, lower back or any other location,
immediately discontinue the use of this traction device and seek the
counsel of a medical professional and/or your health care provider.
Do not begin to reuse this traction device until you have consulted
your health care provider. The application of excessive force or the
improper application of traction may result in additional injury or may
aggravate a pre-existing medical condition.

Instruction Manual
7
HIPTRAC SYSTEM COMPONENTS
The HipTrac system is provided with:
Use only HipTrac replacement parts.
Order from MedRock, Inc. at 1 (503) 719-7775.
A
B
E
I
F
G
H
D
C
A. HipTrac
B. Ankle Binding
C. Above the Knee Binding
D. Slide Carriage
E. Support Legs
F. Foam Pad
G. Hand Pump with Gauge
H. Pull Strap
I. Instruction Manual

Instruction Manual
8
HIPTRAC DEVICE FEATURES AND CONTROLS
Hand Pump and Gauge
The supplied pneumatic hand pump adjusts the force of the traction
delivered. As you pump air into the device’s pneumatic cylinder, the gauge
indicates the amount of air pressure in the cylinder. This pressure correlates
to the force being applied to your hip.
Your health care provider will determine the proper amount of force. Do not
deviate from their recommendations. Doing so may be hazardous to you
and your medical condition. The hand pump includes a release button that
releases air from the cylinder and brings the HipTrac into neutral position.
The release button may also be used to assist in intermittent traction.
NOTE: In an emergency, fully depress and hold the release button until
traction device is in neutral position.
Slide Carriage
Multiple openings for which the hook of the binding inserts for users of
different heights.
Pneumatic Cylinder
The cylinder moves the slide carriage within the HipTrac.
Support Legs
The support leg locks into 3 different angles of 10, 20, and 30 degrees
depending on your comfort level and instructions from your health
care provider.
Pull Strap
The pull strap is used when connecting and disconnecting from the HipTrac at
the end of a session.
Continued on next page.

Instruction Manual
9
Binding
See our instructional videos at www.medrock.com/hiptrac-foam-roller-
resources/ to learn how to put the bindings on and start using HipTrac.
Start by wrapping and attaching the Ankle Binding just above the two ankle
bones (malleoli) so that the straight edge is very close to but right above the
bones. Before securing the two velcro straps around tightly, try to arrange the
binding so that the metal hook is centered to your calf/achilles tendon. Once
centered, then secure the two velcro straps around tightly. Then place the
Above the Knee Binding so that the bottom edge is right above your knee cap
(patella) with your leg out straight. Make sure the nylon strap with plastic hook
on it is running down the back of your calf. Secure the velcro straps of the
Above the Knee Binding, then connect the plastic hook to the plastic D-ring
of the Ankle Binding. Once connected and with leg straight, tighten that nylon
strap down the back of your calf. Now you are ready to connect to HipTrac.
NOTE: Always consult your health care provider before beginning
any treatment.

Instruction Manual
10
NOTES ON HIP TRACTION AND THE HIPTRAC
Hip traction has helped in the treatment of many conditions at the hip.
Traction may be used to treat signs and symptoms associated with the
following hip conditions:
• Osteoarthritis
• Femoral Acetabular Impingement
• Labral Pathology
• Pain
• Joint Stiffness
• Muscle Tightness
Never use traction to treat the following conditions:
• Fractures
• Infections and Inammatory Diseases
• Malignancy
• Rheumatoid Arthritis
• Lumbar Spinal Cord Compression
• Lumbar Spinal Instability
GETTING STARTED PRIOR TO USE
Carefully read and familiarize yourself with the directions you received from
your health care provider. Pay particular attention to the following items:
1. Recommended traction force (remember traction should never cause
you pain).
2. Recommended traction duration for each treatment.
3. Recommended hold and relax times for intermittent traction application
(if prescribed). Prior to use, remember to have a watch readily accessible to
time your treatment.
4. Recommended number of traction treatments daily or weekly.
* Device should be returned to room temperature if stored over
100 degrees F or below 50 degrees F.
• Traumatic or Acute Injury
• Any condition that can be
aggravated by movement
or in which hip traction is
contraindicated
• Pre-Surgical Conditions
• Compression Conditions
• Any condition in which your health
care provider prescribes outpatient
traction of the hip
Continued on next page.

Instruction Manual
11
Assembly
No assembly required other than securing the binding to your ankle and
connecting to corresponding opening in slide carriage. There is also a
foam pad to place between your buttocks and the device to make it more
comfortable. Both the foam pad and binding t easily back into the HipTrac
when not in use.
Set-Up
Place the HipTrac on a rm, at, non-slippery surface. Make sure you have
enough space to lie down fully and that the device is not resting on top of the
air pump hose.
You may also want a pillow for your head for comfort. Have ankle binding
readily available to you.
USING THE HIPTRAC
1. Secure bindings to your leg as per the instructions on Page 9 and our
instructional videos at www.medrock.com/hiptrac-foam-roller-resources/.
2. Open the HipTrac and place support legs into one of the three different
positions. Choose the one that is most comfortable to you or as prescribed
by your health care provider. Make sure that the hand pump and hose are
free from obstruction. Press the release valve on the hand pump to ensure
HipTrac is in the neutral, start position. Take the Pull Strap out and have it
available on each side of you when lying down.
3. Lie down and place your leg, with binding attached, on the HipTrac.
Place the foam pad between your buttocks and HipTrac. Use the Pull Strap
to pull the HipTrac into your involved buttocks, with pad in between, as
tightly as possible while reaching for the highest hook opening you can insert
into. Ensure that you are securely connected to the slide carriage and that
the foam pad is still between your buttocks and HipTrac.
4. Reposition your body so that you are comfortable and in the position
recommended by your health care provider.
Continued on next page.

Instruction Manual
12
5. Begin gradually pumping air into the cylinder until the recommended
amount of traction force has been reached. Some individuals will feel relief
immediately at their hip while others will feel changes as treatment periods
accumulate. Monitor the hand pump gauge making sure never to exceed
the amount of traction force prescribed by your health care provider. It
is normal for you to sense some slight slipping of your ankle within the
binding. This is okay as long as you are comfortable and you are obtaining
the prescribed amount of traction.
6. Stop pumping when the recommended amount of traction force has been
attained, the hand pump will hold the pressure automatically.
NOTE: If traction force reading drops, it was probably caused by body
movement, repositioning, or unit movement. To correct, slowly pump
back to the desired traction force reading and relax.
NOTE: Should you pump beyond your recommended traction force,
depress and hold the air-release button immediately until desired
amount is obtained.
7. After you have reached your recommended traction force begin timing
your traction treatment as prescribed by your health care provider.
8. After the traction treatment is complete, press the release button to release
the traction.
9. Relax for a couple of minutes before removing your leg from the HipTrac.
10. To disconnect the binding from the slide carriage, rst remove foam pad
from between your buttocks and HipTrac. Then use pull strap to pull
HipTrac towards your buttocks while bending your knee slightly. Maintain
pressure towards you with the pull strap as you simply straighten your
knee and the hook should easily lift right out of the HipTrac. Once out,
you can rest your heel on the HipTrac for a few minutes if needed and
eventually roll away from the HipTrac.
NOTE: In an emergency, fully depress and hold the air-release button
until traction is in neutral position.

Instruction Manual
13
ORIENTATION TEST AND SAMPLE PROTOCOL
Health care providers and patients who have not used HipTrac before
generally have the same 3 important questions:
1. How hard or intense should we begin each pull?
2. For how long should we use it?
3. How many times per week can we use it?
To answer these questions, best practice is to start with the Orientation Test.
Not only does this help answer these questions, but also provides some
framework for progressing the different parameters. Like any tool, device or
technique, the health care providers will use the 3 pillars of evidence-based
medicine in order to apply or use the treatment. These 3 pillars are patient
experience, provider experience and the research. The Orientation Test
combines all 3 of these pillars to help you get started!
You can go to the website at: www.medrock.com/hiptrac-foam-roller-
resources/#hiptracgo to see the Orientation Test, Sample Protocols and other
important information to help you begin with HipTrac.

Instruction Manual
14
CARE FOR YOUR HIPTRAC
The HipTrac is designed to be light-weight, portable and durable.
It is built to provide you many years of effective hip traction.
Cleaning
Use only mild detergents to clean the HipTrac.
Troubleshooting
1. The HipTrac features a high quality gauge designed to be extremely
accurate. If traction force reading drops, it was most likely caused by
body movement or repositioning. To rectify, slowly pump back to the
desired traction force reading. If the pressure drops by more than
5-10 psi and doesn’t seem to be holding pressure, please contact us at
2. If you are having trouble securing the bindings, refer to Page 9 under
“Binding” or you may also watch the instructional videos on our website,
www.medrock.com/hiptrac-foam-roller-resources/.
CAUTION: Strictly adhere to the recommendations of your health care
provider. Do not exceed their recommendations. Doing so may result in
additional injury or the aggravation of a pre-existing condition.
The recommended traction treatment force must be determined by a trial
use of the HipTrac with your health care provider and not any other unit or
style of traction.
Storage
Store your HipTrac in a cool, dry place. Should the temperature of the
unit exceed over 100 degrees F or below 50 degrees F, return to room
temperature before operating.
May 29, 2019 8:25 AM

101 SW MADISON SUITE 9262
PORTLAND, OREGON 97207 USA
P: 1 (503) 719-7775
F: 1 (503) 719-7879
WARRANTY INFORMATION
MedRock, Inc. warrants your HipTrac to be free from defects in workmanship
and materials for a period of one (1) year from the date of it being issued to
you. MedRock, Inc. will repair or replace, at its factory, any devices found to
have become defective within the warranty period.
This warranty does not apply to accessories nor does it apply to units that
have been damaged due to misuse, or repaired or altered other than by
MedRock, Inc. at its factory.
This warranty is in lieu of any other warranties expressed or implied.
No person or entity is authorized to bind MedRock, Inc. to any representation
of warranty other than those specically set forth herein.

MEDROCK, INC.
101 SW MADISON STREET
SUITE 9262
PORTLAND, OR 97207 USA
P: 1 (503) 719-7775
F: 1 (503) 719-7879
www.MEDROCK.com
Other manuals for HipTrac
1
Table of contents
Other MedRock Medical Equipment manuals
Popular Medical Equipment manuals by other brands

Otto Bock
Otto Bock Varos 6Y200 Series Instructions for use
Lode
Lode M967900 manual

Mid America Motorworks
Mid America Motorworks CP Relief WandCP 1000 Operation manual
Biegler
Biegler BW 585 Instructions for use

Malsch
Malsch Impulse KL Series Instructions for use
natus
natus Olympic Brainz Monitor Reference manual
Mirion Technologies
Mirion Technologies BIODEX ULTRA-PRO 058-720 Operation manual

Durr Dental
Durr Dental CAS 1 Nstallation and operating instructions
Fukuda Denshi
Fukuda Denshi HBX-800 BIS Series instruction manual

Otto Bock
Otto Bock 1K10 Instructions for use

Invacare
Invacare CareGuard Series Owner's operator and maintenance manual
Ferno
Ferno 103 user manual
