MEFO-MOUSSE MOM BASIC Tyrefox MOM 96-10 User manual
DESIGNED FOR MAINTENANCE OF TYRES
on spoke or alloy wheels from 10”+ Mousse,
from 10“ to 21”with wheel pins from 10 to
30 mm, plus Quad and Go-Kart.
Patent Pending
MADE IN EUROPE
FITTINGMACHINE
NEW!
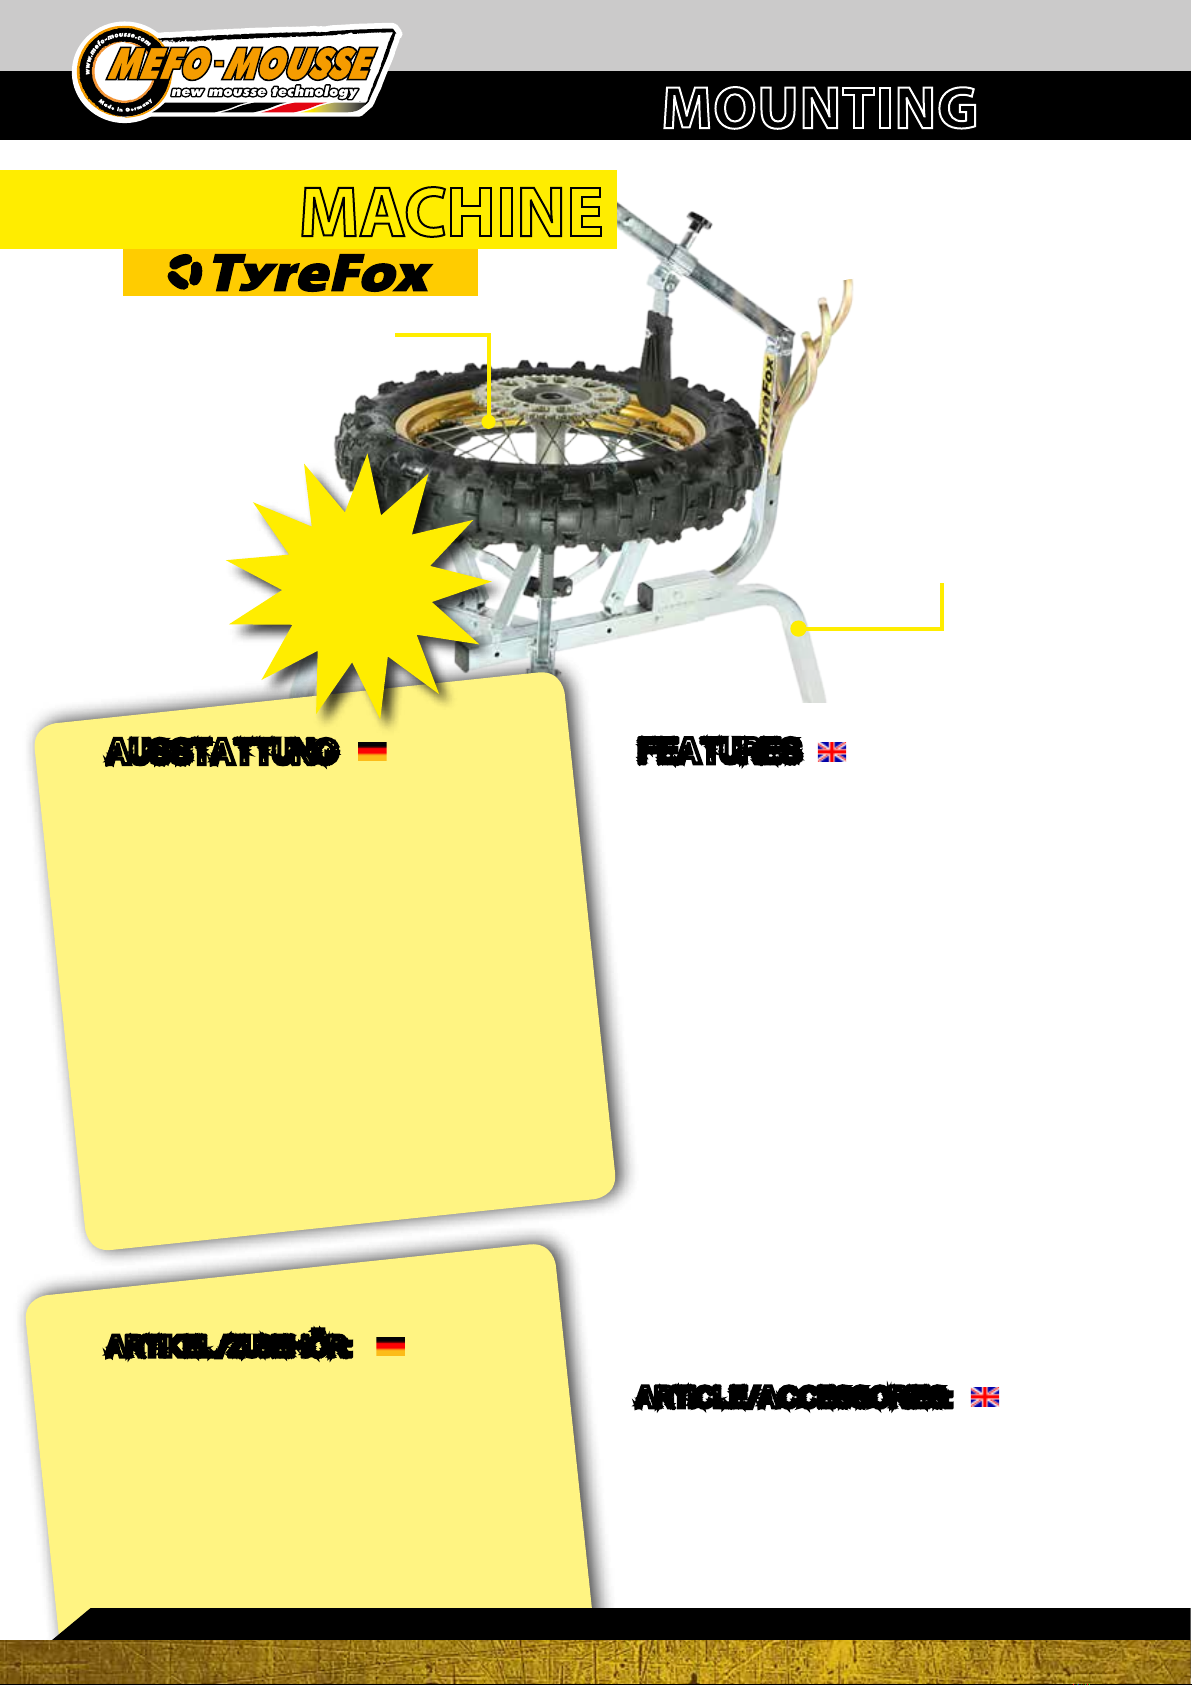
DESIGNED FÜR DIE REIFENMONTAGE
von Rädern ab 10” bis 21” und Mousse.
Mit Achsendurchmessern von 10 bis
30 mm, optional auch für Quad,
Kart und Road.
Das Reifen Montiergerät ist aus kaltverzinkten Vierkant-Rohren ge-
fertigt und ist so unempndlich gegen Kratzer, chemische Mittel und
witterungsbeständig. Es ist kompakt in der Größe und für den leichten
Transport komplett zerlegbar.
Der TYREFOX passt für alle Speichenfelgen von 10“ - 21“- bei Gussfel-
gen ab drei Speichen (16,5“ – 17“ ) mit einem optionalen Montagering.
Die Radauagen passen sich dem Durchmesser der Felge an und ge-
hen automatisch in ihre Ruheposition zurück. Sie sind aus hochfestem
Kunststo um Kratzer zu vermeiden.
Durch den einstellbaren Mindestdurchmesser der Radauagen wird
das Durchrutschen des Rades verhindert, wie z.B. bei einer 17“ Felge
mit 320 mm Bremsscheibe.
Der 10 mm Zentrierdorn kann durch Adapter schnell für Räder mit
größerem Achsendurchmesser umgerüstet werden (für Minimoto
12 mm, Vintage 15 mm und moderne Räder mit 20-25 mm Achsen).
Ein Gummigri am Montagearm sorgt für den perfekten Grip. Der
Abdrückhebel aus Nylon ist weiten- und höhenverstellbar. Große Ha-
ken helfen bei der Fixierung der Montierhebel während der Montage.
Ebenso hilfreich ist das Staufach in der„C“ Säule für die Montierhebel.
AUSSTATTUNG
MOUSSEMOUNTING
15
The structure is made from cold zinc-coated heavy-duty steel tubes
that are completely resistant to scratches, chemicals and atmosphe-
ric agents. It is compact in size, and has the ability to be completely
dismantled for easy transportation or movement.
Thanks to extendable legs that can be secured with wing nuts, it can
be used for working on the oor, or it can easily be extended to a
comfortable working height of 80 centimetres. It has excellent stability,
even on uneven surfaces thanks to the wide base3-legged support.
The tyre-changer is suitable for use on spoked wheels as well as on
alloy rims with 3 or more spokes, with diameters ranging from
10 to 21 inches, and any type of rim well. The wheel support adapts
immediately to the diameter of the rim, giving maximum exibility
of use. The wheel supports are manufactured from nylon to avoid
scratching the rim.
The device features completely automatic return of the wheel support
to the rest position, an extremely simple and ecient mechanical
device that does not requireany maintenance.
Ability to adjust the minimum diameter of supporting the wheel, so
that it does not obstruct the passage of the brake disc (e.g. Motard
wheels with 17 rim and 320 mm diameter brake disc). High exibility,
thanks to the 10 mm diameter wheel centering pin, and easy to t
adapters for use with wheels with larger diameter pins to facilitate fast
changeover between dierent wheel sizes (Minimoto with 12 mm pin,
vintage wheels 15 mm pin, and modern wheels with 20 to 25 mm pin).
Support for bead-breaker tool, with screw xing for rapid deployment
and use.
Hand lever grip with knob to guarantee a perfect grasp.
Large hooks for xing the levers during the remounting operations.
Container for Levers so they are always at hand.
FEATURES
Montiermaschine:
Art-Nr.
MOM 96-10 Montage-Maschine MOM BASIC Tyrefox
MOM 96-11 Montage-Maschine MOM PROFESSIONAL Tyrefox
Optionales Zubehör:
Art-Nr.
MOM 96-21 MEFO Abdrückkit f. ATV/Quad Räder
MOM 96-22 MEFO Wuchtbock f. Basic+Pro M.ständer/Wheel balancing
MOM 96-23 MEFO Transport-Koer
MOM 96-24 MEFO Nylon-Ring für Alu-Guss Räder 16,5-17"
MOM 96-25 MEFO-MOUSSE Montier-Hebel 3er Set, geschwungen
MOM 96-26 MEFO-MOUSSE Montier-Hebel 1 Stück, geschwungen
ARTIKEL/ZUBEHÖR:
Fitting machine:
Art-No.
MOM 96-10 tting machine MOM BASIC Tyrefox
MOM 96-11 tting machine MOM PROFESSIONAL Tyrefox
Optional accessories:
Art-No.
MOM 96-21 MEFO plate for quad wheels with large pin for wheel centering
MOM 96-22 MEFO wheel balancing f. Basic + Pro M. stand
MOM 96-23 MEFO cases for transport of tool components
MOM 96-24 MEFO nylon-ring for three-spoke rims 16,5-17“
MOM 96-25 MEFO-MOUSSE mounting levers, a set of 3, curved
MOM 96-26 MEFO-MOUSSE mounting levers, 1 piece, curved
ARTICLE/ACCESSORIES:

1) Nach dem Positionieren des Rades auf dem Reifenmontiergerät,
prüfen Sie, ob der Zentrier-Bolzen den korrekten Durchmesser (mit
leichtem Spiel) hat und die Radauagen voll geönet sind. Stellen
Sie den Montagearm passend zum Durchmesser des Reifens ein und
lösen Sie die Mutter des Reifenhalters ohne diese zu entfernen.
2) Drücken Sie den Reifen mit dem Montagearm in das Tiefbett!
3a, b, c) Ist ein Reifenhalter montiert setzen Sie die Montierhebel
seitlich davon an. Positionieren Sie 3 Hebel im Abstand von 20-25 cm
an der Reifenwulst. Dabei sollte kein Hebel zu viel Druck auf den
MOUSSE ausüben um Beschädigungen zu vermeiden. Ziehen Sie die
Hebel nacheinander nach vorn bis die Reifenwulst über das Felgen-
horn rutscht.
4a, b, c, d) Entfernen Sie nun die Hebel und drehen Sie das Rad auf die
andere Seite. Positionieren Sie den Montagearm über den Abschnitt
des Reifens, der nun auf dem Felgenhorn liegt. Drücken Sie den
Montagearm und hebeln Sie nach und nach den Reifen mit MOUSSE
komplett aus dem Tiefbett der Felge.
5a, b, c, d) Verlängern Sie den Abdrückhebel und drücken den Reifen
komplett von der Felge nach unten.
DEMONTAGE
16
MOUSSEMOUNTING
1) Place the tire on the tool ensuring that the tire balance pin has the
correct diameter (with little play) and that the expanders are fully
open. Place the tire lever trolley in the position corresponding to the
diameter of the tire to remove, and loosen the nut of the tire block
without removing it.
2) Press the tire down on the side to detach it from the bead of the rim
around the entire diameter. If the tire has been mounted for a long
time, spray on lubricant while pressing.
3a, b, c) Working far from the tire block, if it is in place, using the tire
lever insert 3 levers at the edge of the tire in a position of 20-25cm,
ensuring that they are not too inated so as to avoid pinching the
MOUSSE or tire balls. Extract the 3 levers one at a time ensuring that
the bead of the tire slips into the channel of the rim, obtaining the
extraction of part of the tire.
4a, b, c, d) Proceed to turn the tire, placing the part of the tire extrac-
ted from the rim under the tire lever. Push the lever down then repeat
the operation all around the diameter of the tire except for the zone
of the tire block if mounted.
5a, b, c, d) Extend the tire lever and, forcing the tire away from the tire
block if mounted, extract the tire downward, completely removing it
from the rim. Push the tire lever back in place.
DISMOUNTING
Mounting video on:
www.mefo-mousse.com
17
GELEN SIE DEN MOUSSE GRÜNDLICH UND STECKEN DIESEN
IN DEN REIFEN!
Bitte vermeiden Sie das Auftragen von Moussegel auf die
Reifenwulst und das Felgenhorn!
Für eine einfachere Montage benutzen Sie Reifenpaste!
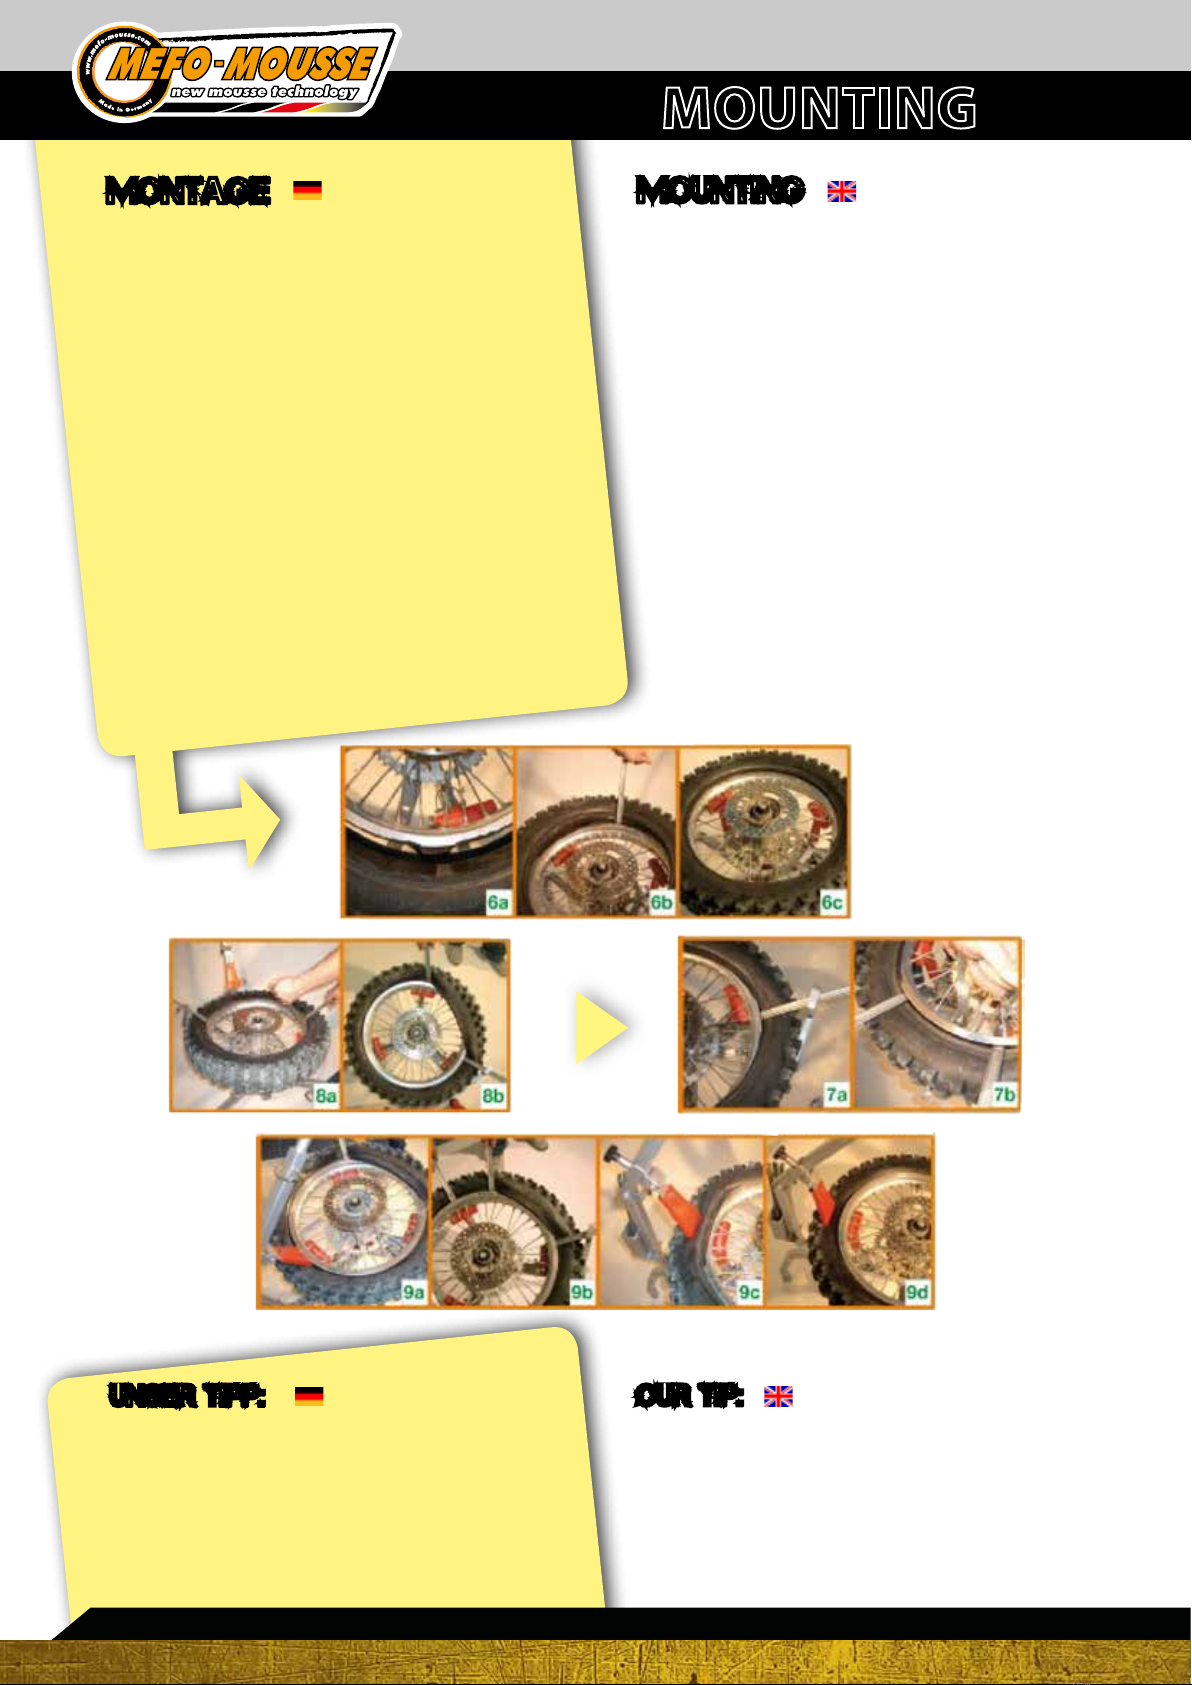
6a, b, c) Platzieren Sie die Unterseite des Reifens unter dem Reifenhal-
ter und hebeln die erste Flanke der Reifenwulst über das Felgenhorn.
Drücken Sie nun das Mousse mit dem Abdrückarm in das Felgenbett.
7a, b) Nehmen Sie den ersten Montierhebel und stecken ihn zwischen
Reifenwulst und Felgen gegenüber des Reifenhalters. Drücken Sie
damit den Reifen über das Felgenhorn. Mit 2 Hebeln montieren Sie
abwechselnd in kleinen Schritten den Reifen.
8a, b) Fahren Sie fort, bis ein Bereich von ca.120° der Reifenwulst noch
frei liegt. Jetzt ist die maximale Spannung des Reifes erreicht. Fixieren
Sie nun einen der Hebel mit dem Haken.
9a, b, c, d) Mit dem Montagearm drücken Sie den Reifen nieder,
wodurch dieser in das Tiefbett rutscht. Jetzt drücken Sie mit den
Montierhebeln den letzten Bereich von 15-20 cm des Reifens über die
Felge. Vor dem letzten Montageschritt drücken Sie den Reifenhalter
mit einem Hebel und den vorgegebenen Löchern im Hakenarm nach
innen. Achten Sie darauf, dass der Reifenhalter nach der Montage nicht
blockiert ist. Abschließend entfernen Sie die Hebel, ziehen die Mutter
des Reifenhalters fest und reinigen Reifen und Felge.
THE REMOUNTING OF THE TIRE: if new, lubricate the internal
surface of the tire and the mousse or tire balls with silicone grease.
6a, b, c)
Insert the tire under the tire block at the bottom and, working with the
lever, insert the rst side of the tire into the rim.
7a, b)
Align the tire block, if mounted, to the mobile handle and block the
rst lever on the tire, working with two other levers, one inserted in a
second position of the tire. With the other through the corresponding
slots, force the tire block outward if possible permitting the tire to slip
back obtaining the correct installation.
8a, b)
Continue to insert small portions of the tire with the N° 2 lever to limit
the force and to go faster without moving around since the wheel is
free to turn to an angle of 120°, until its reaches the maximum tension
of the cord of the tire.
9a, b, c, d)
Using the tire lever push the side of the tire down making the bead slip
inside the channel. At this point insert the last zone of the tire using
the lever and for the last 15/20 cm use the tire lever to complete the
insertion of the tire. To ensure the correct centring of the wheel, blow
up the tire with compressed air making sure to apply pressure on both
sides and continue tightening the nut of the tire block if mounted.
MONTAGE MOUNTING
MOUSSEMOUNTING
OUR TIP:
The correct maintenance for a tire with the mousse or tire balls
anti-puncture system and the life of these parts are guaranteed only
by good lubrication with transparent silicone grease, which, besides
preventing anomalous and early deterioration, aids considerably in
mounting and removing the tire.
The correct lubrication of the mousse or tire balls does not inuence
problems of tire sliding on the rim which is, instead, prevented by
correct mounting/tightening of the tireblock or correct pressure of
the tire balls.
Die korrekte Pege eines mit MOUSSE ausgestatteten Reifens
verlängert die Lebenszeit aller Teile. Dies garantiert das richtige
Auftragen von MOUSSE-Gel, das Beschädigung und vorzeitiges Altern
des MOUSSE vorbeugt. Durch das MOUSSE-Gel wird auch die Montage
und Demontage deutlich vereinfacht. Der Auftrag von MOUSSE-Gel
hat keinen Einuss auf die schädliche Reibung zwischen Reifen und
Felge. Diese ist nur durch festsitzende Montage des Reifenhalters und
richtigen Reifendruck zu vermeiden.
UNSER TIPP:

1st Phase: Insert the three Blegs into base Aand secure with the
N° 3 TE 8x60 screws included and the M8 self-locking nut.
2st Phase: Insert column Cinto base Aand secure with the
N° 1 TE 8x60 screw included and the M8 self-locking nut.
3st Phase: Insert arm lever Dinto column C inserting washers on
both sides and secure with the TE 10x60 screws included.
4st Phase: Insert balancing pin. Turn and secure with safety pin.
The pin you choose from those included will be of a diameter as
close as possible to that of the wheel bearing.
5st Phase: Insert the three plastic wheel
supports and secure with the TE 8x35 screws
included and the M8 self-locking nut.
TOOL ASSEMBLY INSTRUCTIONS:
basic conguration
1) Quick substitution of the wheel pin without using tools.
2) Balancing accessory for road motion/Motard.
3) Ring accessory to support rims in spoked alloy.
4) Accessory for placing tires on alloy or metal rims of any
diameter, for example road mini-motorbikes, go-karts, quads.
5) Cases for easy and safe transport of tool components.
Suitable for
- tubeless
- MEFO MOUSSE
- tyre with innerlube
- tire balls
Suitable for all rim wells.
MEFO Sport GmbH
Mühläckerstraße 1
DE 97520 Röthlein / Germany
Tel.: +49 (0) 97 23 - 91 91 - 0
Fax.: +49 (0) 97 23 - 91 91 - 19
Mail: [email protected]
www.mefo.de
www.mefo-shop.de
www.mefo-mousse.com
MONTAGE ANLEITUNG:
1: Einschieben der drei BBeine in das Basiselement Aund Sicherung
mit den beiliegenden Schrauben N3 TE 8x60 und den selbstsichernden
M8 Muttern.
2: Einschieben der CSäule in das Basiselement A, Sicherung mit den
beiliegenden Schrauben, N1 8x60, und den selbstsichernden
M8 Muttern.
3: Einschieben des Hebels Din die Aufnahme der Säule Cmit beid-
seitig eingelegten Unterlegscheiben, Sicherung mit den beiligenden
TE 10x60 Schrauben.
4: Einsetzen des Auswucht-Bolzens und Sicherung mit dem
Sicherungsstift. Der Auswuchtbolzen sollte aus den mitgelieferten
Bolzen, passend zum Radlager, ausgewählt werden.
5: Einsetzen der Kunststo-T-Stützen und Sicherung mit den beilie-
genden Schrauben TE 8x35 und selbstsichernden M8 Muttern.
Basisgestell
Applikationen / applications
Passen für
- tt
- tbl
- MEFO MOUSSE
Passend für alle Felgenprole.
1) Schnelles wechseln des Auswucht-Bolzens ohne Werkzeug
2) Mobiles Zubehör zum Auswuchten
3) Halterung zum Speichen-Einziehen
4) Halterung zur Reifenmontage unterschiedlichster Räder,
verschiedenster Durchmesser, z.B. Mini-Bikes, Go-Karts, Quads
5) Transportkoer für Zubehör-Ausstattungsteile
Zubehör
18
MOUSSEMOUNTING
accessories
This manual suits for next models
1


