meilan BLADE User manual
Blade Wireless Bike Computer
Quick Start Guide

Blade is one bike computer using Bleutooth and Ant+ wireless protocols. The package
contains a Bluetooth speed & cadence sensor, which can display speed, cadence,
distance, exercise time and other data. It can also support the display of heart rate
and power data.
Introduction

English Wireless Bike Computer BLADE
Table of Contents
01 Installing the BLADE
01 • Installing the mount: F-mount and Stem mount
02 Installing the speed and cadence sensor (C3)
05 Setting up the BLADE
05 • Pair Sensors with Blade via Meilan APP
08 • Restore the factory setup
08 Starting a Workout
08 • Display content of the screen
09 • Icon Description
09 • Starting your ride and storage of the record
10 Packing List
10 • Standard accessories
10 • Optional accessories
10 Charging and Replacing the sensor battery
11 Parameter
11 Safety Claim and Warranty
12 Appendix
12 • Tire circumference table
13 Frequently Asked Queations and Video Links
Installing the BLADE
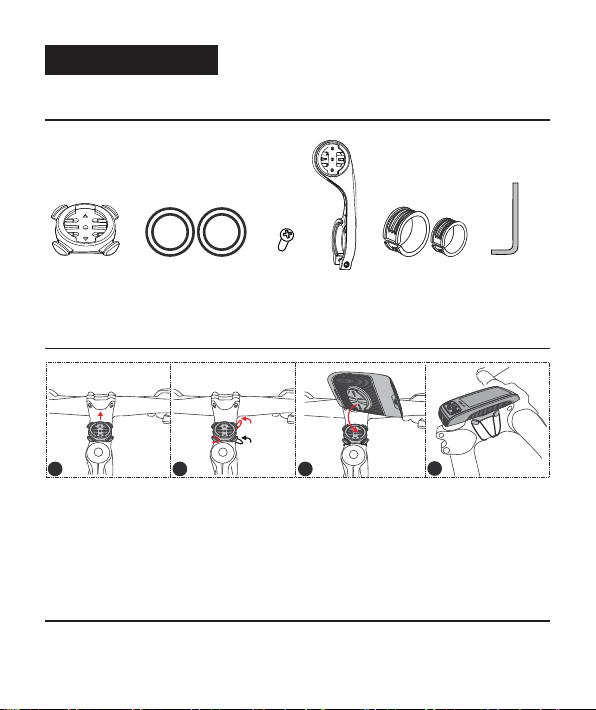
• Installing the mount: F-mount and Stem mount
Stem Mount Rubber Bands *4 Screw Rubber Pad Allen Key
1. Installing the Stem Mount:
(1). Place the bike mount on the stem with the rubber side down.
(2). Attach the stem mount securely using the two rubber bands.
(3). Place the Blade in the mounting grooves and turn clockwise until it locks in place.
To remove, turn counterclockwise or clockwise and lift.
2. Installing the F-mount:
F-mount
1 2 3 4
1

(1). Begin by removing the screw with the Allen key from the F-mount.
(2). Place the rubber pad around the handlebar. 2 rubber bands (thick and thin) for
you to choose based on the handlebar diameter of your bike.
(3). Replace and tighten the screw.
(4). Place the Blade in the mounting grooves and turn clockwise until it locks in place.
To remove, turn counterclockwise or clockwise and lift.
Installing the speed and cadence sensor (C3)
12 3
Speed and Cadence Sensor (C3) Speed Magnet Cadence Magnet Nylon Ties *4 Rubber Band
NOTE: The battery insulator sheet needs to be removed for the first use in order to activate the sensor.
1 2 3
2
(1). Use a coin to twist the cover counter-clockwise until it is loose enough to remove
(the arrow points to unlocked).
(2). Remove the cover, the battery and blue battery insulator sheet.
(3). Insert the battery with the positive side facing up. Use a coin to twist the cover
clockwise back into place.
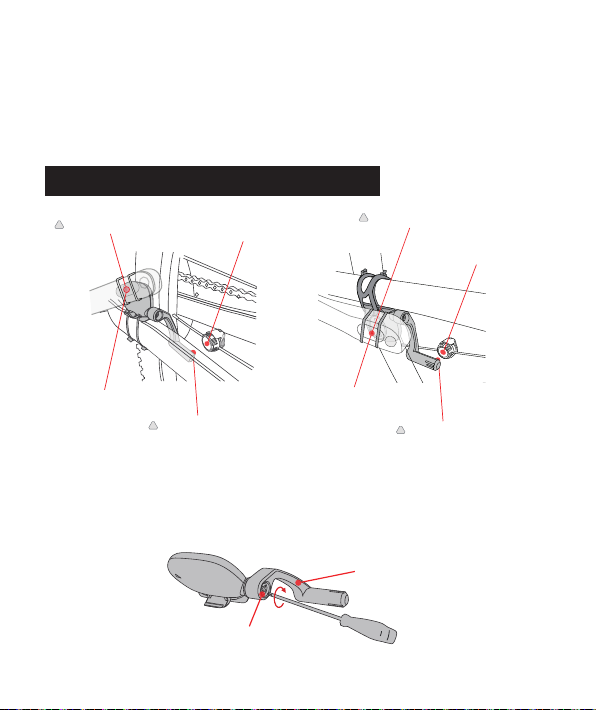
Mounting the speed and cadence sensor
1. Place the sensor on the rear chain stay of your bike, near the pedal. The logo
should be facing up and the arm of the sensor should be inside the rear chain stay,
facing down.
(1). Loosen the sensor screw using a Phillips screwdriver to move it into the correct
position.
Cadence magnet Cadence magnet
Sensor zone ( CADENCE ) Speed magnet
Speed magnet
Sensor screw
Sensor arm Sensor arm,
You can rotating it, do not
more than 90 degree
Sensor zone (CADENCE)
3
Sensor zone ( SPEED )
Sensor zone ( SPEED )
(2). Secure the sensor in place with the provided rubber band or nylon ties, whichever
is preferred. If using nylon ties, do not completely tighten yet, as the magnets still
need to be aligned before completely securing the sensor in place. We recommend
using the nylon ties for the most secure connection.
Left chain stay
Nylon tie
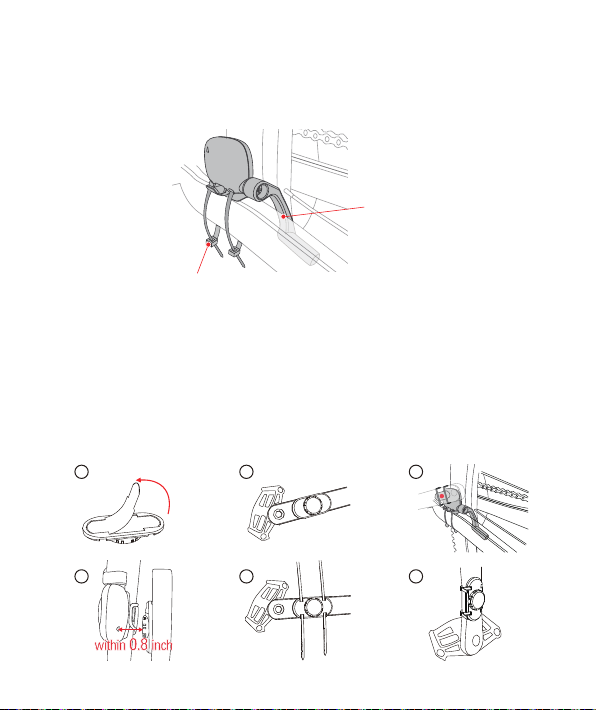
2. Attach the magnet
(1). Remove white liner on the back of cadence magnet and place the magnet onto
the crank, magnet facing in towards the sensor. Align so that the magnet will pass
by the indicator sensing area on the body of the MEILAN C3 sensor. The magnet will
have to within 0.8 inch (about 2cm) to get a reading. Attach the magnet to the
crank arm using two nylon ties. As such, adjust the position of the sensor and/or
magnet if required。
1 2 3
4 5 6
point A
4

(2). Screw the speed magnet onto any spoke on your back wheel, facing in towards the
sensor. Align so that the magnet will pass by the indicator line on the arm of the
MEILAN C3 sensor. The magnet will have to pass within 0.8 inch (about 2cm) to get
a reading. Once again, adjust the position of the sensor and/or magnet if required.
Tighten the magnet in place on the spoke. Once satisfied with the magnet positioning
and tighten.
Setting up the BLADE
• Pair Sensors with Blade via Meilan APP
(1). Download the MEILAN APP (download from Google Play or Apple store) and ensure
Bluetooth is on.
(2). Turn on MEILAN APP to register / log in, follow the APP instructions, Select the
measurement unit and authorize apps.
(3). Turn on Blade, hold left-side button to turn on/turn off the switch key.
(4). Tap "+" to search and add Blade to the APP.
On a very small number of Android phones, there may be connection problems due
to the different android versions. You can try another phone.
Cadence magnet Sensor zone (CADENCE)
Speed magnet
These two must be kept strictly as
shown in the picture on location.
Sensor zone (SPEED)
If using an iPhone If using an Android smartphone
Download on the
App Store
GET IT ON
Googl Play
e
point B
5

(5). Tap icon of “BLADE” to enter the setting menu, then set ODO and update firmware.
(6). Pairing sensors. Tap on the sensor, search and add sensor. Meanwhile, rotate the
wheel to activate the sensor.
BLADE supports the display of speed, cadence value (standard with a sensor), and
also supports the display of heart rate and power value (requiring additional
purchase of related equipment). BLADE is connected to the sensor, and supports
two wireless transmission bands: Bluetooth BLE4.0 and ANT+. For the same type of
name, you can choose one of them.
If you have a heart rate belt, please wear it and step on the wheel for 3-5 laps to
activate the speed, cadence, heart rate, and power sensors to make them work.
6

(7). After the paired, set or modify the name of sensor and wheel circumference, then
complete the setting.
* Set tire circumference : Refer to “ Tire circumference table” (Page 12)
In the personal configutaion, you can set the
measurement (KM/H or MPH)
(8). You can share your cycling records to the third platforms, such as Strava,
TrainingPeaks.
7

NOTE:
1. Time setting: After connecting to the APP, the time is automatically synchronized
with the phone time.
2. When you in update device software process, don’t turn off your phone and bike
computer, and do not exit the update menu. Otherwise your bike computer may
be damaged.
• Restore the factory setup
• Display content of the screen
Long press and key at the same time, go to
factory default settings menu.
* All data is deleted and the unit is reset to the factory default
settings by press , and Cancel by press .
YES; : NO.
Starting a Workout
TM TOT
WGT
HOURS LB KG W
SETTING
8

Faster ( ) than average speed.
Slower ( ) than average speed.
• Icon Description
• Starting your ride and storage of the record
Recording/Pause
Current cadence
Heart rate (Optional)
LAP number
Current speed
Current distance
Power (Optional)
1. Press to start recording.
2. Press to view different measurement data.
3. Press to start the next lap.
4. Press to manual pause the BLADE when you stop moving. But BLADE has an
automatic Start/Stop function , no manual operation is required for a short pause.
Icon Description Icon Description
Clock
Start Recording
Pause Recording
The history view
Segment Function
Battery Power
Current Temperature
Imperial Unit
MPH
F C
Metric Unit
Average
Calorie
Distance
ODO
Maximum
Moving Time
Total time(Moving time+Rest time)
Weight
Wheel Circumference
AVG
KM/H
CAL
DST
ODO
MAX
TM
TOT
WGT
WS
9

NOTE: After manual pause, must press to started manually, then you can start riding.
5. Long press to save your ride. Then enter the history view. Long press the to
exit the history view.
6. After the current data is saved, BLADE will automatically display the last riding record.
At this time, the computer interface will have one icon on the history record
interface. Press to switch the displayed data name. Long press to exit the
history interface.
7. After exiting the page of history, you can start your next ride from 0.
F-mount
Rubber pad
Rubber ring*4
Speed &
cadence sensor
O type rubber band
Cadence magnet
Charging and Replacing the sensor battery
Nylon ties *4
Charging cable
C1 Cadence sensor C5 Heart Rate Monitor
Speed magnet
Bike mount
Packing List
• Standard accessories
• Optional accessories
10

Input: Mirco USB DC 5V/0.5A
There is one CR2032 button battery inside the Speed/Cadence Sensor which
can last for 6-9months or so. When the bike computer or App can't detect the
sensor and the data displayed is not complete; the battery will be probably
without capacity; you should consider to replace the battery. Please check How
to Install for battery replacement.
Parameter
1. Battery type: rechargeable lithium battery
2. Working hours: 100hours
3. Wireless transmission protocols: Bluetooth BLE4.0 / ANT +;
Speed/Cadence Sensor: BLE 4.0
4. Operation frequency: 2.4G HZ
5. Ambient temperature: -10 — + 40
6. Waterproof grade: IPX5
Safety Claim and Warranty
1. Do not put the wasted battery into the water or uncontrolled natural environment;
do not place the product on fire or in an ultra-high temperature environment.
2. If the product is not used continuously for six months, please charge it at least once,
otherwise it may affect your use.
3. This product is suitable for use in small to medium rain. Do not use the product in
heavy rain or soak in water.
4. Riders too much glance at the screen during the high speed riding or improper
training method will increase the chance of injury. The data generated by M4 is for
reference only.
5. This product was developed in accordance with the EN300328V1.9.1 standard.
Please follow the local laws and regulaons when using it in different regions.
6. The product is guaranteed for one year from the date of sale for non-human damage,
and the accessories are not covered by the warranty. You can contact the after-sales
service center through Meilan global distributors or by writing to Meilan. When
sending for repairs, you need to effectively keep the internal storage information.
Data may be lost during the repair process.
11

Appendix
• Tire circumference table
Tire circumference can be determined by either of the following two methods:
• Measure the actual tire circumference (L)
After ensuring that the tire pressure is appropriate, sit on your bike, roll it forward
so that the tire makes one full revolution (use the valve or other marking as a
reference), and measure the distance traveled on the road.
* The tire size is indicated on the side of the tire, you can check the below table to
find the actual circumference.
L(mm)
Wheel Size
ETRTO
935
940
1020
1055
1185
1195
1245
1290
1300
1340
1340
1350
1450
1460
1490
1515
1565
1545
1615
1770
1785
1890
1925
1965
1753
1785
12x1.75
12x1.95
14x1.50
14x1.75
16x1.50
16x1.75
16x2.00
16x1-1/8
16x1-3/8
17x1-1/4(369)
18x1.5
18x1.75
20x1.25
20x1.35
20x1.50
20x1.75
20x1.95
20x1-1/8
12x1-3/8
22x1-3/8
22x1-1/2
24x1.75
24x2.00
24x2.125
24x1(520)
24x3/4 Tubrlar
47-203
54-203
40-254
47-254
40-305
47-305
54-305
28-349
37-349
32-369
40-355
47-355
32-406
35-406
40-406
47-406
50-406
28-451
37-451
37-501
40-501
47-507
50-507
54-507
25-520
L(mm)
Wheel Size
ETRTO
37-630
40-584
50-584
54-484
57-584
18-622
19-622
20-622
23-622
25-622
28-622
30-622
32-622
35-622
38-622
40-622
42-622
44-622
45-622
47-622
54-622
56-622
60-622
27x1-3/8
27.5x1.50
27.5x1.95
27.5x2.10
27.5x2.25
700x18C
700x19C
700x20C
700x23C
700x25C
700x28C
700x30C
700x32C
700C Tubular
700x35C
700x38C
700x40C
700x42C
700x44C
700x45C
700x47C
29x2.1
29x2.2
29x2.3
2169
2079
2090
2148
2182
2070
2080
2086
2096
2105
2136
2146
2155
2130
2168
2180
2200
2224
2235
2242
2268
2288
2298
2326
12
L(mm)
Wheel Size
ETRTO
1952
28-540
32-540
25-559
32-559
37-559
40-559
47-559
50-559
54-559
57-559
58-559
75-559
28-590
37-590
37-584
20-571
23-571
40-590
40-584
25-630
28-630
32-630
24x1-1/8
24x1-1/4
26x1(559)
26x1.25
26x1.40
26x1.50
26x1.75
26x1.95
26x2.10
26x2.125
26x2.35
26x3.00
26x1-1/8
26x1-3/8
26x1-1/2
650C Tubular
26x7/8
650x20C
650x23C
650x25C
26x1(571)
650x38A
650x38B
27x1(630)
27x1-1/8
27x1-1/4
1795
1905
1913
1950
2005
2010
2023
2050
2068
2070
2083
2170
1970
2068
2100
1938
1944
2125
2105
2145
2155
2161
1920
25-571
Frequently Asked Questions and Video Links
You can also go to check our installment and functionality introduction in our official
website/Youtube/Facebook links as below.
Facebook YouTube Website
MEILAN (HONGKONG)CO., LIMITED
5/F, B16 Building, Hezhou, Hengfeng Industrial City, Xixiang Street, Baoan District, Shenzhen, 518000 China
Phone
E-mail : [email protected]
URL : http://www.meilancycling.com
: +86 755 23159119
Other manuals for BLADE
2
Table of contents
Other meilan Bicycle Accessories manuals


Popular Bicycle Accessories manuals by other brands

RIESE & MULLER
RIESE & MULLER Tinker PIZZA-BOX/ THERMO-BOX Assembly instruction

Bosch
Bosch 1 270 020 900 Original instructions

Giant
Giant CONTINUUM WIRELESS manual

Westfalia
Westfalia 94 91 55 instruction manual

Custom Built eBikes
Custom Built eBikes Bafang C965 A instruction manual

Acewell
Acewell ACE-31xx series user manual


