meilan M3 User manual


Table of Contents
02 Introduction
02 Screen Display
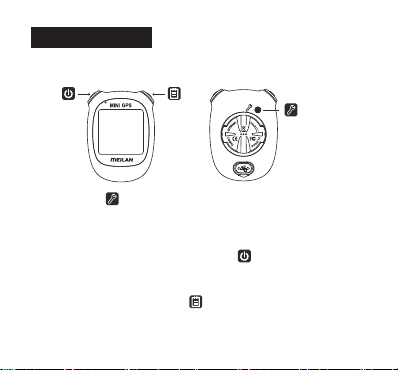
02 • Display screen
03 • Icon description
06 • Computer
06 • Accessories
18 • Power indicator:19 • Charging notification
07 • Operation of buttons
08 • Initial settings
12 • Restore factory settings
04 GPS and Backlight
06 Description of the Device
and Accessories 18 Battery and Charge
07 Setting up the M3
17 History
17 • View the histroy record
17 • Delete the riding data
13 Mount up & Lock it Down
14 Perform a Workout
20 LED Indicator
21 Specification
22 Optional Accessories
23 Safety Statement and Warranty
24 Access to FAQ & Videos
Introduction
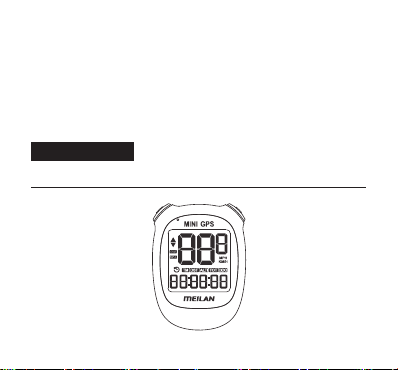
Screen Display
M3 is a simple bike computer with mini and delicate appearance.
Equipped with GPS technology, which can display the basic riding
data such as current time, speed, riding time, distance, total mileage,
altitude and etc.
1
• Display screen
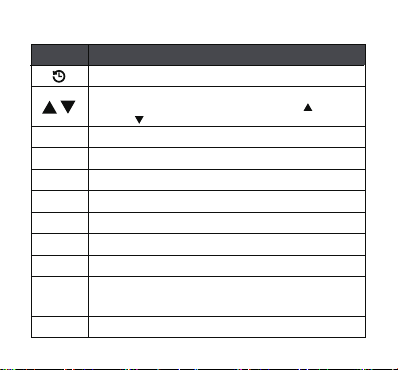
• Icon description
History review mode
Pace arrows
Indicates whether the current speed is faster ( ) or
slower ( ) than the average speed.
Imperial unit
Metric unit
Average
Maximum
Time (active time): Moving time
Icon
MPH
KM/H
AVG
MAX
TM
Current distance
DST
Current altitude
Total distance
ALTI
TOT
ODO
Description
2
Total time, is the duration from the moment you start on the
M3 to the moment you finish the workout
(including auto pause feature or pause the timer manually).

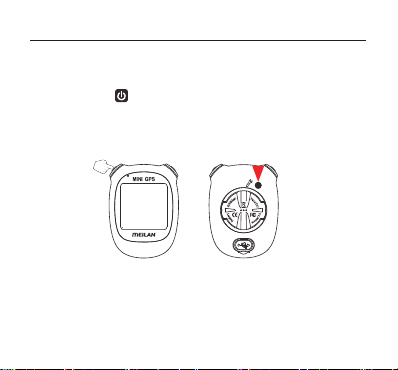
GPS and Backlight
• GPS signal
* Please make sure your M3 is used at open space and barrier-free area
1. Turn on M3.
2. GPS positioning:
A. It’s searching for GPS when LED indicator light is slow blinking.
C. After GPS positioning is successful, the time is automatically
synchronized with the local time via GPS.
D. After the GPS positioning is successful and the M3 works for a few
minutes, the altitude will be automatically calculated by GPS.
* GPS positioning may take 2 minutes or even a longer time when it is
turned on for the first time or after a long period of non-use.
B. When the LED indicator light stays on with full brightness and it reminds
the"Beep"sound at the same time, the GPS positioning succeeds.
You can start to ride.
After 30seconds,the LED light will turn off; it will blink one time per
minute later to remind the power status for user.
3
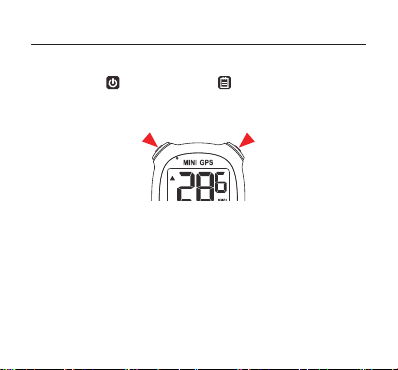
• Backlight
Manual full screen backlight
Short press the left top button and the right top button at the
same time to turn on / off the backlight.
4
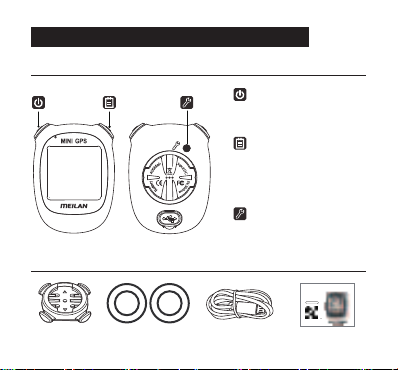
• Accessories
Description of the Device and Accessories
Bike mount Rubber bands*4 Charging cable Instruction
• Computer
SETTING button
Accesses the Settings
menu or save the Setting;
Delete saved data in history
view
(POWER) button
Turns the power on and off,
Switch display of speed data;
Change data in settings mode
Smart (right top) button
Switch display of data menu;
Confirm and go to the next in
settings mode;
Save the cycle data and exit or
enter history.
M3
Mini GPS
Bike Computer
Scanthe QR code above to view
manualsin other languages
Instructionmanual
(Français/Italiano/Русский язык/
中文简体/日本語/한국어/ภาษาไทย)
5
Setting Button :
Operation of buttons
Setting up the M3
Located above the back of the device, this button accesses the settings menu
if pressed when the device is on, then please press again to save if you have
completed the setting.
Smart and Power Button (left top button) :
On the left top side button of the device is the Smart and Power Button which is
to change the data, or power it on or off when held for 2 seconds.
Smart Button (right top button) :
On the right top side button of the device is the Smart Button which is to confirm
and scroll backwards through the functions. And after completing the last step of
setting, press to save the setting. 6
1. Power on and get setup
Press and hold the left top button of M3 for 2 seconds turns on and enter
the setting mode.
Perform the following operation when you use the unit for the first time.
2. Setting the time zone
Select the time zone for the city nearest from your current location, while
searching on Internet.
• Initial settings
SETTING Button
7
( If it is not the first time, press the SETTING button to go to setting menu)
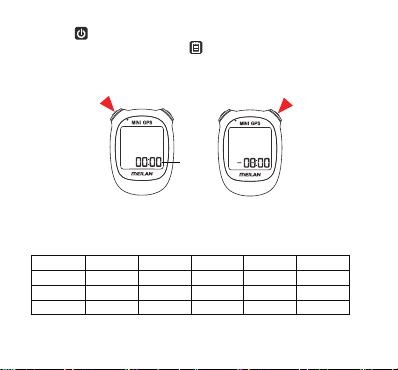
* The value of the data will keep blinking when you set it.
When the left top button is pressed, the time zone changes. After selecting
the appropriate time zone, press the right button to confirm and go to the
next step “Setting the sound”.
Blinking
Change the time zone Confirm and Go to the Next Step
The time zones of most common cities:
Beijing
Sao Paulo
Moscow
Warsaw
UTC + 8
UTC - 3
UTC + 3
UTC + 1
Tokyo
Los Angeles
Sydney
Berlin
UTC + 9
UTC - 8
UTC + 10
UTC + 1
Bangkok
New York
London
San Diego
UTC + 7
UTC - 5
UTC + 0
UTC - 8
8

Press the right top button to confirm and go to the next step “Setting the
units of measurement”.
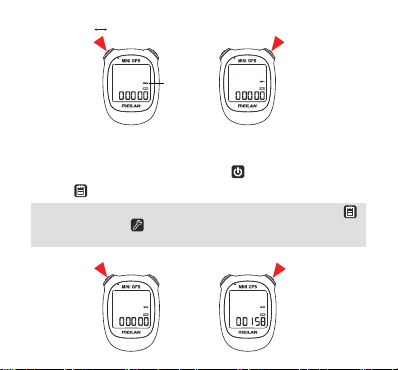
3. Setting the sound
Change the ON/OFF of device sound by pressing the left top button.
Blinking
4. Setting the units of measurement
When the left top button is pressed, either “KM/H” or “MPH (mile)” is
selected for the speed unit display. Select the display as usual.
Press the right top button to confirm and go to the next step “Setting the
ODO”.
OFF ON Confirm and Go to the Next Step
9
* When you have set the ODO and completed the setting by pressing the
right top button or the setting button,you will enter GPS searching and
measurement screen.
Blinking
Confirm and Go to the Next Step
KM/H MPH
5. Setting the ODO
Change the value of the ODO by pressing the left top button.
Press the right top button to confirm. Until the ODO is changed.
Confirm and Go to the Next StepChange the ODO
10
6. GPS searching
Go to the open space and wait for the GPS signal. After the GPS signal
positioning is successful, you can start to ride.
The LED blinking
Now, setup of the M3 Mini is completed.
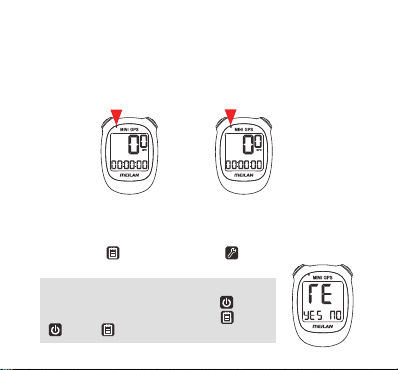
* Restore Factory Settings
Long press the right top button and the SEETING button at the same
time go to factory default settings menu.
* All the data will be deleted when the device is reset
to the factory default mode by pressing ; If you
want to cancel the operation, can press .
YES; NO.
The LED stay on
GPS searching GPS positioning successful
11

● Installing the bike mount on the stem or handlebar
Mount up & Lock it Down
1. Place the bike mount on the stem or handlebar of your bicycle with the
rubber side down. (The triangle symbol in front must point in the direction
of travel.)
2. Attach the bike mount securely using the two rubber bands. (Lock the
mount firmly with two suitable rubber bands according to the size of the
stem and handlebar.)
3. Place the bike computer in the mounting grooves and turn clockwise until
it locks in place. To remove, turn counterclockwise or clockwise and lift.
* NOTE: Two rubber bands fix the mount diagonally.
1 2 3 4
12

Perform a Workout
• Start your workout
LED
1. Turn on the M3 by pressing left top button for 2 seconds. The device
starts to search GPS signal.
2. GPS positioning:
* Please make sure your device is used at open space and barrier-free area
* GPS positioning may take 2 minutes or even a longer time when it is
turned on for the first time or after a long period of non-use.
13

3. You can start to ride.
A. It’s searching for GPS when LED indicator light is slow flashing.
B. After GPS positioning succeeds,the LED light will stay on with full
brightness. After 30seconds, it will turn off and blink one time per minute
as to remind the power status for user.
C. After the GPS positioning is successful, the time and date are
automatically updated according to the GPS.
D. After the GPS positioning is successful and the M3 works for a few
minutes, the altitude will be automatically calculated by GPS.
Altitude Display; Speed Display; Time Display
* The following actions cannot succeed if the device is in the place where
GPS signal cannot be found or received:
14

3. If you need to delete the record of this time
riding, you can long press the setting
button.
• During a workout:
• Ending a workout
1. Press the left top button to switch
current/average/maximum speed display.
1. To end a workout, press and hold the right top button.
2. Press the left top button to select YES to
confirm and save the workout record;
Press the right top button to select NO not to
save the workout record, it will be deleted.
2. Press the right button to switch current
time, riding time, distance, altitude, total
time and ODO.
* During a workout, the device will start and
stop automatcially in sync with the
movement of the bicycle.
15

History
• View histroy record
• Delete the riding data
2. Press the left top button quickly to
check different measurement data
in the record you are viewing.
3. Press the right top button quickly
to scroll to the next one.
1. Long press the right top button
to enter or exit history view.
1. Long press the right top button to enter or exit history view.
2. Press the right top button quickly to scroll to the record view you
want to delete.
3. Then press the SETTING button on the back of M3 to delete. Just
delete this record.
16

Battery and Charge
Red: The battery is low and needs to be recharged.
Yellow: 31-60% power.
Green: Sufficient battery.
LED light is breathing on and off: Charging.
• Power indicator:
Input: Micro USB DC 5V 0.5A
LED
17
Table of contents
Other meilan Bicycle Accessories manuals


Popular Bicycle Accessories manuals by other brands


Specialized
Specialized Elite CylcoComputer user manual

Sigma
Sigma BC 16.16 manual

Playcore
Playcore Dero Setbacks installation instructions

VDO Cyclecomputing
VDO Cyclecomputing x3dw instruction manual

Cateye
Cateye RAPID X2 manual

buratti meccanica
buratti meccanica Clorofilla Trail Use and maintenance manual


