meilan BLADE Instruction manual
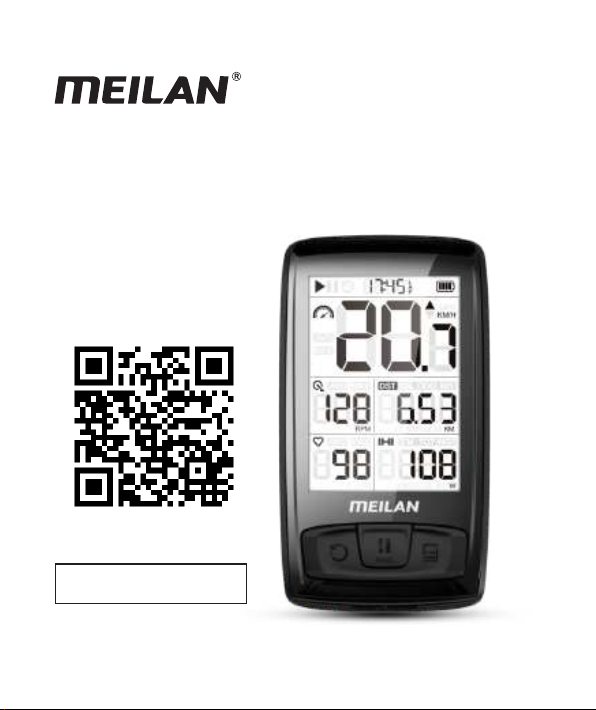
Wireless Bike Computer BLADE
Quick User Guide
APP Download

Menu(English)
123
123
baery and device
assuring that the
off the insulang film,
can work normally.
1.When you use our product in first me, please open the baery cover
of speed/cadence sensor with a coin in a rotaon way. Take out the
baery and peel Then ghten the
baery cover.
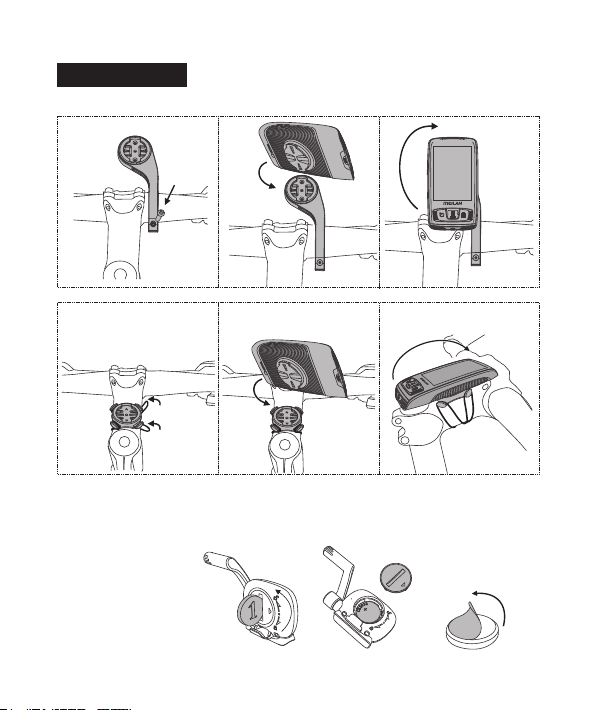
How to Install?
Installment of Device
Installment of C3(Speed/Cadence Sensor)
-01-
How to Install? ................................................................01
APP Pairing Method ........................................................04
Start,Set up and Sensor Pairing........................................05
Button Operations ...........................................................08
................................................................09Meaning of icons
...............................................10Wireless Connecon Protocol
Historical Record Review .................................................11
Charge and Replace the Battery of Sensor.........................12
Parameter. .....................................................................12
Safety Claim and Warranty. ..............................................13
Frequently asked questions and Video Links......................13
Menu(English)
123
123
baery and device
assuring that the
off the insulang film,
can work normally.
1.When you use our product in first me, please open the baery cover
of speed/cadence sensor with a coin in a rotaon way. Take out the
baery and peel Then ghten the
baery cover.
How to Install?
Installment of Device
Installment of C3(Speed/Cadence Sensor)
-01-
How to Install? ................................................................01
APP Pairing Method ........................................................04
Start,Set up and Sensor Pairing........................................05
Button Operations ...........................................................08
................................................................09Meaning of icons
...............................................10Wireless Connecon Protocol
Historical Record Review .................................................11
Charge and Replace the Battery of Sensor.........................12
Parameter. .....................................................................12
Safety Claim and Warranty. ..............................................13
Frequently asked questions and Video Links......................13
A-1A-2
4.Install the wheel magnet into the spoke and ghten it in a rotang
way, assuring the magnet not to slide in high speed.
2.Fix speed/cadence sensor in the very place of the photo: first use
two nylon belts to ghten( A-1); then use one rubber belt to Image
fix again( A-2). Image
3.Peel off the 3M on the back of the cadence magnet and Sck it to the
inside part of the pedal connecng arm. Use 2 nylon belts to fix it and
cut off the longer part.
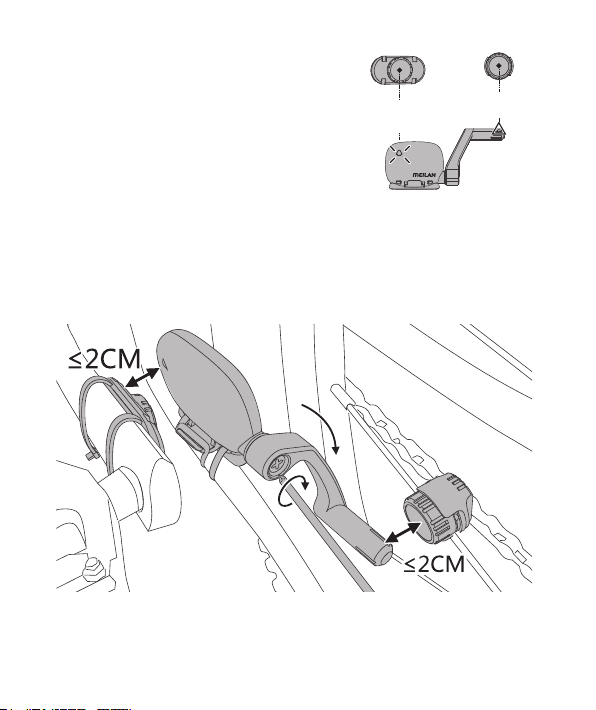
*Note on Installment:
I.Core center of cadence and Wheel magnet
must be aligned with very part of the sensor;
There is one small triangle in the counterpart
of cadence magnet and speed magnet. If it is
not installed right way, it is probably the data
gets down to 0 when it exceeds from 40-60
always.
III. The sensor and the magnet must be assured with strong and steady
installment so that there is no drop or deviaon
II.The distance between magnet and the senor can not exceed 2CM.If
exceeded, the device probably can't get the rotang signal. Can use
screw driver to loose the screws and adjust the distance between
sensor and magnet. There are some race bike, road bikes and indoor
training device with special design, which are not fit for this installaon;
Please take it into consideraon before purchase.
-03--02-
Cadence Sensor
Inducon
Speed Sensor
Inducon
A-1A-2
4.Install the wheel magnet into the spoke and ghten it in a rotang
way, assuring the magnet not to slide in high speed.
2.Fix speed/cadence sensor in the very place of the photo: first use
two nylon belts to ghten( A-1); then use one rubber belt to Image
fix again( A-2). Image
3.Peel off the 3M on the back of the cadence magnet and Sck it to the
inside part of the pedal connecng arm. Use 2 nylon belts to fix it and
cut off the longer part.
*Note on Installment:
I.Core center of cadence and Wheel magnet
must be aligned with very part of the sensor;
There is one small triangle in the counterpart
of cadence magnet and speed magnet. If it is
not installed right way, it is probably the data
gets down to 0 when it exceeds from 40-60
always.
III. The sensor and the magnet must be assured with strong and steady
installment so that there is no drop or deviaon
II.The distance between magnet and the senor can not exceed 2CM.If
exceeded, the device probably can't get the rotang signal. Can use
screw driver to loose the screws and adjust the distance between
sensor and magnet. There are some race bike, road bikes and indoor
training device with special design, which are not fit for this installaon;
Please take it into consideraon before purchase.
-03--02-
Cadence Sensor
Inducon
Speed Sensor
Inducon
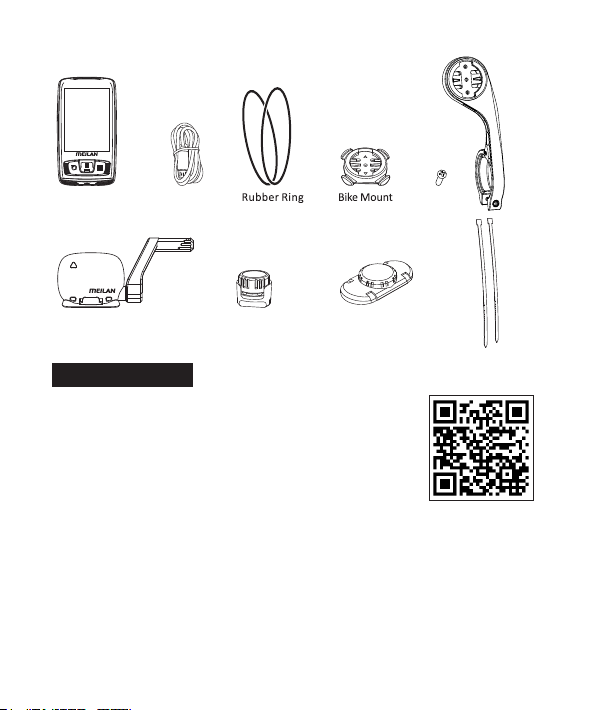
You can download our APP through Google Play; App
Store, Yingyongbao etc stores. You can also download
it through our website www.meilanccycling.com; App
will update connuously according to the market need;
somemes there will be different operaon interface.
Aer the App is installed, registered and enter into it; Open the Bluetooth
and Locaon funcon of the phone and connect BLADE with APP; Then you
can set the paring between Sensor and device; you don't need to set it on
BLADE device again;which will improve your efficiency of using our device.
Aer riders finish one me riding, can sync all the riding data to the APP
by Bluetooth transmission. Then clients can check their data in the APP
quickly.
APP Connecon
MONTH
Hour/Minute
(24-Hour Clock)
DAY
YEAR
B C D E
1.If you don’t want to set in BLADE device, you can short press key
directly and exit the seng menu; Connect the BLADE with APP and then set it
directly in the App. We suggest you to set our BLADE in App. If you set it by
App, you can neglect the set and paring process as below.
2. When you first me use BLADE, you need to set it; Short press the seng
buon behind to enter into seng menu ;press back to the
previous step; press to change data; and press to select next item.
SETTING
SETTING
WGT
Ⅴ.Pairing with sensors
①First, make sure that the sensor baery you want to connect with BLADE is
in normal operaon state and the installaon posion / wearing is correct
way; Ride for 2-3 circles for a short me to ensure that these sensors have
been ac vated in opera on state. All sensors are set with power saving mode.
When it is in non-operaon state, it will enter into sleep mode automa cally
in 3 minutes;Users must move it up and down as to acvate it again; Some
power meters need to be pedaled to ac vate.
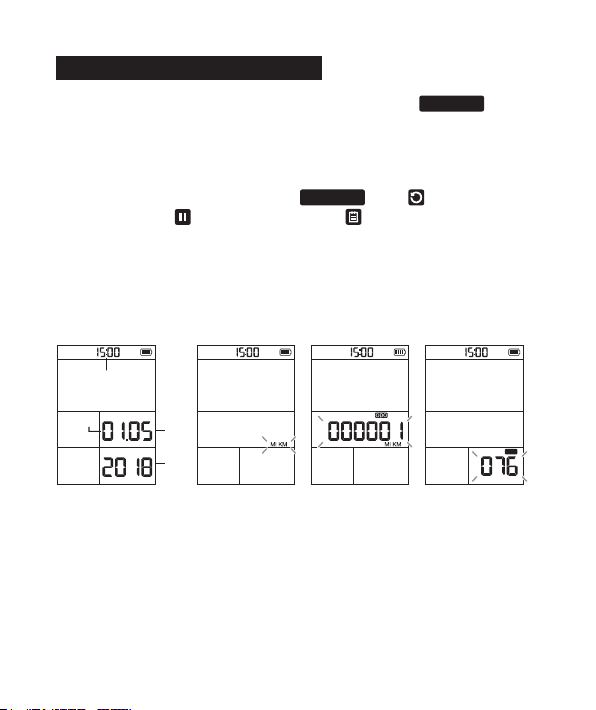
I. Time Seng (Image B)
II. Unit Opons: Metrics Km; Imperial Unit: Mile(Image C)
III. ODO Seng (Image D)
IV. Weight Seng (Image E )
Hour/Minute (24 Hours Standard)
Start,Set up and Sensor Pairing
-05--04-
Wireless Speed
/Cadence Sensor
Spoke Magnet Cadence Magnet
Ribbon
Device Charging Cable Screw
F-Mount
You can download our APP through Google Play; App
Store, Yingyongbao etc stores. You can also download
it through our website www.meilanccycling.com; App
will update connuously according to the market need;
somemes there will be different operaon interface.
Aer the App is installed, registered and enter into it; Open the Bluetooth
and Locaon funcon of the phone and connect BLADE with APP; Then you
can set the paring between Sensor and device; you don't need to set it on
BLADE device again;which will improve your efficiency of using our device.
Aer riders finish one me riding, can sync all the riding data to the APP
by Bluetooth transmission. Then clients can check their data in the APP
quickly.
APP Connecon
MONTH
Hour/Minute
(24-Hour Clock)
DAY
YEAR
B C D E
1.If you don’t want to set in BLADE device, you can short press key
directly and exit the seng menu; Connect the BLADE with APP and then set it
directly in the App. We suggest you to set our BLADE in App. If you set it by
App, you can neglect the set and paring process as below.
2. When you first me use BLADE, you need to set it; Short press the seng
buon behind to enter into seng menu ;press back to the
previous step; press to change data; and press to select next item.
SETTING
SETTING
WGT
Ⅴ.Pairing with sensors
①First, make sure that the sensor baery you want to connect with BLADE is
in normal operaon state and the installaon posion / wearing is correct
way; Ride for 2-3 circles for a short me to ensure that these sensors have
been acvated in operaon state. All sensors are set with power saving mode.
When it is in non-operaon state, it will enter into sleep mode automacally
in 3 minutes;Users must move it up and down as to acvate it again; Some
power meters need to be pedaled to acvate.
I. Time Seng (Image B)
II. Unit Opons: Metrics Km; Imperial Unit: Mile(Image C)
III. ODO Seng (Image D)
IV. Weight Seng (Image E )
Hour/Minute (24 Hours Standard)
Start,Set up and Sensor Pairing
-05--04-
Wireless Speed
/Cadence Sensor
Spoke Magnet Cadence Magnet
Ribbon
Device Data Cable Screw
F-Mount
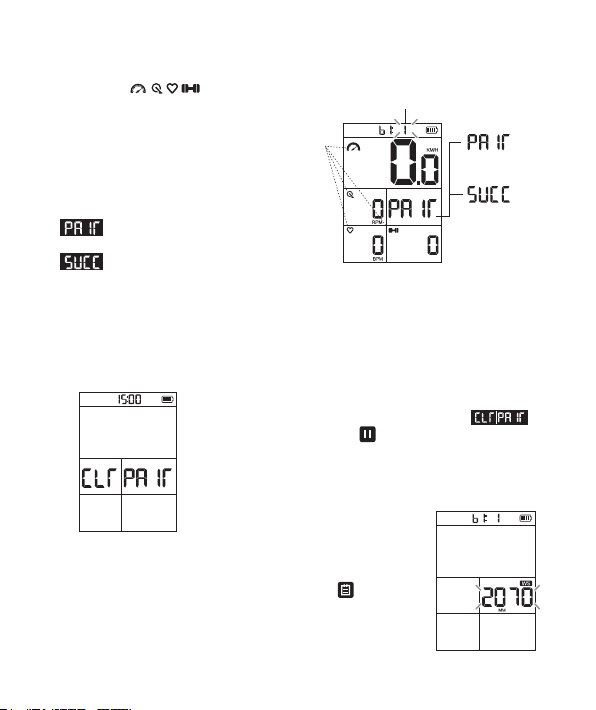
CLEAR: If BLADE device has paired with sensors already before,it
will show next page when it is in paring page again;
means to clear all pairing; Press key to confirm; it will remove
all paired sensors in device and reconnect with sensors.
③ Aer confirming that the sensor you need to
connect has been connected, short press start the
seng of first bike rim circumference. The set of rim
circumference can be viewed and modified in the app.
②B1:1 means device is search for the sensors of first bike;when below
four signs
are flashing, it
means BLADE device is searching all
sensors of this kind and trying to connect;
When one of the sensors has been
connected by BLADE; the icon will stop
flashing, and the display will be always on.
:Only when the four sensors of
speed, cadence, heart rate and power
are all connected successfully, BLADE will display SUCC; If you don't need to connect all the four
types of sensors menoned above, you just need to make sure that the icon of the sensor you
need to connect has stopped flashing. If it's constantly on without flashing again, it means that
the sensor is connected successfully.
sensor.
:BLADE is searching for a connected
Searching And
Paring
Paired Successfully.
Searching for first bike sensor
Flashing
W
W
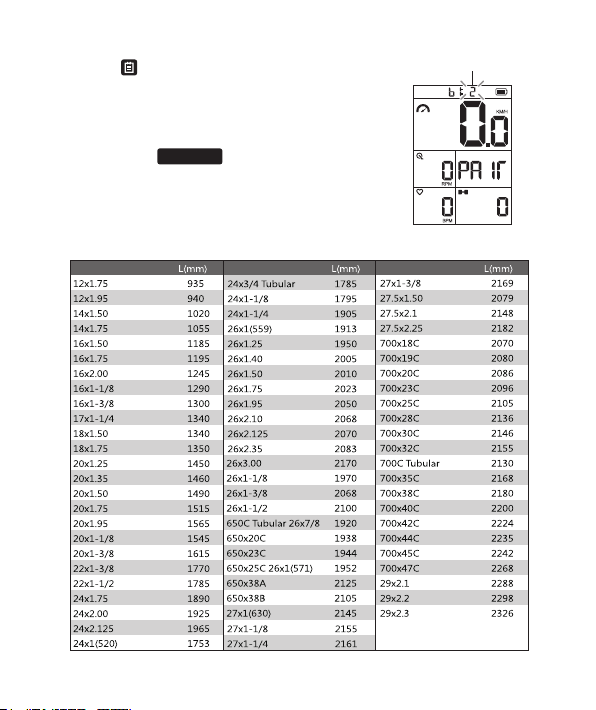
Wheel Size Wheel Size Wheel Size
*Below is the size of rim circumference for reference.
Searching for second bike sensor
④Press right buon again and it will enter
into the search of second bike; the process is
same as that of first bike; If you don't have the
sensor of the second bike to connect, you can
directly press to exit aer you finish
the seng of first bike circumference.
SETTING
-07--06-
CLEAR: If BLADE device has paired with sensors already before,it
will show next page when it is in paring page again;
means to clear all pairing; Press key to confirm; it will remove
all paired sensors in device and reconnect with sensors.
③ Aer confirming that the sensor you need to
connect has been connected, short press start the
seng of first bike rim circumference. The set of rim
circumference can be viewed and modified in the app.
②B1:1 means device is search for the sensors of first bike;when below
four signs
are flashing, it
means BLADE device is searching all
sensors of this kind and trying to connect;
When one of the sensors has been
connected by BLADE; the icon will stop
flashing, and the display will be always on.
:Only when the four sensors of
speed, cadence, heart rate and power
are all connected successfully, BLADE will display SUCC; If you don't need to connect all the four
types of sensors menoned above, you just need to make sure that the icon of the sensor you
need to connect has stopped flashing. If it's constantly on without flashing again, it means that
the sensor is connected successfully.
sensor.
:BLADE is searching for a connected
Searching And
Paring
Paired Successfully.
Searching for first bike sensor
Flashing
W
W
Wheel Size Wheel Size Wheel Size
*Below is the size of rim circumference for reference.
Searching for second bike sensor
④Press right buon again and it will enter
into the search of second bike; the process is
same as that of first bike; If you don't have the
sensor of the second bike to connect, you can
directly press to exit aer you finish
the seng of first bike circumference.
SETTING
-07--06-

SETTING
SETTING
Long press: BLADEpower on; Long press again,BLADE power off
Short press: To adjust the brightness mode
Short Press
In Riding State: Segmentaon (please note that the segmental
funcon will only work when the device has started to record)
In Seng Menu: Select previous item
In Historical Menu: if there is some segmental data in one me
record, users can check the data of each lap
In Seng menu: Switch values
In Riding state: To end this me riding record and store data
In the historical menu: Switch the displayed data name
Long press:
In Riding state: Start to record; Short press again: Pause
recording;if you don't operate it by hand, BLADE will pause/restart
riding automacally
Short Press:
-13-
Buon Operaons
-14-
SETTING
SETTING
Start recording
Pause recording
History review mode
Baery power of the device
Current Temperature
Current Time
Segmentaon: current segment number of turns
Current speed is higher than average speed ;
Current speed is lower than average speed .
Imperial Unit
Metric Unit
TM TOT
WGT
HOURS LB KG W
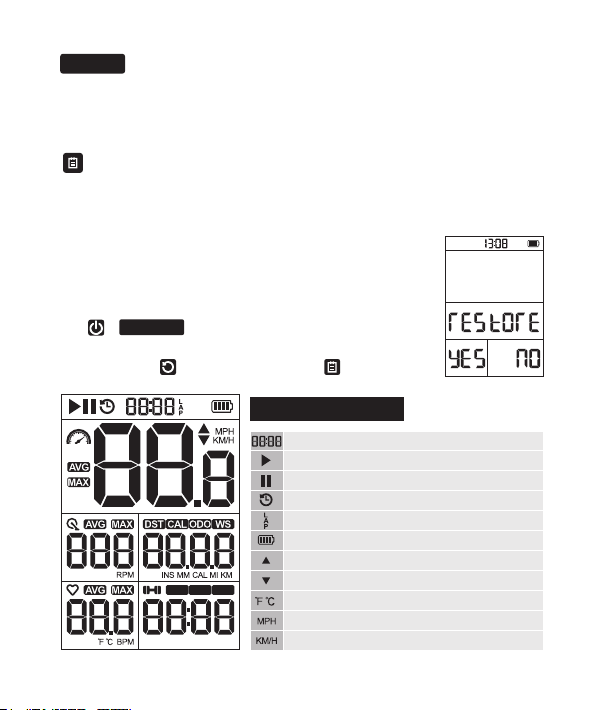
Restore the original seng of factory: long press
+ at the same me; BLADE asks whether
to restore the seng of factory?
Short press ; to confirm, short press ; to cancel
Short Press:
In Riding State: Enter into Seng Menu
In Seng Menu: To Exit the Seng Menu
Short Press
In Riding State: switch the data name displayed
In the sengs menu: select the next item data
In the historical menu: select the next history
Long press:
In Riding State: enter the historical menu
In the historical menu: exit the history menu
Meaning of icons
-09--08-
SETTING
SETTING
Long press: BLADEpower on; Long press again,BLADE power off
Short press: To adjust the brightness mode
Short Press
In Riding State: Segmentaon (please note that the segmental
funcon will only work when the device has started to record)
In Seng Menu: Select previous item
In Historical Menu: if there is some segmental data in one me
record, users can check the data of each lap
In Seng menu: Switch values
In Riding state: To end this me riding record and store data
In the historical menu: Switch the displayed data name
Long press:
In Riding state: Start to record; Short press again: Pause
recording;if you don't operate it by hand, BLADE will pause/restart
riding automacally
Short Press:
-13-
Buon Operaons
-14-
SETTING
SETTING
Start recording
Pause recording
History review mode
Baery power of the device
Current Temperature
Current Time
Segmentaon: current segment number of turns
Current speed is higher than average speed ;
Current speed is lower than average speed .
Imperial Unit
Metric Unit
TM TOT
WGT
HOURS LB KG W
Restore the original seng of factory: long press
+ at the same me; BLADE asks whether
to restore the seng of factory?
Short press ; to confirm, short press ; to cancel
Short Press:
In Riding State: Enter into Seng Menu
In Seng Menu: To Exit the Seng Menu
Short Press
In Riding State: switch the data name displayed
In the sengs menu: select the next item data
In the historical menu: select the next history
Long press:
In Riding State: enter the historical menu
In the historical menu: exit the history menu
Meaning of icons
-09--08-
Speed sensor
connecon status
When the icon is flickering, it show that the computer is sll searching the
signal of the device;when the icon is not flickering and fixed, it shows that
the device is connected successfully.
Cadence sensor
connecon status
Heart rate with
connecon status
Power meter
connecon status
AVG Average
Max Maximum
DST Total distance of one me cycle
CAL Calorie Consumpon
WS Wheel Size
TM Current me
TOT Total me of one me cycle, including the rest me
WGT Weight of rider
ODO
BLADE device takes use of both Bluetooth BLE4.0 and ANT + two
wireless protocols; It can be connected to sensors which is with
same protocol.
Disclaimer: If there is a large amount of 2.4GHZ same frequency
radio interference in your surroundings, which may cause BLADE
malfuncon. For example: some traffic monitoring equipment,
building wireless video transmission, etc.
Wireless Connecon Protocol
Total mileage of all cycling mes,which will only be cleared 0 when the
device is restored to the factory set
Historical Record Review
Being under Historical
Data Browse
Cycle Display of Data Occured in this
me Riding
Month: Date/ Hour: Minunte
AL: All Laps Number in this me
Historcial Record
We recommend you to quickly view the historical record saved by BLADE
through Meilan APP.
There are two types of ways into Historical mode
Long press ,aer it saves the current record, BLADE will move into the
display of this me historical record automacally.
Before starng to ride,long press , BLADE will move into the display of
the latest historical records.
Short press : Switch and display different laps of this me historical
record; LAP 1, 2, 3 quickly
Short press : Switch the data name of display
Short press : Display next historical record
Long press : Exit the menu of historical record
TM
-11--10-

Parameter
Charge and Replace the Battery of Sensor
There is one CR2032 buon baery inside the Speed/Cadence:
Sensor which can last for 6-9months or so. When the bike computer
or App can't detect the sensor and the data displayed is not
complete; the baery will be probably without capacity; you should
consider to replace the baery. Please check How to Install for
baery replacement.
1. Baery type: rechargeable lithium baery
2. Working hours: 80hours
3. Wireless transmission protocols: Bluetooth BLE4.0 / ANT +;
Speed/Cadence Sensor: Bluetooth BLE4.0
4. Operaon frequency: 2.4G HZ
5. Ambient temperature: -10 — + 40 ℃.
6. Waterproof grade: IPX5.
Input:Mirco USB DC 5V/0.5A
Safety Claim and Warranty
1. Do not put the waste baery into the water or uncontrolled natural
environment; do
not place the product on fire or in an ultra-high temperature environ
ment.
2. If the product is not used connuously for six months, please charge
it at least once,otherwise it may affect your use.
3. This product is suitable for use in small to medium rain. Do not use
the product in heavy rain or soak in water.
4.Riders too much glance at the screen during the high speed riding or
improper training method will increase the chance of injury. The data
generated by BLADE is for reference only.
5. This product was developed in accordance with the EN300328V1.9.1
standard. Please follow the local laws and regulaons when using it in
different regions.
6. The product is guaranteed for one year from the date of sale for
non-human damage, and the accessories are not covered by the
warranty. You can contact the aer-sales service center through Meilan
global distributors or by wring to Meilan. When sending for repairs,
you need to effecvely keep the internal storage informaon. Data may
be lost during the repair process.
You can also go to check our installment and funconality introducon
in our official website/Youtube/Facebook links as below.
Frequently asked quesons and Video Links
Youtube WebsiteFacebook
-13--12-
Parameter
Charge and Replace the Battery of Sensor
There is one CR2032 buon baery inside the Speed/Cadence:
Sensor which can last for 6-9months or so. When the bike computer
or App can't detect the sensor and the data displayed is not
complete; the baery will be probably without capacity; you should
consider to replace the baery. Please check How to Install for
baery replacement.
1. Baery type: rechargeable lithium baery
2. Working hours: 100hours
3. Wireless transmission protocols: Bluetooth BLE4.0 / ANT +;
Speed/Cadence Sensor: BLE 4.0
4. Operaon frequency: 2.4G HZ
5. Ambient temperature: -10 — + 40 ℃.
6. Waterproof grade: IPX5.
Input:Mirco USB DC 5V/0.5A
Safety Claim and Warranty
1. Do not put the waste baery into the water or uncontrolled natural
environment; do
not place the product on fire or in an ultra-high temperature environ
ment.
2. If the product is not used connuously for six months, please charge
it at least once,otherwise it may affect your use.
3. This product is suitable for use in small to medium rain. Do not use
the product in heavy rain or soak in water.
4.Riders too much glance at the screen during the high speed riding or
improper training method will increase the chance of injury. The data
generated by BLADE is for reference only.
5. This product was developed in accordance with the EN300328V1.9.1
standard. Please follow the local laws and regulaons when using it in
different regions.
6. The product is guaranteed for one year from the date of sale for
non-human damage, and the accessories are not covered by the
warranty. You can contact the aer-sales service center through Meilan
global distributors or by wring to Meilan. When sending for repairs,
you need to effecvely keep the internal storage informaon. Data may
be lost during the repair process.
You can also go to check our installment and funconality introducon
in our official website/Youtube/Facebook links as below.
Frequently asked quesons and Video Links
Youtube WebsiteFacebook
-13--12-

Other manuals for BLADE
2
Table of contents
Other meilan Bicycle Accessories manuals


