Melink ML1SLS20-5MRGBCCT User manual

Instruction Manual
WIFI SMART LED STRIP
tak
control
2
Take control! Manage your home through the MELINK
application, remotely, from anywhere, at any time. With
one touch in the app or by the selected voice command -
you can control all intelligent MELINK devices at the same
time, including sockets and power strips, cameras, bulbs,
LED strips and others. Customize your own scenes and
automation, group devices in separate rooms, and look
after the house in your absence. MELINK - control and
security at your fingertips.
Przejmij Kontrolę! Zarządzaj domem z pozycji aplikacji
MELINK, zdalnie, z dowolnego miejsca, w dowolnym
czasie. Za jednym dotknięciem w aplikacji lub przez
wybraną komendę głosową - możesz sterować wszyst-
kimi inteligentnymi urządzeniami MELINK jednocześnie,
w tym gniazdami i listwami zasilającymi, kamerami,
żarówkami, taśmami LED oraz innymi. Dostosuj własne
sceny i automatyzacje, grupuj urządzenia w pomieszcze-
niach, doglądaj dom pod Twoją nieobecność. MELINK –
kontorola i bezpieczeństwo na wyciągnięcie ręki.
Assuma o controlo! Faça a gestão da sua casa através
da aplicação MELINK, remotamente, de qualquer lugar,
a qualquer momento. Com um toque na aplicação ou
pelo comando de voz selecionado - pode controlar todos
os dispositivos inteligentes MELINK ao mesmo tempo,
incluindo tomadas e extensões eléctricas, câmaras, lâm-
padas, LEDs e outros. Personalize os seus ambientes e
a automação, agrupe dispositivos em salas separadas e
cuide da casa na sua ausência. MELINK - controle e segu-
rança nas suas mãos.
3
EN
1 Intended use .........................................................................4
2 Technical data .....................................................................4
3 Safety Instructions ...............................................................5
4 Explanation of symbols......................................................8
5 Appliance components..................................................... 11
6 Package contents ............................................................... 11
7 Overview and use ..............................................................12
8 Cleaning ................................................................................15
9 Repair.....................................................................................15
10 Disposal.................................................................................15
11 CE Declaration of Conformity.........................................16
12 Warranty................................................................................17
TABLE OF CONTENT
WIFI SMART
LED STRIP
Model:
ML1SLS20-5MRGBCCT
4
1 Intended use
2 Technical data
The WI-FI SMART LED STRIP is a SMART HOME
product, which can be remotely controlled using
the intuitive melink application. The LED strip allows
discreet lighting of such spaces as shelves, recesses,
wardrobes, counter-tops and mirrors.
Model ML1SLS20-5MRGBCCT
System requirements Android™ 6 or higher; iOS
9.0 or higher
Power supply unit YS16-1202000EC
Input parameters 220-240V~,50Hz, 0.75A
Output parameters 12.0V , 2.0A, 24.0 W
Power supply unit
temperature tc
(maximum acceptable
casing temperature)
85° C
Power supply unit
temperature ta
(maximum acceptable
ambient temperature)
40° C
LED strip power supply 12V
LED strip length 5m
LED Type SMD 5050

5
3 Safety Instructions
Number of diodes 300
Max luminous flux 1700 lm
Wireless communication Wi-Fi 2.4 GHz
802.11 b/g/n
1. Read the entire manual before you start using
the appliance.
2. Do not use the appliance for purposes other
than its intended use.
3. Be careful when installing and using the
appliance.
4. The product is not a toy. Children must not play
with it.
5. Store at a place inaccessible to children.
6. 6. The device is intended for indoor use only.
7. Warning! Do not look at the illuminated LEDs of
the appliance for an extended time. The light
from LEDs can cause injuries or irritation to the
eyes. Do not look at the light source directly
using any optical instruments that focus light
rays.
8. Caution! Risk of overheating. Do not connect the
LED strip to a power source when the strip is still
in its packaging or wound on its reel.
9. Do not use the LED when it is covered or set

6
up within an enclosed space, for example
a wardrobe.
10. The minimum acceptable angle at which LED
strip can be bent is 60˚. Do not bend the strip at
a sharper angle.
11. The appliance is equipped with a non-
replaceable source of light. When the useful life
of the LEDs comes to an end, replace the whole
light fixture.
12. Any and all activities related to LED strip
installation must be performed when the strip is
disconnected from the power source.
13. The product does not contain any user-
serviceable parts.
14. Connect the LED strip only to the supplied
infrared module. The infrared module must
be connected only to the power supply unit
included in the kit.
15. Do not connect or disconnect the LED strip to/
from the infrared module while it is turned on.
16. Do not connect the 5 m LED strip to identical 5 m
LED strips or to other strips.
17. The appliance must be connected to
an alternating current system whose
parameters are compliant with those specified
in the instruction manual and on the rating plate
of the power supply unit.
18. To prevent fire or electrocution, do not immerse
the power supply unit in water or other liquids.

7
Make sure that the electric connection between
the power supply unit, the module and the strip
is not wet.
19. Do not clean the appliance with any strong
chemicals, alkali, abrasive or disinfecting
agents, as they may damage the surface of the
appliance.
20. Do not hang the power supply cord over a table
or sink edge, or over other sharp edges.
21. Do not use any extension cord. If, however,
you are willing to take responsibility for such
an action, use only an extension cord in good
technical condition and compliant with the
appliance power supply parameters.
22. Install the appliance away from kitchen
appliances that become hot, such as ovens,
electric cookers, gas burners etc.
23. Regularly check the power supply unit for
damage. If the power supply unit is damaged, it
must be disposed of in accordance with locally
applicable regulations.
24. Never pull by the power supply cord to remove
the power supply unit from an outlet. Grasp it
by the power supply housing instead, then pull
it out of the outlet.
25. If water is poured over the external electrical
components of the appliance, immediately
turn o power supply of the socket to which
the device is connected and unplug the power

8
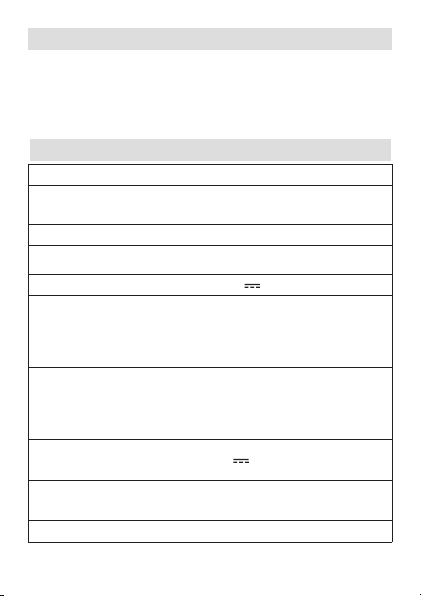
4 Explanation of symbols
Read this instruction manual.
supply unit.Dry the appliance thoroughly before
reconnecting it to the mains.
26. Do not use the appliance if its power supply
housing shows any signs of damage or if the
appliance has been dropped on the floor.
27. Always unplug the power supply unit if it will not
be used for an extended period of time, and
whenever irregularities in the operation of the
appliance occur.
28. Retain the instruction manual and the
packaging, if possible.
29. If you intend to hand this appliance over to
a third party, you should transfer the instruction
manual as well.
30. The external wiring of the device must not be
replaced. If the cable is damaged, the device
(part of the set connected with the cable) must
be destroyed (disposed of).
31. To obtain an electronic version of the
instruction manual, send a message to:
http://instrukcje.vershold.com.

9
Product compliant with requirements
prescribed in the applicable European
Union directives.
Disposal of waste electrical and
electronic equipment - see the
DISPOSAL section of this manual.
The appliance is designed for indoor
use only.
Trademark indicating that the
manufacturer has made a financial
contribution to the development and
operation of a packaging materials
recovery and recycling system.
for Wi-Fi
controler and
tape
LED strip protection class III – a device
in which protection against an electrical
shock is based on supply from a safety
extra-low voltage (SELV) power source,
and in which no voltage higher than
SELV is present.
for AC/DC
adaptor
Power supply unit protection class
II – in class II devices protection
againstelectrical shock is provided by
suitableinsulation (double or reinforced)
whichis highly unlikely to fail.

10
Protection level of an electric device
against ingress of external factors. The
marking consists of the letters IP and
two digits, the first of which denotes
resistance to ingress of solid particles,
and the second, to ingress of water. 2 –
protection against solid particles larger
than 12.5 mm, 0 – no protection against
ingress of water.
Short-circuit resistant protection
transformer.
VI Symbol on the power adapter marking
the energy eciency level Class VI.
Symbol marking polarity of the plug.
Independent power supply unit of the
lamp
Recycling codes identifying the material
from which the packaging is made –
cardboard.
11
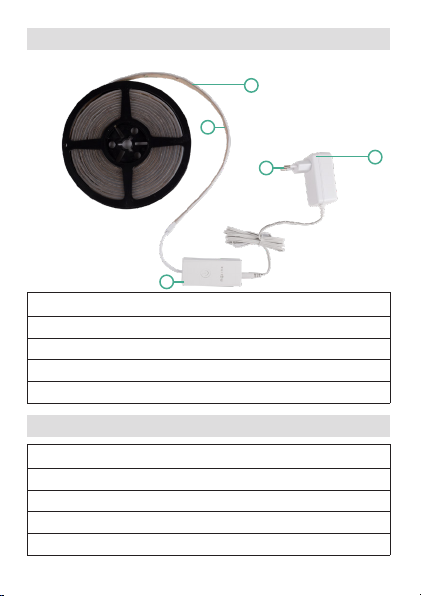
6 Package contents
1
4
2
3
5
1 LED Strip
2Adhesive Tape
3 Wi-Fi Controller Module
4 Power Supply Unit
5 Power Supply Unit main plug
5 Appliance components
Quantity Item
1 LED Strip (5 Meters)
1 User’s manual
1 Power supply
1 Wi-Fi controller module

12
7 Overview and use
7.1 Connecting the device
1. Connect the LED strip to the Wi-FI controller and
the power supply. Plug in the power supply into
a power source, the parameters of which are
compliant with this manual.
2. Note that the LED strip needs to be connected
to the Wi-Fi controller module as shown below:
3. If the device is paired with the app, the LED strip
should be visible as connected in the melink
app.
7.2 Resetting the device
1. To reset the device settings and the previous
Wi-Fi network configured with it, press the
power button on the controller for 10 seconds,
Open the packaging and carefully take out the device. Make
sure the product is intact. Check that the plastic parts are
not broken. If any parts are damaged or missing, contact
the dealer and do not use the device. Keep the packaging
or dispose of it in accordance with local regulations.
Caution! For the sake of children’s safety, do
not leave any packaging materials
accessible and unattended (plastic bags,
cardboard boxes, Styrofoam, etc.). Risk of
suocation!

13
until the LED strip will start flashing, signifying
that the device disconnected from the previous
Wi-Fi network and is ready to be paired.
7.3 Configuring the app
MELINK APP
Controlling all MELINK Smart Home products is possible
through the MELINK Smart Home application, which can
be downloaded on your smartphone. The application is
available to download for a free on the Google Play Store
for Android users and the App Store for iOS users, and can
be found under the name “MELINK Smart Home”.
!
You can only register in the application via your email
address.
After downloading the application follow the steps below
to create an account:
1. Open the application
2. Create an account by clicking on the “Register”
button.
3. Select your region and input your e-mail
address
4. You will be sent a verification code to the e-mail
address used during the registration. Check in
your SPAM folder if you don’t find it in your inbox.
5. Input the verification code in the MELINK APP

14
6. Set a password
7. The application is ready to use.
How to connect the WI-FI SMART LED STRIP to the
MELINK app.
1. Open the MELINK app in the phone.
2. In the “HOME” tab, click “+” in the top right
corner.
3. Select the device you want to add.
4. Follow the instructions displayed on the screen
!Only 2.4 GHz Wi-Fi networks are supported for
connections to MELINK Smart Home products. Please
select a 2.4 GHz network or change your router settings
accordingly.
!
To pair the device to your MELINK App account
the device, on which the app is installed, needs to be
connected to the Wi-Fi network, which you want the
device to be paired to.
!
Controlling MELINK products can only be done by
using a valid MELINK application account and while both
the controlling device and the product are connected to
the internet.
!
For the proper operation of the app and the device,
you must agree to the use of the WI-FI application,
Bluetooth and your location.
If you want to report a problem or have questions about
the operation of the application, contact us through the
application. Go to “FAQ and Opinions” and press “Report

15
a problem”. Complete and submit the form. We will
contact you through the application.
9 Repair
Basic rules
Proper and regular cleaning will ensure safe operation
and extend the life span of the appliance.
Warning! Switch o the appliance, unplug it and let it cool
down before cleaning to avoid electric shock and burns.
Use a dry cloth to remove dust from all elements.
Attention! Do not clean the appliance with any strong
chemicals, alkali, abrasive or disinfecting agents, as
they may damage the surface of the appliance.
Attention! Do not immerse the appliance in water or
other liquids.
The product does not contain any user-serviceable parts.
Do not attempt to repair the product on your own. Always
have a specialist perform repairs. If the power cord is
damaged, it must be replaced by a qualified person, the
manufacturer, or a service center, so as to avoid hazards.
8 Cleaning
All the packaging materials are 100% recyclable and are
labelled as such. Dispose of the packaging in accordance
with local regulations.
Keep the packaging materials out of children’s reach, as
these materials can pose a hazard.
Correct disposal of the appliance:
10 Disposal

16
Vershold Poland Sp. z o. o. hereby declares that the type
of radio device ML1SLS20-5MRGBCCT complies with
Directive 2014/53/EU. This device has been designed,
manufactured and marketed in compliance with the
requirements of the New Approach Directives, therefore,
the product has been marked with the CE mark, and a
declaration of conformity has been issued for it, which is
made available to market regulators.
11 CE Declaration of Conformity
1. According to the WEEE Directive (2012/19/
EU), the crossed-out wheelie bin symbol
(shown on the side) is used to label all electric
and electronic devices requiring segregation.
2. Do not dispose of the spent product with domestic
waste: turn it over to an electric and electronic
devices collection and recycling point. The crossed-
out wheelie bin symbol placed on the product,
instruction manual or package communicates this
requirement.
3. The plastics contained in the device can be recycled
in accordance with the specific marking. Thanks
to recycling, re-use of materials, or other forms of
utilizing used equipment you make a significant
contribution to the protection of our natural
environment.
4. Information on electric and electronic devices
collection locations is available from local
government agencies or from the dealer.

17
12 Warranty
In order to claim a product, you must contact the Seller.
If you have any product-related questions or problems,
or call us at: +48 667 090 903
Your opinion is important to us. Evaluate our product at:
www.vershold.com/opinie
1. The Warrantor for this product grants a
24-month warranty valid from the date of
purchase. Should you find any defect, submit a
complaint at the place of purchase.
2. A defective/damaged product means a product
failing to provide the features described in the
Instruction Manual due to intrinsic properties of
the appliance.
3. The Beneficiary under the warranty shall deliver
the appliance to the Customer Service Point at
a relevant store in order to submit a complaint
about the equipment. When asserting your
rights under the warranty, you need to present
proof of purchase (purchase receipt, invoice)
together with a description of the device defect
in as much detail as possible, in particular of the
external manifestations of the defect.
4. The warranty excludes products with
physical damage other than that caused by
the manufacturer or distributor, including
specifically any damage resulting from incorrect
usage or force majeure.

18
5. The warranty does not cover products from
which the tamper-proof seal has been removed
and products to which repairs, alterations or
structural modifications have been attempted.
6. The warranty does not cover components
subject to natural wear and tear during
operation.
7. It is recommended that the complete product be
returned in order to facilitate defect verification.
Manufacturer / Producent / Fabricante:
VERSHOLD POLAND Sp. z o. o.
ul. Żwirki i Wigury 16A
02-092 Warsaw, Poland
Made in China / Wyprodukowano w Chinach /
Fabricado na China

19

20
PL
1 Użycie zgodnie z przeznaczeniem................................21
2 Dane techniczne.................................................................21
3 Zasady bezpiecznego użytkowania .............................22
4 Objaśnienie symboli ......................................................... 26
5 Elementy urządzenia........................................................ 28
6 Zawartość zestawu........................................................... 29
7 Użytkowanie ........................................................................ 29
8 Czyszczenie ..........................................................................32
9 Naprawa ...............................................................................33
10 Utylizacja...............................................................................33
11 Deklaracja CE..................................................................... 34
12 Gwarancja........................................................................... 35
SPIS TREŚCI
SMART TAŚMA
LED WIFI
Model:
ML1SLS20-5MRGBCCT
Table of contents
Languages:
Other Melink Lighting Equipment manuals

Popular Lighting Equipment manuals by other brands


Lightolier
Lightolier ProSpec 26890 specification

HumanTechnik
HumanTechnik lisa operating instructions

Smartwares
Smartwares SH4-99564 quick start guide

WE-EF
WE-EF FLC122LED Installation and maintenance instructions

Inivos
Inivos ULTRA-V User instruction manual

Hunza
Hunza ULTRA 12 SPOT installation instructions