MEND Technology Wellness User manual
1
MEND WellnessTM (IS02LCDs)
User’s Manual
Ver 1.8 2021.9.17

2
Technical Support:
Website: https://www.mendtechnology.com
Email: support@mendtechnology.com
Company Address:
MEND Technology
10117 SE Sunnyside Road Ste F40
Clackamas, OR 97015
Phone: 503-594-4045
Fax: 503-594-4046
© 2021 MEND Tech, LLC. All rights reserved. MEND Technology and the logo are the trademarks of
MEND Tech, LLC. Trademarks or registered trademarks are the property of their respective holders.
Software and specifications are subject to change without notice.

3
Table of Contents
Introduction................................................................................................................5
Indications ..................................................................................................................5
Warnings and Contraindications..............................................................................5
Adverse Effects...........................................................................................................6
Precautions .................................................................................................................6
Warranty and Service................................................................................................7
MEND Wellness Device and Accessories..................................................................8
Top Panel and Keypad.............................................................................................8
Rear Panel ................................................................................................................9
USB Port ...................................................................................................................9
Microcurrent Output Ports...................................................................................10
Accessories..............................................................................................................10
Operations ................................................................................................................11
Prepare for Operations..........................................................................................11
Install Batteries .................................................................................................11
Connect Wires to the MEND WellnessTM device...............................................11
Connect Wires to Gloves, Strips, or Electrodes ................................................12
Basic Operations ......................................................................................................13
Power ON................................................................................................................13
PROTOCOLS button - All, Recent, History, and Batch Protocols....................13
Select a Protocol .....................................................................................................13
To quickly jump to a protocol ...........................................................................14
To see details of a protocol................................................................................14
Run a Therapy Protocol / HOLD the timer .........................................................15
Pause the Therapy Protocol / SKIP a frequency pair .........................................15
Stop the Therapy Protocol.....................................................................................15
Turn on the Back Light .........................................................................................15
Turn Power OFF ....................................................................................................16
Advanced Operations and Display Information ...................................................17
Protocol Run Information and Status ..................................................................17
Make Run Time Changes ..................................................................................18
To change output current intensity µA..............................................................18
To HOLD the current frequency pair ................................................................18
To SKIP the current frequency pair...................................................................18
To LOCK the keypad ........................................................................................18
Batch Protocols.......................................................................................................18
To go into Batch Protocols................................................................................18
Select a slot .......................................................................................................18
Select a protocol for the slot..............................................................................19
Select from other protocols ...............................................................................19
Assign a protocol to the slot..............................................................................19
Select protocols for other slots ..........................................................................19
Remove a protocol from batch ..........................................................................19
Run a batch of protocols ...................................................................................19
Skip a protocol in batch ....................................................................................19

4
Stop the batch....................................................................................................19
Settings – MAIN MENU..........................................................................................20
To change Settings ............................................................................................20
To turn ON/OFF key beeping ...........................................................................20
To turn ON/OFF protocol end beeping .............................................................20
To change the OUTPUT Drive..........................................................................20
About.........................................................................................................................20
To go to About...................................................................................................20
Version ..............................................................................................................20
Battery Status ....................................................................................................20
Low Battery Indication .....................................................................................21
Disclaimer .........................................................................................................21
Maintenance & Troubleshooting ............................................................................21
Pre-Use Inspection ............................................................................................21
Sanitizing ..........................................................................................................22
Life of Service...................................................................................................22
Disposal ............................................................................................................22
Troubleshooting ................................................................................................23
Technical Manual .....................................................................................................23
Technical Specifications....................................................................................23
Waveform Description ......................................................................................25

5
Introduction
Congratulations on your purchase of the MEND WellnessTM (IS02LCDs) device. The
MEND WellnessTM is the most advanced two channel programmable transcutaneous
electrical nerve stimulator or "TENS" device currently available. MEND Technology
is a leading innovator and distributor of state-of-the-art medical devices.
The MEND WellnessTM is a high-end precision medical device used for the relief of
pain. This device generates low intensity current pulses at microampere levels and
frequency of pulses. The unit can hold multiple therapy protocols. Each protocol
includes multiple frequency pairs. Your licensed health care practitioner can program
frequency pairs with a variety of parameters including current intensity, frequency,
time, modulated wave period, wave slope, and polarity. The micro-ampere level
current is applied by electrodes.
The MEND WellnessTM is a small, portable device that is designed for use in a doctor's
office, clinic or hospital as well as self-administered treatment at home under your
practitioner’s supervision.
Indications
The MEND WellnessTM is intended for the symptomatic relief of chronic intractable
pain. The degree of efficiency will vary with patient selection.
Warnings and Contraindications
•Microcurrent stimulation should not be used on patients whose pain syndromes
are not diagnosed and etiology is not established. If another electrode is used as a
dispersive electrode, placement of the dispersive electrode should ensure
transthoracic stimulation is not possible.
•Safety of microcurrent stimulation has not been established during pregnancy or
birth. Microcurrent stimulation is not effective for pain of central origin including
headache.
•Microcurrent stimulation should be used only under the continued supervision of
a licensed physician. Microcurrent stimulation has no curative value.
Microcurrent stimulation is a symptomatic treatment and as such suppresses the
sensation of pain which would otherwise serve as a protective mechanism.
•The stimulation and electrodes should not be applied across or through the head,
directly on the eyes, covering the mouth, on the front of the neck, especially over
the carotid sinus (upper side of neck), or from electrodes placed on the chest and
the upper back or crossing over the heart. Application of electrodes near the thorax
may increase the risk of cardiac fibrillation.
•Don’t use microcurrent stimulation on patients who have a demand type
pacemaker. A patient with an implanted electronic device (for example a cardiac
Please read this entire manual thoroughly before using it the
device.

6
pacemaker) should not be subjected to stimulation unless specialist medical
opinion has first been obtained.
•Do not allow children to use or handle this device. Keep the device and lead wires
away from children when not in use. Strangulation could result from baby or child
entanglement in the wire leads.
•Do not operate vehicles or potentially dangerous machinery during periods of
stimulation.
•Electronic monitoring equipment such as ECG monitors and ECG alarms may not
operate properly when Inspirstar IS02 PMS is in use.
•Simultaneous connection of a patient to a high frequency surgical medical
equipment may result in burns at the site of the IS02 PMS electrodes and possible
damage to the IS02 PMS.
•Operation in close proximity (e.g. 1 m) to a shortwave or microwave therapy
medical equipment may produce instability in the IS02 PMS output.
Adverse Effects
Please consult your doctor about possible adverse effects which may arise from the
therapy protocols your doctor is using. A common issue is about skin reaction at the
electrode sites. Skin irritation and electrode burns are potential adverse reactions.
Cleaning and hydrating the skin are usually valid methods to reduce the skin irritation
or electrode burns. If gloves or cloth or garment are used as electrodes, these gloves
or cloth or garment should be wet or damp. If electrode pads are used, sometimes
conductive gel on pads can be helpful to increase the conductivity and reduce the skin
reaction.
Precautions
Isolated cases of skin irritation may occur at the site of electrode placement following
long-term application. Effectiveness is highly dependent upon patient selection by a
person qualified in the management of pain patients.
•The device is to be applied with electrodes to the skin of the human body.
•The device has micro amperage current output. The plugs must be inserted
completely into the jacks. The patient may experience prickling sensation if the
skin contact is too dry. Moisture the skin before use.
•Only use the recommended accessories. It can be unsafe to use accessories not in
the instructions for use.
•Use alkaline batteries only. It cannot be connected to external power source. Any
CAUTION
Federal Law (USA) restricts this device to sale by or on the order of a
licensed health care practitioner.
The following are precautions for the safety of the users and the
device.

7
attempt to do so would cause damage of the device and possibly cause harm to
the patient.
•Water into the device could affect the safety and performance. Do not use the
device when the device has got water inside. Do not let water flowing on the
surface of the device. Do not immerse the device into water. Do not use the device
close to flammable mixtures or concentrated flammable fumes such as gasoline.
•The device can only be opened and repaired by the manufacturer or licensed
service personnel. Do not modify the device as it can be unsafe.
•The device is for indoor use where a patient would comfortably stay. Consult your
physician for use in unusual environment conditions e.g. strong magnetic fields
or electromagnetic fields, external electrical influences, electrostatic discharge.
Do not exposure the device in a high dust environment for long period of time.
Warranty and Service
The MEND WellnessTM has a limited one-year warranty. MEND Technology warrants
that the Product is manufactured by Inspirstar Inc in accordance with the specifications.
There is no warranty of merchantability nor of fitness for a particular use. The
Product is marketed under section 510(K) of the Federal Food, Drug and Cosmetic
Act as a device substantially equivalent to a device in commerce. Inspirstar Inc. and
MEND Technology expressly disclaim any claim that the Product can treat or cure any
medical condition or illness. The user must consult with his or her healthcare
practitioner as to the recommended use. The Product may only be used under the
direct supervision of a licensed health care provider. There are no other warranties,
expressed or implied. MEND Technology sole liability hereunder is to replace the
Product with the same or a substitute product. In no event shall Inspirstar Inc. and/or
MEND Technology be liable for personal injury or death of any person using or
misusing the Product.
The MEND WellnessTM unit may be repaired or replaced with the same or a substitute
product within one year of purchase based on the determination of the manufacturer.
Lead wires have a limited warranty of 3 months. To replace products or obtain service,
first call your doctor or MEND Technology. If necessary, send the entire unit with the
carrying case and accessories, insured, postage prepaid, and well packaged, along with
the Return Merchandise Authorization number obtained from MEND Technology.
Please remove the batteries before returning your device.

8
MEND Wellness Device and Accessories
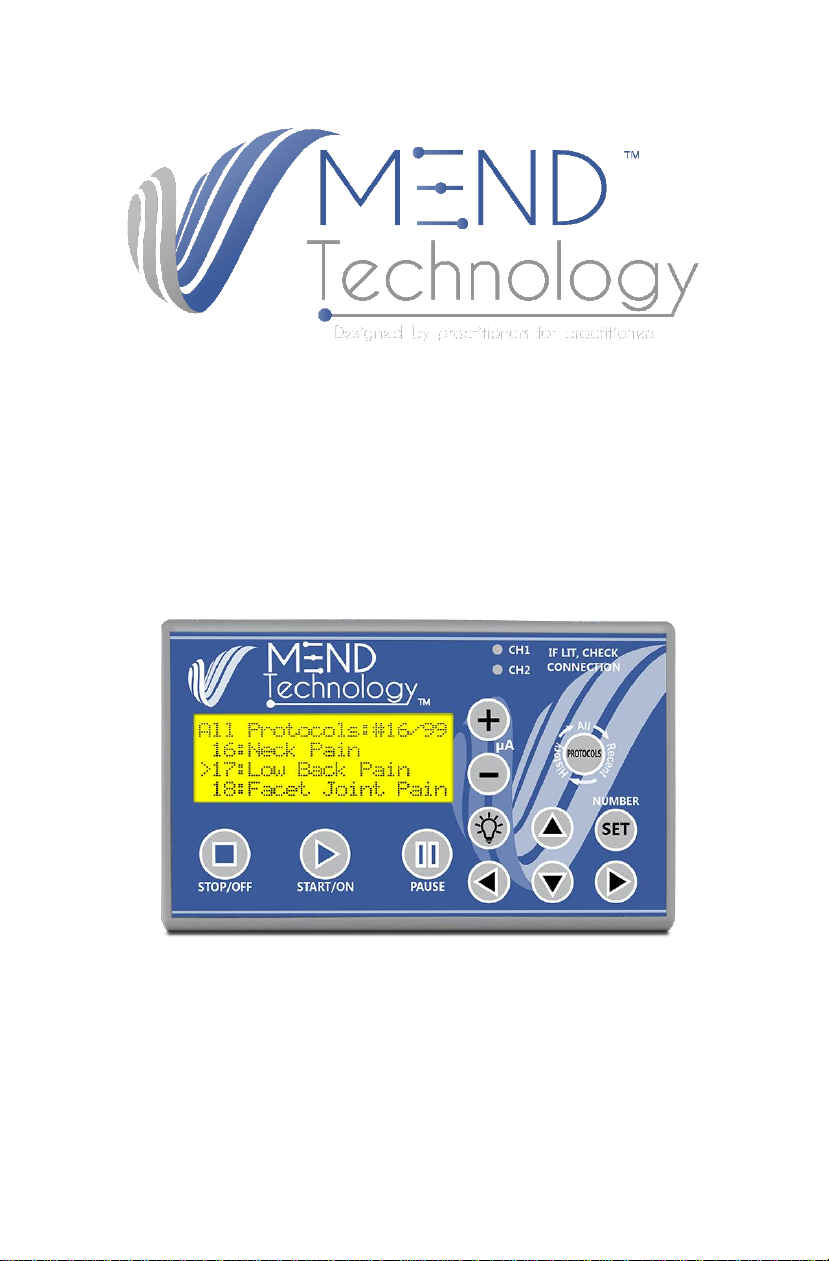
Top Panel and Keypad
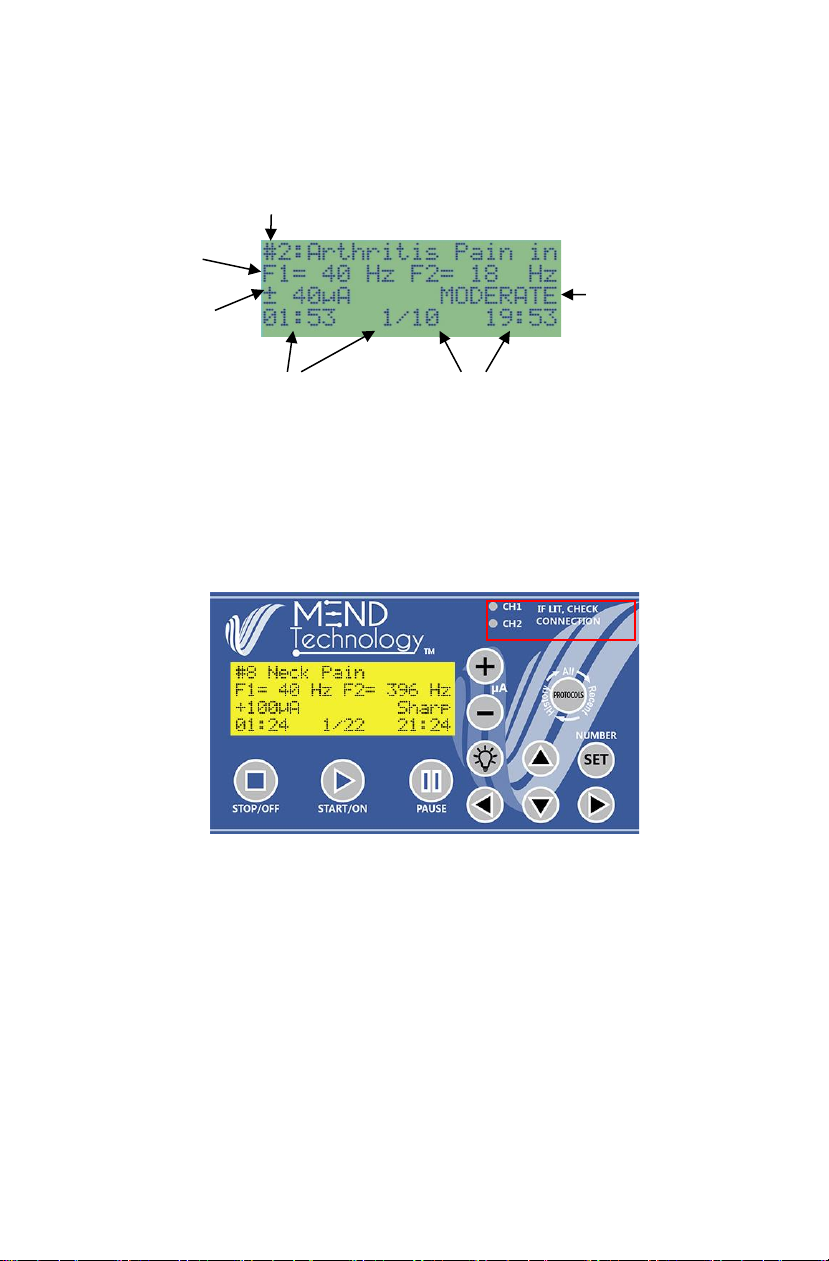
Figure 1 Top Panel
1. Display Area: Menu selection, protocol information, running information and
status, etc. are displayed on LCD screen.
2. Channel Status: LED CH1 and CH2 indicate if the output current can reach their
peak current value in the protocol for channel 1 and channel2, respectively. If the
LED is flashing or ON, check the connection of the electrode to the body.
3. Protocol Running Control:
•Key START/ON to turn on the device, or to start the selected
protocol.
•Key PAUSE to pause the running of the current protocol. Use key
START to resume the running.
•Key STOP to stop the protocol in running, or to turn off the device.
4. Arrow Keys:
• Left Arrow: Back to previous menu level or move cursor to left.
• Right Arrow: Enter menu selection or move cursor to right.
• Up Arrow: Move cursor up or increase number
• Down Arrow: Move cursor down or decrease number
5. Set Number key:
• Press this key to go into and finish the number editing mode. In Number
Editing mode, use arrow keys to change the digits of the number. Press this
key again to move to next number or to finish editing numbers.
9
• In the Main Menu->Settings, use the SET key to jump to the next field and
SET new value.
6. Protocols: Press this key to cycle between “All Protocols”, “Recent
Protocols”, “History Protocols” and “Batch Protocols”.
7. Back Light: turn on or off the back light of the LCD display.
8. Current Keys: to increase or decrease the output current intensity. Your
practitioner should have these set at a typical default setting for you. Range is 20
μA to 400 μA.
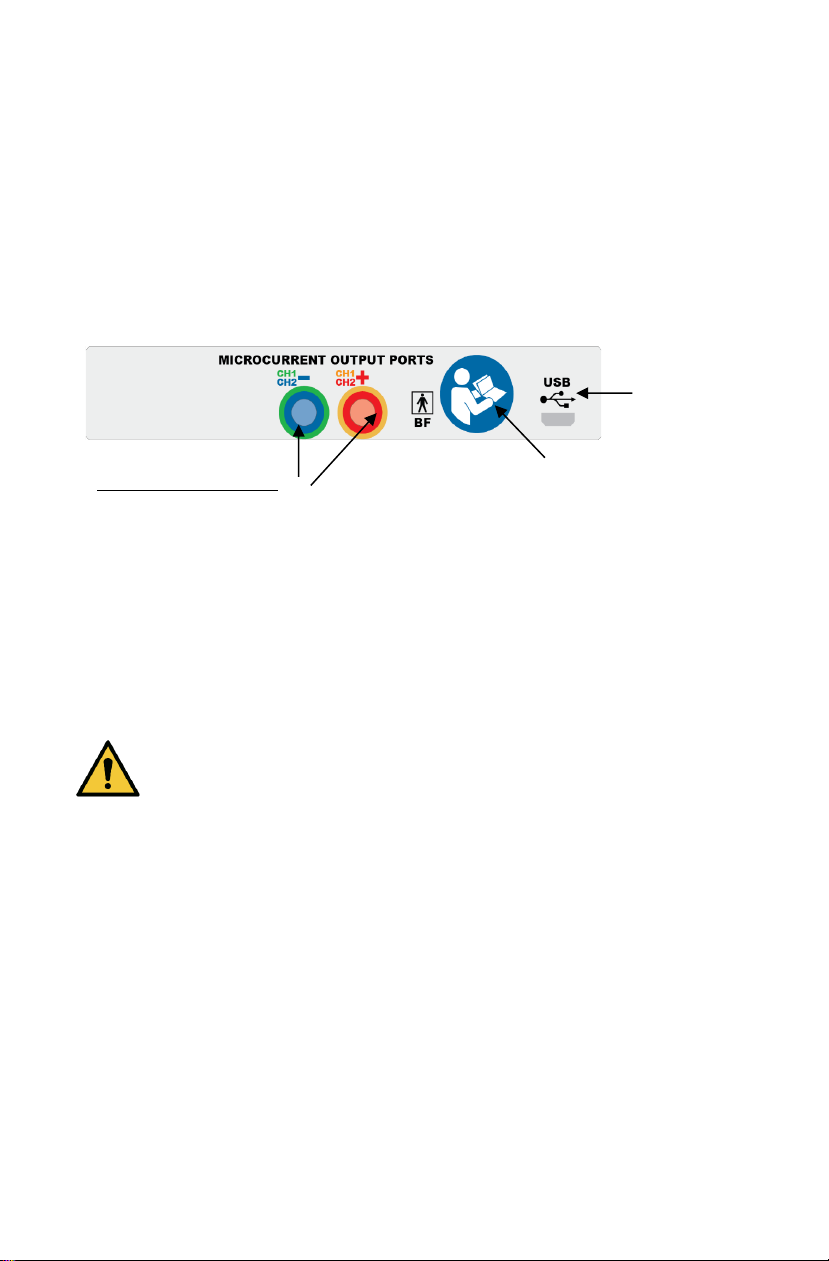
Rear Panel
Figure 2 MEND WellnessTM Output Jacks and USB port
USB Port
The micro USB port is for communication with the computer only, not to supply power
to the MEND Wellness device. The MEND Wellness only operates with battery power
supply.
Equipment that is connected to the Micro USB port interfaces must be
certified according to the respective EN/IEC/UL standards.
Certified computer has one or more of the following markings on the
power supply unit:
Combined Channel Jacks: Refer to user’s manual for safety cautions.
Positive Jack +: Positive leads of CH1 and CH2
Negative Jack -: Negative leads of CH1 and CH2
Device is Body Floating (BF) Type.
Micro USB
connection to PC.
Only used to
program unit.
IEC 60950-1
IEC 60950-22
CAN/CSA-C22.2 No. 60950-1
CAN/CSA-C22.2 No. 60950-22
UL 60950-1
UL 60950-22
Information Technology
Equipment Power Supply
I.T.E. Power Supply
ITE Power Supply
QQGQ7 Power Supply
Microcurrent Output Ports
Output Jacks
Plugs
Connection
Connector
Combined Channel Output Jacks
Positive Jack
(+)
Tip
CH2+
Red
Ring
CH1+
Yellow
Negative
Jack(-)
Tip
CH2-
Blue
Ring
CH1-
Green
Table 1 Color Mapping of Output Ports to Wire Connectors
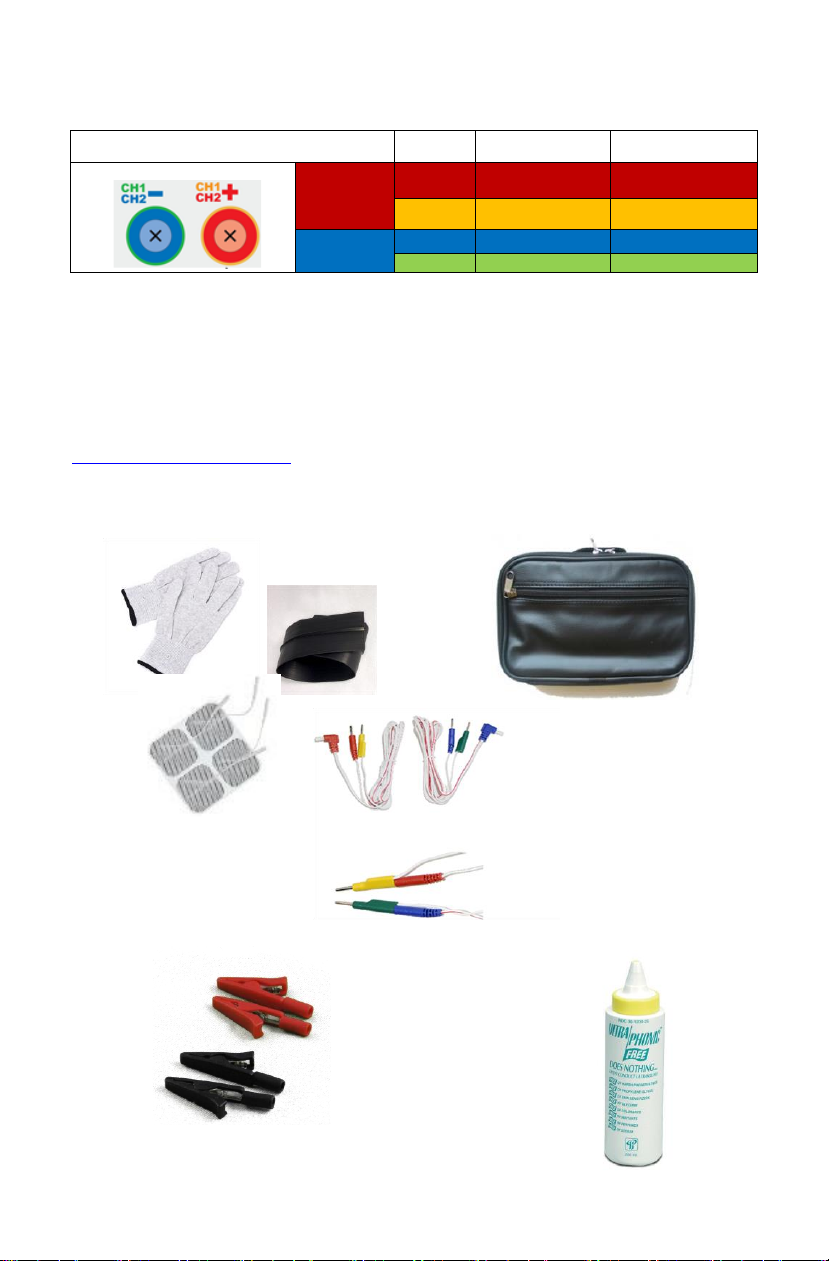
Accessories
The MEND device can be used with various accessories that can be purchased
individually. For example, gloves, electrodes, push pin leads, conductive strips and
conductive material. To purchase additional accessories visit
www.mendtechnology.com
Electrodes, conductive strip &
Gloves
Combinable Leadwires
Carrying Case
Alligator clips
Conductive Gel

11
Operations
Prepare for Operations
The MEND WellnessTM device can be used inside the carrying case. If you have the
soft carrying case, there are two Velcro strips attached inside. Use them to attach to
the back panel of the MEND WellnessTM device.
Install Batteries
The MEND WellnessTM device uses two alkaline batteries in size “AA”. Remove the
batteries when the device is not going to be used for more than one month.
Connect Wires to the MEND WellnessTM device
Insert the plugs into the jacks on the rear panel of the MEND WellnessTM device.
Match the color of the plug with the color on the rear panel.
Insert batteries here

12
Connect Wires to Gloves, Strips or Electrodes
Snap the button or insert the pins on gloves, strips or electrodes.
Please follow your health care practitioner’s instructions on where to place the
electrodes, gloves, towels or strips on the body. Gloves, towels, and strips need to be
wet to provide conduction.
It is recommended to leave the wires and buttons connected to the gloves and leave
the plugs inserted in the MEND WellnessTM after use. If you want to unbutton the
electrode wires from the gloves, hold the button base on the gloves instead of holding
the fiber part of the gloves to avoid damage to the gloves.
DO NOT WEAR THE GLOVES ON BARE HANDS UNLESS YOU
ARE TREATING YOUR OWN HANDS.
To isolate the conductive gloves from bare hands, wear latex or nitrile gloves first
then put on the conductive Electrode Gloves. The gloves must be wet during
treatment.
The electrodes and the wire leads may wear and lose
conductivity over time. Check to ensure the CH1/CH2 LEDs
are not flashing for any connectivity issue when a protocol is
running.

13
Basic Operations
Power ON
Press START/ON to power on the unit. The Power-On Initial Screen displays the last
protocol number previously run. Press START to run this last used protocol.
PROTOCOLS BUTTON - All, Recent, History and Batch Protocols
All Protocols lists all protocols in the profile.
Recent Protocols lists the protocols that were recently used. Use Recent Protocols
to quickly select a protocol that is frequently used.
History Protocols lists the actual protocol running history. The latest used protocol
is displayed on the top of the list. Use History Protocols to check the therapy history
and also to select a protocol to run again. Note: the history will show the exact usage,
so you may see the same protocol multiple times in the history.
Batch Protocols lists the protocols to run in a batch.
Select a Protocol
There are a number of stored therapy protocols in the MEND WellnessTM
IS02LCDs. Please follow your health care practitioner’s instruction regarding the
protocols to be used for your pain complaints.
To browse for a protocol: Press the PROTOCOLS key to get to the All Protocols
screen.
To switch between All
Protocols, Recent Protocols,
History Protocols or Batch
Protocols: press Protocols key
to cycle between the four
protocol list screens.

14
To quickly jump to a protocol number: When the “All Protocols” screen is
displayed, press the SET key and look to the top right corner of the display. The edit
cursor will flash on either the ones or tens digit of the protocol number. Use the UP
and DOWN keys to change the value. Use the LEFT arrow to move to the tens digit
and use UP and DOWN to change the value. Use the RIGHT arrow to move to the
ones digit. Press SET again when done. Alternatively, press and hold the up or
down arrow to scroll quickly.
To see details of a protocol: Press the
RIGHT arrow key to see the details. Use
keys UP and DOWN to scroll through the
screen to see details.
Use the arrow keys UP and
DOWN to browse through the
protocol list.
15
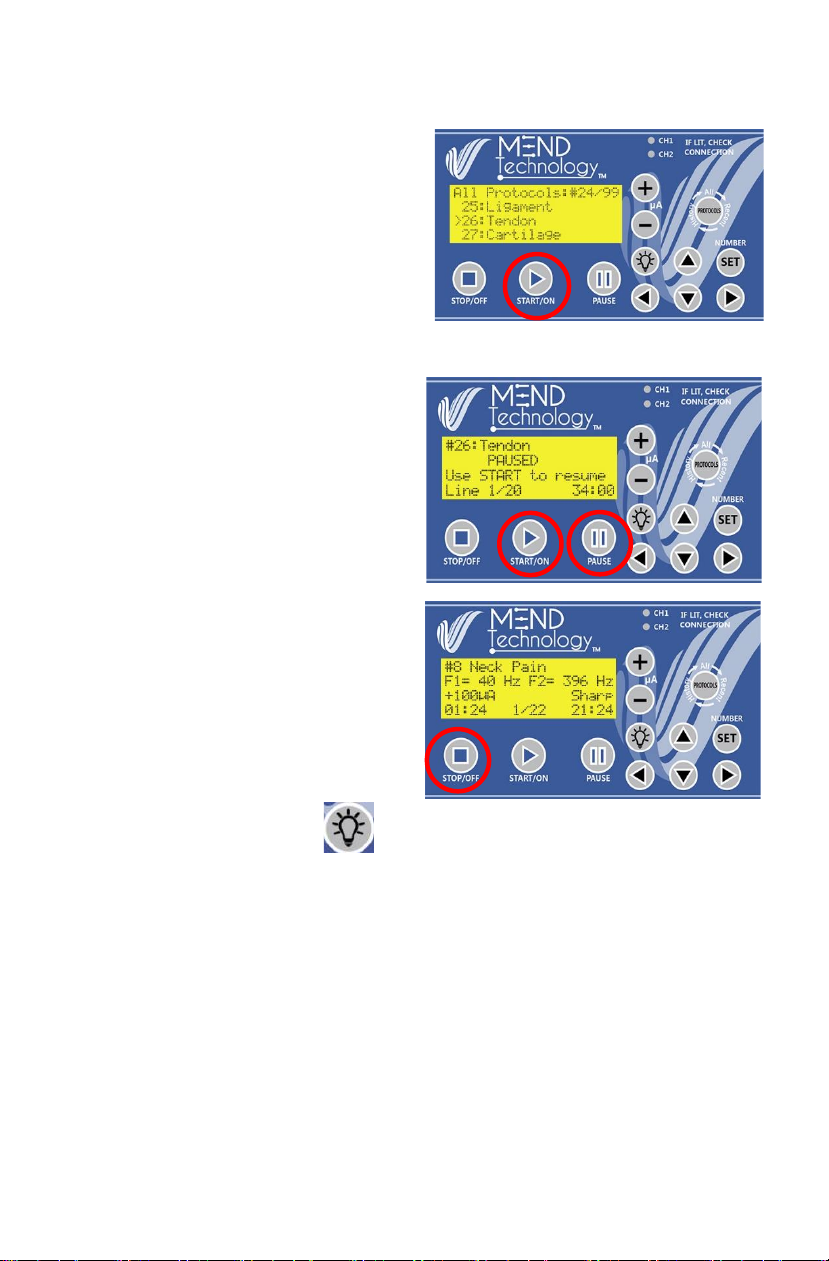
Run a Therapy Protocol
Press the START key to run a protocol.
The protocol will start to run and there
will be microcurrent from the output
jacks. The protocol will stop after the
programmed run time. If you do not start
another protocol, the unit will
automatically turn off.
Pause the Therapy Protocol
While a protocol is running, press
the PAUSE key if you need to
temporarily stop a protocol, press
START to continue running.
While paused, no current is
running. The maximum time for a
PAUSE is 30 minutes.
Stop the Therapy Protocol
At any time during a protocol, you
can press the STOP key to stop
running a therapy protocol.
Turn on the Back Light
To turn on the LCD back light: quickly press the Back Light key to turn on the LCD
back light. The back light will turn off when there is no keypad operations within 10
seconds.
To turn on the LCD back light for 30 seconds: press and hold the Back Light key
for 3 seconds, the light will remain on for 30 seconds. To keep the backlight on for 8
hours, press and hold the Back Light key again until the LCD backlight flashes once.

16
Turn power off
Depending on which screen you are
on, continue to press the STOP/OFF
key to turn off the MEND WellnessTM.
The unit will power off automatically
if the unit is not in use for 60 seconds.
17
Advanced Operations and Display Information
Protocol Run Information and Status
When a protocol is running, the screen will display the protocol information and status.
During the running of the protocol, the MEND WellnessTM uses two LED lights to
indicate the output connection. If the channel status LED CH1 or CH2 turns on or
flashes, check that your leads are inserted firmly into the jacks and your pins are
plugged into the conductive material. The common problems are loose plugs, plugs
are not inserted, the button or push pin is not inserted into gloves or electrodes, dry
skin contact needs moisture or broken leadwires.
Note: During a treatment you may experience a mild tingling sensation as a result
of the stimulating current flow.
Protocol number and name
Current frequency pair number and
remaining time
Total frequency pair numbers and
remaining time
Output current
polarity
(±) and
intensity (μA)
Waveform name
Output channel
frequencies

18
Make Run Time Changes
To change output current intensity μA:Press the ‘+’key to increase the current
intensity value or press the ‘-‘key to
decrease the current intensity value. Or
press the Number SET key multiple
times until the edit cursor has moved to
the output current position, then use the
arrow keys to change the value. Changes made are only applied to the active pair.
Range: 20-400μA
To HOLD the current frequency pair,
press and hold the START key for 2
seconds to hold the timer. Press the
START key to resume the timer.
To SKIP the current frequency pair,
press and hold the PAUSE key for 2
seconds to skip the current frequency pair
and move to the next frequency pair.
To LOCK the keypad when running a
protocol to avoid accidental change or
stop of the protocol, press both the LEFT and RIGHT keys simultaneously. A lock
icon will appear to indicate the keypad is locked. Press the LEFT and RIGHT keys
simultaneously to unlock.
The new values will be applied on the microcurrent output in 3 seconds after
changed. The change of Current Intensity will be carried into the next frequency
pair in the protocol if the next frequency pair has the same parameters as the current
frequency pair. All Run Time changes are dismissed when the protocol is finished
or stopped.
Batch Protocols
Batch Protocols allows you to add up to 9 protocols and run as a batch.
Protocols will run in order.
To go into Batch Protocols: press
the Back (left arrow) key to Main
Menu and use UP/DOWN to select
Batch Protocols and press RIGHT
arrow to enter.
Select a slot: There are 9 protocol
slots in the batch. Each slot can be
assigned to any protocol in the IS02.
Use UP/DOWN to move the selection
symbol “>” up and down.

19
Select a protocol for the slot: Press
RIGHT key to enter to the protocol
selection menu.
Select from other protocols: Press
Protocols key to rotate between All
Protocols, Recent Protocols and
History Protocols. Use UP/DOWN
arrows to select a protocol. See Select
a Protocol on page 13.
Assign a protocol to the slot: press
START key to assign the protocol to
the slot. The assigned protocol will be
shown in the slot in the batch.
Select protocols for other slots:
repeat the above steps for other slots.
Remove a protocol from batch:
select the batch slot and press and
hold STOP key for 2 seconds until
the slot is changed to empty.
You can have empty slot between
protocols in the batch. The empty slot
will be skipped during runtime.
Run a batch of protocols: move the
selection cursor “>” to the protocol to
start with in the batch, and press
START key to start running the
protocols. The slot number in the
batch is shown in front of protocol number.
Skip a protocol in batch: press STOP key to skip the current protocol. The
next protocol in the batch will start.
Stop the batch: press and hold STOP key for 2 seconds to stop running the
batch of protocols.
20
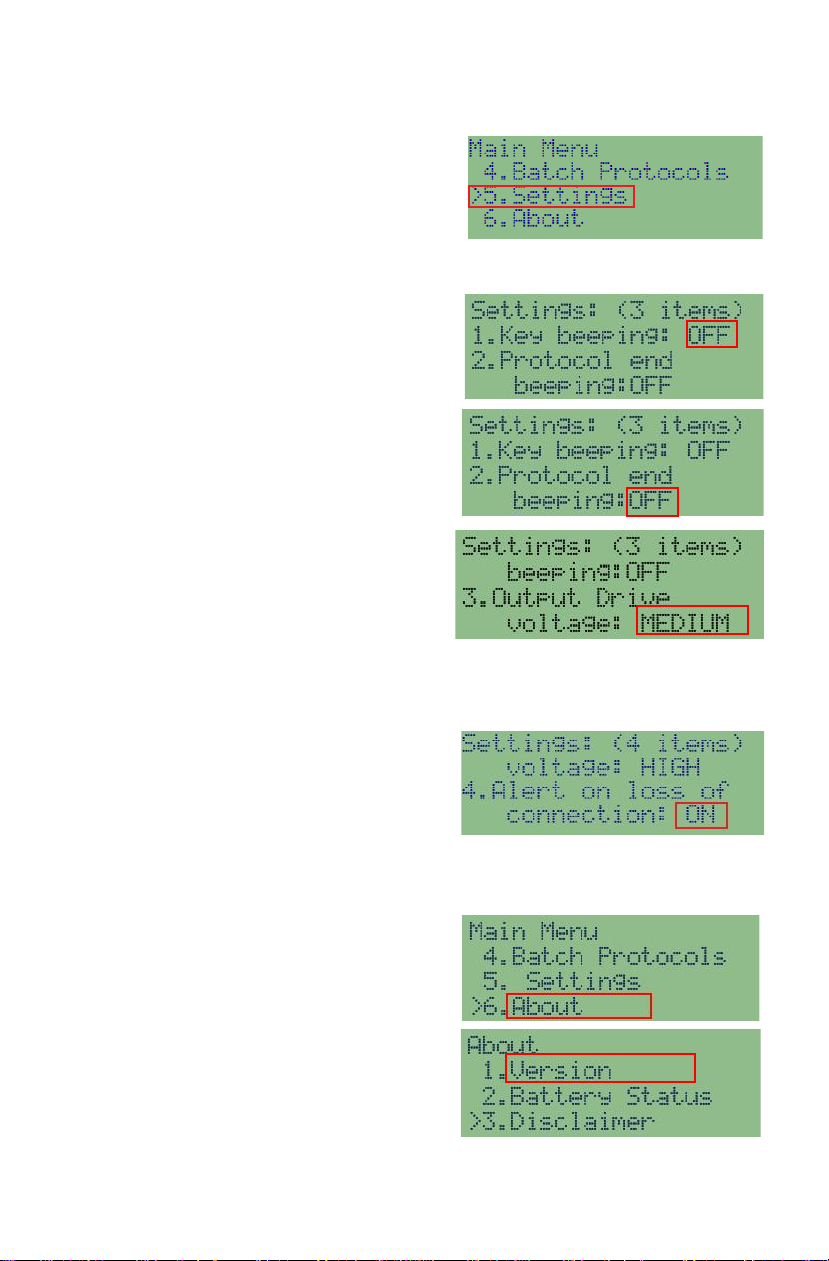
Settings – MAIN MENU
To change Settings: press the BACK arrow
to go to Main Menu and use the UP/DOWN
arrows to select Settings, then press the
RIGHT arrow to enter into the Settings
screen. Press the SET key multiple times
until the edit cursor has moved to the desired setting; use UP/DOWN to change
the value; Press SET key again when the new value is set.
To turn ON/OFF Key beeping: press the
Number SET key until the edit cursor has
moved to the ON/OFF of key beeping, use
UP/DOWN to change the value. Press SET
again when the new value is set.
To turn ON/OFF Protocol end beeping:
press the SET key until the edit cursor has
moved to the Protocol end beeping field,
use UP/DOWN to change the value. Press
SET to enter the new value.
To change the Output Drive: press the
SET key a couple of times to go to “3.
Output Drive”. Use UP/DOWN arrows to
change the value between HIGH,
MEDIUM AND LOW. Press SET.
If the user is sensitive to current, use “Low”. If the user has high skin resistance,
use “High”. The recommendation is to hydrate the patient and especially the
skin.
To change ON/OFF alert sound when the
output connections is lost: use the
UP/DOWN arrows to change the value.
The new settings will take effect after you press BACK arrow key to the Main Menu.
About
To go to About: press the LEFT arrow to go
to the Main Menu and use the DOWN arrow
key to scroll down to About and press the
RIGHT arrow key to enter into the About
screen.
Version: shows the hardware and firmware
information.
Battery Status: shows the battery voltage
Other manuals for Wellness
1
This manual suits for next models
1
Table of contents
Other MEND Technology Medical Equipment manuals


Popular Medical Equipment manuals by other brands


Getinge
Getinge Arjohuntleigh Nimbus 3 Professional Instructions for use

Mettler Electronics
Mettler Electronics Sonicator 730 Maintenance manual

Pressalit Care
Pressalit Care R1100 Mounting instruction

Denas MS
Denas MS DENAS-T operating manual

bort medical
bort medical ActiveColor quick guide

AccuVein
AccuVein AV400 user manual


