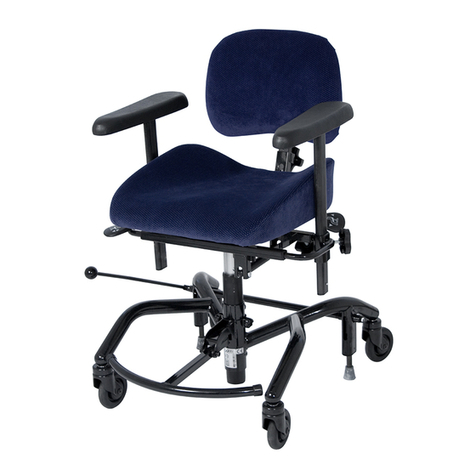
Mercado Medic REAL 9200 TWIN Assembly instructions

20-06583-UK-02
INSTRUCTIONS FOR USE AND CARE REAL 9200 TWIN
Doc. no: 20-06583-UK-02
Art. no: 805097
Amended 2020-12-04
Valid from 2007-06-01
Mercado Medic AB Telephone & Fax E-mail & Internet
SE-181 57 Lidingö Fax +46 (0)8-555 143 99 Internet www.mercado.se
REAL®9200 TWIN
REAL 9200 TWIN REAL 9200 TWIN EL
Sufficient competence in the safe use of this product is achieved by carefully reading
through these instructions for use and care before using the chair for the first time.
REAL 9200 TWIN is a Class I medical device. It is CE marked in accordance with the Swedish Medical Products
Agency’s code of statutes for medical devices, LVFS 2003:11, and has been tested and approved in accordance with
EN 1335-2, EN1335-3 and IEC 60601-1-2. All textiles used in the chair have been tested and approved in accordance
with EN 1021-1 and EN 1021-2.
Mercado Medic AB is certified to ISO 9001, ISO 14001 and ISO 13485 and complies with applicable labour and
environmental legislation.
If you have any questions about your product or if something unexpected has happened, please contact your dealer
first, otherwise you are welcome to contact us at Mercado Medic AB.
PDF versions of our instructions for use and care with magnification options can be found on our website:
www.mercado.se. Information is also provided on the website about accessories that can be installed on Mercado
Medic’s chairs, as well as any field safety notices, prescribing support or recalls of products and accessories.
We reserve the right to make changes to this manual and its contents.

20-06583-UK-02
IMPORTANT INFORMATION & CLASS ............................................PAGE 3
EXPECTED SERVICE LIFE.......................................................PAGE 3
CLEANING, CARE AND CHARGING ..............................................PAGE 4
USER MANUAL ................................................................PAGE 5
RECONDITIONING AND SERVICE ...............................................PAGE 6
CONTENTS

20-06583-UK-02
3
IMPORTANT INFORMATION & CLASS
The REAL chair has replaceable components, accessories and functions with setting options for individual custo-
misation. The chair must only be used by the person for whom it was prescribed and for the purpose for which it is
intended. The chair is intended for indoor use and must not be exposed to water, other fluids or chemicals. Nor should
it be exposed to high temperatures, prolonged and intense sunlight or other forms of radiation. The chair must not be
equipped with any accessories or components other than those approved by Mercado Medic AB. To maintain the CE
marking, modifications or changes must not be carried out without Mercado Medic AB’s approval. Repairs and other
technical measures may only be carried out by personnel authorised by Mercado Medic AB. Read this manual carefully
before using the chair for the first time.
NOTE! The electrical functions may be used for max. 10 % of the time (max. 6 mins/hour).
Exceeding this limit may result in damage to the chair.
EXPECTED SERVICE LIFE
The expected service life of the Product is ten years when used in accordance with the instructions in this manual.
The Product's date of manufacture can be found together with the serial number on one of the silver labels on the
Product's chassis, marked with Lev/Del and stated in the format YYWW (number of year and week).
As a user of the Product, you should contact your prescriber, technical aids centre or distributor if the Product
shows reduced or altered performance.
After the expected service life, it is important to make an overall assessment of the Product before continuing
to use it. After the expected service life, Mercado Medic AB cannot guarantee the suitability and safety of the
product, as Mercado Medic AB has no control over how the product has been used and wear and tear. The overall
assessment of the Product should be carried out by the healthcare organisation if the product is prescribed,
and, as a minimum, should take into account how the Product has been used, the condition of the Product and
its component parts, whether the Product has been reconditioned and been serviced, when this occurred, what
actions have been taken on these occasions and the reason for the actions.
In markets outside Sweden and Norway where a distributor has sold the Product directly to the user (where
applicable), and therefore there is no responsible prescriber, periodic maintenance must be carried out according
to instructions in the section Reconditioning and Service in addition to the overall assessment above.
After the expected service life, Mercado Medic AB cannot guarantee the provision of spare parts. CE marking is
not affected by expected service life.

20-06583-UK-02
4
The chair should be wiped down and kept free from dust and dirt.
Upholstery should be washed using a foam wash:
1. Remove loose dirt, crumbs and similar.
2. Apply a thin layer of foam and rub the foam in evenly with a damp cloth.
3. Wipe with a clean and lightly dampened cloth.
4. Vacuum clean when dry.
For functional reasons, seats, backrests and other padded parts are not made from impermeable materials.
Padded parts should be replaced during reconditioning for hygienic reasons.
The electric lifting mechanisms should be checked regularly for dust, dirt and stability; raise the seat to its
highest position. Clean with a cloth. Do not use any water or solvents. Then lubricate the cylinder using a thin
layer of Teflon or silicone-based grease.
The chair may only be charged using battery charger REAL 9000 type 2240-
12V, with article no. 802289. The battery should be charged regularly; once a
day if possible. It is important that the battery is never completely discharged, as
this helps to prolong the life of the battery. Connect the charging plug (1) on the
charger to the socket on the box with the rocker switch for raising and lowering the
chair. Then plug the charger’s plug (2) into a wall socket. The LED on the charger will indicate that charging
is under way. When the LED changes colour from yellow to green, the battery is fully charged. The chair can
be raised and lowered while charging is in progress. This applies to EL chairs delivered from week 11, 2013 or
previously delivered updated chairs.
NOTE! It is particularly important to charge the battery on chairs with electric brakes, electric tilt mechanisms
and electric backrest mechanisms because these functions require a high battery capacity to be maintained.
To avoid loss of function, charge the battery once a day. When changing the battery (type designation: FGV
20721 12V 7.2Ah), be sure to attach the battery cable marked as positive to the positive terminal on the
battery and the negative cable to the negative terminal. If the chair’s electrical functions stop working, this is
likely due to a blown fuse. Check the fuses in the fuse holders located under the seat on the cable between the
battery and the actuator. Replace the blown fuse with a new 25A fuse.
Bear in mind the following when handling batteries:
Never short-circuit the battery. • Do not throw the battery into fire. • Do not expose the battery to excessive
shocks. • In case of contact with battery acid, rinse with water for about 15 minutes. Seek medical advice. •
Batteries must be disposed of at appropriate recycling facilities.
CLEANING, CARE AND CHARGING
12

20-06583-UK-02
5
BACKREST
ARMRESTS
SEAT HEIGHT
Twin uses one type of backrest mechanism: Medic. The backrest mechanism has separate controls for setting the
height (1) and angle (2). Loosen the knobs on both backrest mechanisms, set the desired height/angle, and then
lock the knobs. The depth of the Medic backrest mechanism can be adjusted using the knob (3). The angle of
the backrest itself is adjusted using the lever (4).
NOTE! Make sure that the Medic backrest mechanism is adjusted in the bracket so the spring button clip locks
and the backrest mechanism cannot be pulled out.
3
2
4
1
Medic
The armrests are height and width adjustable and can be folded back. The height
is adjusted using the wheel (1). To lower the armrest: screw the wheel outwards. To
raise the armrest: lift the armrest to the desired height and then lock the wheel. The
width is adjusted using the wheel (2). Loosen the wheel, adjust and lock. To fold
the armrests up or down, use the knob (3). Pull out and fold back. The device locks
automatically when the armrest is folded back to the upright position. Automatic
locking can be prevented by turning the knob (3) a quarter turn.
1
23
TWIN EL
The seat height is adjusted using the rocker switch (1) under one of the
armrests. To raise the seat: press the top part of the switch. To lower
the seat: press the lower part of the switch. The seat height can also be
adjusted using a separate control unit (2). The left button raises the seat
and the right button lowers it.
TWIN MANUAL
The height is controlled by the lever (3) to one side of the armrest
(standard right). Lift the lever to change the height setting.
1
up
down
3
2
HANDBRAKE
The brake is controlled by a lever (1). To apply: move the lever forward.
The brake lever can be installed on either side of the chair.
NOTE! The brake on the chair must always be applied when getting in and
out of the chair. The brake must be checked on a regular basis. In case of
wear, change the brake rubber. The braking function may be reduced on
uneven surfaces.
When operating the electric brake:
press and hold the button (2) for at least one second.
1
2

20-06583-UK-02
6
RECONDITIONING AND SERVICE
! Important information for reconditioning and servicing REAL 9200 chairs (hereinafter referred to as the
Product):
- The Product does not require periodic maintenance in cases where it has a responsible prescriber in
the healthcare sector. In markets outside Sweden and Norway where a distributor has sold the Product
directly to the user (where applicable), and therefore there is no responsible prescriber, periodic
maintenance must be carried out every other year throughout the Product’s entire life cycle according to
sections 1-10 in this section.
- A thorough visual inspection must be performed of the Product’s main components in connection
with service and reconditioning in order to ensure the user’s safety. These include the base, lifting
mechanism, seat frame, back recliner and U-bars for armrests. The inspection must include welds,
lockable functions and settings.
- The user must not sit in the Product while it is being reconditioned or serviced or during maintenance.
- Do not use high pressure washers when cleaning the Product.
- When checking the base, always inspect the weld between the base’s front and rear legs. Any indication
of cracks in the material or paint in this area should be regarded as reason to replace the base, or the
Product.
- In case of reduced braking action, check both the stability of the base and the condition of the brake
rubber. If the Product is not resting on all four wheels in the unbraked position, the Product must be
withdrawn from service immediately. Check for instability in different locations and directions to rule out
the floor as the cause of any instability.
1. Electronics unit
1.1. Electronics/function/
cleaning
Check the electronics and see which
electrical functions are connected.
Test electrical functions; if the chair
does not work, try connecting the
charger for at least 10 seconds.
Check for any damage to the
electronics box.
1.2. Control unit / function /
cleaning
Check the functions of the controls,
and check that the housing is intact
and that all buttons are working.
Wipe the controls with a cloth lightly
dampened with disinfectant; this is
to avoid the risk of cross-infection.
Do not use solvents, bleach,
polishes, synthetic detergents,
polishing waxes or sprays on the
chair.
1.3. Connectors / attachment
Check that cables and connectors
are intact and properly secured.
Make sure that cables and
connectors cannot be pinched or
crushed.
1.4. Batteries/battery charger/
function
Check that the charger is working
and that the housing and cables are
undamaged.
Check the batteries’ voltage
and that there is not too great a
difference between the batteries’
charge; this indicates that a battery
cell has failed.
1.5. Electric seat tilt / function
Check that the actuator is not visibly
damaged. Check the function of the
actuator’s moving parts. Ensure that
all locking screws are tightened to
avoid any play in the end position.
1.6. Electric backrest / function
Check that the actuator is not visibly
damaged. Check the function of the
actuator’s moving parts. Ensure that
all locking screws are tightened to
avoid any play in the end position.
1.7. Electric brake / function
Check that the actuator is not visibly
damaged. Check the function of the
actuator’s moving parts. Ensure that
all locking screws are tightened to
avoid any play in the end position.
Check all joints and that the clamp
mounting on the brake shaft and
base tube is correctly positioned.
2. Electric lifting mechanism
2.1. Noise / sliding clutch
Listen for any abnormal noise in
the electric lifting mechanism,
and replace the electric lifting
mechanism if a bearing is defective
in any way. The electric lifting
mechanism can be sent to Mercado
Medic AB for repair/reconditioning.
Load the chair and check that the
electric lifting mechanism does not
slip to lowered. Otherwise ensure
the correct torque for the sliding
clutch.
2.2. Rotation lock / lubrication
Check that there is no play in
the electric lifting mechanism in
the direction of rotation. If there
is, replace the electric lifting
mechanism. The electric lifting
mechanism can be sent to Mercado
Medic AB for repair/reconditioning.
2.3. Attachment / tightening
Check that the seat frame and
base are correctly assembled and
tightened.
2.4. Cabling / wear
Inspect cables for any signs of wear,
pinching or crushing.
3. Chassis
3.1. Welds
Check all welds carefully for signs of
cracks, corrosion, movement, etc.
3.2. Bolted joints
Check and tighten all bolted joints.
Replace screws that have damaged
heads or threads.
4. Brakes
4.1. Function / wear
Replace the brake rubber and check
that the brake is working properly.

20-06583-UK-02
7
4.2. Plastic plugs / guide
bushings
Make sure that guide bushings and
plastic plugs are properly secured,
and replace worn or damaged parts.
5. Castors
5.1. Function / roll / swivel
Remove hair and dust from the
castors and check castors and
castor housings for wear and play,
which may indicate defective
bearings. Check that the castors
swivel and the housings rotate
as expected. Replace castors if
necessary.
5.2. Attachment / tightening
Check that the castors’ screws are
intact and tightened.
6. Seat frame
6.1. Mechanics / welds
Check all welded parts carefully
(especially when mounting tilt
mechanisms, as these parts carry
the most load).
6.2. Bolted joints / tightening
Check and tighten all bolted joints.
Replace screws that have damaged
heads or threads.
6.3. Plastic plugs / guide
bushings
Make sure that guide bushings and
plastic plugs are properly secured,
and replace worn or damaged parts.
6.4. Seat / replacement /
cleaning
Replace the seat with a new one
and wash or replace any covers.
6.5. Control / lubrication
Make sure that all knobs and wheels
on the seat frame are working and
that they lock correctly.
6.6. Gas spring tilt / function
If the chair is equipped with gas
tilt controls, check that these lock
securely and that there is no gradual
change in tilt when loaded. Check
and replace damaged wires and
sheaths.
6.7. Crank tilt controls / wear
If the chair is equipped with crank
tilt controls, check that there is
no play and that all screws are
tightened.
6.8. Coxit mechanism / control
Make sure that the knobs for the
flaps turn easily and are securely
locked with the counter nut.
7. Backrest mechanism
7.1. Function / wear
Check and replace any worn parts,
and make sure that moving parts
are working correctly.
7.2. Attachment / tightening
Check that all screws, knobs and
wheels lock properly and that the
spring button clips are working
correctly.
7.3. Plastic plugs / guide
bushings
Make sure that guide bushings and
plastic plugs are properly secured,
and replace worn or damaged parts.
7.4. Backrest / replacement /
cleaning
Replace the backrest with a new
one and wash or replace any covers.
7.5. Gas spring lever / function
Check the gas pressure and
stability of the gas spring. Ensure
that it locks securely and that
there is no gradual change in the
backrest angle when loaded. Check
and replace damaged wires and
sheaths.
8. Armrests
8.1. Function / wear
Check and replace any worn
parts and make sure that locking
mechanisms and moving parts are
working correctly.
8.2. Plastic plugs / guide
bushings
Make sure that guide bushings and
plastic plugs are properly secured,
and replace worn or damaged parts.
8.3. Armrest plates /
replacement / cleaning
Replace armrest plates with new
ones.
8.4. Armrest mechanics /
function
Check all welds and that there is
no damage to the tube system that
may impair or weaken the structure.
9. Accessories
9.1. Restoration
Remove any accessories that are
not normally installed on the chair
and inspect them as detailed below
before potentially placing them in
storage.
9.2. Mechanics
Check all welds and that there is no
damage to mechanical parts that
may impair or weaken the structure.
9.3. Function / wear
Check and replace any worn
parts and make sure that locking
mechanisms and moving parts are
working correctly.
9.4. Padded parts
Discard padded parts to prevent
cross-infection, and discard or
wash covers according to washing
instructions.
10. Final inspection
10.1. Testing
Test the chair’s functionality
and that all individual functions,
electrical functions and brakes are
working correctly. If the chair is
to be stored for a period, the chair
must be put in sleep mode using the
appropriate 9V adapter to save the
batteries.
RECONDITIONING, CONT.

20-06583-UK-02
Mercado Medic AB Telephone & Fax E-mail & Internet
SE-181 57 Lidingö Fax +46 (0)8-555 143 99 Internet www.mercado.se
CONTACT MERCADO
Head office
Visiting address
Tryffelslingan 14, SE-181 57 Lidingö
Postal address
Box 1074, SE-181 22 Lidingö
Switchboard is open: Mon-Fri 08.00-16.30 (CET/
CEST)
Tel: +46 (0)8-555 143 00
Fax: +46 (0)8-555 143 99
E-mail: info@mercado.se
Service and technical support
Telephone hours Mon-Fri
08.00-12.00 and 13.00-16.00 (CET/CEST)
Tel: +46 (0)8-555 143 08
Fax: +46 (0)8-555 143 99
Mobile phone: +46 (0)70-550 63 98
+46 (0)70-894 63 68
E-mail: [email protected]
[Space for product label with serial number.]
Other manuals for REAL 9200 TWIN
2
This manual suits for next models
1
Table of contents
Other Mercado Medic Indoor Furnishing manuals

Mercado Medic
Mercado Medic REAL 9500 Assembly instructions

Mercado Medic
Mercado Medic REAL 8100 PLUS EL Assembly instructions

Mercado Medic
Mercado Medic REAL 2000 Series Specification sheet

Mercado Medic
Mercado Medic REAL 9000 PLUS Series Assembly instructions

Mercado Medic
Mercado Medic SCRIBA User manual

Mercado Medic
Mercado Medic Real 2001 Assembly instructions

Mercado Medic
Mercado Medic REAL 9000 PLUS Series Assembly instructions

Mercado Medic
Mercado Medic REAL 9700 Coxit Assembly instructions

Mercado Medic
Mercado Medic REAL 9800 Coxit EL Assembly instructions

Mercado Medic
Mercado Medic SCRIBA User manual