Metalworks CATM11030 User manual
CATM - GBNLFE - v1.1 - 09102013 ®
7547511GBNLFE
2007 09 version 1.0
1
MANUAL - HANDLEIDING- MANUEL - MANUAL
HYDRAULIC BOTTLE JACK
HYDRAULISCHE FLESKRIK
CRIC BOUTEILLE HYDRAULIQUE
GATO HIDRÁULICO
Please read and keep for future reference
Gelieve te lezen en voor later gebruik bewaren
Veuillez lire et conserver pour usage ultérieur
Leer y salvar para uso posterior
NL
F
GB
E
Part n° : CATM11030 (754751103) - CATM11050 (754751105) - CATM11080 (754751108)-
CATM11112 (754751112) - CATM11200 (754751120) - CATM11300 (754751300)
MANUAL - HANDLEIDING - MODE D’EMPLOI - MANUAL
copyrighted document - all rights reserved by FBC

CATM - GBNLFE - v1.1 - 09102013
2007 09 version 1.0
7547511GBNLFE
2
Before use - Voor het gebruik - Avant l’usage - Antes de utilizar
NL
F
GB
E
CAUTION :
* Use only on a firm, level surface.
* Do not exceed the rated capacity of the jack
* This is a lifting device only. NEVER work under a vehicle without proper support devices such as axles stands (754753030(3 T) -
75476060 (6 T) 754751212 (12 T))
* Make sure that the lifting point is stable and correctly centred on the jack saddle.
* Familiarise yourself thoroughly with this manual before operating to prevent damage to the jack, property or personal injury
* Only lift the vehicle on the manufacturer as recommended jacking point to avoid damage.
OPGEPAST:
* Enkel te gebruiken op een vaste, effen ondergrond.
* De maximale capaciteit van de krik niet overschrijden
* Dit is enkel een heftoestel. Werk NOOIT onder een voertuig zonder voldoende hulpsteunen zoals garagestands (754753030(3 T) -
75476060 (6 T) 754751212 (12 T))
* Verzeker u ervan dat het hefpunt stabiel is en correct gecentreerd op het zadel van de krik.
* Maak u vertrouwd met deze handleiding alvorens de krik te gebruiken om schade aan de krik of eigendommen of een persoonlijk letsel te
vermijden.
* Hef het voertuig enkel op de door de fabricant aangegeven hefpunten om schade te vermijden.
ATTENTION:
* Seulement à utiliser sur un sol ferme et égal.
* Ne pas excéder la capacité maximale du cric
* Ceci est seulement un appareil de levage. JAMAIS travaillez sous la véhicule sans des supports de sécurité sans des chandelles
(754753030(3 T) -75476060 (6 T) 754751212 (12 T))
* Assurez-vous que le point de levage est stable et centré correctement sur la selle du cric.
* Familiarisez-vous avec le manuel avant d’user le cric pour éviter des dégâts au cric ou propriétés ou une blessure personnelle.
* Levez la véhicule seulement sur les points de levage indiqués par le fabricant pour évite des dégâts.
·ADVERTENCIA
* Lea el manual de instrucciones ANTES de utilizar el gato
* Asegúrese siempre de que el resto de personal esté suficientemente lejos de la carga que se levanta
* Este gato está concebido solamente para trabajos de elevación
* El gato debe colocarse en terreno llano y sólido
* Bloquee o calce siempre las ruedas y ponga el freno de mano del vehículo
* Utilice dispositivos adicionales de seguridad (tales como caballetes metálicos) para apoyar el vehículo antes de acceder por debajo del
mismo.
* No cargue el gato más allá de su capacidad máxima de carga
* Compruebe siempre que el gato esté en perfecto estado antes de utilizarlo y no ajuste la válvula de seguridad.
Specifications - Kenmerken - Spécifications - Datos technicos
Maintenance - Onderhoud - Maintenance - Mantenimiento
CODE Orig.N° Lifting Cap.
(T)
Min Height
(mm)
Lifting
Height (mm)
Adj. Height
(mm)
Net
Weight (kg.)
754751103 CATM11030 3 194 118 60 3,6
754751105 CATM11050 5 216 127 70 4,8
754751108 CATM11080 8 230 147 80 6,3
754751112 CATM11120 12 230 155 60 8
754751120 CATM11200 20 242 150 60 11,5
754751300 CATM11300 30 277 145 - 21,2
Adding oil/Lubrication
1.Place jack in upright position
2.Lower pump and piston to full
down position.
3.Remove rubber oil plug P
on jack
4. Fill with hydraulic oil to lower
rim of oil fill hole. Purge system
of air.
5. Replace rubber oil plug.
6. Lubricate pivoting joints and
screw extension periodically for
proper maintenance.
Keep piston, pump and
extension screw in full down
position when not in use.
Avoid contact with moisture. If
contact with moisture occurs,
wipe dry and grease/lubricate
all moving parts
Olie toevoegen/smering
1.Plaats de krik in horizontale
positie.
2. Duw pomp en zuiger volledig
naar beneden.
3. Verwijder oliedop P
4. Vul met hydraulische olie tot
de onderste ring van de open-
ing. Ontlucht het systeem.
5. Plaats de oliedop.
6. Smeer bewegende delen en
vijzel periodiek voor een goed
onderhoud.
Hou zuiger, pomp en vijzel
beneden waar niet in gebruik.
Vermijdt contact met vochtig-
heid. Indien dit toch gebeurt,
wrijf droog en smeer alle
bewegende onderdelen
Ajouter l’huile/graisse
1. Mettez le cric en position
horizontale
2. Pousser la pompe et position
complètement vers le bas.
3.Enlever le bouchon d’huile P
4. Remplisser avec l’huile
hydrauliqe jusqu’à la bague
la plus basse de l’ouverture.
Purger le système.
5. Remetter le bouchon
6. Graisser les pices mouvan-
tes et vis extensible pour une
bonne maintenance.
Tener piston, pompe et vis ex-
tensible toujours en bas si vous
n’utilisez pas le cric. Eviter
contact avec l’humidité. Si
c’est le cas sècher et graissez
les pièces mobiles
P
NL F
GB E
1.Coloque el gato en posición
vertical
2.Baje la bomba y el pistón hasta su
posición más baja
3.Retire el tapón del aceite de goma
del lateral del gato
4.Rellene con aceite hidráulico de
buena calidad hasta la marca más
baja del agujero de rellenado, y
purgue el sistema de aire tal como
se describe más abajo.
5.Coloque de nuevo el tapón del
aceite de goma
6.Lubrique los puntos giratorios y
el tornillo de extensión de forma
regular
7.Mantenga cerrados el pistón, la
bomba y el tornillo de extensión
cuando no estén en uso
8.Evite el contacto con la humedad;
si se produjera el contacto, limpie
cuidadosamente y engrase/lubrique
todas las piezas móviles.
80
22,3180285
5,7
10,8
7,3
copyrighted document - all rights reserved by FBC
CATM - GBNLFE - v1.1 - 09102013 ®
7547511GBNLFE
2007 09 version 1.0
3
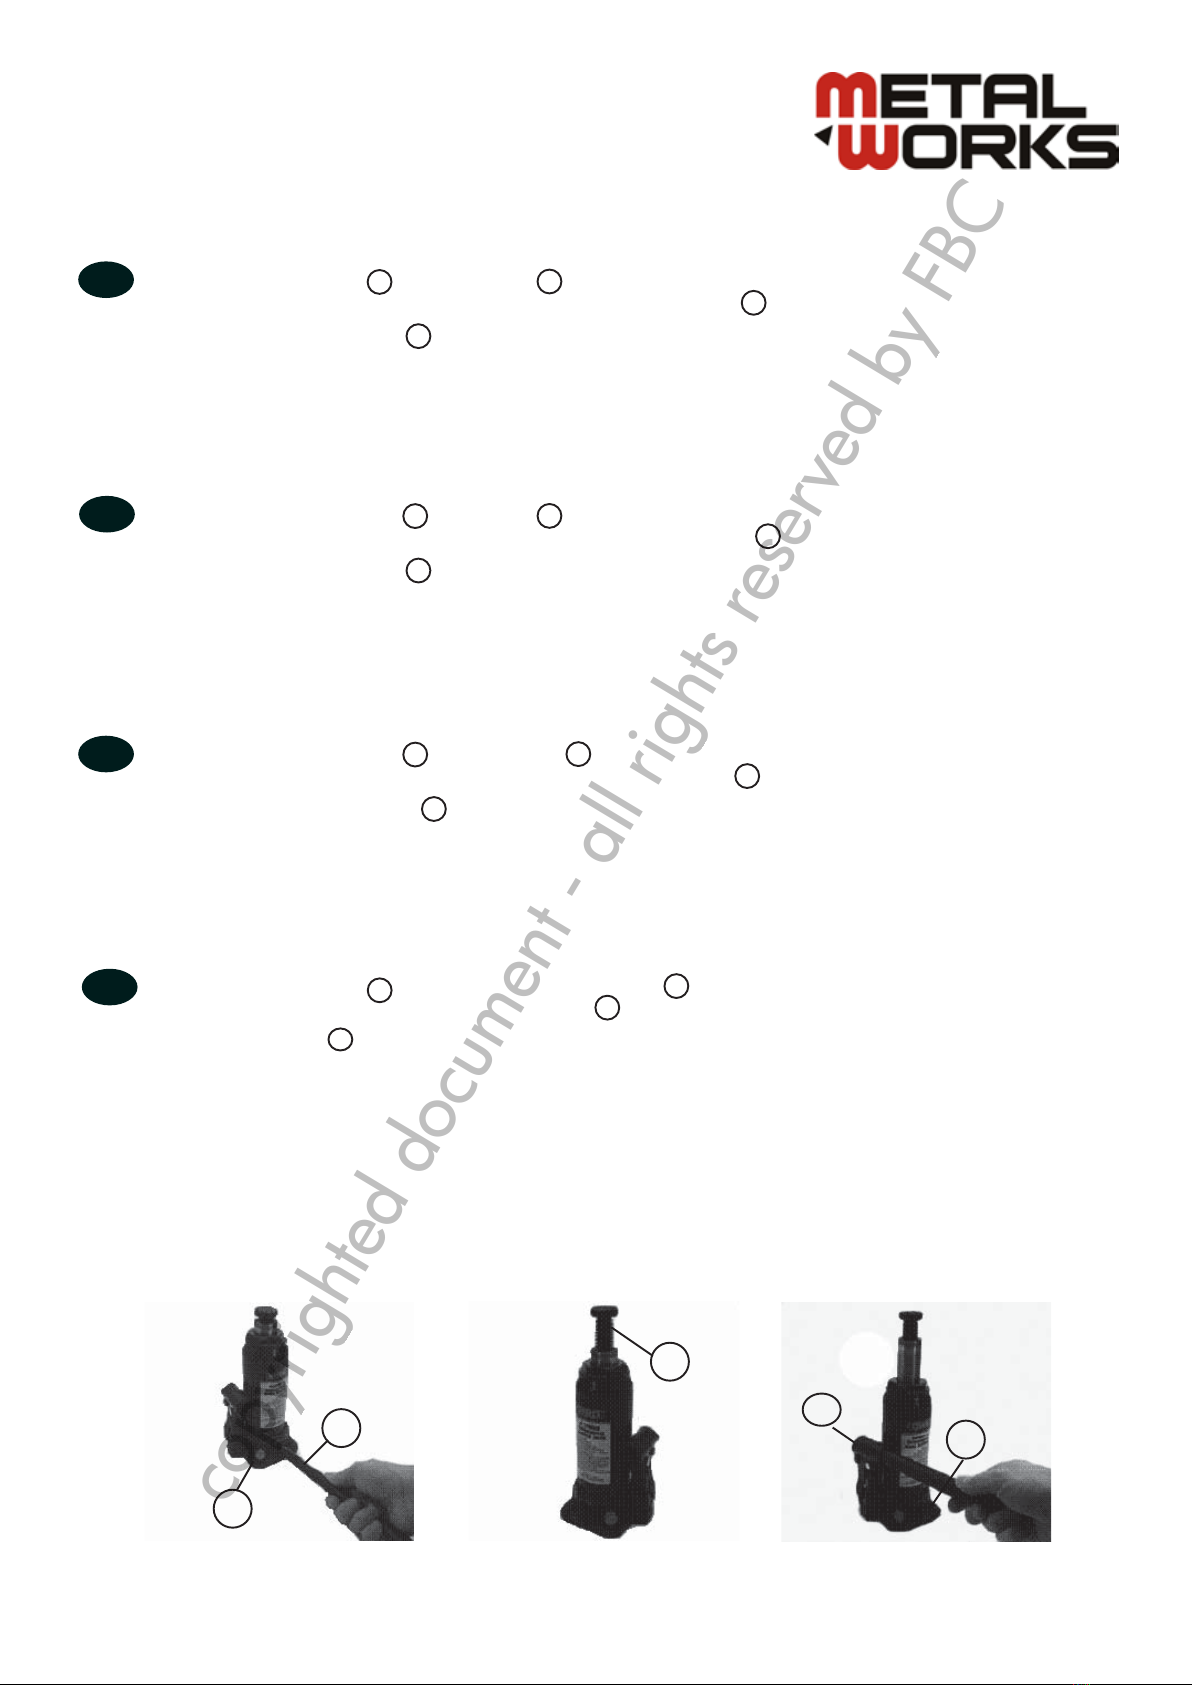
-TO RAISE:
I. With narrow end of jack handle ,close release valve tightly by turning it clockwise. (Fig.1).
2. Place jack under vehicle at proper lifting location. If needed, turn the extension screw on jack counterclockwise until it comes into
contact with vehicle. (Fig.2).
3. Insert jack handle into handle socket , pump the handle to lift vehicle to desired height. (Fig. 3).
-TO LOWER:
CAUTION: Lower vehicle slowly! Turn release valve slowly.
I. Remove handle, use small end to open release valve. (To open release valve turn it SLOWLY in a counter clockwise direction.)
NOTE: Do not open release valve more than ONE full turn.
2. When vehicle is fully lowered, remove jack. (If extension screw has been extended, turn it clockwise until it retracts enough to move jack
away from vehicle)
Use - Gebruik - Usage - Uso
NL
F
GB
E
Fig 1 Fig 2 Fig 3
E
A
B
C
D
D
A B
C
-OM TE HEFFEN :
I. Plaats hendel in de voorziene plaats ,sluit het ventiel door het voorzichting in wijzerszin te draaien. (Fig.1).
2. Plaats de krik onder het voertuig op een effen oppervlak, indien nodig draai de regelvijs tegenwijzerszin tot het in contact komt met
het voertuig. (Fig.2).
3. Steek de hendel in de hendelsteun , pomp met de hendel het voertuig tot op de gewenste hoogte. (Fig. 3).
-OM TE ZAKKEN :
OPGEPAST : Laat het voertuig langzaam zakken ! Draai het ventiel voorzichtig open.
I. Verwijder de hendel, gebruik de smalle kant om het ventiel te openen. (Voorzichtig draaien in tegenwijzerszin.)
NOOT: Het ventiel niet meer dan EEN toer openen.
2. Wanneer het voertuig volledig gezakt is, de cric verwijderen. (Indien de regelvijs uitgedraaid werd, deze in wijzerszin terug indraaien en
de cric vanonder het voertuig halen)
D
A B
C
-POUR LEVER :
I. Mettez le levier dans la place prévue ,fermez la soupape en tournant prudemment dans le sens d’aiguille d’une montre. (Fig.1).
2. Placez le cric sous la véhicule sur un sol égal, si nécessaire tournez le vis de réglage en contre-sens d’aiguille jusqu’au contact
avec la véhicule. (Fig.2).
3. Placez le levier dans le support-levier , pompez avec le levier le véhicule jusqu’à la hauteur souhaitée. (Fig. 3).
-POUR BAISSER :
ATTENTION : Laissez baisser le véhicule lentement ! Ouvrez la soupape soigneusement.
I. Enlevez le levier, utlisez la côté mince pour ouvrir la soupape (Tournez soigneusement en contre-sens d’aiguille.)
NOTE: Jamais ouvrir la soupape plus d’ UN tour.
2. Si la véhicule est baissée complètement, enlevez le cric. (Si le vis de réglage a été tourné, tournez-le dans le sens d’aiguille en enlevez
le cric de la véhicule)
D
A B
C
- PARA ELEVAR:
1.Con el extremo estrecho del mango del gato, cierre la válvula de purga girándola en el sentido de las agujas del reloj (imagen 1)
2. Coloque el gato debajo del vehículo en un punto adecuado para elevarlo (compruebe el manual del vehículo para más detalles). Si es necesario, gire
el tornillo de extensión del gato en el sentido contrario al de las agujas del reloj hasta que entre en contacto con el punto de elevación (imagen 2).
3. Introduzca el mango del gato en la rosca del mango y bombee el mango hasta alcanzar la altura necesaria (imagen 3).
-
PARA BAJAR: (ATENCIÓN: BAJE EL VEHÍCULO LENTAMENTE – GIRE LA VÁLVULA DE PURGA LENTAMENTE)
1. Retire el mango del gato, utilice el extremo pequeño para abrir la válvula de purga girándola LENTAMENTE en dirección contraria al de las agujas del reloj.
NO ABRA LA VÁLVULA DE PURGA MÁS DE UN GIRO COMPLETO.
2. Cuando el vehículo esté completamente bajado, saque el gato. Si el tornillo de extensión ha sido alargado, gírelo en el sentido de las agujas del reloj hasta
que quede completamente recogido
D
A B
C
copyrighted document - all rights reserved by FBC
CATM - GBNLFE - v1.1 - 09102013
Fabrikant/Invoerder
Fabricant/Importateur
Manufacturer/Retailer
Fabricante/Importador
Verklaart hierbij dat het volgende product :
Déclare par ceci que le produit suivant :
Hereby declares that the following product :
Declara que los siguientes productos:
Product
Produit
Product
Producto
Hyraulische eskrik
Cric bouteille hydraulique
Hydraulic bottle jack
Gato hidráulico
Order nr. :
Geldende CE-richtlijnen
Normes CE en vigueur
Relevant EU directives
Normativas de la CE
2006/42/EC
EN 1494/A1:2008
Overeenstemt met de bestemming van de hierboven aangeduide richtlijnen - met inbegrip van
deze betreffende het tijdstip van de verklaring der geldende veranderingen.
Répond aux normes générales caractérisées plus haut, y compris celles dont la date correspond
aux modications en vigueur.
Meets the provisions of the aforementioned directive, including, any amendments valid at the
time of this statement.
Cumple las disposiciones de dicha Directiva, incluyendo las modicaciones vigentes en el
momento de esta declaración.
Test report reference: 70135300601-01 - 70135300601-02
70135300602-01 - 70135300602-02
70135302301-01 - 70135302301-02
Bart Vynckier, Director
VYNCKIER TOOLS NV
Aslak S.L.
Salvador Gil i Vernet, 5
Pol. Ind. Can Torres i Can Llobet
ES-08192 Sant Quirze del Vallès - Barcelona
Vynckier Tools nv.
Avenue Patrick Wagnon, 7
ZAEM de Haureu
B-7700 Mouscron - Moeskroen
EG conformiteitsverklaring
Déclaration de conformité CE
EC declaration of conformity
Declaración de conformidad según la CE
CATM11030 (754751103) - CATM11050 (754751105)
CATM11080 (754751108) - CATM11120 (754751112)
CATM11200 (754751120) - CATM11300 (754751300)
FR
EN
NL
ES
Moeskroen/Mouscron, 09/10/2013
copyrighted document - all rights reserved by FBC
This manual suits for next models
11
Other Metalworks Jack manuals


Popular Jack manuals by other brands

Pittsburgh
Pittsburgh 62590 Owner's manual & safety instructions

Powerbuilt
Powerbuilt 640405 Operating and maintenance instruction manual

Clarke
Clarke STRONG-ARM CTJ3000G quick start guide

Clarke
Clarke CTJ2500QLG Operating & maintenance instructions

Omega Lift Equipment
Omega Lift Equipment 18122C Operating instructions & parts manual

Pittsburgh
Pittsburgh 58816 Owner's manual & safety instructions


