Metcalfe SP-50 User manual

0 | P a g e
METCALFE SP-50
(5 Litre Heavy Duty Mixer)
Installation and Operating Instructions

1 | P a g e
INDEX
YOUR MIXER....................................................................................................... 2
TECHNICAL DATA SHEET...................................................................................... 3
INSTALLATION.................................................................................................... 4
ELECTRICAL CONNECTION………............................................................................. 4
BEFORE USING THE MIXER................................................................................... 4
THERMAL OVERLOAD PROTECTION........................................................................ 5
FITTING THE BOWL............................................................................................. 5
BOWL LIFT & BOWL GUARD.................................................................................. 5
ATTACHMENT SELECTION..................................................................................... 5
FITTING MIXING TOOL......................................................................................... 6
SPEED SELECTION.............................................................................................. 6
CONTROLS......................................................................................................... 6
OPERATION................................................................................................... 7 - 9
CLEANING........................................................................................................ 10
CAPACITY......................................................................................................... 11
MAINTENANCE.................................................................................................. 11
TROUBLESHOOTING.......................................................................................... 12
SPARES & SERVICE............................................................................................ 14
BREAKDOWN DRAWINGS & PART LISTS......................................................... 15 - 21
WIRING DIAGRAM............................................................................................. 22
WARRANTY TERMS............................................................................................ 23
NOTES....................................................................................................... 24 - 26
ELECTRICAL PAT TEST CERTIFICATE.................................................................... 27

2 | P a g e
YOUR MIXER
Speed
Selector
Attachment Hub
Bowl Lift
Handle
Bowl Guard
Bowl Handle Bowl Cradle
Bowl Ingredients Chute Bowl Locking Handle

3 | P a g e
METCALFE SP-50 (5 Litre Heavy Duty Mixer)
The Metcalfe SP-50 (5 Litre) has a total bowl capacity of 5 litres. The 3 mixing tools
provided ensure that all mixing requirements are met.
FEATURES
• Ten speeds (40, 70, 90, 106, 140, 170, 190, 210, 230, and 260 rpm).
• Electronic speed and load control
• Durable, NSF Approved, white powder coating
• Rigid cast aluminium body
• Polycarbonate splash cover with ingredient chute
• All stainless steel attachments
• Dual bowl clamps to lock bowl down
• Heavy duty motor, 800 watts
• Gear-driven, high torque transmission and motor
• Permanently lubricated transmission
• Thermal overload protection
• Attachment hub
• Easy action bowl lift
• Six foot cord with plug
TECHNICAL SPECIFICATIONS
Weight
(kg)
Capacity
(Litres)
Electrical
Supply
Power
(Watt)
Dimensions
(mm) H x W x D
16
5
230V 50Hz
750 W
455 x 370 x 470

4 | P a g e
INSTALLATION
The machine is lubricated and ready to run. It can be positioned on
any substantial work surface or bench which is capable of supporting
a load of 25kg. For stable operation, please punch holes on the table
and fix the SP-50 into place securing it with four screws, please see
figure 1.
The unit weighs 15kg and transportation should require two
people, please see figure 2.
ELECTRICAL CONNECTION
Before connecting this machine to the electrical supply, check that the details on the rating
plate (located on the rear of the machine) correspond to the details of your electrical
connection. The mixer is supplied with a trailing lead fitted with a molded plug. If the style
of plug is unsuitable for the socket you plan to use, the plug must be cut off and replaced
with an appropriate plug.
The mixer should be plugged into a switched socket which isolates all poles and has a
minimum contact clearance of 3mm and located close to the mixer for use in an emergency
and enable the machine to be serviced. (Max. 2 meters of cable).
If the electrical supply cable to the machine becomes damaged, it must be replaced by a
qualified electrician, using cable which is 1.0 or higher and suitable for a 750W motor load.
The earth wire is fixed to the machine and this connection must be kept intact. This mixer
can be stood on a stable, non-resonating working table of a height of between 600 and
900 mm.
BEFORE USING THE MIXER
Before using the mixer, please ensure that all users are familiar with the correct operation
of the machine.
In particular, care should be taken to ensure that the bowl and mixing tools are correctly
fitted and that the bowl guard is in position prior to starting the machine.

5 | P a g e
IMPORTANT INFORMATION
THERMAL OVERLOAD PROTECTION
The thermal overload protection (circuit breaker) will shut off and stop the machine
automatically. If this occurs, please turn the ON/OFF speed selector button to 0 –OFF position
and reduce the batch size. After waiting 1 –2 minutes, turn the ON/OFF speed selector to ON
position. The thermal overload protection is an automatic reset device.
Note: if the circuit breaker overloads frequently and shuts off the machine,
please replace the circuit breaker.
FITTING THE BOWL
With the bowl cradle lowered, place the chosen attachment in the bowl and position the bowl
on the cradle. There are three locational points for the bowl.
1. The locking pin at the rear of the bowl should locate in the hole of the cradle.
2. The two weld clips in the bowl handles must engage on the locating pins located on
the cradle.
3. Levers (latches) which lock the bowl into position.
BOWL LIFT & BOWL GUARD
The bowl cradle and bowl guard are electrically interlocked so that the machine will only
operate with the bowl cradle in the raised position.
In addition to this, the bowl guard must be placed into position by aligning its two pins into
the two small holes on both sides of the bowl. Only once the bowl is raised and the bowl guard
locks, can the machine operate. This ensures complete operator safety at all times.
To start mixing, raise the bowl lift handle 180 degrees in an anti-clockwise direction to the
top. Once mixing is finished, turn off the machine and lower down the bowl handle in the
clockwise direction. During the mixing process, additional ingredients can be added by the
chute located on the right hand side of the bowl guard.
ATTACHMENT SELECTION
The beater, whisk and dough hook are meant for the work implied by their names. Do not use
the beater for dough making or the whisk for anything other than whisking, aerating or mixing
light mixtures. Below table shows the typical uses for each of the tools.
Beater: Firm mixes such as light pastry,
cakes, biscuits, icing, fillings & mashed
vegetables.
Dough Hook: Heavy mixes such as
dough, pie pastry and sausage meat.
Whisk: Light mixes such as whipped
cream, mayonnaise, egg whites,
pancakes and soufflés.

6 | P a g e
SPEED SELECTIONS
To start the mixer, please turn the selector button in a clockwise direction starting from 0.
The speed selected depends largely on the quantity and consistency of the product. It is
recommended that the mixing should always be started at the lowest speed and progressively
increase to the desired setting. Turn the selector button clockwise to increase the speed, and
anti-clockwise to decrease. To stop the mixer, please turn the selector back to 0. The below
table shows the recommended speed for the attachment supplied.
1
2
3
4
5
6
7
8
9
10
Note: Do not force the button ON-OFF as this may damage the potentiometer.
CONTROLS
Speed Selector Button
Position 0: OFF
Position 1-3: Low speeds (Dough Hook)
Position 4–7: Medium speeds (Beater)
Position 7-10: High speeds (Whisk)

7 | P a g e
OPERATION
TO AVOID SERIOUS PERSONAL INJURY:
• DO NOT operate the mixer before reading the instruction manual first.
• ALWAYS disconnect or unplug electrical power before cleaning, servicing or adjusting any
parts or attachments.
• NEVER bypass, alter, modify or attach any unauthorized parts to this equipment.
Doing so may create hazards and will void warranty.
• NEVER operate mixer with a damaged power cord or plug.
• ALWAYS keep hands, hair and clothing away from moving parts.
NOTE: Wash all attachments and bowl prior to use.
ATTACHING THE BOWL TO THE MIXER
NOTE: Install the bowl BEFORE attaching the agitators.
1. Lower the bowl by pushing the bowl lift lever backwards and down to its resting position.
2. Lift the bowl by the bowl handle and
A. slowly position the locking pin (located on the rear of the bowl) into the hole in the
middle rear of the cradle.
B. lower the bowl onto the pins located on either side of the bowl cradle.
3. Once the bowl is positioned on the cradle, secure the bowl by pulling both bowl clamps
forward until the bowl is locked tight.
ATTACHING THE ATTACHMENT TO THE MIXER (i.e., Beater, Dough Hook, Whip)
NOTE: It is easier to install the attachment prior to adding the ingredients into the bowl.
1. The bowl must be installed, lowered into position and the splash cover should be removed.
2. Slide the attachment slowly upwards onto the planetary shaft fitting the shaft pin through
the slot in the agitator.
3. Rotate the attachment clockwise to secure it onto the planetary shaft.
NOTE: After cleaning, make sure to wipe the shaft with Vaseline or vegetable oil for better
lubrication and to prevent breakdown of shaft and its parts. DO NOT use any lubricant that
can be harmful to humans to ingest as some lubricants may come in contact with some mixing
processes.

8 | P a g e
MIXING INGREDIENTS
Follow the capacity chart located on page 11
Overloading or not following this chart will damage the mixer and void the warranty
IMPORTANT: Make sure the speed control dial is in the off position.
1. Add the appropriate mixing ingredients into the bowl.
2. If desired, place the bowl guard on top of the bowl and align the pins on the guard with the
holes on the rim of the bowl (see Fig. 8-1 and 8-2).
Note: In order for the SP50 mixer to operate, the bowl guard must be in place and clicked into
locked position.
3. Lift completely up on the bowl lift lever until the bowl locks into position.
4. Select the appropriate speed setting by rotating the speed selector knob clockwise starting
from 0. To increase mixer speed, continue turning the selector button clockwise to desired
speed.
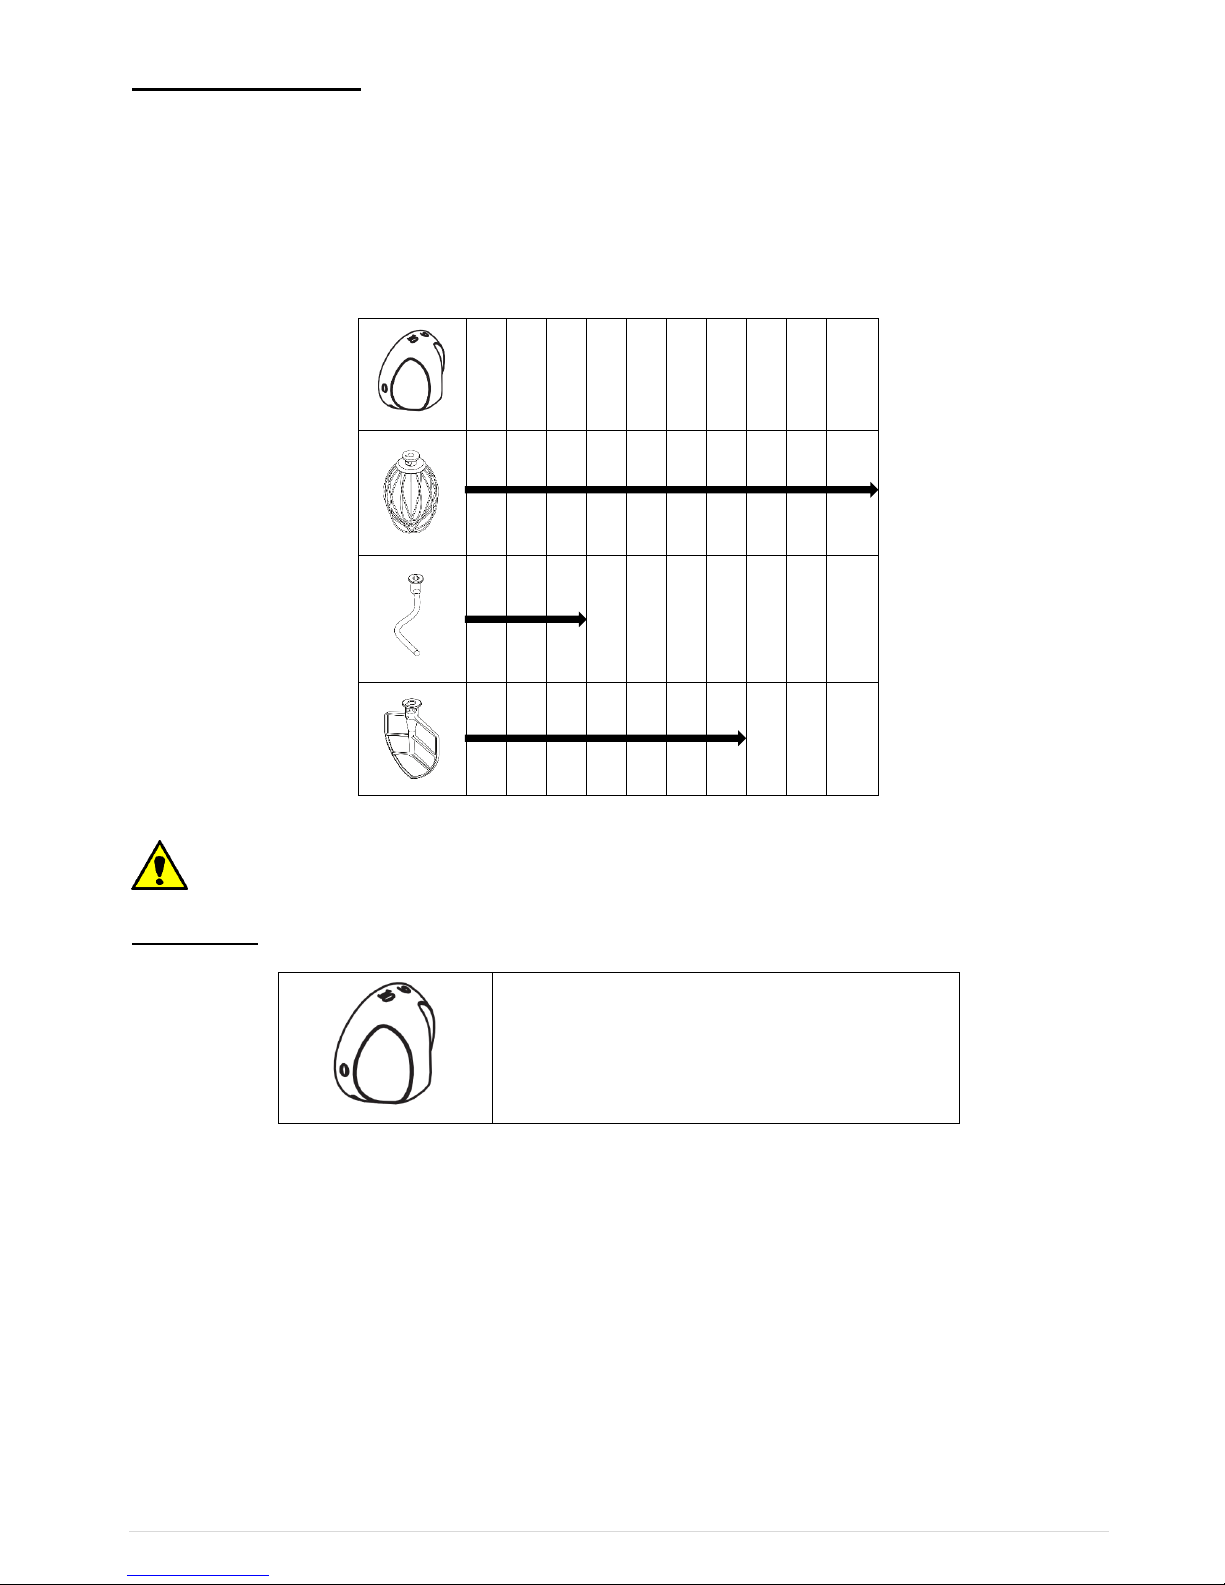
Recommended speeds while mixing:
Position Speed Attachment Product Type/Ingredient
1 (stir) All Start to incorporate ingredients
2 (low) Dough Hook Heavy: mixing pizza, bread, pasta,
stuffing and donut dough’s, cake,
batter, mashed potatoes, etc.
3-7 (medium) Beater Medium: 2nd stage of mixing for
donut dough, etc.
8-10 (high) Whip Light: whipping cream, egg whites,
meringue, mousse, pancake mix,
sponge cakes, etc.
IMPORTANT: When mixing product always follow the recommended agitator and
speed setting according to the capacity chart located on page 12 of this manual.
Always STOP the mixer BEFORE changing or fitting accessories! Failure
to do so may cause harm to the operator; it may also damage the gears
or other parts and WILL void the warranty!
5. During the mixing process, additional ingredients can be added to the mixture using the
food chute located on the splash cover.
6. To turn off the mixer, turn the variable speed control counter clockwise until the dial is
aligned with the selector notch to the zero “0” position and the mixer turns off
NOTE: If the mixer shuts off during operation, return the speed control dial back to the zero
“0” position.

9 | P a g e
NOTE: The mixer is equipped with a manual motor reset on the back column. Reduce the
batch size and wait approximately five minutes, press the reset button and then continue
mixing.
7. When the ingredients have been thoroughly mixed, rotate the speed selector knob and
begin turning the speed control dial counter clockwise to the zero “0” position.
8. Lower the bowl by pushing the bowl lift lever backwards and down to its resting position.
9. Remove the guard by lifting it off the bowl.
10. Remove the attachment from the planetary shaft by lifting it upwards then rotating it
counter clockwise until it is unlocked. Lower the attachment and remove from the planetary
shaft.
11. Push each bowl clamp backwards to unlock the bowl from the bowl cradle.
12. Lift up slightly on the bowl so it clears the pins on the bowl cradle.

10 | P a g e
CLEANING INSTRUCTIONS
It is essential to clean the unit at least once a day, or at the end of each operation period.
ALWAYS unplug the mixer before cleaning.
• FOLLOW the supplier’s instruction on all detergents. Clean mixer, attachments and parts
thoroughly after use. Lubricate moving parts appropriately with Vaseline or vegetable oil, after
wash-down, for better lubrication and to prevent breakdown of shaft and its parts.
• DO NOT use any lubricant that can be harmful to humans to ingest as some lubricants may
come in contact with some mixing processes.
• DO NOT hose down, immerse or pressure wash any part of the mixer.
• NEVER use a scrubber pad, steel wool or abrasive material to clean the mixer.
• NEVER use bleach (sodium hypochlorite) or bleach based cleaner.
• ALWAYS remove the attachment after each batch. If not, the attachment can become stuck
on the shaft and be difficult to remove.
The entire mixer, including removable parts, must be thoroughly cleaned
and sanitized.
It is extremely important to sanitize the mixer and to follow the instructions
on the quaternary sanitizer container to ensure proper sanitation is
achieved.
ALWAYS DISCONNECT OR UNPLUG THE ELECTRICAL POWER FROM THE
MIXER BEFORE CLEANING. RECOMMENDED CLEANING.
Part
Required Action
Frequency
Attachments
Hand-wash using mild soap and water, rinse, dry and
sanitize.
(Note: That the hook, beater and whisk are NOT dish
washer safe.
Clean after each use.
Bowl
Using a scrubber pad, mild soap and water, apply
pressure to ensure the bowl is clean, rinse, dry and
sanitize. The bowl can also be placed in a dishwasher for
cleaning.
Clean after each use.
Splash Cover
Hand-wash using mild soap and water, rinse, dry and
sanitize.
Clean after each use.
Bowl Cradle
Hand-wash using mild soap and water, rinse, dry and
sanitize. Daily Planetary Shaft Wipe with clean damp
cloth, dry and sanitize then lubricate
Daily
Planetary Shaft
Wipe with clean damp cloth, dry and sanitize then
lubricate.
Clean after each use.
Exterior
Hand-wash using mild soap and water, rinse, dry and
sanitize. DO NOT use a water hose and NEVER immerse
in water!
Daily
DO NOT USE CLEANING MATERIALS CONTAINING ABRASIVES OR BLEACHES

11 | P a g e
CAPACITY
The below table lists the recommended capacities of finished weights of regular mixes.
Although the machine may be capable of mixing larger quantities, it will lead to excessive and
premature wear and possible failure. Overloading also results in lengthy processes and
unsatisfactory results.
Product
Maximum Regular Mix (kg)
Whisk
Beater
Dough
Hook
Meringues
10 egg whites
*
Sponge Cake
12 egg whites
*
Stiffly Beaten Egg Whites
12 egg whites
*
Chantilly Cream
1L Liquid cream
*
Chocolate Mousse
500g powder
*
Pancake Mix
1.5L milk
*
Confectioner’s Pastry Cream
1kg powder
*
Choux Pastry
600g flour
*
Shortcrust Pastry
750g flour
*
Sweet Pastry
750g flour
*
Croissants
750g flour
*
Brioche
750g flour
*
Choux Pastry
600g flour
*
Sweet Pastry
750g flour
*
60% Bread Dough
750g flour
*
Pizza
400g flour
*
Stuffing
1Kg
*
Sausage Meat
1Kg
*
Dough
1Kg
*
1. Recommended weight for finished mix rules unless otherwise stated.
2. Water content e.g. 250g water / 500g flour = 50% moisture.
3. For pizza dough with lower moisture content consult Metcalfe Catering Equipment.
4. For higher gluten flour reduce dough batch by 25%.
Note: Too large a quantity is always detrimental to the quality of the work and the life
of the mechanical parts of the beater and may lead to abrupt stoppage.
MAINTENANCE
Regular maintenance is necessary on all machines if they are to remain in good working
order. It is strongly recommended that this be carried out by a trained technician on a
regular basis.
ON A REGULAR BASIS
Clean the machine thoroughly after use and lubricate the rods with Vaseline or lubrication oil
on which the bowl cradle slides. After cleaning the beater shaft, please wipe and lightly
lubricate the beater shaft with Vaseline to prevent rusting. (See CARE OF MIXER)
ON AN ANNUAL BASIS
Check that all bolts are tight and bowl guard is secure

12 | P a g e
TROUBLESHOOTING
Problem
Possible Cause
Action Required
Mixer will not start / run
Power not connected properly.
Check all power connections.
Plug into a live socket. (Do not
use extension cord!) Test
socket with another item.
Building circuit breaker off.
Check breaker box.
Internal motor overload tripped.
Press the motor reset button
on back column.
Mixer speed dial is not set to zero
(0).
Move mixer speed dial back to
zero (0) then speed can be
moved up.
Mixer stops during mixing
Internal motor overload tripped.
Motor overheated.
Press the motor reset button
on back column, Wait five (5)
minutes before restarting.
Mixer is noisy
Mixer is not installed on level
surface.
Adjust surface or relocate
mixer.
Bowl not seated correctly or
clamps not in place.
Ensure bowl is seated into
bowl cradle correctly and bowl
clamps are locked into place.
Attachment not fitted properly.
Remove and re-attached
attachment into position
correctly.
Overloading bowl.
Reduce batch size. (See
capacity)
Mixer time is too long
Batch size too small.
Increase batch size.
Incorrect recipe portions or
temperatures.
Bowl raise sticking or not
operational
Lack of lubrication and/ or cleaning
of bowl slides.
Hand wash using mild soap
and water, dry and lubricate
bowl slides with mineral oil or
food quality grease. If still
sticking, a technician must
clean bowl rise mechanism.
One or more gears not working
Damaged or broken gear.
Technician to replace gear.
Attachments touching bottom
or side of bowl
Defective or dented bowl.
Remove dents or replace bowl
Defective attachment.
Replace attachments.
Broken Whisk Wires
Batch size too large for mixer.
Items too firm, speed to high.
Reduce batch size. (See
capacity) Adjust recipe.
Reduce speed.
Hand utensil dropped into bowl
while mixing.
Stop mixer before working on
mixture.
Broken Beater
Ingredients too cold or too large
(e.g. frozen butter, cream cheese
cut in chunks).
Wait for ingredients to reach
rooms temperature before
mixing. Reduce chunk size.
Broken Dough Hook
Batch size too large for mixer.
Reduce batch size. Adjust
recipe.
Ingredients too cold or too large.
Wait for ingredients to reach
room temperature before
mixing. Reduce chunk size.
Discoloration of mixed product
Bowl has not been thoroughly
cleaned.
Clean the bowl again using a
scrubber pad and applying
pressure (refer to page 8).
Attachments won’t go onto the
planetary shaft easily
Lack of lubrication and/or cleaning
of planetary shaft.
Wipe planetary shaft with
clean damp cloth and
lubricate the shaft with
mineral oil or food quality
grease.

13 | P a g e
. It is recommended that any servicing or maintenance work must be carried out by a trained
technician or electrician.
. Isolate the mixer from the electricity supply by removing the plug from the socket before
cleaning or servicing.
. Isolate the mixer from the electricity supply by removing the plug from the socket.

14 | P a g e
SPARE PARTS AND SERVICE
For more information on Metcalfe Spares / Accessories and Service Support, please always
quote the Serial Number of the machine. This can be found on the serial number plate (as
shown below)
Contact us on the details below;
Metcalfe Sales & Spares Dept Tel: 01766 830 456 - Opt 1
Email: enquires@metcalfecatering.com
Metcalfe Service Dept Tel: 01766 830 456 - Opt 4
Email: karen@metcalfecatering.com
Additional copies of either the instruction manual or breakdown drawing for this unit can be
obtained by visiting the Metcalfe Catering Equipment Ltd website or contacting sales.
Web-site: www.metcalfecatering.com / Sales e-mail: sales@metcalfecatering.com

15 | P a g e

16 | P a g e
SP50 - Base Parts List
Item
Part No.
Qty
Description
1
SP50W01
1
Whisk
2
SP50B02
1
Beater
3
SP50D01
1
Dough Hook
4
SP50G
1
Perspex Safety Guard
5
SP50B01
1
Bowl
6
SP50T01
1
Top Cover
7
5A39
1
Mixer Cover Reinforcement
8
5A14
1
Screw, Socket Hd Cap (Mixer Cover)
9
5A35
4
Screw, Button Hd
10
5A21
1
Plate, Housing Mounting
11
5A33
1
Housing of Electronic Board
12
5A20-1
1
Electronic Circuit Board
13
5A34
4
Screw, Button Hd
14
5A42
2
Spring Washer
15
5A41
2
Standoff
16
5A43
1
Nut
17
SP50/5A05
1
On / Off / Speed Selector
18
5A08-1
1
Spring
19
5A09
1
Plunger
20
5A44
1
Tab, Alignment
21
5A10
1
Nut
22
5A12
1
Washer
23
SP50/5A15
1
Potentiometer
24
5A16
1
Insulation Pad
25
5A45
1
Nut
26
5A26
1
Plastic Plug
27
5A25-1
1
Mixer Body, Side Dial
28
5A27
1
Mixer Base
29
5A28
4
Washer, Flat
30
5A29
4
Washer, Spring Lock
31
5A30
4
Screw, Hex Hd
31
5A30
4
Screw, Hex Hd
32
SP50/UH/1260
4
Rubber Pads

17 | P a g e

18 | P a g e
SP50 - Bowl Lift Parts List
Item
Part No.
Qty
Description
1
5B01
2
Screw, Hex HD
2
5B02-1
2
Spring Washer
3
5B02
2
Flat Washer
4
5B03
2
Bowl Lift Shaft
5
5B04
21
Bushing
6
5B05
2
Set Screw Cut Pt (Bowl Limit)
7
5B06
1
Screw, Flat Head
8
5B07
1
Pad, Bowl Limit
9
5B08
1
Bowl Cradle
10
5B09
2
Bowl Lift Bracket
11
5B10
2
Screw, Flat Head
11a
-
2
Nut, Hex
12
5B11
1
Spring Pin
13
5B12
1
Bowl lift Connecting Rod
14
5B13
1
Cotter Pin
15
5B14
1
Bowl Lift Connector
16
5B15
1
Spring Pin
17
5B16
2
Washer, Flat
18
800091
2
Spring
19
5B18
1
Lock Nut, Nylon Insert
20
5B19
2
Retaining Ring (STW-12)
21
5B20
1
Bowl Lift Handle
22
5B22
1
O Ring (Handle Seal)
23
5B23
1
Power Cord & Plug
24
5B24
1
Overload Relay
25
5B24-1
1
Label, Relay
26
5B24-2
1
Nut
27
-
-
-
28
5B25
2
Screw, Hex Head
29
5B26
4
Washer, Flat
30
800089
2
Bowl Clamp
31
800090
2
Plastic Knob
32
5B31
2
Spring
33
5B33
4
Nut, Hex
34
5B29
2
Washer, Flat
35
5B29-1
2
Washer, Spring Lock
36
5B30
2
Screw, Hex HD
37
5B34
2
Bowl Lock Pin
38
5B35
2
Washer, Lock - Internal Tooth
39
5B36
2
Lock Nut, Nylon Insert
40
-
2
Screw. Ground - Hex HD (Grn)
41
5E02
1
Microswitch

19 | P a g e
Table of contents
Other Metcalfe Mixer manuals
Popular Mixer manuals by other brands

Power Dynamics
Power Dynamics 172.622 instruction manual

Rubi
Rubi Rubimix-9 BL Duplex Translation of the original

AUSTRALIAN MONITOR
AUSTRALIAN MONITOR TX6000 - BROCHURE 1 brochure

Crown
Crown CT10049 Original instructions

Westinghouse
Westinghouse WKSMX1503 instructions

Sigma
Sigma SL-50 Use and maintenance instruction manual

Behringer
Behringer Pro Mixer VMX300 user manual

Robot Coupe
Robot Coupe Blixer 8 operating instructions

Linea 2000
Linea 2000 DOMO DO434BL Instruction booklet

Russell Hobbs
Russell Hobbs RHSBM40 Instructions and warranty

AUDIO TELEX
AUDIO TELEX TX8000 operating instructions

Dash
Dash delish DCSM350 Instruction manual and recipe guide