METER HYDROS 21 GEN 1 User manual

HYDROS 21
GEN 1

i
TABLE OF CONTENTS
1. Introduction..............................................................................................1
2. Operation ...................................................................................................2
2.1 Installation ................................................................................................2
2.2 Connecting................................................................................................. 4
2.2.1 Connect to METER Data Logger........................................................ 5
2.2.2 Connect to a Non-METER Data Logger.............................................5
2.3 Communication .........................................................................................7
3. System.........................................................................................................8
3.1 Specifications............................................................................................8
3.2 Components ............................................................................................ 11
3.3 Theory...................................................................................................... 11
3.3.1 Water Depth................................................................................... 11
3.3.2 Temperature .................................................................................. 12
3.3.3 Electrical Conductivity .................................................................. 12
4. Service....................................................................................................... 13
4.1 Calibration ............................................................................................... 13
4.2 Cleaning................................................................................................... 13
4.2.1 Pressure Transducer ...................................................................... 13
4.2.2 Electrical Conductivity Sensor....................................................... 14
4.3 Troubleshooting....................................................................................... 14
4.4 Customer Support.................................................................................... 15
4.5 Terms and Conditions .............................................................................. 15
References .................................................................................................... 16
Index ................................................................................................................. 17
13869-05
1.13.2021


1
1. INTRODUCTION
Thank you for choosing the HYDROS 21 Water Depth, Temperature, and Electrical
Conductivity (EC) sensor from METER Group.
The HYDROS 21 (CTD) is designed for groundwater monitoring wells or piezometers, surface
water monitoring, and wetland monitoring. The sensor cable is vented to remove the effects
of barometric pressure changes. The sensor also features a precision thermistor to measure
temperature. The integrated 4-probe electrical conductivity transducer accurately senses EC
up to 120 mS/cm.
Prior to use, verify the sensor arrived in good condition.

2
OPERATION
2. OPERATION
Please read all instructions before operating the HYDROS 21 to ensure it performs to its
full potential.
PRECAUTIONS
METER sensors are built to the highest standards, but misuse, improper protection, or improper
installation may damage the sensor and possibly void the manufacturer’s warranty.
Before integrating HYDROS 21 into a system, make sure to follow the recommended installation
instructions and have the proper protections in place to safeguard sensors from damage.
2.1 INSTALLATION
The two most common installation methods for the HYDROS 21 are (1) groundwater well
installation and (2) surface water installation. Hydrology studies using monitoring wells or
piezometers are only as good as the well installation design. It is important to use properly
designed wells to obtain accurate data and for proper sensor operation.
While installing the HYDROS 21, accommodate for the following considerations:
• Biofouling can affect sensor performance. One way to mitigate the accumulation of
microorganisms, plants, and algae is to wrap the sensor with a copper mesh. Inspect and
clean the sensor more frequently in these conditions.
• Buildup of sedimentation or debris around the sensor will cause inaccurate measurements
and potential damage. Ensure the sensor installation is high enough to avoid becoming
buried in sediment.
• If the sensor is in water, it must not experience temperatures below 0 °C (32 °F). If water
freezes in the pressure transducer cavity, the pressure transducer will be permanently
and catastrophically damaged by the ice formation. Freezing is not generally a problem
in deep underground well installations but might be an issue in surface water wells and
underground installations above the frost depth.
WARNING! Exposing the HYDROS 21 sensor to freezing temperatures with water in the pressure transducer cavity
voids the sensor warranty.
Follow the steps listed in Table 1 to set up the HYDROS 21 and start collecting data.
Table 1 Installation
Tools Needed
Zip ties
Measuring tab
Reference document on well design
3
HYDROS 21
Table 1 Installation (continued)
Groundwater Well
Installation
Suspend HYDROS 21 in Well
Ensure the well has been properly installed, consulting additional resources as
necessary (e.g., Sprecher, 2008). The well must be 3.5 cm in diameter or larger.
NOTE: Well design depends on the desired measurement, such as groundwater flow,
quality, level, or pressure head.
Use the Kellem grip to set the desired installation depth. Set the installation
depth based on the zero point for the pressure transducer.
Lower the sensor down the well and use the hook on the Kellem grip to
suspend the sensor in its final position.
Sensor in groundwater well
Cap the well.
Ensure the well is able to vent to atmospheric pressure.
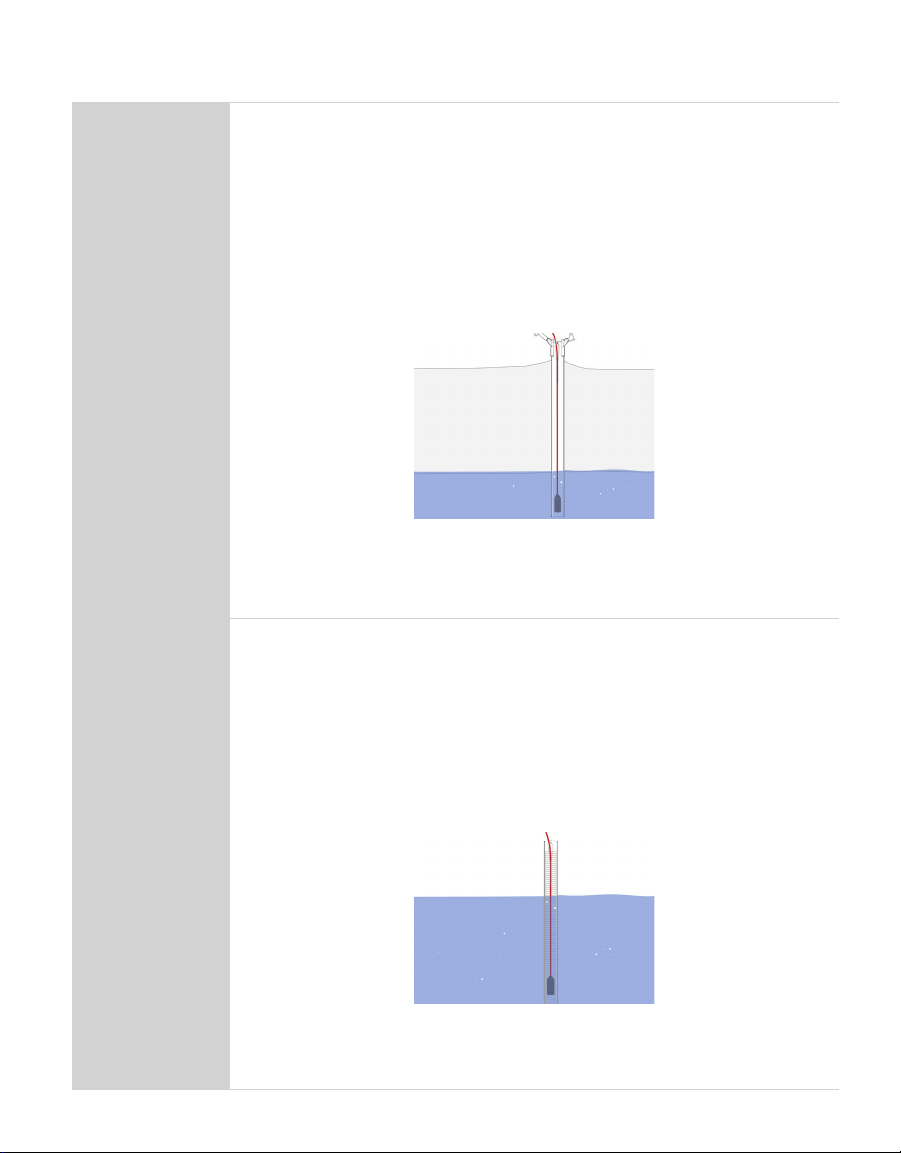
Surface Water
Installation
Suspend HYDROS 21 in Water Body
Select a secure location to mount the sensor, such as a bridge abutment or
pier. If there is not an existing structure, drive a post into the stream bed.
Install sensor protection.
Protect the pressure sensor from noise from water flows. For example, slotted
well screens protect the sensor from debris and dampens the effect of stream
current on the pressure measurement.
Suspend sensor from mounting location.
Sensor suspended in water body
Secure cable, accounting for higher flow conditions to protect sensor cable
from higher currents and floating debris.

4
OPERATION
Table 1 Installation (continued)
Connecting
Secure and Protect Cables
NOTE: Improperly protected cables can lead to severed cables or disconnected sensors.
Cabling issues can be caused by many factors such as rodent damage, driving over sensor
cables, tripping over cables, not leaving enough cable slack during installation, or poor
sensor wiring connections.
Install cables in conduit or plastic cladding when near the ground to avoid
rodent damage.
Gather and secure cables between the HYDROS 21 and the data logger to the
mounting mast in one or more places.
Port1Port2Port 3Port4 Port5Port 6
TEST
OK
ERROR
(-)
(-)(-) (-)
(-)(+)(-)(+)(+)
(+)(+)(+)
Connect to Data Logger
Plug the sensor into a data logger.
Use the data logger to make sure the sensor is reading properly.
Verify that these readings are within expected ranges.
For more instructions on connecting to data loggers, refer to Section2.2.
2.2 CONNECTING
The HYDROS 21 works seamlessly with METER data loggers. The HYDROS 21 can
also be used with other data loggers, such as those from Campbell Scientific, Inc. For
extensive directions on how to integrate the sensors into third-party loggers, refer to the
HYDROS21 Integrator Guide.
HYDROS 21 sensors require an excitation voltage in the range of 3.6 to 15.0 VDC and operate
at a 3.6-VDC level for data communication. HYDROS 21 can be integrated using DDI serial
or SDI-12 protocol. See the HYDROS21 Integrator Guide for details on interfacing with data
acquisition systems.
HYDROS 21 sensors come with a 3.5-mm stereo plug connector (Figure1) to facilitate easy
connection with METER loggers. HYDROS 21 sensors may be ordered with stripped and
tinned wires to facilitate connecting to some third-party loggers (Section2.2.2).

5
HYDROS 21
Ground
Digital communication
Power
Figure1 Stereo plug connector
The HYDROS 21 comes standard with a 10-, 20-, or 40-m cable. In some instances, the cable
can be extended beyond 40 m by the user, but this is discouraged for a variety of reasons.
Please contact Customer Support for more details before extending or splicing cables.
NOTE: The HYDROS 21 vents the pressure transducer through the cable to atmospheric pressure. Long cable lengths
may cause a slow response to changes in atmospheric pressure; a maximum cable length of 40 m is recommended for
optimal venting.
2.2.1 CONNECT TO METER DATA LOGGER
The HYDROS 21 works most efficiently with METER ZENTRA series data loggers. Check the
METER download webpage for the most recent data logger firmware. Logger configuration
may be done using either ZENTRA Utility (desktop and mobile application) or ZENTRA Cloud
(web-based application for cell-enabled data loggers).
1. Plug the stereo plug connector into one of the sensor ports on the logger.
2. Use the appropriate software application to configure the chosen logger port for the
HYDROS 21. METER data loggers will automatically recognize HYDROS 21 sensors.
3. Set the measurement interval.
METER data loggers measure the HYDROS 21 every minute and return the average of the
1-min data across the chosen measurement interval.
HYDROS 21 data can be downloaded from METER data loggers using either ZENTRA Utility or
ZENTRA Cloud. Refer to the logger user manual for more information about these programs.
2.2.2 CONNECT TO A NONMETER DATA LOGGER
The HYDROS 21 can be purchased for use with non-METER (third party) data loggers. Refer
to the third-party logger manual for details on logger communications, power supply,
and ground ports. The HYDROS21 Integrator Guide also provides detailed instructions on
connecting sensors to non-METER loggers.
HYDROS 21 sensors can be ordered with stripped and tinned (pigtail) wires for use with
screw terminals. Refer to the third-party logger manual for details on wiring.
Connect the HYDROS 21 wires to the data logger as illustrated in Figure2 and Figure3, with
the power supply wire (brown) connected to the excitation, the digital out wire (orange) to a
digital input, and the bare ground wire to ground.

6
OPERATION
Ground (bare)
Digital communication (orange)
Power (brown)
Figure2 Pigtail wiring
NOTE: Some early HYDROS 21 (CTD) units may have the older Decagon wiring scheme where the power supply is white,
the digital out is red, and the bare and black wires are ground.
Excitation Digital
in
Data Logger
Ground
Digital
communication
(orange)
Ground
(bare)
Power
(brown)
Figure3 Wiring diagram
NOTE: The acceptable range of excitation voltages is from 3.6 to 15.0 VDC. To read HYDROS 21 sensors with Campbell
Scientific data loggers,power the sensor from a switched 12-V port or a 12-V port if using a multiplexer.
If the HYDROS 21 cable has a standard stereo plug connector and needs to be connected to a
non-METER data logger, use one of the following two options.
Option 1
1. Clip off the stereo plug connector on the sensor cable.
2. Strip and tin the wires.
3. Wire it directly into the data logger.
This option has the advantage of creating a direct connection and minimizes the chance of
the sensor becoming unplugged. However, it then cannot be easily used in the future with a
METER readout unit or data logger.
Option 2
Obtain an adapter cable from METER.
The adapter cable has a connector for the stereo plug connector on one end and three
wires (or pigtail adapter) for connection to a data logger on the other end. The stripped and
tinned adapter cable wires have the same termination as seen in Figure3: the brown wire is
excitation, the orange is output, and the bare wire is ground.
NOTE: Secure the stereo plug connector to the pigtail adapter connections using adhesive-lined heat shrink to ensure
the sensor does not become disconnected during use.

7
HYDROS 21
2.3 COMMUNICATION
The HYDROS 21 communicates using two different methods:
• DDI serial string
• SDI-12 communication protocol
To obtain detailed instructions, refer to the HYDROS 21 Integrator Guide.
The SDI-12 protocol requires that all sensors have a unique address. HYDROS 21 sensor
factory default is an SDI-12 address of 0. To add more than one SDI-12 sensor to a bus, the
sensor address must be changed as described in these steps.
1. Using a PROCHECK connected to the sensor, press the MENU button to bring up the
Configuration tab.
NOTE: If the PROCHECK does not have this option, please upgrade its firmware to the latest version from the
METER Legacy Handheld Devices webpage.
2. Scroll down to SDI-12 Address. Press ENTER.
3. Press the UP or DOWN arrows until the desired address is highlighted.
Address options include 0...9, A...Z, and a...z.
4. Press ENTER.
Detailed information can also be found in the application note Setting SDI-12 addresses on
METER digital sensors using Campbell Scientific data loggers and LoggerNet.
When using the sensor as part of an SDI-12 bus, excite the sensors continuously to avoid
issues with initial sensor startup interfering with the SDI-12 communications.

8
SYSTEM
3. SYSTEM
This section describes the HYDROS 21 Water Depth, Temperature, and EC (CTD) sensor.
3.1 SPECIFICATIONS
MEASUREMENT SPECIFICATIONS
Bulk Electrical Conductivity (EC)
Range 0−120 dS/m
Resolution 0.001 dS/m
Accuracy ±0.01 dS/m or ±10%, whichever is greater
NOTE: The EC measurement is corrected to a standard temperature of 25 °C.
Temperature
Range −11 to +49 °C
Resolution 0.1 °C
Accuracy ±1 °C
Water Depth
Range 0−10,000 mm
Resolution 1 mm
Accuracy ±0.5% of full scale at 20 °C
NOTE: Depth measurement accuracy assumes no abrupt temperature variations.
COMMUNICATION SPECIFICATIONS
Output
DDI serial or SDI-12 communication protocol
Data Logger Compatibility
METER ZL6 data loggers and any data acquisition system capable of 3.6- to 15.0-VDC
power and serial or SDI-12 communication
PHYSICAL SPECIFICATIONS
Dimensions
Length 9.0 cm (3.5 in)
Width 3.4 cm (1.3 in)

9
HYDROS 21
Operating Temperature Range
Minimum 0 °C
Maximum 50 °C
NOTE: Sensors may be used at higher temperatures under certain conditions; contactCustomer
Supportfor assistance.
Cable Length
10 m (standard)
20 m
40 m (maximum cable length)
Cable Diameter
6 mm
Connector Types
3.5-mm stereo plug connector or stripped and tinnedwires
ELECTRICAL AND TIMING CHARACTERISTICS
Supply Voltage (VCC to GND)
Minimum 3.6 V
Typical NA
Maximum 15.0 V
Digital Input Voltage (logic high)
Minimum 2.8 V
Typical 3.6 V
Maximum 5.0 V
Digital Input Voltage (logic low)
Minimum –0.3 V
Typical 0.0 V
Maximum 0.8 V
Digital Output Voltage (logic low)
Minimum NA
Typical 3.6 V
Maximum NA

10
SYSTEM
Power Line Slew Rate
Minimum 1.0 V/ms
Typical NA
Maximum NA
Current Drain (during measurement)
Minimum 0.5 mA
Typical 0.5 mA
Maximum 1.0 mA
Current Drain (while asleep)
Minimum NA
Typical 0.3 mA
Maximum NA
Power Up Time (DDI serial)
Minimum NA
Typical 475 ms
Maximum 500 ms
Power Up Time (SDI-12)
Minimum 300 ms
Typical 475 ms
Maximum 500 ms
Measurement Duration
Minimum NA
Typical 350 ms
Maximum 500 ms
COMPLIANCE
Manufactured under ISO 9001:2015
EM ISO/IEC 17050:2010 (CE Mark)

11
HYDROS 21
3.2 COMPONENTS
The HYDROS 21 sensor monitors water level, temperature, and EC in both ground and surface
water. The HYDROS 21 uses a vented ceramic peizoresistive differential pressure transducer
to measure the pressure from the water column to determine water depth.
A thermistor in thermal contact with the probe provides water temperature, while the
stainless steel screws on the surface of the sensor form a four-electrode array to measure
EC. With a range of 0 to 120 dS/m, the HYDROS 21 has the ability to make accurate EC
measurements in a broad range of applications. The HYDROS 21 has a compact 3.4-cm
diameter body made of rugged Delrin® resin. The electronic circuitry is encapsulated in a
marine-grade epoxy to protect the sensor in corrosive environments.
Figure4 HYDROS 21 component diagram
3.3 THEORY
This section explains the theory of water depth, temeprature, and electrical conductivity.
3.3.1 WATER DEPTH
The HYDROS 21 sensor uses a ceramic peizoresistive differential pressure transducer to
measure the pressure applied by the water column above the sensor. The HYDROS 21 uses a
direct relationship between pressure and water depth to output water depth. The reference
port of the pressure transducer is vented through the cable to atmospheric pressure, so the
HYDROS 21 does not require a reference barometric pressure. A porous Teflon®vent near the
data logger end of the cable provides the reference. The Teflon keeps liquid water out of the
cable but allows air to enter and leave.

12
SYSTEM
Keep the vent open to the same atmospheric pressure that applies to the water and out of
the water. Since the cable conducts reference air between the sensor and the atmosphere, it
is extremely important to protect the cable from any damage that allows water to enter.
3.3.2 TEMPERATURE
A thermistor near the EC sensor senses the temperature of the water. The HYDROS 21 uses
the temperature to adjust the EC measurements to the 25 °C default value and provides the
temperature output for the data stream.
3.3.3 ELECTRICAL CONDUCTIVITY
The HYDROS 21 uses EC to measure the concentration of salts in the water and for
information about dissolved solids. The HYDROS 21 measures EC by applying an alternating
electrical current to two electrodes, measuring the current flow through those electrodes,
and then measuring voltage drop with a separate set of electrodes. The conductance is the
ratio of current to voltage. The HYDROS 21 EC measurements are corrected to EC at 25 °C:
Equation 1
EC25 =
EC
T
1+0.019(T−25)
⎡
⎣
⎤
⎦
where EC25 is the normalized EC at 25 °C, ECTis the EC measured by the probe at
temperature T, and Tis the temperature at the time of measurement.
Conductivity is conductance multiplied by a cell constant (obtained by using conductivity
standards).
NOTE: A four-electrode sensor gives unpredictable readings in air because there is no connection between the voltage
and current electrodes.

13
HYDROS 21
4. SERVICE
This section contains calibration and maintenance guidelines for the HYDROS 21.
Troubleshooting solutions and customer support contact information are also provided.
4.1 CALIBRATION
METER factory calibrates the water depth and EC sensors to values stored internally in
flash memory. The depth sensor is calibrated to known depths of water, and the EC sensor is
calibrated using potassium chloride (KCl) solutions of known concentrations.
Table 2 relates EC at 25 °C for various concentrations of KCl, and these values can be used
to verify the HYDROS 21 EC sensor performance. The value outputs from the HYDROS 21 are
internally corrected to 25 °C.
Table 2 HYDROS 21 calibration values
Electrical Conductivity
(mS/cm)
Concentration of KCl in
Distilled Water
(g/kg)
100 0.0446
200 0.0930
500 0.2456
1,000 0.5120
2,000 1.0673
5,000 2.8186
10,000 5.8758
20,000 12.2490
4.2 CLEANING
Maintaining the HYDROS 21 is essential for consistent sensor performance. Inspect and
clean the HYDROS 21 frequently to prevent accumulation of microorganisms, plants,
sedimentation, or other debris.
4.2.1 PRESSURE TRANSDUCER
The HYDROS 21 ceramic piezoresistive sensor must be protected from sediment and debris.
If sediment or other debris build up on the pressure transducer, clean the membrane.
NOTE: Take care not to damage the pressure sensor.
Follow these steps to clean the HYDROS 21 pressure sensor:
1. Run water through the side slots of the sensor housing across the ceramic pressure
transducer to remove debris.

14
SERVICE
2. If the sediment does not all come off with running water, soak the sensor in a mixture of
water and dish soap for 1 h.
3. Repeat step1.
4.2.2 ELECTRICAL CONDUCTIVITY SENSOR
The four-electrode conductivity measurement is less sensitive to sensor fouling than a
two-electrode sensor, but contamination of the electrodes can still affect the measurement.
Follow these steps to clean the HYDROS 21 EC array:
1. Put on gloves.
NOTE: Do not touch the screws without gloves or contact allow contact with any source of oil or other
nonconducting residue.
2. Insert a swab into the slot on the side of the sensor housing.
3. Rub the screws vigorously with the swab.
NOTE: Take care not to damage the pressure sensor with the swab.
4. Rinse the sensor and screws thoroughly with tap or distilled water.
4.3 TROUBLESHOOTING
Table 3 lists common problems and their solutions. If the problem is not listed or these
solutions do not solve the issue, contact Customer Support.
Table 3 Troubleshooting the HYDROS 21
Problem Possible Solutions
Sensor not responding
Ensure sensor is installed correctly.
Check power to the sensor.
Check sensor cable and stereo plug connector integrity.
Check data logger wiring to ensure brown is power supply, orange is
digital out, and bare is ground.
Sensor is not logging
readings
Ensure the data logger batteries are not dead or weakened.
Check configuration of the data logger in ZENTRA Utility to ensure
the HYDROS 21 is selected.
Ensure the most recent software and firmware are installed from
metergroup.com.
Inaccurate pressure
readings
Check pressure sensor to ensure it is clean and free of sediment or
other debris (Customer Support).
Check for anything interfering with the opening of the vent.

15
HYDROS 21
Table 4 Troubleshooting the HYDROS 21 (continued)
Problem Possible Solutions
Inaccurate EC readings
Check the four electrode array and ensure it is clean and free of
sediment or other debris (Section4.2).
Ensure stainless steel cover is on the bottom of the sensor housing.
Contact Customer Support for a replacement if missing.
4.4 CUSTOMER SUPPORT
NORTH AMERICA
Customer service representatives are available for questions, problems, or feedback Monday
through Friday, 7:00 am to 5:00 pm Pacific time.
Email: support.environment@metergroup.com
sales.environment@metergroup.com
Phone: +1.509.332.5600
Fax: +1.509.332.5158
Website: metergroup.com
EUROPE
Customer service representatives are available for questions, problems, or feedback Monday
through Friday, 8:00 to 17:00 Central European time.
Email: support.europe@metergroup.com
sales.europe@metergroup.com
Phone: +49 89 12 66 52 0
Fax: +49 89 12 66 52 20
Website: metergroup.de
If contacting METER by email, please include the following information:
Name
Address
Phone
Email address
Instrument serial number
Description of the problem
NOTE: For products purchased through a distributor, please contact the distributor directly for assistance.
4.5 TERMS AND CONDITIONS
By using METER instruments and documentation, you agree to abide by the METER Group,
Inc. USA Terms and Conditions. Please refer to metergroup.com/terms-conditions fordetails.

16
REFERENCES
REFERENCES
Sprecher, S.W. 2008. Installing Monitoring Wells in Soils (Version 1.0). National Soil Survey Center,
Natural Resources Conservation Service, USDA, Lincoln, NE.

INDEX
17
INDEX
A
accuracy 8
C
cable length 9
calibration 13
cleaning 13–14
compliance 10
components
cable 9, 11, 12
electrodes 11, 12, 14
pressure transducer 1, 11, 13
sensor body 11
thermistor 1, 11
vent 11
connecting
METER data logger 5
non-METER logger 5–6
connector types 9
customer support 15
E
electrical conductivity 8, 12
email address 15
F
fax number 15
I
installation 2–3
groundwater well 2, 3
tools required 2
water body 3
P
phone number 15
R
range 8
references 16
S
specifications 8–11
communication 8
data logger compatibility 8
electrical and timing 9–10
measurement 8
physical 8
T
temperature 8, 12
terms and conditions 15
theory
electrical conductivity 12
temperature 12
water depth 11
troubleshooting 14
W
water depth 8, 11
wiring 6–7
Table of contents
Other METER Accessories manuals

METER
METER TEROS VERIFICATION CLIP User manual

METER
METER TEROS 10 User manual

METER
METER TEROS 54 User manual

METER
METER TEROS 11 User manual

METER
METER TEROS 10 User manual

METER
METER TEROS 21 Assembly Instructions

METER
METER ATMOS 14 User manual

METER
METER AROYA User manual

METER
METER ATMOS 14 User manual

METER
METER ATMOS 14 User manual


