METER ATMOS 41W User manual

ATMOS 41W

i
TABLE OF CONTENTS
1. Introduction..............................................................................................1
2. Operation ...................................................................................................3
2.1 Installation ................................................................................................3
2.2 Connecting............................................................................................... 13
2.2.1 Bluetooth Connection .................................................................... 13
2.2.2 Configuration................................................................................. 15
2.2.3 Communication Test ...................................................................... 17
2.2.4 Instantaneous Sensor Measurements (Refresh)............................ 19
3. System....................................................................................................... 21
3.1 Specifications.......................................................................................... 21
3.2 Components ............................................................................................ 25
3.2.1 Pyranometer (Solar Radiation)....................................................... 26
3.2.2 Rain Funnel (Precipitation) ............................................................ 28
3.2.3 Electrical Conductivity (EC) ........................................................... 34
3.2.4 Vapor Pressure and Relative Humidity........................................... 34
3.2.5 Barometric Pressure ...................................................................... 36
3.2.6 Air Temperature ............................................................................. 36
3.2.7 Wind Speed and Direction.............................................................. 38
3.2.8 Tilt Sensor...................................................................................... 41
3.2.9 Solar Panels................................................................................... 41
3.2.10 GPS Receiver................................................................................ 42
3.2.11 Timekeeping ................................................................................ 42
3.2.12 Data Storage ................................................................................ 43
3.2.13 Batteries...................................................................................... 45
18498-00
11.2022

ii
3.2.14 TEST Button ................................................................................. 48
3.2.15 Status Lights................................................................................ 50
3.2.16 Cellular Communications............................................................. 51
3.3 Limitations .............................................................................................. 52
3.3.1 Snow and Ice Accumulation ........................................................... 52
3.3.2 Heavy Wind and Strong Wind ......................................................... 52
3.3.3 Electromagnetic Interference........................................................ 52
4. ZENTRA Software................................................................................ 53
4.1 ZENTRA Utility Mobile ............................................................................. 53
4.2 ZENTRA Cloud.......................................................................................... 53
5. Service....................................................................................................... 55
5.1 Uninstalling ............................................................................................. 55
5.2 Calibration............................................................................................... 55
5.3 Recalibration Recommendations............................................................. 57
5.4 Cleaning and Maintenance....................................................................... 57
5.5 Update Firmware ..................................................................................... 62
5.6 Troubleshooting....................................................................................... 62
5.7 Customer Support.................................................................................... 65
5.8 Terms and Conditions .............................................................................. 66
APPENDIX A. Compliance Certifications..................................... 67
A.1 USA.......................................................................................................... 67
A.2 Canada .................................................................................................... 67
A.3 European Union ....................................................................................... 68
A.4 Japan....................................................................................................... 69
References .................................................................................................... 70

1
1. INTRODUCTION
Thank you for choosing the ATMOS41W from METER Group. The ATMOS41W is part of the
ZENTRA System, a collection of data loggers, software, and compatible sensors to measure
environmental parameters accurately and cost effectively.
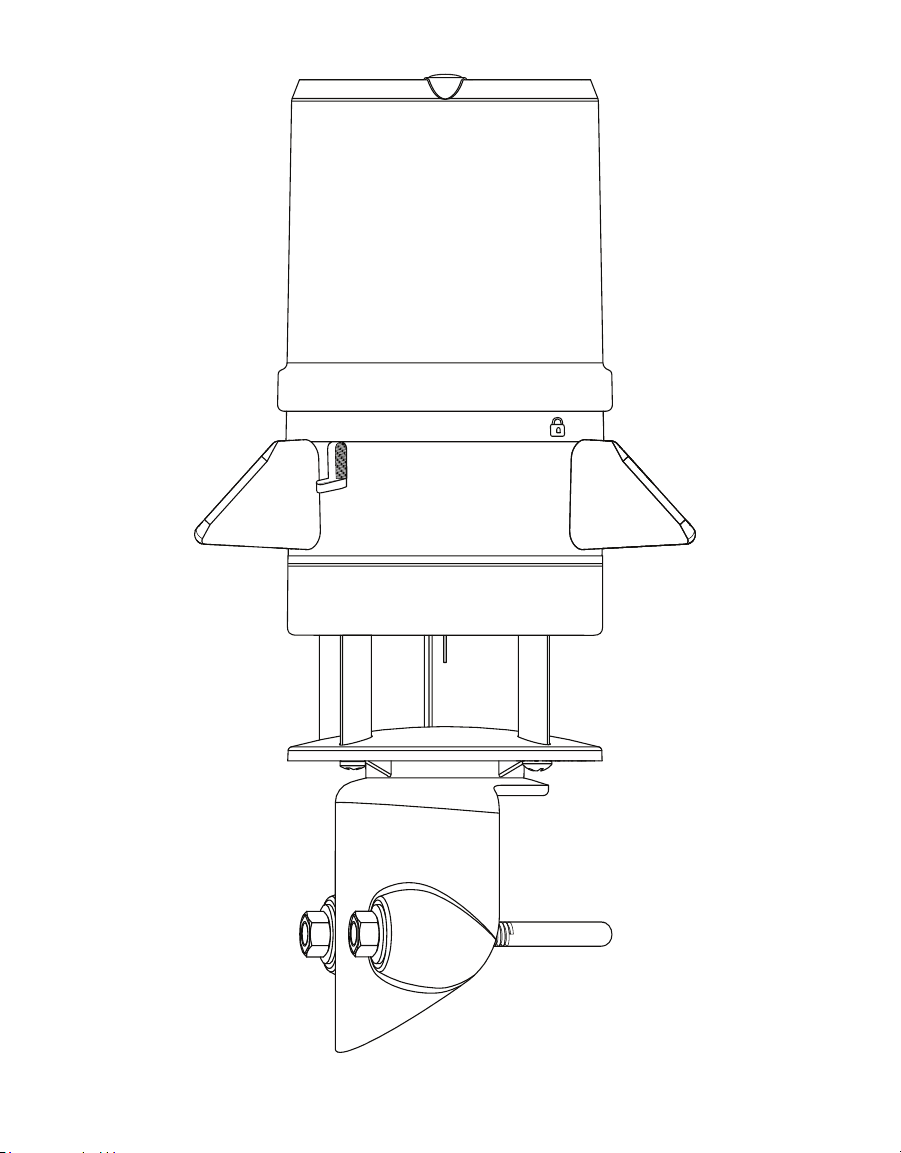
The ATMOS41W All-in-One Wireless Weather Station is designed for continuous monitoring
of environmental variables, including all standard weather measurements (Section3). The
ATMOS41W measures the following:
• Solar radiation
• Precipitation
• Precipitation electrical conductivity
• Relative humidity / Vapor pressure
• Barometric pressure
• Air temperature (min, max, average)
• Wind speed
• Wind direction
• Maximum wind gust
• Tilt
All sensors and wireless cloud communications are integrated into a single, small
form-factor unit, requiring minimal installation effort. A robust design that prevents
errors because of wear or fouling make the weather station ideal for long-term, remote
installations. ATMOS41W can be used for a variety of applications:
• Weather monitoring
• Microenvironment monitoring
• Spatially-distributed environmental monitoring
• Crop weather monitoring
• Fire danger monitoring
• Weather networks
Additional advantages include its low-power design that supports the integrated battery-
operated wireless cloud communication that uploads data straight to ZENTRA Cloud. A tilt
sensor warns the user of out-of-level condition, and no configurations are necessary.

2
INTRODUCTION
Prior to use, verify all ATMOS41W system components are included and appear in good
condition.
• ATMOS41W
• V-bolt with 2 washers and 2 nuts
• 13-mm (1/2-in) wrench
• 8-mm (5/16-in) wrench
• ZENTRA Cloud Device Subscription information (orange card)
• 6 AA batteries, installed (NiMH rechargeable)
When evaluating where to install the ATMOS 41W, METER recommends verifying adequate
cellular signal for the chosen location. The cellular signal must be strong enough for data to
be transmitted to ZENTRA Cloud.

3
ATMOS 41W
2. OPERATION
Please read all instructions before operating the ATMOS41W to ensure it performs to
its full potential. Prior to field installation, please verify all ATMOS 41W components
arrived intact.
Please carefully follow the information in Power On and Connect With ZENTRA Utility
Mobile on page 4 and Add ATMOS 41W toZENTRA Cloud on page 7 (Table1)
before taking the device into the field for installation. Test the ATMOS41W sensor and
communications functionality in a lab or office prior to field installation to verify the
correct operation of the system.
When moving the device to the field, follow Field Site Preparation on page 10 to ensure a
successful installation.
PRECAUTION
METER sensors are built to the highest standards, but misuse,improper protection,or improper installation may
damage the sensor and possibly void the manufacturer’s warranty. Before integrating the ATMOS41W into a system,
make sure to follow the recommended installation instructions and have the proper protections in place to safeguard
sensors from damage.
2.1 INSTALLATION
Follow the steps listed in Table1 to set up the ATMOS41 and start collecting data.
CAUTION
Never immerse the ATMOS41W in liquids.This and other misuse, improper protection,or improper installation may
damage the ATMOS41W and void the warranty.
Table1 Installation
Tools Needed
Wrench 13 mm (0.51 in) and 8 mm (0.31 in) (included with the instrument)
Mounting pole 31.80 to 50.80-mm (1.25 to 2.00-in) diameter
Smaller mounts are compatible if washers are added to the V-bolt. United
States standard pipe sizes that are compatible are 1.00, 1.25, and 1.50-in.
Square tubing with a width of 1.25 to 2.00-in or T-posts can also work as
mounting options.
Software
ZENTRA Utility Mobile using Apple®iPhone®(iOS 11.0 or newer) or Google
AndroidTM smartphone (Android 7.0 or newer). For best results, use the latest
versions of ZENTRA Utility Mobile software and ATMOS 41W firmware.
ZENTRA Utility Mobile will prompt with available updates for software and
ATMOS41W firmware. Consult Section5.6 for more troubleshooting tips.
4
OPERATION
Table 1 Installation (continued)
Preparation
Verify Cellular Signal
METER recommends verifying that the chosen location has adequate
cellular signal.
The cellular signal must be strong enough for data to be transmitted to
ZENTRA Cloud.
Data Access
Data are accessed online via ZENTRA Cloud, a web application used to
download, view, and share data as well as to change configurations.
The ATMOS 41W requires a paid subscription to use ZENTRA Cloud.
Save the orange Device Subscription card included with the ATMOS 41W in a
safe location. This card contains the following information for the subscription:
• Device serial number
• Password
• Server name/address where sensor data is stored.
Device Subscription
Device Serial Number: A4100000
Device Password: password
Server: zentracloud.com
Use this unique Device Serial Number and Device
Password to subscribe to this device on zentracloud.com
Keep this information in a safe place.
Do not leave it inside the device case.
Power On and
Connect With
ZENTRA Utility
Mobile
Install ZENTRA Utility Mobile
Install on a smartphone or tablet:
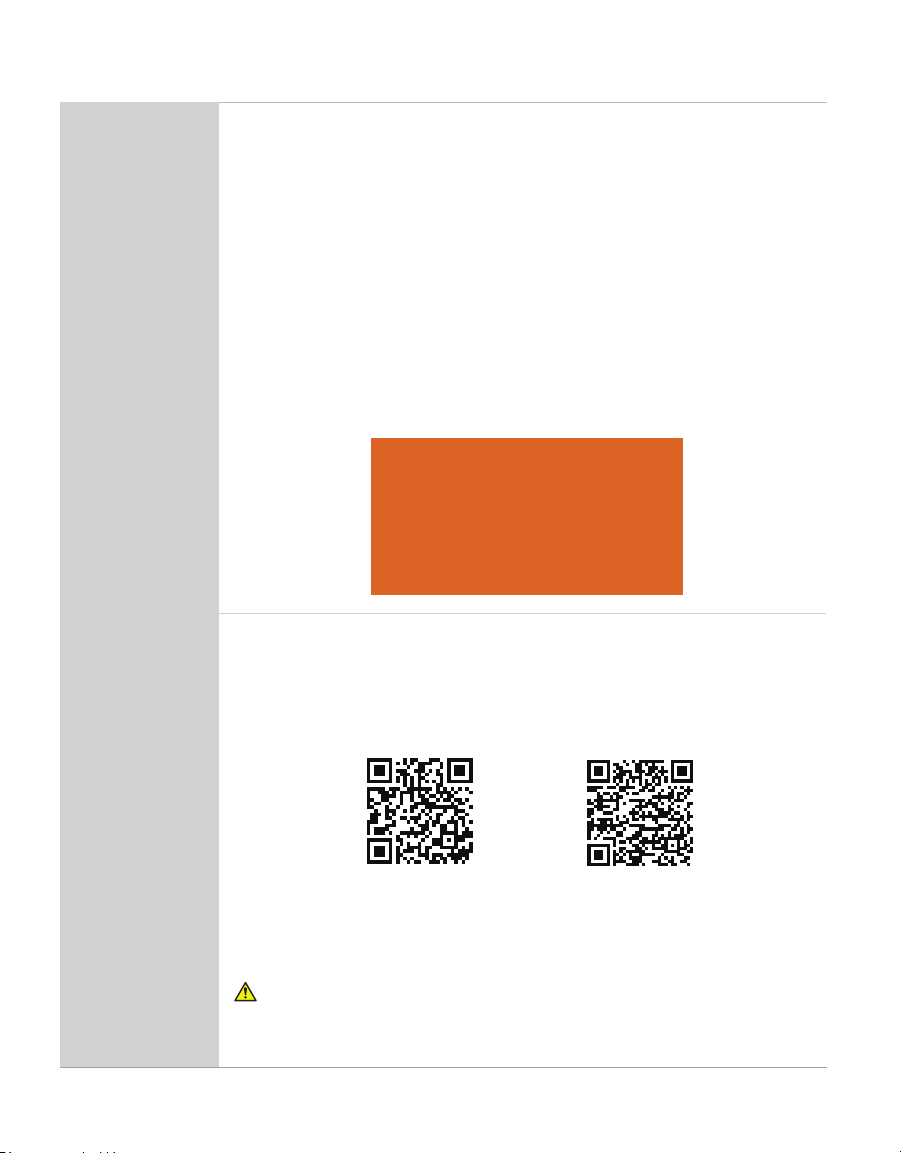
• Scan the QR code below to open the applicable app store for the mobile
device (Apple App Store®online store or Google Play™ store).
• Download the application.
Apple Store App Google Play Store
Remove Rain Funnel
Press the rain funnel down to compress the internal spring. Twist the
funnel counter-clockwise to unlock from the ATMOS41W base as shown in
Section3.2.4.
CAUTION
The rain funnel is connected to the ATMOS41W by a wire to the main unit—DONOT
disconnect the wire.Carefully move the rain funnel to the side,keeping the wire connected.
5
ATMOS 41W
Table 1 Installation (continued)
Power On and
Connect With
ZENTRA Utility
Mobile (continued)
Power Up Device
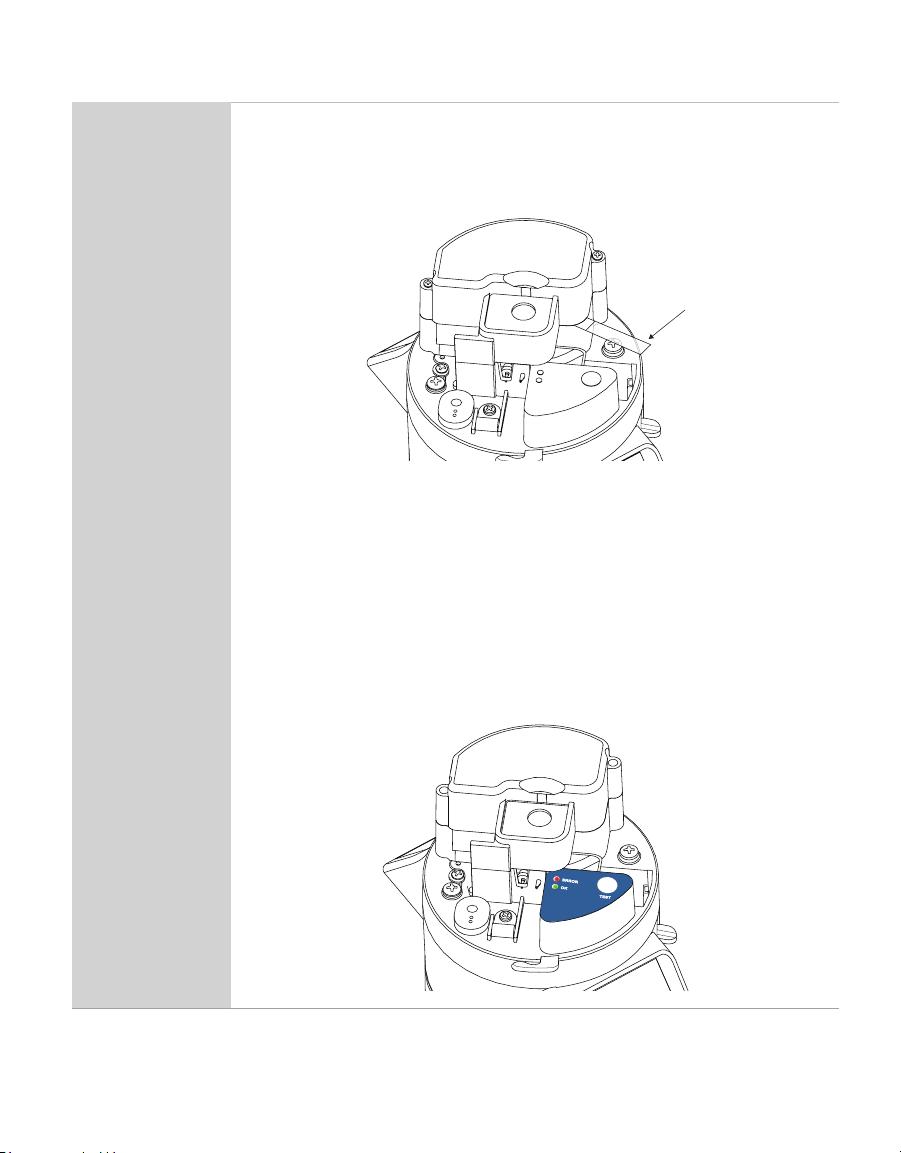
Pull and remove the clear, plastic pull tab that protrudes from the battery
compartment. This will allow contact with the installed batteries and will
activate the Bluetooth®connection to allow for communication with ZENTRA
Utility Mobile.
Pull
Remove
Before Use
Pull tab
The status lights on the blue overlay will start blinking, indicating power
isavailable.
NOTE: The status lights will settle to a short, single green blink every 5 s, signaling the
dataacquisition component isready for use.
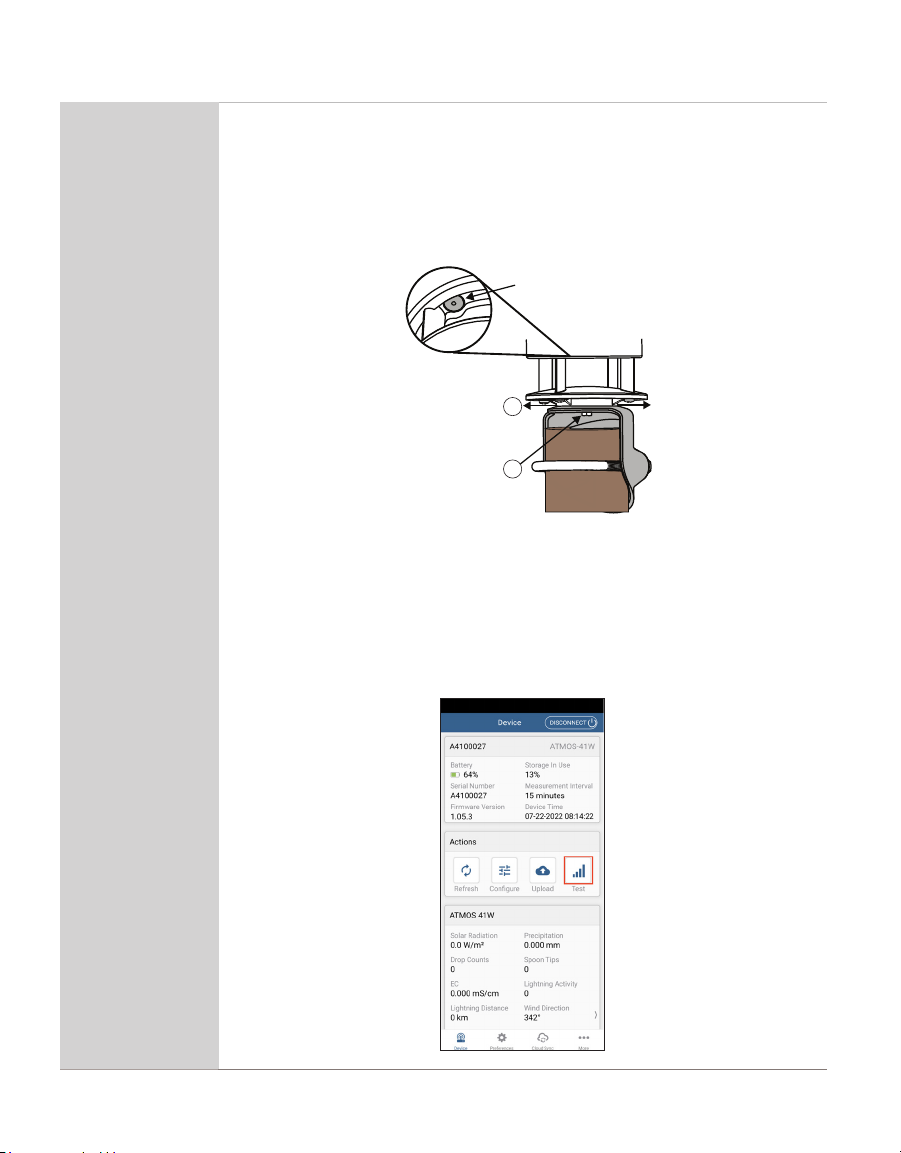
Test Bluetooth Module
With the ZENTRA Utility Mobile app open and the ATMOS 41W rain funnel
removed, push the TEST button on the blue overlay (see image below).
The status lights located on the blue overlay will eventually settle to a single,
short, green flash approximately every 5 s. This signals the instrument is ready
for use (Section3.2.10). The ATMOS41W will now be able to collect and report
data to ZENTRA Cloud according to settings in ZENTRA Utility Mobile.

6
OPERATION
Table 1 Installation (continued)
Power On and
Connect With
ZENTRA Utility
Mobile (continued)
Connect the ATMOS 41W
In ZENTRA Utility Mobile (Section2.2), tap Connect. Select the desired
device. Bluetooth connection will be established and ATMOS 41W and sensor
information will be retrieved.
Replace Rain Funnel
Replace the rain funnel by lining up the recesses, press down, and twist
clockwise until the padlock icons align and the funnel locks (Figure17).
Be sure the funnel cable and connector are clear of the internal spring and are
not pinched before closing. The ATMOS41W is now ready for use.
Configure the ATMOS41W Using ZENTRA Utility Mobile
In ZENTRA Utility Mobile, tap on Configure.
Review the cellular data upload setting and the sensor measurement interval.
Make changes if desired and save changes (Section2.2.2).
Factory default configuration is 15 min logging interval and 1 h upload.
Verify Readings
In ZENTRA Utility Mobile, tap Refresh to show a list of readings. Verify the
readings are within expected ranges (Section2.2.3).
Add ATMOS 41W
toZENTRA Cloud
Create User Account
Using a web browser, navigate to the server address listed on the orange
Device Subscription card. Keep the Device Subscription card close by for use
later in this section or if device needs to be added if deleted from the system.
Device Subscription
Device Serial Number: A4100000
Device Password: password
Server: zentracloud.com
Use this unique Device Serial Number and Device
Password to subscribe to this device on zentracloud.com
Keep this information in a safe place.
Do not leave it inside the device case.

7
ATMOS 41W
Table 1 Installation (continued)
Add ATMOS 41W
toZENTRA Cloud
Select the Sign Up button.
Enter a valid email address and user information.
Accept the Terms and Conditions.
Verify User Account
Select the Sign Up botton to generate a confirmation email.
Click on the hyperlink in the confirmation email to verify the user account.
8
OPERATION
Table 1 Installation (continued)
Add ATMOS 41W
toZENTRA Cloud
(continued)
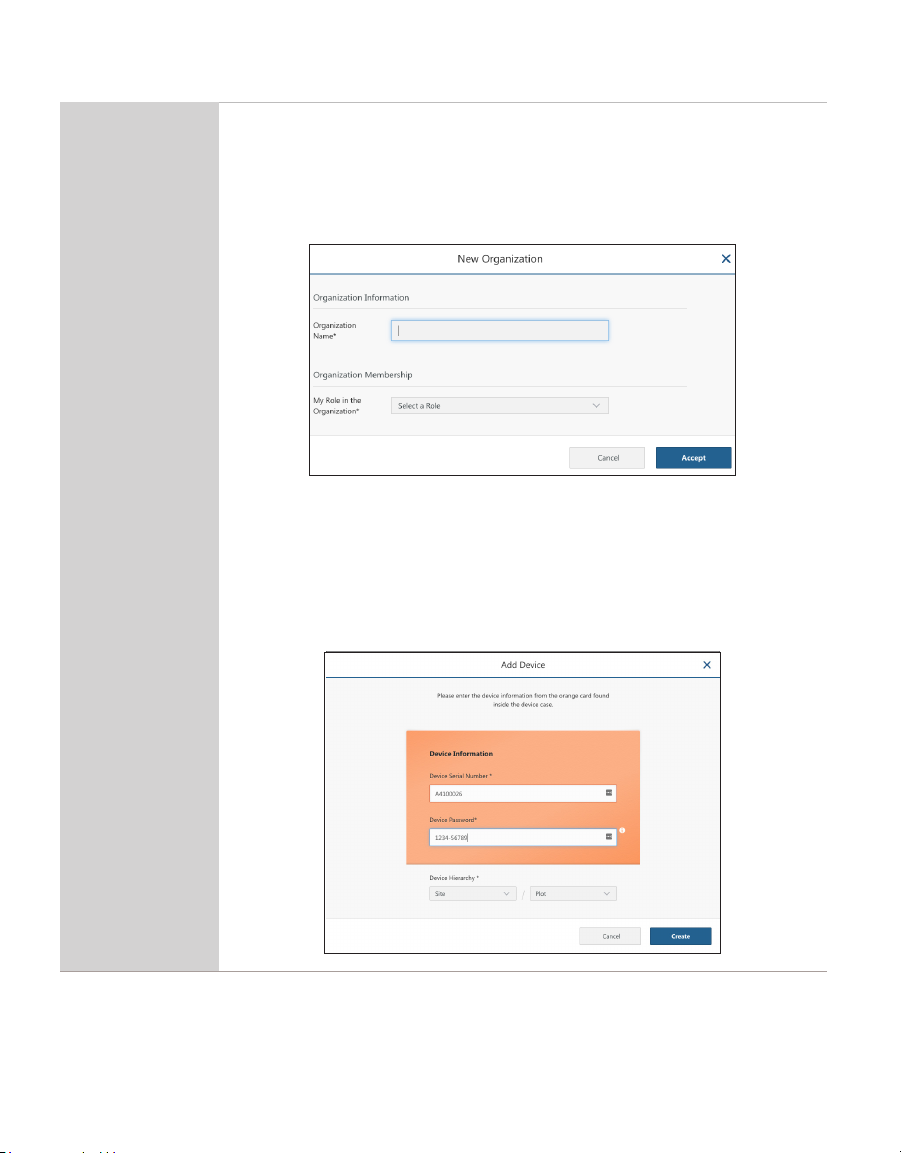
Create Organization
Log into ZENTRA Cloud using the user account created above.
• Select Create Organization.
• Enter Organization name.
• Enter Role.
• Select Accept.
Add Device
Click on Add New button.
Select the desired Device from the menu.
Enter the Device Serial Number and the Device Password from the orange
Device Subscription card (remove from funnel and store in safe location).
Click the Create button to subscribe and add device to the organization.
9
ATMOS 41W
Table 1 Installation (continued)
Add ATMOS 41W
toZENTRA Cloud
(continued)
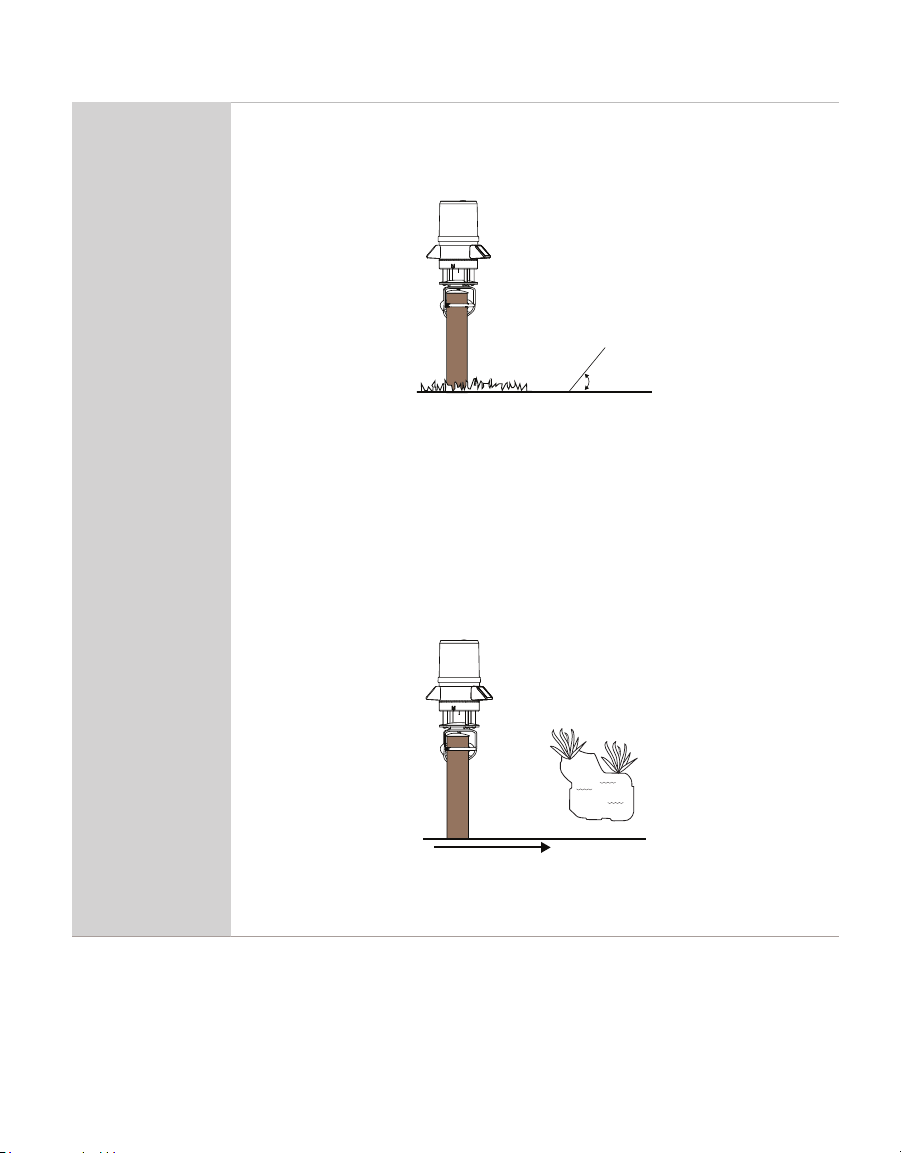
Identify Mounting Location—Landscape
Choose the desired location based on relevant details, including vegetation
cover throughout the season, solar exposure, and wildlife and livestock
activity.
≤19°
Low vegetation
<
10 cm
If adhering to World Meteorological Organization (WMO)asiting standards,
make sure the mount location has minimal slope and low vegetation height so
the pyranometer found on top of the rain funnel will not be covered by shade.
Identify Mounting Location—Interferences
Consider a site far from sources of high electromagnetic interference (EMI),
such as high-voltage power transmission lines, metallic objects, sources of
heat, bodies of water, and obstructions. EMI sources could adversely affect
ATMOS41W rainfall measurements.
≥
100 m
Lake...
Heat sources
(building, car parks,
concrete surface)
WMO siting standards recommend siting 100 m away from heat sources and
bodies of water.

10
OPERATION
Table 1 Installation (continued)
Field Site
Preparation
Check Cellular Signal
Once at the field site, check that the cellular signal is strong enough to
collect and transfer data to ZENTRA Cloud.
• Remove the rain funnel.
• Press the TEST button.
• Connect to device in ZENTRA Utility Mobile.
• Tap Test in ZENTRA Utility Mobile to check the quality of the cellular signal
before finalizing installation (Section2.2.3).
• Replace the rain funnel.
If the cellular signal is low or the cellular test fails, move to an alternative
location (sometimes moving only a few meters is sufficient).
If there is significant bird activity at the site, consider using a bird deterrent
kit. Contact Customer Support for more information.
Install Mounting Pole
Use a mounting pole with a 31.8- to 50.8-mm (1.25- to 2.0-in) diameter.
Prepare the mounting pole to the appropriate height. Many installations
require the ATMOS41W to be mounted 2 m above ground, but mounting height
can be adjusted based on the specific application.
The mounting pole should be within 4.5° of level.
Level mounting
pole within
4.5° of level
11
ATMOS 41W
Table 1 Installation (continued)
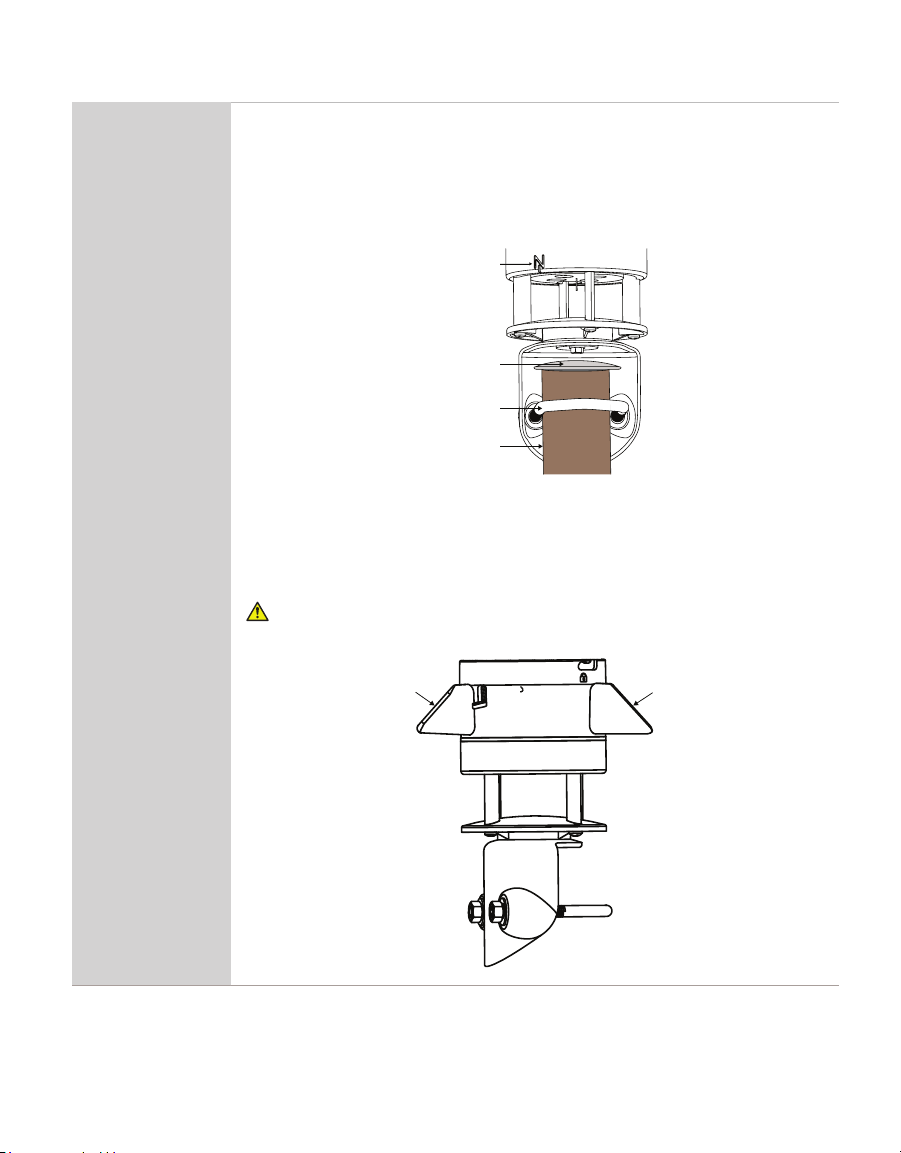
Field Installation
Mount Toward True North
Place the top of the mounting post under the mounting shelf in the mounting
bracket.
Orient the Nengraved on the side of the instrument to point true north (not
magnetic north). The ATMOS41W must be oriented correctly by hand for
accurate wind direction measurements.
Mounting
pole
Mounting
shelf
North
symbol
V-bolt
Mount and Secure Device
Tighten the V-bolt nuts by hand until hand-tight. Then tighten the nuts
further with the 13-mm wrench included. Secure the ATMOS41W flat and
tight against the top of the mounting pole.
CAUTION
Do not overtighten the bolt.
Solar
panel
Solar
panel
12
OPERATION
Table 1 Installation (continued)
Field Installation
(continued)
Level the Device
Use the bubble level underneath the ATMOS41W to level the weather station.
The weather station angle can be adjusted by (1) loosening the leveling screw
attached to the bottom with the 8-mm wrench (included), (2) moving the weather
station side to side as needed to level, and then retightening the screw.
The ATMOS41W must be within approximately ±2° of dead level to accurately
measure rainfall and solar radiation.
Loosen the
level screw
Slide the
ATMOS 41W
side-to-side
Bubble
level
1
2
Reverify Communication Signal and Cellular Signal
Use ZENTRA Utility Mobile to review instantaneous measurements and verify
the sensor is working as expected.
Press Test in ZENTRA Utility Mobile to check the quality of the cellular signal
before finalizing installation.
The ATMOS 41W is now installed and active. Data should be available after the
first upload.
13
ATMOS 41W
2.2 CONNECTING
Connect to the ATMOS41W via bluetooth with smartphone or tablet and ZENTRA Utility Mobile.
Download ZENTRA Utility Mobile from an app store before going to the field.
• Apple®iPhone®(iOS 11.0 or newer)
• Google AndroidTM smartphone (Android 7.0 or newer)
Add ZENTRA Cloud user credentials to allow uploading data.
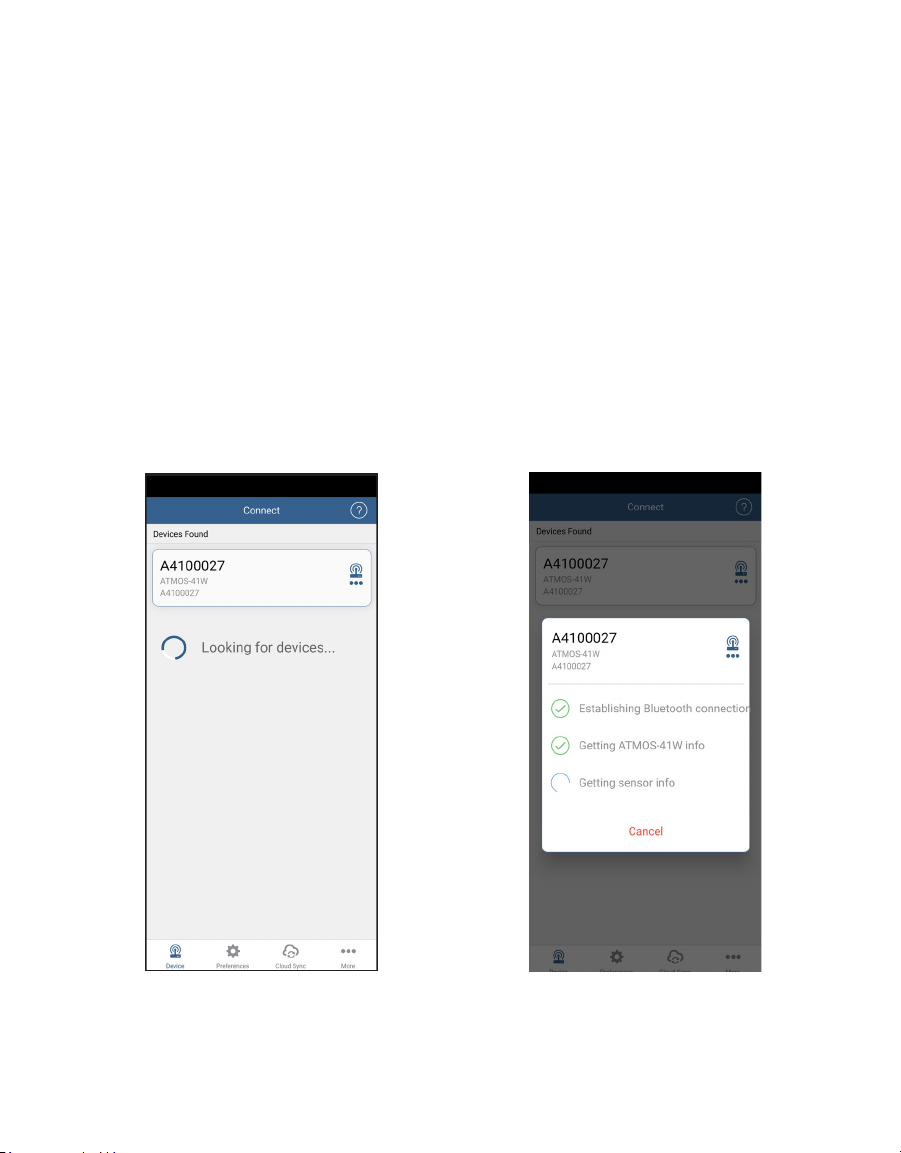
2.2.1 BLUETOOTH CONNECTION
The ATMOS41W rain funnel must be removed in order to press the TEST button before
establishing a Bluetooth connection.
1. On the mobile device, launch ZENTRA Utility Mobile.
2. Look for the ATMOS41W in the Devices Found window (Figure1).
3. Select the ATMOS41W to establish a connection (Figure2).
Figure1 Devices Found window Figure2 Establishing a connection


16
OPERATION
The Configure Device screen will appear (Figure5).
Figure5 Configure Device information screen
4. OPTIONAL Change device name (Figure5).
This value is prepopulated with the device serial number. Consider changing the name to
the field or plot where the ATMOS41W is installed.
5. OPTIONAL In the Configure Device window, set the measurement interval to the desired
interval (Figure5).
The default measurement interval is set for 15 minutes.
6. Click Done.
7. OPTIONAL In the Communication Configuration section of the Configure Device, select
Configure Cellular (Figure5).
In Configure Cellular select Upload Frequency to open the Selection menu.
Other manuals for ATMOS 41W
1
Table of contents
Other METER Weather Station manuals


Popular Weather Station manuals by other brands

La Crosse Technology
La Crosse Technology 327-1417 Instructional manual

Alecto
Alecto WS-3850 user manual

Hyundai
Hyundai WS 1070 instruction manual

La Crosse Technology
La Crosse Technology WS-9004U instruction manual

La Crosse Technology
La Crosse Technology WS-9066U-IT instruction manual

Oregon Scientific
Oregon Scientific BAR386 user manual


