manuals.online logo
Brands
  1. Home
  2. •
  3. Brands
  4. •
  5. Meyer
  6. •
  7. Lantern
  8. •
  9. Meyer Nightspot B LED Street Optik User manual

Meyer Nightspot B LED Street Optik User manual

300
240
110
50
260
70
9
22
Schutzart - Protection IP 67
Schutzklasse - Safety Class II
8 988 0.5 6..
8 988 0.6 6..
8 988 1.5 6..
8 988 1.6 6..
8 988 2.5 6..
8 988 2.6 6..
8 988 0.. 8 988 1..
8 988 1..
8 988 0..
240
60135
260
15
105
85
9
22
MOUNTING
INSTRUCTIONS
.
Stemmessiepener Weg 5 D-58675 Hemer
12
Vordere Rahmenschrauben nicht lösen !
Bei Leuchten mit Anschlusskabel darf dieses nur in
einen Anschlusskasten mit entsprechender
Schutzart und Schutzklasse angeschlossen werden.
Zur Vermeidung von Gefährdungen darf eine
beschädigte äußere flexible Leitung dieser Leuchte
ausschließlich vom Hersteller, seinem Service-
vertreter oder einer vergleichbaren Fachkraft
ausgetauscht werden.
The power supply cable may only be connected to
a connection box wich has the correct degree of
protection an safety class. If the external flexible
cable or cord of this luminaire is damaged, it shall
be exclusively replaced by the manufacturer or his
service agent or a similar qualified person in order
to avoid a hazard.
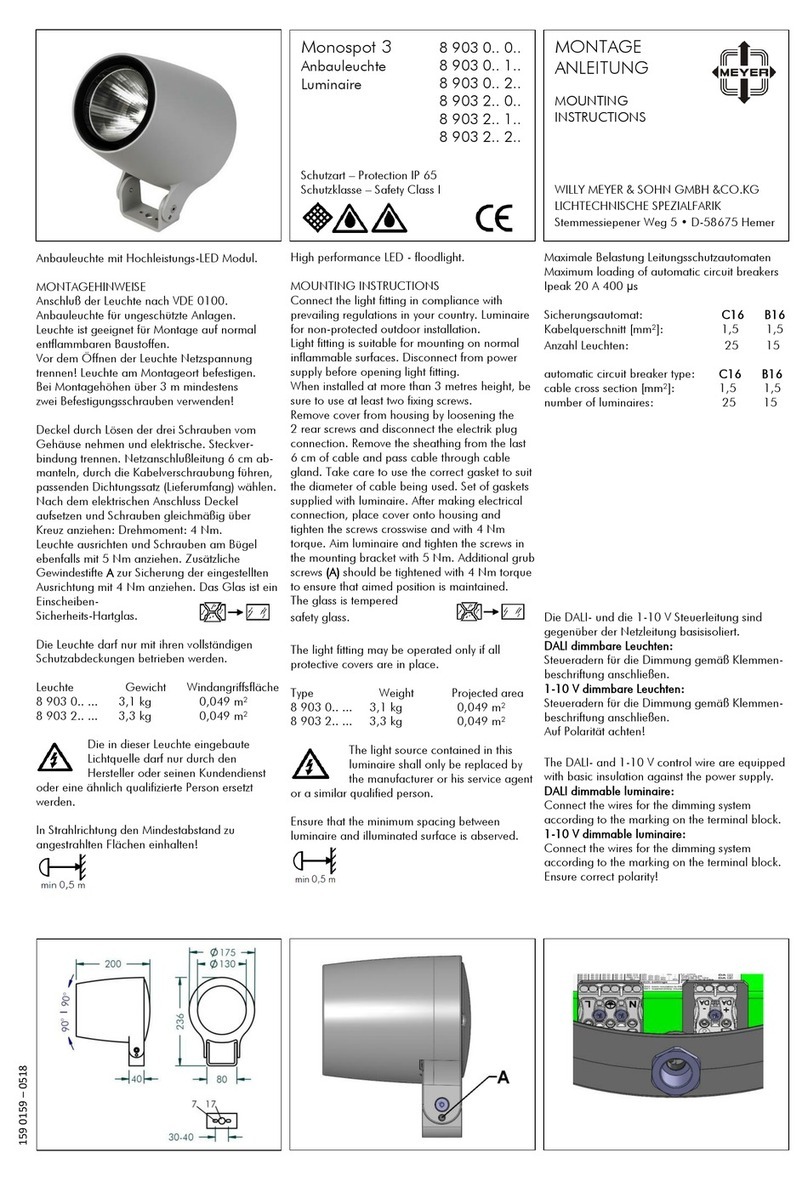
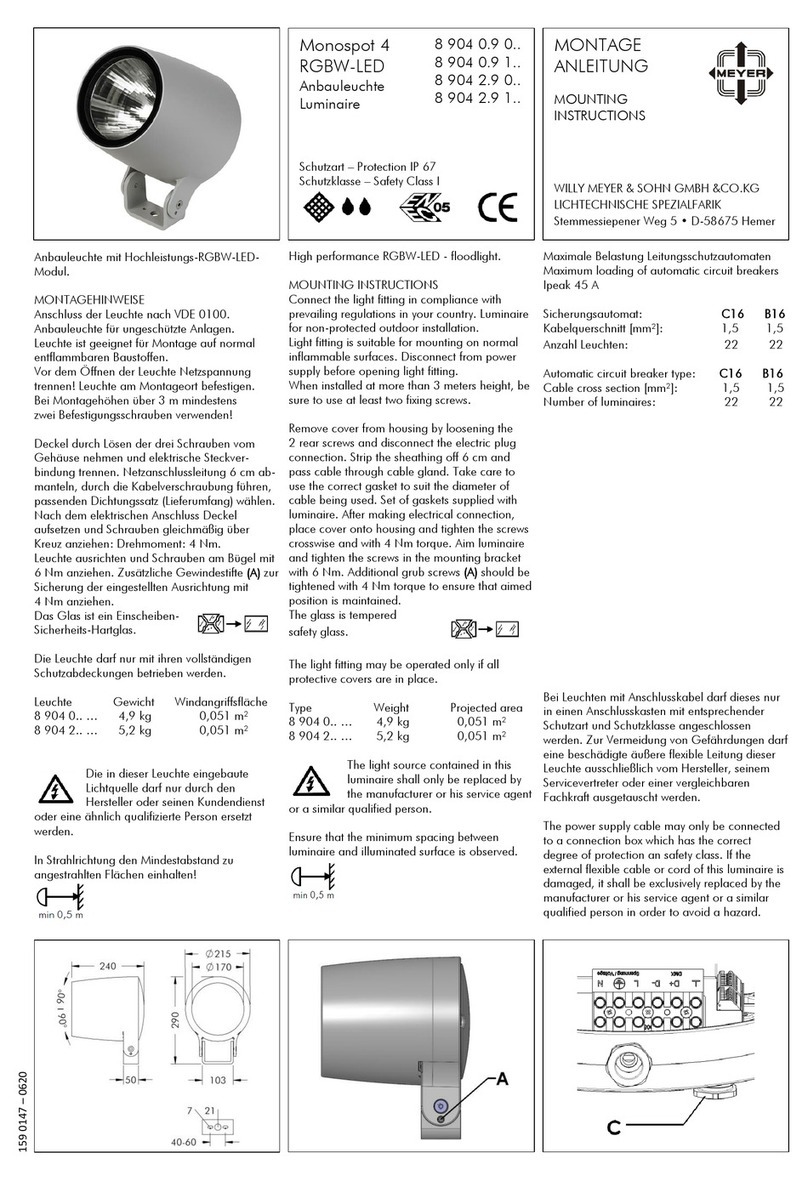
Luminaire with high performance LED module.
MOUNTING INSTRUCTIONS
Connection of light fitting in compliance with
prevailing regulations in your country.
Luminaire for non-protected outdoor installation.
Luminaire is suitible for mounting on
normal inflammable surfaces.
Disconnect from power supply before opening the
light fitting.
Mains M20 cable gland that accept cable
diameters from 8 mm to 15 mm.
Mains M20 cable gland that accept cable
diameters from 6 mm to 10 mm.
ighten the mounting bracket screws with 20 Nm.A
Luminaire with mounting base:
When installed at more than 3 metres
height, be sure to use at least two fixing screws.
After tilting the luminaire to the required position,
first tighten pivot screw with 20 Nm and
subsequently fix with set screw with 4 Nm.
Luminaire with bracket:
1
2
T
Anbauleuchte mit Hochleistungs-LED Modul.
MONTAGEHINWEISE
Anschluß der Leuchte nach VDE 0100.
Anbauleuchte für ungeschützte Anlagen.
Leuchte ist geeignet für Montage auf
normal entflammbaren Baustoffen.
Vor dem Öffnen der Leuchte Netzspannung
trennen. Leuchte am Montageort befestigen.
Bei Montagehöhen über 3 m mindestens
zwei Befestigungsschrauben verwenden.
Bügelschrauben mit 20 Nm festziehen.
Nach dem Neigen der Leuchte zuerst
Gelenkschraube mit 20 Nm festziehen,
dann mit 4 Nm Gewindestift kontern.
Leuchte mit Bügel:
A
Leuchte mit Gelenk:
1
2
Zum Anschluss der Leuchten Kabel mit
Durchmesser 8-15 mm verwenden.
Zum Anschluss der Leuchten Kabel mit
Durchmesser 6-10 mm verwenden.
Nach dem Ausrichten der Leuchte
Schraube mit 30 Nm anziehen.
Zuleitung darf sich nicht mitdrehen.
After adjusting the luminaire
tighten screw first with 30 Nm.
Supply line must not twist while
tightening screw
After that tighten pressure
screw to seal the cable gland.
B
B.
C
B
B C
Erst nach dem Anziehen der
Schraube , die Druckschraube
der Kabelverschraubung dicht anziehen.
Gilt für Leuchten mit Zuleitung.
Applies to luminaires with supply line.
Zahnscheibe
tooth washer
BC
Do NOT remove front frame with glass.
Luminaire must NOT be opened from
the front.
Maximale Belastung von Leitungsschutzautomaten / Maximum loading of automatic circuit breakers
I 34peak A
Sicherungsautomat / automatic circuit breaker type:
Kabelquerschnitt [mm²] / cable cross section [mm²]: 1,5 1,5 1,5
Anzahl Leuchten / number of luminaires:
C16 B16 C20
32 19 40
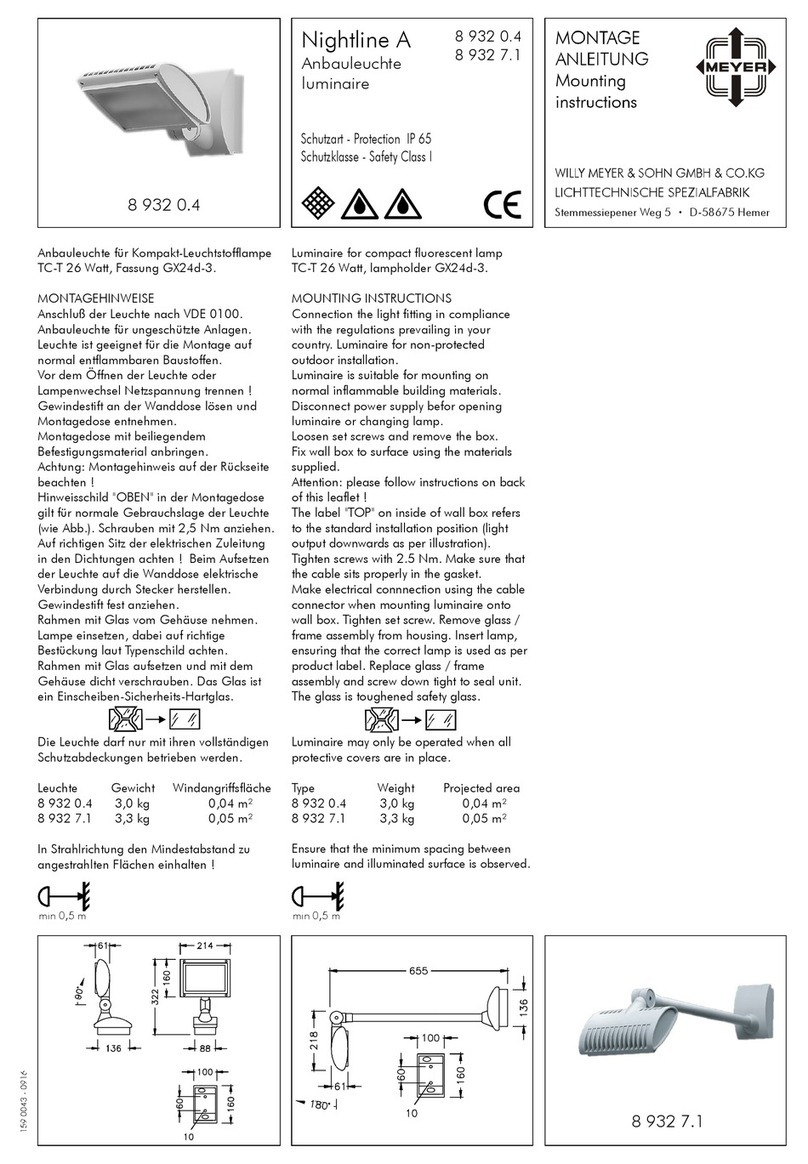
Nightspot B LED
Street Optik
Anbauleuchte
Luminaire
DALI dimmbar
DALI dimmable
Mount the
as described under
.
Adjust luminaire in both planes to required position.
After tightening the pivot screw and set screw,
also tighten screw with 8 Nm so as to fix luminaire.
Remove rear casting.
When loosening the screws care must be taken to
ensure that no parts of the luminaire fall down.
Insert the power supply cable through the cable
gland, Take care to use the correct gasket to suit the
diameter of cable being used. Set of gaskets supplied
with luminaire. Take the sheathing off the last 6 cm
of cable, shorten the individual wires N, L and DALI
to 2 cm. The sheathing of the cable must be firmly
clamped under the strain relief
Connect the wiring. Figure shows the equipotential
connection. To protect the LED against possible
electrical surge, it is imperative that the equipotential
connector is connected to the the earth potential.
Screw cable gland tight.
Before replacing rear casting, make connect
the two parts of the terminal block.
Put rear casting back on and tighten screws
crosswise to ensure that they are tightened equally.
Ensure that the minimum spacing between
luminaire and illuminated surface is observed.
luminaire on the pole
“Luminaire with mounting base”
3
5
5
4.
The DALI control wire is equipped with basic
insulation against the power supply cables.
After making the electrical connection,
ensure that the gasket is correctly in place.
The glass is tempered safety glass.
Luminaire may only be operated when all
protective covers are in place.
Type Weight Projected area
8 988 0.. ... 5,8 kg 0,05 m²
8 988 1.. ... 5,6 kg 0,05 m²
8 988 2.. ... 5,6 kg 0,05 m²
5
Die so montieren, wie vorn unter
beschrieben.
Nach dem Schwenken/Ausrichten der Leuchte
zusätzlich Schraube mit 8 Nm anziehen und
damit die Leuchte fixieren.
Mastleuchten
“Leuchte mit Gelenk”
3
Rückseite des Gehäuses öffnen.
Beim Lösen der Schrauben müssen die Bauteile der
Leuchte gegen Herabfallen gesichert werden !
Vor dem Schließen des Gehäuses elektrische
Verbindung durch Stecker herstellen.
Rückseite des Gehäuses aufsetzen und dicht
verschrauben, Schrauben dabei über Kreuz
gleichmäßig anziehen.
In Strahlrichtung den Mindestabstand zu
angestrahlten Flächen einhalten !
Netzanschlußleitung durch die Kabelverschraubung
führen, dabei passenden Dichtungssatz
(Lieferumfang) wählen. Leitung 6 cm abmanteln,
Einzeladern N, L und DALI auf 2 cm kürzen.
Mantel der Zuleitung muß unter der Zugentlastung
geklemmt werden. Die DALI-Steuerleitung ist
gegenüber der Netzleitung basisisoliert.
Elektrischen Anschluss vornehmen. Abb. zeigt den
Equipotential-Anschluss. Als Schutz der LED vor
möglicher Überspannung ist der Äquipotential-
Anschluss zwingend mit dem Erdpotential zu
verbinden.
Kabelverschraubung festdrehen. Auf richtigen Sitz
der elektrischen Zuleitung in den Dichtungen achten.
Das Glas ist ein Einscheiben-Sicherheits-Hartglas.
Die Leuchte darf nur mit ihren vollständigen
Schutzabdeckungen betrieben werden.
Leuchte Gewicht Windangriffsfläche
8 988 0.. ... 5,8 kg 0,05 m²
8 988 1.. ... 5,6 kg 0,05 m²
8 988 2.. ... 5,6 kg 0,05 m²
4
5
5
3
12
8 988 2.. 8 988 2..
Die in dieser Leuchte eingebaute
Lichtquelle darf nur durch den
Hersteller oder seinen Kundendienst oder eine
ähnlich qualifizierte Person ersetzt werden.
The light source contained in this
luminaire shall only be replaced by
the manufacturer or his service agent or a similar
qualified person.
4
min 0,5 m min 0,5 m
4

Other Meyer Lantern manuals

Meyer Nightline A User manual

Meyer

Meyer Nightline A User manual

Meyer 8 904 0.9 0 Series User manual

Meyer

Meyer 8 904 0.9 0 Series User manual

Meyer Nightspot B 8 987 0 Series User manual

Meyer

Meyer Nightspot B 8 987 0 Series User manual

Meyer Monospot 3 User manual

Meyer

Meyer Monospot 3 User manual

Meyer Nightspot BRGBW-LED User manual

Meyer

Meyer Nightspot BRGBW-LED User manual

Popular Lantern manuals by other brands

DS Produkte TRF18P0752-1 instructions

DS Produkte

DS Produkte TRF18P0752-1 instructions

Stahl ECOLUX 6610 Series operating instructions

Stahl

Stahl ECOLUX 6610 Series operating instructions

SNOWJOE SUNJOE 24V-LGT500-CT Operator's manual

SNOWJOE

SNOWJOE SUNJOE 24V-LGT500-CT Operator's manual

PRG VARI LITE VL5 Service manual

PRG

PRG VARI LITE VL5 Service manual

Raytec VARIO2 series installation guide

Raytec

Raytec VARIO2 series installation guide

ENSA LEDBT18WS2 installation instructions

ENSA

ENSA LEDBT18WS2 installation instructions

LUG OFFICE LB LED N/T Installation instruction

LUG

LUG OFFICE LB LED N/T Installation instruction

Draper RLEDL19/B instructions

Draper

Draper RLEDL19/B instructions

Green Lighting TRI-SENSOR GL4612LU Assembly & fitting instructions

Green Lighting

Green Lighting TRI-SENSOR GL4612LU Assembly & fitting instructions

Panasonic EY3741B57 operating instructions

Panasonic

Panasonic EY3741B57 operating instructions

Clas Ohlson LCC8T instruction manual

Clas Ohlson

Clas Ohlson LCC8T instruction manual

Coolon WDN-140 manual

Coolon

Coolon WDN-140 manual

shada 1000436 instruction manual

shada

shada 1000436 instruction manual

BEGA 84 036 Instructions for use

BEGA

BEGA 84 036 Instructions for use

BEGA 33 596 Instructions for use

BEGA

BEGA 33 596 Instructions for use

Dale Tiffany GT701162 Assembly instructions

Dale Tiffany

Dale Tiffany GT701162 Assembly instructions

Wagan Brite Nite Pop-Up USB Lantern user manual

Wagan

Wagan Brite Nite Pop-Up USB Lantern user manual

Eaton Crouse-Hinds Pauluhn DLLA M2 Series Installation & maintenance information

Eaton

Eaton Crouse-Hinds Pauluhn DLLA M2 Series Installation & maintenance information

manuals.online logo
manuals.online logoBrands
  • About & Mission
  • Contact us
  • Privacy Policy
  • Terms and Conditions

Copyright 2025 Manuals.Online. All Rights Reserved.