Luminaire with 7 x RGBW high performance LED
MOUNTING INSTRUCTIONS
Connection of light fitting in compliance with the
prevailing regulations in your country.
Luminaire for non-protected, outdoor installation.
Luminaire is suitable for installation on normally
inflammable building materials.
Disconnect power supply before opening
luminaire.
Secure the luminaire at the required location.
When installed at above 3 m height,
always use at least 2 fixing screws.
ighten the screw with 20 Nm.
Remove rear casting by loosening the 4 screws.
Pass cable through the cable gland , strip the
sheathing off the last 6 cm of cable and slip the
silicone tubes over the ends of the individual wires.
ATTENTION ! Not more than max. 1 cm of
sheathed cable may protrude into the luminaire
housing ! Make electrical connection. Tighten the
cable gland. Make sure that the power supply
cable fits properly in the cable gland seal.
Put rear casting back into place and make
electrical connection with the terminal block.
Tighten the screws in rear casting .
For the DMX signal we recommend the use of a
CAT-5 cable, 24 to 26 AWG (Ø 6 mm) with a
damping factor (impedance) of ~110 Ohm.
Pass the DMX cable through the second cable
gland, strip the sheathing off the last cm and slip
the enclosed silicone sleeves over the individual
wires. Make the DMX connection, ensuring that the
shielding of the DMX-cable is correctly connected
to the terminal marked .
Up to max. 32 luminaires can be connected to
one DMX interface.
A terminating resistor (120 Ohm) must be put into
the last luminaire in the system. The maximum
distance between the DMX interface and the
furthest luminaire (i.e. the max. DMX cable length)
is, according to ELDOLED, 300 m.
A
Luminaire with mounting base:
B
B
B
**
8
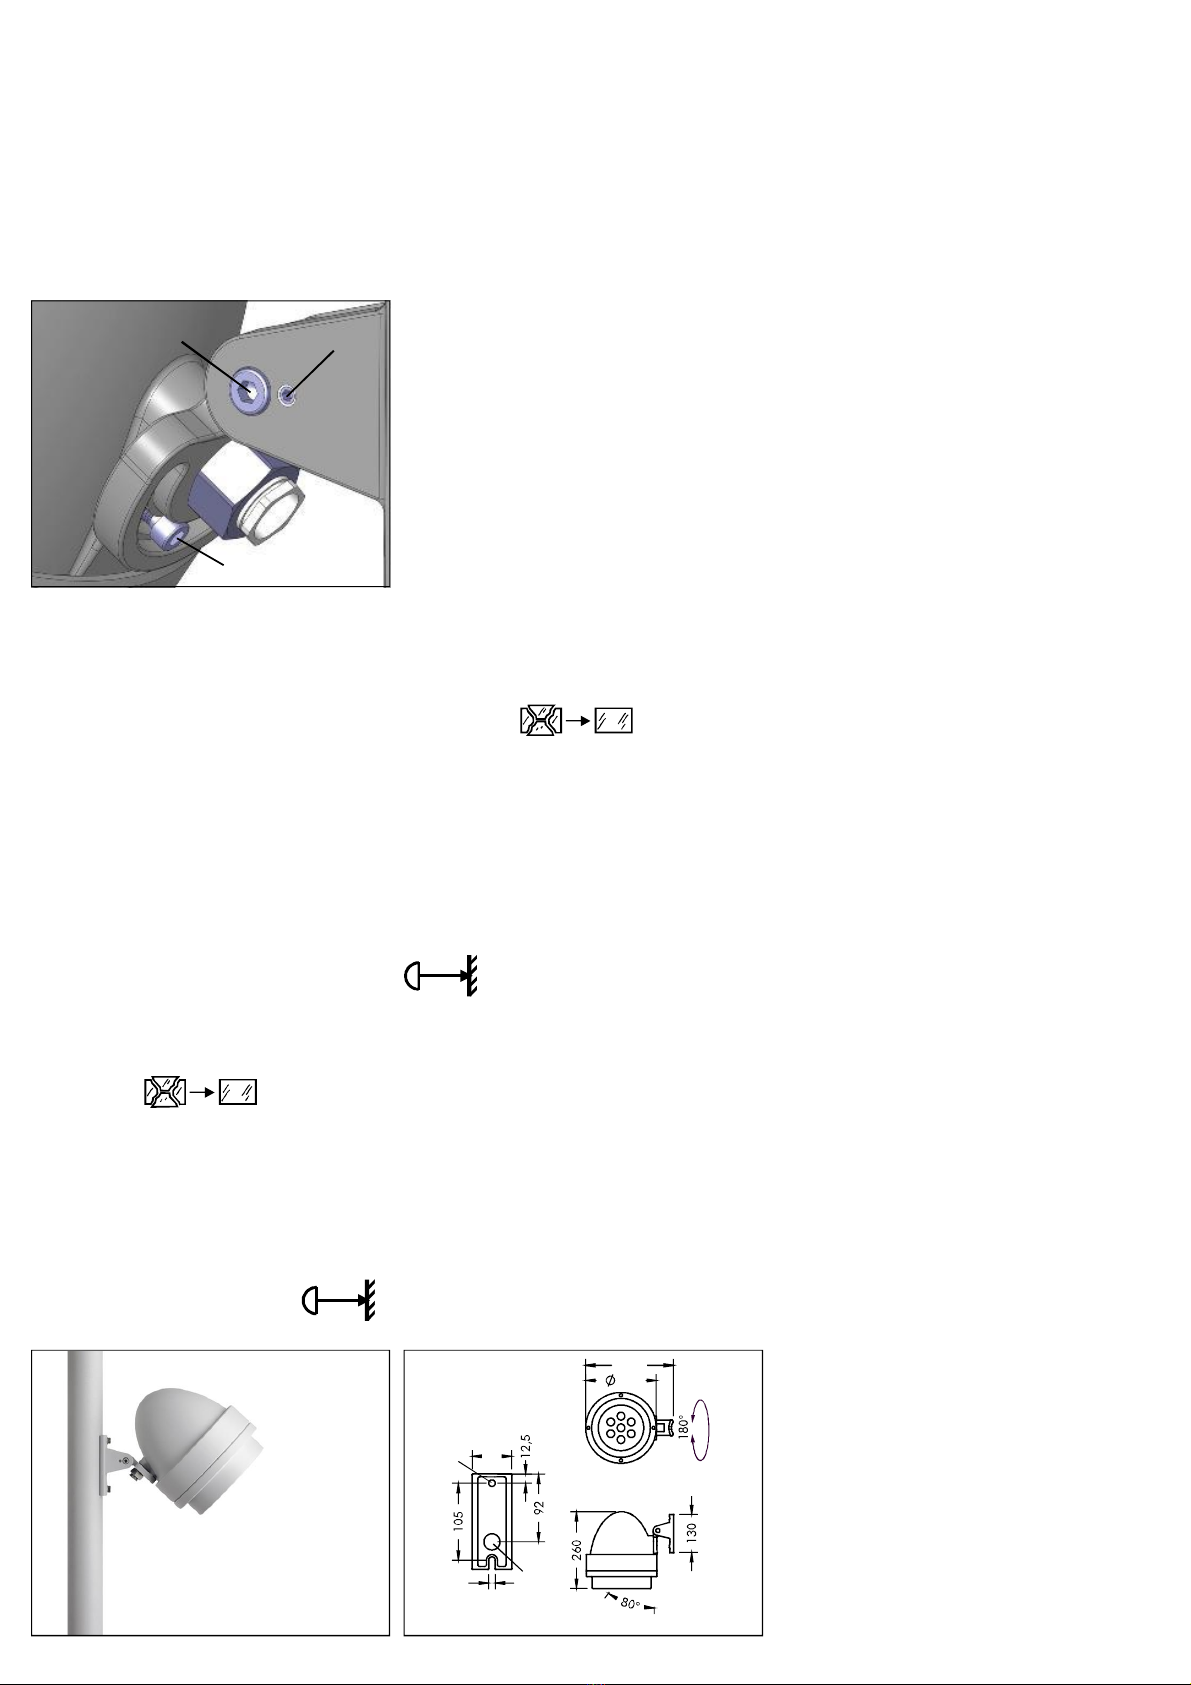
Luminaire with bracket:
1
2
T
After tilting the luminaire to the required position,
first tighten pivot screw with 20 Nm and
subsequently fix with set screw with 4 Nm.
Schutzart - Protection IP 65
Schutzklasse - Safety Class I
Anbauleuchte mit 7 x RGBW Hochleistungs-LED
MONTAGEHINWEISE
Anschluß der Leuchte nach VDE 0100.
Anbauleuchte für ungeschützte Anlagen.
Leuchte ist geeignet für Montage auf
normal entflammbaren Baustoffen.
Vor dem Öffnen der Leuchte
Netzspannung trennen.
Leuchte am Montageort befestigen.
Bei Montagehöhen über 3 m mindestens
zwei Befestigungsschrauben verwenden.
Leuchte mit Bügel:
A
Leuchte mit Gelenk:
1
2
B
B
B
**
Gelenkschraube mit 20 Nm festziehen.
Nach dem Neigen der Leuchte zuerst
Gelenkschraube mit 20 Nm festziehen,
dann mit 4 Nm Gewindestift kontern.
Rückteil durch Lösen der vier Schrauben
abnehmen. Netzanschlußleitung durch die
Kabelverschraubung führen, Leitung 6 cm
abmanteln und beiliegende Silikonschläuche über
die Einzeladern ziehen.
ACHTUNG ! Mantelleitung darf maximal 1 cm in
das Leuchtengehäuse ragen. Elektrischen Anschluß
vornehmen. Kabelverschraubung festdrehen.
Auf richtigen Sitz der elektrischen Zuleitung in den
Dichtungen achten. Rückteil wieder aufsetzen,
dabei die elektrische Verbindung durch
Steckverbinder herstellen.
Rückteil dicht verschrauben.
Für die Übertragung des DMX-Signals empfehlen
wir ein CAT-5-Kabel 24 bis 26 AWG (Ø 6 mm)
mit einem Dämpfungsfaktor von ~110 Ohm.
DMX-Leitung durch die zweite Kabelverschraubung
führen, Leitung 6 cm abmanteln und beiliegenden
Silikonschlauch über die Adern ziehen. DMX-
Anschluss vornehmen und dabei auf korrekten
Anschluss der Abschirmung (Masse) an der
gekennzeichneten Klemme achten.
Kabelverschraubung festdrehen.
Es können max. 32 Leuchten pro DMX-Interface
angeschlossen werden.
In der letzten Leuchte im System muss ein
Abschlusswiderstand (120 Ohm) angeschlossen
sein. Die max. gesamte DMX-Leitungslänge
(vom Interface bis letzte Leuchte im System) beträgt
nach ELDOLED-Angaben 300 m.
Nightspot B
RGBW-LED
Anbauleuchte
Luminaire
8 986 0.9 ...
8 986 1.9 ...
8 986 2.9 ...
.
Stemmessiepener Weg 5 D-58675 Hemer
12
Nach dem Ausrichten der Leuchte
Schraube mit 30 Nm anziehen.
After adjusting of the luminaire
tighten the screw with 30 Nm.
Zahnscheibe
tooth washer
8 986 0..
8 986 1..
8 986 0..
240
60
135
260
15
105
85
9
22
B
300
240
110
50
260
70
9
22
A