WASH POWER XB50 User manual

USER MANUAL
XB50
WASH
POWER
"

2
Table of contents
Safety 3
Robot overview 4-5
Seng up the robot 5-8
Charging the robot 9
Using alternave bracket for hose 10
HMI panel—Starng a program 11
Storing the robot 12
Program overview 13
Extension arms 14-15
XB50 User manual version 1.00 - April 2021

3
Safety instrucons
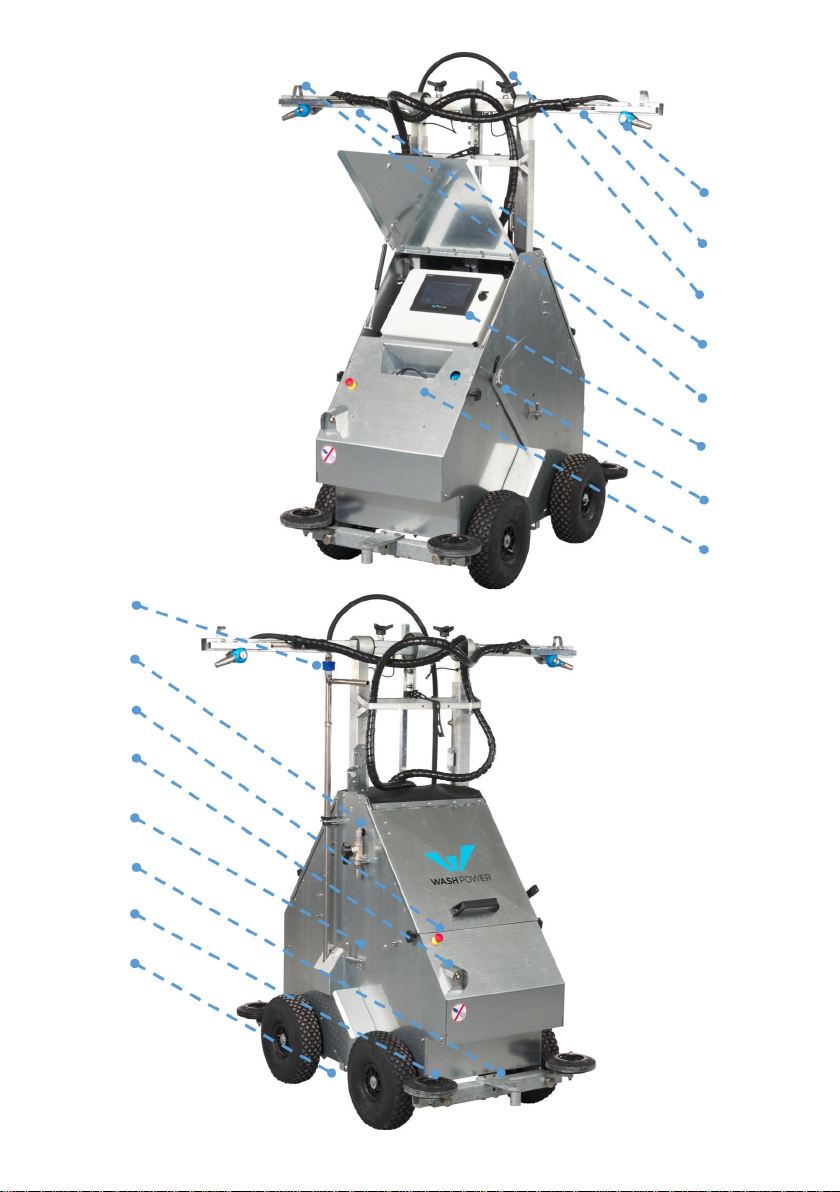
Explanaon of pictograms on the robot
Slippery oor aer washing
Breathing apparatus must be ed with a minimum of a P2 lter which
protects against both solid parcles and liquid aerosols.
Use protecve glasses in the pig house while it is being washed.
Water is highly electrically conducve.
Electricity must be connected away from the wash area.
General safety instrucons
Read the safety instrucons and direcons before use. Failure to comply with the safety
instrucons and direcons will result in the risk of serious injury.
Retain all safety instrucons and direcons for use later on.
You must stay behind the robot according to its direcon of travel while it is in use.
When the robot is in operaon all persons must vacate the cleaning area.
• The work area must be dimensioned so that the robot can operate unhindered in
the enre area you wish to clean.
• In order to prevent the robot stopping unintenonally, the oor must be at and all
objects must be removed.
• When the robot is in use all persons must vacate the cleaning area.
• The charger wall plug must t the electrical socket.
• The charger wall plug must not be changed under any circumstances.
• Do not use adapter plugs together with grounded robots. Plugs that do not t the
wall socket pose a risk of electric shocks.

4
1
2
3
4
5
6
7
8
9
10
11
12
13
14
15
16
S
VNISW
^
O
'
NW

5
1.´
High pressure nozzle
9.
High Pressure
coupling, oor con-
necon pipe
2.
Right wash arm
10.
Pressure relief/ball
valve
3.
Locking handles for
wash arms
11.
Emergency stop(s)
4.
Le wash arm
12.
End wall sensor
5.
Secondary posion
for high pressure
coupling
13.
Wash arm parking on
both sides of robot
6.
Control panel and
ON/OFF buon
14.
Tow bar for manual
transport
7.
Handle for drivemo-
tor belt tensioner
15.
Adjustable sidewhe-
els (x4)
8.
Baery charger and
wall plug compart-
ment
16.
Floor connecon
pipe, high pressure
hose connecon

6
For manual transportaon, use the included
dolly.
Hook the dolly to the tow bar, and lt it unl
the front wheels li from the ground.
Now you can easily move the robot.
You are able to both pull and push the robot
with the aached dolly, making it easy to
move between buildings.
Mount the arms by loosening the two lock-
ing handles (1). Take the arm from the par-
king posion and push it inside the square
tube on top of the robot (2). Make sure the
sensor lights up to signal correct seang (3).
Arm should be turned as depicted, where the
nozzle is downward in relaon to the handle.
When both arms are mounted correctly, gh-
ten the two locking handles.
Seng up the Robot for operaon
12
3

7
Release the handle for the oor connecon
pipe by turning it outwards and leng it slide
down, exposing the highpressure hose con-
necon.
Connect the highpressure hose to the
coupling. Make sure it is seated and locked.
Lock the oor connecon pipe handle using
the locking bracket. Now the pipe i xed in
boom posion.
Open the pressure releaf valve for 5-10 sec.
to ensure no air pockets are present in the
system., and that water is owing freely.
Make sure the highpressure pump is turned
on before doing this.
Seng up the Robot for operaon

8
Make sure the drive motor belt tensioner
handle is in locked posion.
Unlock the drive motor belt tensioner handle
When you need to transport the robot
manually (Page 6)
Open the lid to operate the HMI panel.
Turn the robot ’ON’ by twisng the ON/OFF
buon to ’ON’ posion
Choose the program you want the robot to
perform from the dropdown list.
Press ’play’ to start the chosen program.
Further instrucons on operang the HMI
panel can be found in next chapter (page 9)
The robot starts operang with the program
you have chosen
Seng up the Robot for operaon

9
Pull the charging cable out from the
cable compartment and plug it into a
suitable wall outlet.
When connected check that the charge
lights are lit as follows:
Green:
Connected to power (constant lighng)
Yellow:
STATUS :
When the STATUS (yellow) LED is blin-
king slow, the baery will be approxim-
ately 80% charged and may be retur-
ned into operaon if required.
When the STATUS (yellow) LED is illu-
minated, the baery will be fully
(100%) charged and is ready to be re-
turned into operaon.
When the STATUS (yellow) LED is o
the baery is fully charged. The baery
can be le on connuous charge for an
extended duraon.
Disconnect the AC power cable from
the mains power outlet at any me to
stop charging.
Charging the robot

10
If you need to place the hose on the
wash arms, we have prepared a bracket
on each arm for easy connecon.
The typical use of this posion is when
the oor slates are in same direcon as
the robot. The hose in boom posion,
can get stuck in the ribs .
You can freely use either le or right
side.
Hose bracket locks the connector (dark
blue) in to posion.
Hose is lied clear of the oor.
Using alternave bracket for hose
WASH
POWER

11
Home screen
From here you can choose :
• Program
• Start selected program
• Stop selected program
• Pause selected program
• Select acve wash arms
• Both, le or right
Program list
From here you can select the program
you want the robot to perform.
Mark the program and press √
For more details about the programs,
please read page XX
Start selected program
Pressing the ’Play’ buon will start the
robot, using the chosen program,
shown at the top.
Play buon turns green, stop and pau-
se becomes acve.
Select acve washarm(s)
By tapping on the robot pictogram, you
can choose to acvate only one
washarm. One tap is le, two taps is
right and a third tap will acvate both
again.
HMI panel — starng a program
Hi
PROGRAM
:
101
Cl
0
.
0
%
|
Battery
level
0
.
00
V
©
Ba
I
-
>
*
LL
_
1
m
PROGRAM
101

12
1. Wash the robot to remove all dirt from surface, wheels, ngs etc.
2. Store the robot in an ammoniac free environment
3. Grease the robot every 3 months or 250 hrs operaon
4. Use spray lube on connecon parts
5. Follow the maintenance schedule
Storing the robot

13
Program overview
Washing
programs
for
XB
50
WASH
POWER
Make
cleaning
easy
Farrowing
section
Early
Weaning
section
Finisher
section
Wash
Type
High
intensity
(
slow
)
101
201
301
Medium
intensity
(
medium
)
102
202
302
Low
intensity
(
fast
)
103
203
303
W
/
extension
arms
(
+
80
cm
)
13
High
intensity
(
slow
)
211
311
Medium
intensity
(
medium
)
212
312
Low
intensity
(
fast
)
213
313

14
If your robot have extension arms, they
are placed in brackets on the side of the
robot.
Li the extension arm from the bracket
Mount the extension arm , by sliding it
into the prole on the robot, unl it is
seated at the boom of the prole.
Loosen the rubberband that xes the
washarm cables to accomodate the ex-
tended reach of the washarms.
Extension arms
t

15
Mount the arms by loosening the two
locking handles (1). Take the arm from
the parking posion and push it inside
the square tube on top of the robot (2).
Make sure the sensor lights up to signal
correct seang (3).
Arm should be turned as depicted, whe-
re the nozzle is downward in relaon to
the handle
Make sure to ghten the locking handles
and check that the sensor light for each
arm is lid.
Extension arms
12
3

16
WASH
POWER
"
Make
cleaning
easy
Other manuals for XB50
1
Table of contents
Other WASH POWER Cleaning Equipment manuals
Popular Cleaning Equipment manuals by other brands

Good Way
Good Way QUICK SHOT QS-300 Operating and maintenance instructions

SJE
SJE OPTIMA X Series user manual

FASANO TOOLS
FASANO TOOLS FGA 380 Safety instructions and instruction manual

Host
Host Liberator extractorVAC Safety & maintenance guide

Kärcher
Kärcher NT 22/1 Ap Bp manual

Bosch
Bosch UniversalBrush 3 603 CE0 0 Series Original instructions