MiDRONE AIR41 User manual

MiDRONE AIR 41
USER'S MANUAL
*This picture is shown for reference only. Please refer to the real product.
INTRODUCTION
We thank you for purchasing this product. This model is perfect to debut in the world of drones and
familiarize yourself with the control of such device. The remote controller allows to control it up to a
distance of about 70 meters.
To take full advantage of this product and use it safely please read this manual before use. Please also
keep this manual for future reference.
WARNING
This product is not a simple toy. It is a high-tech device that requires accurate assembly and proper use to
prevent any accidents. The user of this device must use it responsibly and ensure not cause any damage to
third parties or to objects belonging to third parties.
This product is not suitable for children under 14 years.
Please use this product only in places where it is legally permitted.
Please refer to the legislatio o the use of dro es i your cou try.
Midrone can not be held responsible for any damage, loss, injury or death caused directly or indirectly
by the use of this product, part of the product or the information contained in this manual.
Please refer to our website www.midrone.eu for more information.
SAFETY INSTRUCTIONS
The propellers in movement can cause more or less serious injuries which is why you should never use
the drone near the crowd or flying too close to other people or animals.
Accidents can be caused by improper assembly of the drone or a lack of control and also by the use of a
drone and / or damaged remote.
Users of this product should be aware of the risks of potential damage and should therefore use it with
great caution.
1. Avoid the crowds and obstacles : the speed and behavior of the drone can sometimes be unstable
it is strongly advised to use it in places away from the crowds tall buildings or trees high voltage
cables to prevent injury to the user or other persons or damages to the drone.
2. Do not fly the drone in bad weather (rain wind storm) to prevent damages or lost. Keep away
from wet places to avoid dis-functioning of electronic parts.
3. Do not use the drone if you're tired because the control requires maximum concentration. Be very
careful during learning until your control of the drone is acquired.
4. Keep the drone and the battery away from heat: this product is made of metal and plastic parts
and electrical parts. Therefore it should not be exposed to high temperatures such as near fire near

a heating radiator or exposed too long to direct sunlight.
5. Never leave small parts of drone to reach of children to avoid the risk of suffocation.
CHARGING AND USE OF THE LI-PO BATTERY
1. Check that the battery is in perfect condition before charging. If the battery appears damaged you
do not charge it to avoid damage or injuries.
2. Always use the original charger to recharge the battery. Using a non-matching charger could cause
irreversible damage to the battery and cause an accident.
3. When charging if the charge connector is overheating this means an excessive load and this can
cause permanent damage to the battery. Please stop charging immediately if this happens.
4. Do not leave the battery unattended while charging and do not leave load near flammable material
or in a vehicle.
5. When the drone has just finished flight the battery temperature is higher it is preferable to wait
for 30 minutes and charge the lithium battery when cooled otherwise it may damage the battery .
6. Do not short-circuit the battery polarity when connecting the charger.
7. Do not expose the battery to excessive heat never throw it into the fire to avoid any risk of
explosion.
8. Do not dispose of the battery in domestic waste but bring it to a collection point for recycling
please check with your local authorities about it.
DESCRIPTION OF THE REMOTE CONTROL
The supplied remote lets you control the drone up to a maximum distance of 70 meters.
REMARKS :
1. We recommend that you familiarize yourself with the buttons of the remote before you start using
the drone.
BATTERY INSTALLATION
1. I stall batteries i the remote co trol
The operation of the remote requires 4 AA batteries (not included).
Observe the battery polarity when inserting in the compartment at the
back of the remote.
Remove the batteries from remote control for a long period of non-
use to avoid discharge and leakage.

2. Charging and installing the Li-Po battery
Plug the USB connector of the charging cable to a USB port on your
computer or USB charger (not included) and the other end directly to
the battery cable. The charge indicator LED will light in red on the
charger.
It takes about 60 minutes for the lithium battery to be fully charged.
The red LED indicator light turns off when the battery full.
Install the fully charged battery into the compartment provided for this purpose below the drone and plug
the cable into the drone's power plug as shown on the left image.
INSTALLATION OF THE CAMERA
Proceed as described below to install the camera. Warning only that specific camera provided by
Midrone is compatible with this product.
INSTALLING PROTECTIONS AND REPLACING THE PROPELLERS
Install protection in the direction of the arrows as shown in the picture
on the right.
Screw protection when it is in place.
If a propeller replacement is necessary pay special attention to
the direction of rotation. More details in the illustration at
right. The propellers that rotate clockwise are marked with a
letter A. Those that rotate in the anti-clockwise direction are
marked with a letter B.
NOTE: The installation of accessories increases the weight of the drone and can affect the flight time.
BEFORE FLYING
Settle in a space without obstacles with a clearance of about ten meters around you and five meters in
height at least.
Ensure that the battery of the drone and batteries from remote control are fully charged.
Before turning the drone check that the left joystick of the remote controller is completely pulled down in
the center.
PREPARATION FOR TAKE OFF
Connect the battery of the drone the drone LED lights flash rapidly. Then
place the drone to the ground or on a flat surface and turn on the remote
control.
Before each flight you must establish the link between the drone and
remote control by performing this operation: Push the left joystick fully
upward and then pull it to the bottom. A beep sounds when the joystick is
at the top and another beep when it is at the bottom. The 2 beeps indicate
that the synchronization is successful and that the drone is ready to fly.
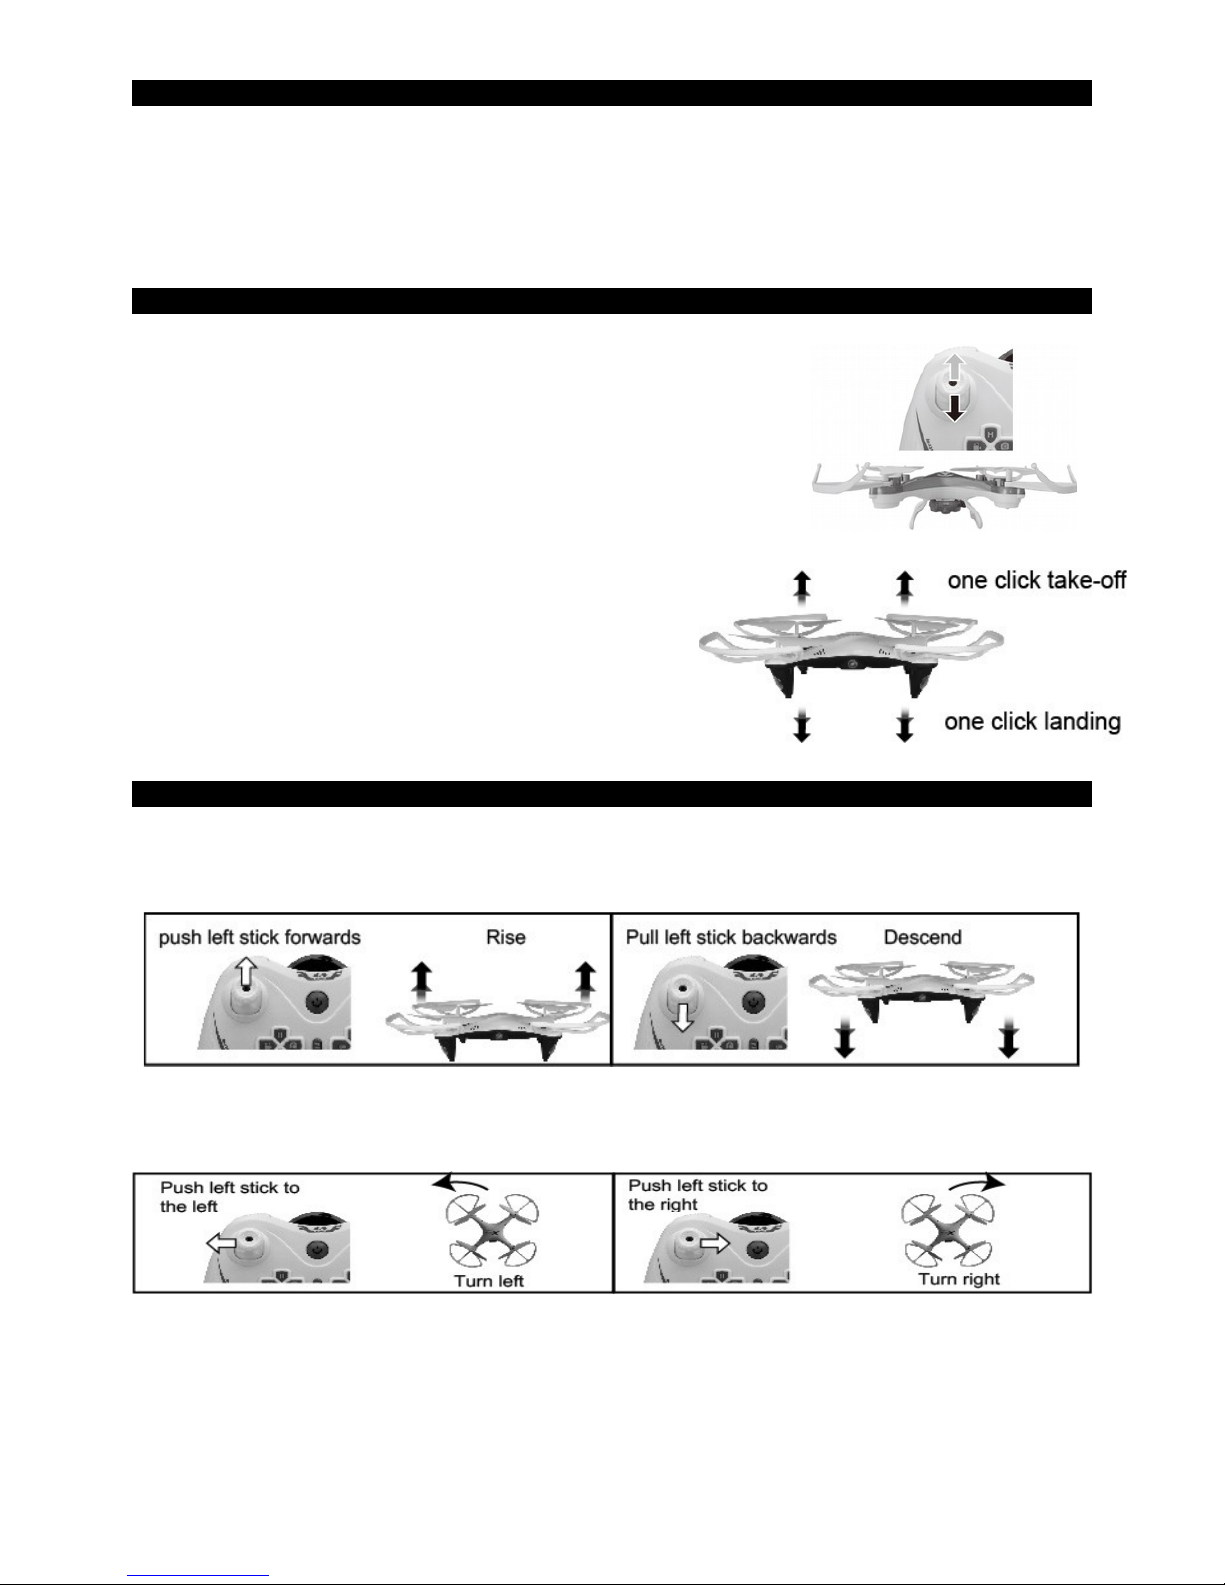
When the synchronisation between the drone and the remote
controller is established simply press on « Auto take-off »
button and the drone will take-off and hover at
approximatively 1 meter height.
You can now start to pilot the drone with the joysticks of the
remote controller. If you press this key again the drone will
land automatically.
FLYING CONTROL
ACCELERATOR (left joystick)
Push the left joystick up: the drone rises.
Pull the left joystick down: the drone descends.
LEFT / RIGHT TURN (left joystick)
Push the left joystick to the left: the drone turns on itself to the left.
Push the left joystick to the right: the drone turns on itself to the right.
FORWARD / BACKWARD FLY (right joystick)
Push the right joystick up: the drone flies forwards.
Push the right joystick down: the drone flies backwards.

SIDEWARD FLY (right joystick)
Push the right joystick to the left: the drone fly leftwards
Push the right joystick to the right: the drone fly rightwards.
FORWARD / BACKWARD MICRO-ADJUSTMENTS (TRIM)
SIDEWARD MICRO-ADJUSTMENTS (TRIM)
FLYING IN CF MODE (DIRECTION LOCK, HEADFREE)
When this mode is enabled the drone uses the direction it has stored at the time of synchronization and
takes the pilot's position as a reference when using the right joystick on the remote. The movement front
or back of this joystick will move away the drone or let it come closer from the pilot and regardless of
the orientation of the front of the drone.
The operation of this mode requires that the pilot remains in the same place as at the time of
synchronization and keeps the drone in front of him during the flight.
1. FLY DIRECTION SETTING
Before the flight place the drone in front of you with the back of the
drone pointing to the remote control.
Connect the battery of the drone the LED lights will flash waiting for
the remote synchronization procedure. Perform this procedure as
explained earlier in this manual in "preparation for take off" section.
Proceed to take off by pushing the left joystick forward.
2. Once this step is done and the drone is flying press the mode switch
button on the remote control to activate CF Mode / Direction Lock.
The remote will beep and the LED lights of the drone will flash

quickly to confirm that this mode is engaged.
3. Press again the mode switch button on the remote to exit the CF
Mode / Direction Lock. The remote will beep once and the LED
lights of the drone keep fixed to confirm disabling this mode.
NOTE: After the flight if the left joystick of the remote control remains in the default center position for
more than three seconds the LEDs of the drone will again flash quickly awaiting for a new setting of the
flight direction. Proceed from step 1 again to set the flight direction.
HIGH / LOW SPEED
The H and L buttons are used to change the flight speed forwards / backwards / leftwards /
rightwards of the drone. The default setting when the remote is turned off is on low speed.
Press H button the remote will beep twice to warn that the high speed mode is selected.
Press L button the remote will beep once to warn that the low speed mode is selected.
PHOTO AND VIDEO
Please make sure that a micro SD card is inserted in the camera slot before taking photos and
videos. The card must be SDHC type of max. 32GB and must be formatted in FAT32 file
format. Press Photo button once to take a picture. Press video button once to start recording
video. Press this button again to stop recording.
360° ROLLOVER (3D FLIP)
When you are piloting the drone well in hand you can now perform tricks of style!
Fly the drone up to 3 meters height.
Press and hold the 3D Rollover
button on the right side of the remote
control and use the right joystick to
control rollover direction to achieve
a 360° rollover forward back left or
right .
URGENT SHUTDOWN
If case of any emergency an urgent shutdown is possible by pressing the auto-landing key and pushing
down the left joystick (throttle). Do not use this function when the aircraft is flying normally on a high
level or the aircraft would drop down directly and get damaged.
TROUBLESHOOTING
Problem Cause Solution
The remote control does
not work at all
1. The batteries are used Remplace the batteries
2. The batteries are not well
installed
Check polarity indications and insert the
batteries in the right direction
3. The ON/OFF switch is on OFF Power ON the remote control
The controls do not work
properly
1. The drone battery is not correctly
installed
Verify the connection of the battery

2. The remote control and drone are
not synchronized
Start again the synchronization procedure
explained in this manual
3. Bad weather conditions Do not fly the drone in windy conditions
or if it rains
The drone does not take
off
1. The propellers are not rotating
fast enough
Push the left joystick upward
2. The drone battery is discharged Recharge the battery
Brutal landing 1. The left joystick is pulled down
to quickly
Pull the left Joystick slowly for a soft
landing
Loss of control 1. Exceeding the maximum range
of the remote control
The maximum range is approximately
70m with remote
2. Bad weather conditions Do not fly the drone in windy conditions
or if it rains
WARRANTY CONDITIONS
1. Warranty period
The Midrone products and accessories are guaranteed against manufacturing defects for a total period of
24 months ** (consisting of an initial period of six months and a second period of 18 months) from the
date of original purchase. Midrone sole obligation in the event of such defects during this period is to
repair or replace the defective product or part with a comparable product or part at the sole discretion of
Midrone.
The following components or parts are not within the scope of this warranty.
• Propellers & propeller protections : no warranty on this component
• The lithium battery receive a limited warranty for 6 months or 50 recharges
Existence of a lack of conformity on the day of purchase
To benefit from the conformity warranty of the defect in the product must exist at the acquisition date.
The defect in the product appears within 6 months after purchase
The defect in the product appears within 6 months after the purchase it is presumed to exist at the date of
acquisition.
The fault occurs more than 6 months after purchase
The fault appears more than six months after purchase you can benefit from the guarantee of conformity
only if you can prove that the defect existed at the time of purchase.
** LAW 201 -3 of 17 March 201 on the consumption, publication NOR: EFIX1307316L
2. Warranty conditions
These conditions must be fulfilled for the warranty service.
You must include the purchase invoice or receipt as proof of purchase date.
• The product must not have been altered modified or repaired by unauthorized person.
• The product must have been used in a normal way as described in the manufacturer's manual.
• The serial number or lot number labels and stickers sabotage must be intact with no signs of tampering.
The guarantee is not applicable for
• Damage resulting from misuse accident shock ...
• Damage resulting from the inability to use the product
• Damage resulting from a fault of the user
• Damage resulting from a job use or installation not in accordance with the manufacturer's specifications
• Damage resulting from a bad use for the good preservation of the unit
• Damage resulting from use of inappropriate accessories or consumables
• Damages that result from use of unauthorized spare parts
• Damage resulting from modification or alteration of the product
• Damage resulting from pilot error
• The damage that result from misconfiguration
• Damage resulting from the use of the unit in a hazardous environment
• Damage resulting from the use of the unit in bad weather
• Damage resulting from the use of a defective or non-charged battery.
• Damage to components: Camera Accu resulting from inadequate mounting of these components
• The damage resulting from the operation of the unit in an electro magnetic interference environment
(radio transmission tower high voltage son high voltage transformer etc.).
• Damage resulting from operating the unit in a known environment for interference from other wireless
devices (Wi-Fi signals data transmission etc ...)
• The damage resulting from the operation of the unit with a higher weight than normal take off weight.
3. Return Product
The product can be returned to your dealer or directly at Midrone after asking in advance a return number
on the site www.MiDrone.eu. If the returned unit is out of warranty no refund or exchange will be
allowed.
. Spare parts available
The main spare parts such as propellers battery propeller protection are available for sale on the site
www.MiDrone.eu
TECHNICAL SPECIFICATIONS
Drone size: 300 x 300 x 65m - Weight: 109g
Flight stability with 6 axis gyro 4 channels
Photo/video : camera 640 x 480 pixels
Rechargeable LiPo battery 450mAh 3.7V
Fly time: 7-8 mins in good conditions
Charging time: about 60 mins
2 flight speed max speed max 8m/s
Direction lock (headless) and 3D flip 360°
Range with 2 4Ghz remote control: about 70m
Auto take-off / landing – Altitude hold
Box co te t :
MiDrone Air41 with camera
Remote control 2.4Ghz
4 blades installed + 4 blade protections
Battery LiPo 450mAh 3.7V + USB Charger
Screwdriver + spare screws
*4 batteries AA 1.5V needed for remote controller(not included in the pack)
RESPECT THE ENVIRONMENT
This product or its battery can not be disposed of with household waste it must be returned to a
collection point to be recycled. Please check with your local authorities for details.
ABOUT THIS USER'S MANUAL
We strive to ensure that the information contained in this manual are as accurate as possible. Changes
may be made to the manual or the product without prior notification. The latest updates will be available
on our website www.midrone.eu. Our company shall under no circumstances be held liable for injury or
damage caused by errors or omissions in this manual.
©Midrone 2018. All rights reserved. All brands and trademarks mentioned in this manual are the property
of their respective owners.

CE DECLARATION OF CONFORMITY
We manufacturer / importer
Company : A6 Europe s.a.
Address : 127-129 rue Colonel Bourg 1140 Brussels Belgium
Declare under our own responsability that the following equipment :
Brand : MiDRONE
Item code: MIDR_AIR41
Product description: R/C Drone MiDRONE Air 41
is in compliance with the essential requirements and other relevant provisions of the European Directive
RED 2014/53/EU. This product has been tested with the listed standards and found in compliance with the
following European Directives :
ETSI EN300440 V2.1.1 : 2017-03
ETSI EN301489-1 V2.1.1 : 2017-02
ETSI EN301489-3 V1.6.1 :2013
EN62115+A12:2015
EN71-1:2014
EN71-2:2011+A1-2014
EN71-3:2013+A1-2014
EN62479:2010
IEC62133: 2012
2006/66/EC (2013/56/EU)
2011/65/EU (EN 62321-3-1:2014)
Date : February 2018
David Peroo Product Manager
Table of contents
Other MiDRONE Drone manuals


