Midtronics inCHARGE 940 User manual
Model INC-940
Diagnostic
Conductance
Charging Station
For analyzing and
charging 12-volt
automotive batteries
•English...................................p. 1
•Français .................................p. 21
•Español..................................p. 45
TM
Battery Management Innovation
INSTRUCTION MANUAL


- 1 -
SAFETYINSTRUCTIONS .........................................................................................................................3
OPERATION ..............................................................................................................................................7
OVERVIEW ........................................................................................................................................7
FRONT PANEL...................................................................................................................................7
INITIAL SETUP...................................................................................................................................8
Dealer Number.............................................................................................................................8
Date and Time .............................................................................................................................8
OPTIONS MENU ................................................................................................................................8
Set Time.......................................................................................................................................8
Printer Type .................................................................................................................................9
Dealer Number.............................................................................................................................9
Language.....................................................................................................................................9
PRE-ANALYSIS BATTERY INSPECTION .........................................................................................9
BATTERY ANALYSIS / CHARGING SETUP ................................................................................... 10
BATTERY ANALYSIS RESULTS ..................................................................................................... 12
TEMPERATURE............................................................................................................................... 12
CHARGE COMPLETION AND AND FINAL ANALYSIS................................................................... 12
INFORMATION MENU ..................................................................................................................... 12
Generate Test Code .................................................................................................................. 13
Print Last Test Results............................................................................................................... 13
View Last Test Results .............................................................................................................. 14
MAINTENANCE ....................................................................................................................................... 14
CABLE SET REPLACEMENT .......................................................................................................... 14
TROUBLESHOOTING............................................................................................................................. 15
ERROR MESSAGES........................................................................................................................ 15
DISPLAY PROBLEMS ...................................................................................................................... 16
TEST CODE PROBLEMS ................................................................................................................ 17
PRINTING PROBLEMS.................................................................................................................... 17
SPECIFICATIONS ................................................................................................................................... 18
PATENTS, LIMITED WARRANTY, SERVICE......................................................................................... 19
TABLE OF CONTENTS

- 2 -

- 3 -
SAFETY INSTRUCTIONS
IMPORTANT SAFETY INSTRUCTIONS: READ AND SAVE
THIS SAFETY AND INSTRUCTION MANUAL. KEEP IT WITH
OR NEAR CHARGER AT ALL TIMES.
1. WARNING: RISK OF EXPLOSIVE GASES
1.1 WORKING IN THE VICINITY OF A LEAD-ACID BATTERY IS DANGEROUS. BATTERIES
GENERATE EXPLOSIVE GASES DURING NORMAL BATTERY OPERATION, AND WHEN
DISCHARGED OR CHARGED. FOR THIS REASON, IT IS OF UTMOST IMPORTANCE
THAT EACH TIME BEFORE USING YOUR CHARGER, YOU RE-READ THIS MANUAL AND
MAKE CERTAIN YOU FULLY UNDERSTAND IT AND FOLLOW THE SAFETY AND
OPERATING INSTRUCTIONS EXACTLY.
1.2 To reduce risk of battery explosion, follow these safety instructions and those published by
the battery manufacturer and the manufacturer of any equipment you intend to use in the
vicinity of a battery. Review cautionary marking on these products and on engine, and on
vehicle or equipment containing the battery.
1.3 CAUTION: To reduce the risk of injury, charge only rechargeable LEAD-ACID TYPE
batteries which may include MAINTENANCE-FREE, LOW-MAINTENANCE OR DEEP
CYCLE batteries. Other types of batteries may burst causing personal injury and damage.
If you are uncertain as to the type of battery you are attempting to charge, or the correct
procedure for checking the battery’s state of charge, contact the seller or battery
manufacturer.
1.4 Use of an attachment not recommended or sold by the battery charger manufacturer may
result in a risk of fire, electric shock, or injury to persons.
1.5 To reduce risk of damage to electric plug and cord, pull by plug rather than cord when
disconnecting charger.
1.6 Position AC and DC leads to avoid tripping over them and to prevent damage by hood,
doors, or moving engine parts; protect from heat, oil, and sharp edges.
1.7 Do not operate charger if it has received a sharp blow, been dropped, or otherwise damaged
in any way; take it to a qualified service center.
1.8 Do not disassemble charger; take it to a qualified service center when repair is required.
Incorrect reassembly may result in a risk of electric shock or fire.
1.9 If the charger is in need of service, call Midtronics at 1-800-776-1995 or 1-630-323-2800.
1.10 To reduce risk of electric shock, unplug charger from the AC outlet before attempting any
maintenance or cleaning. Turning off the controls will not reduce this risk.
1.11 Do not overcharge battery. See Safety Instructions (3).
1.12 When charging a battery, locate in a dry, well-ventilated area.
1.13 Never place articles on or around charger, or locate charger in a way that will restrict the flow
of cooling air through cabinet.
!

1.14 An extension cord should not be used unless absolutely necessary. See Safety Instructions (4.3).
1.15 Have damaged cord or plug replaced immediately.
1.16 Do not expose charger to rain or snow.
2. PERSONAL PRECAUTIONS
2.1 Always have someone within range of your voice, or close enough to come to your aid, when
working around lead acid batteries.
2.2 Have plenty of fresh water and soap nearby in case battery acid contacts skin, clothing or eyes.
2.3 DANGER: Batteries contain sulfuric acid that can cause blindness or severe burns. Wear
complete eye protection, clothing protection, and wear rubber soled shoes. Place damp cloth
over battery to protect against acid spray. When ground is very wet or covered with snow,
wear rubber boots. Avoid touching eyes while working near battery.
2.4 If battery acid contacts skin or clothing, wash immediately with soap and water. If acid enters eye,
immediately flush with running cold water for at least 10 minutes and get doctor’s attention.
2.5 NEVER smoke or allow a spark or flame in vicinity of battery or engine.
2.6 Be extra cautious to reduce risk of dropping a metal tool onto battery. It might spark or short
circuit the battery or other electrical part that may cause an explosion.
2.7 Before working with lead acid battery, remove personal metal items such as rings, bracelets,
necklaces, watches, etc. A lead acid battery can produce a short circuit current high enough
to weld such items, causing a severe burn.
2.8 Use charger for charging LEAD-ACID batteries only. The charger is not intended to supply power
to a low-voltage electrical system other than applications using rechargeable, lead-acid type
batteries. Do not use battery charger for charging dry-cell batteries commonly used with home
appliances. These batteries may burst and cause personal injury and property damage.
2.9 NEVER charge a frozen battery; thaw it out first. Charging will then be safer and more efficient.
3. PREPARING TO CHARGE BATTERY
3.1 If necessary to remove battery from vehicle to charge, always remove grounded terminal
from battery first. Make sure all accessories in the vehicle are off, so as not to cause an arc.
3.2 Stud adapters must be used on side-post and group 31 batteries.
3.3 Be sure area around battery is well ventilated while battery is being charged. Gas can be
forcefully blown away by using a piece of cardboard or other nonmetallic material as a fan.
3.4 Clean battery terminals. Be careful to keep corrosion from coming into contact with your eyes.
3.5 Study all battery manufacturer’s specific precautions such as removing or not removing cell
caps while charging and recommended rates of charge.
3.6 Determine voltage of battery by referring to car owner’s manual and make sure that the
output voltage menu selection is set at the correct voltage. The charger has adjustable
charge rates, so charge battery initially at lowest rate. If charger has only one voltage, verify
that battery voltage matches voltage of charger.
- 4 -
4. GROUNDING AND AC POWER CORD CONNECTION INSTRUCTIONS
4.1 Charger must be grounded to reduce risk of electric shock. Charger is equipped with an
electric cord having an equipment grounding conductor and a grounding plug. The plug must
be plugged into an outlet that is properly installed and grounded in accordance with all local
codes and ordinances.
DANGER: NEVER ALTER AC CORD OR PLUG PROVIDED-IF IT WILL NOT FIT OUTLET,
HAVE PROPER OUTLET INSTALLED BY A QUALIFIED ELECTRICIAN. IMPROPER
CONNECTION CAN RESULT IN THE RISK OF AN ELECTRIC SHOCK.
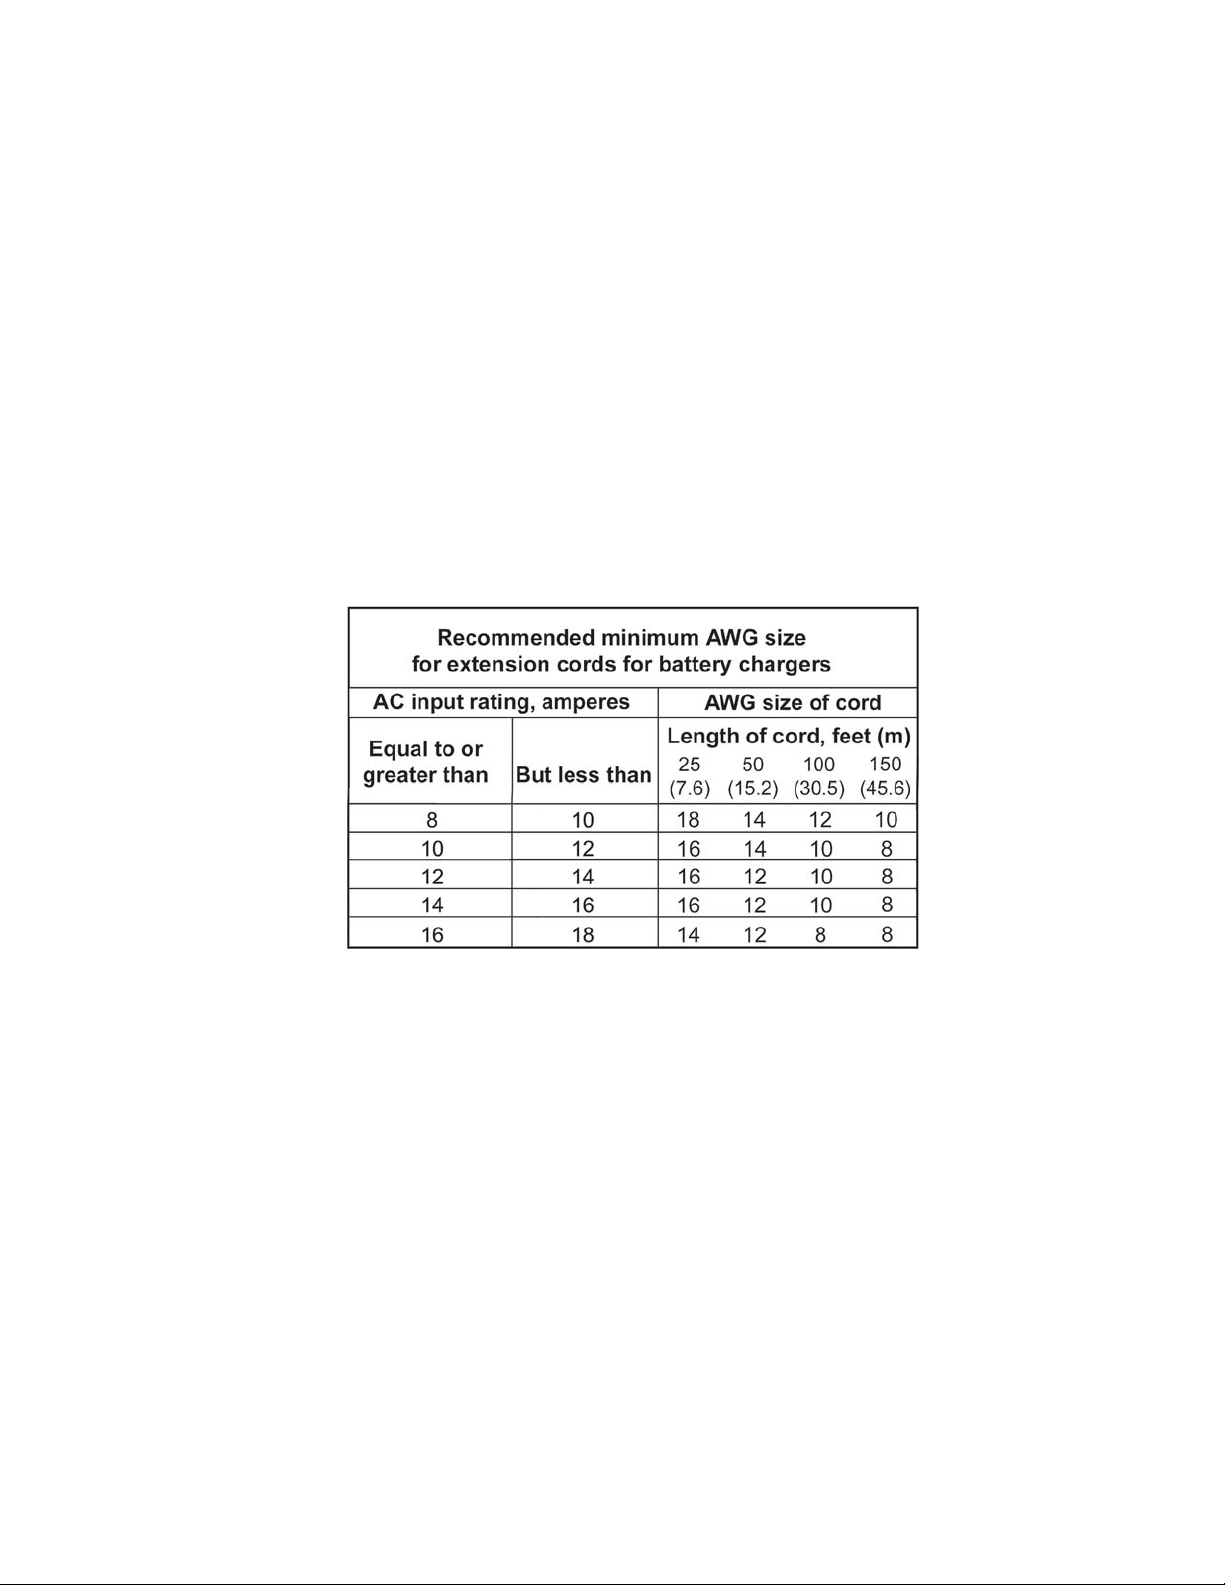
4.2 An extension cord should not be used unless absolutely necessary. Use of improper
extension cord could result in a risk of fire and electric shock. If extension cord must be
used, make sure that:
a) Pins on plus of extension cord are the same number, size, and shape as those of plug on charger;
b) Extension cord is properly wired and in good electrical condition; and
c) Wire size is large enough for AC ampere rating of charger as specified in the following table:
- 5 -
5. CHARGER LOCATION
5.1 Locate charger as far away from battery as charger cables permit.
5.2 Never place charger directly above battery being charged; gases from battery will corrode
and damage charger.
5.3 Never allow battery acid to drip on charger when taking gravity readings or filling a battery.
5.4 Operate charger only in well ventilated area, free of dangerous vapors.
5.5 Store charger in safe, dry location and maintain in perfect condition.
5.6 Do not set battery on top of charger or where its acid might drip onto charger.

- 6 -
6. DC CONNECTION PRECAUTIONS
6.1 All switches should be set in OFF position and AC cord should be DISCONNECTED from
electrical outlet before you connect and disconnect charger clamps. Never allow clamps to
touch each other.
6.2 When attaching charger clamps, be certain to make the best possible mechanical as well as
electrical connection. This will tend to prevent clamps from slipping off connections, avoid
dangerous sparking, and assure safer and more efficient charging. Clamps should be kept clean.
CAUTION—Setting switches to OFF does not always disconnect charger electrical circuit
from AC power cord or DC charger clamps.
6.3 Attach clamps to battery as indicated in 7.7, 7.8, 7.9
7. CHARGER CONNECTION
7.1 If charging in vehicle, firmly apply emergency brake and place gear shift to NEUTRAL; shift
an automatic transmission to PARK.
7.2 Locate charger as far away from battery as charger cords permit and position AC and DC
cords to avoid stepping on or tripping over them and to prevent damage by hood, doors, or
moving engine parts.
7.3 Stay clear of fan blades, belts, pulleys, and any other parts the can cause physical injury.
7.4 Turn OFF all vehicle loads, including door lights, and correct any defects in car’s electrical
system that may have caused low battery.
7.5 If necessary to remove battery from vehicle or equipment, always remove grounded terminal
from battery first.
WARNING: If charging out of vehicle, make sure all vehicle loads are OFF to prevent a
possible arc. A SPARK NEAR BATTERY MAY CAUSE AN EXPLOSION. TO REDUCE RISK
OF A SPARK NEAR BATTERY.
7.6 Check polarity of battery posts. POSITIVE (POS., P, +) post usually has larger diameter than
NEGATIVE (NEG., N, –) post.
7.7 Connect POSITIVE (RED) charger clamp to POSITIVE (POS., P, +) post of battery. Position
yourself as far away from battery as possible, then connect NEGATIVE (BLACK) charger
POSITIVE (POS., P, +) post.
7.8 Do not face battery when making final connection.
7.9 When disconnecting charger, always do so in reverse sequence of connecting procedure
and break first connection while as far away from battery as possible.

- 7 -
OVERVIEW
The inCHARGE940™Diagnostic Conductance Charging Station (Model INC-940) integrates battery
conductance and load testing with charging. The inCHARGE940 safely and accurately tests and fast-
charges most fully discharged batteries in under 2.5 hours and most partially discharged batteries in
less than an hour. Simply connect the inCHARGE940 to the battery, select your test parameters and
press ENTER. Using Midtronics’ patented RTD™ (Real Time Diagnostics) technology, the inCHARGE940
will continuously test and monitor the battery’s temperature, charging voltage, charging current, and
state of charge during the fast charging session. This real-time diagnostic evaluation prevents excessive
heat buildup, battery damage, and gassing common with other fast-charge methods.
With its comprehensive battery testing algorithm, the inCHARGE940 displays three battery decisions:
“Good Battery,” “Charging Required” (low state of charge), and “Replace Battery.” When charging is
required, the inCHARGE940 automatically starts charging the battery. After the charging session, the
inCHARGE940 displays a final result, “Good Battery” or “Replace Battery,” and generates a test code for
effective warranty management.
Safety features include reverse polarity detection/protection and automatic shut-off when charging
is complete or when an unsafe condition occurs. For more information on inCHARGE940 features
and specifications, see “Specifications.”
OPERATION
UP/DOWN
ARROWS: Press
to scroll options in
the display or
increase/
decrease
values. (Press
and hold to
rapidly scroll
values.)
FAULT LED (yellow):
Lights when charging is
interrupted by the
inCHARGE940 or user.
CHARGING LED (red):
Lights when charging.
COMPLETE LED (green):
Lights when charging cycle
is complete.
Typical LCD screen showing a required
step in the test process (first line) and an
option (second line).
Push button sequence (UP or DOWN ARROW
and ENTER) to scroll and select the option.
ENTER:
Press to select
the displayed
option and
continue to the
next step.
INFO:
Press to access
setup options,
print/view
results, and
generate a test
code.
STOP:
Press to abort
the setup or
charging cycle
and reset the
inCHARGE940.
FRONT PANEL

- 8 -
INITIAL SETUP
Before you can begin using the inCHARGE940, you must enter your dealer information, and verify the
date and time. NOTE: After you complete the initial setup, you will have a chance to make revisions
before exiting. If you enter the incorrect dealer information or time in the initial setup, you can revise
your entries using the Options menu. (See “Options Menu” below.)
NOTE: If you inadvertently change the date from its correct setting during the initial setup, it cannot be
changed after inCHARGE940 restarts. You must return the inCHARGE940 to Midtronics to have the
date reset. (See “Patents, Limited Warranty, Service” for more information.)
DEALERNUMBER
When you turn on the inCHARGE940 for the first time, a screen appears requiring you to enter a DEALER
REGION. Use the ARROW buttons to scroll to USA, CANADA, or OTHER, and press ENTER to select.
The next screen will require a DEALER NUMBER. The cursor (a horizontal line) will be positioned below
the first alphanumeric character. Use the ARROW keys to scroll to the correct character
(0–9, A–Z) and press ENTER.
DATE AND TIME
NOTE: The date cannot be set outside of the initial setup. If the date is incorrect, you must return the
inCHARGE940 to Midtronics to have it reset. (See “Patents, Limited Warranty, Service” for more
information.)
The next screen will require you to verify the date and time. The cursor will be positioned under the
month segment. To make changes, press ENTER to move the cursor forward (it cannot be moved back)
to the segment you want to change (month, day, year, hour, or minute). Use the ARROW buttons to
scroll to the correct number, and press ENTER to select it and move to the next segment. When
finished, press ENTER after the cursor is positioned under the minutes segment.
The next screen, which shows the new date and time, enables you to accept or revise your entries.
To accept, use the ARROW buttons to scroll to ACCEPT, then press ENTER. The inCHARGE940 will
restart and be ready to begin battery testing and charging.
To revise, press the ARROW buttons to scroll to REVISE, then press ENTER. The DEALER REGION
screen will reappear enabling you to start over. Press ENTER to move past the screens containing the
correct information.
OPTIONS MENU
You can change the following in the Options menu:
• Set Time
• Printer Type (HP82240B, IrDA, or SERIAL)
• Dealer Number
• Language (used in the user interface and on printed test reports)
To display the Options menu, turn on the inCHARGE940 while pressing and holding the INFO ( i )
button. Press the ARROW buttons to scroll through the options, and press ENTER to select:
SET TIME
The cursor will be positioned under the hour segment. To change the hour, use the ARROW buttons to
scroll to the correct number, and press ENTER to accept it and move to the minutes segment. When
finished, press ENTER.

- 9 -
NOTE: The date cannot be set outside of the initial setup. If the date is incorrect, you must return
the inCHARGE940 to Midtronics to have it reset. (See “Patents, Limited Warranty, Service” for more
information.)
PRINTER TYPE
Select HP82240B, IrDA, or SERIAL. The inCHARGE940 has an infrared sensor and a serial
connector for the printer options.
DEALER NUMBER
LANGUAGE
You can select English, French, or Spanish as the language used in the display and on printed reports.
PRE-ANALYSIS BATTERYINSPECTION
Before using the inCHARGE940, inspect the battery for damages and check for:
• A cracked case or broken terminals. Replace the battery.
• Cracked or broken cables and connections. Repair or replace as needed.
• Corrosion on the battery terminals, and dirt or acid on the case top. Clean with a mixture of
water and baking soda and a wire brush.
• Loose battery cable connections and battery hold-down assembly. Repair or replace as needed.
Side-terminal batteries must be tightened before testing.
a) DEALER REGION: Select USA, CANADA, or OTHER, and press the ENTER button.
b) DEALER NUMBER: The cursor (a horizontal line) will be positioned below the first
alphanumeric character. Use the ARROW keys to scroll to the correct character (0–9,
A–Z) and press ENTER to move the cursor forward (it cannot be moved back) to the
character you want to change.

- 10 -
BATTERY ANALYSIS / CHARGING SETUP
The inCHARGE940 will guide you in selecting your battery test/charging parameters. To select,
scroll to each parameter setting or value using the ARROW buttons and press ENTER to continue.
NOTE: To abort the setup, press STOP. The inCHARGE940 will reset, enabling you to begin your
setup again with the first parameter screen (step 4).
1. Place the inCHARGE940 on the top shelf of the cart and plug it into a dedicated, grounded 115 Vac
(nominal), 15 ampere receptacle. To maintain the current necessary for fast charging,
do not use an AC line cord adapter/extension cord unless absolutely necessary (refer to the
safety instructions at the beginning of the manual). Press the POWER switch to the ON (I) position.
2. If charging out of vehicle, place the battery in the cart’s charging chamber below the
inCHARGE940. Bring the inCHARGE940 clamps into the charging chamber through the back
of the cart.
3. If stud adapters are required, fasten them with the proper tool. Do not use the battery clamps
to tighten adapters. (A set of adapters are included with the inCHARGE940.)
IMPORTANT: Stud adapters must be used on side-post and group 31 batteries. Do not
use steel bolts. Failure to properly install stud adapters, or using stud adapters that are
dirty or worn, may cause false test readings.
4. Connect the positive (red) clamp to the battery’s positive (+) post and the negative (black)
clamp to the negative (–) post. To ensure a proper connection, rock the clamps back and forth.
The inCHARGE940 requires that both sides of the clamp be firmly connected before testing. A
poor connection will produce a CONNECT CLAMPS message. (If you connect the clamps in
reverse polarity, the inCHARGE940 will display BATTERY CLAMPS REVERSED.)
NOTE: Batteries connected in parallel must have the ground cable disconnected to perform a
battery test. Failure to disconnect may cause false test readings.
IMPORTANT: Close the test chamber door before beginning the charging session,
5. CHOOSE CHARGE MODE: Use the ARROW buttons to select AUTOMATIC or MANUAL, and
press ENTER.
SPECIAL INSTRUCTIONS FOR DEEP CYCLE BATTERIES: Charge in Manual mode for 3
hours, then retest and recharge in Automatic mode.
NOTE: If the battery is less than 1 volt, the inCHARGE940 will not charge it in Automatic mode.
To charge the battery, select Manual mode and charge for 2 minutes. Press STOP to abort, then charge
in Automatic mode.
If you select AUTOMATIC:
Go to step 6. If charging is required, the inCHARGE940 will monitor the entire
charging session, including testing, data analysis, charging time, optimized charging
rates, and temperature.

- 11 -
6. CHOOSE TEST: Select IN VEHICLE or OUT OF VEHICLE.
NOTE: It is recommended to remove the battery from the vehicle before charging to avoid
damage to the vehicle electrical system and to charge in the chamber whenever possible.
7. BATTERY TYPE: Select REGULAR or SPECIAL (AGM).
8. CHOOSE TEST TYPE: Select WARRANTY, 48-HOUR CHECK, or OTHER.
If WARRANTY or 48-HOUR CHECK:
Select the battery DIN rating value (Table 1). (If the battery’s DIN rating is unavailable,
select OTHER.)
If OTHER:
a) Select a rating system (Table 1).
b) Select the battery rating (Table 1).
9. The inCHARGE940 will test the battery and display one of three results in Table 2 (with the
approximate charge time, if required).
a) Select the time required to charge the battery (in half-hour increments from 0.5
to 10 hours).
b) Select the rating system (Table 1).
c) Select the battery rating (Table 1). The inCHARGE940 will begin charging the
battery for the selected length of time.
Deutsche Industrie-Norm
Europa-Norm
International Electrotechnical Commission
European labeling of CCA
Cold Cranking Amps, as specified by SAE. The most common
rating for cranking batteries at 0 ºF (–18 ºC).
Japanese Industrial Standard: (shown on a battery as a
combination of numbers and letters, for example: 80D26)
Rating
System
100 to 1000 A
100 to 1700 A
100 to 1000 A
100 to 1700 A
100 to 1700 A
DIN
EN
IEC
SAE
CCA
Description Value Range
Table 1: inCHARGE940 Battery Rating Systems and Value Ranges
JIS 43 values from
26A17 to 245H52
If you select MANUAL:
NOTE: A test code is unavailable if you charge the battery using Manual mode.
CAUTON: Before charging, make sure that the clamps are connected
to the battery. Charging in Manual mode without the clamps connected to
a battery may cause sparks, fire, or personal injury.
!

- 12-
BATTERYANALYSIS RESULTS
For error messages, see “Troubleshooting.”
NOTE: To abort the charge session, press STOP.
TEMPERATURE
Battery temperature is critical during charging. If the inCHARGE940 detects that the temperature
has risen too high or that the battery is frozen, the charging session will stop. See “Error Messages”
in the “Troubleshooting” section for more information.
CHARGE COMPLETIONAND FINALANALYSIS
When charging is finished, the inCHARGE940 will display GOOD BATTERY or REPLACE
BATTERY and the total charge time.
INFORMATION MENU
When the inCHARGE940 displays the final result (GOOD BATTERY, REPLACE BATTERY) three
information options are available:
• GENERATE TEST CODE (available only after a completed Automatic charge).
• PRINT LAST TEST RESULTS
• VIEW LAST TEST RESULTS
To access the Information menu, leave the clamps connected and press the INFO ( i ) button while
the final battery result is displayed. Press the ARROW buttons to display an option, then press
ENTER to select.
If you turn off the inCHARGE940 or disconnect the clamps, the inCHARGE940 will save the last
test results in memory for viewing or printing until you start a new battery analysis/charging session.
(The option to generate a test code will be unavailable.) To access the Information menu before the
next session, press the INFO ( i ) button when the message CHOOSE CHARGE MODE appears.
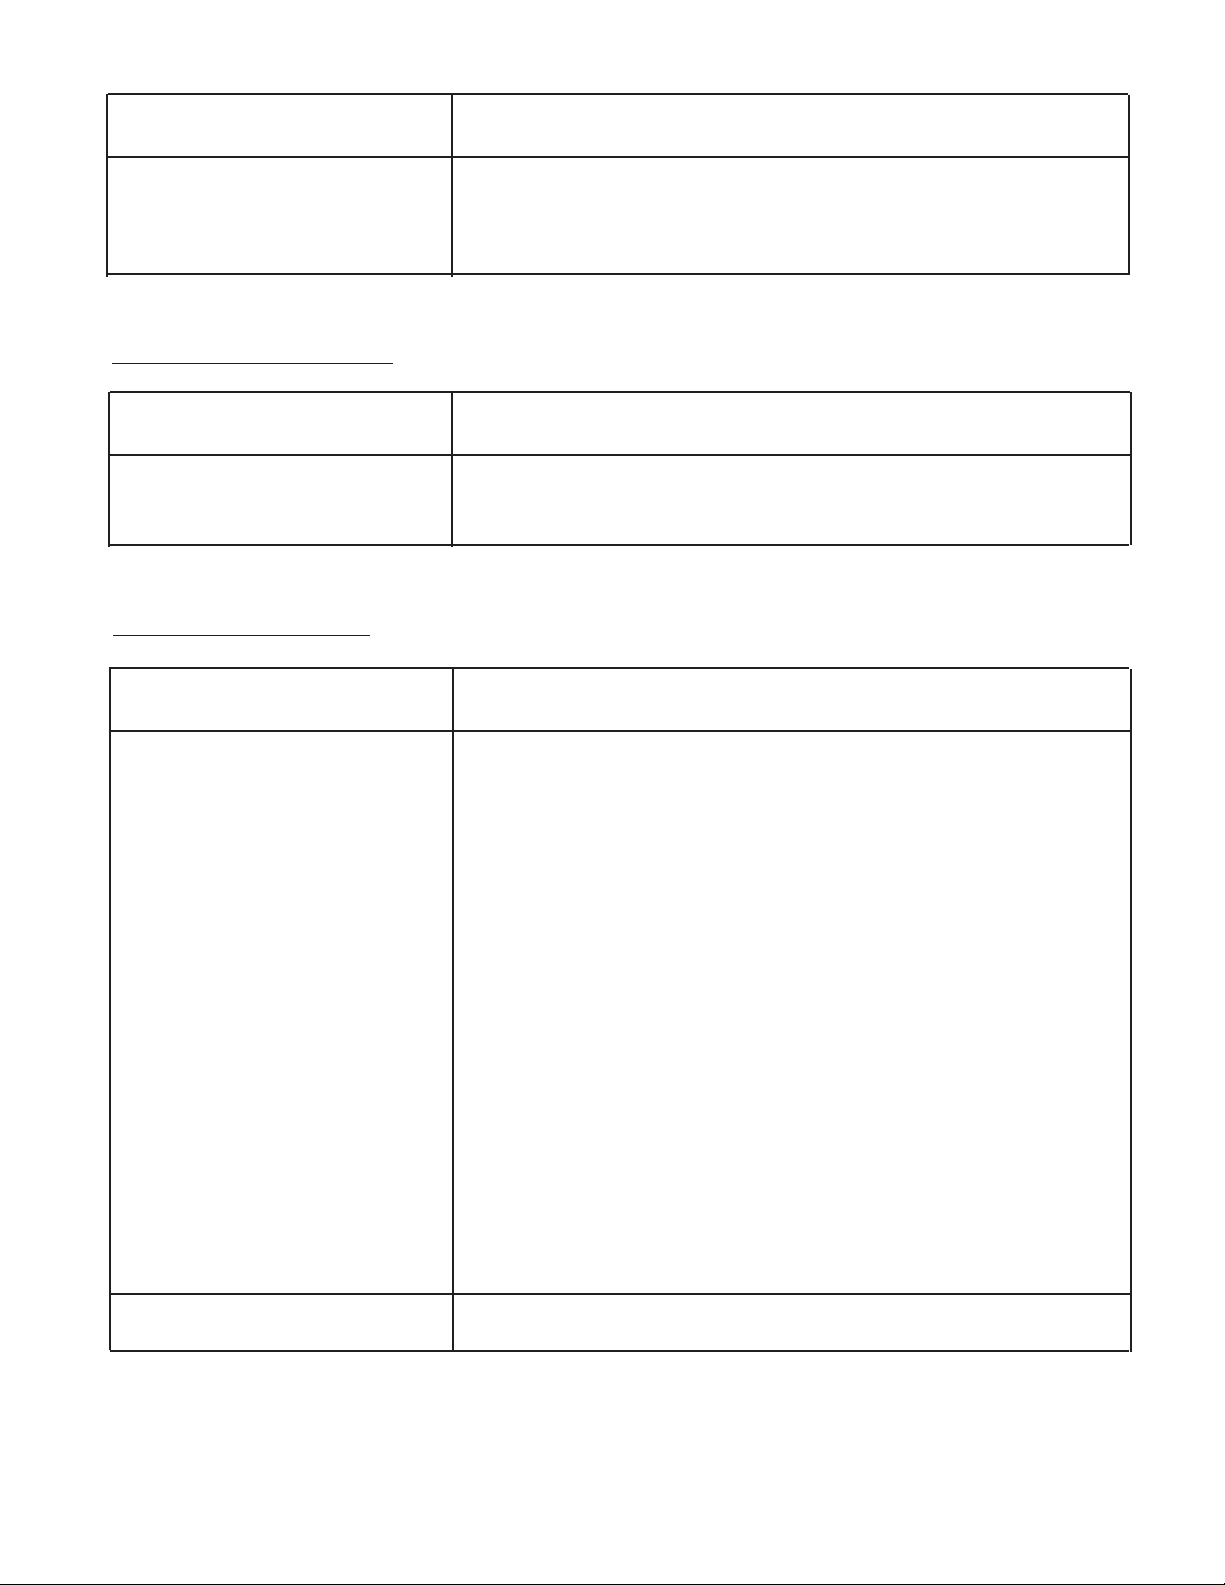
GOOD BATTERY
CHARGING REQUIRED
REPLACE BATTERY
Analysis finds the battery to be good. Reinstall the battery.
Analysis finds that the battery has a low state of charge.
The inCHARGE940 will display an approximate charge time and
begin fast charging. The accumulated CCA and remaining
charging time are displayed and updated at intervals.
If analysis finds the battery to be bad, it will stop charging and
display the result. Replace the battery.
Result Explanation
Table 2: Battery Analysis Results and Explanations

- 13 -
GENERATE TEST CODE
You can generate a test code* at the end of a completed (non-aborted) automatic charging session.
IMPORTANT: You will not be able to select GENERATE TEST CODE if you abort the charge,
disconnect the clamps, or turn off the inCHARGE940 before generating a test code. A test
code is unavailable if you charge the battery using Manual mode.
1. Select GENERATE TEST CODE.
2. REPAIR ORDER#: Enter the 5-digit repair order number.
3. LAST 4 OF VIN: Enter the last 4 digits of the vehicle identification number (VIN) and press
ENTER. The inCHARGE940 will generate a 14-character alphanumeric test code and display it
on the screen.
4. Place the IR printer in the cart’s printer bracket and turn on the printer.
5. Press ENTER to print the test results.
NOTE: The inCHARGE940 will not generate a test code unless you enter a Repair Order Number and
the last four digits of the VIN.
*IMPORTANT: The test code is required on every warranty claim.
PRINT LAST TEST RESULTS
1. Place the IR printer in the cart’s printer bracket and turn on the
printer.
2. Select PRINT LAST TEST RESULTS and press ENTER.
3. PRINTING RESULTS will appear on the display as the results
of the last test are printed.
NOTE: To abort printing, press STOP.
If you turn off the inCHARGE940 or disconnect the clamps, the
inCHARGE940 will save the last test results in memory for printing until
you start a new battery analysis/charging session. To print, press the
INFO ( i ) button when the message CHOOSE CHARGE MODE
appears. Use the ARROW buttons to scroll to PRINT LAST TEST
RESULTS, and press ENTER.
inCHARGE 940 Ver 1.0
(c) 2002 MIDTRONICS, INC
10/17/02
15:01
DEALER NUMBER
A1B2C3
REPAIR ORDER #
12345
LAST 4 OF VIN
1234
BATTERY TEST
WARRANTY
RATING:
280 A DIN
12.85 V 308 CCA
GOOD BATTERY
CHARGE TIME:
48 MIN
TEST CODE
2FKT458-G3G5H7K

- 14 -
To ensure that the inCHARGE940 operates properly:
• Clean the display with a solution of water and mild detergent.
• Inspect and clean the clamps after every use. Liberally apply baking soda and water with a
clean cloth and thoroughly rub the jaw and spring. Rinse with water and let dry. Use a soft wire
brush to remove corrosion.
• Never allow the clamps or cables to lie in the battery tray.
• Immediately clean up any acid spills with a mixture of water and baking soda.
CABLE SET REPLACEMENT
Midtronics offers a replaceable cable set with installation instructions. Call Midtronics to order P/N A078.
MAINTENANCE
a) The battery rating you selected in your setup
b) The test code (if available)
c) The measured voltage and CCA, and the final result.
VIEW LAST TEST RESULTS
1. After selecting this option use the ARROW buttons to scroll through screens showing:
2. Press the INFO ( i ) button to return to the Information menu.
If you turn off the inCHARGE940 or disconnect the clamps, the inCHARGE940 will save the last test
results in memory for viewing until you start a new battery analysis/charging session. To view the
last test results before the next session, press the INFO ( i ) button when the message CHOOSE
CHARGE MODE appears. Use the ARROW buttons to scroll to VIEW LAST TEST RESULTS, and
press ENTER.

TROUBLESHOOTING
- 15 -
ERROR MESSAGES
** TOO COLD TO CHARGE **
Message Solution
If the battery measures less than 32 oF (0oC), the inCHARGE940
will not charge the battery. Never charge a frozen battery.
Allow the battery to warm up before charging.
If the battery temperature measures above 32 oF (0oC):
• Clean the battery terminals using a wire brush and a mixture
of baking soda and water. Repeat the charging process.
• Inspect and clean the clamps. Liberally apply baking soda
and water with a clean cloth and thoroughly rub the jaw and
spring. Use a soft wire brush to remove corrosion buildup.
Rinse with water and let dry. Repeat the charging process.
• Check that the temperature sensor on the inside of the
negative clamp is tight and clean. To tighten it, use a
screwdriver with a T15 star bit. If the sensor is hot, wait until
the sensor cools and repeat the charging process.
• If the message reappears after troubleshooting, replace the
cable set. Order P/N A078 from Midtronics: 1-800-776-1995.
** BATTERY TOO HOT **
** CHECK CONNECTION ** • Clean the battery terminals as described above and
repeat the charging process.
• Inspect and clean the clamps as described above and
repeat the charging process.
• If the message reappears after troubleshooting, replace
the cable set. Order P/N A078 from Midtronics:
1-800-776-1995.
If the battery measures more than 160 oF (71oC) during
charging, the inCHARGE940 will stop charging. Obtain a test
code and replace the battery
CORRUPT HEADER DATA! There is an internal error. Call 1-800-776-1995 to arrange for
service. See “Patents, Limited Warranty, Service.”

- 16 -
Message Solution
SYSTEM NOISE DETECTED The inCHARGE940 has detected signal noise that can affect
the battery analysis.
• Make sure all vehicle loads are off and the ignition is in
the OFF position.
• You may be testing too close to a noise source, i.e., a
charger or other high-current device. If so, move away
and retest.
• If no noise source is identified, fully charge the battery
and retest. If the message appears after recharging,
replace the battery.
ARE CLAMPS CONNECTED? CAUTION: Before charging, make sure that the clamps are
connected to the battery. Charging in Manual mode without
the clamps connected to a battery may cause sparks, fire, or
personal injury.
Display alternates between
CONNECT CLAMPS
and
CHOOSE CHARGE MODE
when you press ENTER.
If the clamps are properly connected, use a voltmeter to check the
battery voltage. The inCHARGE940 requires a minimum of 1 volt to
function in Automatic mode. To raise the voltage level, charge using
Manual mode for at least 30 minutes, then abort and charge in
Automatic mode.
DISPLAYPROBLEMS
Incorrect time or date
Problem Solution
You can change the clock time in the Options menu. See “Set Time”
in the “Options Menu” section.
The date cannot be set outside of the initial setup. If the date is
incorrect, you must return the inCHARGE940 to Midtronics to have it
reset. Call 1-800-776-1995 to arrange for service. For more
information, see “Patents, Limited Warranty, Service.”
Wrong language You can change the language (English, French, or Spanish)
in the Options menu. (See “Language” in the “Options
Menu” section.)
No display Make sure that the inCHARGE940 is plugged in and the outlet is pro-
viding current. The inCHARGE940 requires a 115-volt (nominal),
15-ampere circuit to operate. If the same outlet is powering other de-
vices with the inCHARGE940, a circuit breaker may trip. If troubleshoot-
ing does not correct the problem, call 1-800-776-1995 for service. For
more information, see “Patents, Limited Warranty, Service.”
PRINTING PROBLEMS
- 17 -
Problem Solution
Data will not print • In the Options menu, select PRINTER TYPE and make
sure that the type selected matches your printer:
HP82240B, IrDA, or SERIAL.
• If you are using a serial printer, make sure that the
printer cable is connected to the inCHARGE940 and the
printer, and that the printer is turned on. Data should
print automatically if you turn on the printer before the
charging session is finished.
• If you are using an infrared printer, make sure that
printer is turned on and the printer’s IR lens is aligned
with the IR sensor on the back of the inCHARGE940.
NOTE: The IR printer will go into sleep mode to conserve
the printer battery if left on for an extended period of time.
Press the INFO ( i ) button and select PRINT LAST TEST
RESULTS.
If troubleshooting does not correct the problem, call
1-800-776-1995 for service. For more information, see
“Patents, Limited Warranty, Service.”
Print is too light See the printer manual to adjust the contrast.
No Options menu To display the Options menu, the inCHARGE940 must first be
turned off. Turn it back on while pressing and holding the
INFO (i) button to display the Options menu.
Problem Solution
TEST CODE PROBLEMS
Problem Solution
Test Code is rejected Verify that your Dealer Number, R.O Number, and the last
four digits of the VIN are correct.

- 18 -
SPECIFICATIONS
Testing Methodology
• Conductance analysis
• High-rate load analysis
• Conductance and load comparison analysis
• Charge acceptance analysis
Product Application:
• Automotive 12-volt cranking batteries
• SAE, Side and L terminal (lead terminal
adapters may be required)
• CCA, SAE, DIN, EN, IEC, JIS,
• Multi-language capability.
Rating Battery Types:
CCA EN
SAE IEC
DIN JIS
Input/Output Interface Options:
IR receiver
DB-9 serial port
Input Power:
115 Vac (nominal), 60 Hz, 15 ampere service,
single phase
Output:
• Current limit: Maximum 60 amperes rectified
DC current
• Voltage limit: Maximum 14.4 volts DC voltage
Physical Dimensions:
Shelf mountable: 9” tall x 14” deep x 15” wide
(230 mm x 355 mm x 385 mm)
Weight: 45 lb (19 kg)
Safety
Thermal sensing element in charging clamp
detects high temperature condition.
Integral power electronics thermal sensing
element and shutdown.
Online conductance charge suspension on
batteries that develop faults during the charge via
online conductance
Reverse polarity
This manual suits for next models
1
Table of contents
Languages:
Other Midtronics Batteries Charger manuals

Midtronics
Midtronics GR1 240 User manual

Midtronics
Midtronics GR8 1100 User manual

Midtronics
Midtronics PowerSensor Micro500 User manual

Midtronics
Midtronics ChargeXpress PRO 50-2 User manual

Midtronics
Midtronics MSP-070C User manual

Midtronics
Midtronics DCA-8000P User manual

Midtronics
Midtronics DCA-8000 User manual

Midtronics
Midtronics xRC-3363 User manual

Midtronics
Midtronics GR1-120 User manual

Midtronics
Midtronics DCA-8000PM User manual


