Miele PM 1210 User manual

Operating Instructions
Commercial Rotary Iron
PM 1210
PM 1214
PM 1217
To prevent accidents and machine damage, read
these instructions before installation or use. en-US
M.-Nr. 09 980 931

Contents
2
Caring for the environment ................................................................................................4
IMPORTANT SAFETY INSTRUCTIONS ..............................................................................5
Appropriate use..................................................................................................................... 5
Technical and electrical safety ............................................................................................. 5
Use of the appliance ............................................................................................................. 6
Using accessories ................................................................................................................ 6
Notes on the use of this machine ......................................................................................... 6
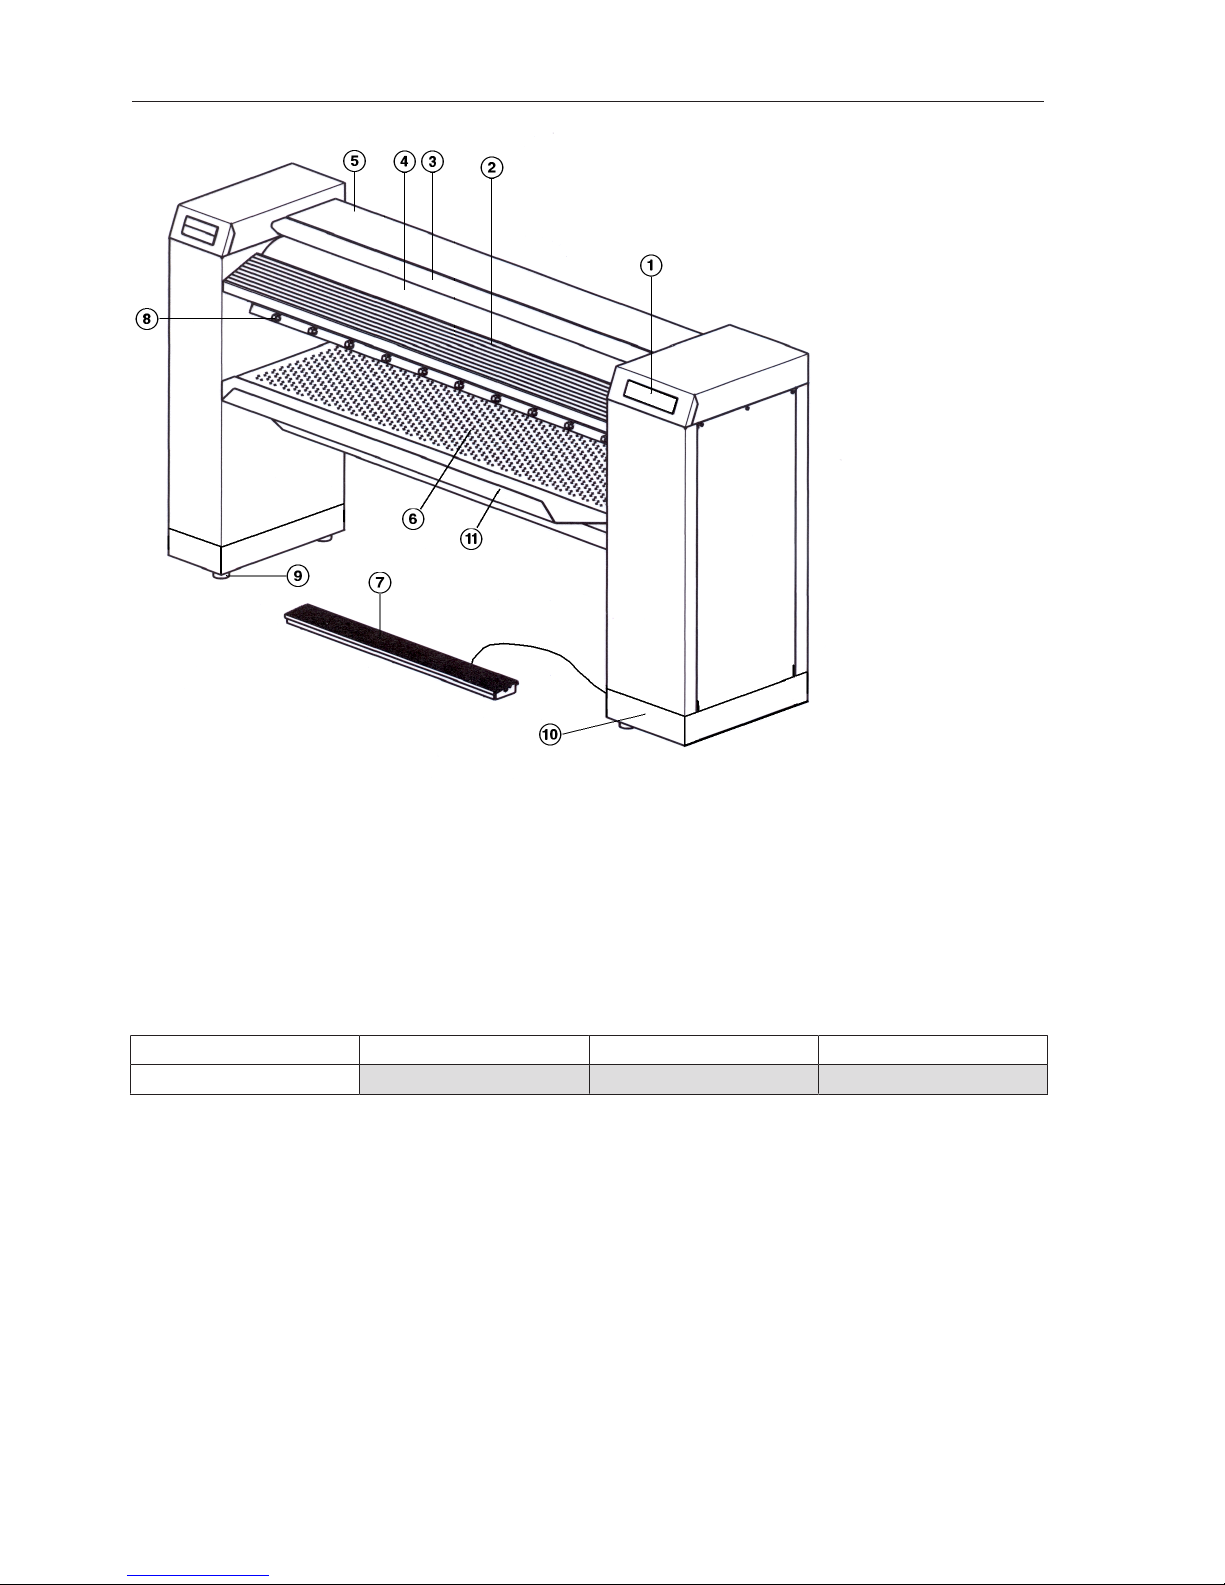
Appliance overview .............................................................................................................8
Touch display ........................................................................................................................ 9
Display symbols .................................................................................................................. 11
Finger guard ........................................................................................................................ 12
Preparing the laundry........................................................................................................13
Residual moisture................................................................................................................ 13
Sorting the laundry .............................................................................................................. 13
Starting up for the first time .............................................................................................14
Cleaning and waxing before starting up for the first time ................................................... 14
Use......................................................................................................................................15
Preparing for use ................................................................................................................. 15
Ironing.................................................................................................................................. 15
Ironing temperature ........................................................................................................ 16
Setting the ironing temperature...................................................................................... 16
Changing the value of a temperature selection button .................................................. 16
Speed of iron.................................................................................................................. 17
Setting the iron speed .................................................................................................... 17
Changing the value of a spin speed selection button .................................................... 18
Laundry feed .................................................................................................................. 18
Pauses in ironing ............................................................................................................ 19
Standby mode................................................................................................................ 19
FlexControl footswitch ................................................................................................... 19
Pick-off bands (PM1214 & PM1217 only) .................................................................... 19
After ironing ......................................................................................................................... 20
Notes ..................................................................................................................................21
Changing the temperature unit............................................................................................ 21
Favorites setting .................................................................................................................. 21
Preventing running while unloaded ..................................................................................... 21
Power outage during ironing ............................................................................................... 21
Peak-load / energy management (optional) ........................................................................ 21
Fault messages ................................................................................................................... 22
Cleaning and maintenance...............................................................................................23
Cleaning the heater plate .................................................................................................... 23
Starting the cleaning program ........................................................................................ 23
Cleaning with the cleaning cloth .................................................................................... 24
Waxing the heater plate....................................................................................................... 25
Waxing with the waxing cloth......................................................................................... 25
Padding instructions............................................................................................................ 26
Removing the ironing cloth ............................................................................................ 26
Fitting the ironing cloth................................................................................................... 26

Contents
3
MieleTechnical Service ....................................................................................................... 27

Caring for the environment
4
Disposal of the packing material
The cardboard box and packing materials protect the appliance during shipping. They
have been designed to be biodegradable and recyclable.
Ensure that any plastic wrappings, bags, etc. are disposed of safely and kept out of the
reach of children. Danger of suffocation!
Disposal of your old appliance
Electrical and electronic appliances contain valuable materials. They also contain certain
substances, compounds and components which were essential for the proper functioning
and safe use of the equipment. Handling these materials improperly by disposing of them
in your household waste can be harmful to your health and the environment. Therefore,
please do not dispose of your old appliance with regular household waste and follow local
regulations on proper disposal.
Consult with local authorities, dealers or Miele in order to dispose of and recycle electrical
and electronic appliances. Miele assumes no responsibility for deleting any personal data
left on the appliance being disposed. Please ensure that your old appliance is kept away
from children until removal. Observe safety requirements for appliances that may tip over
or pose an entrapment hazard.

IMPORTANT SAFETY INSTRUCTIONS
5
Please read these operating instructions supplied with the rotary iron before using it for
the first time. They contain important information on the safety, use, and maintenance of
the rotary iron.
This prevents both personal injury and damage to the appliance.
If other persons are being shown how to operate the rotary iron, they must be given
and/or informed of these important safety instructions.
Keep these operating instructions in a safe place and pass them on to any future user.
Appropriate use
This rotary iron must be used as described in these instructions and must be checked on a
regular basis to make sure it is functioning correctly. Maintenance must be carried out
when necessary.
This rotary iron is only intended for ironing fabrics that were washed in water. Check
fabric care labels to verify that the articles are suitable for machine ironing.
This rotary iron is intended for use in commercial settings. It is not intended for domestic
use. If the rotary iron is operated in a publicly accessible place, it is the supervisor's re-
sponsibility to ensure suitable measures are in place to protect users from any source of
risk or danger.
This rotary iron is not intended for outdoor use.
Technical and electrical safety
Do not operate the rotary iron in a room where cleaning machines operate with solvents
containing PERC or CFC.
The rotary iron should only be operated in a suitable dry room.
Only operate the rotary iron when all removable outer casings are in place so that it is
impossible to touch an electrical, moving, or heated component.
Do not damage, remove or bypass the safety components or control elements of the ro-
tary iron.
Do not make any alterations to the machine, unless authorized to do so by Miele.
If the controls or the electrical cabling insulation has been damaged, the rotary iron must
not be used until it has been repaired.
Repair and maintenance work should be performed by a Miele-authorized service tech-
nician. Work by unqualified persons could be dangerous.
Defective components should be replaced by Miele original parts only. Only with original
Miele parts can the manufacturer guarantee the safety of the appliance.
Make sure this appliance is properly installed and grounded by an authorized technician.
For electrical safety, this machine must be grounded. It is imperative that this basic safety
requirement be tested by a qualified electrician. Consult a qualified electrician if in doubt.
The appliance is completely isolated from the electrical supply when it is turned off at
the main switch or the circuit breaker has been “tripped.”

IMPORTANT SAFETY INSTRUCTIONS
6
Use of the appliance
The rotary iron may not be operated without supervision.
Persons who lack physical, sensory or mental abilities, or experience with the appliance
should not use it without supervision or instruction by a responsible person.
Children should be supervised when they are near the appliance. Do not allow children
to play with it!
In the heated state and with the heater plate contacting the roller, there is a serious risk
of burning if you touch the edge of the heater plate on the laundry output side.
Do not set a higher ironing temperature than specified on the care label of the laundry. If
the ironing temperature is too high, the laundry can catch on fire.
When ironing double-layer laundry, do not reach between the layers to stretch the laun-
dry. There is a danger that you will not be able to move your hands to the side of the
heater plate in a timely manner. This also applies to reaching into pockets whose open
sides are facing the heater plate.
The flexible laundry feed for the reverse removal of laundry (optional) can be applied
only from the front.
Provide sufficient lighting during the operation of the rotary iron.
Keep the work area around the rotary iron free of objects.
Make sure that a fire extinguisher is in the direct vicinity and can be used at any time.
There is a risk of fire if the ironing temperature is too high, the laundry is not suited for iron-
ing, or the laundry was not cleaned in water!
This iron may only be used in mobile installations such as ships if a risk assessment of
the installation has been carried out by a suitably qualified engineer. It is also imperative
that all local and national safety regulations concerning the use of this machine are ob-
served.
Using accessories
Accessory parts may only be fitted when expressly approved by Miele. If other parts are
used, any claims from the warranty will be void.
Notes on the use of this machine
At the laundry infeed table, only allow trained individuals to operate the iron.
Be aware of loose fitting or hanging clothing when using the rotary iron. Items such as
wide sleeves or apron strings could be wound in the roller.
Remove all jewelry and tie back long hair before ironing.
Always smooth out wrinkles as far away as possible from the pull-in point on the infeed
table. Feed pillow cases and duvet covers into the iron with the opening first. Do not hold
the corners from the inside and do not reach into the straps of shirts and aprons.
Check the function of the safety devices daily. The rotary iron may be operated only
with properly functioning safety devices. This guarantees that crushing injuries, burns, and
other severe injuries can be prevented.

IMPORTANT SAFETY INSTRUCTIONS
7
Before switching to reverse, make sure that no one is endangered.
If other persons are being shown how to operate the rotary iron, they must be given or
informed of these IMPORTANT SAFETY INSTRUCTIONS.
Keep these instructions and pass them on to any future users / owners of the appliance.

Appliance overview
8
aControl panel (touch display)
bLaundry infeed table
cFinger guard
dRoller
eHeater plate with cover
fLaundry outfeed table
gFlexControl footswitch
hPick-off bands (PM1214 & PM1217 only)
iHeight-adjustable screw feet
jToe kick (optional)
kLint filter box (optional for PM1210)
Option PM1210 PM1214 PM1217
Stand X X X

Appliance overview
9
Touch display
The buttons on the touch display can be selected by pressing lightly. The button that is
currently selected will then be highlighted with a bar underneath.
Display in the ironing temperature selection mode
abutton
Switches the iron on and off.
bbutton
Pauses the ironing operation.
cbutton
Starts the ironing process. Flashes when
the ironing process can be started.
dbutton
Ironing temperature selection mode.
eTemperature selection button
For nylon and artificial silk.
fTemperature selection button
For silk and woolens.
gTemperature selection button
For cottons and linen.
hbutton
Raises the ironing temperature.
ibutton
Lowers the ironing temperature.
jbutton
Favorites program
kbutton
Service position for carrying out mainte-
nance work. This button must be held
down for at least 3seconds in order to
activate or deactivate it.
lbutton
Heater plate cleaning and waxing mode.
This button must be held down for at least
3seconds in order to activate or deacti-
vate it.

Appliance overview
10
Display in the roller speed selection mode
abutton
Switches the iron on and off.
bbutton
Pauses the ironing process.
cbutton
Starts the ironing process. Flashes when
the ironing process can be started.
d.button
Switches to the roller speed selection
mode
eSpeed selection button
Low speed range
fSpeed selection button
Medium speed range
gSpeed selection button
High speed range
hbutton
Increases the roller speed
ibutton
Decreases the roller speed
jbutton
Favorites program
kbutton
Service position for carrying out mainte-
nance work. This button must be held
down for at least 3seconds in order to
activate or deactivate it.
lbutton
Heater plate cleaning and waxing mode.
This button must be held down for at least
3seconds in order to activate or deacti-
vate it.

Appliance overview
11
Display symbols
1
Activate the finger guard
2
Iron heater element on / heater plate tem-
perature is rising
3
Service display for cleaning and waxing
4
Iron heater element off / heater plate tem-
perature is falling
5
General fault
6 or
Continuous laundry feed on the left or
right side of the iron.
7
Pre-selection and display of temperature
in°C/°F
8
Pre-selection and display of roller speed
9//
Roller speed range
10
Payment system operation
11 °C / °F
Switch between temperature unit in°C
or°F

Appliance overview
12
Finger guard
The finger guard is a safety device that must be checked daily for proper functioning be-
fore startup.
Every time the rotary iron is switched on, check the function of the finger guard.
Activate the finger guard once while the symbol is flashing.
If fingertips become trapped between the roller and the finger guard, the iron will be
stopped immediately and the heater plate disengaged. At the same time, the symbol will
light up continuously. Press the button to switch the iron back on.
The finger guard remains non-operational while the roller is running backward.
Do not use the finger guard intentionally to switch off the iron while it is operating.
Always switch off the iron by pressing the button.

Preparing the laundry
13
Residual moisture
For an excellent finish and optimum ironing performance, the laundry
that is to be ironed should have the following levels of residual mois-
ture, depending on the type of ironing being carried out:
PM1214, PM1217: 15–25% residual moisture
PM1210: 15% residual moisture
The ideal level of residual moisture depends on the textile's proper-
ties.
Sorting the laundry
Sort the laundry according to type and fabric before starting to iron.
At the same time, please observe the instructions on the laundry
item's care label. We recommend sorting the laundry in the following
order:
Type of material Symbol Temperature
Nylon, other synthetics 212-230°F (100–110°C)
then
Woolens, silk 232-302°F (111–150°C)
followed by
Cotton, linen 304-356°F (151–180°C)
Starched laundry should always be ironed last.
Otherwise, any remaining starch residue on the heater plate may
have a negative effect when ironing other laundry items

Starting up for the first time
14
Cleaning and waxing before starting up for the first time
It is essential to clean and wax the heater plate before starting it up
for the first time (see “Cleaning and maintenance”).
Clean the heater plate by passing the cleaning cloth across the en-
tire width of the roller.
After cleaning the heater plate, wax it using the waxing cloth and
suitable ironing wax. Be sure to use the ironing wax sparingly.

Use
15
Preparing for use
Turn on the on-site power switch for the power supply.
Press the button to switch on the iron.
The red display symbol flashes.
Now activate the finger guard by lifting it.
The finger guard is a safety feature which must be checked every
time the iron is started up.
The red symbol will appear in the display and the heater plate will
heat up.
Ironing
Wait until the heater plate has reached the minimum temperature.
The button begins to flash as soon as the minimum temperature
has been reached.
The rotary iron is ready for operation when the set temperature is
reached and the symbol no longer appears in the display.
Now press the flashing button to start up the iron.
The ironing process begins.
Tip: Before starting to iron, allow the roller to rotate for about 5min-
utes so that the temperatures of the heater plate and roller can equal-
ize.
When the machine has heated up, there is a danger of burns on
the edge of the heater plate.
Warning labels on the outer casing of the heater plate indicate the
danger of burns.

Use
16
Ironing tempera-
ture The ironing temperature should be selected according to the type of
fabric being ironed.
Type of fabric Symbol Temperature Preset value
Nylon / artificial silk 212-230°F (100–
110°C)
230°F (110°C)
Woolens / silk 232-302°F (111–
150°C)
257°F (125°C)
Cotton / linen 304-365°F (151–
185°C)
180°F (356°C)
Temperature selection buttons
The iron temperature can be set either via the temperature selection
buttons or alternatively via the or– buttons.
If the ironing temperature is changed from a higher to a lower level,
the heater plate has to cool down first. In this case, the heater ele-
ment for the iron is switched off. The red symbol signals that the
current iron temperature is still too high. When the symbol goes
out, this indicates that the selected temperature has been reached.
Setting the iron-
ing temperature
Press the button on the control panel to access the ironing
temperature selection mode.
The button will then be highlighted with a bar underneath.
Now press one of the threetemperature selection buttons.
(For example, temperature selection button)
The selected temperature selection button will be highlighted with a
bar underneath and the heater plate heated / cooled to the appropri-
ate temperature.
Changing the
value of a temper-
ature selection
button
Press the temperature selection button you want to change the
value for.
Keep it pressed in. The bar will light up underneath it and the current
temperature value will appear in the display.
Press the or– button to set the temperature you want to save for
that button.
Then press and hold the temperature selection button highlighted
with a bar underneath until it flashes once.

Use
17
The new temperature value is now saved for that temperature selec-
tion button.
Tip: Before starting to iron, allow the roller to rotate for about
fiveminutes while unloaded so that the temperatures of the heater
plate and roller can equalize.
Speed of iron PM1210 / PM1214:
Symbol Speed range m/min
Low speed range 1.5–2.2
Medium speed range 2.3–3.2
High speed range 3.3–4
PM1217:
Symbol Speed range m/min
Low speed range 1.5–2.4
Medium speed range 2.5–3.4
High speed range 3.5–4.5
Spin speed selection buttons
The roller speed can be set either via the spin speed selection but-
tons or alternatively via the or– buttons.
Setting the iron
speed
Press the. button to access the roller speed selection mode.
The button will then be highlighted with a bar underneath.
Now press one of the three spin speed selection buttons.
(For example, button)
The selected spin speed selection button will be highlighted with a
bar underneath and the iron speed will be adopted as the button
value.

Use
18
Changing the
value of a spin
speed selection
button
Press the spin speed selection button you want to change the value
for.
The bar will light up underneath it and the current spin speed value
will appear in the display.
Press the or– button to set the roller speed you want to save for
that button.
Press and hold the spin speed selection button until it flashes once.
The new roller speed is now saved for that button.
Laundry feed Press the button to start the ironing process.
The heater plate engages and the roller begins to rotate.
Laundry with buttons must be inserted into the iron so that the
buttons are facing the roller and can be pressed into the roller's
ironing cloth during ironing.
Otherwise, there is a risk of them being damaged or torn off when
they meet the heater plate.
Place a cloth between zippers, metal buttons, and metal hooks to
protect the heater plate before ironing.
Never iron metal or plastic clasps of any kind, or raised buttons.
Now lay the item parallel to the roller at the beginning of the laundry
infeed table.
Smooth the item.
Feed the item evenly into the machine for ironing.
Do not feed small items into the iron on only one side.
If laundry is fed in on just one side, the heat will only be reduced on
one side and the load only exerted on the roller padding on one
side. If the laundry continues to be fed in on one side only, this will
be signaled by an an audible signal and the red symbol or
symbol appearing in the display.
Use the entire roller width wherever possible and distribute small
items evenly on the laundry infeed table.

Use
19
Pauses in ironing Press the button to go into Pause mode when the iron is switched
on.
In Pause mode, the roller stops and the heater plate disengages. The
iron heater element will initially remain switched on during this.
Press the button to start ironing again.
The rotary iron remains ready to operate in Pause mode. After a pe-
riod of 10minutes of non-use, the temperature is reduced to 140°F
(60°C).
After an adjustable period of non-use, the iron switches to Standby
mode.
Standby mode Standby mode is switched off in the factory settings. Standby mode
can be activated at the service level by MieleTechnical Service. The
value representing the time after which the rotary iron switches to
Standby mode can be set between 1 and 30minutes of non-use.
Press the button to switch the rotary iron back on.
In Standby mode, the roller comes to a standstill and the heater
plate is disengaged. The iron heater element switches off.
FlexControl
footswitch
Activating the moveable footswitch stops the roller. This makes it
easy to avoid mistakes when feeding in items.
Steaming the laun-
dry
While ironing, press the footswitch with your foot to steam the laun-
dry.
The roller stops moving. The heater plate remains on.
Remove your foot from the footswitch again to continue ironing.
The roller automatically begins to rotate again. The ironing program
continues.
Alternatively, the footswitch can be adjusted by MieleTechnical Ser-
vice in such a way that the heater plate exits Pause mode and the
roller begins to rotate when the footswitch is activated (domestic
switching).
Pick-off bands
(PM1214 &
PM1217 only)
The laundry is separated from the roller using the pick-off bands.
The ironed laundry can be very hot when it comes out of the
heater plate.
There is a danger of burns!
Use protective gloves if necessary.

Use
20
After ironing
After ironing, let the roller run for about 5minutes at the minimum
heating temperature and without feeding in any laundry to dry out
the padding completely.
Switch off the rotary iron by pressing the button.
The heater plate disengages, and the fan coasts down for cooling
for 10minutes. The button flashes during this process.
Switch off the on-site power switch.
It is important that you let the ironed laundry cool down suffi-
ciently before packing or stacking it.
Hot laundry could self-ignite and cause a fire.
Other manuals for PM 1210
3
This manual suits for next models
2
Table of contents
Other Miele Iron manuals

Miele
Miele B 890 User manual

Miele
Miele HM 16-80 User manual

Miele
Miele HM 29-175 User manual

Miele
Miele B 895 D User manual

Miele
Miele PM 1217 User manual

Miele
Miele B 995 D User manual

Miele
Miele B 890 Parts list manual

Miele
Miele FashionMaster User manual

Miele
Miele HM 21-100 User manual

Miele
Miele B 2312 User manual

Miele
Miele HM 16-83 User manual

Miele
Miele B 3312 User manual

Miele
Miele HM 21-100 User manual

Miele
Miele PRI 210 User manual

Miele
Miele HM 21-140 User manual

Miele
Miele PRI 210 User manual

Miele
Miele HM 21-140 User manual

Miele
Miele HM 16-80 D User manual

Miele
Miele B 1847 User manual

Miele
Miele PRI 210 User manual