manuals.online logo
Brands
  1. Home
  2. •
  3. Brands
  4. •
  5. Mirabelle
  6. •
  7. Bathroom Fixture
  8. •
  9. Mirabelle MIRVL4RTCP User manual

Mirabelle MIRVL4RTCP User manual

TWO HANDLE ROMAN TUB FAUCET
Model MIRVL4RTCP, MIRVL4RTBN, MIRVL4RTORB
GRIFO ROMANO DE LA TINA
Modelos MIRVL4RTCP, MIRVL4RTBN, MIRVL4RTORB
ROBINET ROMAIN DE BAQUET
Modèles MIRVL4RTCP, MIRVL4RTBN, MIRVL4RTORB
1
You may need/Usted puede necesitar/
Aticles dont vous pouvez avoir besion
Goggles
Anteojos Protectores
Lunettes de sécurité
Wrench
Llave
Clé ajustable
Basin Wrench
Llave para Instalar Grifos
Clé pour lavabo
(2) Supply Lines
2 Líneas de Suministro
(2) Tuyaux d'alimentation
Sealant Tape
Cinta Selladora
Ruban d'étanchéité
2.5mm/3.2mm Hex Allen Wrench
2.5mm/3.2mm Hex Llave Allen
2.5mm/3.2mm Cié hexagonale
English Español
Français
CAUTION-TIPS FOR REMOVAL
OF OLD FAUCET:
PRECAUCIÓN-CONSEJOS PARA
CAMBIAR LA LLAVE
MEZCLADORA:
ATTENTION-SUGGESTIONS
POUR ENLEVER L'ANCIEN
ROBIENT:
Always turn off water supply
before removing existing faucet
or replacing any part of the
faucet. Open the faucet handle
to relieve water pressure and
ensure that water is completely
shut off.
Siempre corte el suministro de
agua antes de retirar el grifo actual
o remplazar cualquier pieza del
mismo. Abra la llave del grifo para
liberar la presión de agua y
asegurar que ya no corre agua.
Toujours couper l'alimentation en
eau avant d'enlever ou de
démonter le robinet. Ouvrir le
robinet pour libérer la pression
d'eau et pour s'assurer que
l'alimentation en eau a bien été
coupée.
CARE INSTRUCTIONS: INSTRUCCIONES DE CUIDADO:
DIRECTIVES D'ENTRETINE:
To preserve the finish of your
faucet, apply non-abrasive wax.
Any cleaners should be rinsed
off immediately. Do not use
abrasive cleaners on the faucet.
Para conservar el acabado que cubre
las partes metálicas de su llave
mezcladora, aplique cera que no sea
abrasive, como una cera para autos.
Si usa algún tipo de limpiador,
deberá enjuagarlo inmediatamente.
Los abrasivos suaves son aceptables
en acabados platinum y LifeShine.
Pour préserver le fini des pièces
métalliques du robinet, appliquer
une cire non abrasive comme une
cire à votiure. Rincer
immédiatement le robinet aprés
l'avoir nettoyé avec un agent
nettoyant. Les finis platinum et
LifeShine peuvent être nettoyés à
l'aide de produits abrasifs doux.
www.mirabelleproducts.com03/01/16 REV.C
Silicone
Silicón
Silicone
SILICONE
2
Remove plastic cap and discard.
Retira la tapa de plástico y deséchala.
Retirez le capuchon en plastique et le jetez.
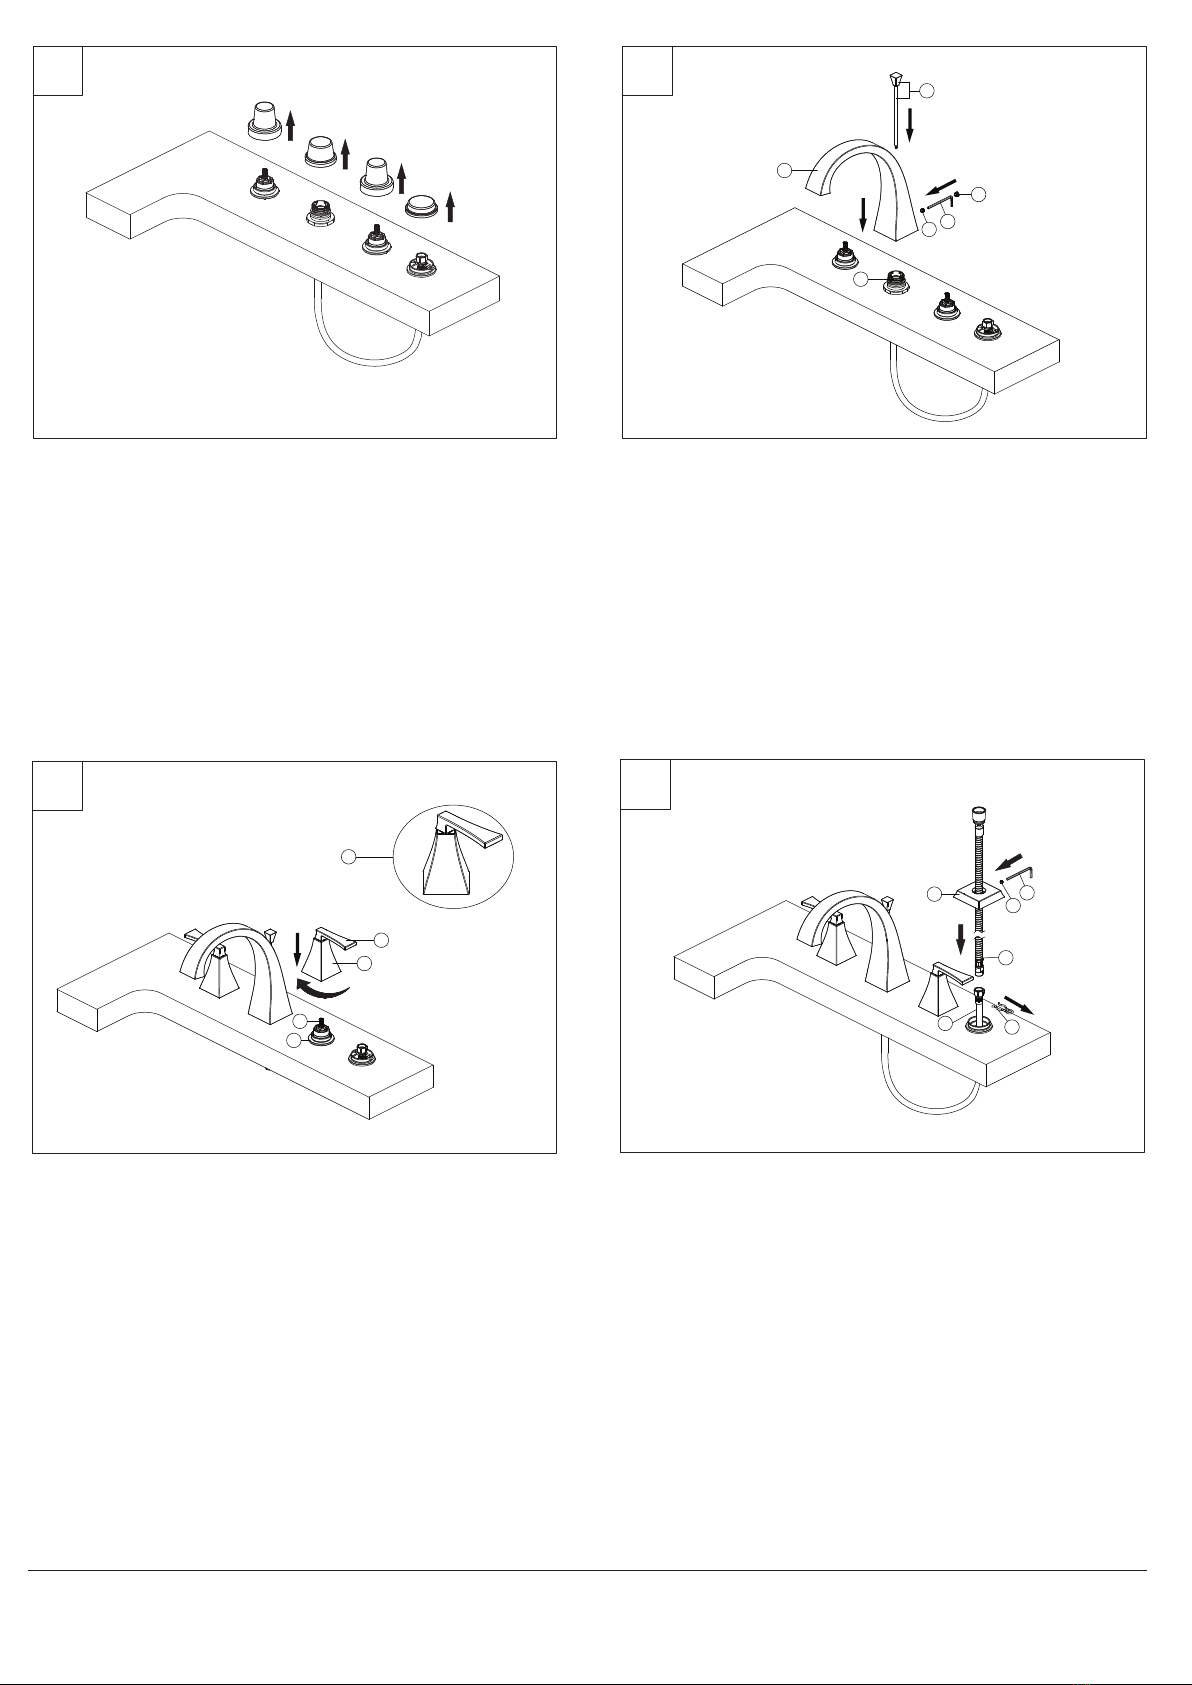
Install the spout (1) on the spout adapter (2). Be sure the spout is resting firmly
on the deck. Push down on spout and tighten set screw (3) with Allen wrench
(Hex: 3.2mm) (4). Insert the index (5). Thread lift rod (6) onto diverter body
through the spout (1) tightly.
Instala el caño (1) en su adaptador (2). Asegúrate de que el caño descanse de
manera firme sobre el borde. Presiona el caño hacia abajo y aprieta el tornillo
de fijación (3) con la llave Allen (Hexagonal: 3,2 mm) (4). Inserta el índice (5).
Enrosca la vara del aireador (6) en el cuerpo del desviador a través del caño
(1) firmemente.
Installez le bec (1) sur l'adaptateur de bec (2). Vérifiez que le bec repose
solidement sur la plage. Poussez sur le bec et serrez la vis de pression (3) à
l'aide d'une clé hexagonale (3,2 mm) (4). Insérez le repère de température (5).
Vissez bien serrée la tirette (6) sur le corps de dérivation à travers le bec (1).
Place handle assembly (1) onto the right (cold) valve stem (3). Then thread the
handle seat (2) onto the flange (4). Place the other handle assembly onto the
left (hot) valve stem and install the same way. After install handle assembly, if
the handle seat is not aligned with handle in a line as shown in the above
diagram (5), rotate the handle seat back (the rotating angle can not exceed
90°) to make the handle seat align with handle in a line.
Monta el ensamblado de la manija (1) en el vástago de la válvula (agua fría)
derecha (3). Luego enrosca el asiento de la manija (2) en la brida (4). Coloca el
otro ensamblado de la manija en el vástago de la válvula (agua caliente)
izquierda e instala de la misma manera. Después de instalar el ensamblado de
la manija, si el asiento de la manija no está alineado con la manija como se
muestra en el diagrama anterior (5), rota el asiento de la manija hacia atrás (el
ángulo de rotación no debe exceder los 90°) para alinear el asiento de la
manija con la manija.
Placez la manette (1) sur la tige droite (froid) du robinet (3). Puis vissez le siège
de la manette (2) sur la bride (4). Placez l'autre manette sur la tige gauche
(chaud) du robinet et fixez de la même manière. Après avoir installé la
manette, si le siège de la manette n'est pas aligné avec la manette, tel
qu'indiqué dans le schéma ci-dessus (5), tournez le siège de la manette
(l'angle de rotation ne peut pas dépasser 90°) pour aligner le siège de la
manette avec celle-ci.
Insert spray hose (1) onto flange (2). Pull out the flexible water supply hose (4)
and remove clip (3). Connect the flexible water supply hose (4) to the spray
hose (1). Push down on flange (2) and tighten set screw (5) with Allen wrench
(Hex: 2.5mm) (6).
1 2
3 4
Coloca la manguera del rociador (1) en la brida (2). Hala hacia afuera la
manguera flexible de suministro de agua (4) y retira la presilla (3). Conecta la
manguera flexible de suministro de agua (4) a la manguera del rociador (1).
Presiona la brida (2) hacia abajo y aprieta el tornillo de fijación (5) con la llave
Allen (Hexagonal: 2,5 mm) (6).
Insérez le tuyau de douchette (1) sur la bride (2). Tirez le tuyau flexible
d'alimentation en eau (4) pour le sortir et retirez la pince (3). Raccordez le
tuyau flexible d'alimentation en eau (4) au tuyau de douchette (1). Enfoncez la
bride (2) et serrez la vis de pression (5) avec une clé hexagonale (2,5 mm) (6).
4
5
2
6
3
1
2
1
4
33
4
1
6
2
5
www.mirabelleproducts.com03/01/16 REV.C
5
3
5 6
Turn on hot and cold water supplies and flush water lines for one minute. Pull
spray hose (1) to its farthest extension and point it down into the tub. Pull the
lift rod up to the full ON position and flush water lines for one minute. After
flushing, turn the handles all the way off to shut off the water. The lift rod
should now be in its normal position. Important: This flushes away any debris
that could cause damage to internal parts.
Abre los suministros de agua caliente y fría y purga los conductos de agua
durante un minuto. Hala la manguera del rociador (1) hasta su máxima
extensión posible hacia abajo en dirección de la tina. Hala la vara del aireador
completamente hacia arriba a la posición de Encendido (ON) y purga los
conductos de agua durante un minuto. Después de purgar, gira las manijas
para cerrar el suministro del agua. La vara del aireador debe estar ahora en su
posición normal. Importante: Esto limpia cualquier residuo que pueda causar
daño a las partes internas.
Faites couler l’eau chaude et l’eau froide pour purger les conduites d'eau
pendant une minute. Tirez le tuyau de la douchette (1) pour l'allonger au
maximum et pointez-le dans la baignoire. Tirez la tirette pour l'amener en
position ouverte maximale et purgez les conduites d'eau pendant une minute.
Après la purge, tournez complètement les manettes pour fermer l'eau. La
tirette devrait maintenant être dans sa position normale. Important: Cette
opération sert à évacuer les débris qui pourraient endommager les éléments
internes.
Connect hand held shower (1) into the end of spray hose (2) by turning metal
hose fitting clockwise. Hand tighten.
Conecta la ducha manual (1) en el extremo de la manguera del rociador (2)
girando el conector de metal de la manguera hacia la derecha. Aprieta con la
mano.
Raccorder la douche-téléphone (1) à l'extrémité du tuyau de douchette (2) en
tournant le raccord de tuyau métallique dans le sens des aiguilles d'une
montre. Serrez à la main.
1
1
1
2
www.mirabelleproducts.com03/01/16 REV.C
4
* Specify Finish
Especifíque el Acabado
Précisez le Fini
RP40159*
Lift rod & Lift Rod knob
Perilla de la varilla de extensión &
Varilla de elevación
Bouton & Tuge de Tige de levage
RP70221
2.5mm Hex Allen Wrench
2.5mm Hex Llave Allen
2.5mm Hex Cié hexagonale
RP70332
3.2mm Hex Allen Wrench
3.2mm Hex Llave Allen
3.2mm Hex Cié hexagonale
RP60093
O-Ring
Junta en Forma de Aro Tórico
Joint torique
RP50002
Set Screw
Tornillo de Fijación
Vis de calage
RP60049
O-Ring
Junta en Forma de Aro Joint torique
Rondelle d’usure
RP80321*
Index
Índice
Repère
RP50054
Set Screw
Tornillo de Fijación
Vis de calage
RP17132*
Handle
Llave
Poignée
RP80322*
Flange
Ribete
Bride
www.mirabelleproducts.com03/01/16 REV.C
RP38129
Hose
Manguera
Rondelle
RP38300*
Shower Head
Cabezal de ducha
Pomme de douche

This manual suits for next models

2

Other Mirabelle Bathroom Fixture manuals

Mirabelle MIRHS4020GCP User manual

Mirabelle

Mirabelle MIRHS4020GCP User manual

Mirabelle MIRHS4060GCP User manual

Mirabelle

Mirabelle MIRHS4060GCP User manual

Mirabelle PROVINCETOWN MIRPR9007CP User manual

Mirabelle

Mirabelle PROVINCETOWN MIRPR9007CP User manual

Mirabelle St. Martin MIRSM3RTCP User manual

Mirabelle

Mirabelle St. Martin MIRSM3RTCP User manual

Mirabelle Boca Raton MIRBR8030ECP User manual

Mirabelle

Mirabelle Boca Raton MIRBR8030ECP User manual

Mirabelle MIRPT8020ECP User manual

Mirabelle

Mirabelle MIRPT8020ECP User manual

Mirabelle MIRED2RTDGCP User manual

Mirabelle

Mirabelle MIRED2RTDGCP User manual

Mirabelle MIRBSKT01CP User manual

Mirabelle

Mirabelle MIRBSKT01CP User manual

Mirabelle MIRSH2040GCP User manual

Mirabelle

Mirabelle MIRSH2040GCP User manual

Mirabelle MIRRI4RTGCP User manual

Mirabelle

Mirabelle MIRRI4RTGCP User manual

Mirabelle MIRRS1025RBN User manual

Mirabelle

Mirabelle MIRRS1025RBN User manual

Mirabelle VILAMONTE MIRVL8030GCP User manual

Mirabelle

Mirabelle VILAMONTE MIRVL8030GCP User manual

Mirabelle MIRBE9005CP User manual

Mirabelle

Mirabelle MIRBE9005CP User manual

Mirabelle MIRBS6040ECP User manual

Mirabelle

Mirabelle MIRBS6040ECP User manual

Mirabelle MIRSH2070ECP User manual

Mirabelle

Mirabelle MIRSH2070ECP User manual

Mirabelle St. Martin MIRSM4RTGCP User manual

Mirabelle

Mirabelle St. Martin MIRSM4RTGCP User manual

Mirabelle MIRPR8020 User manual

Mirabelle

Mirabelle MIRPR8020 User manual

Mirabelle ST. MARTIN MIRSM9005CP User manual

Mirabelle

Mirabelle ST. MARTIN MIRSM9005CP User manual

Popular Bathroom Fixture manuals by other brands

Northwest Territory KMT160704SW owner's manual

Northwest Territory

Northwest Territory KMT160704SW owner's manual

Graff E-6910-C16B-PC Instructions for assembly and use

Graff

Graff E-6910-C16B-PC Instructions for assembly and use

TECE TECEsolid 9240416 Care Instructions

TECE

TECE TECEsolid 9240416 Care Instructions

Toto Aquia TS416E Installation and owner's manual

Toto

Toto Aquia TS416E Installation and owner's manual

DURAVIT Happy D.2 Plus HP 4954 L Mounting instructions

DURAVIT

DURAVIT Happy D.2 Plus HP 4954 L Mounting instructions

ALEX BAITLER AB 215-90 user manual

ALEX BAITLER

ALEX BAITLER AB 215-90 user manual

Axor Montreux 42066 Series Instructions for use/assembly instructions

Axor

Axor Montreux 42066 Series Instructions for use/assembly instructions

Price Pfister KENZO RT6 Series manual

Price Pfister

Price Pfister KENZO RT6 Series manual

Alcoa Alumax Bath Enclosures STIKSTALL 795 Series installation instructions

Alcoa

Alcoa Alumax Bath Enclosures STIKSTALL 795 Series installation instructions

Goodiy Cuadro 501834111 instruction manual

Goodiy

Goodiy Cuadro 501834111 instruction manual

Symmons 0171-3DTP installation guide

Symmons

Symmons 0171-3DTP installation guide

KWC RODAN RODX605TTH Installation and operating instructions

KWC

KWC RODAN RODX605TTH Installation and operating instructions

Swann C58103 Installation instructions and user guide

Swann

Swann C58103 Installation instructions and user guide

Akw Option TT installation instructions

Akw

Akw Option TT installation instructions

Hamwells Loopz quick start guide

Hamwells

Hamwells Loopz quick start guide

Camargue Stella 7006212 manual

Camargue

Camargue Stella 7006212 manual

KOLO ATOL PLUS installation manual

KOLO

KOLO ATOL PLUS installation manual

Moen Eva ACC2505 installation instructions

Moen

Moen Eva ACC2505 installation instructions

manuals.online logo
manuals.online logoBrands
  • About & Mission
  • Contact us
  • Privacy Policy
  • Terms and Conditions

Copyright 2025 Manuals.Online. All Rights Reserved.