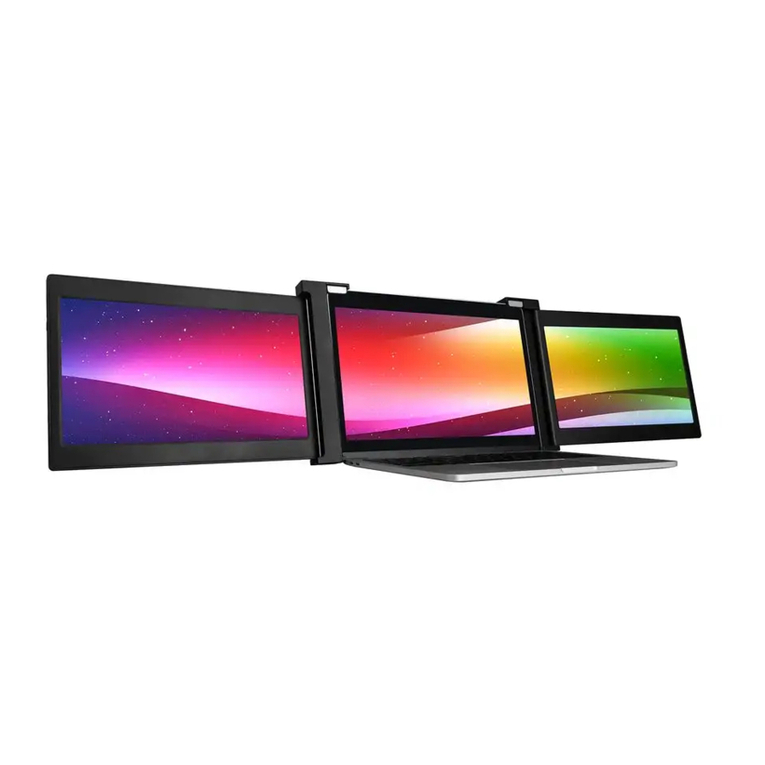
MISURA 3M1303S1 User manual

USER MANUAL ENGLISH
PORTABLE
DUAL MONITOR
Ultra slim
& light weight
Patented
Product
P
Compatible with
Apple M1 Chip
M1
Compatible with
Apple M2 Chip
M2 178°
Ultra Wide
Viewing Angle
1080 IPS
Super TFT
display

Copyright © 2020 MISURA Store s.r.o. All rights reserved.
No part of this manual, including the products and software described in this manual, may be reproduced,
transmitted, transcribed, stored in a data storage system, or translated into any language in any form and by any
means, except for documentation stored by the Buyer for backup purposes without the written permission of
MISURA Store s.r.o. (“MISURA”).
The warranty for the product or service becomes void if: (1) the product is repaired, modified or altered without
the written permission of MISURA or (2) the serial number of the product is illegible or missing.
The technical data and information in this manual are provided for information only, are subject to change at any
time without notice, and should not be construed as a commitment by MISURA.
MISURA is not responsible for any errors or inaccuracies that may appear in this manual, including the products
and software described in this manual.
Monitor 12“ 3M1200S1
Adaptive for laprtop panel:
Length 263- 373mm
Breadth > 185mm
Thickness < 8.5mm
Monitor 13.3“ 3M1303S1
Adaptive for laprtop panel:
Length 293-413mm
Breadth > 204mm
Thickness < 8.5mm
Monitor 14“ 3M1400S1
Adaptive for laprtop panel:
ength 309 - 425mm
Breadth > 209mm
Thickness < 8.5mm
MODELS
NOTICE
Please handle dual monitor with care and do not press the screens to avoid damage.
Do not exceed its maximum turning angle showing as below:
ROTATING ANGLE OF SCREENS:
Left screen(0° - 235°) Right screen(0° - 180°)
MISURA dual monitor still consumes small amount of power when it‘s on standby
status. For energy saving, waste less and low carbon living style, it‘s highly
recommended to remove cable connections when MISURA dual monitor is not in use.

CONTENT
OVERVIEW OF COMPONENTS
INPUST AND BUTTONS
PROTECTIVE CAP
ASSEMBLY
CONNECTION METHODS
DRIVER INSTALLATION – WINDOWS
DRIVER INSTALLATION – MAC
LAPTOP DISPLAY CONFIGURATION – PC
LAPTOP DISPLAY CONFIGURATION – MAC
TECHNICAL SPECIFICATIONS
FAQ
CLEANING AND MAINTENANCE
SAFETY INFORMATION
1
2
3
4
5 - 6
7
8
9
10
11
12
13
15

OVERVIEW OF COMPONENTS
USB-C to
USB-C cable
TF card
(Driver contained)
TF Card reader
DUAL MONITOR
1
2 USB-A to
USB-C cable
TF
USB-C OTG
cable
6* Protective caps

USB-C PD
(In case of power is required,
recommendedto use laptop power
supply (with Type C ) or SS PD charger
to power the device )
Full functioned USB-C
(To receive various inputs from
USB-A or USB-C ports )
INPUTS AND BUTTONS
2
SS
SS
Brightness - (Right screen)
Brightness +(Right screen)
Brightness +(Left screen)
Brightness - (Left screen)

USB-C PD
(In case of power is required,
recommendedto use laptop power
supply (with Type C ) or SS PD charger
to power the device )
Full functioned USB-C
(To receive various inputs from
USB-A or USB-C ports )
Using the protective cap if your laptop is an ultra-thin style(laptop screen thickness ≤6mm),
it helps to reduce the shaking.
PROTECTIVE CAP
3

ASSEMBLY
4
1.
Take the dual
monitor out
of the box.
4.
Lift the stand and pull
the end of the stand
to extend the stand. Press
and hold the button to
retract the stand.
2.
Open the two
screens in
in the directions
described
in the figure.
3.
Place the holder over
the back of the screen
and clamp it well to cover
the edges and fits
on the laptop screen.
5.
Using the necessary cables plug one end into the
Dual monitor and the other into your laptop. For
long term use please plug 5V/3A (or PD power)
external power adapter or laptop power supply
(with Type C)

CONNECTION METHODS
5
1. Connecting the dual monitor by USB-C to USB-C cable
NOTE: After the driver is installed, MISURA dual monitor can be powered by one cable as long as the output power is > 10W.
SS
USB-C
USB-C
if the output power of the laptop port is lower than 10W, external power
supply is required for MISURA dual monitor.
When the dual monitor is connected with external power source (5V 3A power supply) and the laptop is connected to
MISURA dual monitor by full functioned USB-C port, the laptop can also be charged by the external power source.

2. Connecting the dual monitor by 2 USB-A to USB-C cable
Step 1: Please connect both USB-A male connectors to laptop or adapter first.
USB-C
USB-A
USB-A
USB-A
USB-A
USB-C
Step 2: Then connect the USB-C male connectors to MISURA dual monitor.

DRIVER INSTALLATION – WINDOWS
6
1. Windows 10 or higher versions
The driver will be automatically installed when the
dual monitor is connected to your laptop via the
USB-C or USB-A cable. Please ensure that your
laptop is connected to the internet. After successful
installation, restart the laptop to use it.
2. Other Windows versions
a. To load the driver, insert the TF card into your laptop, or use the provided accessories: an OTG
cable and card reader. The folder „Drivers“ will be displayed on your laptop desktop or in „My
Computer (PC)“. (Note: Please install the driver to the default folder.)
b. Open the subfolder and double click the executive drivers and follow the instruction to complete
driver installation.
c. After successful installation, restart the laptop.
d. Connect dual monitor with laptop then dual monitor is ready to use.
REMARK: Windows 7
a. When the Windows 7 driver cannot be installed properly, please operate your laptop as below:
Enter “Control Panel” ----- “System and Security” ----- “Windows update” ----- “Check for updates”
Update to the latest version
b. Open the “driver” folder and double click the executive drivers and follow the instruction to
complete driver installation.
c. After successful installation, restart the laptop.
d. Connect dual monitor with laptop then dual monitor is ready to use.

ÚVOD DO FUNKCÍ OSDDRIVER INSTALLATION – MAC
1. To load the driver, insert the TF card into your laptop, or use the provided accessories: an OTG
cable and card reader. The folder „Drivers“ will be displayed on your laptop desktop.
2. Open the „Drivers“ folder and find the “mac OS” .
3. Enter „System Preferences“ > “Security & Privacy” > „Screen Recording“ > “Unlock“
(Apple ID and password are required) > „Tick UsbDisplay“
4. After successful installation, restart the laptop.
5. Connect MISURA dual monitor with laptop then dual monitor is ready to use.
NOTE: When the drive cannot be found, please operate your Macbook as below:
1.
Enter „System
Preferences“ >
“Security
& Privacy” >
„Screen Recording“
2.
Click the “+”
symbol as shown
in the figure to
add the driver
3. Click “Applications” > „RacerUSB“ > “usbDisplay”
> “Open”
4. Follow the steps to add the driver.
5. After successful installation, restart the laptop.
6. Connect dual monitor with laptop then
dual monitor is ready to use.

LAPTOP DISPLAY CONFIGURATION – PC
7
1. Go to your Display Settings
(Start > Settungs System > Display).
2. Click to „identify“, and the corresponding
number will appear on each screen;
3. Click and drag the numbered screens to the
configuration as shown
4. If two screens appear to be together, such as
2/1, 2/3, etc., please select one of the screen
then go to “Multiple Displays menu” to select
‚Extend desktop on this display“;
5. ITo increase the zoom, click the “Change the
size of test, apps, and other items” dropdown
and select 150%, or preferred zoom.
* Keeping three displays sync can be configured in setting of graphic
card. If there is any issue please consult local distributor.

LAPTOP DISPLAY CONFIGURATION – MAC
8
1. Open Displays Settings
( > System Preferences > Display).
2. Click „Arrangement“ from display menu
3. Ensure that the „Mirror Displays“ box is
unchecked
4. Click each monitor icon and note on which of
your screens a red frame appears
5. Click and drag the screen icons so that they are
on the same side as the associated screens with
a red frame
1920x1080
1920x1080
1920x1080 1920x1080

TECHNICAL SPECIFICATIONS
9
Length 263- 373mm
Breadth >185mm
Thickness < 8.5mm
Length 293-413mm
Breadth >204mm
Thickness < 8.5mm
Length 309 - 425mm
Breadth >209mm
Thickness < 8.5mm
1920*1080
16 : 9
Adaptive for laptop panel
Resolution
Aspect ratio
Backlight type
Power
Speaker NA
1920*1080(Support Video or signal )
Dimension
1.19kg 1.35kg 1.42kg
314x197x28mm 344x212x27mm 360x221x29mm
Tri-screen weight
5V 3A
Only for power
W-LED
Screen size 11.6 inch/12 inch 13.3 inch 14 inch
Type C SS
Type C

FAQ
Q1: There is only one screen lights up but another one blacks out.
A: This situation could happen when you use 2USB-A to USB-C cable for connection. Because the
output power of some laptops is not enough to light up both screens at the same time, so correct connecting
procedure should be followed. First make sure both USB-A male connectors are connected to laptop or adapter,
at the last step connect the USB-C male connector to MISURA dual monitor.
Q2: The screen does not light up, screens are intermittent, screen flickers, keeps restarting
after connecting the expansion screen?
A: You may add an USB-C PD charger to the USB-C PD port.
Q3: How do I need to connect my laptop if it doesn‘t have an USB Type-C port?
A: You can use the 2USB-A to USB-C cable from the accessory to connect. It will only occupy two USB-A ports on
your laptop and one USB-C port on MISURA dual monitor.
Q4: After connecting the product, the laptop does not display the driver, The driver is not
responding?
A: 1. You may have connected the cable to the USB-C PD port on MISURA dual monitor. Please switch it to ano-
ther port.
2. The output port of your laptop cannot deliver enough power to MISURA dual monitor, please connect an additi-
onal USB-C PD charger(5V 3A)to the USB-C PD port on MISURA dual monitor.
Q5: How can I use MISURA dual monitor at its maximum brightness?
A: The maximum brightness is limited to 80% when the connection doesn‘t have an external power involved.
Q6: Can I charge the battery of my laptop if I connect an adapter to the USB-C PD port?
A: Yes, the battery of the laptop can be charged based on two conditions. First the adapter should support 45W
or higher PD charging protocol. Second the laptop is connecting to MISURA dual monitor via its full functioned
USB-C port.

CLEANING AND MAINTENANCE
Turn off the monitor and unplug the cable before cleaning. Clean the surface of the
monitor with a smooth cloth that does not release fibres. Resistant stains can be
removed with a cloth dampened with a mild detergent designed for cleaning
monitors. Do not use a detergent containing alcohol or acetone. Use only a detergent
designed for LCD monitors. Do not spray detergent directly on the surface of the display,
as it may enter the monitor and cause an electric shock.
Depending on the desktop background, the brightness of different parts of the screen may
differ slightly.
If you display the same image for several hours, it may „burn“ into the screen and persist. The
display will gradually but slowly „recover“ or turn it off for a few hours.
THE FOLLOWING SYMPTOMS ARE NORMAL, NOT A DEFECT
IF THE DISPLAY IS BLACK, FLASHING, OR NOT WORKING AT ALL, CONTACT THE SERVICE
OR DEALER FOR REQUEST FOR SERVICING. DO NOT ATTEMPT TO SERVICE IT YOURSELF!

Declaration of conformity according to the EMC Directive 2014/30 / EC on the harmonization of legal regulations
of Member States related to electromagnetic compatibility
Výrobce/dovozce:
MISURA Store s.r.o.
KPoště 429/2
252 67 Tuchoměřice
Person responsible for completing the technical documentation:
Ing. Jirí Mihel – executive director of the company
Description and identification of machinery:
Title: portable USB monitor
Type: 3M1200S1, 3M1303S1, 3M1400S1
The device described above has been tested in accordance with the above standards
and found to comply with the EMC 2014/30/ES. The observations and test results given
in this certificate are only relevant for the test sample.
The product complies with the following European Community regulations:
Directive EN 55032: 2015 of the European Parliament and of the Council
- Electromagnetic compatibility of multimedia equipment – Emission requirements.
Directive EN 55035: 2017 of the European Parliament and of the Council
- Electromagnetic compatibility of multimedia devices – Immunity requirements.
HARMONIZED STANDARDS USED:
IEC 62321-3-1:2013, IEC 62321-5:2013, IEC 62321-4:2013+AMD1:2017,
IEC 62321-7-1:2015, IEC 62321-7-2:2017, IEC 62321-6:2015, IEC 62321-8:2017

Read all supplied documentation carefully before preparing this portable USB-C monitor for use.
To reduce the risk of fire or electric shock, do not expose this portable USB-C monitor to rain or moisture.
Do not attempt to disassemble the cover of this portable USB-C monitor.
Before using this portable USB-C monitor, make sure that all cables are connected properly.
Avoid extremely dusty environments, changes in temperature and humidity. Do not place the portable USB-C
monitor in areas where there is a risk of moisture/splashing.
Do not allow objects or liquids to enter the holes / cutouts on the cover of the portable USB-C monitor.
In the event of technical problems with the portable USB-C monitor, contact aqualified service technician or
dealer.
Do not dispose of this product in a fire.
Do not use this monitor near heating devices or in places subject to high temperatures.
Keep this monitor away from sharp objects.
ÚVOD DO FUNKCÍ OSDSAFETY INFORMATION
This manual suits for next models
2
Table of contents
Other MISURA Monitor manuals

MISURA
MISURA P23CM27BFA01B User manual

MISURA
MISURA P23QG25DFA01B User manual

MISURA
MISURA P23GW24DFI01B User manual

MISURA
MISURA P23PW27DQI01B User manual

MISURA
MISURA P23M16TSTYLE01 User manual

MISURA
MISURA P23QM24DFI01B User manual

MISURA
MISURA 3M101B User manual

MISURA
MISURA P23MM24DFA01B User manual

MISURA
MISURA P23EG34RWA01B User manual

MISURA
MISURA 3M101B User manual