5
GBDFEINLPGRRUTRSDDK
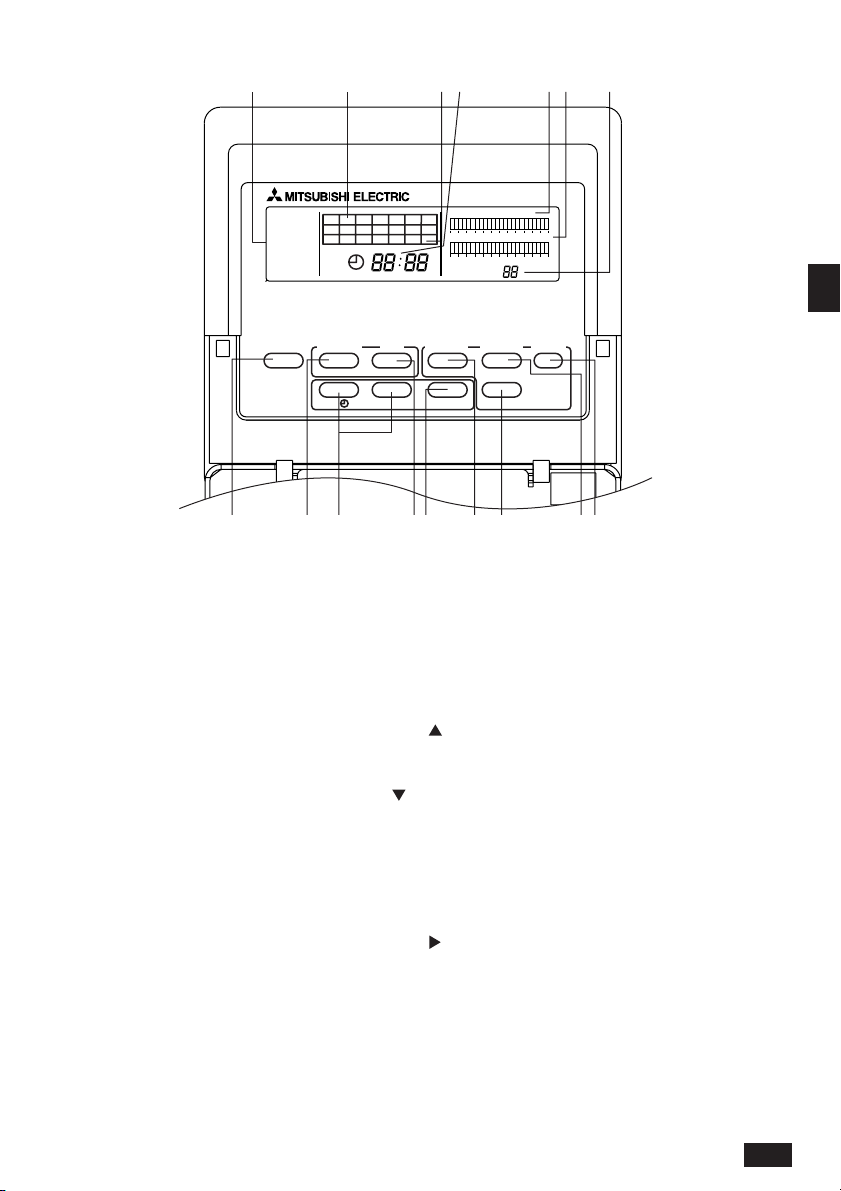
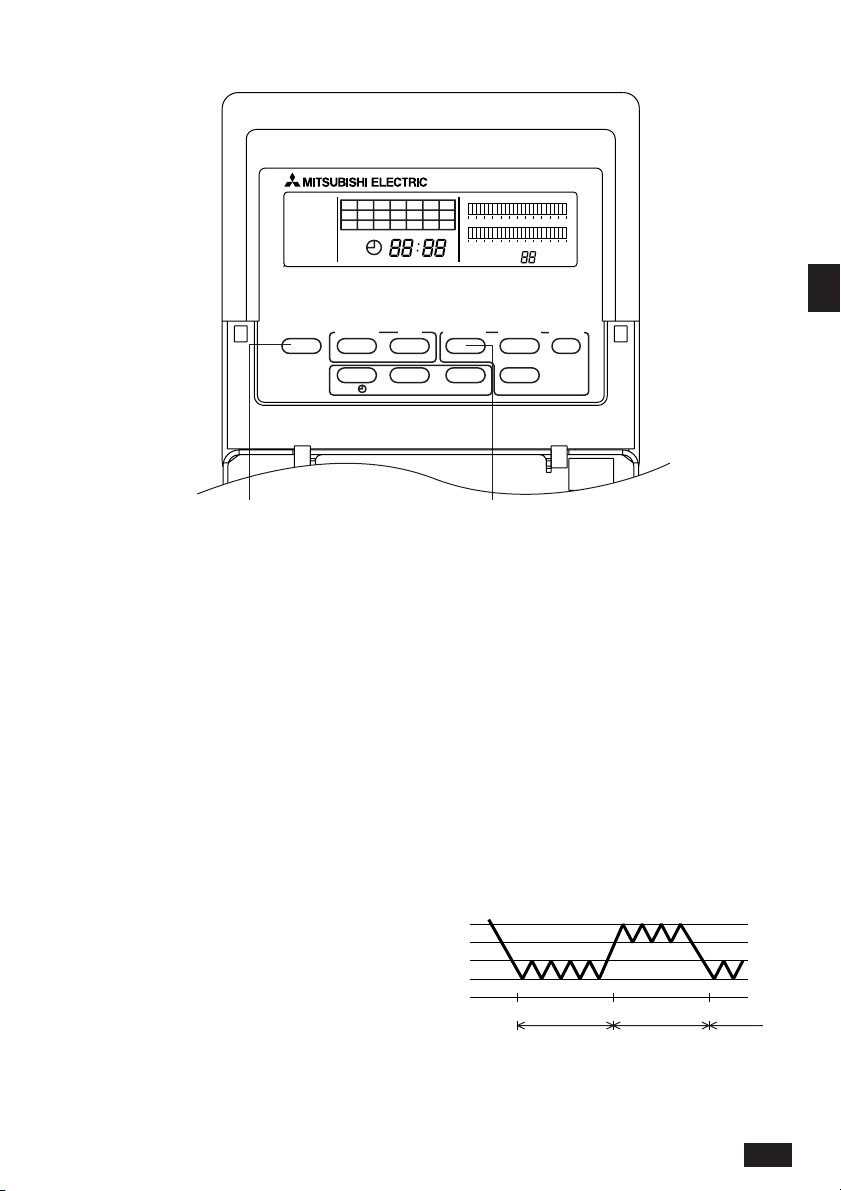
3. Names of Parts and their Functions
ASET/MONITOR DISPLAY:
When SET is displayed, clock adjustment,
change of day, and daily and weekly timer
settings can be performed. When MONI-
TOR is displayed, all switches except SET/
MONITOR SW are invalidated.This is nor-
mal status.
BWEEKLY TIMER SETTING DISPLAY:
Used to select whether the operation pat-
tern set using the PATTERN SETTING can
be applied to different days of the week.
CCURRENT DAY DISPLAY:
Indicates the current day.
DCURRENT TIME DISPLAY:
During MONITOR status, current time is
display.
During daily timer setting, a time desire
for timer setting is displayed.
EOPERATION MODE DISPLAY:
Indicates the operation mode.
FDAILY TIMER SETTING DISPLAY:
24 hours is divided into 48 blocks and each
block is expressed in 30 minutes.
The block display consists of 3 patterns.
GSET BACK DISPLAY
Indicates the set back value.
1SET/MONITOR Button
Using this switch, select “MONITOR”or “SET”Mode.
“MONITOR”: Indicates the current timer setting. All switches expect
MODE SELECTOR SW are invalidated then.This is the
normal status.
“SET”: Set to “SET”mode for clock adjustment, change of day
and daily and weekly timer settings.
2MODE A/B/OFF Button
Used for setting timer in day of week unit.
3CLOCK ADJUSTMENT Button
Used for adjustment of the current time.
Push [ ] SW to advance the time. Each time the button is pushed
the time advances by 1 minute, pushing continuously advances by
1 minute at 0.5 second intervals, and when the lower digit of the
minute becomes “0”the time advances in 10 minute units.
[] SW is used for reversing the time. Each time the button is
pushed the time reverses by 1 minute, pushing continuously re-
verses the time by 1 minute at 0.5 second intervals, and when the
lower digit of the minute becomes “0”the time reverses in 10 minute
units.
4DAY SETTING Button
Used when setting the day.
5WEEK DAY SETTING Button
Used for week day setting.
Pushing [ ] SW moves the week day light display in order of S→M
→T→W→... enabling to set the week day.
6SET BACK SETTING Button
Used for set back setting.
Set back can be done in the range of 1, 2, 4, 6 and 8°C (2, 4, 8, 12 and
16°F).
7ON/OFF/SET BACK Button
Used to specify the time setting pattern.
8DAILY TIMER Button
Used for timer setting in 30 minute units.
9MODE A/B Button
Used to set A Mode or B Mode when specifying the operation time.
ABCDEFG
1234567 89
■
S
▲
■
M
▲
■
T
▲
■
W
▲
■
T
▲
■
F
▲
■
S
▲
SET BACK
MODE A MODE B
0369
12
12 15 18 21 24
SET
M
O
NIT
O
R
SET/MONITOR
ON/OFF/SET BACK
WEEKLY SETTING
PAC-YT32PTA
CLOCK TODAY
DAILY SETTING
▲
▲
▲
MODE A/B/OFF
DAY SET BACK
DAILY TIMER MODE A/B