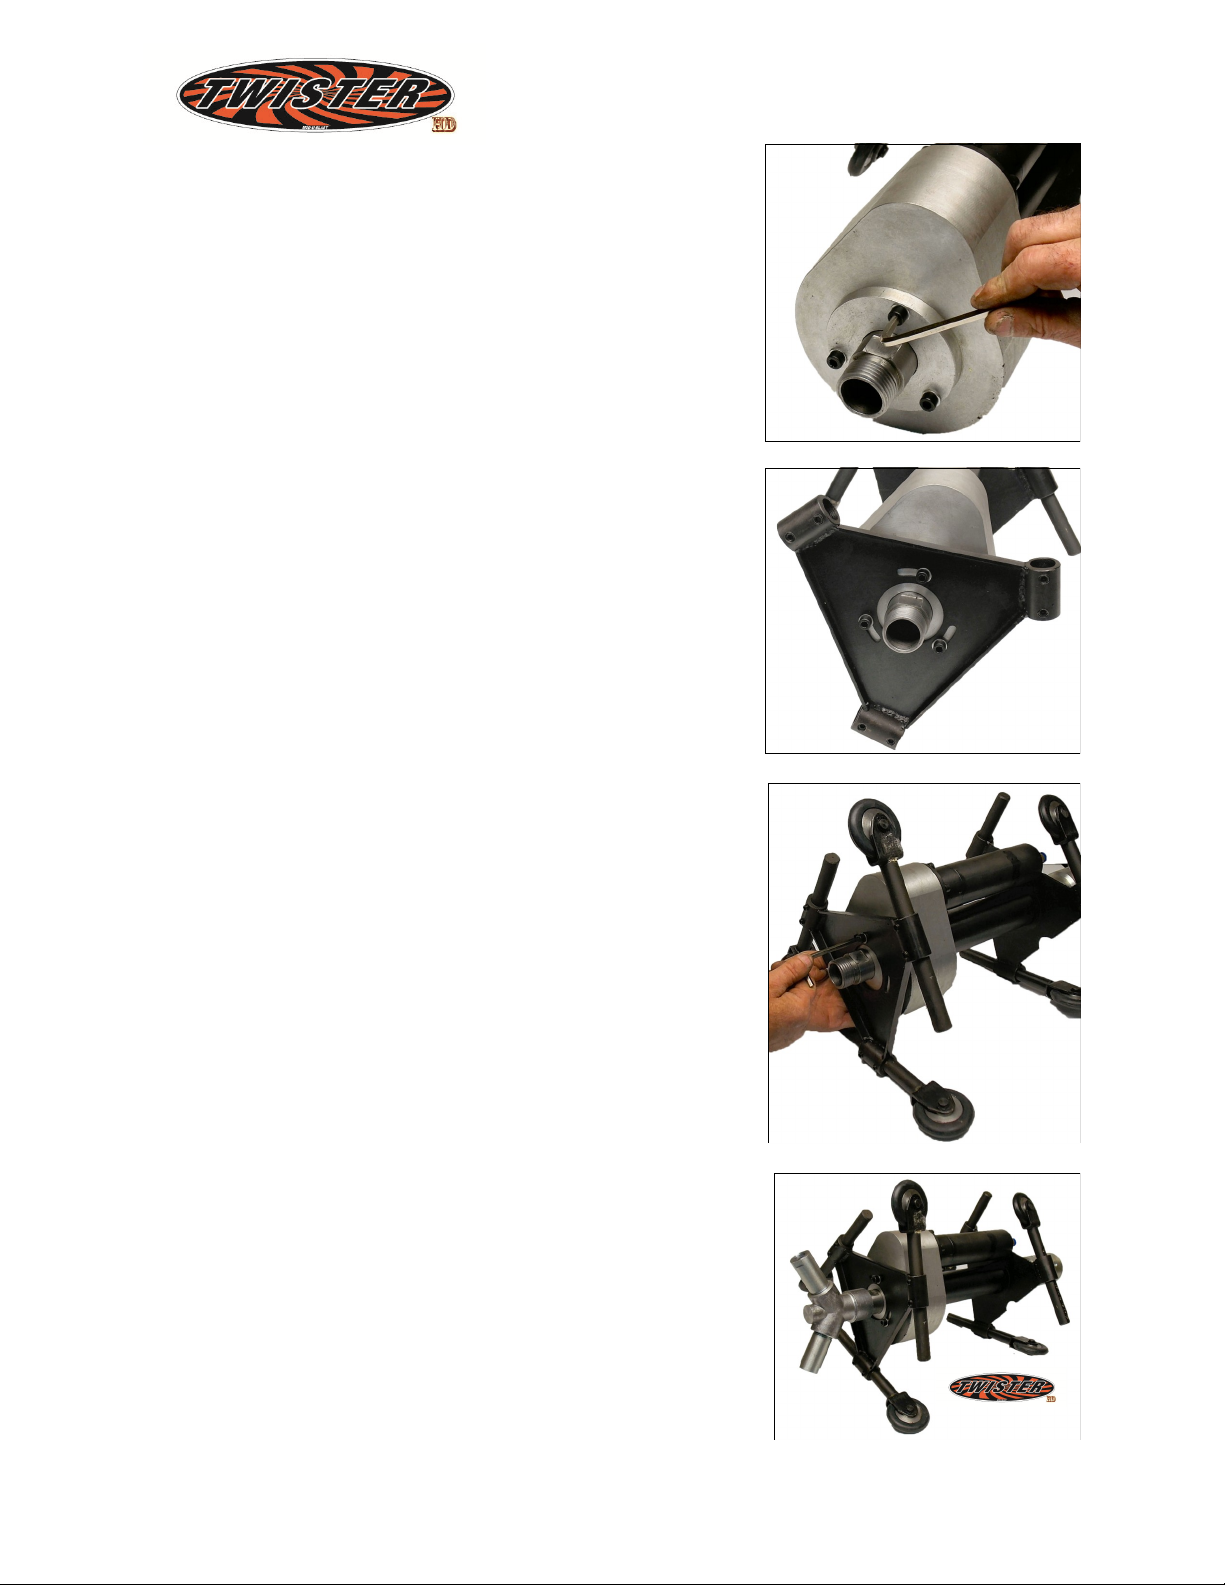
Mod-U-Blast Twister HD Manual

INTERNAL PIPE CLEANING TOOL
OPERATION & MAINTENANCE MANUAL
Manual # Twister1702

2
Contents Page
Important Notice 3
Introduction, Specifications & Air Requirements 4
Assembly Procedure 5 & 6
Safety 7
Set-up 8
Operation 9
Daily Maintenance 10
100 Hour Maintenance 11 & 12
Twister Schematic 13
Gear Box Schematic 14
Optional Air Motor Connections 15
Warranty 16

3
IMPORTANT NOTICE
TO DISTRIBUTORS, PURCHASERS AND END USERS OF MOD-U-BLAST PRODUCTS
The information provided described and illustrated in this material is intended for
experienced, knowledgeable users of abrasive blasting equipment and supplies (products).
The products described in this material may be combined as determined solely by the user
in a variety of ways and purposes. However no representations are made as to intended
use, performance standards, engineering suitability, safe practices or compliance with
government regulations and laws that apply to these products, products of others or a
combination of various products, products of third parties, and a combination of various
products, to exercise caution and familiarize themselves with all applicable laws,
government regulations and safety requirements.
Nor are representations made or intended as to the useful life, maintenance cycles,
efficiency or performance of the referenced products of any combination of products. This
material must not be used for estimating purposes. Production rates, labour performance
or surface finishes are the sole responsibility of the user based on the user’s expertise,
experience and knowledge of industry variables.
It is the responsibility of the user to insure that proper and comprehensive training of
operators has been performed and all environmental and safety precautions observed.
Mod-U-Blast Inc. provides a variety of excellent products to the surface preparation
industry, and we are confident that all proficient users, operators and contractors in this
industry will continue to use our products in a safe and knowledgeable manner.
Before using this product, read all instructions, literature, labels,
specifications and warnings sent with and affixed to the unit.
If operation of the unit is unclear after reading this manual, contact your supervisor for
instructions. It is the responsibility of the employer to read the following instructions to
users of this equipment. Periodic inspection at the work site should be made by
supervisory personnel to ensure the unit is being properly used and maintained. A copy of
this owners manual must be kept with the unit and readily accessible to the operators at
all times.

4
INTRODUCTION:
The TWISTER HD is a rugged, portable, high production tool for blast cleaning the internal
surface of steel pipe. The carriage adjusts for cleaning pipe from 12” (300mm) to
36” (900mm).
The TWISTER HD is a pneumatic tool that is used as an accessory to a standard blast
machine. Compressed air powers the air motor for control of the blast head rotation speed
allowing infinite flexibility for varying degrees of contamination of the steel surface.
SPECIFICATIONS:
Minimum Pipe Diameter 12” (300 mm)
Maximum Pipe Diameter 36” (900 mm)
Maximum Blast Pressure 145 PSI
Air Motor Maximum Pressure 100 PSI
Air Motor Operating Pressure 85 - 100 PSI (70 - 80 rpm)
Weight (in the crate) 17.6 lbs. (8 kg)
AIR MOTOR REQUIREMENTS:
The pneumatic drive air motor requires 18 CFM of dry, clean air for proper operation. The
recommended size of air hose required to run the air motor is 1/2” I.D..
BLAST AIR REQUIREMENTS:
The table shows compressed air consumption Cubic Feet per Minute (CFM) at 110 psi
working pressure when the nozzles are new.
Nozzle Leg Set
Compressor
Capacity
CFM @ 110 PSI
I.D. of Blast
Hose or Lance
31074 Short set: 12” (300 mm) - 20” (500 mm) 215 1-1/4”
31075 Short set: 12” (300 mm) - 20” (500 mm) 282 1-1/4”
31076 Long set: 24” (600 mm) - 36” (900 mm) 424 1-1/2”

5
Remove the main Twister body from the crate
as shown.
Remove the blast hose coupler.
Install back wheel bracket (the back bracket
has a collar) and position the indent to clear
the air inlet of the air motor as shown.
Tighten the set screws in the bracket to the
collar and replace the hose coupler.
Install all three wheel assemblies to desired
depth.
TWISTER ASSEMBLY

6
Remove the 3 screws at the front end of the Twister
Install the front wheel bracket and replace the screws as
shown. Do not tighten the screws yet.
Install wheels the same as the back bracket and line
the front and back wheels up on the same angle then
tighten the front screws.
Install the dual nozzle holder as tight as you can by
hand and install the nozzles with the gaskets and
tighten them using a wrench. Good and snug is
preferable.
TWISTER ASSEMBLY Cont’d

7
SAFETY:
WARNING!
IMPORTANT WARNINGS FOR SAFER BLAST CLEANING
The Twister operator and anyone within 50 feet of the work area must wear
NIOSH approved respirator.
Do not use abrasive containing free silica.
Do not blast with damaged or worn equipment.
Point nozzles only at area being cleaned.
Use only proper, dry and well screened abrasives specifically intended for
blasting. Do not use silica sand.
Keep unprotected workers out of the blast area.
Before blasting check fittings and hose for wear.
Do not substitute for parts from other manufacturers or modified equipment in
any way.

8
SET-UP:
The Twister HD Blast tool attaches to the end of a pipe lance or blast hose in place of a
standard nozzle. The compressor, blast hose/lance and air supply line for the air motor
must be sized to support the blast operation at the pressure and air capacity shown on
page 4 of this manual.
Additional requirements: (see page 15 for options)
A ball valve or regulator is required to adjust the pressure to the Twister air motor.
1/2” I.D. air hose is required to connect compressed air to the air motor.
Install the carriage legs and adjust the legs so that the tool is approximately centered in
the pipe.
Connect the pipe lance or blast hose to the Twister HD Blast tool.
Add 2-3 drops of air tool oil or Automatic Transmission Fluid (ATF) to the inlet on the air
motor and connect the 1/2” I.D. air line to the in-line filter on the air motor.
WARNING!
Hose disconnection while under pressure could cause serious injury or death. Use
safety lock-pins and safety cables on all coupling connections in case of
accidental disconnection.

9
OPERATION:
Connect the air and blast lines to the blast equipment as described in the applicable
operation manuals.
Push the Twister tool through the pipe until the blast head almost exits the opposite end.
Open the air supply to the air motor. Adjust the air pressure to rotate the blast head
(85 -100 psi). Note: Exceeding this pressure will overheat the air motor.
Pressurize the blast machine and adjust the abrasive flow to the Twister tool.
Pull the Twister tool back through the pipe at a constant speed to achieve the desired
degree of blast cleanliness.
When the tool starts to exit the pipe, turn off the abrasive supply from the blast machine.
NOTE: To avoid damage to the Twister, provide an exit ramp, platform or
structural support at the exit end of the pipe.
Turn off the air supply to the Twister air motor.
Care should be taken to cover the vent holes on the air motor when not in use to avoid
any debris entering.

10
DAILY MAINTENANCE:
The daily and every 100 hr. maintenance must be performed to achieve maximum blasting
performance of this tool. The instructions shown on next few pages are the most crucial for
keeping the tool working at its best.
NOTE: 2-3 drops of air tool oil or automatic transmission fluid (ATF) should be added to
the air inlet port on the pneumatic air motor before and after each daily use. (5-6 hrs)
Use lithium grease lightly on the
outside of the collar on the tube
(shown) and return.
Remove the Interior Nylon Liner from
the tool and inspect for wear. There
should not be any holes in the tube
and the outer collar should not be
worn (shown) - if so replace. This
piece protects the rest of the tool from
the media.
Disassemble the in-line air filter
(shown below left) and clean the brass
filter of any dust or debris. (shown)

11
100 HOUR MAINTENANCE:
Remove the air motor from the gearbox. Be careful not
to lose the collar on the splined shaft. As shown.
Remove the abrasive tube using the
tool provided.
Inspect the lip seal & the felt seal under it.
Very important that this seal is in good shape
so that the gear box won’t fill with media.
NOTE: This seal will get damaged if the nylon
tube wears out.
If the seal is in good shape then put a light
coating of lithium grease on the inside edge
and fasten back on the tool.

12
100 HOUR MAINTENANCE cont’d:
Unscrew the housing from
the air motor
To inspect or change the drive gears in the air motor it needs to be
placed in a vise as shown and lightly heat the collar in order to break
the loctite. Once it is broken free then let it cool before continuing
onto the next step.
Be sure to add blue loctite to the threads when reassembling.
Remove the gear set as shown
Inspect the gears & spline for wear.
The collar has a recessed bevel
internally and needs to be placed
with the bevel side as shown. The
splines on the shaft are different on
each side so watch for proper
placement.
Daily & 100 Hr. maintenance are the most crucial to a long productive life of the
Twister Tool. The following pages show schematics of the tool and the gearbox.
Should the nylon tube wear out and allow media into the gearbox then further
steps will need to be taken to remove all the foreign particles from the Twister.
When reinstalling the first set of
gears into the end of the air motor
a flat head screw driver should be
lightly inserted as shown and then
slightly turn the gears to seat the
them properly.

13
TWISTER SCHEMATIC Item
No. Part # Description
1 221718 Gear Box Housing Only
- 221719 Gear Box Complete
2 2217051 Nozzle Head Pipe
3 221703 Air Motor
4 221702 Air Motor Housing
5 221701 Air Motor Collar
6 221710 Nylon Tube Liner
7 221706 Abrasive Tube
8 221705 Nozzle Head
9 31075 Nozzle 5/16”
- 31074 Nozzle 1/4”
- 31076 Nozzle 3/8”
10 221729 Rear Wheel Bracket
11 221728 Front Wheel Bracket
12 221707 Blast Hose Adaptor
13 221709 Hose Adaptor Gasket
14 221711 Nozzle Gasket
15 221704 Gear / Closed Nipple
16 221712 Felt Seal
17 221715 Rubber Lip Seal
18 221708 Wheel Only
19 221731 3 Gears Only
20 221732 Gear Support with 3 gears
21 221721 Gear Spline
22 221721-1 Gear Spline Beveled Collar
23 221721-1-B Gear Box Spline Spacer
- 221720 Small Leg & Wheel Kit
- 221725 Large Leg & Wheel Kit
PART # 221700
Gearbox Schematic on page 14

14
1
2
3
4
5
6
7
8
9
10
3
Item Part Number Description
1 221719-1 GEAR BOX FRONT COVER
2 221714 LARGE BEARING
3 221713 SMALL BEARING
4 221719-2 GEAR SHAFT
5 221716 SMALL RETAINING RING
6 221722 NOZZLE HEAD GASKET
7 221719-3 LARGE GEAR
8 221714 LARGE BEARING
9 221717 LARGE RETAINING RING
10 221719-4 GEAR BOX BACK COVER
11 221712 FELT SEAL
GEAR BOX SCHEMATIC
11

15
OPTIONAL AIR MOTOR CONNECTIONS
1
2
3
4
6
5
No. Part Number Description
1 448-8B 1/4” NPT - Connect to air motor
2 11723 Swivel for Push Hose
3 12-PUSH 1/2” Push Hose (sold by the foot)
4 11723 Swivel for Push Hose
5 448-8D 1/2” NPT - Connect to ball valve
6 65-750 1/2” Ball Valve
The parts listed here show a quick & easy
method we suggest for connecting the air motor.
Our 1/2” push hose requires ‘no clamps’ and
won’t let go.
Contact your local Representative for pricing

16
This manual suits for next models
1
Table of contents
Other Mod-U-Blast Cleaning Equipment manuals