Modena FF 4120GS Owner's manual

User
Manual Book
Deep Fryer
FF 4120GS

2
Thank you for your trust in choosing MODENA products for your household needs. With your
satisfaction as our priority, we constantly aim to deliver stylishly designed products equipped
with state-of-the-art technology to assist you in your daily activities.
This is your guidebook containing everything you need to know about our product. Please reach
out to us if you need further assistance or other information via our Customer Care or our
official website www.modena.com.

3
CONTENTS
Page
INTRODUCTION
2
-
Part 1
: Brief Introduction
4
-
Part 2
: Specification
4
-
Part 3
: How to Use
4
-
Part 4
: Gas Connection
5
-
Part 5
: Cleaning & Maintenance
6
-
Part 6
: Troubleshooting
10

4
Proper installation, usage and maintenance will result in years of satisfactory performance.
This appliance is made with good quality workmanship and materials. Proper installation, operation and
maintenance will extend the appliance performance.
Before installing the fryer, read this manual book carefully and follow all instruction.
This manual book is applicable to the model listed on the cover page. The pictures can reflect on all model of this
series unless the picture for specific model.
Model
Burners
BTU/hr.
Dimension
Liters
FF 4120GS
4
120,000
394*769*11 95mm
17.5 ~ 11.2L
Before installing the appliance, verify that the type of gas (natural or propane) corresponds with the specifications
on the name plate located at the rear part of the appliance. Make sure the appliance is configured for the proper
elevation.
Record your fryer model, device, and serial numbers for future reference below. This information can be found on
the data plate.
Model No:
Device:
Serial No:
Clearance
Minimum clearance from combustible construction: 6” (15cm) from the sides of the appliance, 6” (15cm) from
the back of the appliance. The fryer can be installed on combustible floor.
Minimum clearance from non-combustible construction: 0” from the sides of the appliance, 0” from the back of
the appliance.
Between the fryer anda any open-top flame appliances: 16” (41cm).
Location
a. Install fryer in an area with sufficient air supply for gas combustion at fryer burners.
b. Do not obstruct the flow of combustion and ventilation air.
c. Provide adequate clearance for air openings into the combustion chamber.
Part 1: Brief Introduction
Part 2: Specification
Part 3: How to Use

5
d. Do not permit fans to blow directly onto fryer.
e. Avoid wall-type fans, which create cross-currents within a room. Avoid open windows next to sides or
back.
Installation
The appliance needs to be held down to prevent hot liquid splashing. The methods of holding down the appliance
is similar with installation; units connection, frying pan installation to the recess, or by separate such as adequate
knotting.
Flue Connection
Make flue connection:
a. Find the unit under the hood with good connection to the drain. The hood must be over 16” (15cm) above
the pan on both sides.
b. Do not place stuff on the appliance to maintain the efficient performance.
c. A minimum clerance of 18” (46cm) must be maintained between the fuel and the filter from ventilation.
d. Do not make a direct connection from fuel to fryer.
e. Do not block the gas flow to the appliance. Keep the air balance of the ambient.
All gas supply connections and any pipe joint compound must be resistant to the action of propane gases.
The gas inlet is located on the lower rear of the fryer. Codes require that a gas shutoff valve be installed in the gas
line ahead of the fryer.
The gas supply line must be at least the equivalent of ½” (12.7 mm) iron pipe for single units and 1-1/4” (31.75 mm)
for batteries. If using the optional quick-disconnect flex hose, ¾” (19 mm) iron pipe for single units and 1-1/4”
(31.75 cm) iron pipe for batteries.
Make sure the pipes are clean and free of obstructions, dirt, and piping compound.
Prior to operating, check all joints in the gas supply line for leaks. Use soap and water solution. Do not use an
open flame.
After piping has been checked for leaks, fully clean the gas pipes to remove air.
GAS PRESSURES (ALL MODELS):
The available gas pressure should be the same as that indicated on naming plate. If incoming pressure exceeds 5
kPa, an additional pressure regulator must be added.
TESTING THE GAS SUPPLY PIPING SYSTEM:
When test pressures exceed 5 kPa, the fryer and the individual shutoff valve must be disconnected from the gas
supply piping system.
LEVELING THE FRYER
Check the level of the fryer by placing a level on top of the fryer after gas connections have been made. Ensure
that the fryer is level front-to-back and side-to-side in the final installed position. If using casters, lock the wheels
after unit is level.
OPERATION
Hot oil and other parts may cause burns. Be careful when operating, cleaning and
maintaining the fryer.
Part 4: Gas Connection

6
Spilling hot frying compound can cause severe burns. Do not move fryer without draining
all frying compound from the tank.
OVER-TEMPERATURE SHUTDOWN
If the shortening becomes overheated, a high-temperature shutoff device will turn the gas valve off and extinguish
the pilot.
If the fryer shuts down due to overheating, do not re-light the pilot until the shortening temperature is below 149°C
(300°F).
If an overheating situation persists, contact authorized technician for help.
Cleaning
New units are wiped down at the factory to remove any visible signs of dirt, oil, grease, etc. remaining from the
manufacturing process.
Before any food preparation, thoroughly wipe protective oil from all surface parts and the tank interior with hot
soapy water to remove any film residue and dust or debris.
Do not use chlorine or sulphate/sulphide cleaners
1. Wash any accessories shipped with unit.
2. Rinse fryer and accessories thoroughly and drain the fryer.
3. Wipe tank completely dry with a soft, clean cloth.
FILLING TANK WITH SHORTENING
Solid shortening should NOT be used with this type of fryer. Melting solid shortening will damage the tank.
1. Close the drain valve
2. Fill the fryer tank with liquid shortening.
3. Shortening level should be between the MIN and MAX lines in the fryer tank.
4. Shortening will expand when heated. Do not fill the fryer past the MAX line.
5. Add fresh shortening as needed to maintain oil level.
Part 5: Cleaning & Maintenance

7
Lighting the Pilot
1. Open the door.
2. Turn the thermostat OFF (see picture below, view A). The thermostat is located behind the door.
3. Push the gas control valve knob and turn to OFF. Wait 5 minutes for unburned gas to vent.
4. Push and turn gas control valve knob to the “L” in PILOT (see figure below, view B ).
5. While still holding the knob in, light the pilot with a lit flame. Continue to depress the knob until pilot remains
lit when knob is released. If the pilot does not remain lit, repeat step 3 through 5.
6. Depress and turn gas control knob to ON (See figure below, view C).
7. If gas supply is interrupted, repeat steps 2 through 6.
TURNING ON THE FRYER
1.
Set the temperature knob to desired temperature.
2.
After the set temperature has been reached, the thermostat shuts off the gas flow to burners.
3.
The pilot remains lit. The burners will cycle on and off, maintaining the set temperature.
TURNING OFF THE FRYER
1.
Turn the thermostat OFF.

8
2.
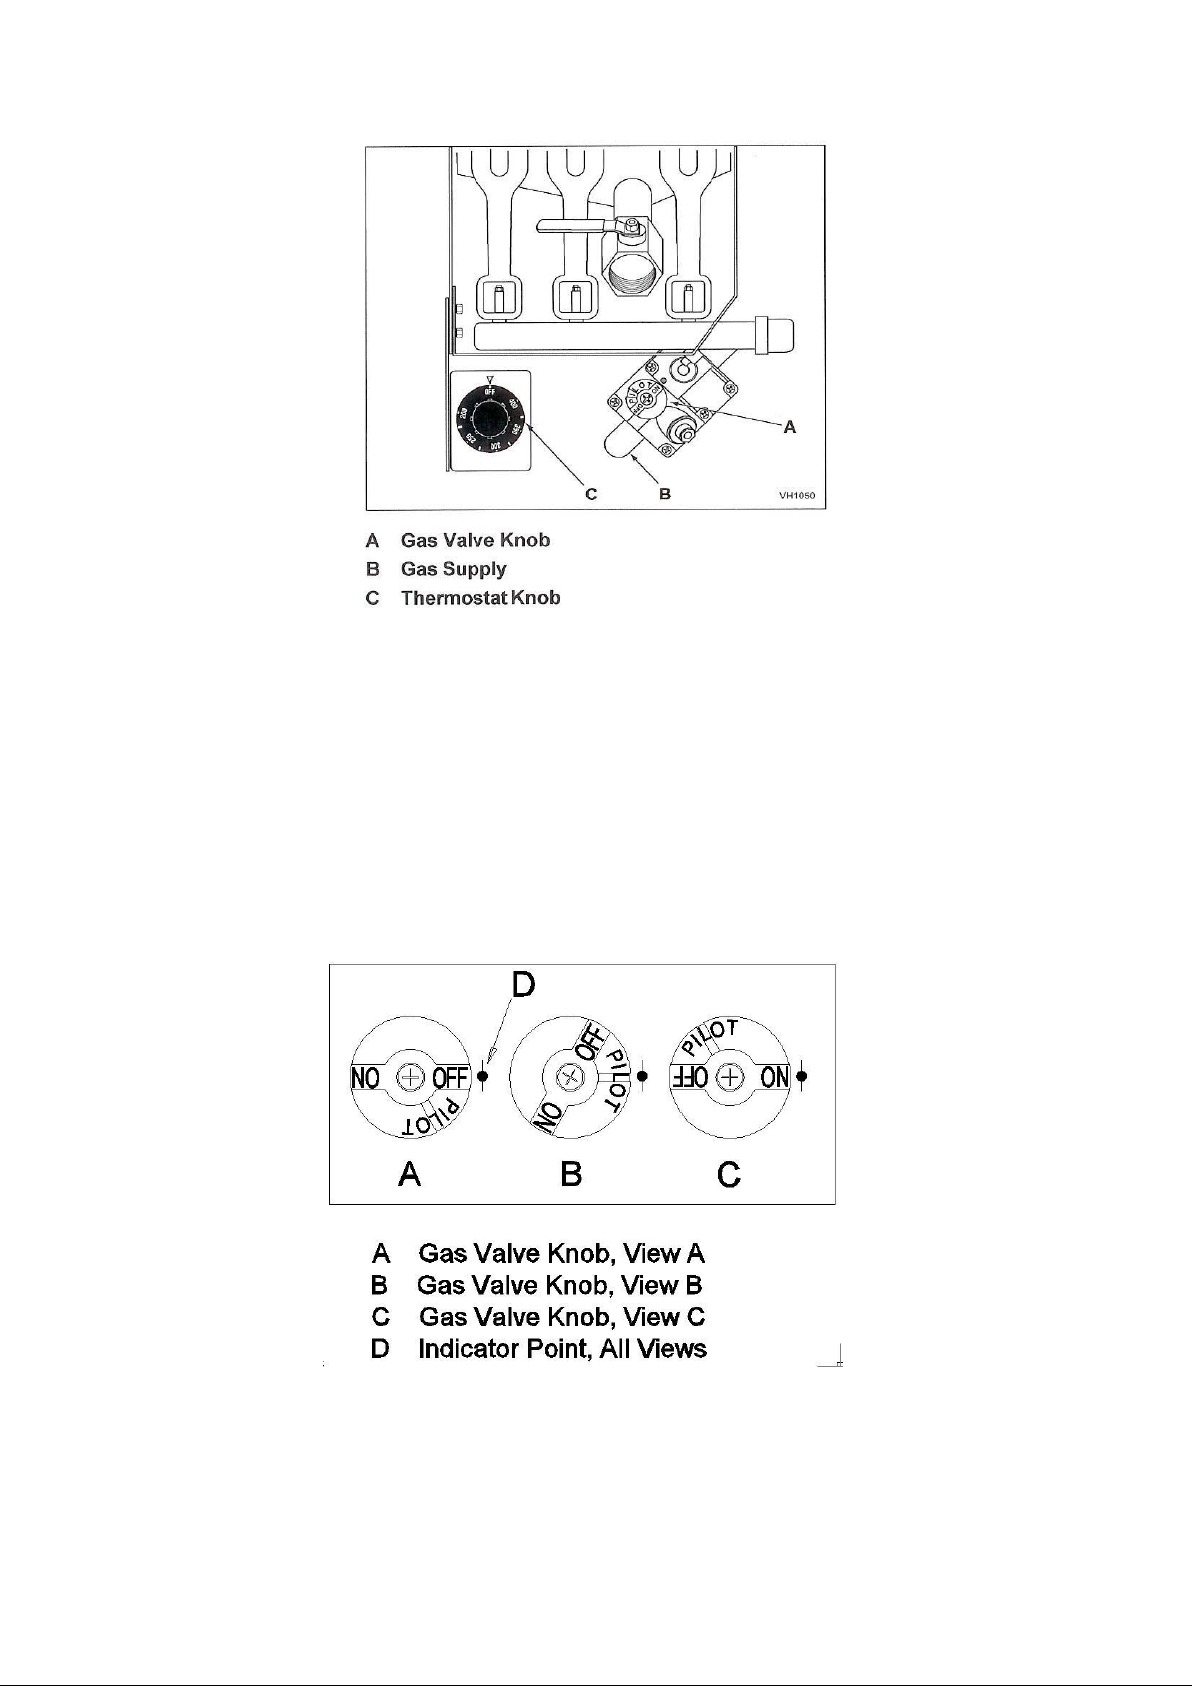
To keep the pilot lit, turn the gas valve to “L” in Pilot.
3.
To shut off all gas to the system, including the pilot, turn the gas valve knob to OFF.
EXTENDED SHUTDOWN
1.
Turn the thermostat knob to OFF.
2.
Push in the pilot knob and turn to OFF.
3.
Thoroughly drain the fryer. Refer to DRAINING THE FRYER.
4.
Clean the fryer according to CLEANING.
5.
Turn off the main gas shutoff valve.
BASIC FRYING INSTRUCTION
1. Set the desired temperature and allow shortening to heat up to that temperature.
2. Fry items that are about the same size together to ensure equal doneness.
3. Drain or wipe dry raw or wet foods to minimize splatter when lowering into hot shortening.
4. Do not overfill baskets.
5. Carefully lower basket into oil.
6. When frying doughnuts and fritters, turn product only once during frying.
7. When cooking French fries or onion rings, shake the basket several times in a way that does not splatter the
shortening.
8. Batter-covered foods should be dropped carefully, one by one, into shortening or basket. If you use the basket,
first dip the basket into the shortening to reduce batter-build up on basket surfaces.
9. When frying is completed, remove basket or product. Hang basket on rear hanger.
EXTENDING SHORTENING MAINTENANCE
Shortening life can be extended by the following guidelines:
Do not salt foods over the fryer.
Use good-quality shortening.
Filter shortening daily (at a minimum).
Replace shortening if it becomes poorly flavored.
Keep equipment and surrounding clean.
Set thermostat correctly.
Remove excess moisture and particles from food products before placing on fryer.
DRAINING THE TANK
1.
Turn the thermostat to OFF.
2.
To keep the pilot lit, turn the gas valve to PILOT.
3.
Direct the drain spout into the container to drain the tank.
4.
Open the drain valve. The oil will drain into the container. When the container is full or the fryer tank is
empty, close the valve. Repeat this step until the fryer is empty.
5.
Clean the tank once a week if necessary.
6.
Once tank is completely empty, add new shortening and set thermostat to desired temperature.
DAILY FILTERING
Hot oil and hot parts can cause burns. Use care when operating, cleaning, and
servicing the fryer.
a. Filter shortening at least once a day. Refer to the instructions provided with the filtering equipment.
b. A cold fryer will not drain properly. Always filter shortening between 250F and 350F. The shortening in the cold
zone area will remain hard if the heat is only on for a few minutes. If necessary, use the clean-out rod to
carefully stir the hard shortening to an area above the cold zone where it will melt. Use the tank brush to help
clear sides and tubes of debris.

9
CLEANING
Daily
The hot oil and parts may cause burns. Be careful when operating, cleaning and maintaining the fryer.
Clean the fryer periodically with tank brush and wipe off with dry-soft cloth. If the daily cleaning is neglected, the oil
will burn and discoloration may occur.
Fingerprints may cause problems in smooth stainess steel surface. This can be minimalized by cleaning with oil or
wax-based cleansers.
a. Clean the exterior surfaces the fryer once a day.
b. Use damp cloth with warm water and soap solution or detergent.
Do not use chlorine or sulphate/sulphide cleaners
c. Rinse thoroughly, wipe with dry-soft cloth.
d. Keep the exterior surface clean and free of fat to prevent stains. If the routine cleaning is neglected, the oil will
burn and discoloration may occur.
e. Clean the discoloration by cleaning with detergent or soap solution.
f. Use non-metalic scouring pad to clean the discoloration.
g. Always scrub with stainless steel grain. Do not use metal-containing or harsh cleansers.
BOIL OUT PROCEDURE
Clean weakly or if necessary:
1. Drain the tank as explained in the DRAINING THE TANK.
2. After the shortening rinsed, wash the residue and sediment with a little warm shortening, using a tank brush.
Let the tank dry.
3. Close the drain valve and fill the tank with non-corrosive, oil-soluble commercial cleanser. Follow the
instructions.
Do not use chlorine or sulphate/sulphide cleaners
4. Add commercial boiling solution. The amount of solution need to be between the MIN and MAX lines in the fryer
tank.
5. Set the thermostat to the suggested temperature for the solution. Let it boil for 15 to 20 minutes.
6. Rinse the solution from the tank.
7. Close the drain valve and refill with water. Add a glass (1/4L) vinegar to netralize the alkali from cleansers. The

10
level need to be between the MIN and MAX lines in the fryer tank.
8. Let it boil out, turn off the thermostat. Let it stand for a few minutes.
9. Drain the tank as explained in the DRAINING THE TANK. Wash with boiling water. All the cleansers need to be
vanished. Dry the tank thoroughly.
10. Close the drain valve and add the shortening. Follow the procedure of FILLING THE TANK WITH
SHORTENING in this manual. This appliance is ready to use.
MAINTENANCE
Hot oil and hot parts can cause burns. Use care when operating, cleaning,
and servicing the fryer.
Spilling hot fryer compound can cause severe burns. Do not move fryer without
draining all frying compound from the tank.
FLUE VENT INSPECTION
When the fryer is cool down, inspect annually. Check the flue vent and clean it from the dirts.
Troubleshooting Chart
Problem:
Possible Cause:
No Heat
Thermostat is not turned on
Pilot flame does not light.
Gas supply is not turned on.
Wire connections loose
Wires connections need to be cleaned
Thermopile does not work
Insufficient or too much heat:
Thermostat button is not set to desired
temperature.
High limit problems
Temperature probe
Tank does not drain:
Shortening is too cold.
Drain pipe clogged from dirts.
Part 6: Troubleshooting

11/20
Table of contents
Other Modena Fryer manuals

Modena
Modena FF 1251 GF Owner's manual

Modena
Modena FF 2141EF Owner's manual

Modena
Modena FF 1061ES Owner's manual

Modena
Modena FF 1061GT Owner's manual

Modena
Modena FF 1050 ETSS Owner's manual

Modena
Modena AF 2510 BEBL Owner's manual

Modena
Modena FT 6930G Owner's manual

Modena
Modena FF Series User manual

Modena
Modena FF 4210ES Owner's manual