manuals.online logo
Brands
  1. Home
  2. •
  3. Brands
  4. •
  5. Modena
  6. •
  7. Fryer
  8. •
  9. Modena FT 6930G Owner's manual

Modena FT 6930G Owner's manual

This manual suits for next models

1

Other Modena Fryer manuals

Modena FF 4120GS Owner's manual

Modena

Modena FF 4120GS Owner's manual

Modena FF 1251 GF Owner's manual

Modena

Modena FF 1251 GF Owner's manual

Modena FF Series User manual

Modena

Modena FF Series User manual

Modena FF 1061ES Owner's manual

Modena

Modena FF 1061ES Owner's manual

Modena FF 1050 ETSS Owner's manual

Modena

Modena FF 1050 ETSS Owner's manual

Modena FF 4210ES Owner's manual

Modena

Modena FF 4210ES Owner's manual

Modena AF 2510 BEBL Owner's manual

Modena

Modena AF 2510 BEBL Owner's manual

Modena FF 1061GT Owner's manual

Modena

Modena FF 1061GT Owner's manual

Modena FF 2141EF Owner's manual

Modena

Modena FF 2141EF Owner's manual

Popular Fryer manuals by other brands

GILES EOF-BIB/FFLT/24/24 manual

GILES

GILES EOF-BIB/FFLT/24/24 manual

GE 168997 manual

GE

GE 168997 manual

Falcon G350/11 Installation and servicing instructions

Falcon

Falcon G350/11 Installation and servicing instructions

GoWISE USA GW22612 instruction manual

GoWISE USA

GoWISE USA GW22612 instruction manual

Wolf IF15/S Specification sheet

Wolf

Wolf IF15/S Specification sheet

Electrolux Thermetic 9CHG583284 Operating and safety instructions

Electrolux

Electrolux Thermetic 9CHG583284 Operating and safety instructions

DeLonghi D677UX Instructions for use

DeLonghi

DeLonghi D677UX Instructions for use

SEVERIN DEEP FRYER - Dimensions

SEVERIN

SEVERIN DEEP FRYER - Dimensions

Toastmaster TMFG18-NAT Installation and operation instructions

Toastmaster

Toastmaster TMFG18-NAT Installation and operation instructions

Domo DO465FR Instruction booklet

Domo

Domo DO465FR Instruction booklet

Russell Hobbs RDF300 Instructions and warranty

Russell Hobbs

Russell Hobbs RDF300 Instructions and warranty

Henny Penny PFG-691 Technical manual

Henny Penny

Henny Penny PFG-691 Technical manual

Farberware FBW FT 43721 B manual

Farberware

Farberware FBW FT 43721 B manual

GERMANICA GEAF5L3LD instruction manual

GERMANICA

GERMANICA GEAF5L3LD instruction manual

Wells F-85 Features and specifications

Wells

Wells F-85 Features and specifications

Philips HD9211 user manual

Philips

Philips HD9211 user manual

Lakeland 31796 Instruction booklet

Lakeland

Lakeland 31796 Instruction booklet

Dash Tasti-Crisp DFAF755 user manual

Dash

Dash Tasti-Crisp DFAF755 user manual

manuals.online logo
manuals.online logoBrands
  • About & Mission
  • Contact us
  • Privacy Policy
  • Terms and Conditions

Copyright 2025 Manuals.Online. All Rights Reserved.

User
Manual Book
Fry Top
FT 6930G, FT 6620G
2
Thank you for your trust in choosing MODENA products for your household needs. With your
satisfaction as our priority, we constantly aim to deliver stylishly designed products equipped
with state-of-the-art technology to assist you in your daily activities.
This is your guidebook containing everything you need to know about our product. Please reach
out to us if you need further assistance or other information via our Customer Care or our
official website www.modena.com.
3
CONTENTS
Page
INTRODUCTION
2
-
Part 1
: Name of Parts
4
-
Part 2
: Installation
6
-
Part 3
: How to Use
10
-
Part 4
: Cleaning & Maintenance
12
-
Part 5
: Troubleshooting
14
-
Part 6
: Specification
15
4
The picture is a general overview and is not necessarily the same a sthe product you receive.
Features and completeness depends on the type of the products.
Part 1: Name of Parts
5
FT 6930G
FT 6620G
6
For your safety
Do not store or use gasoline, or other flammable vapors and liquids near the appliance.
Instructions to be followed in the event of the users smell gas fumes must be posted in a prominent location in
kitchen area. The instructions shall be obtained from a local gas supplier.
Warning:
Any self-modification, wrong installation, adjustment or maintenance can lead ti properly loss or casualty.
Read the installation, operating and maintenance instructions carefully before installing or repairing this
equipment.
This appliance is intended for commercial use only.
This appliance is intended to prepare food for human consumption. No other use is recommended or
authorized by the manufacturer or agents.
This appliance must be handled by authorized technicians for installing gas-fired equipment.
Authorized technicians must perform the initial start-up and adjustment of the appliance. The operator
must be familiar with the appliance use, limitations and other restrictions.
Operating instructions must be read and understood by all persons using or installing this appliance.
Cleanliness of this appliance is important. Read and follow the cleaning instructions and schedules to ensure
the safety of the food product.
DO NOT immerse the appliance or burners.
DO NOT spray the water or steam jet directly at this appliance.
DO NOT splash or pour water to any controls.
DO NOT wash counter around this appliance with water jet. Burners must be thoroughly dried before use.
Burner and grate surfaces will be very hot when in use. DO NOT touch to avoid injury.
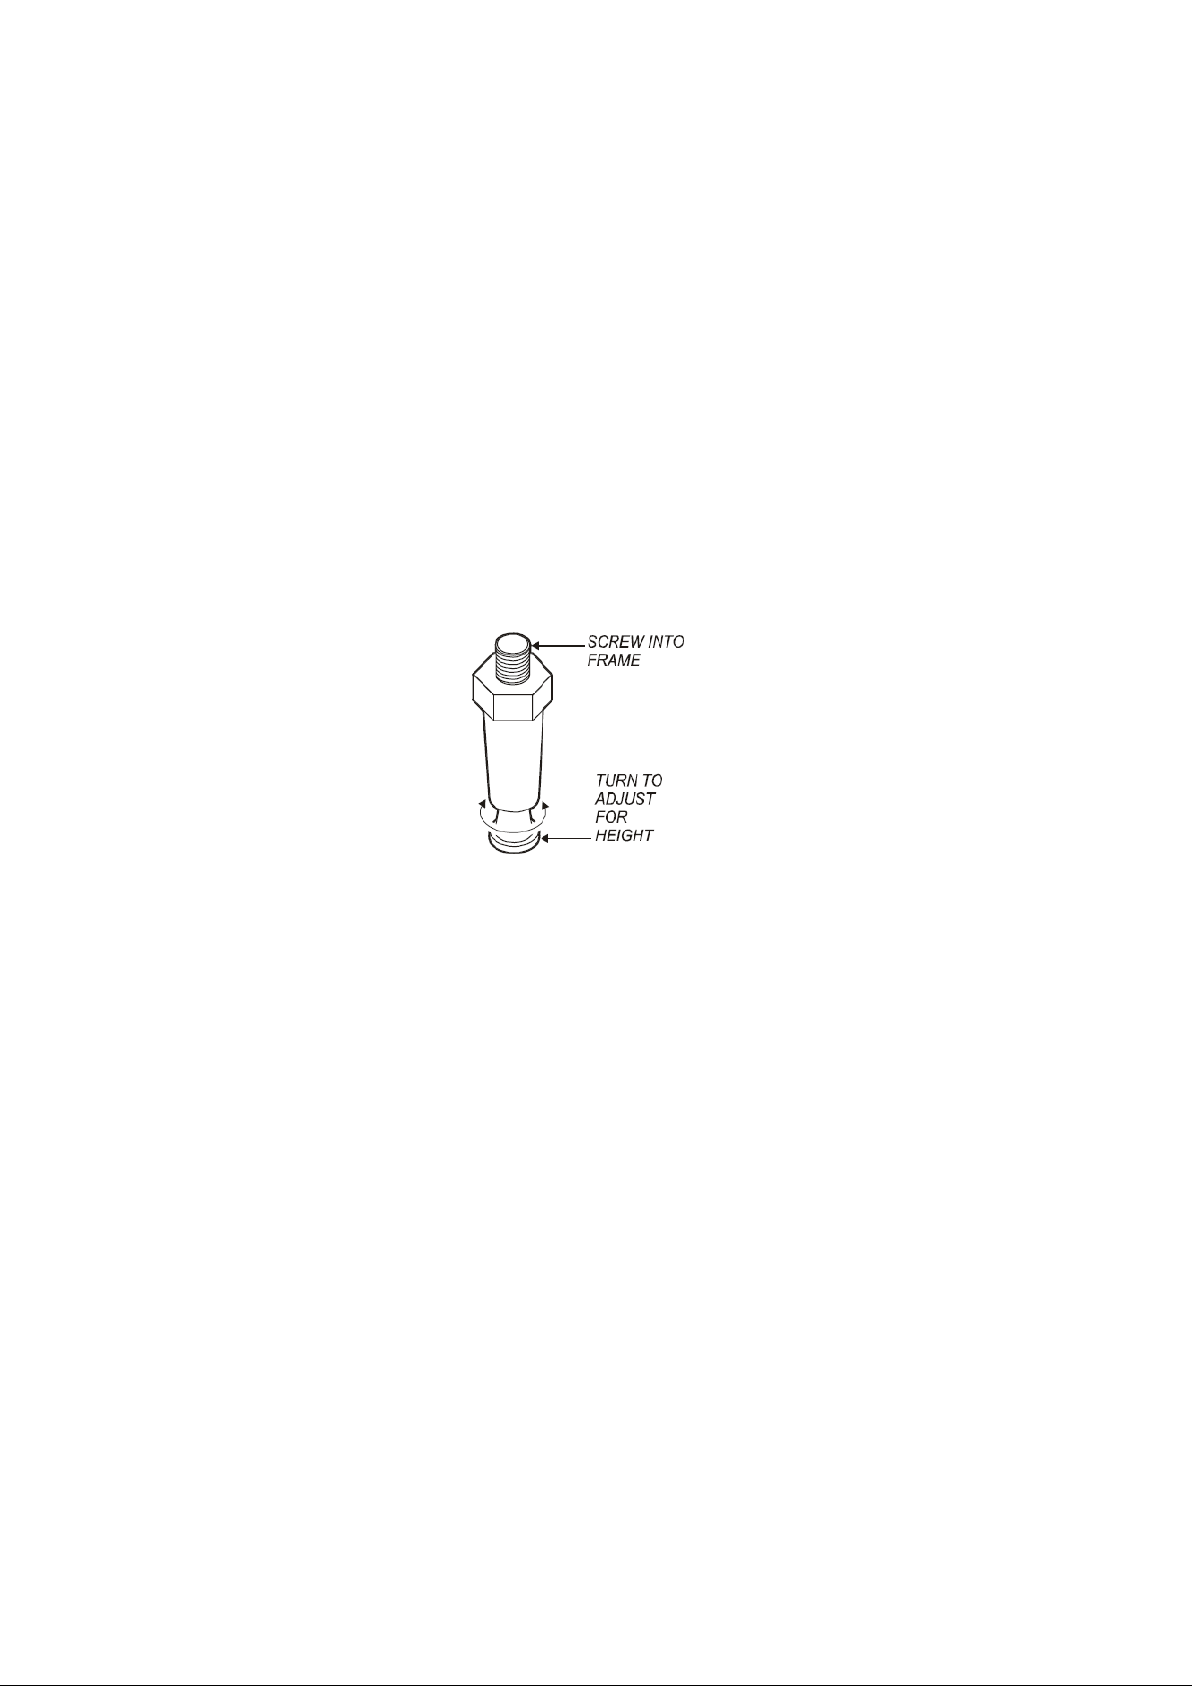
This appliance must be operated with the supplied 4”legs properly installed.
DO NOT operate this appliance if the smell of gas occurs. Turn off all gas supply valves and move to a
remote location and contact MODENA Call Center.
The technical content of this manual, including any parts pictures and/or adjustment procedures, is intended for
use by authorized technician only.
Any procedure which requires the use of tools must be performed by authorized technicians.
Preserve this manual safely. When passing on/sellng the appliance to a third party, the manual book must
be handed along with the appliance. All users operate the appliance complying with the manual and related
safety guidelines..
Unpacking & Inspection
Carefully remove the appliance from the carton. Remove all protective plastic film, packing materials and
accessories from the appliance before performing any installation procedure. Carefully read all instructions in
this manual and the Installation Instruction packed with the appliance before starting any installation.
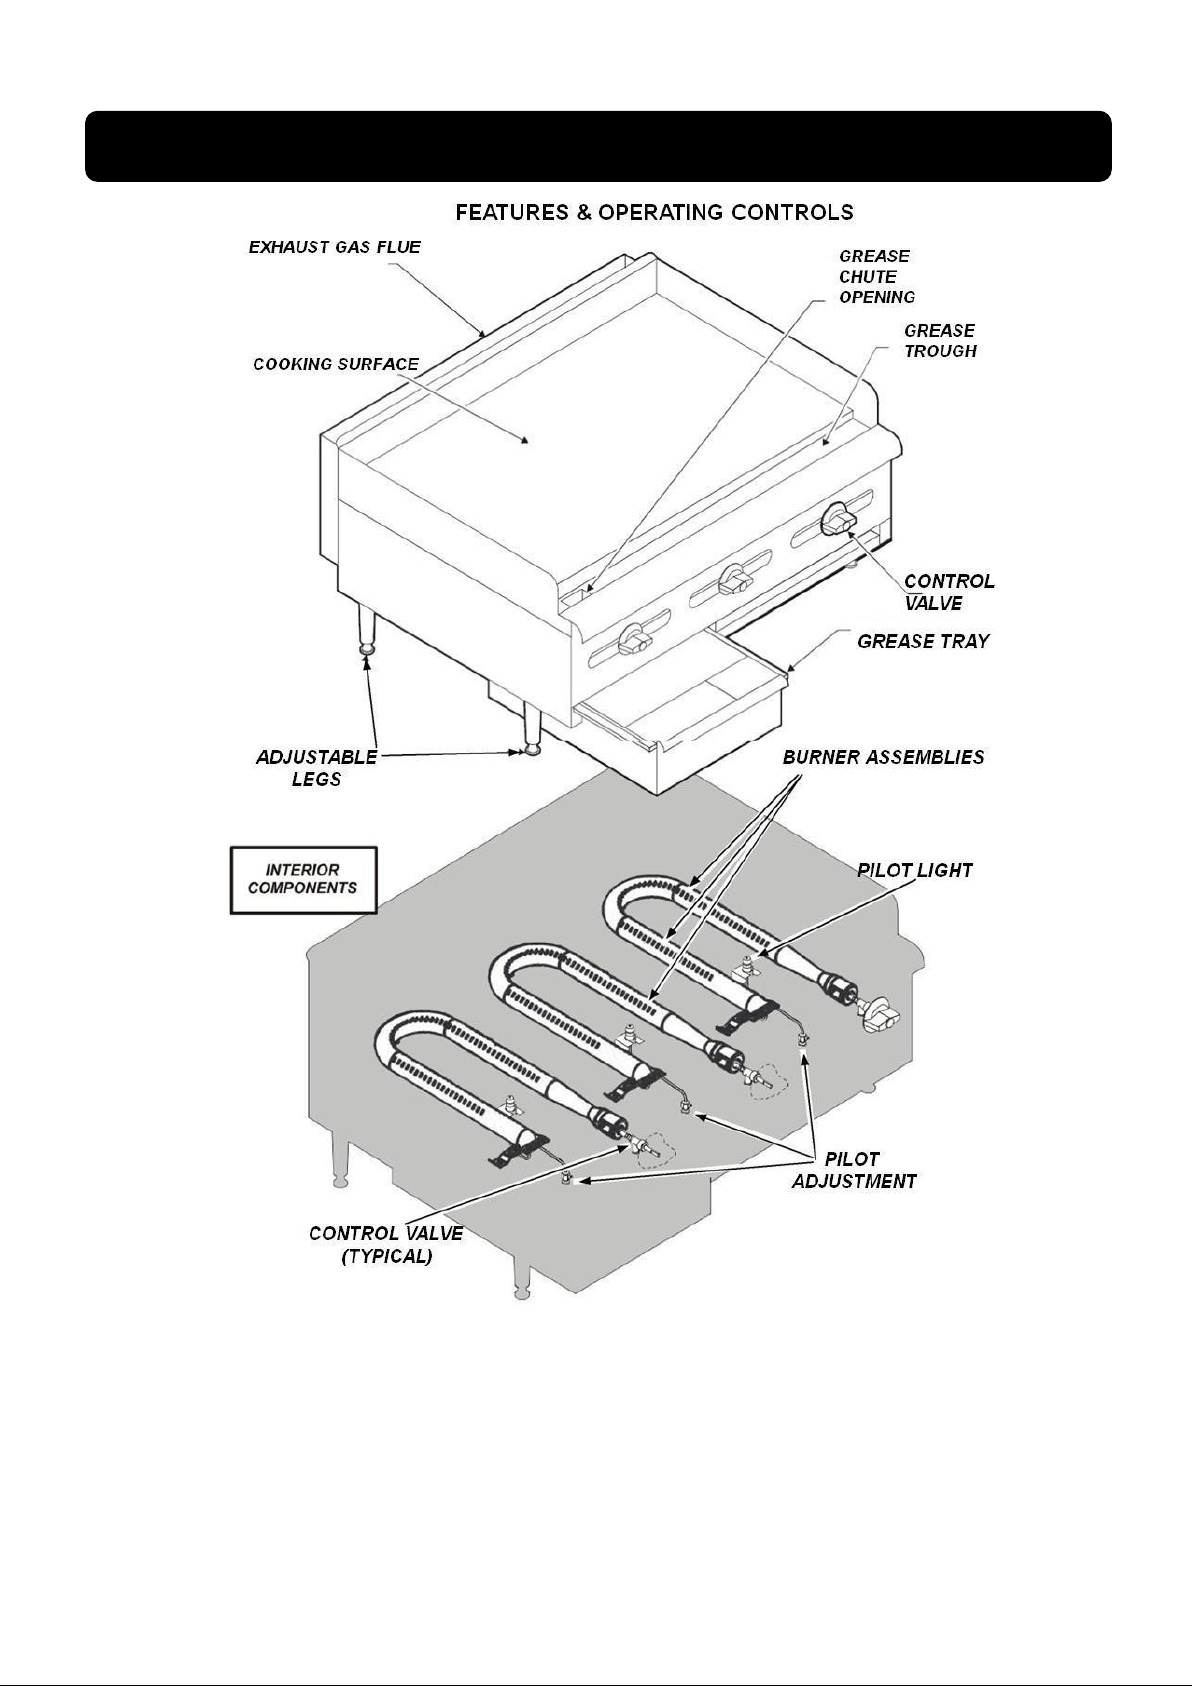
Read and understand all labels and diagrams attached to the appliance.
Carefully account for all components and accessories before discarding packing materials. Store all accessories
in a convenient place for later use.
Components:
Adjustable Legs (set of 4)
Grease Tray
Setup
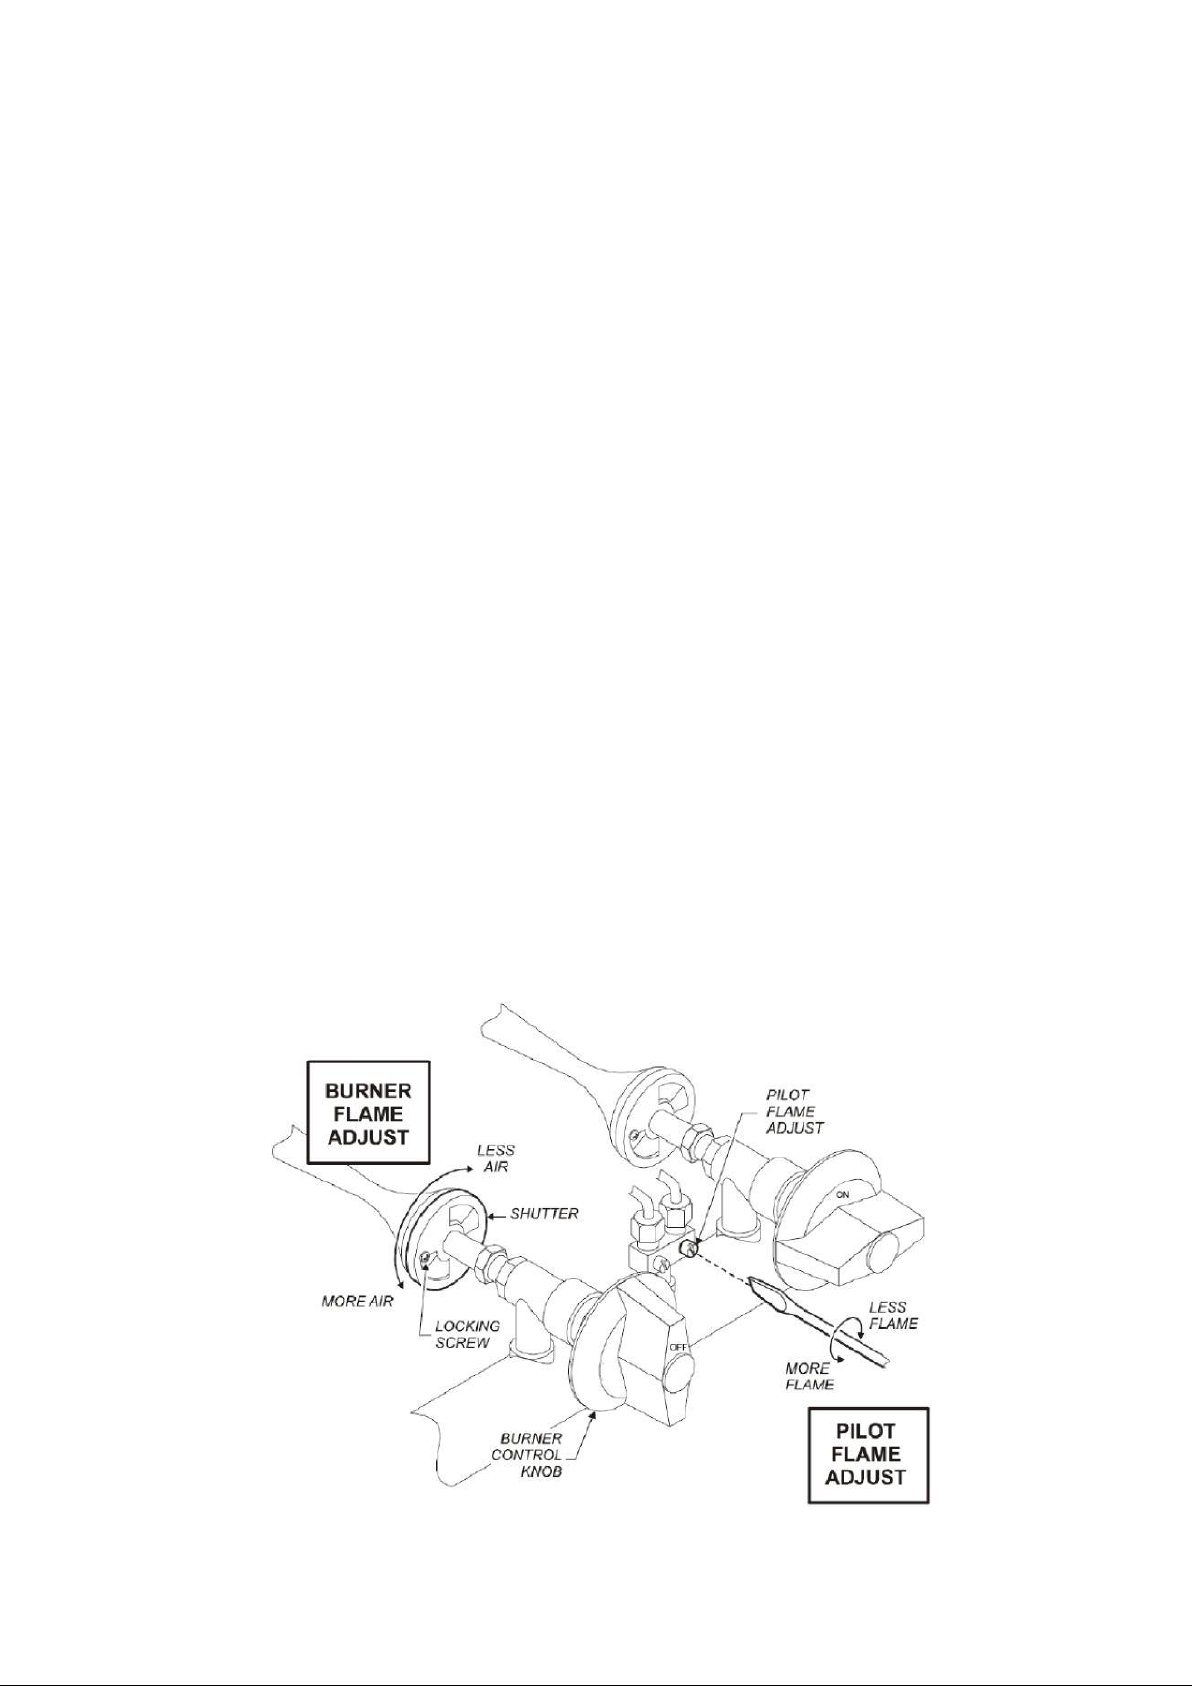
This appliance is intended for certain type of gas. If you want to switch to different types of gases, you have to
change the nozzles of the main burner and adjust the regulator valve for pilot. Please consult the authorized
gas technician. All modifications must be performed by authorized technician.
Part 2: Installation
7
Warning:
FIRE HAZARD: All maintenance of the gas supply and combustion components of this appliance must be perfromed
by authorized technicians. Wrong maintenance will cause fire and explosion.
CAUTION:
HOT SURFACE, Exposed surfaces can be hot to the touch and may cause burns.
The appliance must be installed 18" away from any combustible material.
This appliance is designed for use in non-combustible locations only. Install the appliance on a firm, flat, non-
combustible surface.
Verify local codes for requirements. Concrete, tile, terrazzo or metal surfaces are recommended. Metal or tile
over combustible material may not meet code for non-combustible surfaces. Install adjustable legs in the holes
provided. Verify that the unit attached firmly ON ALL FOUR LEGS. With the adjustable legs, adjust as required to
level the appliance. All four legs must be adjusted to firmly contact the floor in order to prevent tipping.
The appliance must be installed in an area with sufficient ventilation for proper combustion, and must be
installed in such way for combustion and ventilation air will not be obstructed.
When used with an exhaust fan, special precautions must be followed to avoid interruption with the operation of
the appliance, such as the air flow and the lack of air.
Note: DO NOT discard the carton or other packing materials until you have inspected the appliance for hidden
damage and tested it for proper operation.
Danger: HEALTH HAZARD: This appliance must be properly ventilated. No proper ventilation of exhaust gasses
will cause severe injury or death.
Warning; FIRE HAZARD: Do not store gasoline or any other flammable or combustible material near this
appliance. The open flame can cause such materials to ignite.
The area where the appliance is installed must be kept clear of combustibles and flammables, including mops,
rags, grease, wrapping paper and electric cords.
Notice: The warranty on this appliance is in effect only when the appliance is installed in accordance with
these instructions and local codes and ordinances. MODENA declares of no liability for any damage or
injury resulting from failure to comply with this notice.
Gas appliance code compliance
The installation of gas piping from the outlet side of the gas meter or service regulator to the appliance
must be performed by authorized technicians.
Authorized technicians must perform the initial startup and adjustment of this appliance.
The installation of this gas-fired appliance must conform to local codes.
It is the responsibility of the installer to ensure that this gas griddle installation conforms to all applicable
codes and ordinances.
The venting of this appliance must not be obstructed, nor may such venting interfere with the flow of
combustion air required for proper operation of the gas burners.
8
Additional Information:
1. The gas supply line used to connect the appliance to the gas supply system must be black iron pipe, or
other material as approved by local ordinance for gas piping.
2. Gas s upply piping must be ins ide 3/4” diamet er or greater.
3. Use pipe specific sealant for gas piping on all pipe joints. Apply enough sealant to the male threads only.
Sealant must be resistant to the action of liquified petroleum gas (LPG).
4. Ensure all supply piping is clean and free of obstructions, dirt, flakes and pipe sealant compound prior to
installation.
5. All pipe joints must be checked for leaks before lighting. Leak checks should be performed with a soap and
water solution. NEVER CHECK FOR LEAKS WITH AN OPEN FLAME.
Danger: FIRE AND EXPLOSION HAZARD, NEVER use an open flame to check for gas leaks. Fire and explosion
may result.
Warning: RISK OF INJURY, Installation procedures must be performed by authorized technicians with full
knowledge of all applicable gas-fired appliance codes. Failure can lead to personal injury and property damage.
Important: All pipe joints must be checked for leaks before lighting. Leak checks should be performed
with a soap and water solution.
Installing the appliance
Refer to the nameplate: ensure the fuel type and pressure correspond with the nameplate. Do not
connect the appliance to the wrong fuel type and/or pressure.
BE SURE TO MAINTAIN REQUIRED CLEARANCES TO COMBUSTIBLE SURFACES.
The appliance must be placed in its final operational position and leveled front-to-back and side-to-side,
with a waterpass prior to the gas piping installation. Re-check the appliance level after installing the gas
pipe.
Each gas appliance is equipped with a separate gas pressure regulator, which must be installed on the
manifold pipe protruding from the rear of the griddle. Ensure that the regulator is installed in such a way
for the flow arrow stamped on the body of the regulator points toward the griddle. Wrong installation of
the regulator will result in an extremely hazardous condition.
A moisture trap (drip leg) consisting of a tee, 4” nipple pointing down, and cap must be installed upstream
of the gas pressure regulator.
A manual gas shut-off valve may be required by local codes and is, in any case, strongly recommended.
The shut-off valve must be installed between the gas supply piping and the gas pressure regulator.
It is the responsibility of the gas piping installer to identify the code requirement for a shut-off valve.
Shut-off valves, moisture trap and all associated piping must be supplied by the gas piping installer.
Picture 2. Gas Supply Piping
Danger: FIRE AND EXPLOSION HAZARD, NEVER use an open flame to check for gas leaks. Fire and explosion
may result.
9
Important: All pipe joints must be checked for leaks before lighting. Leak checks should be performed with a
soap and water solution.
Warning: FIRE HAZARD, This appliance is supplied with a gas pressure regulator.
Failure to properly install the supplied regulator will result in an extremely hazardous condition.
Flow arrow stamped on body of regulator must point toward the appliance.
Vent hole must point UP.
Important: Ensure the fuel is the gas type. If the available fuel does not match the nameplate
specification, exchange the appliance for the correct type.
Important: the appliance and its individual manual shutoff valve must be disconnected from the supply
system piping during any pressure testing of that system at pressures in excess of 5kPa.
Gas pressure setting:
Gas pressure regulator is factory set.
Pilot flame setting:
Remove all burner control knobs, then remove the front panel.
The pilot adjustments are located between the control valves for each set of burners.
Using a small, flat-blade screwdriver, turn the screw clockwise to decrease the flame size, or counter-
clockwise to increase the flame size.
Adjust the pilot flame to 1/4” high. Test for operation: inside and outside sections of the burner must light
without undue delay. Windy conditions may require a higher flame to allow the pilot to remain ignited.
Replace the front panel and all knobs before returning the unit to service.
Adjust burner flame:
Remove all burner control knobs, remove the front panel. Turn on the individual burner on.
Loosen the locking screw on the shutter.
Turn the shutter to admit more or less air as required. Adjust the air shutter until the flame is mostly blue in
color.
Tighten the locking screw when finished. Replace the front panel and all knobs before returning the unit
to service.
Picture 3. Adjustment
10
IMPORTANT:
Adjustments must be performed by authorized technicians only.
This appliance is shipped from the factory equipped for pre-set gas pressure of specified gas.
For operation other than listed above, contact MODENA Call Center.
Read the description of the appliance operation on the specification sheet carefully.
DO NOT use this appliance if it has been submerged in water.
Contact MODENA Call Center to examine the appliance and to service or replace any component
which has been submerged.
Burners which become wet must be thoroughly dried before use.
For initial startup, and any time the gas supply has been shut-off, it may take several minutes to light the
pilot while air in the piping and manifolds is cleaned.
The burner control knobs must be turned by hand only. Do not use tools to turn the control knob. If the
knob will not turn by hand, DO NOT attempt to force or repair it. Contact MODENA Call Center for
repairs. Forced or improperly repaired valves pose the risk of fire and or explosion.
Ensure the burners, pilot burner and drip tray are properly installed before attempting to operate.
Lighting the pilot flame
Before lighting the pilot light, smell all around the appliance area for gas. Be sure to smell near floor level
because some gas is heavier than air and will settle to the floor.
For initial startup, and any time the gas supply has been shut-off, it may take several minutes to light the pilot
while air in the piping and manifolds is purged.
The pilot light must be lighted by hand:
Turn all control knobs to the full OFF position.
The pilot is located close to the burner, and is accessible from the top of the appliance.
Be sure the gas shut-off valve is ON and the appliance has had time for the air to be purged from the lines.
Attempt to light the pilot every 15 seconds after the gas valve is turned on.
Light the pilot with a long match or fireplace lighter.
DO NOT use a cigarette lighter.
Shut down instructions:
Turn all burner knobs to OFF.
Turn all pilots OFF.
Turn the main gas supply OFF.
WARNING:
FIRE HAZARD, IF YOU SMELL GAS:
DO NOT try to light any appliance.
DO NOT touch any electrical switch
DO NOT use any telephone in your building.
In the event a gas odor is detected, shut down the unit at the main gas shutoff valve and contact your
local gas supplier.
Follow the instructions from the gas supplier immediately.
Preheat the griddle surface to 191°C.
Allow the oil film to cook in for approximately 2 minutes, or until it smokes.
Wipe the griddle surface with a clean damp cloth until all oil is removed.
For new griddles, repeat this procedure 2-3 times until the griddle has a slick, clean surface.
Part 3: How to Use