Modsel Contour Portare User manual

Stretcher User Guide
Thank you for placing your confidence in our stretchers. They have been engineered from
quality materials and hand-made with care to fulfil the requirements of the healthcare
industry. Your stretcher will give years of trouble-free service if used and cared for in
accordance with our directions.
Before using your stretcher please take the time to read our userguide carefully and familiarise yourself
with the controls and operation of the unit.
It is important to assess that this equipment is suitable for your patients clinical needs.
Modsel offers a range of stretchers designed for a wide variety of facility types, departmental use and
procedures.
11/10/2020 - Page 1 of 14
"Trusted products made for trusted professionals"

Warnings
These warnings must be read and understood by all personnel who will use our products.
Patient/Staff Safety
Patients, especially children must not be left unattended on or with a stretcher at any time.
Care must be taken in the operation of all moving parts and accessories to minimise risk of injury to
staff or patients.
Stretcher top must be in the lowest position when patients are getting on or off the stretcher, with
access from either side only.
Maximum static patient load capacity on the backrest must not exceed 100kg distributed evenly or
damage to locking struts and frame may occur.
Maximum static patient load capacity on the stretcher is 300kg and must not be exceeded. Weight
must be distributed as evenly as possible on stretcher top. Any weight loading above 150kg must be
wheeled on smooth, level flooring and attended by more than one staff member.
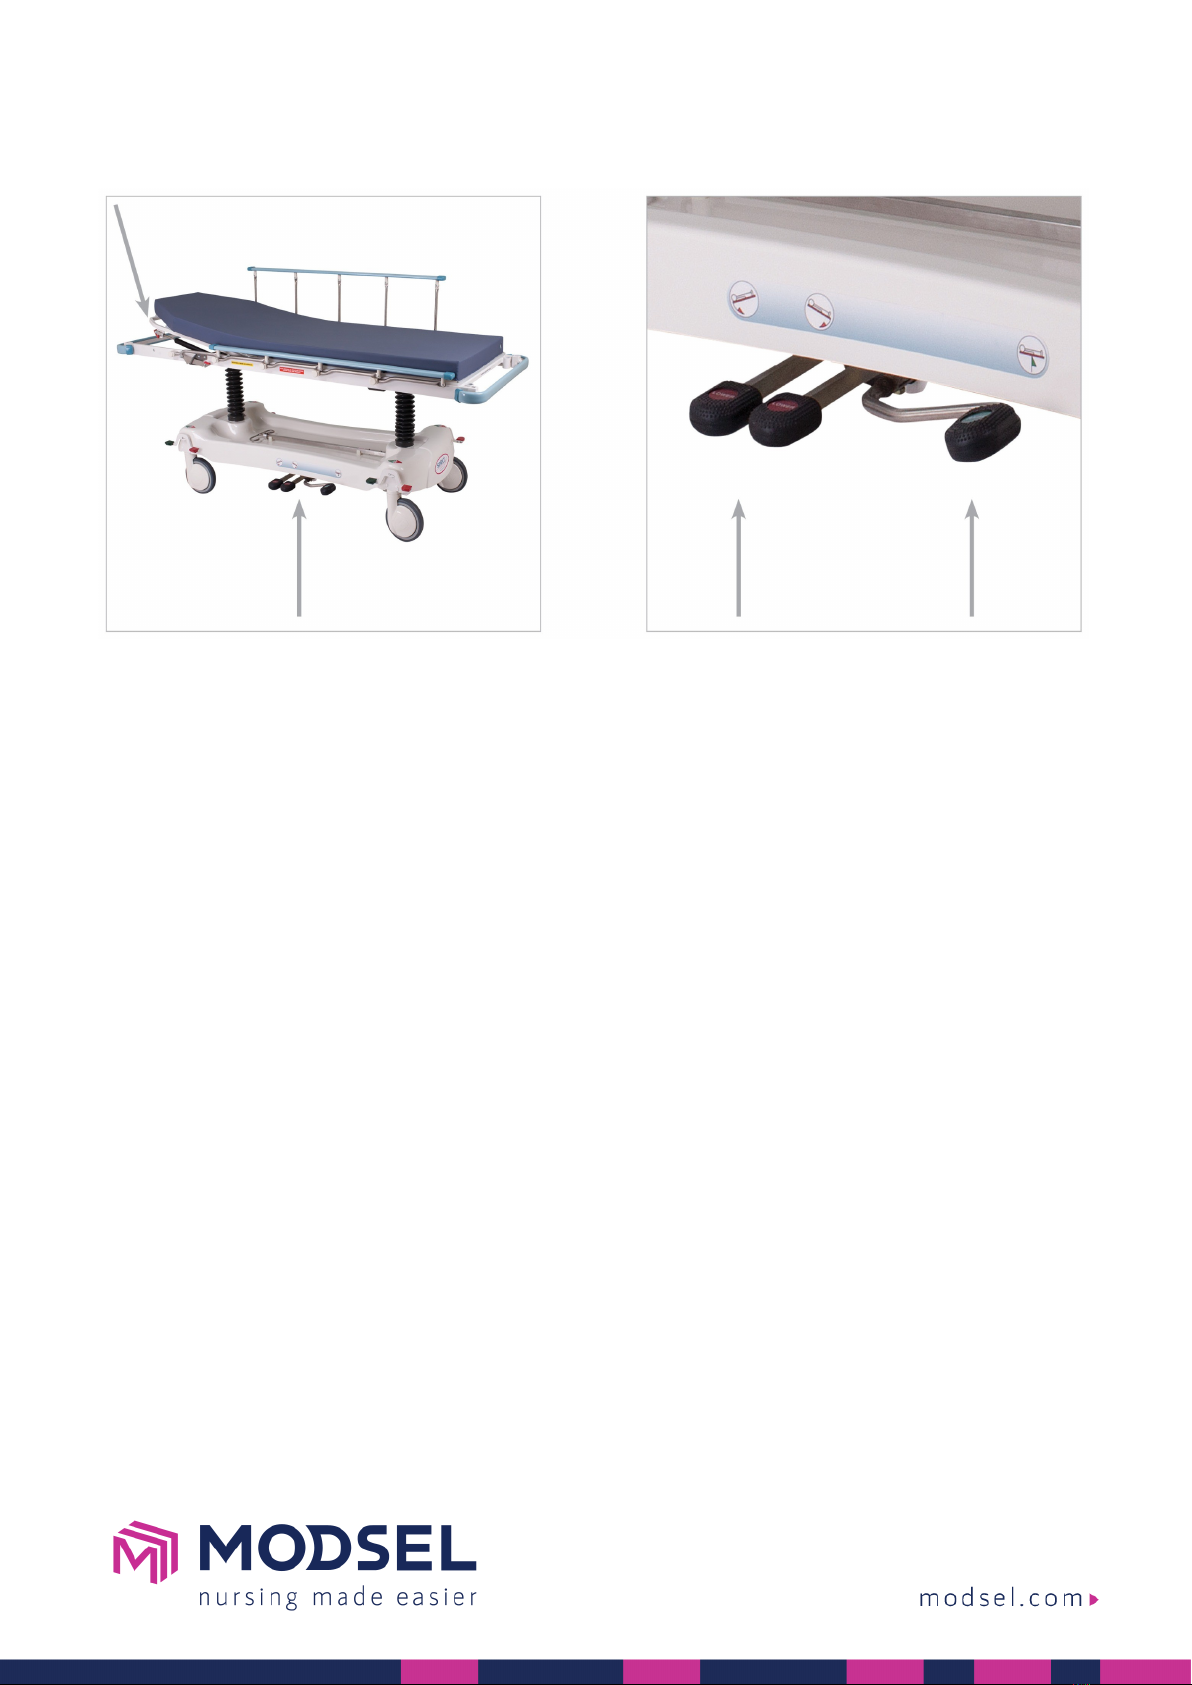
Only apply brakes when stretcher is stationary.
Brakes are to be fully applied during bed / stretcher transfers and attended by qualified clinical staff.
General Use
Backrest must be raised and lowered with care to prevent possible strain to the operator.
Check that all fingers, hands and limbs are clear before lowering backrest.
Stretcher must never be left on sloping surfaces unattended, even with brakes fully engaged.
Traversing side on, across slopes is to be avoided under any circumstances.
On wet or slippery flooring do not lean or apply unnecessary force against stretcher, as it may slide:
even with brakes fully applied.
Clips, locks and retainers are supplied by the manufacturer for patient / staff safety and must not be
removed.
When covering the mattress with a sheet, always ensure that there is sufficient non-slip base material
(more than 75% area of the mattress) contacting the stretcher top surface, to preventslippage or
movement of the mattress.
Dropsides
Stretcher must never be raised or moved with dropsides down.
Patients on a stretcher with dropsides down, must always be attended by qualified clinical staff.
Dropside releases must be operated only by suitably qualified clinical staff in attendance.
Check that all fingers, hands and limbs are clear before lowering dropsides.
Always ensure dropsides are locked firmly in position after raising.
Side loading on any dropsides should not exceed 80kg or damage to the stretcher may occur.
Dropsides locked in mid position should not be subjected to any downward force exceeding 30kg static
loading as this may result in damage to the stretcher or personal injury.
11/10/2020 - Page 3 of 14
"Trusted products made for trusted professionals"

Electric Operation
All electric functions must be operated only by suitably qualified clinical staff in attendance.
Stretcher top must not be lowered onto any object or irreparable damage will occur to the lifters. This
is a built in safety feature to assist in preventing damage to other equipment or injury.
Fingers, hands and limbs must be kept clear of any electrically operated parts such as backrest and
knee break.
Ensure that the electric backrest is supported by a staff member each side before using the quick
release.
ONLY USE THE BACKREST CPR QUICK RELEASE IN AN EMERGENCY - continuous use will prematurely
wear or damage the release mechanism.
If the backrest quick release is activated, lower the backrest completely flat to reset the quick release.
Only charge via a standard 240V power point. DO NOT MOVE the stretcher before disconnecting mains
power.
Sliding Top System
Do up manual slide lock firmly and securely after each use and before tilting top.
Do not release slide lock when stretcher top is tilted.
If slide does not lock firmly and securely, do not use the stretcher under any circumstances, until an
authorised service person has re-tensioned or adjusted the lock.
Always operate an electrically powered sliding top with care, ensuring all personnel and any other
obstructions are clear before use.
Maintenance
Periodic maintenance must be done in accordance with theuser manual to ensure the safest product
at all times and meet warranty requirements.
If any faults are evident, stretcher should be immediately removed from service until repaired.
11/10/2020 - Page 4 of 14
"Trusted products made for trusted professionals"

IV Pole
The standard removable IV Pole may be stored on the stretcher base or a folding IV Pole will be
permanently mounted to either end of the stretcher top. The removable pole can be fitted into one of
the square corner sockets on the stretcher top (normally in all four corners). A folding IV pole is either
stood up to its upright position and dropped slightly to lock into place, or lifted slightly and lowered into
its lying down position.
To raise the IV hanger.
Lift the hanger and let go. The hanger will automatically lock into the desired height setting.
To lower the IV hanger.
Pull down on the lock body to release. Support the hanger and lower it to the desired height, letting go of
the lock body to re-lock.
11/10/2020 - Page 5 of 14
"Trusted products made for trusted professionals"

Steer / Brake System
There are variety of ways stretcher steering is controlled while moving. These include a corner castor
locked into a straight position or a 5th (center) steer wheel pressured onto the floor. NOTE - It is
recommended that a stretcher with corner steering is always pushed from the opposite end to which the
steer castor is positioned, however the endfrom which a stretcher is pushed from is subject to an
organisations internal policy and risk assessment.
To steer the stretcher.
Press one of the cornerGREEN pedals on the base down fully to activate steering. Press the opposite
RED pedal back to the horizontal (neutral) position to disengage steering.
To brake when parked.
Press one of the cornerRED pedals down fully to activate all four castor brakes.Press the opposite
GREEN pedal back to the horizontal (neutral) position to disengage the brakes.
NOTE - To move the stretcher sideways, always ensure the pedals are in the horizontal (neutral) position.
11/10/2020 - Page 6 of 14
"Trusted products made for trusted professionals"

Manual (hydraulic) Raise, Lower & Tilt
To operate the backrest.
Squeeze the red lever under the outer end of the backrest and raise or lower. release the lever to re-lock
the backrest position.
To raise and lower the stretcher top.
Pump down on the GREEN raise pedal on the stretcher base to raise the top. To lower, press both RED
pedals together.
To tilt the stretcher top.
To tilt either the head or foot end of the stretcher top down, press one RED lower pedal as per the
direction on the stretcher base.
11/10/2020 - Page 7 of 14
"Trusted products made for trusted professionals"

Power Assisted (electric) Raise, Lower & Tilt
To operate the backrest.
Press the UPWARD facing arrow labeled 'BACK' on the handset to raise. Press the DOWNWARD facing
arrow to lower.
To raise and lower the stretcher top.
Press the UPWARD facing arrow labeled 'HIGH/LOW' on the handset to raise. Press the DOWNWARD
facing arrow to lower.
To tilt the stretcher top.
Press theDOWNWARD facing arrows labeled 'TILT (FOOT/HEAD)' on the handset to lower either end of
the stretcher top.
To raise and lower knee break (option).
Press the UPWARD facing arrow labeled 'KNEE' on the handset to raise. Press the DOWNWARD facing
arrow to lower.
To contour the stretcher top (option).
Press the UPWARD facing arrow labeled 'BACK & KNEE' on the handset to raise both the backrest and
knee breakto a sitting position together. Press the DOWNWARD facing arrow to lower back to a the lying
position together.
11/10/2020 - Page 8 of 14
"Trusted products made for trusted professionals"

Power Assisted (electric) Charging
Removable battery.
Note - Position of the battery and controller cradle will vary according to the stretcher configuration. The
number of operations per charge will vary according to the loading of the stretcher. Do not continually
run the battery to low charge as this will gradually reduce the battery life. Regular charging of the battery
is recommended. Low Battery Warning: On hearing an audible tone from the unit during use, plug
stretcher into mains power (if available) or remove the battery for charging immediately. Failure to
comply with this will result in shortening of battery life.
To remove the battery, squeeze the lever under the end of the battery to release the lock and then pull
away from the control box interface connection, allowing the battery to continue resting on its slide
support. Carefully lift the battery out.To install the battery, lift the battery into position and rest on its
slide support. Push the battery firmly into the control box interface until you hear the lock click.
Mains power cable.
The stretcher should always be operated while powered with a standard 240V outlet. ALWAYS ENSURE
LEAD IS UNPLUGGED BEFORE MOVING THE STRETCHER. There is a battery backup to allow stretcher
operation whilst unplugged. The number of operations per charge will vary according to the loading of
the stretcher. Do not continually run the battery to low charge as this will gradually reduce the battery
life. Regular charging of the battery is recommended.
Low Battery Warning: On hearing an audible tone from the unit during use, immediately plug unit into a
mains power outlet to recharge battery for a minimum of 6 hours. Failure to comply with this will result in
shortening of battery life.
11/10/2020 - Page 9 of 14
"Trusted products made for trusted professionals"

Dropsides
There areseveral styles of dropside, the most common being the Classic style with vertical risers and
Deluxe style which lowers and folds underneath the stretcher top.
Classic style dropside.
To release, lift the dropside lock tab and then lower the dropside. When the dropside is lifted into its
upright position, it will automatically lock.
Deluxe style dropside.
To release, lift the dropside lock tab and then lower the dropside. When the dropside is lifted into its
upright position, it will automatically lock.
Horizontal rail dropside.
To release,pull the dropside lock knob out and then lower the dropside. When the dropside is lifted into
its upright position, it will automatically lock.
11/10/2020 - Page 10 of 14
"Trusted products made for trusted professionals"

Accessory Sockets
A pair of sockets are provided on the foot end of the stretcher top for a range of accessories such as end
rails, monitor boards and folding foot boards.There is an optional head end accessory socket option also
available.
Installing an accessory.
Loosely insert the accessory into both sockets and then either one at a time or with both hands upside
down and using your forefingers, depress the lock buttons and allow the accessory to drop in. Ensure
both locks have activated after installation.
Removing an accessory.
Either one at a time or with both hands upside down and using your forefingers, depress the lock
buttons and lift the accessory out slightly. Once both lock buttons are released, lift and remove the
accessory completely.
11/10/2020 - Page 11 of 14
"Trusted products made for trusted professionals"

Cleaning
Cleaning is always a concern. It must happen to control infection and cross contamination,
however ongoing changes in technology and supply can affect the life of vital supporting
equipment.
We continue to develop our products and use materials or coatings that will withstand the tough and
aggressive chemicals used in present cleaning programs. Our ranges of Modsel patient transport
stretchers have been carefully designed with the ease of cleaning, safety and longevity in mind.
Cleaning Instructions
Nonphenolic disinfectants are recommended in a diluted solution.
Use all wipes, detergents and disinfectants according to the manufacturers specifications.
Treat specific stains promptly to ensure complete removal, wipe stain from ‘outside in’ to avoid
spreading.
With difficult mattress stains, use a mild proprietary vinyl cleaner.
Machine washing and autoclaving is not recommended.
DO NOT tumble dry, use phenolic disinfectants, abrasive no aqueous cleaners, steel wool or non-
proprietary cleaners containing solvents.
DAMAGE CAUSED BY THESE PROCESSES ARE IDENTIFIABLE AND MAY VOID WARRANTY
Wipe off cleaning product residue with a clean, soft cloth and rinse with fresh warm water immediately
after use. If particular cleaner/disinfectant is not listed we advise to test the particular surface
disinfectant in advance or to contact us in case of any doubts.
11/10/2020 - Page 12 of 14
"Trusted products made for trusted professionals"

Maintenance
Some parts of a stretcher such as castors, struts and bushes are subject to heavy daily use
and will gradually wear. Periodic maintenance will increase the life of your product by
controlling the speed of wear.
After each (12) twelve months of use, the stretcher must be checked in accordance with our
recommended Service Checklist.
TO ENSURE WARRANTY, PERIODIC MAINTENANCE RECORDS MUST BE RETAINED.
To service your stretcher, contact your Servicing Engineer, Distributor or Modsel on 1300 785 790.
Purchase Record
Pleasecompleteand retain for your own records:
Date Purchased
Stretcher Model
Serial Number
Distributor
11/10/2020 - Page 13 of 14
"Trusted products made for trusted professionals"

15 Year Warranty
Designed by us, hand-made with care by us and 100% backed by us... it gives us the
confidence to always offer you the longest warranty.
We warrant in the event that:
Any fabricated structure failure is found within (15) fifteen years from the date of invoice due to faulty
workmanship.
A part or parts of plastic not covered by the above warranty, are found within (5) five years from the
date of invoice to have a structural defect.
All electric parts not covered by the above warranty are found to have a manufacturing defect within (2)
two years from the date of invoice.
The stretcher mattress not covered by the above warranty, is found within (2) two years from the date
of invoice to have defect. This includes faulty cover material, faulty seam welding and foam failure.
Any externally supplied moving parts including springs, castors, hydraulic rams, gas struts, pivots etc
not covered by the above warranty, are subject to third party warranties or found within (1) one year
from the date of invoice to have a structural defect.
The purchaser, within (14) fourteen days of discovery of the defect or defects gives written notice to
Modsel or their distributor or agent, and:
The defect or defects are not due to:
Cosmetic issues such as fading, crazing, discoloration.
Lack of maintenance as per minimum requirements.
Vandalism, negligence, abuse, accidents, improper installation or normal wear and tear.
Products tampered with or altered, modified or repaired by anyone when not approved by Modsel.
Conditions such as close proximity to salt, extreme hot or cold temperatures.
Non-adherence to cleaning and care instructions.
Permeation of fluid substances into foam.
Incorrect usage of electric parts as per the operating directions.
Modsel will:
At our option, repair or replace the part or parts found within our reasonable judgement to have been
defective in workmanship or materials. Should your stretcher ever require attention due to a failure as
defined under the warranty above, pleasecontactModsel oryour local distributor from whom your
stretcher was originally purchased.
11/10/2020 - Page 14 of 14
"Trusted products made for trusted professionals"
This manual suits for next models
8
Table of contents
Other Modsel Medical Equipment manuals
Popular Medical Equipment manuals by other brands

HeartSine
HeartSine SAM 350P AED quick start guide

Zeiss
Zeiss Cryo Trap instruction manual

Mobility Research
Mobility Research LiteGait I 360E Operators & service manual

Powerex
Powerex Medical FirstCall MFLD-LIQ-NFPA-GG-PSI operating & maintenance manual

WESCOR
WESCOR 7720 Essential information

dynarex
dynarex Adjustable Full Length Bed Rail manual

Hoffrichter
Hoffrichter VECTOR et Cpap user manual

Special Tomato
Special Tomato 66 Series user manual

CSO
CSO Z800 Instructions for use

Invacare
Invacare Platinum Series user manual

Stryker
Stryker SIDNE StrykeCam 2 user guide

Accurate Bio-Medical Technology
Accurate Bio-Medical Technology HS10 Operator's manual